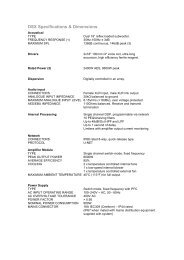
DX1.5 Presets and Flash loader - Martin Audio
DX1.5 Presets and Flash loader - Martin Audio
DX1.5 Presets and Flash loader - Martin Audio

You also want an ePaper? Increase the reach of your titles
YUMPU automatically turns print PDFs into web optimized ePapers that Google loves.
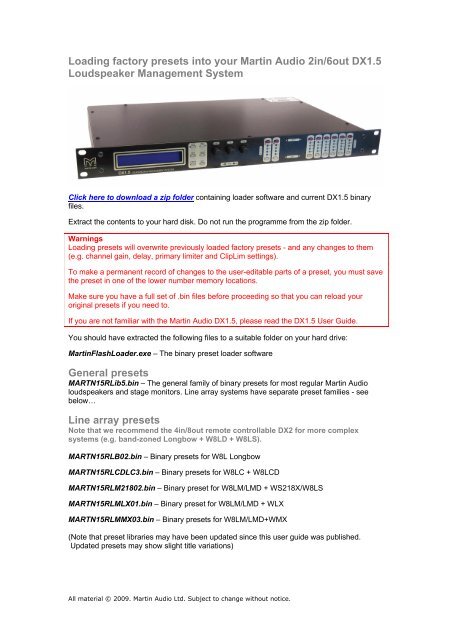
Loading factory presets into your <strong>Martin</strong> <strong>Audio</strong> 2in/6out <strong>DX1.5</strong><br />
Loudspeaker Management System<br />
Click here to download a zip folder containing <strong>loader</strong> software <strong>and</strong> current <strong>DX1.5</strong> binary<br />
files.<br />
Extract the contents to your hard disk. Do not run the programme from the zip folder.<br />
Warnings<br />
Loading presets will overwrite previously loaded factory presets - <strong>and</strong> any changes to them<br />
(e.g. channel gain, delay, primary limiter <strong>and</strong> ClipLim settings).<br />
To make a permanent record of changes to the user-editable parts of a preset, you must save<br />
the preset in one of the lower number memory locations.<br />
Make sure you have a full set of .bin files before proceeding so that you can reload your<br />
original presets if you need to.<br />
If you are not familiar with the <strong>Martin</strong> <strong>Audio</strong> <strong>DX1.5</strong>, please read the <strong>DX1.5</strong> User Guide.<br />
You should have extracted the following files to a suitable folder on your hard drive:<br />
<strong>Martin</strong><strong>Flash</strong>Loader.exe – The binary preset <strong>loader</strong> software<br />
General presets<br />
MARTN15RLib5.bin – The general family of binary presets for most regular <strong>Martin</strong> <strong>Audio</strong><br />
loudspeakers <strong>and</strong> stage monitors. Line array systems have separate preset families - see<br />
below…<br />
Line array presets<br />
Note that we recommend the 4in/8out remote controllable DX2 for more complex<br />
systems (e.g. b<strong>and</strong>-zoned Longbow + W8LD + W8LS).<br />
MARTN15RLB02.bin – Binary presets for W8L Longbow<br />
MARTN15RLCDLC3.bin – Binary presets for W8LC + W8LCD<br />
MARTN15RLM21802.bin – Binary preset for W8LM/LMD + WS218X/W8LS<br />
MARTN15RLMLX01.bin – Binary preset for W8LM/LMD + WLX<br />
MARTN15RLMMX03.bin – Binary presets for W8LM/LMD+WMX<br />
(Note that preset libraries may have been updated since this user guide was published.<br />
Updated presets may show slight title variations)<br />
All material © 2009. <strong>Martin</strong> <strong>Audio</strong> Ltd. Subject to change without notice.
You will need a 9 pin male-to-female, fully wired, pin-to-pin RS232 cable<br />
Note: this lead should be pin-to-pin – not the null modem type.<br />
To load the latest presets into your <strong>DX1.5</strong><br />
1. Connect the 9-pin male to 9-pin female DEE type serial lead from your computer to the<br />
external socket on the rear of the unit.<br />
2. On the <strong>DX1.5</strong> use the blue Menu, Back, Next <strong>and</strong> Enter keys to go into the Interface Submenu<br />
<strong>and</strong> then into External Interface.<br />
3. Once entered, setup as follows:<br />
Serial Speed: 38400<br />
Press Enter to confirm<br />
4. Run the programme <strong>Martin</strong><strong>Flash</strong>Loader.exe.<br />
5. Set the Serial Port Speed to 38400.<br />
The bottom right h<strong>and</strong> window should indicate Good Response.<br />
If the Serial Speed number is not set to 38400 to match the <strong>DX1.5</strong> speed, the software lower<br />
right window may indicate No Response.<br />
All material © 2009. <strong>Martin</strong> <strong>Audio</strong> Ltd. Subject to change without notice.
Make sure that the Serial port Speed on your pc screen is set to 38400 to match the <strong>DX1.5</strong>.<br />
If that fails to fix the problem, try adjusting the Com (Serial Port) number <strong>and</strong> clicking the<br />
Connect button again. It is usually quicker to do this by trial <strong>and</strong> error as Com port numbering<br />
can be a mystery to the average PC user!<br />
6. Click on the File to Load button (circled)<br />
7. Click on the Load New Preset File button (circled)<br />
8. Browse to find the files you extracted earlier.<br />
Click on the preset required (to highlight it) <strong>and</strong> click Open.<br />
All material © 2009. <strong>Martin</strong> <strong>Audio</strong> Ltd. Subject to change without notice.
9. Click Load Now (circled)<br />
10. The programme will communicate with the <strong>DX1.5</strong> <strong>and</strong> ask for confirmation.<br />
Click OK.<br />
You’ll see the green block writing progress bar proceeding from left to right<br />
<strong>and</strong><br />
on the <strong>DX1.5</strong> front panel you’ll see graphics shuffling from right to left…followed by an<br />
indicator test (all LEDs on)…<strong>and</strong> a short delay…<strong>and</strong> then a wake-up procedure.<br />
All material © 2009. <strong>Martin</strong> <strong>Audio</strong> Ltd. Subject to change without notice.
Selecting a specific preset<br />
Each binary file will load a family of presets into your <strong>DX1.5</strong>.<br />
Please note that the <strong>DX1.5</strong> will retain its current preset until instructed to change to<br />
one of the newly loaded ones.<br />
Change the <strong>DX1.5</strong>’s settings to one of the newly loaded presets as<br />
follows:<br />
Press the blue Menu button, then the Back <strong>and</strong> Next buttons to find the Global Memory Sub<br />
Menu <strong>and</strong> press Enter.<br />
Use the Back <strong>and</strong> Next buttons to find the Recall a Memory <strong>and</strong> press Enter.<br />
Use the Back <strong>and</strong> Next buttons to find the Crossover only <strong>and</strong> press Enter.<br />
Browse for the appropriate preset using the Back <strong>and</strong> Next buttons or the Frequency knob.<br />
Note that the <strong>DX1.5</strong> will default to its previous condition if the above operations are not<br />
completed <strong>and</strong> no buttons are pressed for 20 – 30 seconds.<br />
Input parameters<br />
Input parameters are not usually specified within st<strong>and</strong>ard <strong>Martin</strong> <strong>Audio</strong> presets – hence the<br />
Crossover only selection above.<br />
When configuring a new system always ensure that there are no input gain, base delay or<br />
input eq settings left on the input sections by previous users.<br />
Press the input EDIT buttons <strong>and</strong> scroll through the parameters for that input using the blue<br />
Back <strong>and</strong> Next buttons. See section 14) Editing <strong>Audio</strong> Parameters – Input Channels for<br />
operating details…<br />
Amplifier power, amplifier gain, <strong>DX1.5</strong> primary limiter <strong>and</strong><br />
ClipLim settings<br />
Amplifier power<br />
We suggest you specify an amplifier capable of meeting the loudspeaker’s peak power rating<br />
– as long as you use the correct <strong>Martin</strong> <strong>Audio</strong> limiter recommendations.<br />
Primary limiters<br />
The primary Limiter parameters protect the loudspeaker from rms heating effects whilst the<br />
correct amplifier power specification <strong>and</strong> ClipLim settings protect the loudspeaker from<br />
transient overloads <strong>and</strong> clipping.<br />
Primary Limiter thresholds are factory preset for new products <strong>and</strong> recommended in the user<br />
guide CD controller spreadsheets for older products. Factory preset primary Limiters are set<br />
for power amplifiers with the pro-audio voltage gain* st<strong>and</strong>ard of 32dB (x40). Spreadsheet<br />
recommendations for older products show a range of primary Limiter settings depending on<br />
your chosen amplifier gain/sensitivity.<br />
* We recommend using power amplifier voltage with known gain settings if at all possible.<br />
Manufacturers’ sensitivity settings are not very useful as the resulting gain figures will vary<br />
from model to model depending on their power specifications causing spectral imbalance<br />
when using mixed amplifier set-ups.<br />
If you have to use a power amplifier set to a different gain st<strong>and</strong>ard, make absolutely sure that<br />
you adjust the 32dB st<strong>and</strong>ard factory preset or spreadsheet recommendation as follows:<br />
All material © 2009. <strong>Martin</strong> <strong>Audio</strong> Ltd. Subject to change without notice.
Power amplifier gain Primary limiter threshold adjustment from 32dB<br />
preset st<strong>and</strong>ard<br />
23dB Add 9dB (e.g. +4dBu becomes +13dBu)<br />
24dB Add 8dB<br />
25dB Add 7dB<br />
26dB (Crown st<strong>and</strong>ard) Add 6dB (e.g. +4dBu becomes +10dBu)<br />
27dB Add 5dB<br />
28dB Add 4dB<br />
29dB Add 3dB<br />
30dB Add 2dB<br />
31dB Add 1dB (e.g. +4dBu becomes +5dBu)<br />
32dB (Industry st<strong>and</strong>ard) <strong>Martin</strong> <strong>Audio</strong> preset st<strong>and</strong>ard<br />
33dB Decrease by 1dB (e.g. +4dBu becomes +3dBu)<br />
34dB Decrease by 2dB<br />
35dB Decrease by 3dB<br />
36dB Decrease by 4dB (e.g. +4dBu becomes 0dBu)<br />
37dB Decrease by 5dB<br />
38dB Decrease by 6dB<br />
39dB Decrease by 7dB<br />
40dB Decrease by 8dB (e.g. +4dBu becomes -4dBu)<br />
ClipLims<br />
The ClipLim settings protect the loudspeaker from transient overloads (<strong>and</strong> protects against<br />
amplifier clipping if the amplifier is capable of supplying the loudspeaker’s rated peak power).<br />
All <strong>Martin</strong> <strong>Audio</strong> loudspeakers are designed to professional AES power ratings that allow for<br />
6dB signal peaks above the rated AES power. This means that <strong>Martin</strong> <strong>Audio</strong> loudspeakers<br />
have peak power h<strong>and</strong>ling capabilities that are 6dB above (4x) their AES power ratings –<br />
when the correct controller settings are used.<br />
Note that the ClipLims default to Medium 2dB Above the primary limiter thresholds if not set<br />
up. To take advantage of your power amplifier’s <strong>and</strong> loudspeaker’s peak capability, set the<br />
ClipLims as follows:<br />
Subwoofers Slow 6dB Above<br />
Low mid/LF Medium 6dB Above<br />
High mid/HF Fast 6dB Above<br />
If you have specified an amplifier smaller than the loudspeaker’s peak power rating you may<br />
need to reduce the ClipLim settings by a dB or two to prevent amplifier clipping as it runs out<br />
of headroom.<br />
You must, of course, set the recommended primary Limiter threshold before adjusting the<br />
ClipLim level to prevent amplifier clipping.<br />
If you end up setting the ClipLim as low as 2dB Above in an attempt to prevent significant<br />
amplifier clipping, <strong>and</strong> the amplifier still clips, you probably need a bigger amplifier. If budgets<br />
don’t allow for a bigger amplifier you may need to reduce the primary Limiter threshold<br />
settings to prevent the amplifier from clipping at the 2dB Above ClipLim setting.<br />
System configurations<br />
Your <strong>Martin</strong> <strong>Audio</strong> <strong>DX1.5</strong> Loudspeaker Management System must be correctly patched.<br />
There are a large number of <strong>Martin</strong> <strong>Audio</strong> factory presets <strong>and</strong> configurations <strong>and</strong> these are<br />
being exp<strong>and</strong>ed all the time. It is always sensible to check your <strong>DX1.5</strong> output channel<br />
allocations for the particular preset you have chosen to use before patching your system. This<br />
will ensure that the appropriate b<strong>and</strong> is being routed to each loudspeaker section.<br />
You can do this by pressing each yellow output channel EDIT button <strong>and</strong> noting the output<br />
channel allocations (e.g. Low, MidHi) indicated on the <strong>DX1.5</strong>’s display panel.<br />
All material © 2009. <strong>Martin</strong> <strong>Audio</strong> Ltd. Subject to change without notice.