IM 956-2 Temperature Sensors for Units wit - McQuay International
IM 956-2 Temperature Sensors for Units wit - McQuay International
IM 956-2 Temperature Sensors for Units wit - McQuay International

You also want an ePaper? Increase the reach of your titles
YUMPU automatically turns print PDFs into web optimized ePapers that Google loves.
<strong>Temperature</strong> <strong>Sensors</strong> <strong>for</strong> <strong>Units</strong> <strong>wit</strong>h MicroTech ® III<br />
Unit Controller and LonWorks ® or BACnet ®<br />
Communication Module<br />
Sharp edges can cause personal injury. Avoid contact<br />
<strong>wit</strong>h them.<br />
Note: For instructions on how to install the LonWorks<br />
Communication Module refer to <strong>IM</strong> 927. To install the<br />
BACnet Communication Module refer to <strong>IM</strong> 928.<br />
Figure 1. Discharge Air <strong>Temperature</strong> Sensor<br />
LonWorks Field Installation Kit<br />
<strong>McQuay</strong> P/N 107293070<br />
Qty P/N Description<br />
1 668105801 LonWorks Communication Module<br />
1 669207601 <strong>IM</strong> 927 MicroTech Water Source Heat Pump<br />
LonWorks Communication Module<br />
1 910101660 <strong>IM</strong> <strong>956</strong> <strong>Temperature</strong> <strong>Sensors</strong> <strong>for</strong> <strong>Units</strong> <strong>wit</strong>h<br />
MicroTech III Unit Controller and LonWorks<br />
or BACnet Communication Module<br />
2 669008901 Air <strong>Temperature</strong> Sensor, flanged,<br />
+ 4EGA9159 <strong>wit</strong>h two-pin connector<br />
1 107201601 Water <strong>Temperature</strong> Sensor, <strong>wit</strong>h two-pin<br />
+ 4EGA9159 connector<br />
4 802028115 Stand-off, 7/16"<br />
5 061049201 Wire Tie, 8"<br />
BACnet Field Installation Kit<br />
<strong>McQuay</strong> P/N 107293071<br />
Qty P/N Description<br />
1 668105901 BACnet Communication Module<br />
1 669207701 <strong>IM</strong> 928 MicroTech Water Source Heat Pump<br />
BACnet MS/TP Communication Module<br />
1 910101660 <strong>IM</strong> <strong>956</strong> <strong>Temperature</strong> <strong>Sensors</strong> <strong>for</strong> <strong>Units</strong> <strong>wit</strong>h<br />
MicroTech III Unit Controller and LonWorks<br />
or BACnet Communication Module<br />
2 669008901 Air <strong>Temperature</strong> Sensor, flanged,<br />
+ 4EGA9159 <strong>wit</strong>h two-pin connector<br />
1 107201601 Water <strong>Temperature</strong> Sensor, <strong>wit</strong>h two-pin<br />
+ 4EGA9159 connector<br />
4 802028115 Stand-off, 7/16"<br />
5 061049201 Wire Tie, 8"<br />
© 2010 <strong>McQuay</strong> <strong>International</strong><br />
CAUTION<br />
Installation & Maintenance Data<br />
Group: WSHP<br />
<strong>IM</strong> <strong>956</strong>-2<br />
Part Number: 910109765<br />
Date: January 2010<br />
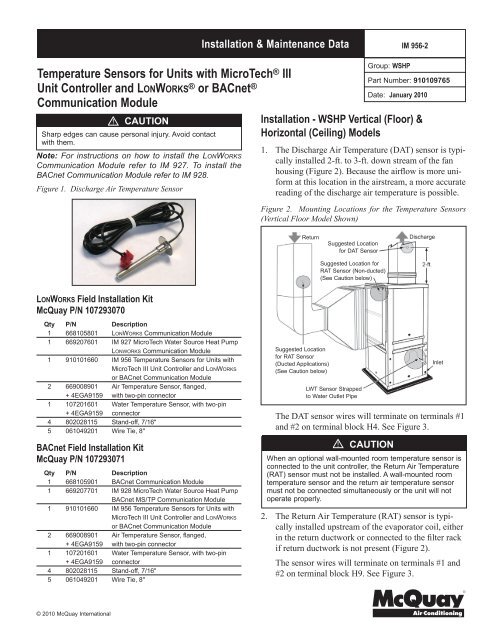
Installation - WSHP Vertical (Floor) &<br />
Horizontal (Ceiling) Models<br />
1. The Discharge Air <strong>Temperature</strong> (DAT) sensor is typically<br />
installed 2-ft. to 3-ft. down stream of the fan<br />
housing (Figure 2). Because the airflow is more uni<strong>for</strong>m<br />
at this location in the airstream, a more accurate<br />
reading of the discharge air temperature is possible.<br />
Figure 2. Mounting Locations <strong>for</strong> the <strong>Temperature</strong> <strong>Sensors</strong><br />
(Vertical Floor Model Shown)<br />
Return<br />
Suggested Location<br />
<strong>for</strong> RAT Sensor<br />
(Ducted Applications)<br />
(See Caution below)<br />
Suggested Location<br />
<strong>for</strong> DAT Sensor<br />
Suggested Location <strong>for</strong><br />
RAT Sensor (Non-ducted)<br />
(See Caution below)<br />
LWT Sensor Strapped<br />
to Water Outlet Pipe<br />
Discharge<br />
Inlet<br />
The DAT sensor wires will terminate on terminals #1<br />
and #2 on terminal block H4. See Figure 3.<br />
CAUTION<br />
When an optional wall-mounted room temperature sensor is<br />
connected to the unit controller, the Return Air <strong>Temperature</strong><br />
(RAT) sensor must not be installed. A wall-mounted room<br />
temperature sensor and the return air temperature sensor<br />
must not be connected simultaneously or the unit will not<br />
operate properly.<br />
2. The Return Air <strong>Temperature</strong> (RAT) sensor is typically<br />
installed upstream of the evaporator coil, either<br />
in the return ductwork or connected to the filter rack<br />
if return ductwork is not present (Figure 2).<br />
The sensor wires will terminate on terminals #1 and<br />
#2 on terminal block H9. See Figure 3.<br />
®
<strong>Temperature</strong> <strong>Sensors</strong> <strong>for</strong> <strong>Units</strong> <strong>wit</strong>h MicroTech® III Unit Controller<br />
and LonWorks® or BACnet® Communication Module<br />
3. The Leaving Water <strong>Temperature</strong> (LWT) sensor is<br />
typically installed on the outlet water line, just inside<br />
the unit cabinet (Figure 2). Thermal grease can be<br />
used between the sensor and the water line to improve<br />
thermal conductivity between the two metal<br />
surfaces. Insulation must be applied over the sensor.<br />
The LWT sensor wires will run back to terminals #3<br />
and #4 on terminal block H4. See Figure 3.<br />
Figure 3. Terminal Connections <strong>for</strong> <strong>Temperature</strong> <strong>Sensors</strong> on the<br />
MicroTech III Unit Controller<br />
Installation - WSHP Console Models<br />
1. The Discharge Air <strong>Temperature</strong> (DAT) sensor is<br />
installed between the coil and fan housing<br />
(Figure 4).<br />
Figure 4. Discharge Air <strong>Temperature</strong> Sensor (DAT) & Return<br />
Air <strong>Temperature</strong> (RAT) Sensor Locations<br />
DAT Sensor<br />
Location<br />
RAT Sensor<br />
Location<br />
(See Caution)<br />
Discharge Air Opening<br />
Return Air<br />
Opening<br />
The DAT sensor wires will terminate on terminals #1<br />
and #2 on terminal block H4 (Figure 6).<br />
CAUTION<br />
When an optional wall-mounted room temperature sensor is<br />
connected to the unit controller, the Return Air <strong>Temperature</strong><br />
(RAT) sensor must not be installed. A wall-mounted room<br />
temperature sensor and the return air temperature sensor<br />
must not be connected simultaneously or the unit will not<br />
operate properly.<br />
2. The Return Air <strong>Temperature</strong> (RAT) sensor is installed<br />
be<strong>for</strong>e the evaporator coil, just above the<br />
return air opening (Figure 4).<br />
The sensor wires will terminate on terminals #1 and<br />
#2 on terminal block H9. See Figure 6.<br />
<strong>IM</strong> <strong>956</strong>-2 / Page 2 of 3 ©2010 <strong>McQuay</strong> <strong>International</strong> • www.mcquay.com • 800.432.1342
<strong>Temperature</strong> <strong>Sensors</strong> <strong>for</strong> <strong>Units</strong> <strong>wit</strong>h MicroTech® III Unit Controller<br />
and LonWorks® or BACnet® Communication Module<br />
3. The Leaving Water <strong>Temperature</strong> (LWT) sensor is<br />
installed on the outlet water line (Figure 5). Thermal<br />
grease can be used between the sensor and the water<br />
line to improve thermal conductivity between the<br />
two metal surfaces. Insulation must be applied over<br />
the sensor.<br />
The LWT sensor wires will run back to terminals #3<br />
and #4 on terminal block H4. See Figure 6.<br />
Figure 5. Leaving Water <strong>Temperature</strong> Sensor (LWT) Location<br />
<strong>for</strong> <strong>Units</strong> Using a Communication Module<br />
LWT Sensor Strapped<br />
to Water Outlet Pipe<br />
<strong>McQuay</strong> Training and Development<br />
Warranty<br />
Figure 6. Terminal Connections <strong>for</strong> <strong>Temperature</strong> <strong>Sensors</strong> on the<br />
MicroTech III Unit Controller<br />
Now that you have made an investment in modern, efficient <strong>McQuay</strong> equipment, its care should<br />
be a high priority. For training in<strong>for</strong>mation on all <strong>McQuay</strong> HVAC products, please visit us at<br />
www.mcquay.com and click on training, or call 540-248-9646 and ask <strong>for</strong> the Training Department.<br />
All <strong>McQuay</strong> equipment is sold pursuant to its standard terms and conditions of sale, including Limited<br />
Product Warranty. Consult your local <strong>McQuay</strong> Representative <strong>for</strong> warranty details. Refer to Form<br />
933-43285Y. To find your local <strong>McQuay</strong> Representative, go to www.mcquay.com.<br />
This document contains the most current product in<strong>for</strong>mation as of this printing. For the most up-to-date product<br />
in<strong>for</strong>mation, please go to www.mcquay.com.<br />
Products Manufactured in an ISO Certified Facility.<br />
©2010 <strong>McQuay</strong> <strong>International</strong> • www.mcquay.com • 800.432.1342 <strong>IM</strong> <strong>956</strong>-2 / Page 3 of 3