Barracuda Message Archiver Quick Start Guide - Barracuda Networks
Barracuda Message Archiver Quick Start Guide - Barracuda Networks
Barracuda Message Archiver Quick Start Guide - Barracuda Networks
You also want an ePaper? Increase the reach of your titles
YUMPU automatically turns print PDFs into web optimized ePapers that Google loves.
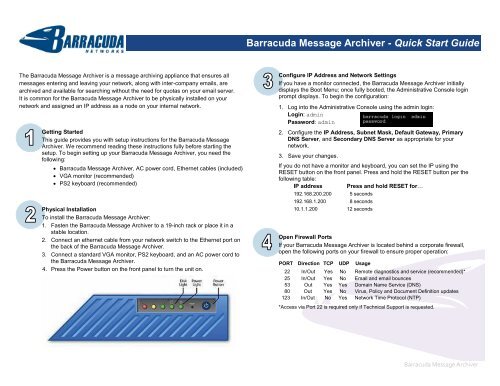
The <strong>Barracuda</strong> <strong>Message</strong> <strong>Archiver</strong> is a message archiving appliance that ensures all<br />
messages entering and leaving your network, along with inter-company emails, are<br />
archived and available for searching without the need for quotas on your email server.<br />
It is common for the <strong>Barracuda</strong> <strong>Message</strong> <strong>Archiver</strong> to be physically installed on your<br />
network and assigned an IP address as a node on your internal network.<br />
Getting <strong>Start</strong>ed<br />
This guide provides you with setup instructions for the <strong>Barracuda</strong> <strong>Message</strong><br />
<strong>Archiver</strong>. We recommend reading these instructions fully before starting the<br />
setup. To begin setting up your <strong>Barracuda</strong> <strong>Message</strong> <strong>Archiver</strong>, you need the<br />
following:<br />
� <strong>Barracuda</strong> <strong>Message</strong> <strong>Archiver</strong>, AC power cord, Ethernet cables (included)<br />
� VGA monitor (recommended)<br />
� PS2 keyboard (recommended)<br />
Physical Installation<br />
To install the <strong>Barracuda</strong> <strong>Message</strong> <strong>Archiver</strong>:<br />
1. Fasten the <strong>Barracuda</strong> <strong>Message</strong> <strong>Archiver</strong> to a 19-inch rack or place it in a<br />
stable location.<br />
2. Connect an ethernet cable from your network switch to the Ethernet port on<br />
the back of the <strong>Barracuda</strong> <strong>Message</strong> <strong>Archiver</strong>.<br />
3. Connect a standard VGA monitor, PS2 keyboard, and an AC power cord to<br />
the <strong>Barracuda</strong> <strong>Message</strong> <strong>Archiver</strong>.<br />
4. Press the Power button on the front panel to turn the unit on.<br />
<strong>Barracuda</strong> <strong>Message</strong> <strong>Archiver</strong> - <strong>Quick</strong> <strong>Start</strong> <strong>Guide</strong><br />
Configure IP Address and Network Settings<br />
If you have a monitor connected, the <strong>Barracuda</strong> <strong>Message</strong> <strong>Archiver</strong> initially<br />
displays the Boot Menu; once fully booted, the Administrative Console login<br />
prompt displays. To begin the configuration:<br />
1. Log into the Administrative Console using the admin login:<br />
Login: admin<br />
Password: admin<br />
2. Configure the IP Address, Subnet Mask, Default Gateway, Primary<br />
DNS Server, and Secondary DNS Server as appropriate for your<br />
network.<br />
3. Save your changes.<br />
If you do not have a monitor and keyboard, you can set the IP using the<br />
RESET button on the front panel. Press and hold the RESET button per the<br />
following table:<br />
IP address Press and hold RESET for…<br />
192.168.200.200 5 seconds<br />
192.168.1.200 8 seconds<br />
10.1.1.200 12 seconds<br />
Open Firewall Ports<br />
If your <strong>Barracuda</strong> <strong>Message</strong> <strong>Archiver</strong> is located behind a corporate firewall,<br />
open the following ports on your firewall to ensure proper operation:<br />
PORT Direction TCP UDP Usage<br />
22 In/Out Yes No Remote diagnostics and service (recommended)*<br />
25 In/Out Yes No Email and email bounces<br />
53 Out Yes Yes Domain Name Service (DNS)<br />
80 Out Yes No Virus, Policy and Document Definition updates<br />
123 In/Out No Yes Network Time Protocol (NTP)<br />
*Access via Port 22 is required only if Technical Support is requested.<br />
<strong>Barracuda</strong> <strong>Message</strong> <strong>Archiver</strong>
Verify and Configure Access from the Web Interface<br />
Use a computer with a web browser connected to the same network as the<br />
<strong>Barracuda</strong> <strong>Message</strong> <strong>Archiver</strong>, and follow these steps:<br />
1. In the browser address bar, enter http:// followed by the <strong>Barracuda</strong> <strong>Message</strong><br />
<strong>Archiver</strong> IP address, followed by the default web interface HTTP Port<br />
(:8000). For example, if you configured the <strong>Barracuda</strong> <strong>Message</strong> <strong>Archiver</strong><br />
with an IP address of 192.168.200.200, you would enter the following:<br />
http://192.168.200.200:8000<br />
2. Log in to the <strong>Barracuda</strong> <strong>Message</strong> <strong>Archiver</strong> web interface as administrator:<br />
Username: admin Password: admin<br />
3. Go to the BASIC > IP Configuration page and perform the following:<br />
� Verify the values for IP Address, Subnet Mask, and Default Gateway.<br />
� Verify the values for Primary and Secondary DNS Server.<br />
� Enter the External System Name and Port. These values are used by<br />
your users to access the <strong>Barracuda</strong> <strong>Message</strong> <strong>Archiver</strong>.<br />
� Enter the <strong>Barracuda</strong> <strong>Message</strong> <strong>Archiver</strong> Default Hostname and Default<br />
Domain. This is the name used for status alert emails, email reports,<br />
etc. For example, enter barracuda as the Default Hostname and<br />
.com as the Default Domain.<br />
� In the Local Domains section, enter the email domains that are to be<br />
archived. Click Add after each domain entry.<br />
Important: You must configure the local domain entry for each domain for<br />
which you wish to store mail. For example, enter .com<br />
4. Click Save Changes to save the entered information.<br />
Product Activation<br />
Go to BASIC > Status and verify that your Energize Updates subscription is<br />
activated on your <strong>Barracuda</strong> <strong>Message</strong> <strong>Archiver</strong>. Under Subscription Status,<br />
verify the Energize Updates subscription is Current. If the Energize Updates<br />
status is Not Activated, click the activation link to go to the <strong>Barracuda</strong> <strong>Networks</strong><br />
Product Activation page, and complete activation of your subscriptions.<br />
Change the Administrator Password<br />
To avoid unauthorized use, we recommend changing the default administrator<br />
password to a more secure password. You can only change the administrator<br />
password for the web interface.<br />
1. Go to BASIC > Administration, and enter your old and new passwords.<br />
2. Click Save Password.<br />
<strong>Barracuda</strong> <strong>Message</strong> <strong>Archiver</strong> - <strong>Quick</strong> <strong>Start</strong> <strong>Guide</strong><br />
Update the Firmware<br />
1. Go to ADVANCED > Firmware Update. If there is a new Latest General<br />
Release available:<br />
2. Click Download Now, and allow the download to complete. To avoid<br />
damaging the unit, do not power OFF during a firmware update or<br />
download.<br />
3. Click Apply Now to start the update process after which the unit<br />
automatically reboots.<br />
Note: Read the Release Notes to learn about enhancements and new features.<br />
It is good practice to verify settings, as new features may be included with the<br />
firmware update.<br />
Configure and Activate Journaling on your Email Server<br />
If you have an email server capable of journaling, verify that it is set up and<br />
enabled per the directions for your particular email server.<br />
� Notes for Microsoft ® Exchange 2003, 2007, and 2010:<br />
Make sure to enable envelope journaling. “Envelope journaling” is an<br />
additional setting that must be enabled at a global level in Exchange in order<br />
for it to be in effect whenever standard (aka “message-only”) journaling is<br />
activated for a particular mailbox store.<br />
For more information, visit http://techlib.barracuda.com/display/BMAv31/<br />
� Configuring Envelope (SMTP) Journaling for Microsoft Exchange 2007-2010<br />
� Configuring an SMTP Journal Account for Microsoft Exchange 2003<br />
More information on journaling, including specific activation directions, is<br />
available in several places on Microsoft's Knowledge Base and TechNet sites.<br />
� Enabling “<strong>Message</strong> only” journaling: http://support.microsoft.com/kb/261173<br />
� Enabling “Envelope” journaling:<br />
http://technet.microsoft.com/en-us/library/aa997541.aspx<br />
� Troubleshooting message journaling in Exchange:<br />
http://support.microsoft.com/kb/843105<br />
For more deployment options, visit http://techlib.barracuda.com/display/BMAv31/<br />
� Google Apps Deployment<br />
� Office 365 Deployment<br />
� Kerio connect Mail Server Deployment<br />
� Lotus Notes/Domino 8 IMAP Deployment<br />
Contact and Copyright Information<br />
<strong>Barracuda</strong> <strong>Networks</strong>, Inc. 3175 S. Winchester Blvd, Campbell, CA 95008 USA � phone: 408.342.5400 � fax: 408.342.1061 � www.barracuda.com<br />
Copyright � 2004-2012 <strong>Barracuda</strong> <strong>Networks</strong>, Inc. All rights reserved. Use of this product and this manual is subject to license. Information in this document<br />
is subject to change without notice. <strong>Barracuda</strong> <strong>Message</strong> <strong>Archiver</strong> and <strong>Barracuda</strong> is a trademark of <strong>Barracuda</strong> <strong>Networks</strong>, Inc. All other brand and product names<br />
mentioned in this document are registered trademarks or trademarks of their respective holders. v3.1-120117-20-1017sk<br />
<strong>Barracuda</strong> <strong>Message</strong> <strong>Archiver</strong>


