Dometic Seitz GmbH Installation instructions HEKI ... - Leisure Spares
Dometic Seitz GmbH Installation instructions HEKI ... - Leisure Spares
Dometic Seitz GmbH Installation instructions HEKI ... - Leisure Spares

You also want an ePaper? Increase the reach of your titles
YUMPU automatically turns print PDFs into web optimized ePapers that Google loves.
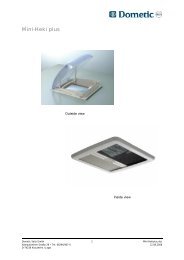
<strong>Dometic</strong> <strong>Seitz</strong> <strong>GmbH</strong><br />
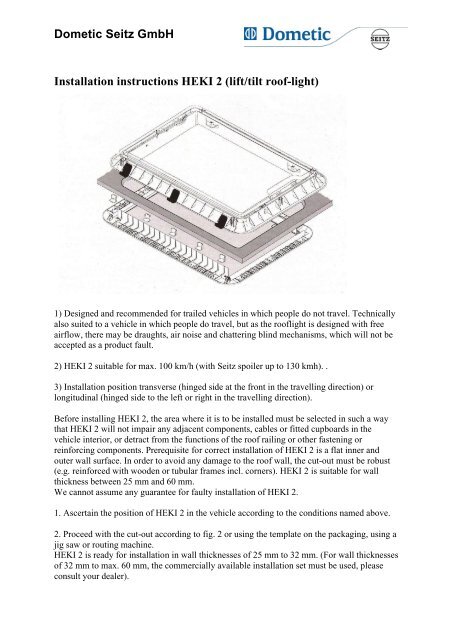
<strong>Installation</strong> <strong>instructions</strong> <strong>HEKI</strong> 2 (lift/tilt roof-light)<br />
1) Designed and recommended for trailed vehicles in which people do not travel. Technically<br />
also suited to a vehicle in which people do travel, but as the rooflight is designed with free<br />
airflow, there may be draughts, air noise and chattering blind mechanisms, which will not be<br />
accepted as a product fault.<br />
2) <strong>HEKI</strong> 2 suitable for max. 100 km/h (with <strong>Seitz</strong> spoiler up to 130 kmh). .<br />
3) <strong>Installation</strong> position transverse (hinged side at the front in the travelling direction) or<br />
longitudinal (hinged side to the left or right in the travelling direction).<br />
Before installing <strong>HEKI</strong> 2, the area where it is to be installed must be selected in such a way<br />
that <strong>HEKI</strong> 2 will not impair any adjacent components, cables or fitted cupboards in the<br />
vehicle interior, or detract from the functions of the roof railing or other fastening or<br />
reinforcing components. Prerequisite for correct installation of <strong>HEKI</strong> 2 is a flat inner and<br />
outer wall surface. In order to avoid any damage to the roof wall, the cut-out must be robust<br />
(e.g. reinforced with wooden or tubular frames incl. corners). <strong>HEKI</strong> 2 is suitable for wall<br />
thickness between 25 mm and 60 mm.<br />
We cannot assume any guarantee for faulty installation of <strong>HEKI</strong> 2.<br />
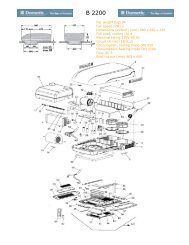
1. Ascertain the position of <strong>HEKI</strong> 2 in the vehicle according to the conditions named above.<br />
2. Proceed with the cut-out according to fig. 2 or using the template on the packaging, using a<br />
jig saw or routing machine.<br />
<strong>HEKI</strong> 2 is ready for installation in wall thicknesses of 25 mm to 32 mm. (For wall thicknesses<br />
of 32 mm to max. 60 mm, the commercially available installation set must be used, please<br />
consult your dealer).
<strong>Dometic</strong> <strong>Seitz</strong> <strong>GmbH</strong><br />
3. Hold <strong>HEKI</strong> 2 in the cut-out without any sealant, to check the size (approx. 2 mm clearance<br />
for cut out all round).<br />
4. Apply permanently elastic sealant (butyl) to the outer part of the base frame. We<br />
recommend contacting your sealant supplier (fig. 3).<br />
5. Position the outer frame centrally in the cut-out and press in position applying gentle, even<br />
pressure.
<strong>Dometic</strong> <strong>Seitz</strong> <strong>GmbH</strong><br />
6. Gently screw the 16 mounting blocks to the inside of the vehicle (use the large hole spacing<br />
in the mounting block). Use the mounting blocks and appropriate screws indicated in the table<br />
below for the corresponding roof thickness.<br />
It is adequate to tighten the screws gently by hand (torque = 1.5 Nm). If necessary, re-tighten<br />
the mounting blocks again uniformly after approx. 10-30 minutes.<br />
Wall Thickness Mounting Block Screws<br />
25-32mm grey 4x25mm<br />
32-39mm black 4x32mm<br />
39-46mm yellow 4x40mm<br />
46-53mm blue 4x46mm<br />
53-60mm red 4x52mm<br />
7. Position the inner frame on the base frame and screw in place using the corresponding<br />
screws 2.5 x 25 (use small hole diameter in mounting block).<br />
It is adequate to tighten the screws gently by hand!<br />
Check blind function! Undo the screws slightly when the blind moves sluggishly.<br />
8. Snap the ventilation grids into position.<br />
9. Remove the PE protective film from the acrylic glass on the inside and outside.<br />
No liability is assumed for incorrect installation!<br />
<strong>HEKI</strong> 2 is not suitable for installation in vertical surfaces!<br />
Arrange for the modification to be entered in the vehicle's papers! (When vehicle height and<br />
overall weight have been changed).