English - Bosch eBike Systems
English - Bosch eBike Systems
English - Bosch eBike Systems
- TAGS
- bosch
- ebike
- www.bosch-ebike.de

You also want an ePaper? Increase the reach of your titles
YUMPU automatically turns print PDFs into web optimized ePapers that Google loves.
OBJ_BUCH-1557-002.book Page 2 Friday, October 12, 2012 12:14 PM<br />
2 |<br />
6<br />
5<br />
4<br />
f<br />
e<br />
d<br />
RESET<br />
Reichweite<br />
TURBO TURBO<br />
SPORT SSPORT<br />
TOUR<br />
TURBO<br />
SPORT<br />
TOUR<br />
ECO<br />
OFF<br />
MPH MPH<br />
KM/H KM/H<br />
MPH<br />
KM/H<br />
AMM<br />
PMWH<br />
MIN<br />
MPH<br />
KM/H<br />
AMM<br />
PMWH<br />
MIN<br />
MPH<br />
KM/H<br />
AMM<br />
PMWH<br />
MIN<br />
MPH<br />
KM/H<br />
Reichweite<br />
Reichweite<br />
0 276 001 Y45 | (12.10.12) <strong>Bosch</strong> <strong>eBike</strong> <strong>Systems</strong><br />
a<br />
b<br />
c<br />
9<br />
1<br />
2<br />
7 8<br />
3
OBJ_BUCH-1557-002.book Page 3 Friday, October 12, 2012 12:14 PM<br />
A<br />
RESET<br />
ECO<br />
KM/H KM/H<br />
KM/H KM/H<br />
Reichweite<br />
Reichweite<br />
4<br />
14<br />
3<br />
15<br />
13<br />
16<br />
5 – 17 mm<br />
<strong>Bosch</strong> <strong>eBike</strong> <strong>Systems</strong> 0 276 001 Y45 | (12.10.12)<br />
B<br />
10<br />
18<br />
11<br />
12<br />
17<br />
| 3
OBJ_BUCH-1557-002.book Page 4 Friday, October 12, 2012 12:14 PM<br />
4 |<br />
28<br />
27<br />
24<br />
23<br />
22 21<br />
26<br />
25<br />
24<br />
23<br />
0 276 001 Y45 | (12.10.12) <strong>Bosch</strong> <strong>eBike</strong> <strong>Systems</strong><br />
19<br />
21<br />
22<br />
29<br />
20
OBJ_BUCH-1557-002.book Page 5 Friday, October 12, 2012 12:14 PM<br />
C<br />
D<br />
26<br />
24<br />
23<br />
27<br />
25<br />
19<br />
24<br />
23<br />
<strong>Bosch</strong> <strong>eBike</strong> <strong>Systems</strong> 0 276 001 Y45 | (12.10.12)<br />
26<br />
28<br />
25<br />
20<br />
27<br />
24<br />
23<br />
| 5
OBJ_BUCH-1557-002.book Page 6 Friday, October 12, 2012 12:14 PM<br />
6 |<br />
34<br />
<strong>eBike</strong> Battery Charger 42-4/230<br />
0 275 007 905<br />
Input: 230V 50Hz 1.5A<br />
Output: 42V 4A<br />
Made in PRC<br />
Robert <strong>Bosch</strong> GmbH, Reutlingen<br />
29<br />
For safe operation see manual. Risk of electric shock. Dry location use only. Charge only batteries of<br />
WARNING the <strong>Bosch</strong> <strong>eBike</strong> <strong>Systems</strong>. Other batteries may burst causing personal damage. Do not replace the plug<br />
assembly as risk of fire or electric shock may result.<br />
PRECAUCION<br />
Para un funcionamiento con seguridad, ver el manual. Peligro de sacudida eléctrica. Utilice<br />
solamente en lugares secos. Cargar únicamente baterías de sistemas <strong>eBike</strong> de <strong>Bosch</strong>.<br />
Otras baterías podrían reventar, causando lesiones personales y daños. No reemplace el ensamblaje del enchufe,<br />
ya que el resultado puede ser riesgo de incendio o sacudidas eléctricas.<br />
ATTENTION<br />
Pour un fonctionnement sûr, reportez-vous au manuel. Risque de choc électrique. Utiliser en lieu sec<br />
uniquement. A utiliser uniquement avec les batteries des systèmes d’assistance électrique<br />
<strong>eBike</strong> de <strong>Bosch</strong>. D'autres<br />
batteries risqueraient d'éclater et de causer des blessures corporelles et des dommages.<br />
Ne pas remplacer la connectique car un risque d'incendie ou de choc électrique pourrait en résulter.<br />
0 276 001 Y45 | (12.10.12) <strong>Bosch</strong> <strong>eBike</strong> <strong>Systems</strong><br />
32<br />
33<br />
30<br />
31
OBJ_BUCH-1557-002.book Page 7 Friday, October 12, 2012 12:14 PM<br />
E<br />
F<br />
34<br />
35<br />
35<br />
26<br />
<strong>Bosch</strong> <strong>eBike</strong> <strong>Systems</strong> 0 276 001 Y45 | (12.10.12)<br />
30<br />
20<br />
31<br />
21<br />
| 7
OBJ_BUCH-1557-002.book Page 1 Friday, October 12, 2012 12:14 PM<br />
<strong>English</strong>–1<br />
Safety Notes<br />
Read all safety warnings and all instructions.<br />
Failure to follow the warnings and instructions<br />
may result in electric shock, fire<br />
and/or serious injury.<br />
Save all safety warnings and instructions for future reference.<br />
The term “battery pack” used in these operating instructions<br />
refers both to standard battery packs (battery packs with<br />
holder on the bike frame) and to rack-type battery packs (battery<br />
packs with holder in the rear rack/carrier).<br />
� Do not open the drive unit yourself. The drive unit is<br />
maintenance-free and may be repaired only through a<br />
qualified repair person and only using original spare<br />
parts. This will ensure that the safety of the drive unit is<br />
maintained. Unauthorised opening of the drive unit will<br />
void any and all warranty claims.<br />
� All components mounted to the drive unit and all other<br />
components of the <strong>eBike</strong> drive (e.g., the chainwheel,<br />
chainwheel seat, pedals) may be replaced only against<br />
identical components or components specifically approved<br />
for your <strong>eBike</strong> by the bicycle manufacturer. This<br />
protects the drive unit against overload and damage.<br />
� Remove the battery pack from the <strong>eBike</strong> before working<br />
on the <strong>eBike</strong> (e.g., assembling, maintenance, etc.),<br />
transporting it via car or plane, or storing it. Danger of<br />
injury when accidentally actuating the On/Off switch.<br />
� The start-assistance function may only be used when<br />
starting (driving off) the <strong>eBike</strong>. Danger of injury when<br />
the wheels of the <strong>eBike</strong> do not have ground contact while<br />
using the start-assistance function.<br />
� Use only original <strong>Bosch</strong> battery packs approved for<br />
your <strong>eBike</strong> by the manufacturer. Using other battery<br />
packs can lead to injuries and pose a fire hazard. When using<br />
other battery packs, <strong>Bosch</strong> shall not assume any liability<br />
and warranty.<br />
� Please observe all national regulations on registering<br />
and using <strong>eBike</strong>s.<br />
� Please read and observe the safety warnings and instructions<br />
enclosed in the operating instructions of the<br />
battery pack as well as in the operating instructions of<br />
your <strong>eBike</strong>.<br />
Drive Unit Speed/<br />
Drive HMI Intuvia<br />
Product Description and<br />
Specifications<br />
Intended Use<br />
The drive unit is intended exclusively for your <strong>eBike</strong> and may<br />
not be used for other purposes.<br />
The <strong>eBike</strong> is intended for use on paved paths. It is not permitted<br />
for use in competition.<br />
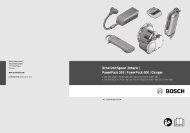
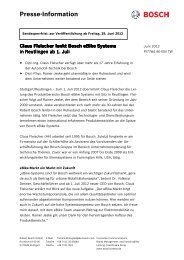
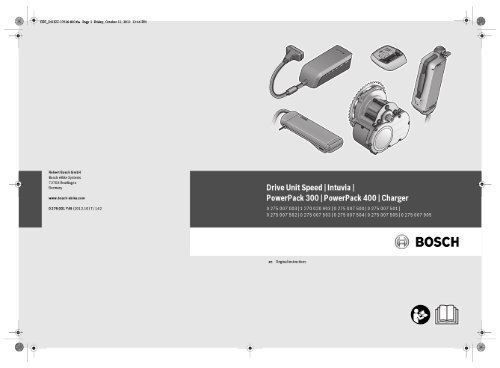
Product Features<br />
(see page 2–3)<br />
The numbering of the product features refers to the illustrations<br />
on the graphics page.<br />
All representations of bike components, with exception of the<br />
drive unit, drive HMI incl. operating unit, speed sensor and<br />
corresponding holders, are schematic and can deviate from<br />
your <strong>eBike</strong>.<br />
1 Display-function button “i”<br />
2 Illumination button<br />
3 Drive HMI<br />
4 Holder for drive HMI<br />
5 Drive HMI On/Off button<br />
6 “RESET” button<br />
7 USB port<br />
8 Protective cap of USB port<br />
9 Drive unit<br />
10 Operating unit<br />
11 Display-function button “i” on the operating unit<br />
12 Reduce value/scroll down button “–”<br />
13 Increase value/scroll up button “+”<br />
14 Start-assistance button “WALK”<br />
15 Lock latch for drive HMI<br />
16 Locking screw for drive HMI<br />
17 Speed sensor<br />
18 Spoke magnet of the speed sensor<br />
Indication Elements, Drive HMI<br />
a Motor-output indicator<br />
b Assistance-level indicator<br />
c Text indication<br />
d Value indication<br />
e Speed indication<br />
f Battery charge-control indicator<br />
0 276 001 Y45 | (12.10.12) <strong>Bosch</strong> <strong>eBike</strong> <strong>Systems</strong>
OBJ_BUCH-1557-002.book Page 2 Friday, October 12, 2012 12:14 PM<br />
Technical Data<br />
Drive Unit Drive Unit Speed<br />
Article number 0 275 007 003<br />
Power output W 350<br />
Output torque, max. Nm 50<br />
Rated voltage V 36<br />
Operating temperature °C –5...+40<br />
Storage temperature °C –10...+50<br />
Degree of protection IP 54 (dust and splash<br />
water protected)<br />
Weight, approx. kg 4<br />
Drive HMI Intuvia<br />
Article number 1 270 020 903<br />
Max. charging current, USB<br />
connection. mA 500<br />
Charging voltage, USB connection<br />
V 5<br />
Operating temperature °C –5...+40<br />
Storage temperature °C –10...+50<br />
Degree of protection IP 54 (dust and splash<br />
water protected)<br />
Weight, approx. kg 0.15<br />
Lighting*<br />
Rated voltage<br />
Power output<br />
V 6<br />
– Front light<br />
W<br />
2.7<br />
– Rear light<br />
W<br />
0.3<br />
* Not possible via the <strong>eBike</strong> battery pack in all country-specific versions,<br />
depending on the statutory regulations<br />
Assembly<br />
Inserting and Removing the Battery Pack<br />
For inserting and removing the battery pack in/from the<br />
<strong>eBike</strong>, please read and observe the battery pack operating instructions.<br />
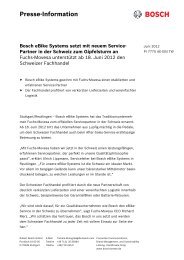
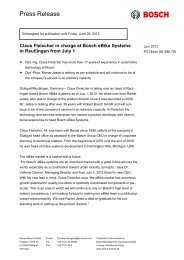
Inserting and Removing the Drive HMI<br />
(see figure A)<br />
To insert the drive HMI 3, slide it from the front into the<br />
holder 4.<br />
To remove the drive HMI 3, press the lock latch 15 and slide<br />
the drive HMI toward the front out of the holder 4.<br />
� Remove the drive HMI when parking the <strong>eBike</strong>, so that<br />
the drive cannot be used by unauthorised persons.<br />
Without the drive HMI, the <strong>eBike</strong> system cannot be<br />
switched on.<br />
<strong>English</strong>–2<br />
The drive HMI can also be secured in the holder against removing.<br />
For this, remove the holder 4 from the handlebar. Insert<br />
the drive HMI into the holder. Screw the locking screw 16<br />
from below into the corresponding thread in the holder.<br />
Mount the holder onto the handlebar again.<br />
Checking the Speed Sensor<br />
(see figure B)<br />
The speed sensor 17 and its spoke magnet 18 must be<br />
mounted in such a manner that the spoke magnet, after a turn<br />
of the wheel, moves past the speed sensor with a clearance of<br />
at least 5 mm, yet no more than 17 mm.<br />
Note: If the clearance between speed sensor 17 and spoke<br />
magnet 18 is too small or too large, or if the speed sensor 17<br />
is not properly connected, the speed indication e will fail, and<br />
the <strong>eBike</strong> drive will operate in emergency mode.<br />
In this case, loosen the screw of the spoke magnet 18 and fasten<br />
the spoke magnet to the spoke in such a manner that it<br />
runs past the mark of the speed sensor at the correct clearance.<br />
When the speed is still not being indicated in the speed<br />
indication e after this, please refer to an authorised bicycle<br />
dealer.<br />
Operation<br />
Initial Operation<br />
Requirements<br />
The <strong>eBike</strong> system can only be activated when the following requirements<br />
are met:<br />
– A sufficiently charged battery pack is inserted (see operating<br />
instructions of the battery pack).<br />
– The drive HMI is properly inserted in the holder (see “Inserting<br />
and Removing the Drive HMI”, page <strong>English</strong>–2).<br />
– The drive HMI is properly connected (see “Checking the<br />
Speed Sensor”, page <strong>English</strong>–2).<br />
Switching the <strong>eBike</strong> System On/Off<br />
Options for switching on the <strong>eBike</strong> system:<br />
– If the drive HMI is already switched on when inserting it in<br />
the holder, the <strong>eBike</strong> system is automatically switched on.<br />
– When the drive HMI and the battery pack are inserted,<br />
briefly press the On/Off button 5 of the drive HMI once.<br />
– When the drive HMI is inserted, press the On/Off button of<br />
the battery pack (see battery pack operating instructions).<br />
Note: When switching on the <strong>eBike</strong> system, the pedals of the<br />
<strong>eBike</strong> must not be subject to load, as otherwise the motor output<br />
capacity will be limited. The error message “Release<br />
pedal” is displayed in text indication c.<br />
If the <strong>eBike</strong> system was inadvertently switched on with load<br />
applied to the pedals, then switch it off and then on again<br />
without load.<br />
<strong>Bosch</strong> <strong>eBike</strong> <strong>Systems</strong> 0 276 001 Y45 | (12.10.12)
OBJ_BUCH-1557-002.book Page 3 Friday, October 12, 2012 12:14 PM<br />
<strong>English</strong>–3<br />
The drive is activated as soon as you step into the pedals (except<br />
when in start-assistance mode, see “Switching Start-assistance<br />
On/Off”, page <strong>English</strong>–4). The motor output depends<br />
on the settings of the drive HMI.<br />
As soon as you stop pedaling when in normal operation, or as<br />
soon as you have reached a speed of 45 km/h, the assistance<br />
from the <strong>eBike</strong> drive is switched off. The drive is automatically<br />
re-activated as soon you start pedaling again and the speed is<br />
below 45 km/h.<br />
Options for switching off the <strong>eBike</strong> system:<br />
– Press the On/Off button 5 of the drive HMI.<br />
– Switch the battery pack off by its On/Off button (see battery<br />
pack operating instructions.)<br />
– Remove the drive HMI out of its holder.<br />
When no power output of the drive is requested for approx.<br />
10 minutes (e. g., because the <strong>eBike</strong> is parked) and no button<br />
of the drive HMI or operating unit is pressed, the battery pack<br />
automatically switches off to save energy.<br />
Indications and Settings of the Drive HMI<br />
Power Supply of the Drive HMI<br />
When the drive HMI is inserted in holder 4, a sufficiently<br />
charged battery pack is inserted in the <strong>eBike</strong> and the <strong>eBike</strong><br />
system is switched on, power is supplied to the drive HMI via<br />
the <strong>eBike</strong>'s battery pack.<br />
When the drive HMI is removed from holder 4, it is supplied<br />
with power via an internal battery pack. If the internal battery<br />
pack is low when switching on the drive HMI, “Attach to bike”<br />
is displayed for 3 s in text indication c. Afterwards, the drive<br />
HMI switches off again.<br />
To recharge the internal battery pack, insert the drive HMI into<br />
the holder 4 (a battery pack must be inserted in the <strong>eBike</strong>).<br />
Switch the <strong>eBike</strong> battery pack off by its On/Off button (see<br />
battery pack operating instructions).<br />
The drive HMI can also be charged via USB connection. Open<br />
protective cap 8 for this. Using a matching USB cable, connect<br />
the USB port 7 of the drive HMI to a commercially available<br />
USB charger or to the USB port of a computer; (5 V charging<br />
voltage; max. 500 mA charging current). “USB<br />
connected” is displayed in text indication c of the drive HMI.<br />
Switching the drive HMI On/Off<br />
To switch on the drive HMI, briefly press the On/Off button 5.<br />
When the internal battery pack is sufficiently charged, the<br />
drive HMI can also be switched on when not inserted in the<br />
holder.<br />
To switch off the drive HMI, press the On/Off button 5.<br />
When the drive HMI is not inserted in the holder and no button<br />
is pressed, it automatically switches off after 1 min to save energy.<br />
Battery Charge-control Indicator<br />
The battery-pack charge-control indicator f indicates the<br />
charge condition of the <strong>eBike</strong>’s battery pack, and not the<br />
charge condition of the drive HMI’s internal battery pack. The<br />
charge condition of the <strong>eBike</strong>’s battery pack can also be read<br />
from the battery pack’s LEDs.<br />
On indicator f, each bar of the battery pack symbol is equivalent<br />
to a capacity of approx. 20 %:<br />
100 % to 80 % capacity<br />
20 % to 5 % capacity; the battery pack should be<br />
recharged.<br />
Less than 5 % capacity; drive assistance is no longer<br />
possible. The LEDs of the charge-control indicator<br />
on the battery pack go out.<br />
When the <strong>eBike</strong> lighting is powered via the battery pack<br />
(country-specific), the capacity upon first indication of the<br />
empty battery pack symbol will be sufficient for approx.<br />
2 hours of lighting. When the symbol begins to flash, the lighting<br />
will continue to operate only for a short period.<br />
When the drive HMI is removed from holder 4, the last indicated<br />
battery pack charge condition is stored.<br />
Setting the Assistance Level<br />
The level of assistance of the <strong>eBike</strong> drive when pedaling can<br />
be adjusted via the drive HMI. The assistance level can be<br />
changed anytime, even during riding.<br />
Note: For individual versions, it is possible that the the assistance<br />
level is pre-set and cannot be changed. It is also possible<br />
that less assistance levels are available for selection than<br />
listed here.<br />
The following assistance levels (max.) are available:<br />
– “OFF”: The drive is switched off, the <strong>eBike</strong> can be operated<br />
as a normal bicycle through pedaling.<br />
– “ECO”: Effective assistance at maximum efficiency for<br />
maximum cruising range<br />
– “TOUR”: Uniform assistance, for touring with long cruising<br />
range<br />
– “SPORT”: Powerful assistance for sportive riding off road<br />
as well as for urban traffic<br />
– “TURBO”: Maximum assistance, supporting highest cadence<br />
for sportive riding<br />
To increase the assistance level, press the “+” button 13 on<br />
the operating unit until the desired assistance level is displayed<br />
in indicator b; to decrease the assistance level, press<br />
the “ –” button 12.<br />
The requested motor output is displayed in indicator a. The<br />
maximum motor output depends on the selected assistance<br />
level.<br />
0 276 001 Y45 | (12.10.12) <strong>Bosch</strong> <strong>eBike</strong> <strong>Systems</strong>
OBJ_BUCH-1557-002.book Page 4 Friday, October 12, 2012 12:14 PM<br />
Assistance Level Motor Output*<br />
(Derailleur)<br />
“ECO” 30 %<br />
“TOUR” 100 %<br />
“SPORT” 180 %<br />
“TURBO” 250 %<br />
*The motor output can vary for individual versions.<br />
When the drive HMI is removed from holder 4, the last indicated<br />
assistance level is stored; the motor-output indicator a remains<br />
empty.<br />
Switching Start-assistance On/Off<br />
The start-assistance function can be used for additional support<br />
on the first meters when starting is difficult (e. g., at a<br />
traffic light or when starting uphill).<br />
� The start-assistance function may only be used when<br />
starting (driving off) the <strong>eBike</strong>. Danger of injury when<br />
the wheels of the <strong>eBike</strong> do not have ground contact while<br />
using the start-assistance function.<br />
To activate the start-assistance function, press and hold the<br />
“WALK” button 14 on the operating unit. The <strong>eBike</strong>’s drive is<br />
activated.<br />
The start-assistance function is switched off as soon as any<br />
of the following incidents occur:<br />
– You release “WALK” button 14,<br />
– You press another button on the drive HMI,<br />
– You pedal in forward or quickly in backward direction,<br />
– The wheels of the <strong>eBike</strong> are blocked (e. g., through braking<br />
or running against an obstruction),<br />
– Your speed exceeds 18 km/h.<br />
Switching the Lighting On/Off<br />
Depending on country-specific regulations, two lighting versions<br />
are possible:<br />
– The front light, rear light and display backlight can be<br />
switched on and off at the same time via the drive HMI.<br />
In this version, “Lights on” is displayed for approx. 1 s in<br />
text indication c when switching on, and “Lights off” when<br />
switching off.<br />
– Only the display backlight can be switched on and off; the<br />
front and rear light of the <strong>eBike</strong> are independent of the<br />
drive HMI.<br />
For both versions, the lighting is switched on and off by<br />
pressing button 2.<br />
Speed and Distance Indication<br />
The speed indication e always displays the current speed.<br />
The following functions are available in the function indication<br />
(combination of text indication c and value indication d):<br />
– “Range”: Estimated range of the available battery-pack<br />
charge (for constant conditions such as assistance level,<br />
route profile, etc.)<br />
– “Distance”: Distance covered since the last reset<br />
– “Trip time”: Trip time since the last reset<br />
<strong>English</strong>–4<br />
– “Avg. Speed”: Average speed achieved since the last reset<br />
– “Max. Speed”: Maximum speed achieved since the last reset<br />
– “Clock”: Current time<br />
To switch between the indication functions, press the “i”<br />
button 1 on the drive HMI or the “i” button 11 on the operating<br />
unit until the desired function is displayed.<br />
To reset “Distance”, “Trip time” and “Avg. Speed”, switch to<br />
any of the three functions and then press and hold the<br />
“RESET” button 6 until the indication is set to zero. This also<br />
resets the values of the other two functions.<br />
To reset the “Max. Speed”, switch to this function and then<br />
press and hold the “RESET” button 6 until the indication is set<br />
to zero.<br />
When the drive HMI is removed from the holder 4, all function<br />
values remain stored and can be viewed.<br />
Displaying/Adapting Basic Settings<br />
The basic settings can be displayed and changed no matter if<br />
the drive HMI is in the holder 4 or not.<br />
To access the basic settings menu, press and hold the<br />
“RESET” button 6 and the “i” button 1 until “Configuration”<br />
is displayed in text indication c.<br />
To switch between the basic settings, press the “i” button 1<br />
on the drive HMI until the desired basic setting is displayed.<br />
When the drive HMI is inserted in holder 4, you can also press<br />
the “i” button 11 on the operating unit.<br />
To change the basic settings, press the On/Off button 5 next<br />
to the “ –” indication to decrease the value or scroll down, or<br />
the illumination button 2 next to the “+” indication to increase<br />
the value or scroll up.<br />
When the drive HMI is inserted in holder 4, you can also<br />
change the values with the “ –” button 12 or the “+” button 13<br />
on the operating unit.<br />
To exit the function and store a changed setting, press the<br />
“RESET” button 6 for 3 s.<br />
The following basic settings are available:<br />
– “unit km/mi”: The speed and distance can be displayed either<br />
in kilometres or miles.<br />
– “time format”: The time can be displayed either in the<br />
12 hour or 24 hour format.<br />
– “clock”: The current time can be set here. Pressing and<br />
holding the setting buttons fast-forwards the setting<br />
speed.<br />
– “<strong>English</strong>”: The language for text indication can be<br />
changed. The available languages are German, <strong>English</strong>,<br />
French, Spanish, Italian and Dutch.<br />
– “odometer”: Indicates the total distance travelled with the<br />
<strong>eBike</strong> (not changeable).<br />
– “power-on hours”: Indicates the total travel duration with<br />
the <strong>eBike</strong> (not changeable).<br />
<strong>Bosch</strong> <strong>eBike</strong> <strong>Systems</strong> 0 276 001 Y45 | (12.10.12)
OBJ_BUCH-1557-002.book Page 5 Friday, October 12, 2012 12:14 PM<br />
<strong>English</strong>–5<br />
Error Code Indication<br />
The components of the <strong>eBike</strong> system are continuously and automatically<br />
monitored. When an error is detected, the respective<br />
error code is indicated in text indication c.<br />
To return to the standard indication, press any button on the<br />
drive HMI 3 or on the operating unit 10.<br />
Depending on the type of error, the drive is automatically shut<br />
off if required. Continued travel without assistance from the<br />
Code Cause Corrective Measure<br />
100 Internal error of the drive unit Have the drive unit checked<br />
101 Connection problem of the drive unit Have connections and contacts checked<br />
102 Error of the speed sensor Have the speed sensor checked<br />
103* Connection problem of the lighting<br />
system<br />
Have connections and contacts checked<br />
104 Connection problem of the drive HMI Have connections and contacts checked<br />
105 Temperature of the drive unit too high<br />
(above 40 °C)<br />
200 Internal electronic error of battery<br />
pack<br />
201 Temperature of the battery pack too<br />
high (above 40 °C)<br />
202 Temperature of the battery pack too<br />
low (below –10 °C)<br />
Power Supply of External Devices via USB<br />
Connection<br />
With the USB connection, it is possible to operate and charge<br />
most devices whose power supply is possible via USB (e.g.,<br />
various mobile phones).<br />
Prerequisite for the charging is that the drive HMI and a sufficiently<br />
charged battery pack are inserted in the <strong>eBike</strong>.<br />
drive is possible at any time. However, have the <strong>eBike</strong><br />
checked before attempting new trips.<br />
� Have all inspections and repairs carried out only by an<br />
authorised bicycle dealer. When an error is still displayed<br />
despite corrective measures, please also refer to an<br />
authorised bicycle dealer.<br />
Allow the drive unit to cool down. Continued travel without assistance<br />
from the <strong>eBike</strong> drive is possible and speeds up the cooling of the drive<br />
unit.<br />
Have battery pack checked<br />
Allow the battery pack to cool down. Continued travel without <strong>eBike</strong> drive<br />
is possible and speeds up the cooling of the battery pack.<br />
Allow the battery pack to warm up slowly in a warm location.<br />
203 Connection problem of battery pack Have connections and contacts checked<br />
204 Incorrect polarity of battery pack Charge the battery pack with the original <strong>Bosch</strong> charger as described in<br />
the operating instructions.<br />
410 One or more buttons of the drive HMI<br />
are blocked.<br />
414 Connection problem of the operating<br />
unit<br />
418 One or more buttons of the operating<br />
unit are blocked.<br />
Check if any buttons are blocked, e.g. from dirt or debris. Clean the<br />
buttons, if required.<br />
Have connections and contacts checked<br />
Check if any buttons are blocked, e.g. from dirt or debris. Clean the<br />
buttons, if required.<br />
422 Connection problem of the drive unit Have connections and contacts checked<br />
423 Connection problem of battery pack Have connections and contacts checked<br />
424 Communication error among the com- Have connections and contacts checked<br />
ponents<br />
430 Internal battery pack of drive HMI<br />
empty<br />
Charge drive HMI (in holder or via USB port)<br />
490 Internal error of the drive HMI Have the drive HMI checked<br />
*only for <strong>eBike</strong> lighting via battery pack (country-specific)<br />
Open the protective cap 8 of the USB port on the drive HMI.<br />
Using a matching USB cable, connect the USB port of the external<br />
device to the USB port 7 of the drive HMI.<br />
0 276 001 Y45 | (12.10.12) <strong>Bosch</strong> <strong>eBike</strong> <strong>Systems</strong>
OBJ_BUCH-1557-002.book Page 6 Friday, October 12, 2012 12:14 PM<br />
Notes on Riding with the <strong>eBike</strong> System<br />
When does the <strong>eBike</strong> Drive Operate?<br />
The <strong>eBike</strong> drive supports you when riding, as long as you step<br />
into the pedals. Without pedaling, there is no assistance. The<br />
motor output always depends on the amount of your pedaling<br />
power.<br />
When applying less pedaling power, the assistance or support<br />
will be lower than when applying a lot of pedaling power. This<br />
applies independent of the assistance Level.<br />
The <strong>eBike</strong> drive automatically switches off at speeds in excess<br />
of 45 km/h. When the speed falls below 45 km/h, the drive is<br />
automatically available again.<br />
An exception applies for the start-assistance function, in<br />
which the <strong>eBike</strong> can be driven at low speed without pedaling.<br />
The <strong>eBike</strong> can also be ridden as a normal bicycle without assistance<br />
at any time, by either switching off the <strong>eBike</strong> system<br />
or setting the assistance level to “OFF”. The same applies<br />
when the battery pack is empty.<br />
Interaction of the <strong>eBike</strong> System with the Bicycle Gears<br />
The bicycle gears should be used as with a normal bicycle,<br />
even with <strong>eBike</strong> drive (please observe the operating instructions<br />
of your <strong>eBike</strong>).<br />
Independent of the type of gearing, it is recommended to<br />
briefly interrupt the pedaling while changing gears. This<br />
makes changing gears easier and reduces the wear of the<br />
drive train.<br />
By selecting the right gear, you can increase the speed and<br />
range with the same pedaling effort.<br />
Gathering First Experience<br />
It is recommended to gather first experience with the <strong>eBike</strong><br />
away from roads with heavy traffic.<br />
Try out the different assistance levels. As soon as you feel<br />
safe, you can participate in traffic with the <strong>eBike</strong> as with any<br />
other bicycle.<br />
Test the operating range of your <strong>eBike</strong> under different conditions<br />
before planning longer and more challenging rides.<br />
Influences on the Operating Range<br />
The operating range depends on many factors, such as:<br />
– Assistance level,<br />
– Gear-switching behaviour,<br />
– Bicycle tyres and tyre pressure,<br />
– Age and condition of the battery pack,<br />
– Route profile (inclines) and road or path conditions (road<br />
or path surface),<br />
– Head wind and ambient temperature,<br />
– Weight of the <strong>eBike</strong>, rider and equipment/luggage<br />
<strong>English</strong>–6<br />
For these reasons, it is not possible to predict an accurate operating<br />
range before starting your ride. General rules:<br />
– For the same motor output of the <strong>eBike</strong> drive: The less<br />
power or force that you have to bring about to reach a certain<br />
speed (e.g. through optimal use of the gears), the less<br />
energy the <strong>eBike</strong> drive will consume, and the greater the<br />
range for a battery-pack charge.<br />
– The higher the assistance level under otherwise same conditions,<br />
the lower the range.<br />
Careful Handling of the <strong>eBike</strong><br />
Please observe the operating and storage temperatures of the<br />
<strong>eBike</strong> components. Protect the drive unit, drive HMI and battery<br />
pack against extreme temperatures (e.g. from intense<br />
sunlight without adequate ventilation). The components (especially<br />
the battery pack) can become damaged through extreme<br />
temperatures.<br />
Maintenance and Service<br />
Maintenance and Cleaning<br />
Keep all components of your <strong>eBike</strong> clean, especially the battery-pack<br />
contacts and corresponding holder contacts. Clean<br />
them carefully with a soft, damp cloth.<br />
All components including the drive unit may not be immersed<br />
in water or cleaned with a high-pressure cleaner.<br />
For service or repairs on the <strong>eBike</strong>, please refer to an authorised<br />
bicycle dealer.<br />
After-sales Service and Customer Assistance<br />
In case of questions concerning the <strong>eBike</strong> system and its components,<br />
please refer to an authorised bicycle dealer.<br />
For contact data of authorised bicycle dealers, please refer to<br />
www.bosch-ebike.com<br />
Transport<br />
The battery packs are subject to the Dangerous Goods Legislation<br />
requirements. Private users can transport battery<br />
packs by road without further requirements.<br />
When being transported by commercial users or third parties<br />
(e.g. via air transport or forwarding agency), special requirements<br />
on packaging and labelling must be observed (e.g. ADR<br />
Regulations). For preparation of the item being shipped, an<br />
expert for hazardous material can be consulted as required.<br />
Dispatch battery packs only when the housing is undamaged.<br />
Tape or mask off open contacts and pack up the battery pack<br />
in such a manner that it cannot move around in the packaging.<br />
Please also observe possibly more detailed national regulations.<br />
In case of questions concerning transport of the battery<br />
packs, please refer to an authorised bicycle dealer. Bicycle<br />
dealers can also provide suitable transport packaging.<br />
<strong>Bosch</strong> <strong>eBike</strong> <strong>Systems</strong> 0 276 001 Y45 | (12.10.12)
OBJ_BUCH-1557-002.book Page 7 Friday, October 12, 2012 12:14 PM<br />
<strong>English</strong>–7<br />
Disposal<br />
The drive unit, drive HMI (incl. operating unit), battery<br />
pack, speed sensor, accessories and packaging<br />
should be sorted for environmental-friendly recycling.<br />
Do not dispose of <strong>eBike</strong>s and their components into household<br />
waste!<br />
Only for EC countries:<br />
According to the European Guideline<br />
2002/96/EC, electrical devices/tools that<br />
are no longer usable, and according to the<br />
European Guideline 2006/66/EC, defective<br />
or used battery packs/batteries, must<br />
be collected separately and disposed of in<br />
an environmentally correct manner.<br />
The integrated battery pack in the drive HMI may only be removed<br />
for disposal. Opening the housing shell can damage or<br />
destroy the drive HMI.<br />
Please return battery packs that are no longer usable to an authorised<br />
bicycle dealer.<br />
Li-ion:<br />
Please observe the instructions in section<br />
“Transport”, page <strong>English</strong>–6.<br />
Subject to change without notice.<br />
0 276 001 Y45 | (12.10.12) <strong>Bosch</strong> <strong>eBike</strong> <strong>Systems</strong>
OBJ_BUCH-1557-002.book Page 8 Friday, October 12, 2012 12:14 PM<br />
Safety Notes<br />
Lithium ion battery pack PowerPack<br />
Read all safety warnings and<br />
all instructions. Failure to follow<br />
the warnings and instructions<br />
may result in electric<br />
shock, fire and/or serious injury.<br />
Save all safety warnings and instructions for future reference.<br />
The term “battery pack” used in these operating instructions<br />
refers both to standard battery packs (battery packs with<br />
holder on the bike frame) and to rack-type battery packs (battery<br />
packs with holder in the rear rack/carrier), except when<br />
explicitly referring to the design type.<br />
� Remove the battery pack from the <strong>eBike</strong> before working<br />
on the <strong>eBike</strong> (e.g., assembling, maintenance, etc.),<br />
transporting it via car or plane, or storing it. Danger of<br />
injury when accidentally actuating the On/Off switch.<br />
� Do not open the battery pack. Danger of short-circuiting.<br />
Opening the battery pack voids any and all warranty<br />
claims.<br />
Protect the battery pack against heat (e. g., also<br />
against continuous intense sunlight), fire<br />
and immersing into water. Danger of explosion.<br />
� Keep the battery pack not being used away from paper<br />
clips, coins, keys, nails, screws or other small metal objects,<br />
that can make a connection from one terminal to<br />
another. Shorting the battery-pack terminals together<br />
may cause burns or a fire. For short-circuiting damage<br />
caused in this manner, any and all warranty claims through<br />
<strong>Bosch</strong> shall be invalid.<br />
� Under abusive conditions, liquid may be ejected from<br />
the battery pack. Avoid contact. If contact accidentally<br />
occurs, flush with water. If liquid contacts eyes, additionally<br />
seek medical help. Liquid ejected from the battery<br />
pack may cause skin irritations or burns.<br />
� Vapours can escape in case of damage and improper<br />
use of the battery pack. Provide for fresh air and seek<br />
medical attention in case of complaints. The vapours<br />
can irritate the respiratory system.<br />
� Charge the battery pack only with original <strong>Bosch</strong> battery<br />
chargers. When using non-original <strong>Bosch</strong> chargers,<br />
the danger of fire cannot be excluded.<br />
� Use the battery pack only together with <strong>eBike</strong>s that<br />
have an original <strong>Bosch</strong> <strong>eBike</strong> drive system. This is the<br />
only way to protect the battery pack against dangerous<br />
overload.<br />
<strong>English</strong>–8<br />
� Use only original <strong>Bosch</strong> battery packs approved for<br />
your <strong>eBike</strong> by the manufacturer. Using other battery<br />
packs can lead to injuries and pose a fire hazard. When using<br />
other battery packs, <strong>Bosch</strong> shall not assume any liability<br />
and warranty.<br />
� Please read and observe the safety warnings and instructions<br />
enclosed in the operating instructions of the<br />
charger and drive unit/drive HMI (Human Machine Interface),<br />
as well as in the operating instructions of your<br />
<strong>eBike</strong>.<br />
Product Description and<br />
Specifications<br />
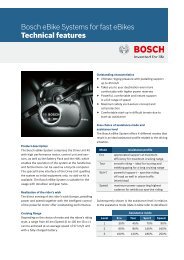
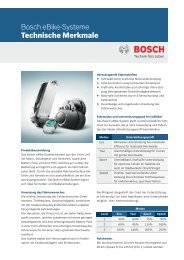
Product Features<br />
(see page 4–5)<br />
The numbering of the product features refers to the illustrations<br />
on the graphics pages.<br />
All representations of bike components, with exception of the<br />
battery packs and their holders, are schematic and can deviate<br />
from your <strong>eBike</strong>.<br />
19 Holder of the rack-type battery pack<br />
20 Rack-type battery pack<br />
21 Operation and charge-control indicator<br />
22 On/Off button<br />
23 Key of the battery pack lock<br />
24 Battery-pack lock<br />
25 Upper holder of the standard battery pack<br />
26 Standard battery pack<br />
27 Bottom holder of the standard battery pack<br />
28 Carrying strap<br />
29 Battery charger<br />
<strong>Bosch</strong> <strong>eBike</strong> <strong>Systems</strong> 0 276 001 Y45 | (12.10.12)
OBJ_BUCH-1557-002.book Page 9 Friday, October 12, 2012 12:14 PM<br />
<strong>English</strong>–9<br />
Technical Data<br />
Lithium ion battery pack PowerPack 300 PowerPack 400<br />
Article number<br />
– Standard battery pack, black<br />
– Standard battery pack, white<br />
– Rack-type battery pack<br />
Assembly<br />
� Place down the battery pack only on clean surfaces. In<br />
particular, avoid soiling the charge socket and the contacts,<br />
e. g. by means of sand or ground.<br />
Checking the Battery Pack Before Using for the<br />
First Time<br />
Check the battery pack before charging it or using it with your<br />
<strong>eBike</strong> for the first time.<br />
For this, press the On/Off button 22 to switch on the battery<br />
pack. When no LED of the charge-control indicator 21 lights<br />
up, the battery pack may be damaged.<br />
When at least one, but not all LEDs of the charge-control indicator<br />
21 is lit, then fully charge the battery pack before using<br />
for the first time.<br />
� Do not charge a damaged battery pack and do not use<br />
it. Please refer to an authorised bicycle dealer.<br />
Charging the Battery Pack<br />
� Use only the charger provided with your <strong>eBike</strong> or an<br />
identical original <strong>Bosch</strong> charger. Only this charger is<br />
matched to the lithium-ion battery pack used in your <strong>eBike</strong>.<br />
Note: The battery pack is supplied partially charged. To ensure<br />
full battery pack capacity, completely charge the battery<br />
pack in the charger before using for the first time.<br />
The battery pack must be removed from the <strong>eBike</strong> for charging.<br />
For charging the battery pack, read and observe the operating<br />
instructions of the charger.<br />
The battery pack can be charged any time without reducing<br />
the service life. Interrupting the charging procedure does not<br />
cause damage to the battery pack.<br />
0 275 007 500<br />
0 275 007 501<br />
0 275 007 502<br />
0 275 007 503<br />
0 275 007 504<br />
0 275 007 505<br />
Rated voltage V= 36 36<br />
Rated capacity Ah 8.2 11<br />
Energy Wh 300 400<br />
Operating temperature °C –10...+40 –10...+40<br />
Storage temperature °C –10...+60 –10...+60<br />
Allowable charging temperature range °C 0...+40 0...+40<br />
Weight, approx. kg 2.5 2.5<br />
Degree of protection IP 54 (dust and splash water<br />
protected)<br />
IP 54 (dust and splash water<br />
protected)<br />
The battery pack is equipped with a temperature control indicator,<br />
which enables charging only within a temperature<br />
range between 0°C and 40 °C.<br />
When the battery pack is not<br />
within the charging-temperature<br />
range, three LEDs of the<br />
charge-control indicator 21<br />
flash. Disconnect the battery pack from the charger until its<br />
temperature has adjusted.<br />
Do not connect the battery pack to the charger until it has<br />
reach the allowable charging temperature.<br />
Charge-control Indicator<br />
When the battery pack is switched on, the five green LEDs of<br />
the charge-control indicator 21 indicate the charge condition<br />
of the battery pack.<br />
In this, each LED indicates approx. 20 % capacity. When the<br />
battery pack is completely charged, all five LEDs light up.<br />
Additionally, the charge condition of the switched on battery<br />
pack is indicated on the drive HMI. Read and observe the operating<br />
instructions of the drive unit and the drive HMI.<br />
When the capacity of the battery pack is below 5 %, all LEDs<br />
of charge-control indicator 21 on the battery pack go out;<br />
however, the drive HMI does provide an additional indication<br />
function.<br />
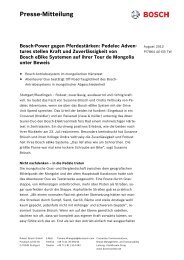
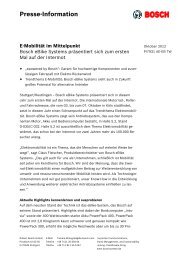
Inserting and Removing the Battery Pack<br />
(see figures C–D)<br />
� Always switch the battery pack off when inserting or<br />
removing it from the holder.<br />
In order for the battery pack to be inserted, the key 23 must<br />
be inserted into the lock 24 and the lock must be unlocked.<br />
To insert the standard battery pack 26, place it via the contacts<br />
onto the bottom holder 27 on the <strong>eBike</strong>. Pivot the battery<br />
pack to the stop into the upper holder 25.<br />
0 276 001 Y45 | (12.10.12) <strong>Bosch</strong> <strong>eBike</strong> <strong>Systems</strong>
OBJ_BUCH-1557-002.book Page 10 Friday, October 12, 2012 12:14 PM<br />
To insert the rack-type battery pack 20, slide it with the<br />
contacts facing ahead until it engages in the holder 19 of the<br />
rear rack/carrier.<br />
Check if the battery pack is tightly seated. Always lock the<br />
battery pack with lock 24, as otherwise the lock can open and<br />
the battery pack could fall out of the holder.<br />
After locking, always remove the key 23 from the lock 24.<br />
This prevents the key from falling out and the battery pack<br />
from being removed from unauthorised persons when the<br />
<strong>eBike</strong> is parked.<br />
To remove the standard battery pack 26, switch it off and<br />
unlock the lock with the key 23. Pivot the battery pack out of<br />
the upper holder 25 and pull it by the carrying strap 28 out of<br />
the bottom holder 27.<br />
To remove the rack-type battery pack 20, switch it off and<br />
unlock the lock with the key 23. Pull the battery pack out of<br />
the holder 19.<br />
Operation<br />
Initial Operation<br />
� Use only original <strong>Bosch</strong> battery packs approved for<br />
your <strong>eBike</strong> by the manufacturer. Using other battery<br />
packs can lead to injuries and pose a fire hazard. When using<br />
other battery packs, <strong>Bosch</strong> shall not assume any liability<br />
and warranty.<br />
Switching On and Off<br />
Switching the battery pack on is one of the possibilities to<br />
start the <strong>eBike</strong> system. Read and observe the operating instructions<br />
of the drive unit and the drive HMI.<br />
Before switching on the battery pack or the <strong>eBike</strong> system,<br />
check that the lock 24 is locked.<br />
Note: When switching on the <strong>eBike</strong> system, the pedals of the<br />
<strong>eBike</strong> may not be subject to load, as otherwise the output capacity<br />
of the drive will be limited.<br />
To switch on the battery pack, press the On/Off button 22.<br />
The LEDs of indicator 21 light up and at the same time indicate<br />
the charge condition.<br />
Note: When the battery-pack capacity is below 5%, none of<br />
the LEDs of charge-control indicator 21 will light up. Only the<br />
drive HMI will indicate if the <strong>eBike</strong> system is switched on.<br />
To switch off the battery pack, press the On/Off button 22<br />
again. The LEDs of indicator 21 go out. This also switches off<br />
the <strong>eBike</strong> system.<br />
When no power output of the <strong>eBike</strong> drive is requested for approx.<br />
10 minutes (e. g., because the <strong>eBike</strong> is parked) and no<br />
button of the drive HMI or operating unit is pressed, the <strong>eBike</strong><br />
system and thus the battery pack automatically switch off to<br />
save energy.<br />
<strong>English</strong>–10<br />
The battery pack is protected against deep discharging, overcharging,<br />
overheating and short-circuiting through the “Electronic<br />
Cell Protection (ECP)”. In case of hazardous situations,<br />
a protective circuit automatically switches off the battery<br />
pack.<br />
When a defect of the battery<br />
pack is detected, two LEDs of<br />
the charge-control indicator 21<br />
flash. In this case, please refer<br />
to an authorised bicycle dealer.<br />
Notes for Optimum Handling of the Battery Pack<br />
The battery-pack life can be prolonged when being properly<br />
maintained and especially when being operated and stored at<br />
the right temperatures.<br />
With increasing age, however, the battery-pack capacity will<br />
diminish, even when properly maintained.<br />
A significantly reduced operating period after charging indicates<br />
that the battery pack is worn out and must be replaced.<br />
You can replace the battery pack yourself.<br />
In case the carrying strap 28 of the standard battery pack<br />
should be defective, please have it replaced by a bicycle dealer.<br />
Recharging the Battery Pack prior to and during Storage<br />
When not using the battery pack for a longer period, charge it<br />
to approx. 60 % (3 to 4 LEDs lit on the charge-control indicator<br />
21).<br />
Check the charge condition after 6 months. When only one<br />
LED of the charge-control indicator 21 lights up, recharge the<br />
battery pack again approx. 60 %.<br />
Note: When the battery pack is stored discharged (empty) for<br />
longer periods, it can become damaged despite the low selfdischarging<br />
and the battery-pack capacity may be strongly reduced.<br />
It is not recommended to have the battery pack connected<br />
permanently to the charger.<br />
Storage Conditions<br />
Store the battery pack in a dry, well-ventilated location. Protect<br />
the battery pack against moisture and water. Under unfavourable<br />
weather conditions, it is recommended e. g. to remove<br />
the battery pack from the <strong>eBike</strong> and store it in an<br />
enclosed location until being used again.<br />
The battery pack can be stored at temperatures between<br />
–10 °C and +60 °C. For a long battery-pack life, however,<br />
storing the battery pack at a room temperature of approx.<br />
20 °C is of advantage.<br />
Take care that the maximal storage temperature is not exceeded.<br />
As an example, do not leave the battery pack in a vehicle<br />
in summer and store it out of direct sunlight.<br />
<strong>Bosch</strong> <strong>eBike</strong> <strong>Systems</strong> 0 276 001 Y45 | (12.10.12)
OBJ_BUCH-1557-002.book Page 11 Friday, October 12, 2012 12:14 PM<br />
<strong>English</strong>–11<br />
Maintenance and Service<br />
Maintenance and Cleaning<br />
Keep the battery pack clean. Clean the battery pack carefully<br />
with a soft, damp cloth. The battery pack may not be immersed<br />
in water or cleaned with a water jet.<br />
When the battery pack is no longer operative, please refer to<br />
an authorised bicycle dealer.<br />
After-sales Service and Customer Assistance<br />
In case of questions concerning the battery packs, please refer<br />
to an authorised bicycle dealer.<br />
� Note down the manufacturer and the number of the key<br />
23. In case of loss of the keys, please refer to an authorised<br />
bicycle dealer. Please provide the name of the manufacturer<br />
and the number of the key.<br />
For contact data of authorised bicycle dealers, please refer to<br />
www.bosch-ebike.com<br />
Transport<br />
The battery packs are subject to the Dangerous Goods Legislation<br />
requirements. Private users can transport battery<br />
packs by road without further requirements.<br />
When being transported by commercial users or third parties<br />
(e.g. via air transport or forwarding agency), special requirements<br />
on packaging and labelling must be observed (e.g. ADR<br />
Regulations). For preparation of the item being shipped, an<br />
expert for hazardous material can be consulted as required.<br />
Dispatch battery packs only when the housing is undamaged.<br />
Tape or mask off open contacts and pack up the battery pack<br />
in such a manner that it cannot move around in the packaging.<br />
Please also observe possibly more detailed national regulations.<br />
In case of questions concerning transport of the battery<br />
packs, please refer to an authorised bicycle dealer. Bicycle<br />
dealers can also provide suitable transport packaging.<br />
Disposal<br />
Battery packs, accessories and packaging should be<br />
sorted for environmental-friendly recycling.<br />
Do not dispose of the battery packs into household waste!<br />
Only for EC countries:<br />
According to the European Guideline<br />
2002/96/EC, electrical devices/tools that<br />
are no longer usable, and according to the<br />
European Guideline 2006/66/EC, defective<br />
or used battery packs/batteries, must<br />
be collected separately and disposed of in<br />
an environmentally correct manner.<br />
Please return battery packs that are no longer usable to an authorised<br />
bicycle dealer.<br />
Li-ion:<br />
Please observe the instructions in section<br />
“Transport”, page <strong>English</strong>–11.<br />
Subject to change without notice.<br />
0 276 001 Y45 | (12.10.12) <strong>Bosch</strong> <strong>eBike</strong> <strong>Systems</strong>
OBJ_BUCH-1557-002.book Page 12 Friday, October 12, 2012 12:14 PM<br />
Safety Notes<br />
Read all safety warnings and<br />
all instructions. Failure to follow<br />
the warnings and instructions<br />
may result in electric<br />
shock, fire and/or serious injury.<br />
Save all safety warnings and instructions for future reference.<br />
The term “battery pack” used in these operating instructions<br />
refers both to standard battery packs (battery packs with<br />
holder on the bike frame) and to rack-type battery packs (battery<br />
packs with holder in the rear rack/carrier).<br />
Keep the charger away from rain or moisture. The<br />
penetration of water into a battery charger increases<br />
the risk of an electric shock.<br />
� Only charge <strong>eBike</strong>-approved <strong>Bosch</strong> lithium-ion battery<br />
packs. The battery-pack voltage must match the battery-pack<br />
charging voltage of the charger. Otherwise<br />
there is danger of fire and explosion.<br />
� Keep the battery charger clean. Contamination can lead<br />
to danger of an electric shock.<br />
� Before each use, check the battery charger, cable and<br />
plug. If damage is detected, do not use the battery<br />
charger. Never open the battery charger yourself.<br />
Have repairs performed only by a qualified technician<br />
and only using original spare parts. Damaged battery<br />
chargers, cables and plugs increase the risk of an electric<br />
shock.<br />
� Do not operate the battery charger on easily inflammable<br />
surfaces (e. g., paper, textiles, etc.) or surroundings.<br />
The heating of the battery charger during the charging<br />
process can pose a fire hazard.<br />
� Vapours can escape in case of damage and improper<br />
use of the battery pack. Provide for fresh air and seek<br />
medical attention in case of complaints. The vapours<br />
can irritate the respiratory system.<br />
� Supervise children. This will ensure that children do not<br />
play with the charger.<br />
� Children or persons that owing to their physical, sensory<br />
or mental limitations or to their lack of experience or<br />
knowledge, are not capable of securely operating the<br />
charger, may only use this charger under supervision<br />
or after having been instructed by a responsible person.<br />
Otherwise, there is danger of operating errors and injuries.<br />
Charger<br />
<strong>English</strong>–12<br />
� Please read and observe the safety warnings and instructions<br />
enclosed in the operating instructions of the<br />
battery pack and drive unit/drive HMI, as well as in the<br />
operating instructions of your <strong>eBike</strong>.<br />
� A short version of important safety warnings in <strong>English</strong>,<br />
French and Spanish with the following content can be<br />
found on the bottom side of the charger (marked with number<br />
33 in the representation on the graphics page):<br />
– For safe operation see manual. Risk of electric shock.<br />
– Dry location use only.<br />
– Charge only batteries of the <strong>Bosch</strong> <strong>eBike</strong> <strong>Systems</strong>. Other<br />
batteries may burst causing personal damage.<br />
– Do not replace the plug assembly as risk of fire or electric<br />
shock may result.<br />
Product Description and<br />
Specifications<br />
Product Features<br />
(see page 6–7)<br />
The numbering of the product features refers to the illustration<br />
of the battery charger on the graphics page.<br />
20 Rack-type battery pack<br />
21 Battery charge-control indicator<br />
26 Standard battery pack<br />
29 Battery charger<br />
30 Charger socket<br />
31 Plug-in connector<br />
32 Ventilation openings<br />
33 Safety warnings, charger<br />
34 Charge connector<br />
35 Socket for charge connector<br />
Technical Data<br />
Battery Charger Charger<br />
Article number 0 275 007 905<br />
Rated voltage V~ 207–264<br />
Frequency Hz 47 –63<br />
Output voltage V 42<br />
Charging current A 4<br />
Allowable charging temperature<br />
range °C 0...+40<br />
The values given are valid for a nominal voltage [U] of 230 V. For different<br />
voltages and models for specific countries, these values can vary.<br />
<strong>Bosch</strong> <strong>eBike</strong> <strong>Systems</strong> 0 276 001 Y45 | (12.10.12)
OBJ_BUCH-1557-002.book Page 13 Friday, October 12, 2012 12:14 PM<br />
<strong>English</strong>–13<br />
Battery Charger Charger<br />
Charging time<br />
– PowerPack 300<br />
– PowerPack 400<br />
Operation<br />
� Place down the battery pack only on clean surfaces. In<br />
particular, avoid soiling the charge socket and the contacts,<br />
e. g. by means of sand or ground.<br />
Initial Operation<br />
Connecting the Charger (see figures E–F)<br />
� Observe the mains voltage! The voltage of the power<br />
supply must correspond with the data given on the nameplate<br />
of the battery charger. Battery chargers marked with<br />
230 V can also be operated with 220 V.<br />
Plug the charger plug 31 of the power cord into the charger<br />
socket 30 of the charger.<br />
Connect the mains cable (country-specific) to the mains supply.<br />
Switch the battery pack off and remove it from the holder of<br />
the <strong>eBike</strong>. For this, read and observe the operating instructions<br />
of the battery pack.<br />
Insert the charger plug 34 of the battery charger into the socket<br />
35 on the battery pack.<br />
Charging Procedure<br />
The charging procedure begins as soon as the charger is connected<br />
with the battery pack and the mains supply.<br />
Note: The charging procedure is only possible when the temperature<br />
of the battery pack is within the allowable chargingtemperature<br />
range.<br />
During the charging procedure, the LEDs of charge-control indicator<br />
21 on the battery pack light up. Each continuously lit<br />
LED is equivalent to a charge capacity of approx. 20 %. The<br />
flashing LED indicates the charging of the next 20 %.<br />
� Use caution when touching the charger during the<br />
charging procedure. Wear protective gloves. Especially<br />
in high ambient temperatures, the charger can heat up<br />
considerably.<br />
Note: Pay attention that the charger is well ventilated during<br />
the charging procedure and that the ventilation openings 32<br />
on both sides are not clogged or contaminated.<br />
h<br />
h<br />
2.5<br />
3.5<br />
Number of battery cells 10 –80<br />
Operating temperature °C –10...+75<br />
Storage temperature<br />
Weight according to<br />
°C –20...+70<br />
EPTA-Procedure 01/2003 kg 0.8<br />
Degree of protection IP 40<br />
The values given are valid for a nominal voltage [U] of 230 V. For different<br />
voltages and models for specific countries, these values can vary.<br />
The battery pack is completely charged when all five LEDs of<br />
indicator 21 light up continuously. The charge procedure is<br />
automatically ended.<br />
Disconnect the charger from the mains supply and the battery<br />
pack from the charger.<br />
When disconnecting the battery pack from the charger, the<br />
battery pack is automatically switched off.<br />
The battery pack can now be inserted into the <strong>eBike</strong>.<br />
Troubleshooting – Causes and Corrective<br />
Measures<br />
Cause Corrective Measure<br />
Two LEDs of the battery<br />
pack flashing<br />
Battery pack defective Refer to an authorised bicycle<br />
dealer<br />
Three LEDs of the battery<br />
pack flashing<br />
Battery pack too warm or too<br />
cold<br />
Disconnect the battery pack<br />
from the charger and allow to<br />
adjust to the ambient temperature<br />
until the charging-temperature<br />
range is reached.<br />
Do not connect the battery<br />
pack to the charger until it has<br />
reach the allowable charging<br />
temperature.<br />
No charging procedure possible (no indication on battery<br />
pack)<br />
Plug not inserted correctly Check all plug connections<br />
Contacts of battery pack<br />
soiled<br />
Ventilation openings 32 of<br />
the charger clogged or contaminated<br />
Socket outlet, cable or charger<br />
defective<br />
Carefully clean the contacts<br />
of the battery pack<br />
Clean ventilation openings<br />
32 and set up charger well<br />
ventilated<br />
Check mains voltage, have<br />
charger checked through<br />
bicycle dealer<br />
Battery pack defective Refer to an authorised bicycle<br />
dealer<br />
0 276 001 Y45 | (12.10.12) <strong>Bosch</strong> <strong>eBike</strong> <strong>Systems</strong>
OBJ_BUCH-1557-002.book Page 14 Friday, October 12, 2012 12:14 PM<br />
Maintenance and Service<br />
Maintenance and Cleaning<br />
If the charger should fail, please refer to an authorised bicycle<br />
dealer.<br />
After-sales Service and Customer Assistance<br />
In case of questions concerning the charger, please refer to an<br />
authorised bicycle dealer.<br />
For contact data of authorised bicycle dealers, please refer to<br />
www.bosch-ebike.com<br />
Disposal<br />
Battery chargers, accessories and packaging should be sorted<br />
for environmental-friendly recycling.<br />
Do not dispose of battery chargers into household waste!<br />
Only for EC countries:<br />
According to the European Guideline<br />
2002/96/EC for Waste Electrical and Electronic<br />
Equipment and its implementation<br />
into national right, battery chargers that are<br />
no longer usable must be collected separately<br />
and disposed of in an environmental<br />
correct manner.<br />
Subject to change without notice.<br />
<strong>English</strong>–14<br />
<strong>Bosch</strong> <strong>eBike</strong> <strong>Systems</strong> 0 276 001 Y45 | (12.10.12)