ADAM-6066 User Manual
ADAM-6066 User Manual
ADAM-6066 User Manual
- TAGS
- manual
- www.kgs.no

Create successful ePaper yourself
Turn your PDF publications into a flip-book with our unique Google optimized e-Paper software.
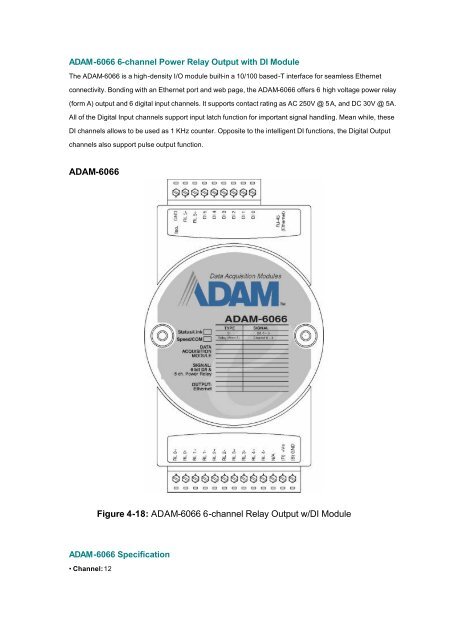
<strong>ADAM</strong>-<strong>6066</strong> 6-channel Power Relay Output with DI Module<br />
The <strong>ADAM</strong>-<strong>6066</strong> is a high-density I/O module built-in a 10/100 based-T interface for seamless Ethernet<br />
connectivity. Bonding with an Ethernet port and web page, the <strong>ADAM</strong>-<strong>6066</strong> offers 6 high voltage power relay<br />
(form A) output and 6 digital input channels. It supports contact rating as AC 250V @ 5A, and DC 30V @ 5A.<br />
All of the Digital Input channels support input latch function for important signal handling. Mean while, these<br />
DI channels allows to be used as 1 KHz counter. Opposite to the intelligent DI functions, the Digital Output<br />
channels also support pulse output function.<br />
<strong>ADAM</strong>-<strong>6066</strong><br />
Figure 4-18: <strong>ADAM</strong>-<strong>6066</strong> 6-channel Relay Output w/DI Module<br />
<strong>ADAM</strong>-<strong>6066</strong> Specification<br />
• Channel: 12
Figure 2: <strong>ADAM</strong>-<strong>6066</strong> Digital Input (Dry Contact) Wiring<br />
Figure 3: <strong>ADAM</strong>-<strong>6066</strong> Relay Output Wiring
<strong>ADAM</strong>-<strong>6066</strong> Configuration<br />
Step 1 : Please change the IP address of the configuration PC as 10.0.0.XXX.<br />
Step 2 : Please open the <strong>ADAM</strong>-5000TCP -6000 utility software<br />
Step 3 : The utility software will automatically scan the <strong>ADAM</strong>-6000 modules. Please wait for the<br />
<strong>ADAM</strong>-<strong>6066</strong> being found by utility software.<br />
Step 4 : Please go the “Network” page to change the IP address of <strong>ADAM</strong>-<strong>6066</strong> module to be<br />
compatible with user’s existing network and set the host idle time out value (the <strong>ADAM</strong>-6000<br />
module can only accept 8 connection from host station. Any host station doesn’t request the<br />
communication with this <strong>ADAM</strong>-6000 module over the time out setting, the connection of this host<br />
station will be released for the other stations) then press “Apply” to download the new IP address<br />
to <strong>ADAM</strong>-<strong>6066</strong> module (the default password for the changing configuration is “00000000”).
Step 5 : Re-configuring the IP address of the configuration PC to be the original setting<br />
(compatible with user’s existing network) then re-start the utility software. The software will<br />
automatically search the <strong>ADAM</strong>-<strong>6066</strong> module again.
Step 6 : Please click on the “<strong>6066</strong>” to go to the <strong>ADAM</strong>-<strong>6066</strong> configuration main page.<br />
Step 7 : Please go to “Communication WDT” to set up the communication watchdog timer setting.<br />
This function is used for security protect, it means sometimes, noise or other reasons will cause<br />
the communication fail, and the host PC won’t control the modules anymore, but the modules will<br />
keep the latest output status, and this status may cause dangerous, so while this situation<br />
happen, the communication WDT will detect it till timeout then reset the module and set the<br />
output to safety value to prevent the dangerous, user can set the safety value by themselves.
Step 8 : Please go to the left windows to click the “+” beside “<strong>6066</strong> to extend the tree path of<br />
<strong>ADAM</strong>-<strong>6066</strong> configuration then click on “DO:XX” to access the digital output channel<br />
configuration page. The digital output channel of <strong>ADAM</strong>-<strong>6066</strong> can be configured as typical DO<br />
output, pulse output, DO with LO to Hi delay or DO with Hi to LO delay:<br />
For typical DO setting :<br />
For Pulse Output setting :<br />
<strong>User</strong> can set the Lo/Hi sign width based on exact requirement. The <strong>ADAM</strong>-<strong>6066</strong> pulse<br />
output also support the limited count and continuous pulse output (please select this<br />
function in the block of “How Many Pulse Count to Output”.
Please click the “Update” to download the configuration into <strong>ADAM</strong>-<strong>6066</strong> module then<br />
clicking the “To start pulse output ” to initiate the pulse output action.<br />
For “Lo to Hi delay” and “Hi to Lo delay” function :
Step 9 : Please click on “DI:XX” to access the digital input configuration page. The digital input<br />
channel of <strong>ADAM</strong>-<strong>6066</strong> supports typical DI, counter, frequency, Lo to Hi Latch and Hi to Lo Latch.<br />
For typical DI setting :
For Counter se tting :<br />
For Frequency setting :
For “Lo to Hi Latch” and “Hi to Lo Latch” setting :
Data Stream<br />
Data Stream Configuration<br />
In addition to TCP/IP communication protocol, <strong>ADAM</strong>-6000 supports UDP communication<br />
protocol to regularly broadcast data to specific host PCs.<br />
Click the tab of Data Stream, then configure the broadcasting interval and the specific IP<br />
addresses which need to receive data from the specific <strong>ADAM</strong>-6000 I/O module. This UDP Data<br />
Stream function broadcasts up to 8 host PCs simultaneously, and the interval is user-defined<br />
from 50ms to 7 Days.
Data Stream Monitoring<br />
After finishing the configuration of Data Stream, you can select the item “Monitor Data Stream” in<br />
the function bar or click icon to call up operation display as below Figure.<br />
Select the IP address of the <strong>ADAM</strong>-6000 you want to read data, then click “Start ” button. The<br />
Utility software will begin to receive the stream data on this operation display.
Firmware and Web Page Update<br />
<strong>ADAM</strong>-6000 I/O modules are available to remote download firmware for customization web pages<br />
or new functions upgrade. Select the Firmware Upgrade tab and click the “Browsing” button to<br />
find the specific firmware (*.bin) for upgrade.<br />
Click the upgrade button, then the new firmware will be downloaded into the specific <strong>ADAM</strong>-6000<br />
module.