2 Inch LED Recessed LIGHTING - Prescolite
2 Inch LED Recessed LIGHTING - Prescolite
2 Inch LED Recessed LIGHTING - Prescolite

Create successful ePaper yourself
Turn your PDF publications into a flip-book with our unique Google optimized e-Paper software.
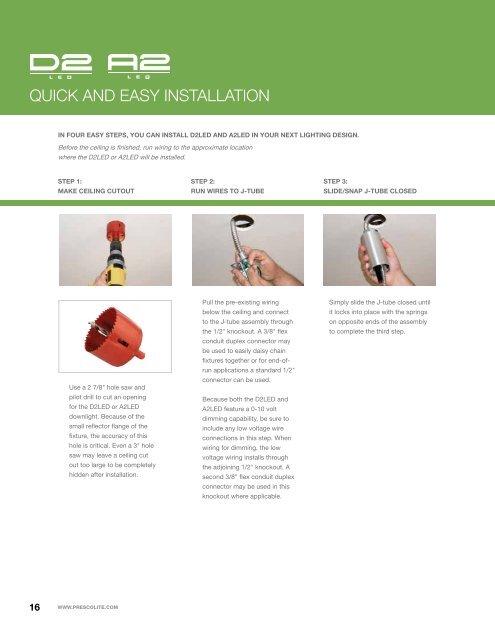
quIck ANd eAsY INsTALLATION<br />
16<br />
In four EAsy stEPs, you cAn InstALL D2<strong>LED</strong> AnD A2<strong>LED</strong> In your nExt LIghtIng DEsIgn.<br />
Before the ceiling is finished, run wiring to the approximate location<br />
where the D2<strong>LED</strong> or A2<strong>LED</strong> will be installed.<br />
stEP 1:<br />
mAkE cEILIng cutout<br />
Use a 2 7/8" hole saw and<br />
pilot drill to cut an opening<br />
for the D2<strong>LED</strong> or A2<strong>LED</strong><br />
downlight. Because of the<br />
small reflector flange of the<br />
fixture, the accuracy of this<br />
hole is critical. Even a 3" hole<br />
saw may leave a ceiling cut<br />
out too large to be completely<br />
hidden after installation.<br />
WWW.PRESCOLITE.COM<br />
stEP 2:<br />
run WIrEs to J-tuBE<br />
Pull the pre-existing wiring<br />
below the ceiling and connect<br />
to the J-tube assembly through<br />
the 1/2" knockout. A 3/8" flex<br />
conduit duplex connector may<br />
be used to easily daisy chain<br />
fixtures together or for end-ofrun<br />
applications a standard 1/2"<br />
connector can be used.<br />
Because both the D2<strong>LED</strong> and<br />
A2<strong>LED</strong> feature a 0-10 volt<br />
dimming capability, be sure to<br />
include any low voltage wire<br />
connections in this step. When<br />
wiring for dimming, the low<br />
voltage wiring installs through<br />
the adjoining 1/2" knockout. A<br />
second 3/8" flex conduit duplex<br />
connector may be used in this<br />
knockout where applicable.<br />
stEP 3:<br />
sLIDE/snAP J-tuBE cLosED<br />
Simply slide the J-tube closed until<br />
it locks into place with the springs<br />
on opposite ends of the assembly<br />
to complete the third step.