

Indirect, Through-Pass, Solar Food Dryer - Small Farm ...
Indirect, Through-Pass, Solar Food Dryer - Small Farm ...
Indirect, Through-Pass, Solar Food Dryer - Small Farm ...

You also want an ePaper? Increase the reach of your titles
YUMPU automatically turns print PDFs into web optimized ePapers that Google loves.
Homebrew<br />
The Design, Construction, and Use of an<br />
<strong>Indirect</strong>, <strong>Through</strong>-<strong>Pass</strong>, <strong>Solar</strong> <strong>Food</strong> <strong>Dryer</strong><br />
Dennis Scanlin<br />
©1997 Dennis Scanlin<br />
Drying is our oldest<br />
method of food<br />
preservation. For<br />
several thousand years<br />
people have been<br />
preserving dates, figs,<br />
apricots, grapes, herbs,<br />
potatoes, corn, milk, meat,<br />
and fish by drying. Until<br />
canning was developed at<br />
the end of the 18th century,<br />
drying was virtually the only<br />
method of food<br />
preservation. It is still the<br />
most widely used method.<br />
Drying is an excellent way<br />
to preserve food and solar<br />
food dryers are an<br />
appropriate food<br />
preservation technology for<br />
a sustainable world.<br />
<strong>Food</strong> scientists have found that by reducing the<br />
moisture content of food to between 10 and 20%,<br />
bacteria, yeast, mold and enzymes are all prevented<br />
from spoiling it. The flavor and most of the nutritional<br />
value is preserved and concentrated. Vegetables, fruits,<br />
meat, fish and herbs can all be dried and can be<br />
preserved for several years in many cases. They only<br />
have 1/3 to 1/6 the bulk of raw, canned or frozen foods<br />
and only weigh about 1/6 that of the fresh food product.<br />
They don’t require any special storage equipment and<br />
are easy to transport.<br />
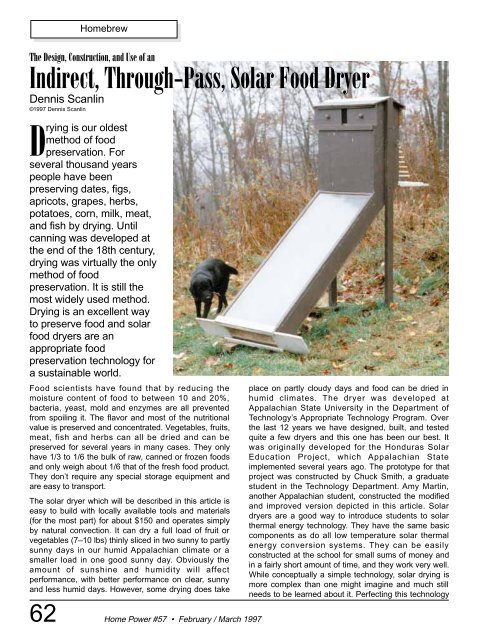
The solar dryer which will be described in this article is<br />
easy to build with locally available tools and materials<br />
(for the most part) for about $150 and operates simply<br />
by natural convection. It can dry a full load of fruit or<br />
vegetables (7–10 lbs) thinly sliced in two sunny to partly<br />
sunny days in our humid Appalachian climate or a<br />
smaller load in one good sunny day. Obviously the<br />
amount of sunshine and humidity will affect<br />
performance, with better performance on clear, sunny<br />
and less humid days. However, some drying does take<br />
62 Home Power #57 • February / March 1997<br />
place on partly cloudy days and food can be dried in<br />
humid climates. The dryer was developed at<br />
Appalachian State University in the Department of<br />
Technology’s Appropriate Technology Program. Over<br />
the last 12 years we have designed, built, and tested<br />
quite a few dryers and this one has been our best. It<br />
was originally developed for the Honduras <strong>Solar</strong><br />
Education Project, which Appalachian State<br />
implemented several years ago. The prototype for that<br />
project was constructed by Chuck Smith, a graduate<br />
student in the Technology Department. Amy Martin,<br />
another Appalachian student, constructed the modified<br />
and improved version depicted in this article. <strong>Solar</strong><br />
dryers are a good way to introduce students to solar<br />
thermal energy technology. They have the same basic<br />
components as do all low temperature solar thermal<br />
energy conversion systems. They can be easily<br />
constructed at the school for small sums of money and<br />
in a fairly short amount of time, and they work very well.<br />
While conceptually a simple technology, solar drying is<br />
more complex than one might imagine and much still<br />
needs to be learned about it. Perfecting this technology
Above: Yum...the apples are almost ready.<br />
has been one of our goals and while we are not there<br />
yet, over the years we have come up with some<br />
designs that work pretty well. This article will describe<br />
guidelines for designing, constructing and using a solar<br />
food dryer.<br />
Factors affecting food drying<br />
There are three major factors affecting food drying:<br />
temperature, humidity and air flow. They are interactive.<br />
Increasing the vent area by opening vent covers will<br />
decrease the temperature and increase the air flow,<br />
without having a great effect on the relative humidity of<br />
the entering air. In general more air flow is desired in<br />
the early stages of drying to remove free water or water<br />
around the cells and on the surface. Reducing the vent<br />
area by partially closing the vent covers will increase<br />
the temperature and decrease the relative humidity of<br />
the entering air and the air flow. This<br />
would be the preferred set up during<br />
the later stages of drying when the<br />
bound water needs to be driven out<br />
of the cells and to the surface.<br />
Temperature<br />
There is quite a diversity of opinion<br />
on the ideal drying temperatures.<br />
<strong>Food</strong> begins cooking at 180˚F so<br />
one would want to stay under this<br />
temperature. All opinions surveyed<br />
fall between 95° and 180˚F, with<br />
110°–140˚F being most common.<br />
Recommended temperatures vary<br />
depending on the food bring dried.<br />
Our experience thus far and the<br />
research of quite a few others leads<br />
to the conclusion that in general<br />
higher temperatures (up to 180˚F)<br />
increase the speed of drying. One<br />
study found that it took<br />
Home Power #57 • February / March 1997<br />
Homebrew<br />
approximately 5 times as long to dry food at 104˚F as it<br />
did at 176˚F. Higher temperatures (135°–180˚F) also<br />
destroy bacteria, enzymes (158˚F), fungi, eggs and<br />
larvae. <strong>Food</strong> will be pasteurized if it is exposed to 135˚F<br />
for 1 hour or 176˚F for 10–15 min. Most bacteria will be<br />
destroyed at 165˚F and all will be prevented from<br />
growing between 140°–165°. Between 60° and 140˚F<br />
bacteria can grow and many will survive, although<br />
bacteria, yeasts and molds all require 13% or more<br />
moisture content for growth which they won’t have in<br />
most dried foods.<br />
Some recommended drying temperatures are:<br />
Fruits and Vegetables: (except beans and rice):<br />
100°–130°F (Wolf, 1981); 113°–140° (NTIS, 1982);<br />
temperatures over 65°C (149°F) can result in sugar<br />
caramelization of many fruit products<br />
Meat: 140°–150° F (Wolf, 1981)<br />
Fish: no higher than 131°F (NTIS, 1982); 140°-150°<br />
(Wolf, 1981)<br />
Herbs: 95°–105°F (Wolf, 1981)<br />
Livestock Feed: 75°C (167°F) maximum temperature.<br />
(NTIS, 1982)<br />
Rice, Grains, Seeds, Brewery Grains: 45°C (113°F)<br />
maximum temperature. (NTIS, 1982)<br />
Temperatures Obtainable in our Appalachian <strong>Dryer</strong><br />
Our Appalachian dryer, with a reflector added, has<br />
reached temperatures over 200˚F on a sunny 75˚F day<br />
with all the vents closed. Preliminary experiences with a<br />
4' long reflector have demonstrated a 20˚F rise in the<br />
Below: Adjusting the vents and testing (tasting?) the progress.<br />
63
Temperature in Degrees Fahrenheit<br />
Chart 1<br />
150°<br />
100°<br />
50°<br />
Top<br />
Homebrew<br />
Bottom<br />
9 am 12 pm 3 pm 6 pm<br />
Time of Day for October 15, 1996<br />
Ambient<br />
dryer temperature and a decrease in drying time. By<br />
fully opening the vents the temperature can be brought<br />
down to within 10° or 20° higher than the ambient<br />
temperature. The dryer can operate for most of the day<br />
between 120° and 155˚F by opening the exhaust vents<br />
1–2" (10–20 sq. in.). These are the temperatures at the<br />
bottom of the food drying area when the dryer has just<br />
been filled with food and a reflector is being used. The<br />
temperature drops significantly as it passes through the<br />
moist food. Chart 1 shows: the temperatures below the<br />
bottom tray of food, the temperatures above the top tray<br />
of food, and the ambient temperatures, right after a full<br />
load of 25 sliced apples (about 8 lbs) had been placed<br />
in the dryer. The dryer on this day had a reflector on it.<br />
It was a clear sunny day with relative humidities<br />
between 62 and 93%. By the end of the day, apples on<br />
bottom 5 trays were dry, some apples on top 5 trays<br />
were not. The temperatures were recorded with a Pace<br />
Scientific Pocket Logger, model XR220, 1401<br />
McLaughlin Drive, P.O. Box 10069, Charlotte, NC<br />
28212, (704) 5683691<br />
Chart 2 shows a dryer operating in the afternoon of its<br />
second day of drying a load of food. One can see how<br />
the temperatures increase in the top of the dryer, as the<br />
food in the top of the dryer dries. This test was not<br />
using a reflector. By the end of this day all apples slices<br />
were bone dry, almost like crackers.<br />
Possible temperature related problems<br />
There are a couple of potential problems associated<br />
with higher temperatures. One study reported slightly<br />
higher vitamin C loss in fruits dried at 167˚F than at<br />
131˚F. Greater vitamin loss has also been reported for<br />
the direct style of food dryer which exposes the food<br />
directly to the sun’s radiation (ASES, 1983). However,<br />
there are many other factors that affect vitamin loss and<br />
the losses are different for different foods and different<br />
vitamins. I need to explore this topic more fully.<br />
Case hardening is another potential problem associated<br />
with drying at higher temperatures. If the temperature of<br />
air is high and the relative humidity is low, there is the<br />
64 Home Power #57 • February / March 1997<br />
possibility that surface moisture will be removed more<br />
rapidly than interior moisture can migrate to the surface.<br />
The surface can harden and retard the further loss of<br />
moisture. <strong>Solar</strong> dryers start off at low temperatures and<br />
high humidity and thus avoid this problem, I believe. At<br />
least I have not observed it.<br />
Air flow and velocity<br />
The second of three factors affecting food drying is air<br />
flow, which is the product of the air velocity and vent<br />
area. The drying rate increases as the velocity and<br />
quantity of hot air flowing over the food increases.<br />
Natural convection air flow is proportional to vent area,<br />
dryer height (from air intake to air exhaust), and<br />
temperature. However air flow is also inversely<br />
proportional to the temperature in a solar dryer. As the<br />
air flow increases by opening an exhaust vent the dryer<br />
temperature will decrease. Ideally one would want both<br />
high temperatures and air flow. This can be difficult to<br />
achieve in a solar dryer.<br />
Air velocity in a natural convection collector is affected<br />
by the distance between the air inlet and air exhaust,<br />
the temperature inside the dryer and the vent area. The<br />
greater the distance, temperature and vent area the<br />
greater the velocity. It is often measured in feet per<br />
minute (FPM) or meters per second. With constant<br />
temperatures, 230 FPM air velocity drys twice as<br />
rapidly as still air; at 460 FPM drying occurs three times<br />
more rapidly than in still air (Desrosier, 1963). Axtell &<br />
Bush (1991) suggest air velocities between 0.5 to 1.5<br />
meters per second which is about 100 to 300 FPM.<br />
Desrosier (1963) suggests even higher air velocities<br />
between 300 to 1000 FPM.<br />
The quantity of air, measured in cubic feet per minute<br />
(CFM) or cubic meters per minute, is the product of<br />
velocity and area of the exhaust vent. Morris (1981)<br />
recommends 2–4 CFM per square foot of collector for<br />
an efficient performing natural convection solar air<br />
heater. If the air flows are too slow the collector will heat<br />
Temperature in Degrees Fahrenheit<br />
Chart 2<br />
130°<br />
120°<br />
110°<br />
100°<br />
90°<br />
80°<br />
1:30 pm<br />
Top<br />
Bottom<br />
Ambient<br />
2:00 pm 2:30 pm 3:00 pm 3:30 pm<br />
Time of Day for October 13, 1996<br />
4:00 pm
up and lose more heat to the air surrounding it. An<br />
efficient solar thermal collector should not feel hot to the<br />
touch. NTIS (1982) suggests 1/3 to 1/2 cubic meters<br />
per minute (11.5 to 17.5 CFM) per cubic meter of dryer<br />
volume as being a good flow rate for solar dryers.<br />
Most designers of fossil fuel powered industrial food<br />
drying systems recommend considerably higher flows.<br />
Axtell & Bush (1991) of the Intermediate Technology<br />
Development Group (ITDG) recommend between 0.3 to<br />
0.5 cubic meters per second or about 600 and 1000<br />
CFM. Desrosier (1963) recommends 250 CFM per SF<br />
of drying surface. For the dryer described in this article<br />
with 18 SF of drying surface that would equal a little<br />
over 4,500 CFM.<br />
Measured air velocities and flows<br />
in the Appalachian dryer<br />
Our solar dryers are only able to achieve air velocities<br />
between 50 and 130 FPM with natural convection. Less<br />
than most of the 100 to 1000 FPM range<br />
recommended. Air velocities were measured in the<br />
solar collector’s air flow channel with a Kurtz 490 series<br />
mini-anemometer.<br />
Our dryer also has less total air flow than is<br />
recommended by most. During normal operation it<br />
allows 25–60 CFM. A tremendous difference from the<br />
600 to 4500 CFM recommended for industrial drying<br />
systems. It has around 9 SF of glazing and should<br />
allow, according to Morris, 18 to 36 CFM for efficient<br />
collector performance. Our drying volume is about 3<br />
cubic feet (0.08 cubic meters) and would according to<br />
NTIS need between 1 to 1.5 CFM. Quite a bit less than<br />
recommended by Morris for efficient collector<br />
performance and also less than our dryer’s normal<br />
operating performance.<br />
Increasing air flows and air velocity seems to have<br />
potential for increasing the performance of solar dryers.<br />
Unfortunately as the air flow increases the temperature<br />
Temperature in Degrees Fahrenheit<br />
Chart 3<br />
140°<br />
130°<br />
120°<br />
110°<br />
100°<br />
90°<br />
80°<br />
70°<br />
60°<br />
Bottom<br />
Ambient<br />
12:00 pm 12:30 pm 1:00 pm 1:30 pm 2:00 pm<br />
Time of Day for October 6, 1996<br />
2:30 pm<br />
Home Power #57 • February / March 1997<br />
Homebrew<br />
decreases in a solar dryer. Chart 3 depicts the<br />
temperature decline when the vents are fully opened<br />
from a 1 1/2" opening and then almost fully closed. We<br />
have found temperature to be more significant than air<br />
flow in affecting the speed or rate of drying and so we<br />
usually reduce the air flows by partially closing the<br />
exhaust vents to increase the temperature. By<br />
increasing the power or performance of our solar<br />
collector greater air flows will be possible while<br />
maintaining high temperatures.<br />
Relative Humidity<br />
While not something one can do much about, the<br />
relative humidity is the third factor affecting food drying.<br />
The higher the humidity the longer the drying will take.<br />
More air will be required and the temperatures will need<br />
to be higher. Each 27˚F increase in temperature<br />
doubles the moisture holding capacity of the air<br />
(Desrosier,1963). In the Appalachian region where we<br />
have tested our dryers we normally have a relative<br />
humidity throughout the summer and early fall of 55 to<br />
100%. This moist air can’t hold as much moisture as<br />
less humid air could and as a result drying takes longer<br />
than it might in a dryer climate. This humidity also<br />
makes higher temperatures desirable for our climate.<br />
How to get the correct temperature and air flow<br />
The temperature obtainable in the dryer will be affected<br />
by several things: area of south facing glazing,<br />
insulation, air-tightness, area of vent opening, and<br />
ambient temperature. The area of south facing glazing<br />
is an important design decision. The dryer pictured has<br />
9.2 SF of south facing glazing and approximately 3 CF<br />
of drying volume or 3 SF of glazing for every 1 CF of<br />
drying chamber. This is a good ratio. If one is interested<br />
in drying speed, increasing the ratio of glazing SF per<br />
cubic foot of dryer volume, adding more insulation<br />
and/or adding a reflector to the dryer would be<br />
desirable. This will allow one to increase the<br />
temperatures, air velocities and total air flow; and<br />
decrease the drying time. The temperature rise in the<br />
dryer described can be as high as 125˚F above ambient<br />
with a reflector and all vents closed. Normal<br />
temperature rises without a reflector and with both<br />
exhaust vents opened 1–3" (12–36 square inches)<br />
would be 50 to 70˚F. As mentioned previously, our<br />
preliminary testing indicates about a 20˚F increase in<br />
temperature by adding a reflector. The maximum<br />
temperature observed was 204˚F. The higher Delta T’s<br />
and maximum temperatures will be reached with<br />
exhaust vent opening area reduced.<br />
Designing for good air flows involves quite a few<br />
considerations. The air flow channel should be properly<br />
sized. The depth of the channel should be 1/15 to<br />
1/20th the length of the collector. Making the air flow<br />
65
Homebrew<br />
path as aerodynamic as possible is also desirable;<br />
especially for a natural convection collector. Although<br />
turbulence created by fins on the back of an absorber<br />
plate or corrugated metal has been shown to deliver as<br />
much as 40% more heat in active systems (Morris,<br />
1981). One should try to keep the intake and exhaust<br />
vents spread as evenly as possible along the width of<br />
the collector to allow easy air movement. The intake and<br />
exhaust area and profile should ideally be the same or<br />
larger than the air flow channel. Air flow rates can be<br />
increased, while keeping temperatures up between<br />
140˚F and 175˚F, by constructing a larger, more efficient,<br />
better insulated collector and/or adding a reflector to the<br />
collector. Increasing the size and/or performance of the<br />
collector can also increase air velocity by increasing the<br />
temperature inside the dryer. A larger, more efficient or<br />
powerful collector will allow one to more fully open up<br />
the vents thus increasing the CFM or volume of air<br />
moving through the dryer, while still keeping the<br />
temperatures high in the dryer. The dryer described here<br />
has 2 exhaust vents with a total of about 1.6 square feet<br />
of exhaust vent area. With the vents completely open<br />
the maximum temperature attainable on a sunny 70˚F<br />
day is only about 85˚F and so we normally decrease the<br />
vent area and CFM of air flow to increase the<br />
temperature and decrease the drying time. The area of<br />
exhaust vent during normal operation for several dryers<br />
we have designed and constructed is 10 square inches<br />
or less. This enables the dryer to achieve temperatures<br />
over 130˚F and still allow air flow. It is desirable to have<br />
adjustable vent covers so one can adjust for different<br />
foods and weather conditions. Ideally the temperature in<br />
a food dryer should be controllable. The air velocity<br />
could also be improved by adding a fan, possibly PV<br />
powered as has been discussed in a previous HP<br />
article, or tall chimneys. Adding chimneys to a dryer and<br />
increasing the distance between the air inlet and<br />
exhaust will increase the velocity and volume of air<br />
moving through the dryer.<br />
Collector design<br />
The dryer uses a “<strong>Through</strong> <strong>Pass</strong>” collector configuration.<br />
<strong>Solar</strong> energy passes through a glazing material and is<br />
absorbed by 5 layers of black aluminum window<br />
screening diagonally positioned in the air flow channel.<br />
The air around the absorber, the black screen, is heated<br />
and rises into the drying chamber. A slight vacuum or<br />
negative pressure is created by the rising air which<br />
draws in additional air through the inlet vent and the<br />
aluminum mesh absorber. This air is heated and the<br />
process continues (Illustration 1).<br />
<strong>Through</strong> pass mesh type absorbers can outperform<br />
plate type absorbers by quite a bit if properly designed<br />
because the air must pass through the mesh resulting<br />
66 Home Power #57 • February / March 1997<br />
Illustration 1<br />
in excellent heat transfer (Morris, 1981). At Appalachian<br />
State we have compared the various absorber plate<br />
configurations and have found the diagonally positioned<br />
mesh type absorbers to produce the highest<br />
temperatures inside a box connected to the collector.<br />
Expanded wire lathe is recommended by some for the<br />
mesh but needs to be painted and didn’t perform any<br />
better in our tests than the window screening. Using<br />
stock black or dark gray aluminum window screen<br />
eliminates having to paint the absorber and is less<br />
expensive and time consuming than other options. The<br />
bottom of the air flow channel can be painted black or<br />
some dark color to absorb any solar energy that gets<br />
through the mesh or possibly painted a light or<br />
reflective color to reflect sunlight back on to absorber<br />
mesh. Morris (1981) recommends a dark color, when<br />
we experimented with this we found similar<br />
performance with both strategies.<br />
Another characteristic of our collector is it’s U-tube<br />
design. In addition to the air flow channel right below<br />
the glazing, there is a second air flow channel right<br />
below the first one and separated by a 1/2" thick piece<br />
of polyisocyanurate foam insulation board. This allows<br />
air to circulate when the vents are closed to increase<br />
the temperatures for pasteurization or to recycle air that<br />
has not absorbed much moisture in the latter stages of<br />
drying (Illustration 2).<br />
When the vents are open most air will be drawn up in<br />
the top air channel and the bottom channel helps to<br />
reduce heat loss to the outside through the bottom of<br />
the dryer. The measured air flow velocity in this bottom<br />
channel was about 15 FPM with the two exhaust vents
Illustration 2<br />
open 1.5" each and went up to about 25 FPM when all<br />
vents were closed. This seems to support the recycling<br />
theory. I’m not sure this feature is necessary; but, it<br />
doesn’t seem to hurt the performance and may be<br />
helpful some times. We need to look at this some more.<br />
One significant decision, in addition to size, which<br />
needs to be made when designing an air heating solar<br />
collector is what depth should the air flow channel be.<br />
The air flow channel depth for a through pass collector<br />
should be 1/20 the length of the collector (Morris,<br />
1981). The collector pictured is 60" long and has a 3"<br />
air deep air space (1/20 x 60") in both air flow channels.<br />
Any kind of glazing will work for this design.<br />
Appalachian’s dryer has two layers of glazing; the outer<br />
is Sun-Lite HP, a fiberglass reinforced polyester (FRP),<br />
often referred to as Kalwall. It is available from <strong>Solar</strong><br />
Components Corporation for about $2.00/SF (121<br />
Valley Street, Manchester, NH,03103-6211, (603) 668-<br />
8186). The inner glazing is Teflon manufactured by the<br />
DuPont Company, (Barley Mill Plaza 30-2166, P.O. Box<br />
80030, Wilmington, DE 19880-0030, (302) 892-7835).<br />
There is a 3/4" air space between the two layers and<br />
the glazings are caulked in place. The dryer should face<br />
due south for best stationary performance. The altitude<br />
angle of the glazing above horizontal should be the<br />
compliment of the average noon altitude angle of the<br />
sun at your latitude for the months you expect to be<br />
using the dryer or your latitude minus 10˚, if you<br />
primarily intend to use it during the later part of the<br />
summer and early part of fall. For our latitude here in<br />
Boone, NC of 36˚ that would be 26˚. The dryer pictured<br />
has an angle of 36˚.<br />
The sides and bottom of the collector and the sides,<br />
Home Power #57 • February / March 1997<br />
Homebrew<br />
door and top of the drying chamber are insulated with<br />
1/2" Celotex Tuff-R polyisocyanurate foam insulation. It<br />
normally is covered with an aluminum foil. I am going to<br />
use 3/4" in the next one constructed. Making sure you<br />
tightly construct the collector by making good tight<br />
fitting joints, especially the door, and using caulks<br />
and/or gasket material is also desirable. And finally<br />
adding a reflector to the dryer and properly positioning it<br />
(about 20˚ above horizontal in early October to 40˚ in<br />
mid July at 36˚ N LAT) will improve the performance.<br />
Materials Needed (approximate cost is $150, excluding<br />
stainless steel shelf screen)<br />
One 4' x 8' 3/4" CDX exterior plywood for sides, vent<br />
covers and door<br />
One 4' x 8' 1/4" exterior plywood for bottom, roof and<br />
south wall of drying box<br />
approx. 12 - 8' long 1x2 pine<br />
Two 8' long PT 2x4 for dryer legs<br />
Water resistant glue<br />
Caulk or glazing tape<br />
Eight 1/4" X 2 1/4" lag bolts and washers<br />
24" wide by 30' long piece of black or dark gray<br />
aluminum window screen (.65/FT)<br />
Ten 21" x 14.5" Stainless steel screen for drying<br />
shelves ($6.62/SF) adds another $150 to cost or could<br />
use a vinyl or vinyl clad fiberglass screen for about<br />
.35/SF<br />
24" X 12 ft. 0.040 Sun Lite HP plastic glazing<br />
($1.85/SF)<br />
Two 3 1/4" strap hinges approx.<br />
Fifty 1 1/2" galvanized deck screws<br />
paint<br />
Two 2" hook and eyes<br />
One 4' x 8' 3/4" celotex foil faced polyisocyanurate<br />
insulation board<br />
<strong>Dryer</strong> Construction and Details<br />
The dryer is primarily constructed of 3/4" exterior<br />
plywood, 1/4" exterior plywood, 3/4" celotex insulation<br />
board, dark aluminum screening, glazing, some 3/4"<br />
thick pine boards, and wood screws. The cutout<br />
illustrations (Illustration 3 & 4) dimension the layout of<br />
the important plywood and insulation pieces.<br />
I tried to improve on the design depicted in this article<br />
by slightly increasing the glazed area (from about 9 to<br />
10 SF), the SF/CF ratio (from 3 to 3.5 SF/CF), the<br />
thickness of insulation used ( 1/2" to 3/4") and lowering<br />
the collector altitude angle (from 36˚ to 26˚) to improve<br />
late summer and early fall performance. I am also going<br />
to develop a larger and more permanent adjustable<br />
reflector. Verify the measurements before blindly cutting<br />
67
Illustration 3<br />
Illustration 4<br />
Homebrew<br />
68 Home Power #57 • February / March 1997
Illustration 5<br />
Home Power #57 • February / March 1997<br />
Homebrew<br />
everything out. I tried to be as accurate as I could;<br />
however, there may be some mistakes. The exploded<br />
isometric drawing (Illustration 5) and the multiview<br />
(Illustration 6) illustrate the basic construction.<br />
Basically begin by laying out the dryer sides, the door<br />
and the vent pieces on the 3/4" plywood. Cut these out<br />
with a skill or jig saw. Cut the 1/4" plywood bottom out<br />
with skill saw. Use the plywood side pieces to layout the<br />
insulation board dryer side pieces and cut with a razor<br />
knife. Glue the insulation to the plywood sides and then<br />
connect the sides together by gluing and screwing or<br />
nailing the plywood bottom on and screwing the 22 1/2"<br />
long wooden struts made from 1x2 stock in place.<br />
Illustration 7 describes the location of the most critical<br />
struts. Cut out insulation where the struts join the side<br />
pieces. Once the basic form is constructed everything<br />
else is applied as depicted in plans and photos.<br />
Using the dryer<br />
1) The initial phase of drying is more dependent on air<br />
flow than temperature, so keep the bottom vents<br />
completely open and the top about 1/2 open or more.<br />
After 1 to 2 hours reduce the top exhaust vent opening<br />
to 1"–3", leaving the bottom vents completely open, and<br />
Illustration 6<br />
69
Homebrew<br />
let the temperature rise. Keep the dryer under 180˚ F.<br />
Close all the vents at night to prevent rehydration of any<br />
food left in dryer. On cloudy days keep the bottom vents<br />
closed and the top vents almost closed to keep<br />
temperatures as high as possible.<br />
2) Keep everything as clean as possible; wash food<br />
gently in cold water 3) Get fruit and/or vegetables in<br />
dryer as quickly as possible after harvesting to preserve<br />
vitamins<br />
3) Remove blemished and woody areas of fruits and<br />
vegetables<br />
4) Consider blanching most vegetables, by exposing to<br />
steam for a few minutes and then dipping in ice water,<br />
to inactivate enzymes which can cause color, flavor and<br />
nutritional deterioration. Blanching helps preserve<br />
carotene, thiamine, and ascorbic acid. Blanching also<br />
makes cell membranes more permeable, which<br />
promotes more rapid drying and will kill potentially<br />
harmful micro-organisms. The blanched dried product<br />
will often have a softer texture when rehydrated.<br />
Blanching apricots, peaches and pears imparts a<br />
translucent appearance to the dehydrated product and<br />
Illustration 7<br />
70 Home Power #57 • February / March 1997<br />
can also be used for fruits which will not have<br />
detrimental color changes during drying: grapes, figs,<br />
plums and prunes. Don’t blanch onion, garlic,<br />
mushrooms, horseradish, herbs, or vegetables with<br />
cabbage like flavors<br />
5) Consider sulfuring fruits. Sulfuring helps preserve the<br />
light color of apples and apricots and also helps<br />
preserve ascorbic acid (C), and beta-carotene (A), and<br />
helps control microbiological and insect activity. It also<br />
protects delicate flavors and increases the shelf life of<br />
dried foods. Sulfuring involves burning elemental sulfur<br />
and exposing the fruit to the fumes for 1-5 hrs or<br />
dipping the fruit for 30 seconds in a 5–7% potassium<br />
metabisulfate solution. When fruit has been adequately<br />
sulfured the surface will be lustrous. Pretreating<br />
tomatoes with potassium metabisulfate prior to drying<br />
has been reported to significantly improve the taste and<br />
aroma of sauce made from the dried tomatoes. Sulfur<br />
flowers are available at pharmacies or use pure sulfur<br />
from garden centers. Use 1 tbls/lb of fruit. Thiamine is<br />
destroyed by sulfuring.<br />
6) Slice food thin (1/8") for most rapid drying and cut<br />
uniformly.<br />
7) Most vegetables should be dried until they feel<br />
distinctly dry and brittle, around 10% MC.<br />
8) If drying meat use lean meat, cut into very thin strips<br />
and marinate before drying. Beef, turkey, chicken, and<br />
salmon can all be dried.<br />
9) If drying fish keep temperatures under 131˚F to avoid<br />
cooking it and consider salting 1–2 days before drying.<br />
Salting retards bacterial action and aids in the removal<br />
of water by osmosis.<br />
10) The safe maximum percentages of water to leave in<br />
home dried produce are: no more than 10% for<br />
vegetables and no more than 20% for fruits (Hertberg et<br />
al., 1975). Fruit can be considered dry when it is<br />
leathery, suede-like, or springy. No wetness should
come out of a cut piece when squeezed. A few pieces<br />
squeezed together should fall apart and spring back<br />
when pressure is released. Vegetables should be<br />
brittle, or tough to brittle almost crisp like crackers or<br />
potato chips.<br />
11) Put screen over the intake and exhaust vents to<br />
keep insects out.<br />
Tips for Storing Dried <strong>Food</strong>s<br />
1) Cool food to room temperature before packaging<br />
2) Store dry fruits and vegetables in small, airtight,<br />
moisture, insect and rodent proof containers in dark,<br />
cool, dry and clean places. Glass jars, plastic bags, or<br />
plastic containers that can be sealed tightly are good.<br />
Store grains, roots, and legumes in places with good air<br />
circulation (NTIS, 1982).<br />
2) Dried meats and fish should be stored below 5°C<br />
(41°F) to avoid rancidity (NTIS. 1982).<br />
3) Most fruits and vegetables will keep for 6 months if<br />
stored at 70°F and 3-4 times that long at 52°F (Wolf,<br />
1981).<br />
4) Meat and Fish can be stored dried for several<br />
months in moisture proof, airtight containers. (Wolf,<br />
1981)<br />
5) If drying herbs store in uncapped jars for 24 hrs, if<br />
moisture collects, herbs need additional drying<br />
6) Refrigeration or freezing will extend life of dried food.<br />
7) Carefully label the food.<br />
Influence of dehydration on nutritional value of food<br />
While all methods of food preservation result in a<br />
degradation of the food quality and drying is no<br />
exception, drying food does increase the concentrations<br />
of proteins, fats and carbohydrates. Fresh peas are 7%<br />
protein and 17% carbohydrates; dried peas 25% protein<br />
and 65% carbohydrates. Fresh beef is 20% protein and<br />
dried is 55%. There is; however, a loss of vitamins. The<br />
extent of vitamin loss will be dependent upon the<br />
caution exercised during the preparation of the food for<br />
drying, the drying process selected, and storage of<br />
dried food. In general indirect drying methods such as<br />
the dryer described in this article retain more vitamins<br />
than sun drying or direct drying and also better than<br />
canning. Ascorbic acid, and carotene can be damaged<br />
by oxidative processes. Thiamin is heat sensitive and<br />
destroyed by sulfuring. The carotene content of<br />
vegetables is decreased by as much as 80% if dried<br />
without enzyme inactivation by blanching or sulfuring.<br />
Thiamin will be reduced by 15% in blanched vegetables<br />
and up to 75% in unblanched. In general more rapid<br />
drying will retain more ascorbic acid than slow drying.<br />
Usually dried meat has slightly fewer vitamins than<br />
Home Power #57 • February / March 1997<br />
Homebrew<br />
fresh. Fruits and vegetables are generally rich sources<br />
of carbohydrates and drying, especially direct sun<br />
drying, can deteriorate carbohydrates. The addition if<br />
sulfur dioxide is a means of controlling this<br />
deterioration.<br />
Influence of drying on Micro-organisms<br />
Living organisms require moisture; so by reducing the<br />
moisture we are able to reduce the ability of molds,<br />
bacteria, and yeasts from growing. Bacteria and yeasts<br />
generally require moisture contents over 30%. Drying<br />
food lower than 30% is no problem in a solar dryer.<br />
Molds however can grow with as little as 12%. Molds<br />
also require air, so as long as dried food is stored in an<br />
airtight container molds should not be a problem. Also if<br />
food was dried at over 140°F or if it was pasteurized<br />
prior to and after drying all 4 of the problem causing<br />
agents will be destroyed. Salt can be also used to<br />
control microbial activity if drying fish or meat. It is also<br />
important to start with clean food and utensils, and<br />
store food away from dust, rodents, insects and<br />
humidity.<br />
Influence of drying on Enzyme activity<br />
Enzymes are produced when plant tissues are<br />
damaged. Their production can lead to discoloration,<br />
loss of vitamins, and breakdown of tissues. Most<br />
enzymes are inactivated at 158˚F. They also require<br />
moisture to be active and their activity decreases with<br />
decreasing moisture. But dried food still has some<br />
moisture so food deterioration due to enzymes can still<br />
be a problem. Browning of fruit for example and loss of<br />
carbohydrate content. One minute of moist heat at 212<br />
F will inactivate enzymes. This can be achieved by<br />
blanching. Sulfuring also deactivates enzymes.<br />
Surprisingly dry heat does not affect enzymes very<br />
much. Short exposures to a dry 400°F has little effect.<br />
Blanching times vary. In general 1–3 minutes for leafy<br />
vegetables, 2–8 for peas, beans, and corn and 3–6 for<br />
potatoes, carrots, and similar vegetables.<br />
Access<br />
Author: Dennis Scanlin, 3137 George’s Gap Road,<br />
Vilas, NC 28692 • 704-297-5084<br />
Internet Email: Scanlindm@conrad.appstate.edu<br />
Sun-Lite HP glazing is available from <strong>Solar</strong><br />
Components Corporation, 121 Valley Street,<br />
Manchester, NH 03103-6211 • 603-668-8186<br />
Teflon glazing is manufactured by the DuPont, PO Box<br />
80030, Wilmington, DE 19880-0030 • 302-892-7835<br />
Reference List<br />
American <strong>Solar</strong> Energy Society (1983). Progress in <strong>Pass</strong>ive<br />
<strong>Solar</strong> Systems. Boulder, Colorado: American <strong>Solar</strong> Energy<br />
Society, p. 682.<br />
71
Homebrew<br />
Axtell, B.L. & Bush, A. (1991) Try dying it!: Case studies in the<br />
dissemination of tray drying technology. London, UK:<br />
Intermediate Technology Publications.<br />
Desrosier, N.W. (1963). The technology of food<br />
preservation.Westport, Conn.: Avi Publishing.<br />
Hertzberg, R., Vaughan, B., & Greene, J. (1976). Putting <strong>Food</strong><br />
By. New York: Bantam.<br />
International Labour Office (1986). Practical methods of food<br />
preservation.<br />
Martinez, P.S. (1985 ). Production characteristics of a solar<br />
heated drying plant. Sunworld, 13(1,19), 19-21.<br />
Morris, S. (1981). Retrofitting with Natural Convection<br />
Collectors. In T. Wilson (Ed.), Home Remedies: A Guidebook<br />
for Residential Retrofit (pp. 152 - 161). Philadelphia, PA: Mid-<br />
Atlantic <strong>Solar</strong> Energy Association.<br />
National Technical Information Service (NTIS). (1982).<br />
Improved <strong>Food</strong> Drying and Storage; a training manual.(report<br />
no. A360.33). Washington, DC: U.S. Peace Corps.<br />
Winter, Steven & Associates, Inc. (1983). The <strong>Pass</strong>ive <strong>Solar</strong><br />
Construction Handbook. Emmaus, Pa: Rodale Press.<br />
Wolf, R. (1981). <strong>Solar</strong> <strong>Food</strong> <strong>Dryer</strong> Preserves <strong>Food</strong> for Year-<br />
Round Use; Using <strong>Solar</strong> Energy. Emmaus, PA: Rodale Press.<br />
Propane<br />
Refrigerator<br />
DPR2260<br />
$995.00<br />
Plus Shipping<br />
Danby ®<br />
“Good things come in small packages”<br />
• 7.8 cu. ft. Capacity<br />
Refrigerator.<br />
• Reversible Door Hinges.<br />
• Door Liner has large,<br />
functional divisions,<br />
plus a molded Egg Rack.<br />
• Tall Upper Shelf<br />
accommodates 1 & 2 gal Jugs.<br />
• 3 Easy-glide Shelves<br />
and a Large Crisper.<br />
• Battery Powered Refrigerator<br />
Light.<br />
• Automatic Lighter<br />
(piezo-electric)<br />
• Automatic Safety Valve.<br />
• European Style Door<br />
with Recessed Handles.<br />
• Refrigerator is AGA & CGA<br />
Approved.<br />
• No Electricity Needed.<br />
(800) GO-SOLAR (467-6527) nrgoufit@cdsnet.net<br />
136 S. Redwood Hwy, POB 1888, Cave Junction, OR 97523<br />
Web Page: http://www.energyoutfitters.com<br />
Dealer<br />
Inquiries<br />
Invited<br />
MEMBER<br />
72 Home Power #57 • February / March 1997<br />
SNORKEL STOVE CO<br />
camera ready b/w<br />
3.5 wide<br />
3.4 high
Dennis Scanlin,<br />
Marcus Renner,<br />
David Domermuth, &<br />
Heath Moody<br />
©1999 Dennis Scanlin, Marcus Renner,<br />
David Domermuth, and Heath Moody<br />
his article<br />
describes a series of<br />
experiments<br />
conducted over the last<br />
year and a half with<br />
three solar food dryers.<br />
The food dryers were<br />
constructed at<br />
Appalachian State<br />
University (ASU) using<br />
plans published in<br />
HP57. The goal of this<br />
research program was<br />
to improve the design<br />
and to determine the<br />
most effective ways to<br />
use the dryer.<br />
Above, Photo 1: Three identical solar food dryers for testing against a control.<br />
1 1/2 x 3/4 inch<br />
Pine<br />
24 Home Power #69 • February / March 1999<br />
Figure 1: Cutaway View of the Appalachian <strong>Solar</strong> <strong>Food</strong> <strong>Dryer</strong><br />
3–6 Layers of Lath<br />
or Screen<br />
7 feet<br />
3/4 inch Plywood<br />
Roof<br />
1/4 inch Plywood<br />
Vent Covers<br />
Drying Shelves<br />
1/4 inch Plywood<br />
1/4 inch Plywood<br />
3/4 inch Foil-Faced<br />
Foam Insulation<br />
0.040 Sun-Lite HP Glazing<br />
1 1/2 x 1/8 inch<br />
Aluminum Bar Trim<br />
3/4 x 3/4 inch<br />
Pine<br />
Screened Air Intake<br />
1 1/2 x 3/4 inch<br />
Pine<br />
6 feet
Figure 2: Multiple Views of the Appalachian <strong>Solar</strong> <strong>Food</strong> <strong>Dryer</strong><br />
Access Door<br />
to Drying Trays<br />
Handles<br />
These solar food dryers are basically wooden boxes<br />
with vents at the top and bottom. <strong>Food</strong> is placed on<br />
screened frames which slide into the boxes. A properly<br />
sized solar air heater with south-facing plastic glazing<br />
and a black metal absorber is connected to the bottom<br />
of the boxes. Air enters the bottom of the solar air<br />
heater and is heated by the black metal absorber. The<br />
warm air rises up past the food and out through the<br />
vents at the top (see Figure 1). While operating, these<br />
dryers produce temperatures of 130–180° F (54–82°<br />
C), which is a desirable range for most food drying and<br />
for pasteurization. With these dryers, it’s possible to dry<br />
food in one day, even when it is partly cloudy, hazy, and<br />
very humid. Inside, there are thirteen shelves that will<br />
hold 35 to 40 medium sized apples or peaches cut into<br />
thin slices.<br />
The design changes we describe in this article have<br />
improved the performance, durability, and portability of<br />
the dryer, and reduced construction costs. This work<br />
could also help in designing and constructing solar air<br />
heaters used for other purposes, such as home heating<br />
or lumber drying. Most of our experiments were<br />
conducted with empty dryers using temperature as the<br />
measure of performance, though some of our<br />
experiments also involved the drying of peaches and<br />
apples. We have dried almost 100 pounds (45 kg) of<br />
fruit in these dryers during the past year. Graduate<br />
students in the ASU Technology Department<br />
constructed the dryers, and students taking a <strong>Solar</strong><br />
Exhaust Vents<br />
Drying Chamber<br />
Collector Chamber<br />
Reflective Surface<br />
(one test case)<br />
Collector Surface<br />
(glazing)<br />
Home Power #69 • February / March 1999<br />
<strong>Solar</strong> Dehydration<br />
Air Intake<br />
Rear Side Front<br />
Above, Photo 2: Setting up the solar simulator.<br />
25
<strong>Solar</strong> Dehydration<br />
Graph 1: Single vs. Double Glazing<br />
Degrees F<br />
180<br />
160<br />
140<br />
120<br />
100<br />
80<br />
60<br />
40<br />
20<br />
8:00 9:00 10:00 11:00 Noon 13:00 14:00 15:00 16:00 17:00<br />
Time<br />
Single Glazing Ambient Double Glazing<br />
Energy Technology course modified them for individual<br />
experiments.<br />
Methodology<br />
We began by constructing three identical food dryers.<br />
Having three dryers allowed us to test two hypotheses<br />
at one time. For example, to examine three versus six<br />
layers of absorber mesh and single versus double<br />
glazing, <strong>Dryer</strong> One might have three layers of black<br />
aluminum window screening as an absorber with single<br />
glazing; <strong>Dryer</strong> Two, six layers of the same absorber<br />
screen with single glazing; and <strong>Dryer</strong> Three, six layers<br />
of the same absorber screen with two layers of glazing.<br />
Once we set up an experiment, we collect data. This<br />
lasts from several days to a couple of weeks until we<br />
are confident that the data is reliable. Then we try<br />
something different.<br />
Using three food dryers also allows us to offer more<br />
students hands-on experiences with solar air heaters.<br />
Each semester, students take apart the dryers’ solar<br />
collectors and rebuild them using different materials or<br />
strategies. This classwork was supplemented with<br />
experiments set up and completed by several graduate<br />
students.<br />
Equipment for Data Collection<br />
We have two systems for measuring temperature. The<br />
first system uses inexpensive indoor/outdoor digital<br />
thermometers. One temperature sensor is placed inside<br />
the dryer and the other one outside. Different locations<br />
are used for the sensor inside the dryer. If food is being<br />
dried, we normally place it under the bottom tray of food<br />
and out of direct sunlight. This temperature data is<br />
recorded on a data collection form every half hour or<br />
whenever possible.<br />
The other system uses a $600 data logger from Pace<br />
Scientific to record temperature data. It is capable of<br />
26 Home Power #69 • February / March 1999<br />
measuring temperature, relative humidity, AC current,<br />
voltage, light, and pressure. The logger does not have a<br />
display, but it’s possible to download the data to a<br />
computer. The software that comes with the logger<br />
allows us to see and graph the data. The data can also<br />
be exported to a spreadsheet for statistical analysis.<br />
We measure air flows with a Kurz 490 series minianemometer.<br />
We weigh the food before placing it in the<br />
dryer, sometimes during the test, and at the end of each<br />
day. We use an Ohaus portable electronic scale,<br />
purchased from Thomas Scientific for $111. We<br />
measure humidity with a Micronta hygrometer<br />
purchased from Radio Shack for about $20.<br />
<strong>Solar</strong> Simulator<br />
In addition to outdoor testing with the actual food<br />
dryers, we use a solar simulator (see Photo 2) built by<br />
David Domermuth, a faculty member in the Technology<br />
Department at ASU. With the simulator, we can do<br />
more rapid testing and replicate the tests performed on<br />
the dryers, even on cloudy days. The simulator also lets<br />
us control variables such as ambient temperature,<br />
humidity, and wind effects. The unit can be altered<br />
quickly because the glazing is not bolted on. The<br />
simulator was constructed for $108. It was built in the<br />
Below, Photo 3: This dryer has both a vertical wall<br />
reflector and side reflectors.
same way as the food dryer, but without the food drying<br />
box at the top.<br />
The simulator uses three 500 watt halogen work lights<br />
to simulate the sun. The inlet and outlet temperatures<br />
are measured with digital thermometers. The<br />
temperature probes are shaded to give a true reading<br />
of the air temperature. We conducted the simulator<br />
tests inside a university building with an indoor<br />
temperature of 62–64° F (17–18° C). As we changed<br />
variables, we noticed significant differences in outlet air<br />
temperatures. The simulator did produce temperatures<br />
comparable to those produced by the food dryers out in<br />
the sun. However, we did not always achieve positive<br />
correlations with our food dryers’ outdoor performance.<br />
We may need to use different kinds of lights or alter our<br />
procedures somewhat.<br />
Experiments<br />
We have done at least twenty different tests over the<br />
last year and a half. All were done outside with the<br />
actual food dryers and some were also repeated with<br />
the solar simulator. The dryers were set up outside the<br />
Technology Department’s building on the ASU campus<br />
in Boone, North Carolina. We collected some additional<br />
information at one of the authors’ homes. Every test<br />
was repeated to make sure we were getting consistent<br />
performance. We tried to run the tests on sunny to<br />
mostly sunny days, but the weather did not always<br />
cooperate. The dips in many of the charts were caused<br />
by passing clouds.<br />
Single vs. Double Glazing<br />
The original design published in HP57 used two layers<br />
of glazing separated by a 3/4 inch (19 mm) air gap. We<br />
used 24 inch (0.6 m) wide, 0.040 inch (1 mm) Sun-Lite<br />
HP fiberglass-reinforced polyester plastic for the outer<br />
layer. For the inner layer, we used either another piece<br />
of Sun-Lite, or Teflon glazing from Dupont. Sun-Lite<br />
glazing is available from the <strong>Solar</strong> Components<br />
Corporation for about $2.40 per square foot ($25.83 per<br />
m2 ). These two layers cost over $50, or about one-third<br />
of the total dryer cost. We wanted to see if the second<br />
layer helped the performance significantly and justified<br />
the added expense.<br />
We set up two dryers with six layers of steel lath<br />
painted flat black. One had single glazing and the other<br />
had two layers of glazing. The outer glazing was Sun-<br />
Lite HP on both dryers. The dryer with double glazing<br />
used Teflon as the inner glazing. The two dryers were<br />
identical except for the number of glazing layers. The<br />
tests were run on nine different days between February<br />
17 and March 26, 1998. We opened the bottom vent<br />
covers completely and the top vent covers to two<br />
inches (51 mm). The ambient temperatures were cool<br />
and no food was being dried.<br />
Figure 3: Sun Angles<br />
and Reflection with a<br />
Vertical Reflector<br />
Home Power #69 • February / March 1999<br />
Noon<br />
11:00 / 13:00<br />
<strong>Solar</strong> Dehydration<br />
Noon<br />
11:00 / 13:00<br />
10:00 / 14:00<br />
Reflective Surface<br />
10:00 / 14:00<br />
9:00 / 15:00<br />
9:00 / 15:00<br />
8:00 / 16:00<br />
8:00 / 16:00<br />
As Graph 1 shows, the double glazing did result in<br />
higher dryer temperatures. This was on a sunny day<br />
with clear blue skies and white puffy clouds, low<br />
humidity (30%), and light winds. The temperatures<br />
throughout most of the day were slightly higher with<br />
double glazing. However, the single glazed dryer works<br />
well and routinely reached temperatures of 130–180° F<br />
(54–82° C). When this test was replicated with the solar<br />
simulator, the double glazing also produced slightly<br />
higher temperatures.<br />
Our conclusion is that double glazing is not necessary<br />
for effective drying. It does reduce some heat loss and<br />
increases the dryer’s temperature slightly, but it<br />
increases the cost of the dryer significantly. Another<br />
problem is that some condensation forms between the<br />
two layers of glazing, despite attempts to reduce it by<br />
caulking the glazing in place. The condensation<br />
detracts from the dryer’s appearance and may cause<br />
maintenance problems with the wood that separates<br />
the two layers of glazing.<br />
Reflectors<br />
One possible way to improve the performance of these<br />
dryers is to use reflectors. We tried several strategies:<br />
making the vertical south wall of the dryer box a<br />
reflective surface, hinging a single reflector at the<br />
bottom of the dryer, and adding reflectors on each side<br />
of the collector.<br />
27
<strong>Solar</strong> Dehydration<br />
Graph 2: Vertical Wall Reflector vs. No Reflector<br />
Degrees F<br />
180<br />
160<br />
140<br />
120<br />
100<br />
80<br />
60<br />
40<br />
9:30 10:00 10:30 11:00 11:30 Noon<br />
With Reflector<br />
Time<br />
Without Reflector Ambient<br />
Vertical Wall Reflector<br />
We realized that the vertical south<br />
wall of the dryer box could be<br />
painted a light color or coated with<br />
aluminum foil, a mirror, or reflective<br />
Mylar (see Photo 3). A vertical<br />
south-facing wall reflector would<br />
reflect some additional energy into<br />
the dryer’s collector, protect the<br />
wood from cracking, and prevent<br />
deterioration from UV radiation.<br />
Considering the fact that the angle<br />
of reflection equals the angle of<br />
incidence, we were able to model<br />
the performance of this reflector,<br />
using a protractor and a chart of sun<br />
altitude angles (see Figure 3). If the<br />
dryer is moved several times<br />
throughout the day to track the sun’s<br />
azimuth angle, then the reflector<br />
concentrates some additional solar<br />
energy onto the dryer’s collector<br />
during most of the day.<br />
Figure 4: Single Reflector at Low Sun Angle<br />
Reflective Surface<br />
8:30 / 4:30 Sun<br />
15° Reflector Angle<br />
28 Home Power #69 • February / March 1999<br />
Look at the temperatures recorded on Graph 2. A slight<br />
increase in dryer temperature was recorded in the dryer<br />
having the south-facing reflective wall. The reflected<br />
light covers the collector most completely at midmorning<br />
and afternoon. As the sun gets higher, the light<br />
is reflected onto a smaller area of the collector.<br />
Single Reflector<br />
A single reflector was hinged to the bottom of the<br />
collector (see Photo 4). This reflector was supported<br />
with a string and stick arrangement, similar to one used<br />
by <strong>Solar</strong> Cookers International. With all reflector<br />
systems, the dryer has to be moved several times<br />
throughout the day if performance is to be maximized.<br />
This allows it to track the azimuth angle of the sun. The<br />
altitude angle of the reflector also needs to be adjusted<br />
during the day from about 15° above horizontal in the<br />
Above, Photo 4: Setting the front reflector angle.<br />
35°<br />
Sun Angle<br />
morning and evening to 45° above<br />
horizontal around noon (see Figures<br />
4 and 5). The reflector added<br />
10–20° F (2.4–4.8° C) to the<br />
temperature of the dryer and<br />
removed slightly more moisture from<br />
the food than a dryer without a<br />
reflector.<br />
Side Mounted Reflectors<br />
A third strategy was to add reflectors<br />
to both sides of the collector. This<br />
captures more solar energy than the
Figure 5: Single Reflector at High Sun Angle<br />
Noon Sun<br />
Reflective Surface<br />
45° Reflector Angle<br />
other two strategies. We determined that the ideal<br />
reflector angle would be 120° from the collector surface<br />
(see Figure 6). This assumes that the dryer is pointing<br />
toward the sun’s azimuth orientation.<br />
We performed an experiment to compare a dryer with<br />
two side reflectors and a vertical wall reflective surface<br />
with a dryer having no reflectors (see Photo 3). Both<br />
dryers were moved throughout the test period to track<br />
the sun. The reflectors were mounted with hinges and<br />
could be closed or removed when transporting the dryer<br />
(see Photo 5). Graph 3 shows the significant increase<br />
in temperatures attained by using these reflectors. The<br />
problem with this design was that if the dryer could not<br />
track the sun for one reason or another, one of the<br />
Figure 6: Ideal Angle for Side-Mounted Reflectors<br />
Reflector<br />
Surface<br />
60°<br />
Reflector<br />
Angle<br />
Collector Surface<br />
Reflector<br />
Surface<br />
80°<br />
Sun Angle<br />
Right, Photo 5:<br />
Side reflectors<br />
folded onto<br />
glazing for<br />
transportation.<br />
Home Power #69 • February / March 1999<br />
<strong>Solar</strong> Dehydration<br />
reflectors would shade the collector in the morning and<br />
the other in the afternoon.<br />
We concluded that the vertical wall reflector and the<br />
single reflector mounted to the bottom of the collector<br />
are the best ways to add reflectors, since tracking is not<br />
crucial in these applications. However, these dryers<br />
routinely attain temperatures of 130–180° F (54–82° C)<br />
without reflectors, which is hot enough for food drying<br />
and for pasteurization. Based on our work so far,<br />
reflectors just don’t seem to be worth the trouble.<br />
Absorbers<br />
All low temperature solar thermal collectors need<br />
something to absorb solar radiation and convert it to<br />
heat. The ideal absorber is made of a conductive<br />
material, such as copper or aluminum. It is usually thin,<br />
without a lot of mass, and painted a dark color, usually<br />
black. The original dryer design called for five layers of<br />
Graph 3: Vertical Wall & Side Reflectors<br />
vs. No Reflector<br />
Degrees F<br />
180<br />
160<br />
140<br />
120<br />
100<br />
80<br />
60<br />
40<br />
20<br />
8:00 9:00 10:00 11:00 Noon 13:00 14:00 15:00 16:00<br />
Time<br />
With Reflectors Without Reflectors Ambient<br />
29
<strong>Solar</strong> Dehydration<br />
Figure 7: Collector/Absorber<br />
Configurations<br />
Steeply Angled Sections Dual <strong>Pass</strong><br />
U-Tube <strong>Through</strong> <strong>Pass</strong><br />
black aluminum window screening, which had proven to<br />
work well in other air heating collectors we had<br />
constructed. Other designs call for metal lath, metal<br />
plates such as black metal roofing, or aluminum or<br />
copper flashing. We decided to try some different<br />
materials and approaches to see if we could come up<br />
with a better absorber.<br />
Plate vs. Screen<br />
First, we compared five layers of black aluminum<br />
window screen placed diagonally in the air flow channel<br />
to one piece of black corrugated steel roofing placed in<br />
the middle of the channel (see Figure 7). We found that<br />
the mesh produced temperatures about 7° F (3.9° C)<br />
higher than the roofing in full sun. Other experiments<br />
have shown that mesh type absorbers are superior to<br />
plate type absorbers. These differences might be<br />
reduced if we used a copper or aluminum plate instead<br />
of the steel roofing.<br />
Graph 4: Lath vs. Screen Absorber<br />
Degrees F<br />
180<br />
160<br />
140<br />
120<br />
100<br />
80<br />
60<br />
40<br />
9:00 10:00 11:00 Noon 13:00 14:00 15:00 16:00 17:00 18:00 19:00<br />
Time<br />
Lath Screen Ambient<br />
Normal Diagonal Absorber<br />
30 Home Power #69 • February / March 1999<br />
Reverse Diagonal Absorber<br />
Lath vs. Screen<br />
Next, we compared three layers of pre-painted black<br />
aluminum window screening to three layers of<br />
galvanized steel lath painted flat black. We found that<br />
the lath produced temperatures as much as 15° F (3.6°<br />
C) higher than the screen in our outdoor solar food<br />
dryer tests. We got the same results when we<br />
compared six layers of screen to six layers of lath (see<br />
Graph 4). While we found that the lath produced slightly<br />
higher temperatures, it was harder to work with, needed<br />
to be painted, and cost slightly more than the screen.<br />
When these tests were replicated with the solar<br />
simulator, we had slightly better results with the screen<br />
than with the lath in both the three and six layer tests.<br />
We were disappointed by the lack of positive correlation<br />
between our outdoor tests with the actual food dryers<br />
and our indoor tests with the solar simulator. But there<br />
are many variables to control and quite a few people<br />
involved in setting things up and collecting data, so our<br />
control was not as tight as we would have liked. Despite<br />
these problems, we are confident in concluding that<br />
there is not a great deal of difference in performance<br />
between lath and screen—both work effectively.<br />
Layers of Absorber Mesh<br />
We then compared three layers of lath to six layers of<br />
lath, and three layers of screen to six layers of screen.<br />
Obviously the more screen used, the greater the<br />
expense. The literature on solar air heaters<br />
recommends between five and seven layers. We<br />
arbitrarily picked three and six layers. In our outdoor<br />
tests, we found that six layers of screen produced<br />
temperatures 5–10° F (1.2–2.4° C) higher than three<br />
layers. Likewise, when we repeated these experiments<br />
outdoors with lath, we found that six layers<br />
outperformed both two and four layers (see Graph 5).
Graph 5: Two vs. Four vs. Six Layers of Absorber<br />
Degrees F<br />
140<br />
120<br />
100<br />
80<br />
60<br />
40<br />
20<br />
10:00 10:30 11:00 11:30<br />
Time<br />
Noon 12:30 13:00<br />
2 Layers<br />
6 Layers<br />
4 Layers<br />
Ambient<br />
Tests performed in the solar simulator showed very little<br />
difference between three and six layers. We used the<br />
simulator to test one and two layers and no absorber.<br />
With no absorber, the temperature decline was over 60°<br />
F (33° C), dropping from 153 to 89° F (67 to 32° C) .<br />
The temperatures for one, two, three, and six layers of<br />
lath after one half-hour were 145, 155, 159, and 160° F<br />
(63, 68, 70, and 71° C). Based on our work, we feel that<br />
two or three layers of screen or lath are adequate for<br />
effective performance, but adding a few more layers will<br />
produce slightly higher temperatures.<br />
Reflective Is Effective<br />
When constructing a solar air heater, you must decide<br />
what to do with the bottom of the air flow channel,<br />
below the absorbing material. In the next part of our<br />
research, we placed aluminum flashing in the bottom of<br />
the air flow channels of two of the three dryers, on top<br />
Graph 6: Collector Bottom Material Comparison<br />
Degrees F<br />
160<br />
140<br />
120<br />
100<br />
80<br />
60<br />
40<br />
20<br />
11:45 12:15 12:45 13:15<br />
Time<br />
13:45 14:15 14:45<br />
Black Flashing Aluminum Flashing<br />
Ambient Foil-faced Tuff-R<br />
Degrees F<br />
160<br />
140<br />
120<br />
100<br />
80<br />
60<br />
40<br />
20<br />
Home Power #69 • February / March 1999<br />
<strong>Solar</strong> Dehydration<br />
Graph 7: Absorber Installation Comparison<br />
5:00 7:00 9:00 11:00 13:00<br />
Time<br />
15:00 17:00 19:00 21:00<br />
Bottom to Top Top to Bottom<br />
Ambient Steeply Angled Sections<br />
of the 3/4 inch (19 mm) foil-faced insulation (Celotex<br />
Tuff-R, polyisocyanurate). The flashing in one of the<br />
dryers was painted flat black. The third dryer was left<br />
with just the reflective insulation board on the bottom of<br />
the air flow channel. This test was done with both the<br />
actual dryers and the solar simulator. In both cases, the<br />
highest temperatures were attained with the reflective<br />
foil-faced insulation. The differences were substantial,<br />
with the reflective insulation showing readings as much<br />
as 25° F (14° C) higher than the dryer with the black<br />
aluminum flashing (see Graph 6).<br />
Mesh Installation<br />
The original design called for the mesh to be inserted<br />
into the collector diagonally from the bottom of the air<br />
flow channel to the top (see Figure 7). This seemed the<br />
best from a construction point of view. In this test, three<br />
configurations were compared: from bottom to top as<br />
originally designed, from top to bottom, and a series of<br />
more steeply angled pieces of mesh stretching from the<br />
top to the bottom of the air flow channel. The<br />
differences in temperatures attained were very small<br />
(see Graph 7), and we concluded that there was not<br />
much difference in performance.<br />
U-Tube vs. Single <strong>Pass</strong><br />
Another characteristic of the original design is the Utube<br />
air flow channel. In addition to the air flow channel<br />
right below the glazing, there is a second air flow<br />
channel right below the first one, separated by a piece<br />
of insulation board (see Figure 7). We compared a<br />
dryer with this U-tube design to a dryer with just a<br />
straight shot single channel and found no significance<br />
difference in temperatures. We removed the insulation<br />
board from our dryers and have completed all the<br />
experiments detailed in this article without the U-tube<br />
setup.<br />
31
180<br />
160<br />
140<br />
120<br />
100<br />
80<br />
60<br />
40<br />
<strong>Solar</strong> Dehydration<br />
Graph 8: PV Exhaust Fan vs. Vent<br />
Degrees F<br />
9:00 11:00 13:00 15:00<br />
Time<br />
17:00 19:00 21:00<br />
PV-Powered Fan 3 Inch Vent Ambient<br />
Active vs. <strong>Pass</strong>ive<br />
We experimented with several small, PV-powered fans<br />
to see if they would generate higher air flows and<br />
possibly accelerate food dehydration. We tried three<br />
different sizes: 0.08, 0.15, and 0.46 amps. We placed<br />
the fans in the exhaust area of the dryer. Of the three,<br />
the 0.15 amp fan seemed to work the best. It increased<br />
the air flow from about 25 to 50 feet per minute (8 to 15<br />
meters per minute), but decreased temperatures<br />
significantly (see Graph 8). The larger fan did not fit in<br />
the exhaust vent opening, and the smallest fan did not<br />
significantly increase the air flow.<br />
Even with the fans in use, the drying performance did<br />
not improve. In every trial, the passive dryer either<br />
matched or outperformed the active dryer. Each<br />
morning during a five-day experiment, we placed<br />
exactly the same weight of fruit in each dryer. We used<br />
one to three pounds (0.4 to 1.4 kg) of apple or peach<br />
slices. Each afternoon between 2:30 and 5 PM, we<br />
Graph 9: Three Inch vs. Six Inch Exhaust Vent<br />
Degrees F<br />
200<br />
180<br />
160<br />
140<br />
120<br />
100<br />
80<br />
60<br />
40<br />
7:00 9:00 11:00 13:00 15:00<br />
Time<br />
17:00 19:00 21:00<br />
3 Inch Vent 6 Inch Vent Ambient<br />
32 Home Power #69 • February / March 1999<br />
removed and weighed the fruit. On all five days, the fruit<br />
dried in the passive dryer weighed either the same or<br />
less than the fruit dried in the active dryer.<br />
Vent Opening<br />
The dryers have vent covers at the top which can be<br />
adjusted to regulate the air flow and temperature. The<br />
smaller the opening, the higher the temperatures<br />
attained. We wanted to know how much the vents<br />
should be opened for maximum drying effectiveness.<br />
We tried a variety of venting combinations while drying<br />
fruit. For most of our experiments, we filled five to<br />
seven of the thirteen shelves with 1/8 inch (3 mm) fruit<br />
slices. We cut up, weighed, and placed an identical<br />
quantity and quality of fruit in each of two dryers in the<br />
morning. Sometime between 2 and 6 PM, we removed<br />
the fruit from the dryers and weighed it again. We<br />
compared openings of different measurements: a one<br />
inch (25 mm) to a seven inch (178 mm), a 3/4 inch (19<br />
mm) to a five inch (127 mm), a three inch (76 mm) to a<br />
six inch (152 mm), a three inch (76 mm) to a nine inch<br />
(229 mm), and a three inch (76 mm) to a five inch (127<br />
mm). During these experiments, the bottom vents were<br />
completely open.<br />
We found that higher temperatures were attained with<br />
smaller vent openings, but that drying effectiveness<br />
was not always maximized. The best performance was<br />
observed when the vents were opened between three<br />
and six inches (76 and 152 mm), and temperatures<br />
peaked at 135–180 °F (54–82° C) (see Graph 9). With<br />
the one inch (25 mm) and smaller openings and the<br />
seven inch (178 mm) and larger openings, less water<br />
was removed from the fruit. There was no difference in<br />
the water removed when we compared three inches to<br />
five inches (76 mm to 127 mm) and three inches to six<br />
inches (76 mm to 152 mm).<br />
Based on this work, we would recommend opening the<br />
leeward exhaust vent cover between three and six<br />
inches (76 and 152 mm), or between ten and twenty<br />
square inches (65 and 129 cm2 ) of total exhaust area.<br />
The exact size of the opening depends on the weather<br />
conditions. With the vents opened between three and<br />
six inches (76 and 152 mm), we have been able to<br />
remove as much as sixty ounces (1.75 l) of water in a<br />
single day from a full load of fruit and completely dry<br />
about three and one-half pounds (1.5 kg) of apple slices<br />
to 12–15% of the fruit’s wet weight.<br />
Construction Improvements<br />
As we experimented with the dryers, we came up with<br />
some design improvements to simplify the construction,<br />
reduce the cost, and increase the durability or<br />
portability of the unit. To simplify the construction and<br />
eliminate warping problems caused by wet weather, we<br />
decided to eliminate the intake vent covers during our
experiments. The vent covers at the top, if closed at<br />
night, would prevent or reduce reverse thermosiphoning<br />
and rehydration of food left in the dryer.<br />
The redesigned air intake now has aluminum screen<br />
secured to the plywood side pieces with wooden trim.<br />
We also redesigned the top exhaust vent cover to<br />
eliminate the warping problem caused by leaving the<br />
vent covers opened during wet weather. The new<br />
exhaust vent cover works very well (see Photo 6). It<br />
spreads the exhaust air across the dryer’s width rather<br />
than concentrating it in the center. This should improve<br />
convective flows and performance. However, the vent<br />
cover makes it more difficult to calculate the exhaust<br />
area, and as a result, we mainly used the old design for<br />
our research this past year.<br />
We added wheels and handles to the unit, as it is heavy<br />
and difficult to move around. It’s now easier to<br />
maneuver, although it is still difficult to transport in a<br />
small pickup truck. We purchased ten-inch (254 mm)<br />
lawnmower-style wheels for $6 each. The axle cost $2.<br />
With the wheels on the small legs at the bottom of the<br />
collector, one person can move the dryer.<br />
The original design specified thin plywood for the roof of<br />
the dryer. We replaced that with 3/4 inch (19 mm)<br />
plywood and covered the peak of the roof with<br />
aluminum flashing. We also used 1/2 inch (38 mm)<br />
wide by 1/8 inch (3 mm) thick aluminum bar stock and<br />
stainless steel screws to attach the glazing to the<br />
dryer’s collector. Each collector used fourteen feet,<br />
eight inches (4.5 m) of aluminum bar at a cost of $23.<br />
The 1/4 inch (6 mm) plywood strips used in the original<br />
design were adequate and less expensive, but would<br />
have required more maintenance.<br />
Conclusions and Recommendations<br />
The dryer described in HP57 has worked well in our<br />
tests. It produces temperatures of 130–180° F (54–82°<br />
C), and can dry up to 15 apples or peaches—about 3<br />
1/2 pounds (1.6 kg) of 1/8 inch (3 mm) thick slices—in<br />
one sunny to partly sunny day. The best performance in<br />
our outdoor tests was attained with six layers of<br />
expanded steel lath painted black, although aluminum<br />
screen works almost as well and is easier to work with.<br />
We also found that two or three layers of screen or lath<br />
would produce temperatures almost as high as six<br />
layers. The surface behind the absorber mesh should<br />
be reflective, and for best performance the exhaust vent<br />
covers should be opened three to six inches (76–152<br />
mm). The cost of the dryer and the time to construct it<br />
can be reduced by eliminating the U-tube air flow<br />
channel divider, the second or inner layer of glazing,<br />
and the intake vent covers, and by reducing the number<br />
of layers of screen or lath to two or three.<br />
Home Power #69 • February / March 1999<br />
<strong>Solar</strong> Dehydration<br />
Above, Photo 6: The new vent design.<br />
We made the unit more portable by adding wheels and<br />
handles, and improved the durability by fastening the<br />
legs with nuts and bolts, using aluminum bar to hold the<br />
glazing in place, and using 3/4 inch (19 mm) plywood<br />
for the roof. We would also like to take the insulation<br />
board out of a dryer to see if it significantly impacts the<br />
performance. This would further decrease the cost of<br />
the dryer. Soon, we hope to compare this design to<br />
direct solar dryers, which a Home Power reader has<br />
recently suggested can outperform our design. Thus<br />
far, we have avoided direct dryers because of concerns<br />
about vitamin loss in foods exposed to direct solar<br />
radiation.<br />
We have tried to carefully explore all of the significant<br />
variables affecting this dryer’s performance. We have<br />
been able to increase drying effectiveness with higher<br />
temperatures of approximately 30° F (16.6° C), while<br />
decreasing the cost by about $30. We have<br />
demonstrated the best vent opening for drying<br />
effectiveness, and seen the impact that variables such<br />
as double glazing, fans, reflectors, and absorber type<br />
have on performance. We have also developed and<br />
demonstrated a low cost solar simulator that can be<br />
used to test solar thermal collectors indoors.<br />
Access<br />
Authors: Dennis Scanlin, Marcus Renner, David<br />
Domermuth, and Heath Moody, Department of<br />
Technology, Appalachian State University, Boone, NC<br />
28608 • 704-262-3111 • scanlindm@appstate.edu<br />
33
<strong>Solar</strong> Dehydration<br />
<strong>Solar</strong> Cookers International (SCI), 1919 21st Street,<br />
Sacramento, CA 95814 • 916-455-4499<br />
Fax: 916-455-4498 • sci@igc.org<br />
Sun-Lite HP glazing was purchased from <strong>Solar</strong><br />
Components Corporation, 121 Valley Street,<br />
Manchester, NH 03103-6211 • 603-668-8186<br />
Fax: 603-668-1783 • solar2@ix.netcom.com<br />
www.solar-components.com<br />
Scales, anemometers, and other data collection<br />
equipment were purchased from Thomas Scientific,<br />
PO Box 99, Swedesboro, NJ 08085 • 800-345-2100<br />
609-467-2000 • Fax: 800-345-5232<br />
value@thomassci.com • www.thomassci.com<br />
Data logger was purchased from Pace Scientific, Inc.,<br />
6407 Idlewild Rd., Suite 2.214, Charlotte, NC 28212<br />
704-568-3691 • Fax: 704-568-0278<br />
sales@pace-sci.com • www.pace-sci.com<br />
Fight Global Warming<br />
P.O. Box 1101, Arcata, CA 95518-1101<br />
Phone: 707-822-9095 • Fax: 707-822-6213 • www.sunfrost.com<br />
34 Home Power #69 • February / March 1999<br />
Creating Peace<br />
of Mind!<br />
P eace of mind has become a<br />
premium in today’s society. The Y2K<br />
problem has created unrest, fear and<br />
even panic in the minds of millions of<br />
Americans. The global economy is<br />
going berserk. But while the future is<br />
definitely uncertain, one thing you can<br />
count on is the fact that no matter<br />
what happens, you will need food and<br />
water! Emergency food storage is a<br />
wise safeguard against all emergencies<br />
from floods, earthquakes and<br />
hurricanes to unemployment or illness.<br />
Millennium III <strong>Food</strong>s offers nutritionally<br />
balanced food plans for individuals,<br />
families or communities at competitive<br />
prices.<br />
At Millennium III <strong>Food</strong>s, we don’t just<br />
sell storage food…<br />
WE CREATE PEACE OF MIND.<br />
• TWO WEEK SHIPPING<br />
• “One Year Supplies” are nutritionally<br />
balanced to deliver over<br />
1,900 calories per day<br />
• Real food that’s easy to use!<br />
• Awarded #1 Best Tasting<br />
• A La Carte ordering or purchase One<br />
Year Units for one, two or four persons.<br />
Great value, simple planning!<br />
Call for prices and information<br />
SALES 888•883•1603<br />
FAX 406•388•2603<br />
P.O. Box 10010<br />
Bozeman, Montana 59719<br />
WWW.M3MFOODS.COM
