Leuze GS 61 & GS 63 Forked Photoelectric Sensor - CTi Automation
Leuze GS 61 & GS 63 Forked Photoelectric Sensor - CTi Automation
Leuze GS 61 & GS 63 Forked Photoelectric Sensor - CTi Automation

You also want an ePaper? Increase the reach of your titles
YUMPU automatically turns print PDFs into web optimized ePapers that Google loves.
Part No. 501 11253<br />
We reserve the right to make changes • <strong>GS</strong>_A40gb.fm<br />
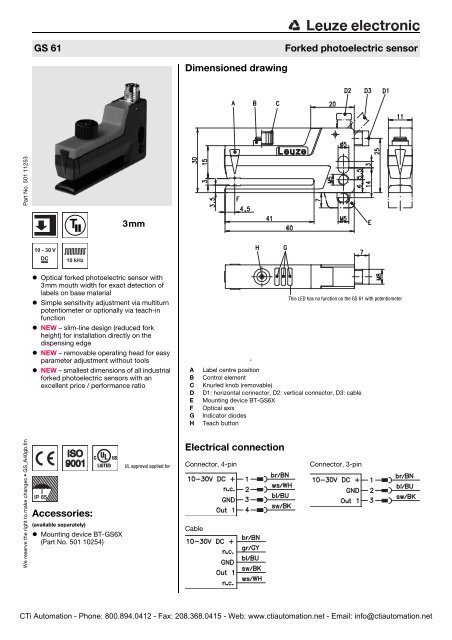
<strong>GS</strong> <strong>61</strong> <strong>Forked</strong> photoelectric sensor<br />
10 - 30 V<br />
DC 10 kHz<br />
3mm<br />
� Optical forked photoelectric sensor with<br />
3mm mouth width for exact detection of<br />
labels on base material<br />
� Simple sensitivity adjustment via multiturn<br />
potentiometer or optionally via teach-in<br />
function<br />
� NEW – slim-line design (reduced fork<br />
height) for installation directly on the<br />
dispensing edge<br />
� NEW – removable operating head for easy<br />
parameter adjustment without tools<br />
� NEW – smallest dimensions of all industrial<br />
forked photoelectric sensors with an<br />
excellent price / performance ratio<br />
IP 65<br />
Accessories:<br />
(available separately)<br />
U L US<br />
C<br />
LISTED<br />
� Mounting device BT-<strong>GS</strong>6X<br />
(Part No. 501 10254)<br />
UL approval applied for<br />
Dimensioned drawing<br />
A Label centre position<br />
B Control element<br />
C Knurled knob (removable)<br />
D D1: horizontal connector, D2: vertical connector, D3: cable<br />
E Mounting device BT-<strong>GS</strong>6X<br />
F Optical axis<br />
G Indicator diodes<br />
H Teach button<br />
Electrical connection<br />
Cable<br />
<strong>Leuze</strong> electronic GmbH + Co. KG In der Braike 1 D-73277 Owen Tel. +49 (0) 7021 573-0<br />
info@leuze.de • www.leuze.com<br />
This LED has no function on the <strong>GS</strong> <strong>61</strong> with potentiometer<br />
Connector, 4-pin Connector, 3-pin<br />
<strong>GS</strong> <strong>61</strong>… - 01<br />
<strong>CTi</strong> <strong>Automation</strong> - Phone: 800.894.0412 - Fax: 208.368.0415 - Web: www.ctiautomation.net - Email: info@ctiautomation.net<br />
– 1 –
Specifications<br />
Physical data<br />
Mouth width 3mm<br />
Mouth depth 40mm<br />
Label width ≥ 2mm<br />
Label gap ≥ 2mm<br />
Switching frequency max. 10kHz<br />
Conveyor speed with teach-in ≤ 20m/min (0.3m/s)<br />
Typ. response time ≤ 50μs<br />
Repeatability see diagrams<br />
Delay before start-up<br />
Electrical data<br />
≤ 300ms acc. to IEC 60947-5-2<br />
Operating voltage UB Residual ripple<br />
Open-circuit current<br />
Switching output<br />
10 … 30VDC (incl. residual ripple)<br />
≤ 15% of UB ≤ 30mA<br />
1) …/6 1 push-pull switching output<br />
switching signal in the label gap<br />
…/6D<br />
Pin 4: PNP gap signal, NPN label signal<br />
1 push-pull switching output<br />
signal on the label<br />
Signal voltage high/low<br />
Output current<br />
Capacitive load<br />
Pin 4: PNP label signal, NPN gap signal<br />
≥ (UB-2V)/≤ 2V<br />
≤ 100mA<br />
≤ 0.2μF2) Indicators<br />
Green LED ready<br />
Green LED, flashing teach-in activated<br />
Yellow LED switching signal in the label gap<br />
Red LED (<strong>GS</strong> <strong>61</strong>/… .2… only)<br />
Mechanical data<br />
teach error / function error<br />
Housing base PC plastic, black RAL 9005<br />
Upper part of housing PC plastic, red RAL 3000<br />
Optics PC plastic<br />
Weight 20g with connector<br />
70g with cable<br />
Connection type M8 connector, 4-pin, or<br />
M8 connector, 3-pin, or<br />
cable 2m (cross section 5 x 0.2mm²)<br />
Tightening torque of fastening screws<br />
Environmental data<br />
max. 3Nm<br />
Ambient temp. (operation/storage)<br />
Protective circuit<br />
-20°C … +60°C/-30°C … +70°C<br />
3)<br />
VDE safety class<br />
1, 2<br />
III<br />
Protection class IP 65 with mounted connector<br />
Standards applied<br />
Certifications<br />
IEC 60947-5-2<br />
UL 508 4)<br />
1) The push-pull switching outputs must not be connected in parallel<br />
2) Max. permissible input capacitance of a consumer connected to the switching output that can be switched without<br />
activation of short-circuit-current limiting.<br />
3) 1=polarity reversal protection, 2=short-circuit protection for all outputs<br />
4) For UL applications: for use in class 2 circuits according to NEC only<br />
Order guide<br />
The sensors listed here are preferred types; current information at www.leuze.com.<br />
Designation Part No.<br />
Teach-In <strong>GS</strong><strong>61</strong>/6.2-S8 501 10108<br />
<strong>GS</strong><strong>61</strong>/6D.2-S8 501 10109<br />
<strong>GS</strong><strong>61</strong>/6.2-S8V 501 107<strong>63</strong><br />
<strong>GS</strong><strong>61</strong>/6D.2-S8V 501 10764<br />
<strong>GS</strong><strong>61</strong>/6.2-S8.3 501 10765<br />
<strong>GS</strong><strong>61</strong>/6D.2-S8.3 501 10766<br />
<strong>GS</strong><strong>61</strong>/6.2 501 10767<br />
<strong>GS</strong><strong>61</strong>/6D.2 501 10768<br />
Potentiometer <strong>GS</strong><strong>61</strong>/6-S8 501 10110<br />
<strong>GS</strong><strong>61</strong>/6D-S8 501 10111<br />
<strong>GS</strong><strong>61</strong>/6-S8V 501 10112<br />
<strong>GS</strong><strong>61</strong>/6D-S8V 501 10113<br />
<strong>GS</strong><strong>61</strong>/6-S8.3 501 107<strong>61</strong><br />
<strong>GS</strong><strong>61</strong>/6D-S8.3 501 10762<br />
<strong>GS</strong><strong>61</strong>/6 501 10769<br />
<strong>GS</strong><strong>61</strong>/6D 501 10770<br />
Marking on the<br />
sensor<br />
� Align the label tape<br />
according to the sensor’s<br />
marker "Label centre<br />
position".<br />
Diagrams<br />
100<br />
90<br />
80<br />
70<br />
60<br />
50<br />
40<br />
30<br />
20<br />
10<br />
0<br />
0 50 100 150 200<br />
Repeatability [μm] Repeatability as a function of the conveyor speed<br />
Remarks<br />
Conveyor speed [m/min]<br />
<strong>GS</strong> <strong>61</strong><br />
Approved purpose:<br />
The forked photoelectric<br />
sensor is an optoelectronic<br />
sensor for contactless detection<br />
of non-transparent<br />
labels on any given base<br />
material. Depending on the<br />
setting, a switching signal<br />
occurs in the gap (gap signal)<br />
between two successive<br />
labels or on the label (label<br />
signal).<br />
<strong>GS</strong> <strong>61</strong>… - 01 0903<br />
<strong>CTi</strong> <strong>Automation</strong> - Phone: 800.894.0412 - Fax: 208.368.0415 - Web: www.ctiautomation.net - Email: info@ctiautomation.net<br />
– 2 –
<strong>GS</strong> <strong>61</strong> <strong>Forked</strong> photoelectric sensor<br />
Type key<br />
Operating principle<br />
<strong>GS</strong> <strong>Forked</strong> sensor, optical<br />
Series<br />
<strong>61</strong> Small series with excellent price / performance ratio<br />
Output function<br />
/6 Push-pull output: PNP signal in the label gap, NPN signal on the label<br />
/6D Push-pull output: PNP signal on the label, NPN signal in the label gap<br />
Configuration<br />
N/A Potentiometer adjustment<br />
.2 Teach button on the device<br />
Electrical connection<br />
N/A Device with cable, standard length 2000mm, cable outlet at 45°<br />
-S8 M8 connector, 4-pin, horizontal plug outlet<br />
-S8V M8 connector, 4-pin, vertical plug outlet<br />
-S8.3 M8 connector, 3-pin, horizontal plug outlet<br />
-S8V.3 M8 connector, 3-pin, vertical plug outlet<br />
<strong>Sensor</strong> adjustment via potentiometer for <strong>GS</strong> <strong>61</strong><br />
G S 6 1 / 6 D . 2 - S 8 . 3 V<br />
Notice: A removable operating head is plugged on the potentiometer in ex works. This can be used<br />
to manually adjust the forked photoelectric sensor without the use of a tool. If this is not desired,<br />
the operating head can simply be pulled off – a screwdriver is then necessary for making adjustments.<br />
The following description applies to a forked photoelectric sensor with switching signal in the label<br />
gap (<strong>GS</strong> <strong>61</strong>/6…). For device versions with switching signal on the label (<strong>GS</strong> <strong>61</strong>/6D…), the LED indicators<br />
are inverted.<br />
Preparation: Remove one or more labels from the base material and advance this blank area into<br />
the sensor.<br />
- If the yellow OUT LED does not switch on when the blank area is encountered, increase the<br />
sensitivity by turning the potentiometer clockwise until the yellow OUT LED switches on.<br />
- Starting from this setting, turn the potentiometer clockwise another approx. one half turn.<br />
- Now advance the label tape so that a label is in the sensor.<br />
- If set correctly, the yellow OUT LED must now switch off. Reduce the sensitivity by turning<br />
counterclockwise if the LED remains on.<br />
- Finished: if set correctly, the LED changes between gap and label.<br />
Top view of sensor with<br />
operating head plugged<br />
<strong>CTi</strong> <strong>Automation</strong> - Phone: 800.894.0412 - Fax: 208.368.0415 - Web: www.ctiautomation.net - Email: info@ctiautomation.net
Short instructions for sensor adjustment via teach button for <strong>GS</strong> <strong>61</strong>/… .2… (teach-in)<br />
≥ 2 s<br />
≥ 7 s<br />
Standard function<br />
Normal operation after switch-on<br />
ON LED - green = ready<br />
OUT LED - yellow = switching output<br />
WARN LED - red = warning<br />
Teach-in (level 1)<br />
Can be performed either with dynamic teaching<br />
(described in the following) or with static teaching<br />
Green ON LED and yellow OUT LED<br />
flash simultaneously 3 x per sec.<br />
Move several labels through the sensor<br />
Briefly press the button again to end the teach event<br />
Red WARN LED is off<br />
if teach is error-free<br />
Setting switching behaviour (Level 2)<br />
Setting the switching output:<br />
Signal in the gap/signal on the label<br />
Green ON LED and yellow OUT LED<br />
flash alternately 3 x per sec.<br />
Release the button, green ON LED continues to flash<br />
OUT LED - yellow: on=signal in the gap<br />
off=signal on the label<br />
Pressing the button briefly once more terminates the setting with the<br />
currently indicated switching behaviour<br />
= function lockable through constant application of U B on the teach input<br />
<strong>GS</strong> <strong>61</strong><br />
<strong>CTi</strong> <strong>Automation</strong> - Phone: 800.894.0412 - Fax: 208.368.0415 - Web: www.ctiautomation.net - Email: info@ctiautomation.net
<strong>GS</strong> <strong>61</strong> <strong>Forked</strong> photoelectric sensor<br />
Standard function for <strong>GS</strong> <strong>61</strong>/… .2…<br />
During operation the sensor is always in this function. The sensor detects label gaps with high precision<br />
and speed. This is indicated by the yellow LED and the switching output.<br />
Indicators:<br />
ON LED - green Constantly ON when operating voltage is applied.<br />
OUT LED - yellow Indicates the switching signal. LED is ON if the sensor detects label gaps.<br />
The display is independent of the output setting.<br />
WARN LED - red Is OFF if operation is error-free. The LED illuminates in the event of a teach error.<br />
Operation<br />
The teach button must be pressed for at least 2 seconds to operate the device. The button can be electrically<br />
disabled to prevent accidental operation.<br />
<strong>Sensor</strong> setting (Teach-In) via Teach button for <strong>GS</strong> <strong>61</strong>/… .2…<br />
Manual teach while label tape is passing through (dynamic)<br />
Preparation: Insert label tape into the sensor.<br />
� Press the teach button until green and yellow LEDs flash simultaneously.<br />
� Release teach button.<br />
� Advance the label tape at a maximum speed of 20m/min through the sensor so<br />
that at least 3 … 7 labels pass through the sensor.<br />
� Press the button briefly once more to terminate the teach process, the sensor<br />
goes into standard mode.<br />
3 … 7 label gaps should be advanced through the sensor in order to achieve stable<br />
switching points.<br />
If the teach process is faulty (e.g. unfavourable base material), the red LED illuminates.<br />
Repeat the teach process. If the fault cannot be rectified, the label material cannot be<br />
detected with the <strong>GS</strong> <strong>61</strong>/… .2….<br />
Manual teach if the label tape cannot be advanced (static)<br />
Preparation: Remove one or more labels from the base material and advance this blank<br />
area into the sensor.<br />
� Press the teach button until green and yellow LEDs flash simultaneously.<br />
� Release teach button.<br />
� Press the button briefly once more to terminate the teach process, the sensor<br />
goes into standard mode.<br />
If the teach process is faulty (e.g. unfavourable base material), the red LED illuminates.<br />
Repeat the teach process. If the fault cannot be rectified, the label material cannot be<br />
detected with the <strong>GS</strong> <strong>61</strong>/… .2….<br />
Adjusting the switching behaviour of the switching output (signal in<br />
the label gap/on the label)<br />
� Press the teach button until green and yellow LEDs flash alternately.<br />
� Release the teach button - the green LED continues to flash, the yellow LED<br />
alternates slowly between ON and OFF.<br />
� Yellow LED ON = output switches in the label gap<br />
Yellow LED OFF = output switches on the label.<br />
� If the button is pressed again while the LED is ON, the device switches in the<br />
label gap. For control purposes, the switching behaviour is displayed as long as<br />
the button is pressed. If the output is to switch on the label, the button must be<br />
pressed while the LED is OFF.<br />
� Finished.<br />
≥ 2s<br />
The green and the<br />
yellow LEDs flash<br />
simultaneously<br />
approx. 3x per sec.<br />
≥ 2s<br />
The green and the<br />
yellow LEDs flash<br />
simultaneously<br />
approx. 3x per sec.<br />
>7s<br />
The green and the<br />
yellow LEDs flash<br />
alternately<br />
approx. 3x per sec.<br />
<strong>CTi</strong> <strong>Automation</strong> - Phone: 800.894.0412 - Fax: 208.368.0415 - Web: www.ctiautomation.net - Email: info@ctiautomation.net
Mounting with the BT-<strong>GS</strong>6X mounting device<br />
Maintenance information<br />
The BT-<strong>GS</strong>6X is necessary if mounting compatibility with the <strong>GS</strong> 06 forked photoelectric sensor is<br />
desired. When using, ensure secure seating (tighten set screw).<br />
The <strong>GS</strong> <strong>61</strong> forked photoelectric sensor is largely maintenance free. Depending on the environmental conditions and the used<br />
materials, it may be necessary from time to time to clean the transparent parts in the lower and upper fork of the forked photoelectric<br />
sensor. We recommend using a soft, moist cloth for this purpose. To protect the surface, cleaning agents containing solvents<br />
should not be used for transparent parts.<br />
Environmental durability<br />
<strong>GS</strong> <strong>61</strong><br />
The used materials feature very good resistance to weak acids and bases as well as to UV exposure. Contact with organic solvents<br />
is possible only to a limited extent and only for short times. Resistance to chemicals and oils must be determined on a caseby-case<br />
basis.<br />
<strong>CTi</strong> <strong>Automation</strong> - Phone: 800.894.0412 - Fax: 208.368.0415 - Web: www.ctiautomation.net - Email: info@ctiautomation.net
Part No. 501 11254<br />
We reserve the right to make changes • <strong>GS</strong>_A41gb.fm<br />
(I)<strong>GS</strong> <strong>63</strong> <strong>Forked</strong> photoelectric sensor<br />
10 - 30 V<br />
DC 10 kHz<br />
ALC<br />
3mm<br />
� Optical forked photoelectric sensor with<br />
3mm fork width and 60mm fork depth for<br />
exact detection of labels on base material<br />
� High switching frequency and short<br />
response time guarantee very good<br />
repeatability<br />
� NEW – slim-line design (reduced fork<br />
height) for installation directly on the<br />
dispensing edge<br />
� NEW – ALC function (Auto Level Control):<br />
highest performance reserve through<br />
autonomous online optimisation of the<br />
switching threshold<br />
� NEW – Storage of up to ten teach values in<br />
the sensor<br />
� NEW – Warning output for indicating teach<br />
or function errors (I<strong>GS</strong> <strong>63</strong>)<br />
� NEW – Easy adjustment via lockable teach<br />
button or teach input<br />
IP 65<br />
Accessories:<br />
(available separately)<br />
U L US<br />
C<br />
LISTED<br />
� Mounting device BT-<strong>GS</strong>6X<br />
(Part No. 501 10254)<br />
UL approval applied for<br />
Dimensioned drawing<br />
A Label centre position<br />
D D1: horizontal connector, D2: vertical connector, D3: cable<br />
E Mounting device BT-<strong>GS</strong>6X<br />
F Optical axis<br />
G Indicator diodes<br />
H Teach button<br />
Electrical connection<br />
Connector, 4-pin<br />
Cable, 5-wire, I<strong>GS</strong> <strong>63</strong> only<br />
<strong>Leuze</strong> electronic GmbH + Co. KG In der Braike 1 D-73277 Owen Tel. +49 (0) 7021 573-0<br />
info@leuze.de • www.leuze.com<br />
(I)<strong>GS</strong> <strong>63</strong>… - 01<br />
<strong>CTi</strong> <strong>Automation</strong> - Phone: 800.894.0412 - Fax: 208.368.0415 - Web: www.ctiautomation.net - Email: info@ctiautomation.net<br />
– 1 –
Specifications<br />
Physical data<br />
Mouth width 3mm<br />
Mouth depth 60mm<br />
Label width ≥ 2mm<br />
Label gap ≥ 2mm<br />
Switching frequency max. 10kHz<br />
Conveyor speed with teach-in ≤ 20m/min (0.3m/s)<br />
Typ. response time ≤ 50μs<br />
Repeatability see diagrams<br />
Delay before start-up<br />
Electrical data<br />
≤ 300ms acc. to IEC 60947-5-2<br />
Operating voltage UB Residual ripple<br />
Open-circuit current<br />
Switching output<br />
10 … 30VDC (incl. residual ripple)<br />
≤ 15% of UB ≤ 30mA<br />
1) …/6 1 push-pull switching output<br />
switching signal in the label gap<br />
…/6D<br />
Pin 4: PNP gap signal, NPN label signal<br />
1 push-pull switching output<br />
signal on the label Pin 4: PNP label signal, NPN gap signal<br />
Warning output I<strong>GS</strong> <strong>63</strong> only… 1 push-pull switching output<br />
pin 4: active low (normal operation high, event case low)<br />
Switching output function<br />
Signal voltage high/low<br />
Output current<br />
Capacitive load<br />
gap signal/label signal adjustable<br />
≥ (UB-2V)/≤ 2V<br />
≤ 100mA<br />
≤ 0.2μF2) Indicators<br />
Green LED ready<br />
Yellow LED switching signal in the label gap<br />
Red LED<br />
Mechanical data<br />
teach error / function error<br />
Housing base diecast zinc; cathodic immersion lacquered surface, black<br />
RAL 9005<br />
Upper part of housing PC plastic, red RAL 3000<br />
Optics PC plastic<br />
Weight 55g with connector, 100g with cable<br />
Connection type<br />
Environmental data<br />
M8 connector, 4-pin, metal or<br />
cable 2m (cross section 5 x 0.2mm²)<br />
Ambient temp. (operation/storage)<br />
Protective circuit<br />
-20°C … +60°C/-30°C … +70°C<br />
3)<br />
VDE safety class<br />
1, 2<br />
III<br />
Protection class IP 65 with mounted connector<br />
Standards applied<br />
Certifications<br />
IEC 60947-5-2<br />
UL 508 4)<br />
Options<br />
Teach-in input<br />
Active/not active ≥ 8V/≤ 2V<br />
Activation/disable delay ≤ 0.2ms<br />
Input resistance typ. 10kΩ<br />
1) The push-pull switching outputs must not be connected in parallel<br />
2) Max. permissible input capacitance of a consumer connected to the switching output that can be switched without<br />
activation of short-circuit-current limiting.<br />
3) 1=polarity reversal protection, 2=short-circuit protection for all outputs<br />
4) For UL applications: for use in class 2 circuits according to NEC only<br />
Order guide<br />
The sensors listed here are preferred types; current information at www.leuze.com.<br />
Designation Part No.<br />
Without warning output <strong>GS</strong><strong>63</strong>/6.3-S8 501 10104<br />
<strong>GS</strong><strong>63</strong>/6D.3-S8 501 10105<br />
<strong>GS</strong><strong>63</strong>/6.3-S8V 501 10106<br />
<strong>GS</strong><strong>63</strong>/6D.3-S8V 501 10107<br />
With warning output I<strong>GS</strong><strong>63</strong>/6.3 501 10759<br />
I<strong>GS</strong><strong>63</strong>/6D.3 501 10760<br />
Marking on the<br />
sensor<br />
� Align the label tape<br />
according to the sensor’s<br />
marker "Label centre<br />
position".<br />
Diagrams<br />
100<br />
90<br />
80<br />
70<br />
60<br />
50<br />
40<br />
30<br />
20<br />
10<br />
0<br />
0 50 100 150 200<br />
Repeatability [μm] Repeatability as a function of the conveyor speed<br />
Remarks<br />
(I)<strong>GS</strong> <strong>63</strong><br />
Conveyor speed [m/min]<br />
Approved purpose:<br />
The forked photoelectric<br />
sensor is an optoelectronic<br />
sensor for contactless detection<br />
of non-transparent<br />
labels on any given base<br />
material. Depending on the<br />
setting, a switching signal<br />
occurs in the gap (gap signal)<br />
between two successive<br />
labels or on the label (label<br />
signal).<br />
(I)<strong>GS</strong> <strong>63</strong>… - 01 0903<br />
<strong>CTi</strong> <strong>Automation</strong> - Phone: 800.894.0412 - Fax: 208.368.0415 - Web: www.ctiautomation.net - Email: info@ctiautomation.net<br />
– 2 –
(I)<strong>GS</strong> <strong>63</strong> <strong>Forked</strong> photoelectric sensor<br />
Type key<br />
Warning function<br />
I <strong>Sensor</strong> has warning output<br />
Operating principle<br />
<strong>GS</strong> <strong>Forked</strong> sensor, optical<br />
Series<br />
<strong>63</strong> High quality series with metal housing and ALC function<br />
Output function<br />
/6 Push-pull output: PNP signal in the label gap, NPN signal on the label<br />
/6D Push-pull output: PNP signal on the label, NPN signal in the label gap<br />
Configuration<br />
.3 Teach button on the device and teach input<br />
Electrical connection<br />
N/A Device with cable, standard length 2000mm, cable outlet at 45°<br />
-S8 M8 connector, 4-pin, horizontal plug outlet<br />
-S8V M8 connector, 4-pin, vertical plug outlet<br />
ALC (Auto Level Control) function<br />
I G S 6 3 / 6 D . 3 - S 8 V<br />
In each teach process the current signal values in the sensor are digitally determined, resulting in the optimum switching threshold<br />
being calculated for maximum performance reserve. All values are saved permanently, retaining their validity as long as the<br />
dynamic parameters of the system remain unchanged and the material is not changed.<br />
Signal changes can result each time the roll is changed, even with labels that are apparently the same. This is caused, for example,<br />
by material variations (transmission factor, homogeneity …) or changes of the dynamic parameters (e.g. tape tension, middle<br />
position, jitter, etc.) that can have a negative affect on the performance reserve of the sensor.<br />
With the ALC function, the sensor now automatically corrects the switching threshold in such a way that the maximum performance<br />
reserve is always available during operation - the sensor works absolutely reliably and free of errors.<br />
The teach event only needs to be repeated if the sensor does not switch following a change of material.<br />
<strong>CTi</strong> <strong>Automation</strong> - Phone: 800.894.0412 - Fax: 208.368.0415 - Web: www.ctiautomation.net - Email: info@ctiautomation.net
Short instructions for sensor adjustment via teach button for (I)<strong>GS</strong> <strong>63</strong> (teach-in)<br />
≥ 2 s<br />
≥ 7 s<br />
Standard function<br />
Normal operation after switch-on<br />
ON LED - green = ready<br />
OUT LED - yellow = switching output<br />
LED WARN - red = warning output<br />
Teach-in (level 1)<br />
Can be performed either with dynamic teaching<br />
(described in the following) or with static teaching<br />
Green ON LED and yellow OUT LED<br />
flash simultaneously 3 x per sec.<br />
Move several labels through the sensor<br />
Briefly press the button again to end the teach event<br />
Red WARN LED is off<br />
if teach is error-free<br />
Setting switching behaviour (Level 2)<br />
Setting the switching output:<br />
Signal in the gap/signal on the label<br />
Green ON LED and yellow OUT LED<br />
flash alternately 3 x per sec.<br />
Release the button, green ON LED continues to flash<br />
OUT LED - yellow: on=signal in the gap<br />
off=signal on the label<br />
Pressing the button briefly once more terminates the setting<br />
with the currently indicated switching behaviour<br />
= function lockable through constant application of U B on the teach input<br />
(I)<strong>GS</strong> <strong>63</strong><br />
<strong>CTi</strong> <strong>Automation</strong> - Phone: 800.894.0412 - Fax: 208.368.0415 - Web: www.ctiautomation.net - Email: info@ctiautomation.net
(I)<strong>GS</strong> <strong>63</strong> <strong>Forked</strong> photoelectric sensor<br />
Standard function for (I)<strong>GS</strong> <strong>63</strong><br />
During operation the sensor is always in this function. The sensor detects label gaps with high precision<br />
and speed. This is indicated by the yellow LED and the switching output.<br />
Indicators:<br />
ON LED - green Constantly ON when operating voltage is applied.<br />
OUT LED - yellow Indicates the switching signal. LED is ON if the sensor detects label gaps.<br />
The display is independent of the output setting.<br />
WARN LED - red Is OFF if operation is error-free. If the "Control limit reached" message appears,<br />
the red LED lights.<br />
Operation<br />
The teach button must be pressed for at least 2 seconds to operate the device. The button can be electrically<br />
disabled to prevent accidental operation.<br />
<strong>Sensor</strong> adjustment (teach-in) via teach button for (I)<strong>GS</strong> <strong>63</strong><br />
Manual teach while label tape is passing through (dynamic)<br />
Preparation: Insert label tape into the sensor.<br />
� Press the teach button until green and yellow LEDs flash simultaneously.<br />
� Release teach button.<br />
� Advance the label tape at a maximum speed of 20m/min through the sensor so<br />
that at least 3 … 5 labels pass through the sensor.<br />
� Press the button briefly once more to terminate the teach process, the sensor<br />
goes into standard mode.<br />
3 … 5 label gaps should be advanced through the sensor in order to achieve stable<br />
switching points.<br />
If the teach process is faulty (e.g. unfavourable base material), the red LED illuminates and<br />
the warning output is activated. Repeat the teach process. If the fault cannot be rectified,<br />
the label material cannot be detected with the (I)<strong>GS</strong> <strong>63</strong>.<br />
Manual teach if the label tape cannot be advanced (static)<br />
Preparation: Remove one or more labels from the base material and advance this blank<br />
area into the sensor.<br />
� Press the teach button until green and yellow LEDs flash simultaneously.<br />
� Release teach button.<br />
� Press the button briefly once more to terminate the teach process, the sensor<br />
goes into standard mode.<br />
If the teach process is faulty (e.g. unfavourable base material), the red LED illuminates and<br />
the warning output is activated. Repeat the teach process. If the fault cannot be rectified,<br />
the label material cannot be detected with the (I)<strong>GS</strong> <strong>63</strong>.<br />
Adjusting the switching behaviour of the switching output (signal in<br />
the label gap/on the label)<br />
� Press the teach button until green and yellow LEDs flash alternately.<br />
� Release the teach button - the green LED continues to flash, the yellow LED<br />
alternates slowly between ON and OFF.<br />
� Yellow LED ON = output switches in the label gap<br />
Yellow LED OFF = output switches on the label.<br />
� If the button is pressed again while the LED is ON, the device switches in the<br />
label gap. For control purposes, the switching behaviour is displayed as long as<br />
the button is pressed. If the output is to switch on the label, the button must be<br />
pressed while the LED is OFF.<br />
� Finished.<br />
≥ 2s<br />
The green and the<br />
yellow LEDs flash<br />
simultaneously<br />
approx. 3x per sec.<br />
≥ 2s<br />
The green and the<br />
yellow LEDs flash<br />
simultaneously<br />
approx. 3x per sec.<br />
>7s<br />
The green and the<br />
yellow LEDs flash<br />
alternately<br />
approx. 3x per sec.<br />
<strong>CTi</strong> <strong>Automation</strong> - Phone: 800.894.0412 - Fax: 208.368.0415 - Web: www.ctiautomation.net - Email: info@ctiautomation.net
<strong>Sensor</strong> adjustment (teach-in) via teach input for (I)<strong>GS</strong> <strong>63</strong><br />
The following description applies to PNP switching logic!<br />
UTeach not connected Internal pull-down resistor pulls Teach button can be operated;<br />
the input down to zero<br />
all functions adjustable<br />
UTeach low ≤ 2V Low level Teach button can be operated;<br />
all functions adjustable<br />
UTeach high ≥ 8V High level Teach button disabled;<br />
button has no function<br />
UTeach >2V…
(I)<strong>GS</strong> <strong>63</strong> <strong>Forked</strong> photoelectric sensor<br />
Storing teach values in the sensor<br />
It is possible to store or retrieve up to 10 different teach values. In this way, various label materials can be processed without the<br />
operator needing to perform a teach process. If this function is desired, static interlocking of the teach button is recommended<br />
so that no operation of the device can occur.<br />
The process starts with the execution of the line teach (see description on page 6). The teach value ascertained in this way<br />
remains in sensor memory and is then stored in one of 10 possible storage places using the process described in the following.<br />
Flow chart: First perform line teach, then store teach value.<br />
Storing teach values<br />
Button disabled<br />
Button enabled<br />
Reading out teach values<br />
Button disabled<br />
Button enabled<br />
Locking the teach button via the teach input<br />
(I)<strong>GS</strong> <strong>63</strong><br />
4 ms … ∞ 580 … 620ms 4 … 100ms<br />
(n x 50ms) -10ms<br />
…<br />
(n x 50ms) +10ms<br />
50ms<br />
Pulse only<br />
necessary if<br />
a low-level<br />
was applied<br />
previously<br />
4 ms … ∞<br />
Pulse only<br />
necessary if<br />
a low-level<br />
was applied<br />
previously<br />
Activation - store current teach<br />
value:<br />
Action starts with the falling edge:<br />
tTeach = 580 … 620ms<br />
Action - read out teach value:<br />
Action starts with the falling edge:<br />
t Teach = 780 … 820ms<br />
Load teach<br />
value<br />
Selection of storage place:<br />
The pulse length determines the storage place<br />
for the current teach value:<br />
n=1,2,3 … 10<br />
Example: t for storage place 3:<br />
140ms ...160ms<br />
Select storage place:<br />
The pulse length determines the storage place<br />
from which the teach value is loaded:<br />
n=1,2,3 … 10<br />
Example: t for storage place 7:<br />
340ms ... 360ms<br />
A static high signal (≥ 4ms) on the teach input locks the teach button on<br />
the device if required so that no manual operation is possible (e.g. protection<br />
against erroneous operation or manipulation).<br />
If the teach input is not connected or if there is a static low signal, the button<br />
is enabled and can be operated freely.<br />
The selection of the<br />
storage place is<br />
concluded with the<br />
rising edge. 50ms<br />
after the rising edge,<br />
the sensor returns to<br />
normal operation.<br />
780 … 820ms 4 … 100ms (n x 50ms) -10ms<br />
…<br />
(n x 50ms) +10ms<br />
50ms<br />
The selection of the<br />
storage place is<br />
concluded with the<br />
rising edge. 50ms<br />
after the rising edge,<br />
the sensor returns to<br />
normal operation.<br />
Button disabled<br />
Button enabled after 3s<br />
Button disabled<br />
Button enabled after 3s<br />
<strong>CTi</strong> <strong>Automation</strong> - Phone: 800.894.0412 - Fax: 208.368.0415 - Web: www.ctiautomation.net - Email: info@ctiautomation.net<br />
t<br />
t
Mounting with the BT-<strong>GS</strong>6X mounting device<br />
Maintenance information<br />
The BT-<strong>GS</strong>6X is necessary if mounting compatibility with the <strong>GS</strong> 06 forked photoelectric sensor is<br />
desired. When using, ensure secure seating (tighten set screw).<br />
The (I)<strong>GS</strong> <strong>63</strong> forked photoelectric sensor is largely maintenance free. Depending on the environmental conditions and the used<br />
materials, it may be necessary from time to time to clean the transparent parts in the lower and upper fork of the forked photoelectric<br />
sensor. We recommend using a soft, moist cloth for this purpose. To protect the surface, cleaning agents containing solvents<br />
should not be used for transparent parts.<br />
Environmental durability<br />
(I)<strong>GS</strong> <strong>63</strong><br />
The used materials feature very good resistance to weak acids and bases as well as to UV exposure. Contact with organic solvents<br />
is possible only to a limited extent and only for short times. Resistance to chemicals and oils must be determined on a caseby-case<br />
basis.<br />
<strong>CTi</strong> <strong>Automation</strong> - Phone: 800.894.0412 - Fax: 208.368.0415 - Web: www.ctiautomation.net - Email: info@ctiautomation.net