

MONITOR GF 3800 Vented Heating Systems - HouseNeeds, Inc.
MONITOR GF 3800 Vented Heating Systems - HouseNeeds, Inc.
MONITOR GF 3800 Vented Heating Systems - HouseNeeds, Inc.

You also want an ePaper? Increase the reach of your titles
YUMPU automatically turns print PDFs into web optimized ePapers that Google loves.
22<br />
SECTION H<br />
MAINTENANCE AND CHECK<br />
Push operation switch to "OFF" remove the AC Plug from the wall outlet and wait approximately 30 minutes for the<br />
heater to cool before performing any of the following steps.<br />
Checking the Heater Area<br />
Should be kept clean and free from combustible<br />
materials, gasoline and other flammable vapors and<br />
liquids.<br />
Retrieving Objects from Inside the Heater<br />
Should an object fall inside the heater, through the grill<br />
openings, it must be removed to avoid affecting the<br />
operation of the heater.<br />
After allowing the heater to cool, remove the front cover<br />
panel and grill. (See Step 5, Page 21.) After the object<br />
has been removed, replace the grill and front panel<br />
before attempting to re-start the heater.<br />
Cleaning the Cabinet<br />
When the cabinet is soiled, wipe it with a damp cloth.<br />
Restore the shine with a dry cloth. The use of abrasive<br />
household cleaners may dull the finish.<br />
ACAUTION:<br />
Checking the Flue Pipe<br />
At the beginning of each heating season, check the<br />
inside of the flue pipe. Foreign matter, spider webs, etc.<br />
must be removed.<br />
Be sure all fittings and joints are tight.<br />
NOTE: Reassembly and Reseating of,the Vent-Air<br />
Intake Pipes<br />
Make sure that all exhaust pipe and intake pipe<br />
connections are firmly mated.<br />
Make sure that the connections between the flue pipe<br />
and exhaust/air intake pipe and hose are secured by the<br />
pipe holder (P/N 4006) and the hose band (P/N 4008).<br />
Cleaning the Interior<br />
Remove the front cover and grill assemblies (See Step 5,<br />
Page 21), and vacuum and wipe away dust and other<br />
accumulation.<br />
Cleaning the Blower Guard<br />
<strong>Heating</strong> efficiency will be reduced if the blower guard at<br />
rear of the cabinet is blocked with dirt or dust.<br />
Blockage also produces a rise in heat that could cause<br />
the heater to shut off.<br />
Wipe the guard clean at least once a week.<br />
Electric Motor Maintenance<br />
Motors are permanently lubricated and need no<br />
lubrication. Keep fan and motor free of dust and dirt<br />
clean annually.<br />
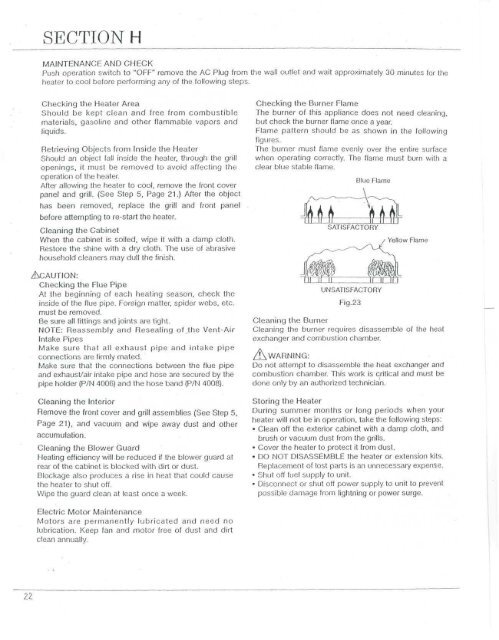
Checking the Burner Flame<br />
The burner of this appliance does not need cleaning,<br />
but check the burner flame once a year.<br />
Flame pattern should be as shown in the following<br />
figures.<br />
The burner must flame evenly over the entire surface<br />
when operating correctly. The flame must burn with a<br />
clear blue stable flame.<br />
Blue Flame<br />
SATISFACTORY<br />
UNSATISFACTORY<br />
Fig.23<br />
Yellow Flame<br />
Cleaning the Burner<br />
Cleaning the burner requires disassemble of the heat<br />
exchanger and combustion chamber.<br />
/t\ WARNING:<br />
Do not attempt to disassemble the heat exchanger and<br />
combustion chamber. This work is critical and must be<br />
done only by an authorized technician.<br />
Storing the Heater<br />
During summer months or long periods when your<br />
heater will not be in operation, take the following steps:<br />
• Clean off the exterior cabinet with a damp cloth, and<br />
brush or vacuum dust from the grills.<br />
• Cover the heater to protect it from dust.<br />
• DO NOT DISASSEMBLE the heater or extension kits.<br />
Replacement of lost parts is an unnecessary expense.<br />
• Shut off fuel supply to unit.<br />
• Disconnect or shut off power supply to unit to prevent<br />
possible damage from lightning or power surge.