GeoVision GV-Data Capture Troubleshooting - Video nadzor
GeoVision GV-Data Capture Troubleshooting - Video nadzor
GeoVision GV-Data Capture Troubleshooting - Video nadzor

Create successful ePaper yourself
Turn your PDF publications into a flip-book with our unique Google optimized e-Paper software.
New Feature Guide V8.5.3<br />
F<strong>GV</strong>8530-A
© 2012 <strong>GeoVision</strong>, Inc. All rights reserved.<br />
Under the copyright laws, this manual may not be copied, in whole or in part,<br />
without the written consent of <strong>GeoVision</strong>.<br />
Every effort has been made to ensure that the information in this manual is<br />
accurate. <strong>GeoVision</strong>, Inc. makes no expressed or implied warranty of any kind<br />
and assumes no responsibility for errors or omissions. No liability is assumed<br />
for incidental or consequential damages arising from the use of the information<br />
or products contained herein. Features and specifications are subject to<br />
change without notice.<br />
<strong>GeoVision</strong>, Inc.<br />
9F, No. 246, Sec. 1, Neihu Rd.,<br />
Neihu District, Taipei, Taiwan<br />
Tel: +886-2-8797-8377<br />
Fax: +886-2-8797-8335<br />
http://www.geovision.com.tw<br />
Trademarks used in this manual: <strong>GeoVision</strong>, the <strong>GeoVision</strong> logo and <strong>GV</strong><br />
series products are trademarks of <strong>GeoVision</strong>, Inc. Windows and Windows XP<br />
are registered trademarks of Microsoft Corporation.<br />
January 2012
Feature Guide V8.5.3<br />
Feature Guide for<br />
V8.5.3 <strong>GeoVision</strong> Surveillance System<br />
This Guide provides an overview of key features in V8.5.3 <strong>GV</strong>-System. It also includes<br />
information about how the features differ from similar features in earlier versions.<br />
Cards Supported<br />
V8.5.3 only supports the following <strong>GV</strong> video capture cards:<br />
• <strong>GV</strong>-600(S) V3.20 and later<br />
• <strong>GV</strong>-650(S) V3.30 and later<br />
• <strong>GV</strong>-800(S) V3.30 and later<br />
• <strong>GV</strong>-804A V3.10 and later<br />
• <strong>GV</strong>-600A<br />
• <strong>GV</strong>-650A<br />
• <strong>GV</strong>-800A<br />
• <strong>GV</strong>-900A<br />
• <strong>GV</strong>-600B<br />
• <strong>GV</strong>-650B<br />
• <strong>GV</strong>-800B<br />
• <strong>GV</strong>-1120, <strong>GV</strong>-1120A All Series<br />
• <strong>GV</strong>-1240, <strong>GV</strong>-1240A All Series<br />
• <strong>GV</strong>-1480, <strong>GV</strong>-1480A All Series<br />
• <strong>GV</strong>-1008<br />
• <strong>GV</strong>-3008<br />
• <strong>GV</strong>-4008, <strong>GV</strong>-4008A<br />
Note that <strong>GV</strong>-600 (V4), <strong>GV</strong>-650 (V4) and <strong>GV</strong>-800 (V4) and <strong>GV</strong>-804 (V4) Cards are renamed to<br />
<strong>GV</strong>-600A, <strong>GV</strong>-650A, <strong>GV</strong>-800A and <strong>GV</strong>-804A. These V4 and A Cards are the same video<br />
capture cards.<br />
i
ii<br />
Contents<br />
Cards Supported .......................................................................i<br />
Contents ....................................................................................ii<br />
1. Support for 31 Languages....................................................................................1<br />
1.1 Revising Translated Text Using MultiLang Tool .............................................2<br />
2. New Features in <strong>GV</strong>-Mobile Server......................................................................6<br />
2.1 Accessing <strong>GV</strong>-<strong>Video</strong> Gateway.......................................................................7<br />
2.2 Viewing Live View in MJPEG Using Non-IE Browsers ..................................9<br />
3. Enhanced Motion Detection Sensitivity ..............................................................10<br />
4. Wide View for Wall Mounted Fisheye Camera ................................................... 11<br />
5. Enhanced Smoothness in Fisheye Object Tracking...........................................12<br />
6. Support for Fisheye Features in ViewLog ..........................................................13<br />
7. Saving PIP / PAP View in AVI Format.................................................................15<br />
8. Flexible Privilege Settings in Authentication Server ...........................................16<br />
9. Support for New IP Devices ...............................................................................18
1. Support for 31 Languages<br />
Feature Guide V8.5.3<br />
Previously, the 16 languages supported are Czech, Danish, English, French, German,<br />
Hebrew, Hungarian, Italian, Japanese, Polish, Portuguese, Russian, Serbian, Simplified<br />
Chinese, Spanish and Traditional Chinese. In V8.5.3, the following 15 languages are added:<br />
• Arabic<br />
• Bulgarian<br />
• Dutch<br />
• Finland<br />
• Greek<br />
• Indonesian<br />
• Norwegian<br />
• Lithuanian<br />
• Persian<br />
• Romanian<br />
• Slovakian<br />
• Slovenian<br />
• Sweden<br />
• Thai<br />
• Turkish<br />
1
1.1 Revising Translated Text Using MultiLang Tool<br />
The user interface has been translated from English into 30 other languages. If you find the<br />
translation to be unsuitable and would like to correct it, you can use the MultiLang Tool to<br />
revise the translation. Next, you can apply the revised text to the applications and export<br />
an .exe file to make the same revision on another computer. You can also send the revision<br />
back to <strong>GeoVision</strong> to have the revision included in future software releases.<br />
To revise the translated text:<br />
1. Install MultiLang Tool from the Surveillance System Software DVD.<br />
2. Close all <strong>GeoVision</strong> applications first and then double-click MultilingualConfig.exe. This<br />
dialog box appears.<br />
2<br />
Figure 1<br />
3. Click Language and select the language of the text you want to revise.
Feature Guide V8.5.3<br />
4. In the Search field, type all or part of the text in English or the target language and click<br />
Search.<br />
Note:<br />
1. The search is case sensitive.<br />
Figure 2<br />
2. Before making any revision, click Tools and select Revision Note to read the revision<br />
instructions.<br />
3. Double-click the text you want to revise. This dialog box appears.<br />
Figure 3<br />
4. Revise the translated text and click OK.<br />
Tip: The text may contain symbols such as %d or \n that instruct the application to perform<br />
certain functions. Be careful not to change the symbols in the translated text.<br />
3
To apply the revised text:<br />
1. To apply the revised translation to the applications, click Save. For the following<br />
applications, the system will automatically locate the corresponding files on your<br />
computer and replace with the revised translation.<br />
4<br />
• <strong>GV</strong>-System<br />
• Remote ViewLog<br />
• Fast Backup and Restore (FBR)<br />
• <strong>GV</strong>-IP Device Utility<br />
• Multi View<br />
• Remote E-Map<br />
• Center V2<br />
• Vital Sign Monitor<br />
• Dispatch Server<br />
• <strong>GV</strong>-GIS<br />
• MCamCtrl Utility<br />
• POS Text Sender<br />
• Authentication Server<br />
• SMS Server<br />
• Audio Broadcast<br />
• Multicast<br />
• TwinDVR System<br />
• Bandwidth Control Client Site<br />
• Backup Viewer<br />
• <strong>GV</strong>-Mobile Server
Feature Guide V8.5.3<br />
2. After applying the revision, a dialog box appears to show which applications have been<br />
revised. Click OK.<br />
Figure 4<br />
3. The message “Do you want to apply the revised multilingual texts to another folder?”<br />
appears. If the storage path for the application has been changed or if the associated<br />
application is not listed in the dialog box, click Yes and select the folder of the<br />
application.<br />
To export or send the revised text:<br />
1. To export the revision as an executable file, click Tools, Export and Export executable<br />
file. You can copy the .exe file to another computer and apply the same translation<br />
revision by running the .exe file.<br />
2. To report the translation revision back to <strong>GeoVision</strong>,<br />
• If your default mail client is Outlook, Outlook Express or Mozilla Thunderbird, click<br />
Tools, Export and Send Report to send the revision.<br />
• If your default mail client is not set up or supported, click Tools, Export and Export<br />
text file, and email the exported text file to gvlocalize@geovision.com.tw.<br />
5
2. New Features in <strong>GV</strong>-Mobile Server<br />
<strong>GV</strong>-Mobile Server V1.2 allows you to access up to 32 IP channels from a <strong>GV</strong>-<strong>Video</strong> Gateway<br />
and watch camera live view in MJPEG using non-IE browsers. A <strong>GV</strong>-USB Dongle is required<br />
to use the new features in <strong>GV</strong>-Mobile Server V1.2.<br />
Without the <strong>GV</strong>-USB Dongle, <strong>GV</strong>-Mobile Server needs to be installed on the same computer<br />
as <strong>GV</strong>-System to encode the 32 channels connected to <strong>GV</strong>-System.<br />
6<br />
Figure 5<br />
RTSP<br />
Using the <strong>GV</strong>-USB Dongle, you can now install <strong>GV</strong>-Mobile Server on any computer and<br />
remotely connect to <strong>GV</strong>-<strong>Video</strong> Gateway. <strong>GV</strong>-Mobile Server can encode up to 32 of the 128 IP<br />
channels from <strong>GV</strong>-<strong>Video</strong> Gateway.<br />
Figure 6
2.1 Accessing <strong>GV</strong>-<strong>Video</strong> Gateway<br />
Feature Guide V8.5.3<br />
1. In <strong>GV</strong>-Mobile Server, click the Stream Source tab and select <strong>GV</strong>-<strong>Video</strong> Gateway.<br />
Figure 7<br />
2. Type the IP Address, Command Port, User Name and Password of the <strong>GV</strong>-<strong>Video</strong><br />
Gateway. The default command port for <strong>GV</strong>-<strong>Video</strong> Gateway is 11000.<br />
3. Click Apply.<br />
4. In the left menu, right-click a channel, click Source Camera, and select a channel on<br />
<strong>GV</strong>-<strong>Video</strong> Gateway.<br />
Figure 8<br />
7
5. Set the FPS, Quality, Codec and Resolution of the live view, and click Apply.<br />
6. Repeat step 4-5 for up to 32 channels.<br />
You can arrange up to 32 channels from <strong>GV</strong>-<strong>Video</strong> Gateway into matrix channels. Refer to<br />
Setting Matrix Channels, Chapter 11, DVR User's Manual on the Surveillance System<br />
Software DVD for detailed instructions.<br />
8
2.2 Viewing Live View in MJPEG Using Non-IE Browsers<br />
Feature Guide V8.5.3<br />
You can watch live view in MJPEG codec using non-IE browsers such as Google Chrome,<br />
Firefox and Safari.<br />
To enable MJPEG Stream:<br />
1. Click the Http-MJPEG tab and click Enable MJPEG Stream.<br />
Figure 9<br />
2. Modify the default HTTP Port 8080 if necessary.<br />
3. Set the Width and Height of the live view. The range is between 1 and 2048 pixels.<br />
4. Set an FPS from 1-30 fps and Quality from 1-99. Higher value indicates better quality.<br />
5. Click Apply.<br />
After completing the setting, you can now use the address below to access live view in non-IE<br />
browsers:<br />
http://:/cam_video_rs.cgi.jpg?cam=<br />
For example, http://192.168.3.117:8080/cam_video_rs.cgi.jpg?cam=1<br />
9
3. Enhanced Motion Detection Sensitivity<br />
Motion Detection is now enhanced to improve sensitivity. Previously, <strong>GV</strong>-System uses images<br />
in QCIF resolution to determine whether motion is present. In V8.5.3, motion is detected using<br />
images in CIF resolution, which provides more details and better precision.<br />
10<br />
Figure 10
4. Wide View for Wall Mounted Fisheye Camera<br />
Feature Guide V8.5.3<br />
When a <strong>GV</strong>-Fisheye Camera is set to Wall Mount for Camera Position and Geo Fisheye:<br />
180 degree for Camera Modes, you can now enable Wide View to increase the height of the<br />
180 degree view.<br />
Figure 11: Wide View Disabled Figure 12: Wide View Enabled<br />
When Wide View is enabled, the height of the camera view is increased to include the more<br />
distorted area toward the edge of the camera. On the other hand, when Wide View is disabled,<br />
the curved portion of the camera view is cropped, which reduces the height of the camera<br />
view.<br />
To enable wide view:<br />
1. Right-click the fisheye camera view, click the camera number and select Geo Fisheye.<br />
2. Right-click the camera view again, select Fisheye Option and select Settings. This<br />
dialog box appears.<br />
Figure 13<br />
3. Select Wide View and click OK.<br />
11
5. Enhanced Smoothness in Fisheye Object Tracking<br />
360° Object Tracking function for fisheye camera is now enhanced to make video smoother<br />
and move around less frequently. Previously, the camera view readjusts position every time<br />
the subject moves in order to keep the moving subject at the center of the camera view. In<br />
V8.5.3, the camera view only re-centers on the subject when the subject is at the edge of the<br />
camera view and about to disappear from sight. As a result, the video appears smoother.<br />
12<br />
Figure 14
6. Support for Fisheye Features in ViewLog<br />
Feature Guide V8.5.3<br />
In ViewLog, you can now apply object tracking to video recorded by fisheye cameras. You can<br />
also set the recorded fisheye video to wide view or change the display ratio.<br />
To apply 360° Object Tracking:<br />
1. In ViewLog, select a video recorded by a fisheye camera.<br />
2. Click the View Mode button, select Single View, select Geo Fisheye and select Geo<br />
Fisheye: 360 degree.<br />
Figure 15<br />
3. Right-click the fisheye image, select Fisheye Option, select 360 Object Tracking and<br />
select Advanced Settings. This dialog box appears.<br />
Figure 16<br />
4. Configure the object tracking settings. See Setting Up a <strong>GV</strong>-Fisheye Camera, Chapter 3,<br />
DVR User's Manual on the Surveillance System Software DVD for detailed instructions.<br />
5. To enable object tracking, right-click the fisheye image, select Fisheye Option, select<br />
360 Object Tracking and select Tracking.<br />
13
6. Click the Play button to see object tracking applied to the video.<br />
14<br />
Figure 17<br />
To enable wide view or change display ratio:<br />
1. In ViewLog, select a video recorded by a fisheye camera.<br />
2. Click the View Mode button, select Single View, select Geo Fisheye and select a type<br />
of camera mode.<br />
3. Right-click the fisheye image, select Fisheye Option and select Settings. This dialog<br />
box appears.<br />
Figure 18<br />
4. Set the screen ratio of the video to be 4:3 or 16:9.<br />
5. Select Wide View to increases the height of the 180 degree view when camera position<br />
is set to wall mount. For more details on Wide View, see 4. Wide View for Wall Mounted<br />
Fisheye Camera.<br />
6. Click OK.
7. Saving PIP / PAP View in AVI Format<br />
Feature Guide V8.5.3<br />
Using V8.5.3, you can now apply PIP (Picture-in-Picture) or PAP (Picture-and-Picture) view to<br />
a recorded video in ViewLog and then save the video in AVI format. When playing back the<br />
AVI file, the video will be displayed in PIP or PAP view.<br />
1. Select a recorded video in ViewLog.<br />
2. Click the View Mode button, select Single View and select Mega Pixel View (PIP) or<br />
Mega Pixel View (PAP).<br />
3. For PIP View, adjust the navigation box to have a close-up view of the selected area. For<br />
PAP View, drag up to 7 areas to see the close-up views.<br />
4. Click the Save as AVI button and select Save as AVI. The view you have set appears.<br />
Figure 19<br />
Note: If the frame of the PIP / PAP navigation box is partially invisible, click the Setting tab,<br />
click the arrow next to <strong>Video</strong> Effects and clear the selection for De-Interlace.<br />
5. Click OK to save the video in AVI format. When you play the AVI file, the PIP or PAP<br />
view will be applied.<br />
For more details on PIP or PAP view, see Picture-in-Picture View or Picture-and-Picture View,<br />
Chapter 1, DVR User's Manual on the Surveillance System Software DVD.<br />
15
8. Flexible Privilege Settings in Authentication Server<br />
In Authentication Server, you can now assign different privileges for each <strong>GV</strong>-System or group<br />
of <strong>GV</strong>-Systems to a user account. Previously, only one set of privileges can be assigned to<br />
each user account and you apply the same setting to one or multiple <strong>GV</strong>-Systems.<br />
16<br />
Figure 20: Before V8.5.3 Figure 21: V8.5.3 and after<br />
1. In Authentication Server, click the Account Setup button and select Password<br />
Setup to display the Password Setup window.<br />
Figure 22
Feature Guide V8.5.3<br />
2. Select a user account to assign permission and rights. The available <strong>GV</strong>-Systems or<br />
groups of <strong>GV</strong>-Systems are listed under the account.<br />
3. Use the Valid Group drop-down list to select All DVR or a group.<br />
4. Under the user account, click a <strong>GV</strong>-System or group and select the options you want to<br />
grant permission.<br />
5. Repeat the step above for each <strong>GV</strong>-System or group.<br />
Using Figure 21 as an example, you can grant permission for Security Staff to back up and<br />
delete event log for Office A DVR, but assign a different set of privileges for Office B DVR.<br />
17
9. Support for New IP Devices<br />
The following <strong>GeoVision</strong> and third-party IP devices will now be supported in V8.5.3.<br />
� Audio: A “�” mark indicates the <strong>GV</strong>-System supports the two-way audio communication<br />
18<br />
with the device; “N/A” indicates the function is unavailable in the device.<br />
� Codec: The video codec supported by <strong>GV</strong>-System are listed.<br />
� PTZ: A “�” mark indicates the <strong>GV</strong>-System supports the PTZ function of the device; “N/A”<br />
indicates the function is unavailable in the device.<br />
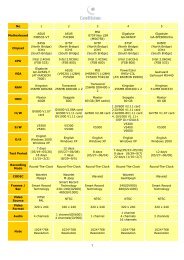
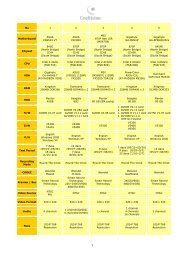
Brand Model Audio Codec PTZ<br />
ACTi<br />
KCM-5211<br />
KCM-5311<br />
�<br />
�<br />
JPEG / MPEG-4 / H.264<br />
JPEG / MPEG-4 / H.264<br />
N/A<br />
N/A<br />
<strong>GV</strong>-BX140DW � JPEG / MPEG-4 / H.264 N/A<br />
<strong>GV</strong>-CR420 � JPEG / MPEG-4 / H.264 N/A<br />
<strong>GV</strong>-FER521 � JPEG / MPEG-4 / H.264 N/A<br />
<strong>GV</strong>-MDR120 � JPEG / MPEG-4 / H.264 N/A<br />
<strong>GV</strong>-MDR140W � JPEG / MPEG-4 / H.264 N/A<br />
<strong>GeoVision</strong> <strong>GV</strong>-MDR220 � JPEG / MPEG-4 / H.264 N/A<br />
<strong>GV</strong>-MDR320 � JPEG / MPEG-4 / H.264 N/A<br />
<strong>GV</strong>-MDR520 � JPEG / MPEG-4 / H.264 N/A<br />
<strong>GV</strong>-MFD140W � JPEG / MPEG-4 / H.264 N/A<br />
<strong>GV</strong>-SD220 � JPEG / MPEG-4 / H.264 �<br />
<strong>GV</strong>-VS11 � JPEG / MPEG-4 / H.264 N/A<br />
LG<br />
LSW2010<br />
LW345<br />
�<br />
�<br />
JPEG / MPEG-4 / H.264<br />
JPEG / MPEG-4 / H.264<br />
N/A<br />
N/A<br />
Panasonic<br />
DG-SF334<br />
DG-SP304<br />
�<br />
�<br />
JPEG / MPEG-4 / H.264<br />
JPEG / MPEG-4 / H.264<br />
N/A<br />
N/A<br />
Note: When manually adding the IP device to <strong>GV</strong>-System, select Auto Detect if the model<br />
is not listed in the Device drop-down list.