- Page 1 and 2:
Before attempting to connect or ope
- Page 3 and 4:
Contents Important Notice for V8.5.
- Page 10:
1.1 GV-4008 The GV-4008 Card provid
- Page 15 and 16:
Troubleshooting Power Supply Issues
- Page 17 and 18:
Video Capture Cards 8. To access th
- Page 19:
1.2 GV-4008A 1 Video Capture Cards
- Page 24 and 25:
Specifications Interface PCI-E x1 1
- Page 28 and 29:
20 Figure 1-12
- Page 30 and 31:
Installing Drivers After installing
- Page 32 and 33:
1.4 GV-1120A, 1240A, 1480A GV-Combo
- Page 36:
Connecting GV-NET/IO Card to GV-Com
- Page 39 and 40:
Installing Drivers 1 Video Capture
- Page 41 and 42:
Interface Type PCI-E x1 Input Type
- Page 45 and 46:
Figure 1-20 1 Video Capture Cards A
- Page 47 and 48:
Installing Drivers 1 Video Capture
- Page 49:
1.6 GV-900A 1 Video Capture Cards O
- Page 53 and 54:
Installing Drivers 1 Video Capture
- Page 55 and 56:
1.7 GV-650A, GV-800A 1 Video Captur
- Page 57:
Video Capture Cards For the BNC-typ
- Page 60 and 61:
Installing Drivers After installing
- Page 62 and 63:
Interface PCI, PCI-E x1 Input Type
- Page 64 and 65:
Connecting One GV-600A Card For the
- Page 67 and 68:
Connecting Hardware Watchdog 1 Vide
- Page 69 and 70:
Specifications Interface PCI Input
- Page 73 and 74:
Connecting Hardware Watchdog 1 Vide
- Page 75 and 76:
Specifications Interface PCI, PCI-E
- Page 79 and 80:
1.11 Installing Drivers 1 Video Cap
- Page 81 and 82:
1 Video Capture Cards GV-4008 GV-40
- Page 83 and 84:
1 Video Capture Cards 1.13 Comparis
- Page 85 and 86:
1 Video Capture Cards GV-1008 GV-11
- Page 87 and 88:
1 Video Capture Cards GV-600B x 2 G
- Page 91 and 92:
2.2 Installing the System 2 Softw a
- Page 93 and 94:
2.3 Program List The Surveillance S
- Page 95:
2.4 User’s Manuals 2 Softw are I
- Page 99 and 100:
Start/stop recording Set up recordi
- Page 101 and 102:
Basic Operation 2. In the Video Log
- Page 103 and 104:
3.4 Choosing the Recording Mode 3 B
- Page 105 and 106:
Basic Operation 5. Click the arrow
- Page 107:
3.7 Playing the Video You can play
- Page 110 and 111:
6. Enter the Start Time and End Tim
- Page 112 and 113:
Before attempting to connect or ope
- Page 114 and 115:
Contents Important Notice for V8.5.
- Page 116:
Important Notice for V8.5 GPU Decod
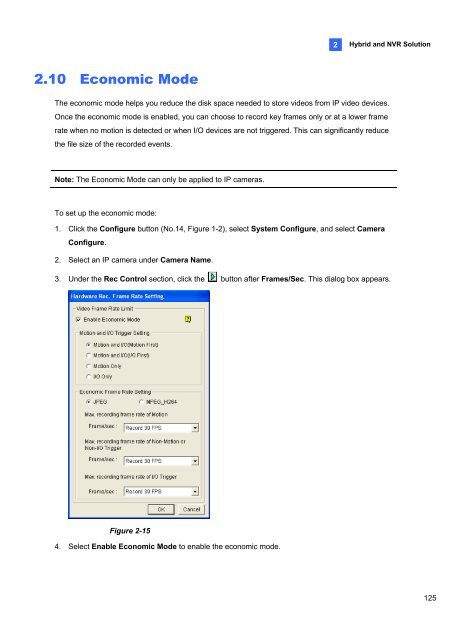
- Page 124:
Connecting Hardware Watchdog 1 Vide
- Page 127 and 128:
2. Select the cameras you want to s
- Page 129 and 130:
Specifications Interface PCI-E x1 1
- Page 133:
Connecting Hardware Watchdog Insert
- Page 136:
1.3 GV-3008 1 Video Capture Cards T
- Page 140 and 141:
Connecting Hardware Watchdog 1 Vide
- Page 142 and 143:
Specifications Interface PCI-E x1 G
- Page 144:
Packing List (D-Type) 1. GV-Combo A
- Page 149 and 150:
Connecting Hardware Watchdog Insert
- Page 151 and 152:
Specifications Interface Type PCI-E
- Page 153:
1.5 GV-1008 The GV-1008, as a three
- Page 157 and 158:
Connecting Hardware Watchdog Insert
- Page 159 and 160:
Specifications Interface PCI-E x1 I
- Page 163 and 164:
Connecting Hardware Watchdog Insert
- Page 165 and 166:
Specifications Interface PCI-E x1 I
- Page 167 and 168:
Connecting One GV-650A / GV-800A Ca
- Page 170 and 171:
Connecting Hardware Watchdog 1 Vide
- Page 172 and 173:
Specifications Interface PCI, PCI-E
- Page 174 and 175:
1.8 GV-600A 1 Video Capture Cards T
- Page 176:
Video Capture Cards For the BNC-Typ
- Page 179 and 180:
Installing Drivers After installing
- Page 181:
1.9 GV-600B, GV-650B, GV-800B There
- Page 185 and 186:
Installing Drivers After installing
- Page 187:
Interface PCI-E x1 Input Type DVI V
- Page 191 and 192:
1.12 Comparison Chart (H/W Compress
- Page 193 and 194:
78 GV-3008 GV-3008 x 2 Interface PC
- Page 195 and 196:
80 GV-600B GV-650B GV-800B GV-900A
- Page 197 and 198:
1.14 Comparison Chart (S/W Compress
- Page 199:
84 GV-1008 x 2 GV-1120A x 2 GV-1240
- Page 204 and 205:
Installing Drivers 2 Hardware Acces
- Page 207 and 208:
Connections with Two Video Capture
- Page 209 and 210:
RS-485 Device Connections To connec
- Page 212 and 213:
Overview Relay Out 1 Relay Out 2 Re
- Page 215:
100 2. You can connect a RJ-11 to U
- Page 219 and 220:
Extended Connections Via the RS-485
- Page 221 and 222:
2.5 GV-Hub V2 The GV-Hub V2 adds fo
- Page 225 and 226:
2.6 GV-COM V2 The GV-COM V2 adds on
- Page 229:
Connections Insert the GV-I/O 12-In
- Page 233:
Specifications OS Supported Output
- Page 236 and 237:
Connections to PC There are three w
- Page 238 and 239:
Extending Transmission over the Dis
- Page 242 and 243:
Overview DIP Switch Figure 2-37 2 H
- Page 244 and 245:
Assigning Addresses to GV-I/O Box 8
- Page 246:
Hardware Accessories 3. Multiple pi
- Page 250 and 251:
Connections to PC There are two way
- Page 252:
Extending Transmission over the Dis
- Page 255 and 256:
2.12.1 Fixed IP Connection To assig
- Page 257 and 258:
2. In the Username field, type a na
- Page 263 and 264:
2.12.7 Updating Firmware To update
- Page 265:
2.13 Installing USB Driver To use t
- Page 269 and 270:
Installing the System To install th
- Page 271:
Third page: 21. Local DDNS Server 2
- Page 274 and 275:
The controls in the main screen: No
- Page 276 and 277:
The controls in the ViewLog window:
- Page 278 and 279:
4.3 SingleView Viewer 16 15 14 13 1
- Page 280 and 281:
The controls in the MultiView Viewe
- Page 282 and 283:
The controls in the Center V2 windo
- Page 284 and 285:
Troubleshooting
- Page 286 and 287:
Troubleshooting A message “Can’
- Page 288 and 289:
Multicam Digital Surveillance Syste
- Page 291 and 292:
GPU Decoding Specifications iv Impo
- Page 293 and 294:
vi 1.6 System Idle Protection .....
- Page 295 and 296:
viii 3.3.1 Setting Digital Object T
- Page 297 and 298:
x 4.8 Remote Playback Server ......
- Page 299 and 300:
xii 8 Remote Viewing ..............
- Page 301 and 302:
xiv 9.2 Creating an E-Map File.....
- Page 303 and 304:
xvi 11.8 Hot-Swap Recording........
- Page 306 and 307:
Chapter 1 Configuring Main System..
- Page 308:
1.17 Touch Screen Support .........
- Page 312:
11 Network Enables the connection t
- Page 321 and 322:
16 Note: 1. If the designated stora
- Page 326:
1.2.4 Setting Day and Night Recordi
- Page 339 and 340:
34 1.3.3 Adjusting Video Attributes
- Page 345 and 346:
40 Activating Turbo Mode 1. Click t
- Page 347 and 348:
42 1.4.2 Associate Monitoring You c
- Page 349 and 350:
44 1.4.3 Daylight Saving Time Recor
- Page 351:
46 1.5 Account and Password The pas
- Page 356 and 357:
1.5.4 Preventing Unauthorized Syste
- Page 358 and 359:
1.6 System Idle Protection The Syst
- Page 360:
1.6.3 Auto Start Recording If the a
- Page 371 and 372:
66 1.8.2 Special Days Schedule 1. C
- Page 373 and 374:
68 1.8.4 Center V2 Schedule Set up
- Page 376 and 377:
After setup is completed, the GVSer
- Page 378:
1.9.2 Merging Video Events You can
- Page 383 and 384: 78 1.10 Alert Notification When eve
- Page 386 and 387: [Email-Alerts Setup] Specify the ti
- Page 388 and 389: 1. In the Dial HotLine drop-down li
- Page 392 and 393: 1.11.2 PTZ Idle Protection 1 Config
- Page 394: 1.11.3 Auto Switching PTZ Control P
- Page 399 and 400: 94 1.13.2 Noise Detection to Reduce
- Page 401 and 402: 96 1.14 Picture-in-Picture View Wit
- Page 404: 1.17 Touch Screen Support The GV-Sy
- Page 409 and 410: 104 2. Click the Configure button,
- Page 412: Chapter 2 Hybrid and NVR Solution .
- Page 420 and 421: 2.5.2 Scanning Camera You can add c
- Page 424: 2.6 PTZ IP Camera To set up the IP
- Page 428 and 429: 2.9 Camera Mapping Using GV IP Devi
- Page 432 and 433: Note: 2 Hybrid and NVR Solution 1.
- Page 435 and 436: 130 Chapter 3 Video Analysis ......
- Page 440 and 441: 6. Select Define Detect Region from
- Page 442 and 443: Zooming in Objects While the PTZ is
- Page 445 and 446: 140 Starting Object Zooming After t
- Page 447 and 448: 142 Setting up Advanced Single Came
- Page 449: 144 3.3 Digital Object Tracking Wit
- Page 453: 148 3.4 Object Counting and Intrusi
- Page 461: 156 3.5.3 Searching Object Index Yo
- Page 465 and 466: 160 3.6.2 Searching Video Snapshots
- Page 467: 162 3.7 Face Detection The Face Det
- Page 473 and 474: 168 3.9 Unattended and Missing Obje
- Page 475: 170 3.9.2 Detecting Missing Objects
- Page 482 and 483:
3.12 Panorama View Spliced from mul
- Page 486 and 487:
3.13 Video Defogging Smoky environm
- Page 488 and 489:
3.14 Video Stabilization Images fro
- Page 490 and 491:
3.15 Wide Angle Lens Dew arping Cam
- Page 493 and 494:
188 5. To set detection sensitivity
- Page 500:
3.19 Advanced Unattended Object Det
- Page 506 and 507:
3.21 Video Analysis Schedule A sche
- Page 512:
Note: 1. For GV-Fisheye Cameras, th
- Page 515 and 516:
210 4.10 Fast Key Reference........
- Page 518 and 519:
The controls in the ViewLog window:
- Page 521:
216 The option of Thumbnail View is
- Page 524 and 525:
4.1.3 Bookmarking a Frame 4 Playing
- Page 526 and 527:
4.1.4 Searching a Video Event 4 Pla
- Page 528:
List Mode and Line Mode 4 Playing B
- Page 531 and 532:
226 4.1.5 Merging and Exporting Vid
- Page 538:
4.1.7 Saving Images You can save th
- Page 541 and 542:
236 To Enable the Face Mask for an
- Page 543 and 544:
238 4.1.11 Displaying GPS Data If t
- Page 545 and 546:
240 4.1.13 Advanced Settings The Se
- Page 552:
4.2 Object Search This feature allo
- Page 555 and 556:
250 The buttons on the Advanced Log
- Page 558 and 559:
4.4 Quick Search Quick Search is a
- Page 560:
4.4.1 Event Query Settings Click th
- Page 563:
258 3. Type the connection informat
- Page 567 and 568:
262 4.6 LAN ViewLog Using LAN ViewL
- Page 570 and 571:
4.7.2 Retrieving Recordings from Mu
- Page 572 and 573:
4.7.4 Resuming Backup 4 Playing Bac
- Page 574:
Playing Back Video Files 7. Select
- Page 577:
272 Chapter 5 Backup, Deletion and
- Page 585 and 586:
280 5.3.2 Including the Player in t
- Page 587 and 588:
282 . Tip: If you just want to dele
- Page 589 and 590:
284 Note: 1. The repair and the sea
- Page 591 and 592:
286 5. You may see the distorted im
- Page 594:
6.1 I/O Device Setup To connect the
- Page 598 and 599:
6.1.2 Keeping Last Toggle Status Th
- Page 601:
296 6.3 Advanced I/O Applications I
- Page 607 and 608:
302 6.3.5 Overlaying Input Name ont
- Page 609:
304 6.5 I/O Enable Setting You can
- Page 619 and 620:
314 6.6.7 Editing Background Image
- Page 622 and 623:
6.6.10 Managing a Group of I/O Devi
- Page 625 and 626:
320 6.8 Virtual I/O Control Through
- Page 627:
322 Chapter 7 Point-Of-Sale (POS) A
- Page 630 and 631:
Settings At the POS device: 7 Point
- Page 633:
328 7.1.2 Data Capture Box Integrat
- Page 636 and 637:
7.2.2 Network Connection 1. Connect
- Page 638:
7.3 POS Device Setup To set up a PO
- Page 644:
7.6 Abnormal Transaction Alerts 7 P
- Page 647:
342 7.7 Codepage Mapping This featu
- Page 653 and 654:
348 5. When the defined text is ide
- Page 655:
350 8.6.2 Host List................
- Page 658 and 659:
3. On any remote computer, open an
- Page 661:
356 8.2.2 Server Settings Figure 8-
- Page 671 and 672:
366 3. Click the Settings tab, and
- Page 673 and 674:
368 8.2.11 FTP Server Settings You
- Page 675 and 676:
370 8.3 Single View Viewer After yo
- Page 677 and 678:
372 8.3.1 Control Panel A control p
- Page 679:
374 8.3.3 Video Recording Click the
- Page 684 and 685:
8.3.7 PTZ Control Click the Camera
- Page 686:
8.3.9 I/O Control The new interface
- Page 689:
384 8.3.12 Picture-and-Picture View
- Page 692:
[Monitor] Enable I/O and Schedule m
- Page 695 and 696:
390 8.6 Multi View Viewer Multi Vie
- Page 697 and 698:
392 9 Configure 10 Edit Host 11 Cam
- Page 699 and 700:
394 8.6.3 Channel Status Informatio
- Page 701 and 702:
396 8.6.5 Combination of Multiple H
- Page 703 and 704:
398 8.6.6 Video Recording You can s
- Page 705 and 706:
400 8.6.8 Hardware-Compressed or Me
- Page 707 and 708:
402 8.6.10 Visual PTZ Control Panel
- Page 709:
404 8.6.12 Remote ViewLog More than
- Page 713 and 714:
408 8.6.15 Host Information To show
- Page 715 and 716:
410 8.7 Multicast and Audio Broadca
- Page 717 and 718:
412 8.7.2 Sending Audio Broadcast Y
- Page 719 and 720:
414 Through the Web Interface of We
- Page 721 and 722:
416 8.9 Remote Playback With the Re
- Page 724 and 725:
8. To export the search results, se
- Page 726 and 727:
8.13 Mobile Phone Applications With
- Page 728 and 729:
8.13.1 Windows PDA GV-GView V2 is a
- Page 730 and 731:
Playing Back the Recordings To play
- Page 732 and 733:
Accessing I/O Devices To access the
- Page 734 and 735:
Controlling PTZ Cameras To control
- Page 736 and 737:
8.13.2 Windows Smartphone With the
- Page 738 and 739:
3. On the login screen, enter the I
- Page 740 and 741:
Other Functions In addition to live
- Page 742 and 743:
Connecting to GV-System The followi
- Page 744 and 745:
4. On the Login screen, enter the I
- Page 746 and 747:
Connecting to GV-System To connect
- Page 749 and 750:
444 8.13.5 3G Mobile Phone Without
- Page 753 and 754:
448 2. Enter the IP address of your
- Page 755 and 756:
450 Accessing Live View To access l
- Page 757 and 758:
452 PTZ Speed Control for PTZ Camer
- Page 759 and 760:
454 3. Select the desired recording
- Page 761 and 762:
456 Accessing Live View To access l
- Page 763 and 764:
458 PTZ Speed Control for PTZ Camer
- Page 765 and 766:
460 3. Select the desired recording
- Page 767:
462 Access to a GV-IP device: 1. Ta
- Page 771 and 772:
466 8. If the camera supports PTZ f
- Page 773 and 774:
E-Map Application E-Map displays th
- Page 775 and 776:
470 9.2 Creating an E-Map File To c
- Page 777 and 778:
472 9.2.1 Creating an E-Map File fo
- Page 779 and 780:
474 9.3.1 Setting the Pop-up Map Fu
- Page 781 and 782:
476 The controls in the Remote E-Ma
- Page 785 and 786:
480 9.4.4 Viewing Host Information
- Page 787 and 788:
482 9.5 E-Map Server The E-Map Serv
- Page 789 and 790:
484 9.5.3 Setting E-Map Server Befo
- Page 791 and 792:
486 9.5.5 Accessing Authentication
- Page 793 and 794:
Short Message Service Via a GSM/GPR
- Page 797:
492 [Message Filter] Figure 10-4 Se
- Page 802 and 803:
10.4.2 Viewing SMS Log Click the SM
- Page 804:
10.5 Password Security To prevent u
- Page 808 and 809:
10.6.3 Setting Alert Notification T
- Page 810 and 811:
11.7.3 Customizing the Features ...
- Page 812 and 813:
Useful Utilities This chapter discu
- Page 814:
11.1.2 Registering Domain Name with
- Page 818 and 819:
11.1.4 Local DDNS Server The Local
- Page 820 and 821:
MultiCast Mode Multicast Network is
- Page 823:
518 11.2.3 Installing TwinDVR The T
- Page 826:
Starting WebCam Server at TwinDVR C
- Page 829 and 830:
524 11.3.2 Running the Watermark Pr
- Page 831 and 832:
526 11.4 Twin View Display You can
- Page 833 and 834:
528 11.5 Windows Lockup This featur
- Page 835 and 836:
530 Settings Click the Settings but
- Page 837 and 838:
532 11.5.3 Token File for Save Mode
- Page 839 and 840:
534 11.6.2 The Server Window Go to
- Page 841 and 842:
536 11.6.4 Creating a User Account
- Page 843:
538 b. To log into the server using
- Page 848 and 849:
Note: When the disconnection icon a
- Page 850 and 851:
3. Click Tools on the menu bar, and
- Page 852:
11.7 Fast Backup and Restore With t
- Page 855 and 856:
550 11.7.4 Backing up and Restoring
- Page 857 and 858:
552 11.8 Hot-Swap Recording The pro
- Page 860 and 861:
3 DVR Database Info Indicates the p
- Page 863 and 864:
558 11.8.5 Logging In Automatically
- Page 866 and 867:
11.9 Backup Server With Backup Serv
- Page 868:
11.9.2 Enabling Backup Server Befor
- Page 873 and 874:
568 11.9.5 Viewing Server Status Yo
- Page 875 and 876:
570 11.9.6 Retrieving Recorded File
- Page 878 and 879:
11.10.2 Starting Backup Viewer Befo
- Page 882:
11.10.5 Using Remote ViewLog Using
- Page 885 and 886:
580 11.11.2 Allowing Remote Control
- Page 891:
586 11.12 Report Generator With the
- Page 899 and 900:
594 4. Type the IP or domain name,
- Page 901:
596 11.13 Spot Monitor Controller G
- Page 904:
11.13.2 Spot Monitor Panel With the
- Page 911 and 912:
606 2. Click the Display list. If y
- Page 913:
608 11.15.3 Setting Scanned Pages Y
- Page 918 and 919:
11.16 GIS Recording GV-System can r
- Page 920 and 921:
11.16.2 Recording GPS Locations of
- Page 922 and 923:
11.16.4 Viewing GPS Locations durin
- Page 924 and 925:
11.16.5 Sending GPS Data to the GV-
- Page 926 and 927:
6. In the Account for GPS Receiver
- Page 929 and 930:
624 11.17.3 Setting IP Devices 1. D
- Page 931:
626 11.18 MCamCtrl Utility for GV-J
- Page 934 and 935:
11.19.1 Starting the Mobile Server
- Page 936:
11.19.2 Connecting through GeoVisio
- Page 941:
Appendix A. USB Dongle Required for
- Page 946 and 947:
E. Supported IP Device Brands Appen
- Page 948 and 949:
G. Custom Icon Naming Chart for Mul
- Page 950 and 951:
I. Dual Stream Support List Appendi