Engine Manual Manual del motor - HPI Racing
Engine Manual Manual del motor - HPI Racing
Engine Manual Manual del motor - HPI Racing

You also want an ePaper? Increase the reach of your titles
YUMPU automatically turns print PDFs into web optimized ePapers that Google loves.
2<br />
1<br />
2<br />
3<br />
4<br />
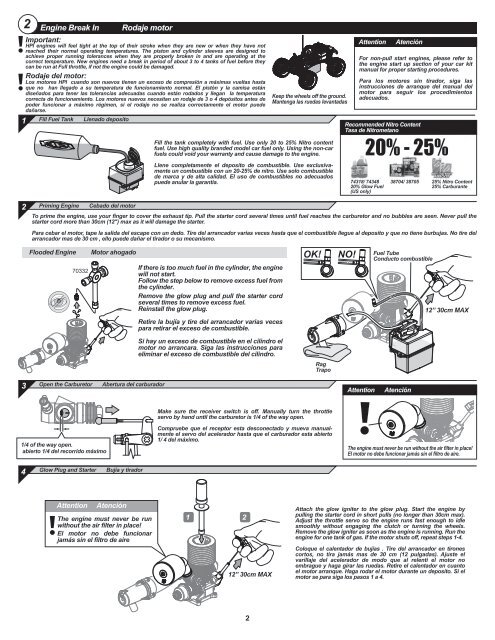
<strong>Engine</strong> Break In Rodaje <strong>motor</strong><br />
Important:<br />
<strong>HPI</strong> engines will feel tight at the top of their stroke when they are new or when they have not<br />
reached their normal operating temperatures. The piston and cylinder sleeves are designed to<br />
achieve proper running tolerances when they are properly broken in and are operating at the<br />
correct temperature. New engines need a break in period of about 3 to 4 tanks of fuel before they<br />
can be run at Full throttle, if not the engine could be damaged.<br />
Rodaje <strong>del</strong> <strong>motor</strong>:<br />
Los <strong>motor</strong>es <strong>HPI</strong> cuando son nuevos tienen un exceso de compresión a máximas vueltas hasta<br />
que no han llegado a su temperatura de funcionamiento normal. El pistón y la camisa están<br />
diseñados para tener las tolerancias adecuadas cuando están rodados y llegan la temperatura<br />
correcta de funcionamiento. Los <strong>motor</strong>es nuevos necesitan un rodaje de 3 o 4 depósitos antes de<br />
poder funcionar a máximo régimen, si el rodaje no se realiza correctamente el <strong>motor</strong> puede<br />
dañarse.<br />
Fill Fuel Tank Llenado deposito<br />
Priming <strong>Engine</strong> Cebado <strong>del</strong> <strong>motor</strong><br />
2<br />
Keep the wheels off the ground.<br />
Mantenga las ruedas levantadas<br />
For non-pull start engines, please refer to<br />
the engine start up section of your car kit<br />
manual for proper starting procedures.<br />
Para los <strong>motor</strong>es sin tirador, siga las<br />
instrucciones de arranque <strong>del</strong> manual <strong>del</strong><br />
<strong>motor</strong> para seguir los procedimientos<br />
adecuados.<br />
20% - 25%<br />
To prime the engine, use your finger to cover the exhaust tip. Pull the starter cord several times until fuel reaches the carburetor and no bubbles are seen. Never pull the<br />
starter cord more than 30cm (12") max as it will damage the starter.<br />
Para cebar el <strong>motor</strong>, tape la salida <strong>del</strong> escape con un dedo. Tire <strong>del</strong> arrancador varias veces hasta que el combustible llegue al deposito y que no tiene burbujas. No tire <strong>del</strong><br />
arrancador mas de 30 cm , ello puede dañar el tirador o su mecanismo.<br />
Flooded <strong>Engine</strong> Motor ahogado<br />
70332<br />
Open the Carburetor Abertura <strong>del</strong> carburador<br />
1/4 of the way open.<br />
abierto 1/4 <strong>del</strong> recorrido máximo<br />
Glow Plug and Starter Bujía y tirador<br />
Attention Atención<br />
The engine must never be run<br />
without the air filter in place!<br />
El <strong>motor</strong> no debe funcionar<br />
jamás sin el filtro de aire<br />
Fill the tank completely with fuel. Use only 20 to 25% Nitro content<br />
fuel. Use high quality branded mo<strong>del</strong> car fuel only. Using the non-car<br />
fuels could void your warranty and cause damage to the engine.<br />
Llene completamente el deposito de combustible. Use exclusivamente<br />
un combustible con un 20-25% de nitro. Use solo combustible<br />
de marca y de alta calidad. El uso de combustibles no adecuados<br />
puede anular la garantía.<br />
If there is too much fuel in the cylinder, the engine<br />
will not start.<br />
Follow the step below to remove excess fuel from<br />
the cylinder.<br />
Remove the glow plug and pull the starter cord<br />
several times to remove excess fuel.<br />
Reinstall the glow plug.<br />
Retire la bujía y tire <strong>del</strong> arrancador varias veces<br />
para retirar el exceso de combustible.<br />
Si hay un exceso de combustible en el cilindro el<br />
<strong>motor</strong> no arrancara. Siga las instrucciones para<br />
eliminar el exceso de combustible <strong>del</strong> cilindro.<br />
Make sure the receiver switch is off. <strong>Manual</strong>ly turn the throttle<br />
servo by hand until the carburetor is 1/4 of the way open.<br />
Compruebe que el receptor esta desconectado y mueva manualmente<br />
el servo <strong>del</strong> acelerador hasta que el carburador esta abierto<br />
1/ 4 <strong>del</strong> máximo.<br />
1 2<br />
12” 30cm MAX<br />
OK!<br />
Rag<br />
Trapo<br />
Attention Atención<br />
Recommended Nitro Content<br />
Tasa de Nitrometano<br />
NO!<br />
74318/ 74348<br />
20% Glow Fuel<br />
(US only)<br />
Attention Atención<br />
38704/ 38705 25% Nitro Content<br />
25% Carburante<br />
Fuel Tube<br />
Conducto combustible<br />
12” 30cm MAX<br />
The engine must never be run without the air filter in place!<br />
El <strong>motor</strong> no debe funcionar jamás sin el filtro de aire.<br />
Attach the glow igniter to the glow plug. Start the engine by<br />
pulling the starter cord in short pulls (no longer than 30cm max).<br />
Adjust the throttle servo so the engine runs fast enough to idle<br />
smoothly without engaging the clutch or turning the wheels.<br />
Remove the glow igniter as soon as the engine is running. Run the<br />
engine for one tank of gas. If the <strong>motor</strong> shuts off, repeat steps 1-4.<br />
Coloque el calentador de bujías . Tire <strong>del</strong> arrancador en tirones<br />
cortos, no tira jamás mas de 30 cm (12 pulgadas). Ajuste el<br />
varillaje <strong>del</strong> acelerador de modo que al relenti el <strong>motor</strong> no<br />
embrague y haga girar las ruedas. Retire el calentador en cuanto<br />
el <strong>motor</strong> arranque. Haga rodar el <strong>motor</strong> durante un deposito. Si el<br />
<strong>motor</strong> se para siga los pasos 1 a 4.