Engine Manual Manual del motor - HPI Racing
Engine Manual Manual del motor - HPI Racing
Engine Manual Manual del motor - HPI Racing

Create successful ePaper yourself
Turn your PDF publications into a flip-book with our unique Google optimized e-Paper software.
Es<br />
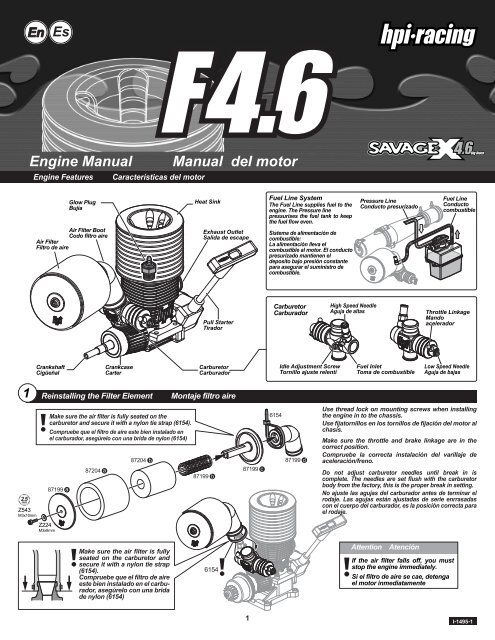
<strong>Engine</strong> <strong>Manual</strong> <strong>Manual</strong> <strong>del</strong> <strong>motor</strong><br />
<strong>Engine</strong> Features Características <strong>del</strong> <strong>motor</strong><br />
1 Reinstalling the Filter Element Montaje filtro aire<br />
2.5<br />
mm<br />
Z543<br />
M3x10mm<br />
Z224<br />
M3x8mm<br />
Make sure the air filter is fully seated on the<br />
carburetor and secure it with a nylon tie strap (6154).<br />
Compruebe que el filtro de aire este bien instalado en<br />
el carburador, asegúrelo con una brida de nylon (6154)<br />
87199 a<br />
Glow Plug<br />
Bujía<br />
Air Filter Boot<br />
Codo filtro aire<br />
Air Filter<br />
Filtro de aire<br />
Crankshaft<br />
Cigüeñal<br />
87204 a<br />
Crankcase<br />
Carter<br />
87204 b<br />
Make sure the air filter is fully<br />
seated on the carburetor and<br />
secure it with a nylon tie strap<br />
(6154).<br />
Compruebe que el filtro de aire<br />
este bien instalado en el carburador,<br />
asegúrelo con una brida<br />
de nylon (6154)<br />
Heat Sink<br />
Exhaust Outlet<br />
Salida de escape<br />
Pull Starter<br />
Tirador<br />
Carburetor<br />
Carburador<br />
87199 b<br />
6154<br />
87199 c<br />
1<br />
Fuel Line System<br />
The Fuel Line supplies fuel to the<br />
engine. The Pressure line<br />
pressurises the fuel tank to keep<br />
the fuel flow even.<br />
Sistema de alimentación de<br />
combustible:<br />
La alimentación lleva el<br />
combustible al <strong>motor</strong>. El conducto<br />
presurizado mantienen el<br />
deposito bajo presión constante<br />
para asegurar el suministro de<br />
combustible.<br />
Carburetor<br />
Carburador<br />
6154<br />
Idle Adjustment Screw<br />
Tornillo ajuste relenti<br />
87199 d<br />
High Speed Needle<br />
Aguja de altas<br />
Pressure Line<br />
Conducto presurizado<br />
Fuel Inlet<br />
Toma de combustible<br />
Use thread lock on mounting screws when installing<br />
the engine in to the chassis.<br />
Use fijatornillos en los tornillos de fijación <strong>del</strong> <strong>motor</strong> al<br />
chasis.<br />
Make sure the throttle and brake linkage are in the<br />
correct position.<br />
Compruebe la correcta instalación <strong>del</strong> varillaje de<br />
aceleración/freno.<br />
Do not adjust carburetor needles until break in is<br />
complete. The needles are set flush with the carburetor<br />
body from the factory, this is the proper break in setting.<br />
No ajuste las agujas <strong>del</strong> carburador antes de terminar el<br />
rodaje. Las agujas están ajustadas de serie enrrasadas<br />
con el cuerpo <strong>del</strong> carburador, es la posición correcta para<br />
el rodaje.<br />
Attention Atención<br />
If the air filter falls off, you must<br />
stop the engine immediately.<br />
Si el filtro de aire se cae, detenga<br />
el <strong>motor</strong> inmediatamente<br />
Fuel Line<br />
Conducto<br />
combustible<br />
Throttle Linkage<br />
Mando<br />
acelerador<br />
Low Speed Needle<br />
Aguja de bajas<br />
I-1495-1
2<br />
1<br />
2<br />
3<br />
4<br />
<strong>Engine</strong> Break In Rodaje <strong>motor</strong><br />
Important:<br />
<strong>HPI</strong> engines will feel tight at the top of their stroke when they are new or when they have not<br />
reached their normal operating temperatures. The piston and cylinder sleeves are designed to<br />
achieve proper running tolerances when they are properly broken in and are operating at the<br />
correct temperature. New engines need a break in period of about 3 to 4 tanks of fuel before they<br />
can be run at Full throttle, if not the engine could be damaged.<br />
Rodaje <strong>del</strong> <strong>motor</strong>:<br />
Los <strong>motor</strong>es <strong>HPI</strong> cuando son nuevos tienen un exceso de compresión a máximas vueltas hasta<br />
que no han llegado a su temperatura de funcionamiento normal. El pistón y la camisa están<br />
diseñados para tener las tolerancias adecuadas cuando están rodados y llegan la temperatura<br />
correcta de funcionamiento. Los <strong>motor</strong>es nuevos necesitan un rodaje de 3 o 4 depósitos antes de<br />
poder funcionar a máximo régimen, si el rodaje no se realiza correctamente el <strong>motor</strong> puede<br />
dañarse.<br />
Fill Fuel Tank Llenado deposito<br />
Priming <strong>Engine</strong> Cebado <strong>del</strong> <strong>motor</strong><br />
2<br />
Keep the wheels off the ground.<br />
Mantenga las ruedas levantadas<br />
For non-pull start engines, please refer to<br />
the engine start up section of your car kit<br />
manual for proper starting procedures.<br />
Para los <strong>motor</strong>es sin tirador, siga las<br />
instrucciones de arranque <strong>del</strong> manual <strong>del</strong><br />
<strong>motor</strong> para seguir los procedimientos<br />
adecuados.<br />
20% - 25%<br />
To prime the engine, use your finger to cover the exhaust tip. Pull the starter cord several times until fuel reaches the carburetor and no bubbles are seen. Never pull the<br />
starter cord more than 30cm (12") max as it will damage the starter.<br />
Para cebar el <strong>motor</strong>, tape la salida <strong>del</strong> escape con un dedo. Tire <strong>del</strong> arrancador varias veces hasta que el combustible llegue al deposito y que no tiene burbujas. No tire <strong>del</strong><br />
arrancador mas de 30 cm , ello puede dañar el tirador o su mecanismo.<br />
Flooded <strong>Engine</strong> Motor ahogado<br />
70332<br />
Open the Carburetor Abertura <strong>del</strong> carburador<br />
1/4 of the way open.<br />
abierto 1/4 <strong>del</strong> recorrido máximo<br />
Glow Plug and Starter Bujía y tirador<br />
Attention Atención<br />
The engine must never be run<br />
without the air filter in place!<br />
El <strong>motor</strong> no debe funcionar<br />
jamás sin el filtro de aire<br />
Fill the tank completely with fuel. Use only 20 to 25% Nitro content<br />
fuel. Use high quality branded mo<strong>del</strong> car fuel only. Using the non-car<br />
fuels could void your warranty and cause damage to the engine.<br />
Llene completamente el deposito de combustible. Use exclusivamente<br />
un combustible con un 20-25% de nitro. Use solo combustible<br />
de marca y de alta calidad. El uso de combustibles no adecuados<br />
puede anular la garantía.<br />
If there is too much fuel in the cylinder, the engine<br />
will not start.<br />
Follow the step below to remove excess fuel from<br />
the cylinder.<br />
Remove the glow plug and pull the starter cord<br />
several times to remove excess fuel.<br />
Reinstall the glow plug.<br />
Retire la bujía y tire <strong>del</strong> arrancador varias veces<br />
para retirar el exceso de combustible.<br />
Si hay un exceso de combustible en el cilindro el<br />
<strong>motor</strong> no arrancara. Siga las instrucciones para<br />
eliminar el exceso de combustible <strong>del</strong> cilindro.<br />
Make sure the receiver switch is off. <strong>Manual</strong>ly turn the throttle<br />
servo by hand until the carburetor is 1/4 of the way open.<br />
Compruebe que el receptor esta desconectado y mueva manualmente<br />
el servo <strong>del</strong> acelerador hasta que el carburador esta abierto<br />
1/ 4 <strong>del</strong> máximo.<br />
1 2<br />
12” 30cm MAX<br />
OK!<br />
Rag<br />
Trapo<br />
Attention Atención<br />
Recommended Nitro Content<br />
Tasa de Nitrometano<br />
NO!<br />
74318/ 74348<br />
20% Glow Fuel<br />
(US only)<br />
Attention Atención<br />
38704/ 38705 25% Nitro Content<br />
25% Carburante<br />
Fuel Tube<br />
Conducto combustible<br />
12” 30cm MAX<br />
The engine must never be run without the air filter in place!<br />
El <strong>motor</strong> no debe funcionar jamás sin el filtro de aire.<br />
Attach the glow igniter to the glow plug. Start the engine by<br />
pulling the starter cord in short pulls (no longer than 30cm max).<br />
Adjust the throttle servo so the engine runs fast enough to idle<br />
smoothly without engaging the clutch or turning the wheels.<br />
Remove the glow igniter as soon as the engine is running. Run the<br />
engine for one tank of gas. If the <strong>motor</strong> shuts off, repeat steps 1-4.<br />
Coloque el calentador de bujías . Tire <strong>del</strong> arrancador en tirones<br />
cortos, no tira jamás mas de 30 cm (12 pulgadas). Ajuste el<br />
varillaje <strong>del</strong> acelerador de modo que al relenti el <strong>motor</strong> no<br />
embrague y haga girar las ruedas. Retire el calentador en cuanto<br />
el <strong>motor</strong> arranque. Haga rodar el <strong>motor</strong> durante un deposito. Si el<br />
<strong>motor</strong> se para siga los pasos 1 a 4.
4<br />
5<br />
<strong>Engine</strong> does not start<br />
Fuel mixture needle settings are out of range<br />
<strong>Engine</strong> could be worn out<br />
Out of fuel<br />
Contaminated fuel<br />
Glow plug igniter is not charged<br />
Glow plug is bad<br />
No fuel flow<br />
<strong>Engine</strong> flooded<br />
<strong>Engine</strong> has overheated<br />
Throttle valve isn’t adjusted properly<br />
Air cleaner is blocked<br />
Idle speed is set too low<br />
Air bubbles in the fuel line<br />
Glow plug is bad<br />
<strong>Engine</strong> is overheated<br />
Airflow through system is bad<br />
Throttle servo is improperly set up<br />
Throttle servo glitch<br />
Idle adjustment screw is set too high<br />
No!<br />
Description Possible Problem Solution<br />
<strong>Engine</strong> starts, then stalls<br />
Idle speed too high<br />
El <strong>motor</strong> no arranca<br />
Set the needles to the factory setting, see page 5 sec 6<br />
Replace piston and sleeve<br />
Refill fuel tank<br />
Replace fuel<br />
Charge glow igniter<br />
Replace glow plug<br />
4<br />
Ok!<br />
Check fuel lines for cracks, leaks, and holes. Replace fuel line if necessary.<br />
Remove glow plug and discharge fuel<br />
Allow engine to cool, richen the fuel mixture and then restart<br />
Set idle and adjust needle valve to the maunfacturers recommended settings<br />
Check air filter. Clean or replace if necessary<br />
Adjust the idle speed<br />
Check for leaks or cracks in the fuel line<br />
Replace glow plug<br />
Allow engine to cool and then restart<br />
Check connections between tank, engine and exhaust<br />
Set servo to neutral and reset linkages according to radio and mo<strong>del</strong> manufacturer’s specifications.<br />
Replace the radio batteries<br />
Set idle screw to factory setting, see page 5 for proper idle speed adjustment<br />
Low speed needle set too lean<br />
Set low speed needle to factory setting, see page 5 for proper low speed needle adjustment<br />
Improperly set neutral on transmitter throttle trigger See your radio and car kit instructions for setting neutral on transmitter throttle trigger<br />
Problema Causa Solución<br />
El <strong>motor</strong> arranca y se para<br />
Relenti muy alto<br />
Optional Tuning Ajustes opcionales<br />
Idle Adjustment Screw Tornillo ajuste relenti<br />
Idle Adjustment Screw<br />
Tornillo ajuste relenti<br />
RPM Low<br />
Menos rev.<br />
RPM High<br />
Mas rev.<br />
Low Speed Needle Adjustment Ajuste aguja de bajas<br />
Troubleshooting Averías y soluciones<br />
Ajustes erróneos<br />
Motor usado<br />
Falta de combustible<br />
Combustible contaminado<br />
Calentador de bujía descargado<br />
Bujía defectuosa<br />
No llega combustible al <strong>motor</strong><br />
Motor ahogado<br />
Motor sobrecalentado<br />
Mal ajuste <strong>del</strong> acelerador<br />
Filtro aire obturado<br />
Relenti muy bajo<br />
Aire en los tubos de alimentación<br />
Bujía defectuosa<br />
Motor que se recalienta<br />
Flujo de aire pobre<br />
Servo <strong>del</strong> acelerador mal montado<br />
Problemas <strong>del</strong> servo <strong>del</strong> acelerador<br />
Ajuste muy alto <strong>del</strong> relenti<br />
Aguja de bajas muy seco<br />
Posición <strong>del</strong> neutro mal ajustada en la emisora<br />
About 1mm (0.04")<br />
Aprox 1mm (0,04")<br />
Improper Idle Speed Setting<br />
Clutch engaged and wheels turning.<br />
Ajuste incorrecto <strong>del</strong> relenti<br />
El embrague actúa y las ruedas giran<br />
The idle speed is set after the high-speed needle is adjusted and the engine is up to operating temperature. To properly set the Idle Adjustment Screw, turn on your radio system and<br />
set the throttle trim on the transmitter so that the throttle is in its neutral position. This will ensure that the throttle slide is fully closed and resting against the idle adjustment screw. Turn<br />
the idle adjustment screw counter clockwise to reduce the idle speed, or clockwise to increase it. The idle speed should be set high enough to keep the engine running smoothly but not<br />
engage the clutch and turn the wheels. Too high of an idle speed will prematurely wear out the clutch shoes and brake disk.<br />
El relenti debe ajustarse después de haber ajustado la aguja de altas y que el <strong>motor</strong> tenga la temperatura correcta. Para ajustar correctamente el relenti, conecte el equipo<br />
de radio y coloque el acelerador en posición neutra. Esto le asegura que el acelerado esta cerrado contra el tornillo de ajuste. Gire el tornillo de ajuste el sentido antihorario<br />
para disminuir las revoluciones o en sentido horario para aumentarlas. El relenti debe ser lo suficientemente elevado para que el <strong>motor</strong> gire regularmente sin que el<br />
embrague actúe y las ruedas no giren. Un relenti demasiado alto provocara un desgaste excesivo <strong>del</strong> embrague y <strong>del</strong> freno.<br />
Flush (Factory Setting)<br />
Enrrasado (ajuste de fabrica)<br />
Low Speed Needle<br />
Aguja de bajas More Fuel = Rich<br />
Mas carburante = Graso<br />
Less Fuel = Lean<br />
Menos carburante= Seco<br />
We recomend that you do not touch the Low Speed Needle. If adjustment is needed, the low-speed mixture is set after the high-speed needle is adjusted and the engine is up to<br />
operating temperature. Set the needle flush (Factory Setting) with the carburetor body, this setting is ideal for breaking in and starting your <strong>motor</strong>. For increased performance turn the<br />
needle in 1/8 turn increments; this will improve bottom end throttle response. To test your setting, place the car on the ground and let the engine idle for 30 seconds then accelerate to 3/4<br />
throttle. If there is a lot of white smoke and the car accelerates slowly, the mixture is too rich. If the engine accelerates quickly and then sputters, the mixture is too lean.<br />
When the low-speed needle is set correctly the engine's throttle response should be smooth and quick. CAUTION: Never turn in more than 2 turns from flush this will cause the<br />
engine to run too lean and may damage your engine! If the Low Speed Needle is set too lean you will experience the following: Flame out at part or 3/4 throttle or Overheating<br />
(Temperatures above 250°C (120°F) at the glow plug). If your engine is running too lean, reset the Low Speed Needle to its factory setting (Flush) and start the tuning process again.<br />
El relenti debe ajustarse después de haber ajustado la aguja de altas y que el <strong>motor</strong> tenga la temperatura correcta. Para ajustar correctamente el relenti, conecte el equipo de radio y<br />
coloque el acelerador en posición neutra. Esto le asegura que el acelerado esta cerrado contra el tornillo de ajuste. Gire el tornillo de ajuste el sentido anti-horario para disminuir las<br />
revoluciones o en sentido horario para aumentarlas. El relenti debe ser lo suficientemente elevado para que el <strong>motor</strong> gire regularmente sin que el embrague actúe y las ruedas no giren.<br />
Un relenti demasiado alto provocara un desgaste excesivo <strong>del</strong> embrague y <strong>del</strong> freno.<br />
Coloque los ajustes de fabrica<br />
Reemplace el conj. pistón camisa<br />
Llene el deposito<br />
Cambie de combustible<br />
Cargue el calentador de bujías<br />
Sustituya la bujía<br />
Compruebe que no hay fugas. Cambie los tubos si es necesario<br />
Desmonte la bujía y vacíe el <strong>motor</strong> de combustible<br />
Déjelo enfriar, ajuste la carburación mas grasa y vuelva a arrancar<br />
Ajuste el relenti y vuelva a ajustar el acelerador segun manual<br />
Compruebe el filtro, limpielo o cámbielo si es necesario<br />
Ajuste el relenti<br />
Compruebe los tubos de alimentación<br />
Sustituya la bujía<br />
Deje enfriar y vuelva a arrancar<br />
Compruebe los tubos entre el <strong>motor</strong>,deposito y escape<br />
Coloque el servo en neutral y monta el varillaje siguiendo el manual<br />
Cambie las baterías <strong>del</strong> equipo de radio<br />
Vuelva a los ajustes de fabrica, vea en la pag. 13 el reglaje correcto<br />
Ajuste la aguja de bajas como se indica en la pag. 13<br />
Revise las instrucciones de montaje de su kit y de su emisora para ajustar el acelerador.<br />
Proper Idle Speed Setting<br />
<strong>Engine</strong> runs smoothly without wheels turning.<br />
Ajuste correcto <strong>del</strong> relenti<br />
El <strong>motor</strong> gira regularmente y las ruedas no giran<br />
If idle is unstable, adjust the low<br />
speed needle to get a stable idle.<br />
Afterwards, you need to readjust<br />
the idle adjustment screw.<br />
Si el relenti es inestable, ajuste la<br />
aguja de bajas hasta que se<br />
estabilice. A continuación vuelva a<br />
ajustar el tornillo <strong>del</strong> relenti.
6 Carburetor Factory Setting (Break In Setting) Ajustes de fabrica <strong>del</strong> carburador (Rodaje)<br />
High Speed Needle, Idle Adjustment Screw and Low speed Needle are designed to be set flush with the carburetor body. This makes it easy to reset the carburetor to the Factory Break In Setting if needed<br />
La aguja de altas , el tornillo <strong>del</strong> relenti y la aguja de bajas están diseñados para funcionar enrrasados con el cuerpo <strong>del</strong> carburador. De este modo es mas fácil volver a los ajustes originales si es necesario<br />
7<br />
Flush<br />
Enrrasado<br />
Attention Atención<br />
When needle is over tightened,<br />
the needle is damaged.<br />
Si las agujas están demasiado<br />
apretadas pueden dañarse<br />
Exploded View Despiece<br />
1476<br />
1477<br />
Z700<br />
a<br />
High Speed Needle<br />
Aguja de altas<br />
Spare Parts Listado de piezas<br />
Number<br />
Referencia<br />
Qty.<br />
Cant.<br />
1485<br />
1483<br />
Description<br />
Descripción<br />
1472<br />
1471<br />
1470<br />
1473<br />
1468<br />
1481<br />
1469<br />
1463<br />
1484<br />
b<br />
Idle Adjustment Screw<br />
Tornillo relenti<br />
c<br />
About 1mm (0.04")<br />
Aprox 1mm (0,04")<br />
1463<br />
1420<br />
Number<br />
Referencia<br />
Low Speed Needle<br />
Aguja de bajas<br />
Qty.<br />
Cant.<br />
1447<br />
1460<br />
1488<br />
1414<br />
1492<br />
Description<br />
Descripción<br />
5<br />
a<br />
b<br />
c<br />
Break-in Setting<br />
Ajuste de rodaje<br />
Flush with groove<br />
Enrrasado<br />
Flush with groove<br />
Enrrasado<br />
Flush with groove<br />
Enrrasado<br />
Number Qty.<br />
Referencia Cant.<br />
After Break-in Setting<br />
Ajuste post-rodaje<br />
Please refer to the Tuning After Break-in<br />
section on pg. 3 for tuning tips.<br />
Siga las instrucciones de la sección<br />
Reglaje después <strong>del</strong> rodaje en la pta.. 3<br />
Please refer to the Optional Tuning<br />
section on pg. 4 for tuning tips.<br />
Siga las instrucciones de la<br />
sección Reglaje opcionales en la<br />
pag. 4<br />
Description<br />
Descripción<br />
1495 1 Nitro Star F4.6 <strong>Engine</strong> With Pullstart<br />
Motor Nitro Star F4.6 con tirador<br />
1450 1 Dust Protection And O-Ring Complete Set<br />
Guardapolvos /conjunto toricas<br />
1485 1 Idle Needle Valve(F4.6/D-cut)<br />
Válvula tornillo relenti (F4,6)<br />
1414 2 Retainer For Piston Pin<br />
Clip de bulon (21BB)<br />
1460 4 GASKET FOR CYLINDER (0.2mm/F4.6)<br />
Junta culata (0,2mm/4uds/F4,6)<br />
1488 1 Cylinder/Piston Set (F4.6)<br />
Conjunto cilindro/pistón (F4.6)<br />
1409 4 CAP HEAD SCREW M3.5x16mm<br />
Tornillo cabeza redonda M3,5x16mm<br />
1463 1 Slide Carburetor Complete (Composite/F4.6/D-Cut)<br />
Carburador de tirador completo (Composite F4,6)<br />
1489 1 Cylinder/piston/Connecting Rod Set (F4.6)<br />
Conjunto Cilindro/pistón/Biela /F4.6)<br />
1420 1 Brass Collet<br />
Cono latón<br />
1468 2 Washer Set For Fuel Line Fitting<br />
Conjunto juntas alimentación<br />
1490 1 Aluminum Heatsink Head (Purple/F4.6)<br />
Culata refrigeradora aluminio (Púrpura/F4.6)<br />
1425 1 O Ring For Cover Plate (21BB)<br />
Junta torica tapa rasera (21BB)<br />
1469 2 O-Ring For Carburetor Body<br />
Junta torica carburador<br />
1491 1 Crankcase (Black/F4.6)<br />
Carter (Negro F4.6)<br />
1426 1 Cover Plate (F4.1)<br />
Tapa cierre (F4.1)<br />
1470 1 Main Needle Valve Holder<br />
Soporte válvula aguja altas<br />
1492 1 Connecting Rod (F4.6)<br />
Biela (F4.6)<br />
1427 8 Screw M2.6x6mm For Cover Plate<br />
Tornillo M2,6x6mm para tapa trasera<br />
1471 1 Main Needle<br />
Aguja altas<br />
1493 1 Crankshaft (SG Shaft/F4.6)<br />
Cigüeñal (Tipo SG/ F4.6)<br />
1428 1 Pullstart Assy. (w/o One-Way Bearing)<br />
Tirador completo (sin rodamiento One-way)<br />
1472 1 Main Needle/Fuel Intake Set<br />
Conjunto aguja altas/ Toma combustible<br />
1504 1 Glow Plug Cold R5<br />
Bujía fria R5<br />
1430 1 One Way Bearing For Pullstart<br />
Rodamiento One-way para tirador<br />
1473 1 Fuel Line Fitting/Washer Set<br />
Toma combustible/juntas<br />
87117 1 Back Plate Unit For Nitro Star BB Series And Force 21/25<br />
Placa trasera para Nitro Start serie BB y Force 21/25<br />
1432 1 Starting Shaft (21BB)<br />
Eje arrancador (21BB)<br />
1476 1 Dust Protection<br />
Guardapolvo<br />
87118 1 Gear Set For Back Plate Unit<br />
Conjunto piñónes placa trasera<br />
1433 1 Starting Pin/Pressure Spring (21BB)<br />
Grupilla arranque/muelle presión (21BB)<br />
1477 1 Uniball<br />
Rotula uniball<br />
87119 1 Case For Back Plate Unit<br />
Caja para tapa trasera<br />
1434 1 Lock Pin For Carburetor (21BB)<br />
Grupilla fijación carburador (21BB)<br />
1481 1 Slide Carburetor Main Body (Composite)<br />
Cuerpo carburador de tirador (Composite)<br />
Z421 12 Cap Head Screw M2.6x8mm<br />
Tornillo cabeza redonda M2,6x8mm<br />
1442 1 Piston Pin/Retainer Set<br />
Conjunto eje pistón /clips<br />
1483 1 Slide Valve<br />
Tirador<br />
Z423 12 Cap Head Screw M2.6x12mm<br />
Tornillo cabeza redonda M2,6x12mm<br />
1447 1 Underhead (F4.6)<br />
Culatin<br />
1484 1 Idle Adjustment Screw<br />
Tornillo relenti<br />
Z700 6 Set Screw M3x4mm<br />
Tornillo allen M3x4mm<br />
1442<br />
1489<br />
1414<br />
1491<br />
1433<br />
1434<br />
1493<br />
1432<br />
1425<br />
1426<br />
1409<br />
1490<br />
1427<br />
1430<br />
87119<br />
1504<br />
87118<br />
87119<br />
87118<br />
87117<br />
1428<br />
1427<br />
Z421<br />
Z423
8<br />
Optional Tuning Mantenimiento<br />
Glow Plug Bujía<br />
Outdoor Temp<br />
Temperatura exterior<br />
Hot<br />
Calor<br />
Cold<br />
Frío<br />
How Glow Plugs Work:<br />
Unlike full sized car engines that use spark plugs and a distributor to fire the cylinders in the combustion cycle, glow engines rely on glow plugs. In a Nitro engine, ignition is initiated by the<br />
application of a glow igniter. When the igniter is disconnected, the heat inside the combustion chamber keeps the glow plug filament glowing, firing the next cycle thereby keeping the engine<br />
running. Ignition timing in a glow engine is automatic. At higher RPM’s the plug becomes hotter, firing the fuel/air mixture earlier, effectively advancing the timing. At lower RPM’s the plug<br />
becomes cooler, firing the fuel/air mixture later, effectively retarding the timing. Since the glow plug performs so many important functions, proper plug selection and maintenance are crucial to a<br />
properly running engine.<br />
Como funciona la bujía:<br />
Contrariamente a los <strong>motor</strong>es reales que usan bujías de chispa y un distibuidor para hacer funcionar los cilindros en el ciclo de combustión, los <strong>motor</strong>es de bujía incandescente solo usan la<br />
bujía. En un <strong>motor</strong> térmico nitro , la puesta en marcha se realiza a través de un calentador de bujía. Una vez desconectado el propio calor generado por el <strong>motor</strong> en la cámara de combustión<br />
es suficiente para mantener el filamento incandescente provocando así la ignición en ciclos posteriores permitiendo el correcto funcionamiento <strong>del</strong> <strong>motor</strong> . La velocidad de encendido en los<br />
<strong>motor</strong>es de bujía incadescente se autorregula. A mayor régimen de giro la bujía esta mas caliente, encendiendo la mezcla aire/combustible mas rápidamente, acelerando así la velocidad de<br />
encendido. A menor régimen de giro la bujía esta mas fria, encendiendo la mezcla aire/combustible mas tarde , retardando así la velocidad de encendido. Dada la importancia de las funciones<br />
de las bujías de incadescencia su correcta elección y mantenimiento es crucial para un funcionamiento correcto.<br />
Glow Plug<br />
Bujía<br />
Glow Plug Cold R5<br />
Bujía fria R5<br />
Air Filter Filtro de aire<br />
Glow Plug Medium Cold R4<br />
Bujía medio-fria R4<br />
Glow Plug Medium R3<br />
Bujía media R3<br />
When to replace the glow plug:<br />
Fuel and temperature will have an effect on the performance, reliability, and life span of the glow<br />
plug and therefore glow plugs should be considered expendable engine components. Aside from<br />
burnout or plug failure, there are several signs that can indicate the plug should be replaced.<br />
Plug filament/plug body is discolored or the surface is rough.<br />
<strong>Engine</strong> cuts out when idling.<br />
El filamento o el cuerpo de la bujía esta decolorada o rugoso<br />
El <strong>motor</strong> se para al relenti<br />
Proper Air Filter Maintenance:<br />
Dirt is the biggest enemy of a nitro engine and proper air filter maintenance is one of the most important factors<br />
that will effect your engines longevity. If you are using the air filter supplied with your kit, we recommend cleaning the<br />
element after every run. If you are using an after market air filter, please follow the manufacturers recommendations.<br />
Regardless, it is always a good habit to check the element after every run to make sure it is properly seated in the<br />
filter body and that the body is fully seated on the carburetor. Never run the engine without the airfilter!<br />
Mantenimiento correcto <strong>del</strong> filtro de aire:<br />
El polvo es el peor enemigo de un <strong>motor</strong> nitro y un correcto mantenimiento <strong>del</strong> filtro de aire es uno de los factores mas<br />
importantes para una mayor duración <strong>del</strong> <strong>motor</strong>. Si usa el filtro incluido en el kit , le recomendamos que lo limpie después de<br />
cada uso. Si usa un filtro de repuesto, siga los consejos <strong>del</strong> fabricante. Es recomendable verificar el filtro antes y después de<br />
cada uso para comprobar su correcta instalación en el carburador. No ruede jamás si el filtro de aire instalado !!<br />
1 2 3<br />
Reinstalling The Air Filter:<br />
After properly cleaning the filter element make sure it is reinstalled<br />
correctly. If you are using the filter that came with your kit, follow the<br />
illustration to reinstall the filter element in the filter body. Make sure<br />
there are no gaps between the element and body. Make sure the<br />
filter is fully seated on the carburetor and secure it with a tie strap<br />
(<strong>HPI</strong> part #6154). Never run the engine without the air filter!<br />
Montaje <strong>del</strong> filtro de aire:<br />
Una vez limpio, asegúrese que lo vuelve a montar correctamente. Si<br />
usa el filtro <strong>del</strong> kit siga la ilustración para volver a instalarlo.<br />
Asegúrese que no quedan fisuras entre el filtro y el elemento<br />
filtrante. Compruebe que el filtro esta bien fijado en el carburador con<br />
una brida (<strong>HPI</strong> ref.6154). No use jamás el <strong>motor</strong> sin filtro de aire!<br />
Glow Plug Characteristics<br />
Características de la bujía<br />
Cold plug will have better mid, high<br />
RPM power and will last longer at<br />
high temperature.<br />
Una bujía fria tiene mas potencia<br />
en los regímenes medios/altos y<br />
durara mas tiempo a elevadas<br />
temperatura<br />
Hot plug will be easy to start and<br />
stable for tuning. But will fail<br />
sooner at high engine temperature.<br />
La bujía es fácil de arrancar y los<br />
ajustes estables. A elevadas<br />
temperaturas perderá eficiencia.<br />
Plug filament is distorted or bent.<br />
<strong>Engine</strong> becomes difficult to start.<br />
Cuando sustituir la bujía:<br />
El combustible y la temperatura afectan a las prestaciones y a la fiabilidad/duración de vida de la<br />
bujía y debe considerarse como un elemento con desgaste <strong>del</strong> <strong>motor</strong>. Aparte de que este<br />
fundida o falle, existen síntomas que nos indican que la bujía debe sustituirse.<br />
El filamento esta torcido<br />
El <strong>motor</strong> es dificil de arrancar<br />
Z190<br />
Air Filter Oil<br />
Aceite para<br />
filtro de aire<br />
6<br />
Proper Glow Plug Selection:<br />
Proper glow plug selection depends on several factors. Fuel type, nitro methane content, weather, and<br />
altitude can drastically effect performance. Finding the best combination of fuel and plug temperature<br />
for your driving condition is the key to getting the maximum performance out of your Nitro Star <strong>Engine</strong>.<br />
Extending the life of your Glow Plug:<br />
To maximize and extend the life of your glow plug follow these simple tips:<br />
Remove the glow igniter when using more than 1/2 throttle or if the engine does not start after a few seconds.<br />
Do not run the engine lean. Lean conditions will overheat the plug causing the element to be damaged or fail.<br />
Use the best Fuel/Plug combination for your driving conditions.<br />
Use a fuel that has a lower nitro content.<br />
Elija la bujía correcta:<br />
La elección de la bujía correcta depende de varios factores. El tipo de combustible, la cantidad de<br />
nitrometano, el clima y la altitud pueden influir en las prestaciones <strong>del</strong> <strong>motor</strong>. Encontrar la mejor<br />
combinación entre el carburante y la temperatura de la bujía ayudara a mejorar las prestaciones de<br />
su <strong>motor</strong> Nitro Star<br />
Prolongar la vida de su bujía:<br />
Para aumentar la duración de su bujía, siga estos consejos:<br />
Retire el calentador de bujía por debajo de 1/2 aceleración máxima o si el <strong>motor</strong> no arranca rápidamente<br />
No use ajustes demasiado secos, esto provocara el sobrecalentamiento de la bujía<br />
Use la mejor combinación bujía/combustible para su pilotaje<br />
Use un combustible con una menor tasa de nitro<br />
HOT!<br />
Caliente<br />
Glow Plug Igniter<br />
Calentador de bujías<br />
6154<br />
Glow Plug<br />
Bujía caliente<br />
Pliers<br />
Alicates<br />
Good Plug<br />
Element glows when tested.<br />
Buen estado:<br />
El filamento se ilumina<br />
completamente<br />
Filament<br />
Filamento<br />
Bad Plug<br />
Element may be damaged or<br />
broken if it doesn’t light up<br />
completely.<br />
Mal estado:<br />
El filamento no se<br />
ilumina completamente<br />
Never run the engine without the air filter!<br />
¡ No use jamás el <strong>motor</strong> sin filtro de aire!<br />
Bad Plug<br />
Element is broken or<br />
doesn’t light up at all.<br />
Mal estado:<br />
El filamento no se ilumina<br />
Cleaning The Filter Element:<br />
Remove and clean the air filter with nitro fuel when soiled. Spray fuel through the clean side to ensure proper dirt<br />
removal.Squeeze the filter to remove excess fuel. To re-coat the air filter with oil, place the element in a plastic bag<br />
with several drops of air filter oil. Using your fingers, work the oil into the element making sure it is evenly distributed.<br />
Limpieza <strong>del</strong> filtro:<br />
Retire el elemento filtrante y limpielo con el mismo combustible. Haga para combustible desde el lado limpio para<br />
eliminar completamente la suciedad. Para volver a aceitar el filtro, colóquelo dentro de una bolsa de plástico con<br />
unas gotas de aceite para filtros. Apriete la bolsa con los dedos para que el aceite impregne el filtro, compruebe que<br />
todo el filtro esta bien impregnado.<br />
6154<br />
87199 c<br />
Z543<br />
M3x10mm<br />
87199 a<br />
Z224<br />
M3x8mm<br />
87204 a<br />
87204 b<br />
87199 b<br />
87199 d<br />
Note: Nota:<br />
OK!
<strong>Engine</strong> Storage Tips Consejos de conservación <strong>del</strong> <strong>motor</strong><br />
Storing The <strong>Engine</strong>:<br />
Using proper storage techniques are not only a good habit but are critical to the life of your engine. Nitro fuel contains castor for lubrication. If the castor is not burned out of the engine, over time it can gum up and damage<br />
the crank bearings. Using your fuel bottle, drain all remaining fuel from the tank. Use a fully charged igniter and try to restart the engine to burn any remaining fuel out of the lines. Repeat this step until the engine will not<br />
start. After burning off the fuel, remove the glow plug and add several drops of after run oil then crank the engine over to spread it throughout the engine. If you plan on storing your engine for long periods of time (more<br />
than 3 months), the after run oil may gum up as well but will not damage the bearings. To prepare the engine for re use, use 70% Isopropyl Alcohol or Denatured Alcohol and cycle it through the engine using the pull<br />
starter or roto start. DO NOT TRY TO START THE ENGINE WITH THE ALCOHOL! The few minutes you take to properly prepare your engine for storage can add valuable time to its operating life and maintain its<br />
optimum performance.<br />
Guardando el <strong>motor</strong>:<br />
Para guardar su <strong>motor</strong> existen unas técnicas que le ayudaran a aumentar la duración de su <strong>motor</strong>. El carburante nitro contiene ricino para su lubricación. Si el ricino no se quema dentro<br />
<strong>del</strong> <strong>motor</strong>, con el tiempo puede acumularse en los rodamientos <strong>del</strong> <strong>motor</strong>. Con su botella de repostaje retire todo el combustible <strong>del</strong> deposito. Arranque el <strong>motor</strong> con el combustible que<br />
quede en el interior y en los tubos de alimentación. Repita la operación hasta que el <strong>motor</strong> no arranque. Una vez quemado todo el combustible retire la bujía y coloque unas gotas de<br />
aceite de conservación (after-run) y gire suavemente el <strong>motor</strong> para repartirlo por todo el interior. Si tiene intención de no usar su <strong>motor</strong> mas de 3 meses, el aceite de conservación puede<br />
dañar los rodamientos <strong>del</strong> <strong>motor</strong>. Para preparar el <strong>motor</strong> para su puesta en marcha, use alcohol isopropilico (70º) o alcohol desnaturalizado y hagalo circular por dentro <strong>del</strong> <strong>motor</strong> usando el<br />
tirador o el Roto Start. NO INTENTE ARRANCAR EL MOTOR CON ALCOHOL!! Los minutos que pase preparando su <strong>motor</strong> para guardarlo pueden ser importantes para aumentar la<br />
vida de su <strong>motor</strong>.<br />
<strong>Engine</strong> Rebuilding Reconstrucción <strong>del</strong> <strong>motor</strong><br />
There comes a time when your engine just won’t provide the performance it<br />
did when it was new. When that time comes a rebuild is in order. Follow the<br />
steps below to disassemble, repair and then reassemble the engine.<br />
Llega un momento que el <strong>motor</strong> pierde prestaciones respecto a cuando era<br />
nuevo. Este es el momento de reconstruirlo. Siga las instrucciones siguientes<br />
para su desmontaje,reparación y montaje <strong>del</strong> <strong>motor</strong>.<br />
Check engine compression.<br />
If there is no compression, the<br />
engine will not start.<br />
Compruebe la comprensión <strong>del</strong><br />
<strong>motor</strong>. Si no tiene comprensión,<br />
el <strong>motor</strong> no arrancara<br />
6<br />
OK! NO!<br />
2<br />
mm<br />
2<br />
mm<br />
2.5<br />
mm<br />
2<br />
mm<br />
70332<br />
Glow Plug Wrench<br />
Llave de bujías<br />
<strong>Engine</strong> Assembly Montaje <strong>del</strong> <strong>motor</strong><br />
After completely disassembling the engine, examine the components to determine which parts need to be replaced.<br />
Scratches on the crankshaft, or piston and sleeve are signs that dirt has entered the engine. Before reassembly, thoroughly<br />
clean all parts to make sure they are free of foreign debris. Reassemble the engine in the reverse order of disassembly<br />
(Step 6 - Step 1). Make sure to note the direction of the oil hole on the rod and the direction of the sleeve as they are critical<br />
to proper engine function. As you assemble the engine, use a small amount of oil on each part to make sure they are well<br />
lubricated and move freely. When you are finished, the new components will need to be broken in. Please turn to Page 2<br />
and follow the instructions to break in the new components.<br />
Una vez desmontado el <strong>motor</strong>, examine los componentes para ver que piezas necesitan ser sustituidas. Rayaduras en el<br />
cigüeñal, pistón o camisa son signos de que el polvo a entrado en el interior <strong>del</strong> <strong>motor</strong>. Antes de volver a montar el <strong>motor</strong><br />
limpie cuidadosamente todas las piezas. Vuelva a montar el <strong>motor</strong> en sentido inverso al desmontaje (paso 6 a paso 1) . No<br />
olvide de colocar correctamente el orificio de engrase de la biela y la posición de la camisa ya que son dos piezas<br />
fundamentales para el funcionamiento <strong>del</strong> <strong>motor</strong>. Durante el montaje, ponga un poco de aceite en cada pieza para<br />
asegurarse que están bien lubricadas. Una vez terminado el montaje el <strong>motor</strong> debe de volver a realizar un rodaje , para ello<br />
vea la pag. 10 y siga las instrucciones para rodarlo.<br />
7<br />
Z903<br />
Allen Wrench 2.5mm<br />
Llave allen<br />
Z904<br />
Allen Wrench 2.0mm<br />
Llave allen<br />
1 2 3<br />
4<br />
87118<br />
1460<br />
1488<br />
87119<br />
1491<br />
87118<br />
1493<br />
87119<br />
Z423<br />
Z421<br />
5<br />
1490<br />
2.5<br />
mm<br />
1409<br />
1447<br />
1414<br />
1488<br />
1492<br />
1442<br />
1414<br />
1504<br />
8<br />
mm<br />
1432<br />
1425<br />
Oil hole must face<br />
towards crankshaft<br />
El orificio de lubricación<br />
debe estar encarado al<br />
cigüeñal<br />
0.1mm<br />
NO!<br />
1433<br />
Z164<br />
Grease<br />
Grasa<br />
1426<br />
1430<br />
39014<br />
Oil Spray (Japan only)<br />
Aceite en spray<br />
Z159<br />
Thread Lock<br />
Fijatornillos<br />
2<br />
mm<br />
1427<br />
1430<br />
Note<br />
Direction.<br />
Atención<br />
posición<br />
Note Direction.<br />
Atención posición
9<br />
EUROPE<br />
Warranty Garantía<br />
North American and European Customers<br />
Your <strong>HPI</strong> product is warranted to be free from defects in materials and workmanship for a period of two (2) years from the purchase date. For verification,<br />
please keep your original receipt in a safe place. If there are any defects with the materials, workmanship, or assembly of your engine, <strong>HPI</strong> will gladly<br />
repair or replace it for you at our discretion. Products which have been worn out, abused, or improperly operated will not be covered under warranty.<br />
Due to the complex nature of <strong>HPI</strong> Products and the legal requirements of different regions, warranties issued by <strong>HPI</strong> USA are only valid for products<br />
sold to and used in the USA, Canada and South America. <strong>HPI</strong> USA warranties are not transferable to other parts of the world.<br />
Not Covered By Warranty:<br />
This warranty does not cover problems from normal wear, abuse, neglect, or any damage arising as a result of improper use, use of improper fuel, overheating, continuous<br />
neglect, or damage from glow plugs. Please see the warranty cautions contained in this instruction manual to identify damage that may have been caused by improper use<br />
or care of your engine.<br />
<strong>HPI</strong> <strong>Racing</strong> shall not be liable for any loss or damages, whether direct, indirect, special, incidental, or consequential, arising from the use, misuse, or abuse of this product<br />
and any accessory or chemical required to operate this product.<br />
DO NOT return engines without prior approval. Please note any returned engine, which is inspected by our staff and is found to have an invalid warranty claim may be<br />
subject to an inspection & handling fee before it can be returned. Any repairs made to engines resulting from neglect or misuse will be charged (parts & labor) before the<br />
work is started.<br />
For warranty claims please return the engine to the shop where you bought it, along with a copy of the original receipt (please keep the original), if directed by<br />
<strong>HPI</strong>'s distributor the shop will then return the engine for professional inspection. The engine must be returned with a written description of the problem, showing<br />
a daytime phone number where you can be reached for questions. The engine must be returned complete with crankcase, crankshaft, piston, sleeve, connecting<br />
rod, cylinder head, complete carburetor & pull starter. You should not return the clutch, flywheel, flywheel collet, nut, air cleaner, manifold or muffler.<br />
In case of any further problems, please contact your local distributor, please check www.hpi-europe.com for details or call <strong>HPI</strong> Europe in the UK on 44 1283<br />
229400 in normal office hours.<br />
<strong>HPI</strong> <strong>Racing</strong> garantiza la calidad de los materiales y su resistencia por un periodo de dos (2) años a partir de la fecha de adquisición<br />
<strong>del</strong> mo<strong>del</strong>o. Guarde el recibo de compra ya que en caso de tener que usar la garantía sera necesaria su presentación. En caso de<br />
piezas defectuosas, de uso o de montaje , <strong>HPI</strong> lo reparara o cambiara sin cargo.<br />
Esta garantía no cubre los problemas derivados de un uso normal, de negligencia ,de uso abusivo ni los daños resultantes de una<br />
utilización incorrecta de este producto. <strong>HPI</strong> <strong>Racing</strong> no se hace responsable por los daños y perjuicios , directos o indirectos,<br />
producidos por el uso incorrecta o abusiva de este producto así como de cualquier accesorio o producto químico usado<br />
conjuntamente con este producto.<br />
NO DEVOLVER este producto sin autorización. Cualquier producto devuelto para su inspección en garantía generara gastos de<br />
manipulación por parte de nuestro personal en caso de que la avería o desperfecto no este cubierto por esta garantía. Todas la<br />
reparaciones de averías producidas por un uso incorrecto o excesivo de este mo<strong>del</strong>o serán facturadas (coste de las piezas y mano<br />
de obra) antes de empezar la reparación.<br />
Para las solicitudes de garantía devuelva el producto a la tienda donde lo compro con una copia de la factura de compra ( conserve<br />
el original). Si el distribuidor <strong>HPI</strong> <strong>Racing</strong> lo autoriza , la tienda enviara su producto o la parte dañada para una inspección por los<br />
profesionales. El producto debe enviarse con una descripción escrita <strong>del</strong> problema y un numero de teléfono de contacto.<br />
Si tiene cualquier otro problema, contacte con su distribuidor local. Visite la web www.hpi-europe.com o llame a <strong>HPI</strong> Europa en<br />
Inglaterra al 44 1283 229400 en horario de oficinas.<br />
Please return to your kit instruction manual for proper after-run maintenance tips.<br />
Lea atentamente el manual de instrucciones para encontrar la guía de<br />
mantenimiento y puesta a punto<br />
www.hpiracing.com<br />
<strong>HPI</strong> <strong>Racing</strong> USA<br />
70 Icon Street<br />
Foothill Ranch, CA 92610 USA<br />
(949) 753-1099<br />
8<br />
www.hpiracing.co.jp<br />
<strong>HPI</strong> Japan<br />
3-22-20 Takaoka-kita, Naka-ku,<br />
Hamamatsu, Shizuoka, 433-8119, JAPAN<br />
053-430-0770<br />
www.hpi-europe.com<br />
<strong>HPI</strong> Europe<br />
21 William Nadin Way, Swadlincote,<br />
Derbyshire, DE11 0BB, UK<br />
(44) 01283 229400