Engine Manual Manual del motor - HPI Racing
Engine Manual Manual del motor - HPI Racing
Engine Manual Manual del motor - HPI Racing

Create successful ePaper yourself
Turn your PDF publications into a flip-book with our unique Google optimized e-Paper software.
<strong>Engine</strong> Storage Tips Consejos de conservación <strong>del</strong> <strong>motor</strong><br />
Storing The <strong>Engine</strong>:<br />
Using proper storage techniques are not only a good habit but are critical to the life of your engine. Nitro fuel contains castor for lubrication. If the castor is not burned out of the engine, over time it can gum up and damage<br />
the crank bearings. Using your fuel bottle, drain all remaining fuel from the tank. Use a fully charged igniter and try to restart the engine to burn any remaining fuel out of the lines. Repeat this step until the engine will not<br />
start. After burning off the fuel, remove the glow plug and add several drops of after run oil then crank the engine over to spread it throughout the engine. If you plan on storing your engine for long periods of time (more<br />
than 3 months), the after run oil may gum up as well but will not damage the bearings. To prepare the engine for re use, use 70% Isopropyl Alcohol or Denatured Alcohol and cycle it through the engine using the pull<br />
starter or roto start. DO NOT TRY TO START THE ENGINE WITH THE ALCOHOL! The few minutes you take to properly prepare your engine for storage can add valuable time to its operating life and maintain its<br />
optimum performance.<br />
Guardando el <strong>motor</strong>:<br />
Para guardar su <strong>motor</strong> existen unas técnicas que le ayudaran a aumentar la duración de su <strong>motor</strong>. El carburante nitro contiene ricino para su lubricación. Si el ricino no se quema dentro<br />
<strong>del</strong> <strong>motor</strong>, con el tiempo puede acumularse en los rodamientos <strong>del</strong> <strong>motor</strong>. Con su botella de repostaje retire todo el combustible <strong>del</strong> deposito. Arranque el <strong>motor</strong> con el combustible que<br />
quede en el interior y en los tubos de alimentación. Repita la operación hasta que el <strong>motor</strong> no arranque. Una vez quemado todo el combustible retire la bujía y coloque unas gotas de<br />
aceite de conservación (after-run) y gire suavemente el <strong>motor</strong> para repartirlo por todo el interior. Si tiene intención de no usar su <strong>motor</strong> mas de 3 meses, el aceite de conservación puede<br />
dañar los rodamientos <strong>del</strong> <strong>motor</strong>. Para preparar el <strong>motor</strong> para su puesta en marcha, use alcohol isopropilico (70º) o alcohol desnaturalizado y hagalo circular por dentro <strong>del</strong> <strong>motor</strong> usando el<br />
tirador o el Roto Start. NO INTENTE ARRANCAR EL MOTOR CON ALCOHOL!! Los minutos que pase preparando su <strong>motor</strong> para guardarlo pueden ser importantes para aumentar la<br />
vida de su <strong>motor</strong>.<br />
<strong>Engine</strong> Rebuilding Reconstrucción <strong>del</strong> <strong>motor</strong><br />
There comes a time when your engine just won’t provide the performance it<br />
did when it was new. When that time comes a rebuild is in order. Follow the<br />
steps below to disassemble, repair and then reassemble the engine.<br />
Llega un momento que el <strong>motor</strong> pierde prestaciones respecto a cuando era<br />
nuevo. Este es el momento de reconstruirlo. Siga las instrucciones siguientes<br />
para su desmontaje,reparación y montaje <strong>del</strong> <strong>motor</strong>.<br />
Check engine compression.<br />
If there is no compression, the<br />
engine will not start.<br />
Compruebe la comprensión <strong>del</strong><br />
<strong>motor</strong>. Si no tiene comprensión,<br />
el <strong>motor</strong> no arrancara<br />
6<br />
OK! NO!<br />
2<br />
mm<br />
2<br />
mm<br />
2.5<br />
mm<br />
2<br />
mm<br />
70332<br />
Glow Plug Wrench<br />
Llave de bujías<br />
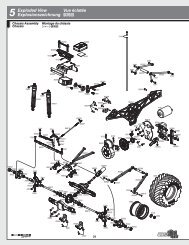
<strong>Engine</strong> Assembly Montaje <strong>del</strong> <strong>motor</strong><br />
After completely disassembling the engine, examine the components to determine which parts need to be replaced.<br />
Scratches on the crankshaft, or piston and sleeve are signs that dirt has entered the engine. Before reassembly, thoroughly<br />
clean all parts to make sure they are free of foreign debris. Reassemble the engine in the reverse order of disassembly<br />
(Step 6 - Step 1). Make sure to note the direction of the oil hole on the rod and the direction of the sleeve as they are critical<br />
to proper engine function. As you assemble the engine, use a small amount of oil on each part to make sure they are well<br />
lubricated and move freely. When you are finished, the new components will need to be broken in. Please turn to Page 2<br />
and follow the instructions to break in the new components.<br />
Una vez desmontado el <strong>motor</strong>, examine los componentes para ver que piezas necesitan ser sustituidas. Rayaduras en el<br />
cigüeñal, pistón o camisa son signos de que el polvo a entrado en el interior <strong>del</strong> <strong>motor</strong>. Antes de volver a montar el <strong>motor</strong><br />
limpie cuidadosamente todas las piezas. Vuelva a montar el <strong>motor</strong> en sentido inverso al desmontaje (paso 6 a paso 1) . No<br />
olvide de colocar correctamente el orificio de engrase de la biela y la posición de la camisa ya que son dos piezas<br />
fundamentales para el funcionamiento <strong>del</strong> <strong>motor</strong>. Durante el montaje, ponga un poco de aceite en cada pieza para<br />
asegurarse que están bien lubricadas. Una vez terminado el montaje el <strong>motor</strong> debe de volver a realizar un rodaje , para ello<br />
vea la pag. 10 y siga las instrucciones para rodarlo.<br />
7<br />
Z903<br />
Allen Wrench 2.5mm<br />
Llave allen<br />
Z904<br />
Allen Wrench 2.0mm<br />
Llave allen<br />
1 2 3<br />
4<br />
87118<br />
1460<br />
1488<br />
87119<br />
1491<br />
87118<br />
1493<br />
87119<br />
Z423<br />
Z421<br />
5<br />
1490<br />
2.5<br />
mm<br />
1409<br />
1447<br />
1414<br />
1488<br />
1492<br />
1442<br />
1414<br />
1504<br />
8<br />
mm<br />
1432<br />
1425<br />
Oil hole must face<br />
towards crankshaft<br />
El orificio de lubricación<br />
debe estar encarado al<br />
cigüeñal<br />
0.1mm<br />
NO!<br />
1433<br />
Z164<br />
Grease<br />
Grasa<br />
1426<br />
1430<br />
39014<br />
Oil Spray (Japan only)<br />
Aceite en spray<br />
Z159<br />
Thread Lock<br />
Fijatornillos<br />
2<br />
mm<br />
1427<br />
1430<br />
Note<br />
Direction.<br />
Atención<br />
posición<br />
Note Direction.<br />
Atención posición