L Series SVL241 - Sony
L Series SVL241 - Sony
L Series SVL241 - Sony

You also want an ePaper? Increase the reach of your titles
YUMPU automatically turns print PDFs into web optimized ePapers that Google loves.
Guía de<br />
Inicio<br />
Rápido<br />
Computadora personal<br />
Serie L <strong>SVL241</strong><br />
Printed in China<br />
© 2012 <strong>Sony</strong> Corporation<br />
4-445-541-21 (1)<br />
Lea este manual y la Reglamentación<br />
de Seguridad detenidamente antes<br />
de utilizar este producto.<br />
Manténgalos en un sitio seguro.<br />
Instalación inicial<br />
1 Verifique<br />
los artículos<br />
2 suministrados<br />
Adaptador de CA<br />
Cable de alimentación<br />
Teclado inalámbrico 1<br />
Mouse inalámbrico 1<br />
Receptor inalámbrico (para teclado / mouse)<br />
Baterías AA (2)<br />
1 Antes comenzar a utilizar el equipo, inserte<br />
la batería alcalina AA suministrada.<br />
Las funciones y especificaciones pueden<br />
variar y están sujetas a cambios sin previo<br />
aviso.<br />
4<br />
Conéctese a Internet<br />
Conéctese a Internet para activar Windows<br />
automáticamente.<br />
Conexión por cable<br />
Conecte su computadora y enrutador con un<br />
cable LAN.<br />
Conexión Wi-Fi® (LAN inalámbrica)<br />
1 Abra los accesos apuntando a la esquina<br />
superior derecha de la pantalla, luego,<br />
mueva el puntero hacia abajo y haga clic<br />
en el acceso Configuración.<br />
2 Haga clic en (el ícono de red).<br />
3 Seleccione la red deseada (SSID) y haga<br />
clic en Conectar.<br />
Para obtener detalles sobre la clave de<br />
seguridad y otras configuraciones, consulte el<br />
manual del dispositivo de red o la información<br />
de su proveedor del servicio de Internet.<br />
Conecte el<br />
3 adaptador de CA<br />
Ajuste el ángulo de la pantalla para localizar<br />
el puerto de entrada de CC detrás del pie de<br />
apoyo. Haga pasar el cable del adaptador de<br />
CA a través del orificio del pie de apoyo y<br />
conéctelo al puerto de entrada de CC.<br />
Enchufe el cable de alimentación al adaptador<br />
de CA y luego conéctelo a una toma de CA.<br />
5 Ubique<br />
la Guía<br />
del usuario<br />
La computadora ofrece una introducción a la<br />
Guía del usuario. Actualice la guía completa en<br />
línea; para ello, siga los pasos a continuación.<br />
1 Abra los accesos apuntando a la esquina<br />
superior derecha de la pantalla, luego,<br />
mueva el puntero hacia abajo y haga clic<br />
en el acceso Buscar.<br />
2 Haga clic en Aplicaciones e introduzca<br />
“Manual de VAIO” en el cuadro de búsqueda.<br />
3 Haga clic en Manual de VAIO en la lista<br />
Aplicaciones.<br />
Puede consultar la Guía del usuario con el<br />
smartphone. Escanee este código o acceda<br />
a la siguiente dirección URL.<br />
http://rd1.sony.net/helpguide/<br />
r/vaio/sp?model=svl2412&<br />
country=us&lang=eng<br />
Encienda la<br />
computadora VAIO®<br />
Mantenga presionado el botón de encendido<br />
de la PC hasta que se ilumine el indicador de<br />
encendido.<br />
El proceso de inicio tarda unos minutos. No es<br />
necesario realizar ninguna acción hasta que<br />
aparezca la ventana de configuración.<br />
6<br />
Inicie VAIO Care<br />
Mientras que la computadora esté<br />
encendida, presione el botón ASSIST para<br />
iniciar VAIO Care y, a continuación, haga clic<br />
en los elementos del panel derecho para<br />
completar los siguientes pasos.<br />
Uso de VAIO Update<br />
Haga clic en Software VAIO.<br />
Para utilizar Windows Update, haga clic<br />
en el acceso Buscar y Configuración y,<br />
luego, busque Windows Update.<br />
Cree su Medio de Recuperación<br />
Haga clic en Herramientas avanzadas.<br />
Los Medio de Recuperación no se<br />
suministran con la computadora. Consulte<br />
la Guía de recuperación, copia de<br />
seguridad y solución de problemas antes<br />
de crear el Medio de Recuperación.<br />
Registre la computadora<br />
Haga clic en Acerca de VAIO.<br />
Otras consejos<br />
Manipulación de la computadora<br />
No ejerza presión sobre la computadora,<br />
especialmente sobre la pantalla táctil / LCD<br />
o el cable del adaptador de CA.<br />
Cuidado del disco duro<br />
Si la computadora está equipada con una<br />
unidad de disco duro incorporada, evite mover<br />
la computadora mientras está encendida o<br />
durante los procesos de encendido y apagado.<br />
Ventilación<br />
Coloque la computadora sobre superficies<br />
duras, como un escritorio o una mesa. La<br />
circulación adecuada de aire es importante<br />
para evitar el sobrecalentamiento.<br />
Daños por líquidos<br />
Evite que cualquier líquido entre en contacto<br />
con la computadora.<br />
7 Use<br />
una cuenta<br />
Microsoft<br />
Inicie sesión en Windows con una cuenta<br />
Microsoft de modo que pueda utilizar y<br />
descargar aplicaciones de la Tienda<br />
Windows.<br />
1 Abra los accesos apuntando a la esquina<br />
superior derecha de la pantalla, luego,<br />
mueva el puntero hacia abajo y haga clic<br />
en el acceso Configuración.<br />
2 Haga clic en Cambiar configuración de PC,<br />
Usuarios y Cambiar a una cuenta<br />
Microsoft.<br />
3 Siga las instrucciones en pantalla.<br />
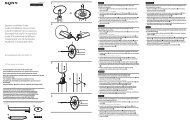
Piezas y controles<br />
A<br />
Pantalla LCD / panel táctil<br />
B<br />
Cámara / indicador incorporado<br />
Indicador de apagado de<br />
imagen<br />
Indicador de temporizador<br />
Indicador WIRELESS<br />
Indicador de la unidad de disco<br />
Indicador MONITOR<br />
Indicador de encendido de la PC<br />
C<br />
Sensor remoto <br />
D<br />
(Parte inferior)<br />
Micrófono incorporado<br />
Subwoofer<br />
Altavoces incorporados<br />
E<br />
Ventilación<br />
F<br />
Botón 3D Botón WEB : Inicia el explorador web (inicia Windows y, a continuación,<br />
el explorador web cuando la computadora está apagada).<br />
Botón TV : Enciende el TV, sin iniciar Windows.<br />
Botón de encendido del MONITOR: Enciende o apaga la pantalla LCD.<br />
Botón de encendido de la PC<br />
G<br />
Botones de funciones del MONITOR: Abren los menús para cambiar la<br />
configuración de la imagen, etc.<br />
– Botón HOME<br />
– Botón OPTION<br />
– Botones / / botones VOL (Volumen)<br />
– Botones / / botones CH (Canal) <br />
– Botón INPUT/OK<br />
– Botón RETURN<br />
Sitios web de asistencia<br />
http://esupport.sony.com/US/VAIO (Estados Unidos)<br />
http://www.sony.ca/support/ (Canadá: inglés) http://fr.sony.ca/support/ (Canadá: francés)<br />
http://esupport.sony.com/LA/VAIO (Área de América Latina)<br />
http://esupport.sony.com/BR/VAIO (Brasil)<br />
H<br />
Unidad óptica<br />
Botón de expulsión de la unidad<br />
I<br />
Puerto HDMI OUTPUT<br />
Puerto HDMI INPUT<br />
Conectores VIDEO INPUT<br />
Puerto LAN<br />
Puerto de entrada de CC<br />
Puerto LAN MONITOR ONLY<br />
Puerto CABLE/ANT<br />
(DIGITAL/ANALOG) <br />
Puerto USB MONITOR ONLY<br />
Puerto USB x 3 (El puerto con<br />
la marca es compatible con<br />
la carga USB y cumple con el<br />
estándar USB 2.0.)<br />
J<br />
Tapa del compartimiento del<br />
módulo de memoria<br />
K<br />
Indicador de acceso a medios<br />
Ranura combinada para<br />
“Memory Stick Duo” / tarjeta de<br />
memoria SD<br />
Puerto USB x 3 (Cumple con<br />
el estándar USB 3.0.)<br />
Puerto i.LINK de 4 pines (S400)<br />
Conector para auriculares<br />
Conector para micrófono<br />
Botón ASSIST: Inicia VAIO Care<br />
mientras la computadora está<br />
encendida (permite ajustar<br />
fácilmente la computadora y<br />
realizar el mantenimiento).<br />
ˈ<br />
Solo en los modelos<br />
seleccionados.
Quick<br />
Start<br />
Guide<br />
Personal Computer<br />
L <strong>Series</strong> <strong>SVL241</strong><br />
Please read this manual and<br />
Safety Regulations carefully<br />
before using the product.<br />
Keep them in a safe place.<br />
Initial Setup<br />
1 Check<br />
AC adapter<br />
Power cord<br />
4 Connect<br />
supplied items<br />
Wireless keyboard 1<br />
Wireless mouse 1<br />
Wireless receiver (for keyboard/mouse)<br />
AA batteries (2)<br />
1 Insert the supplied AA alkaline battery<br />
before use.<br />
Features and specifications may vary and are<br />
subject to change without notice.<br />
to the<br />
Internet<br />
Connect to the Internet to automatically<br />
activate Windows.<br />
Wired connection<br />
Connect your computer and router with a<br />
LAN cable.<br />
Wi-Fi (Wireless LAN) connection<br />
1 Open the charms by pointing to the top<br />
right corner of the screen, then move the<br />
pointer down and click the Settings<br />
charm.<br />
2 Click (the network icon).<br />
3 Select the desired network (SSID) and click<br />
Connect.<br />
For details on the security key and other<br />
settings, refer to the manual of the network<br />
device or the information from your Internet<br />
service provider.<br />
2 Connect<br />
AC adapter<br />
Adjust the angle of the screen to locate the<br />
DC IN port behind the foot stand. Route the<br />
AC adapter cable through the hole in the<br />
foot stand and plug it into the DC IN port.<br />
Plug the power cord into the AC adapter,<br />
then plug it into an AC outlet.<br />
5 Locate<br />
User Guide<br />
An introduction of the User Guide is<br />
available on your computer. Update to the<br />
complete guide online by following the<br />
steps below.<br />
1 Open the charms by pointing to the top right<br />
corner of the screen, then move the pointer<br />
down and click the Search charm.<br />
2 Click Apps and enter “VAIO Manual” in the<br />
search box.<br />
3 Click VAIO Manual in the Apps list.<br />
You can see the User Guide on your<br />
smartphone. Scan this code or access the<br />
URL below.<br />
http://rd1.sony.net/helpguide/<br />
r/vaio/sp?model=svl2412&<br />
country=us&lang=eng<br />
3 Turn<br />
on your<br />
VAIO® computer<br />
Press and hold down the PC power button<br />
until the PC power indicator light turns on.<br />
The startup process will take a few minutes.<br />
No action is required until the setup window<br />
appears.<br />
6<br />
Start VAIO Care<br />
While the computer is on, press the ASSIST<br />
button to start VAIO Care, then complete<br />
the following steps by clicking the items in<br />
the right pane.<br />
Use VAIO Update<br />
Click VAIO Software.<br />
To use Windows Update, click the<br />
Search charm and Settings, then search<br />
Windows Update.<br />
Create your Recovery Media<br />
Click Advanced Tools.<br />
Recovery Media are not supplied with your<br />
computer. Refer to the supplied Recovery,<br />
Backup and Troubleshooting Guide<br />
before creating the Recovery Media.<br />
Register your computer<br />
Click About your VAIO.<br />
Other Tips<br />
Computer Handling<br />
Do not exert pressure on your computer,<br />
especially the LCD/touch screen or the AC<br />
adapter cable.<br />
HDD Care<br />
If your computer is equipped with a built-in<br />
hard disk drive, avoid moving the computer<br />
when it is turned on, is in the process of<br />
powering on, or is shutting down.<br />
Ventilation<br />
Place your computer on hard surfaces such<br />
as a desk or table. Proper air circulation<br />
around vents is important to prevent<br />
overheating.<br />
Liquid Damage<br />
Protect your computer from contact with<br />
liquids.<br />
7 Use<br />
Microsoft account<br />
Sign in to Windows with a Microsoft account<br />
so that you can use and download apps<br />
from Windows Store.<br />
1 Open the charms by pointing to the top<br />
right corner of the screen, then move the<br />
pointer down and click the Settings<br />
charm.<br />
2 Click Change PC settings, Users, and<br />
Switch to a Microsoft account.<br />
3 Follow the on-screen instructions.<br />
Parts and Controls<br />
A<br />
LCD screen / touch screen<br />
B<br />
Built-in camera / indicator<br />
Picture off indicator<br />
Timer indicator<br />
WIRELESS indicator<br />
Disc drive indicator<br />
MONITOR indicator<br />
PC power indicator<br />
C<br />
Remote sensor <br />
D<br />
(Bottom)<br />
Built-in microphone<br />
Subwoofer<br />
Built-in speakers<br />
E<br />
Air vent<br />
F<br />
3D button WEB button : Launches the web browser - starts Windows, then the web<br />
browser when your computer is off.<br />
TV button : Turns on the TV, without starting Windows.<br />
MONITOR power button: Switches the LCD screen ON or OFF.<br />
PC power button<br />
G<br />
MONITOR operation buttons: Open menus to change picture settings, etc.<br />
– HOME button<br />
– OPTION button<br />
– / buttons / VOL (Volume) buttons<br />
– / buttons / CH (Channel) buttons – INPUT/OK button<br />
– RETURN button<br />
H<br />
Optical disc drive<br />
Drive eject button<br />
Support website<br />
http://esupport.sony.com/US/VAIO (USA)<br />
http://www.sony.ca/support/ (Canada: English) http://fr.sony.ca/support/ (Canada: French)<br />
http://esupport.sony.com/LA/VAIO (Latin American area)<br />
http://esupport.sony.com/BR/VAIO (Brazil)<br />
I<br />
HDMI OUTPUT port<br />
HDMI INPUT port<br />
VIDEO INPUT jacks<br />
LAN port<br />
DC IN port<br />
MONITOR ONLY LAN port<br />
CABLE/ANT (DIGITAL/<br />
ANALOG) port MONITOR ONLY USB port<br />
USB port × 3 (Compliant with<br />
the USB 2.0 standard, the port<br />
with the mark supports USB<br />
charging.)<br />
J<br />
Memory module compartment<br />
cover<br />
K<br />
Media Access indicator<br />
“Memory Stick Duo”/SD<br />
memory card combined slot<br />
USB port × 3 (Compliant with<br />
the USB 3.0 standard.)<br />
i.LINK 4-pin (S400) port<br />
Headphones jack<br />
Microphone jack<br />
ASSIST button: Starts<br />
VAIO Care while your computer<br />
is on - easily tune-up and self<br />
support the computer.<br />
ˈOn selected models only.