ADVANCE - Gaswinkel
ADVANCE - Gaswinkel
ADVANCE - Gaswinkel

Create successful ePaper yourself
Turn your PDF publications into a flip-book with our unique Google optimized e-Paper software.
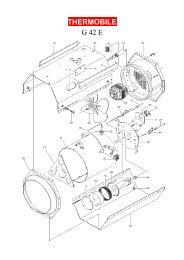
4. EVACUATION OF BURNT GAS<br />
4.1. Evacuation of burnt gas pipe.<br />
The burnt gas evacuation pipe must have the following diameters, depending on model:<br />
• Models CMB-5 and CMB-5 E can only be attached to one of the two following types of combustion product<br />
evacuation pipes:<br />
1º. If you choose an Ø 80 mm pipe for the evacuation, the pipe joining the cutter will be adjusted “to the<br />
bottom” in the inside of the water heater’s casing.<br />
2º. If the Ø 100 pipe is chosen to evacuate the combustion products, the coupler must be installed. Ø 80 to Ø<br />
100 supplied with the water heater. The Ø 80 area will be fitted “to the bottom in the inside of the casing of the<br />
water heater’s draught diverter; the Ø 100 pipe of the duct will be adjusted from the inside and to the bottom<br />
of the Coupler".<br />
• Models EB-10 and EB-10 E.<br />
Pipe for fitting the draft diverter on the inside. Ø 11 cm.<br />
Pipe for fitting on the outside. Ø 12 cm.<br />
Couplings for draft diverters are found at specialist trade stores.<br />
4.2. The mass flow rates for calculating flues are found in the table on page 16.<br />
4.3. Ensuring the correct evacuation of combustion gases.<br />
To ensure the system is functioning with the water heater’s nominal power, check the tightness of the whole<br />
combustion gas evacuation system through a spray plate, cooled mirror or any other approved apparatus,<br />
4.4. Maintenance.<br />
Recommended on an annual basis. This must be carried out by an Official<br />
Technical Service.<br />
5. MOUNTING THE COVER.<br />
If for any reason you need to remove the cover for installation:<br />
5.1. Remove the gas knob and temperature selector by pulling them out.<br />
5.2. Loosen the screws connecting the cover.<br />
5.3. Assemble the controls by pressing them inwards.<br />
10