
You also want an ePaper? Increase the reach of your titles
YUMPU automatically turns print PDFs into web optimized ePapers that Google loves.
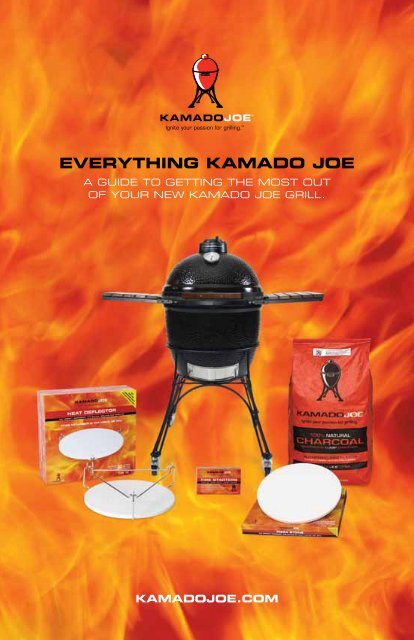
<strong>EVERYTHING</strong> <strong>KAMADO</strong> <strong>JOE</strong><br />
A GUIDE TO GETTING THE MOST OUT<br />
OF YOUR NEW <strong>KAMADO</strong> <strong>JOE</strong> GRILL.<br />
<strong>KAMADO</strong><strong>JOE</strong>.COM
SIGNATURE TASTE.<br />
UNMATCHED VALUE.<br />
Like many of you, I’m passionate about outdoor cooking. Over the years, I’ve<br />
cooked on everything from high-end stainless steel gas grills to inexpensive<br />
briquette charcoal grills. If those were my only choices I would pick the latter<br />
for one simple reason–the taste. There is nothing better than the mouthwatering<br />
taste of charcoal grilled food. Fortunately there is a better option–<br />
the Kamado Joe.<br />
My passion for that signature taste led me to the Kamado style of cooking.<br />
With Natural Lump Charcoal, these ceramic grills are the prevailing choice for<br />
cooking flexibility and temperature range.<br />
After using a Kamado grill for years I decided to design one with better<br />
materials and offer it at a competitive price. That was the start of the Kamado<br />
Joe Company, and today my passion for that signature taste still drives the<br />
innovation I put into all of our grills and accessories.<br />
When you compare the cooking advantages and cost per use, our grills and<br />
accessories are unmatched in the value they bring to you.<br />
We have some exciting products and accessories in development and my<br />
promise to you is to continue to innovate, inform you and provide superior<br />
products that function as promised.<br />
Thank you for considering Kamado Joe.<br />
Robert “Bobby” Brennan<br />
Founder & President<br />
Kamado Joe Grills<br />
Happy Grilling!
TAbLE Of CONTENTS<br />
The Kamado Joe Difference ………………………………… Page 1<br />
Kamado Joe Components …………………………………… Page 2<br />
Assembling Your Kamado Joe Grill ………………………… Page 3<br />
Lighting Instructions ………………………………………… Page 4<br />
Controlling the Temperature ………………………………… Page 5<br />
Cooking Temperature Guide ………………………………… Page 6<br />
Using Your Kamado Joe: Baking …………………………… Page 7<br />
Using Your Kamado Joe: Roasting …………………………… Page 8<br />
Using Your Kamado Joe: Grilling …………………………… Page 9<br />
Using Your Kamado Joe: Smoking …………………………… Page 10<br />
Cooking Configurations ……………………………………… Page 11<br />
Care & Maintenance ………………………………………… Page 16<br />
Safe Use of Your Kamado Joe Grill …………………………… Page 18<br />
Kamado Joe Grills …………………………………………… Page 19<br />
Kamado Joe Accessories …………………………………… Page 21<br />
Warranty ……………………………………………………… Page 27<br />
Online Warranty Registration ………………………………… Page 28
THE <strong>KAMADO</strong> <strong>JOE</strong> DIffERENCE<br />
CongraTulaTions on The purChase of your new Kamado<br />
Joe grill. With normal care your Kamado Joe Grill will provide you with a<br />
lifetime of cooking pleasure. Here are just a few reasons why you made a good<br />
investment in a Kamado Joe Grill.<br />
superior TasTe<br />
There’s only one reason to cook outside; the unique taste of charcoal grilled<br />
food. Infrared and gas grills try to replicate it, but there’s just no substitute for<br />
charcoal.<br />
We only recommend Kamado Joe 100% Natural Lump Charcoal for use in<br />
our grills, and for good reason: 1. It burns over 200°F hotter that briquette<br />
charcoal, and even burner hotter and longer that other lump charcoal brands.<br />
2. Our 100% Natural Lump Charcoal burns cleaner that other charcoal because<br />
it’s made from hardwoods for a truly natural taste. Briquette charcoal contains<br />
additives like borax, starch and sawdust from waste lumber.<br />
ready To CooK in 15 minuTes<br />
There is a popular misconception that any charcoal grill has a longer preheat<br />
time than gas grills. The fact is that Kamado Joe Grills are ready in 15 minutes;<br />
the same time the typical gas grill user takes to preheat their grill. We may<br />
have been confused with briquette charcoal grills, which can take 30 minutes<br />
or longer.<br />
a grill, a smoKer and an oVen all in one<br />
We call our outdoor cooker a grill, but that’s only part it. In reality, it’s a grill, a<br />
smoker and an oven all in one. Cook as high as 750°F+ or as low as 225°F or<br />
anywhere in between with a quick adjustment to the air flow. The flexibility<br />
comes from a combination of the ceramic shell, air control and 100% Natural<br />
Lump Charcoal. We even added an easy-to-read thermometer for good<br />
measure.<br />
BuilT To lasT a lifeTime<br />
Quality design and materials are just as important as the “wow factor” of our<br />
grills. Our ceramics are backed by a 20-year guarantee, and with average care<br />
your Kamado Joe Grill could easily be the last grill you’ll ever buy.<br />
1
only pennies per use<br />
There are a number of variables when trying to compare heat sources like<br />
gas, briquette charcoal and 100% Natural Lump Charcoal; varying BTUs per<br />
gas grill, weight versus volume of charcoal needed. In short, our 100% Natural<br />
Lump Charcoal costs only pennies per use and it can be relit for multiple<br />
cookings. You can’t do that with gas or briquettes.<br />
low mainTenanCe<br />
There’s nothing better than a grill that’s doesn’t need constant attention.<br />
With us there’s no tanks to replace or large amounts of ash to clean up. In<br />
fact, our grills are self-cleaning. Just fire it up and you’re ready to go. For more<br />
information, see our Care and Maintenance section on page 16.<br />
shown (Left to Right): Heat Deflector, Kamado Joe Grill, Fire Starter Cubes, Pizza Stone,<br />
100% Natural Lump Charcoal.<br />
2
ASSEMbLING YOUR <strong>KAMADO</strong> <strong>JOE</strong> GRILL<br />
assemBling your Kamado Joe grill wiTh a CarT<br />
1. Cut the plastic bands and remove the top and side panels of<br />
the shipping box.<br />
2. Remove the top and bottom of the cart and attach them, then<br />
depress the tabs on the two locking casters (the locking<br />
casters indicate the front of the cart).<br />
3. Open the grill and remove the components.<br />
4. Place assembled cart on a secure level surface before inserting the grill.<br />
5. Gently lift the grill and place it in the cart. Adjust the position so<br />
the front of the grill is centered between the legs with the two<br />
locking casters. we highly recommend that two people lift<br />
the grill into the cart due to the weight.<br />
3<br />
adVisory: do noT lifT The grill inTo The CarT By The<br />
hinge meChanism or side shelf aTTaChing TaBs.<br />
6. Open the grill and fully open the bottom draft door. Place the<br />
fire box inside the grill and align the opening at the bottom of<br />
the fire box with the opening in the draft door. This allows the<br />
air to flow freely into the grill and to remove ash residue with<br />
the included ash tool.<br />
7. Place the cast iron grate in the bottom of the fire box. The<br />
ash will fall through the holes in the grate and collect<br />
underneath the fire box.<br />
8. Place the fire ring on top of the fire box with the “notches up”.<br />
The notches are used to secure the legs of the Heat Deflector<br />
accessory when cooking indirectly (see page 12).<br />
9. Place the stainless steel cooking grate on top of the fire ring<br />
with the hinged door in the front of the grill.<br />
10. Close the grill lid and place the cast iron top vent on top of the<br />
lid neck. The “Kamado Joe” logo should face the front of the grill.<br />
11. Attach the side shelves by placing the front pins in the slots of<br />
the shelf brackets.<br />
12. See the section on “Grill Bands” on page 16 to ensure that the<br />
bands of your grill have the proper tension.
assemBling your Kamado Joe “sTand alone” grill and inserTing<br />
iT inTo your Kamado Joe grill TaBle<br />
1. Follow steps 1 and 3 on the previous page, then attach the<br />
bamboo handle with the nuts (included) and a 10mm wrench.<br />
2. Open the lid and place the thermometer sensor through the<br />
small hole on the front of the lid. Slide the washer and nut onto<br />
the sensor and turn the nut finger tight. Adjust the position of<br />
the thermometer so it is upright, then tighten the nut with a<br />
14mm wrench. do not over tighten.<br />
3. Place the three grill feet on the bottom shelf of the grill table<br />
and center them using the hole in the top shelf as a guide.<br />
Form a triangle s with the top being where the back of the grill<br />
will be placed. The other two feet should be placed just to the<br />
left and right of the bottom draft door (See page 25).<br />
4. Gently place the grill into the table and adjust the feet. Be<br />
careful not to catch the bottom draft door handle on the edge<br />
of the hole to avoid damaging the handle or grill table surface.<br />
we highly recommend that two people lift the grill into the<br />
grill table due to the weight of the grill.<br />
5. Follow steps 5 through 9 on the previous page.<br />
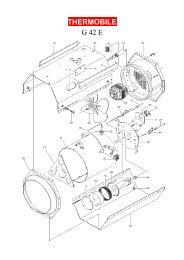
TEMP<br />
GAUGE<br />
BAMBOO<br />
HANDLE<br />
STAINLESS<br />
STEEL DRAFT<br />
DOOR<br />
CAST IRON<br />
TOP VENT<br />
LID<br />
Kamado Joe ComponenTs<br />
SPRING<br />
HINGE<br />
BASE<br />
GRILLING<br />
GRATE<br />
FIRE RING<br />
CAST IRON<br />
FIRE GRATE<br />
FIRE BOX<br />
4
LIGHTING YOUR <strong>KAMADO</strong> <strong>JOE</strong> GRILL<br />
Kamado Joe Fire Starter Cubes are one of the quickest ways to start your grill.<br />
They are odorless, smokeless and environmentally safe. Each cube burns up to<br />
1300°F for 8-12 minutes to ensure that you’re ready to cook in 15 minutes.<br />
lighTing insTruCTions<br />
1. Fill fire box with Kamado Joe 100% Natural Lump Charcoal just<br />
below holes on the side of the fire box.<br />
2. Place 1-2 Kamado Joe Fire Starter Cubes in the charcoal so<br />
1/4 of cube is visible.<br />
3. Open bottom draft door fully and leave grill lid open.<br />
4. Light the Fire Starter Cubes. The 100% Natural Lump Charcoal<br />
will be ready in 15 minutes or less.<br />
5. Close the grill lid and adjust air flow until the desired<br />
temperature is reached.<br />
6. Your Kamado Joe grill should be heated for 15 minutes prior to cooking.<br />
Do not cook before the fuel has a coating of ash.<br />
Charcoal chimneys and electric starter are acceptable methods of lighting the<br />
100% Natural Lump Charcoal.<br />
CauTions<br />
do not use lighter fluid, gas or other combustible liquids to ignite the<br />
100% Natural Lump Charcoal. Liquid chemicals are a fire hazard and they will<br />
impregnate the ceramic material and cause an undesirable taste to food.<br />
do not use “instant light” briquettes. This will cause the same undesirable<br />
taste.<br />
do not use any type of briquette charcoal. This type of charcoal contains<br />
additives like borax, starch and sawdust from waste lumber, which will leave<br />
three times the amount of ash as 100% Natural Lump Charcoal. Also, most<br />
brands of briquette charcoal cannot reach temperatures above 500°F.<br />
5
CONTROLLING THE TEMpERATURE<br />
Achieving a consistent temperature as high as 750°F or as low as 225°F is easy<br />
on your Kamado Joe Grill. In fact, you can maintain low temperatures for up to<br />
12 hours without adding 100% Natural Lump Charcoal.<br />
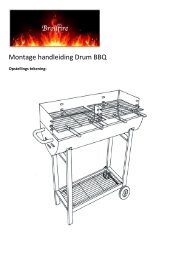
air flow and TemperaTure<br />
Your Kamado Joe Grill works on a simple<br />
principle; the more air you allow to pass<br />
through the grill, the higher the temperature.<br />
The less air the lower the temperature.<br />
Many new grillers think that opening the<br />
top vent all the way will allow all the heat to<br />
escape–just the opposite is true. a fully open<br />
top vent will create very high temperatures,<br />
because it increases the air flow to the 100%<br />
Natural Lump Charcoal.<br />
Diagram of air flow.<br />
sTeps<br />
1. With the 100% Natural Lump Charcoal fully lit and lid closed,<br />
make sure the bottom draft door is fully open.<br />
2. Open the top vent fully and monitor the temperature until it<br />
reaches your desired temperature.<br />
3. Close the top vent half way, wait 1-2 minutes and check the<br />
temperature.<br />
4. Adjusting the top vent by either closing it more (lower<br />
temperature) or opening it more (higher temperature). A ¼”<br />
adjustment can change the temperature as much as 25°F.<br />
5. Monitor the temperature during cooking and if you notice that<br />
the temperature has moved outside your desired range, adjust<br />
the top vent in very small increments and wait 1-2 minutes.<br />
CooKing Tip<br />
When you open the lid to check your food, the top vent’s bottom disk will slide<br />
to the closed position. Be sure to reset the top vent setting after you close the<br />
lid to maintain your temperature.<br />
6
COOKING TEMpERATURE GUIDE<br />
As with all cooking guides, the settings and times are suggestions that have<br />
worked for us. Your cooking style and tastes may be different, but that’s the<br />
fun of owning a Kamado Joe Grill. You can experiment and create a cooking<br />
style that fits your own taste.<br />
slow Cook/smoke (225°f–275°f)<br />
Depending on the type of meat, you can expect to set the time between 30<br />
minutes and 2 hours per pound. all slow cooking uses a heat deflector for<br />
indirect heating (see page 23).<br />
Beef Brisket ………………… 2 Hrs per lb.<br />
Boston Butt (pulled pork) …… 2 Hrs per lb.<br />
Chicken Wings …………… 30 Minutes per lb.<br />
Full Rack of Ribs …………… 1 Hr per lb.<br />
Roasts ……………………… 1 Hr per lb.<br />
OPEN CLOSED<br />
roast/Bake/grill (325°f–450°f)<br />
The times listed below are for cooking directly on the cooking grate (direct<br />
heating). if you use a heat deflector (see page 23) for indirect heating, a<br />
good general rule is 15 minutes per pound.<br />
Chicken (pieces) …………… 30–45 Min<br />
Chicken (whole) …………… 60–80 Min<br />
Pork Tenderloin …………… 20-30 Min<br />
Shrimp …………………… 5–10 Min<br />
Turkey ……………………… 2–4 Hrs<br />
OPEN CLOSED<br />
steak house sear (500°f–750°f)<br />
OPEN CLOSED<br />
The times listed below are for a meat cooked to “medium”. Adjust the time and<br />
temperature to fit your individual taste.<br />
Hamburgers ……………… 8–10 Min<br />
Pork Chops ………………… 6–8 Min<br />
Steak ……………………… 6–8 Min<br />
7
<strong>KAMADO</strong> <strong>JOE</strong> GRILL: bAKING<br />
For baking, it is easier to achieve your desired temperature by keeping the<br />
draft door fully open and only adjusting the top vent.<br />
The top vent has two cast iron disks that are attached by a<br />
screw. The top disk with the small holes is called a “daisy wheel”<br />
and it’s used for low temperature cooking (smoking) when the<br />
bottom disk completely covers the opening. for baking, it’s best to use the<br />
bottom disk for achieving your desired temperature.<br />
sTeps<br />
1. When the 100% Natural Lump Charcoal<br />
is fully lit, secure the Heat Deflector legs<br />
in the notches of the fire ring and place<br />
the ceramic plate in the top position.<br />
2. Place the Pizza Stone on top of the<br />
Heat Deflector. Close the lid and allow<br />
the plates to preheat for 10 minutes.<br />
3. Make sure the bottom draft door is fully<br />
open. Open the top vent fully and<br />
monitor the temperature until it<br />
reaches your desired temperature.<br />
3. Close the top vent half way, wait 1-2 minutes and check the<br />
temperature.<br />
4. Adjusting the top vent by either closing it more (lower<br />
temperature) or opening it more (higher temperature) by a ¼”<br />
can change the temperature as much as 25°F.<br />
5. Monitor the temperature during cooking and if you notice that<br />
the temperature has moved outside your desired range, adjust<br />
the top vent in very small increments.<br />
CooKing Tip<br />
If you’re baking a pizza, sprinkle corn meal on Pizza Stone just before adding<br />
you pizza to prevent it from sticking.<br />
Tip<br />
See all the available cooking configurations starting on page 12.<br />
Baking configuration.<br />
8
<strong>KAMADO</strong> <strong>JOE</strong> GRILL: ROASTING<br />
For roasting, it is easier to achieve your desired temperature by keeping the<br />
draft door fully open and only adjusting the top vent.<br />
The top vent has two cast iron disks that are attached by a<br />
screw. The top disk with the small holes is called a “daisy wheel”<br />
and it’s used for low temperature cooking (smoking) when the<br />
bottom disk completely covers the opening. for roasting, it’s best to use the<br />
bottom disk for achieving your desired temperature.<br />
sTeps<br />
1. When the 100% Natural Lump Charcoal<br />
is fully lit, secure the Heat Deflector legs<br />
in the notches of the fire ring and place<br />
the ceramic plate in the top or bottom<br />
position. The bottom position should<br />
be used if you want to place a drip pan<br />
between the Heat Deflector and the<br />
cooking grate. You will not damage the<br />
ceramic plate if you allow the drippings<br />
to fall onto it. For Heat Deflector<br />
cleaning instructions, see page 17.<br />
2. Place the cooking grate on top of the Heat Deflector, and close<br />
the lid.<br />
3. Make sure the bottom draft door is fully open. Open the top<br />
vent fully and monitor the temperature until it reaches your<br />
desired temperature.<br />
4. Close the top vent half way, wait 1-2 minutes and check the<br />
temperature.<br />
5. Adjusting the top vent by either closing it more (lower<br />
temperature) or opening it more (higher temperature) by a ¼”<br />
can change the temperature as much as 25°F.<br />
6. Monitor the temperature during cooking and if you notice that<br />
the temperature has moved outside your desired range, adjust<br />
the top vent in very small increments.<br />
Tip<br />
See all the available cooking configurations starting on page 12.<br />
9<br />
Roasting “Bottom” configuration.
<strong>KAMADO</strong> <strong>JOE</strong> GRILL: GRILLING<br />
For grilling, it is easier to achieve your desired temperature by keeping the<br />
draft door fully open and only adjusting the top vent.<br />
The top vent has two cast iron disks that are attached by a<br />
screw. The top disk with the small holes is called a “daisy wheel”<br />
and it’s used for low temperature cooking (smoking) when the<br />
bottom disk completely covers the opening. for grilling, it’s best to use the<br />
bottom disk for achieving your desired temperature.<br />
sTeps<br />
1. Allow the 100% Natural Lump Charcoal<br />
to fully light (15 minutes), then close the<br />
lid.<br />
2. Make sure the bottom draft door is fully<br />
open. Open the top vent fully and<br />
monitor the temperature until it<br />
reaches your desired temperature.<br />
3. Close the top vent half way, wait 1-2<br />
minutes and check the temperature.<br />
4. Adjusting the top vent by either closing<br />
it more (lower temperature) or opening it more (higher<br />
temperature) by a ¼” can change the temperature as much as<br />
25°F.<br />
5. Monitor the temperature during cooking and if you notice that<br />
the temperature has moved outside your desired range, adjust<br />
the top vent in very small increments.<br />
Grilling configuration.<br />
10
<strong>KAMADO</strong> <strong>JOE</strong> GRILL: SMOKING<br />
For smoking, it’s best to close the bottom draft door down to ½” to 1” open.<br />
Control the air flow with the top vent by fully closing the bottom disk and use<br />
the “daisy wheel” (the top disk with the small holes).<br />
sTeps<br />
1. When the 100% Natural Lump Charcoal<br />
is fully lit, secure the Heat Deflector legs<br />
in the notches of the fire ring and place<br />
the ceramic plate in the top or bottom<br />
position. The bottom position should<br />
be used if you want to place a drip pan<br />
between the Heat Deflector and<br />
cooking grate. You will not damage the<br />
ceramic plate if you allow the drippings<br />
to fall onto it. For Heat Deflector<br />
Roasting “Bottom” configuration.<br />
cleaning instructions, see page 17.<br />
2. Place the cooking grate on top of the Heat Deflector, and close<br />
the lid.<br />
3. Close the bottom draft door down to ½” to 1” open.<br />
4. Close the top vent and turn the daisy wheel so it is fully open.<br />
Wait 5-10 minutes and check the temperature.<br />
5. Adjusting the daisy wheel by either closing it more (lower<br />
temperature) or opening it more (higher temperature) and wait<br />
1-2 minutes for the temperature to adjust. If the temperature is<br />
still to too high, close the draft door another ¼” to ½”.<br />
6. Monitor the temperature during cooking and if you notice that<br />
the temperature has moved outside your desired range, adjust<br />
the top vent and/or bottom draft door in very small increments.<br />
Tip<br />
When smoking, the low temperature will stabilize after an hour.<br />
See all the available cooking configurations starting on page 12.<br />
11
COOKING CONfIGURATION: bAKING<br />
Figure 1 Figure 2<br />
BaKing (Figure 1)<br />
Use this configuration for heating foods that can be cooked in ceramic or<br />
metal containers like casseroles and hot appetizers. a pizza cannot be baked<br />
directly on the heat deflector. The bottom crust will burn.<br />
accessories: Heat Deflector<br />
BaKing (Figure 2)<br />
The perfect configuration for baking pizza, cookies or bread.<br />
accessories: Heat Deflector, Pizza Stone<br />
12
COOKING CONfIGURATION: ROASTING<br />
13<br />
Figure 1 Figure 2<br />
roasTing (Figure 1)<br />
This configuration works well for roasting chicken (with or without a Chicken<br />
Stand), turkey or other foods with indirect heat. Use this set up if you do not<br />
use a drip pan. It’s also a better set up than Figure 2 for adding wood chips.<br />
accessories: Heat Deflector, Chicken Stand (optional)<br />
roasTing (Figure 2)<br />
This configuration works just as well as Figure 1, but it allows you to use a drip<br />
pan between the Heat Deflector and cooking grate.<br />
accessories: Heat Deflector, Chicken Stand (optional)
COOKING CONfIGURATION: GRILLING<br />
Figure 1 Figure 2<br />
grilling (Figure 1)<br />
This configuration is the standard way of grilling on your Kamado Joe Grill.<br />
Great for steaks, hamburgers, chicken breasts or anything you want to cook<br />
directly over the 100% Natural Lump Charcoal.<br />
accessories: None<br />
grilling (Figure 2)<br />
If you’re grilling delicate foods like seafood, fish or vegetables you can use the<br />
Heat Deflector metal stand to raise the food higher in your Kamado Joe Grill.<br />
Moving food away from the direct heat prevent the outside from charring as<br />
much as Figure 1.<br />
To simulate Figure 2 without a Heat Deflector, you can use a Kamado Joe Grill<br />
Expander (see page 25).<br />
accessories: Heat Deflector<br />
14
COOKING CONfIGURATION: SMOKING<br />
15<br />
Figure 1 Figure 2<br />
smoKing (Figure 1)<br />
This configuration works well for smoking Boston butts, brisket, ribs other<br />
foods with indirect heat. Use this set up if you do not use a drip pan. It’s also<br />
a better set up than Figure 2 for adding wood chips. Food will tend to cook<br />
faster with this set up.<br />
accessories: Heat Deflector<br />
smoKing (Figure 2)<br />
This configuration is the standard choice for low-temperature cooking with<br />
indirect heat. Use this set up if you use a drip pan.<br />
accessories: Heat Deflector
CARE & MAINTENANCE<br />
Your Kamado Joe Grill is made of quality materials, so general care and<br />
maintenance is minimal. The best way to protect your Kamado Joe from<br />
the elements is with a Grill Cover. They are available for the standard<br />
configuration with a cart and for the Kamado Joe Stand Alone Grill in our<br />
Teak Grill Table (see page 24).<br />
Care & mainTenanCe<br />
remoVing ashes<br />
Occasionally, you will need to remove the ashes underneath the fire box.<br />
your Kamado Joe includes an ash tool and here are the steps for<br />
removing ashes from a grill in a cart and a grill table:<br />
sTeps<br />
1. If there is partially used charcoal in the grill, stir the charcoal so<br />
any ash in the fire box will drop down.<br />
2. Open the bottom draft door, and place a small container under<br />
the opening to catch the ash. For Grill Tables, use a dust pan,<br />
paper plate or newspaper to catch the ash.<br />
3. Insert the ash tool through the draft door and pull the ash out<br />
into the container.<br />
optional: Remove the cooking grate, fire ring and fire box from the grill, and<br />
use a small scoop to remove the ash. Reinsert the internal components.<br />
grill Bands<br />
Check the position and tightness of the bands at the beginning of each<br />
grilling season or annually.<br />
if the bands are in the proper position, use a 10mm wrench and Allen<br />
wrench to check the tightness of each band connector. You should not be<br />
able to easily turn the Allen wrench while holding the nut in place. If loose,<br />
tighten firmly.<br />
if a band is not centered on the gasket material, loosen the band enough<br />
to push it back in place with a blunt instrument like a flat head screwdriver.<br />
Tighten the band connector with a 10mm wrench and Allen wrench.<br />
Continued on next page.<br />
16
CARE & MAINTENANCE<br />
mold<br />
If your Kamado Joe Grill is out in the elements and you do not use your grill<br />
for an extended period of time (we don’t understand why that would ever be<br />
the case), moisture can be trapped inside the grill and you may see areas of<br />
mold on the cooking grate or internal ceramics. do not use bleach or other<br />
cleaning products. It will add an unpleasant taste to food.<br />
Kamado Joe Grills work like a self-cleaning oven<br />
To self-clean your Kamado Joe grill:<br />
1. Add charcoal, light it and allow the grill to heat to a<br />
temperature of 600°F for 15 minutes.<br />
2. Allow the grill to cool down completely, then brush the grilling<br />
grate before the next cooking.<br />
gasKeT replaCemenT<br />
The gasket material will degrade over time, and depending on your use, the<br />
felt gasket material under the bands and the neck of the lid will need to be<br />
replaced every 1-2 years.<br />
replacing gasket material<br />
1. Heat the grill to 400°F and allow it to cool until it is warm<br />
to the touch (approximately 125°F).<br />
2. Find the end of the gasket material or carefully cut it with a box<br />
cutter, and pull the gasket material away from the ceramics.<br />
3. Clean the area with an adhesive remover or solvent.<br />
4. Pull the protective layer away from the new adhesive layer and<br />
apply the new gasket material.<br />
5. Keep pulling away the protective layer until the new gasket<br />
material reaches the starting point.<br />
6. Use a box cutter or scissors to cut the gasket material so it<br />
meets the starting point.<br />
Tip<br />
The top vent should fit snuggly. You may need to apply two layers of gasket<br />
material.<br />
17
CARE & MAINTENANCE<br />
heaT defleCTor and piZZa sTone<br />
Care and Cleaning of the Ceramic plates<br />
1. Allow ceramics to cool completely before cleaning or storage.<br />
2. Wipe off food material with a brush and store inside in a dry place.<br />
Tips<br />
• Do not place on tables or surfaces that are not heat-resistant.<br />
• Do not use to either plate to cook with on a stove top.<br />
• Do not season with olive oil or other cooking oils.<br />
• Do not use cleaning chemicals or soap and water.<br />
• Do not soak in water. It may cause it to crack with the next use.<br />
SAfETY<br />
follow these safety guidelines at all times:<br />
1. ATTENTION! This barbecue grill will become very hot, do not move it<br />
during operation.<br />
2. Your Kamado Joe is designed for outdoor use only. Do not use indoors.<br />
3. CAUTION! Do not use spirit or petrol for lighting or re-lighting<br />
! Use only firelighters complying to EN 1860-3 !<br />
4. WARNING! Keep children and pets away.<br />
5. Never place your Kamado Joe Grill directly on a wooden deck or<br />
table and cook with it. It may damage the surface or cause a fire.<br />
Only use your grill in the provided cart or in one of our Grill<br />
Tables.<br />
6. Wait until the ashes are completely cool before removing them<br />
from your grill and disposing of them.<br />
7. Do not use gasoline or other combustible liquids to ignite the<br />
100% Natural Lump Charcoal in your Kamado Joe Grill.<br />
8. Never move your grill while it is hot or if there are hot ashes in it.<br />
9. avoid “flashbacks” when cooking. If you operate your grill above<br />
500°F, then deprive the fire of oxygen by closing the top and bottom<br />
air vents, a sudden surge of flame called a “flashback” can occur if<br />
you suddenly open the lid of the grill. This occurs because of the<br />
sudden exposure to oxygen, which causes a brief but intense flame.<br />
To prevent a flashback, open the lid about 1” for 2-3 seconds, then<br />
you can open the lid fully.<br />
18
<strong>KAMADO</strong> <strong>JOE</strong> GRILLS (WITH CART)<br />
Kamado Joe grills are available in Two Colors:<br />
• Red with Natural Bamboo Side Shelves and Handle<br />
• Black with Teak-finished Bamboo Side Shelves and Handle<br />
Our grills come fully assembled. Simply place the empty grill in the cart,<br />
insert the internal components and attach the top vent and side shelves. Set<br />
up time is less than 30 minutes.<br />
We use high quality materials so your Kamado Joe Grill will look for years to<br />
come. See for yourself.<br />
maTerials<br />
Base/lid ………………………… High Fire Heat-Resistant Ceramics<br />
glaze …………………………… Heat-Resistant Ceramic Coating<br />
handle/shelves (red) ………… Finished Bamboo<br />
handle/shelves (Blk) ………… Bamboo/Teak Finish<br />
Top Vent/fire grate …………… Cast Iron<br />
Bands …………………………… Powder Coated Galvanized Steel<br />
spring hinge …………………… Powder Coated Galvanized Iron<br />
19
<strong>KAMADO</strong> <strong>JOE</strong> “STAND ALONE” GRILLS<br />
Set of 3 Matching Grill Feet in<br />
Black or Red Included<br />
Kamado Joe “stand alone” grills are designed to be used with Kamado Joe<br />
Grill Tables or in an outdoor kitchen. They carry the same materials, quality<br />
and dimensions as our standard configuration, with the elimination of the<br />
side shelves and cart.<br />
available in Two Colors and four Configurations:<br />
• Red with Natural Bamboo, Black Steel Bands<br />
• Red with Natural Bamboo, Stainless Steel Bands<br />
• Black with Teak-finished Bamboo, Black Steel Bands<br />
• Black with Teak-finished Bamboo, Stainless Steel Bands<br />
Stand Alone Grills come fully assembled. Simply place the empty grill in the<br />
Grill Table, insert the internal components and attach the top vent. Set up<br />
time is less than 30 minutes.<br />
maTerials<br />
Base/lid ………………………… High Fire Heat-Resistant Ceramics<br />
glaze …………………………… Heat-Resistant Ceramic Coating<br />
handle/shelves (red) ………… Finished Bamboo<br />
handle/shelves (Blk) ………… Bamboo/Teak Finish<br />
Top Vent/fire grate …………… Cast Iron<br />
Bands (Black) …………………… Powder Coated Galvanized Steel<br />
Bands (stainless steel) ………… Stainless Steel<br />
spring hinge …………………… Powder Coated Galvanized Iron<br />
20
100% NATURAL<br />
LUMp CHARCOAL<br />
We recommend our 100% Natural<br />
Lump Charcoal as a heat source for<br />
your Kamado Joe Grill. It’s made from<br />
a blend of hardwoods, and unlike<br />
briquettes that contain chemicals and<br />
fillers, 100% Natural Lump Charcoal<br />
lets the true flavor of your food come<br />
through.<br />
fIRE STARTER CUbES<br />
Kamado Joe Fire Starter Cubes are<br />
the quickest way to start your grill.<br />
They are odorless, smokeless and<br />
environmentally safe. Each cube burns<br />
up to 1300°F for 8-12 minutes to<br />
ensure that you’re ready to cook in 15<br />
minutes.<br />
GRILL COVERS<br />
Our Premium Gill Covers are made<br />
of durable vinyl for all-weather<br />
protection to extend the life of<br />
your Kamado Joe Grill. Custom fit<br />
and available in black. Covers are<br />
available for standard Kamado Joe<br />
Grills that use a cart and Stand<br />
Alone Grills that use a Kamado Joe<br />
Teak Grill Table.<br />
21
HEAT DEfLECTOR<br />
Our Heat Deflector is one of our<br />
most versatile accessories because<br />
it allows you to bake, grill or smoke<br />
with indirect heat.<br />
The metal stand has a two-position<br />
setting for the ceramic plate, and<br />
it can be used by itself to raise<br />
food higher in the grill. Perfect for<br />
tender foods like seafood, fish and<br />
vegetable. See all the different<br />
configurations possible starting on<br />
page 12.<br />
pIZZA STONE<br />
The advantages of our high-impact<br />
ceramic Kamado Joe Pizza Stone is<br />
that it distributes heat evenly across<br />
the entire surface, and absorbs excess<br />
moisture. Excellent for baking pizza,<br />
but it can also be used for bread,<br />
cookies or any food that can be baked<br />
in a ceramic or metal container like<br />
casseroles or hot appetizers.<br />
Bottom Position Setting<br />
Top position Setting<br />
22
CHICKEN STAND<br />
The Kamado Joe Chicken Stand is<br />
the perfect way to roast a chicken<br />
for incredible tenderness. Roasting<br />
vertically allows the outside of the<br />
chicken to brown uniformly without<br />
charring the bottom, and eliminates<br />
sticking to the cooking grate.<br />
Fill the stand with your favorite liquid<br />
to infuse flavor into the meat. Use beer,<br />
juices or your favorite marinade for<br />
unbeatable finger-licking chicken.<br />
GRILL EXpANDER<br />
Add up to 60% more cooking area<br />
with our premium Grill Expander.<br />
It’s also an excellent way to cook<br />
tender food like seafood, fish and<br />
vegetables.<br />
It can also be used with a heat<br />
deflector for smoking or roasting.<br />
Made of 304 Grade Stainless Steel<br />
for easy clean up and years of use.<br />
23
RIb RACK<br />
Our 304 stainless steel rib rack allows you to cook more ribs by placing the<br />
ribs vertically into your grill. You can also place other cuts of meat in the rib<br />
rack like chicken pieces or pork chops.<br />
GRILL GRIppER<br />
Made of durable 304 stainless steel for years<br />
of beauty and use, our grill gripper securely<br />
clamps onto any cooking grate. Avoid the<br />
mess and potential burn hazard of moving or<br />
repositioning your cooking grate.<br />
24
SOLID TEAK GRILL TAbLE<br />
Enjoy the beauty and weather-resistance of a Kamado Joe Teak Grill Table.<br />
Designed for plenty of working area on the large table top. Assembly is quick<br />
and easy in as little as 15 minutes.<br />
features:<br />
• Solid Teak construction<br />
• Locking Casters for stability<br />
25
STAINLESS STEEL GRILL TAbLES<br />
Our Stainless Steel Grill Table is the ultimate in beauty and weather<br />
resistance. Constructed of brushed 304 stainless steel. Comes fully assembled.<br />
features:<br />
• Fold-down Side Shelves<br />
• Locking Casters for stability<br />
• Spacious storage area<br />
• Condiment Tray<br />
26
<strong>KAMADO</strong> <strong>JOE</strong> LIMITED WARRANTY<br />
models Covered: ClassicJoe, ClassicJoe Stand Alone and ClassicJoe BigJoe<br />
limited lifetime warranty on Ceramic parts<br />
Kamado Joe warrants that all ceramic parts used in this Kamado Joe grill and smoker<br />
are free of defects in material and workmanship for as long as the original purchaser<br />
owns the grill.<br />
limited 5-year warranty on metal and Cast iron parts<br />
In addition, Kamado Joe warrants that all metal and cast iron parts used in this<br />
Kamado Joe grill and smoker are free of defects in material and workmanship for a<br />
period of five (5) years.<br />
when does warranty Coverage Begin?<br />
Warranty coverage commences on the original date of purchase and covers only the<br />
original purchaser. For the warranty to apply, you must register your grill at:<br />
http://www.kamadojoe.com/form_grill_registration.html<br />
If a defect in material or workmanship is discovered during the applicable warranty<br />
period under normal use and maintenance, Kamado Joe will, at our sole option,<br />
replace or repair the defective component at no cost to you for the component itself.<br />
This warranty does not apply to labor, freight, or any other cost associated with the<br />
service, repair or operation of the grill.<br />
what is not Covered?<br />
This warranty does not apply to damage caused by abuse or use of the product for<br />
purposes other than that for which it is designed, damage caused by lack of proper<br />
use, assembly, maintenance or installation, damages caused by accidents or natural<br />
disasters, damage caused by unauthorized attachments or modifications, or damage<br />
during shipment. This warranty does not cover thermometers or felt gaskets. This<br />
warranty does not cover damage from normal wear and tear from use of the product<br />
(for example, scratches, dents, dings and chipping) or changes in the appearance of<br />
the grill that do not affect its performance.<br />
This limiTed warranTy is eXClusiVe and in lieu of any oTher warranTy,<br />
wriTTen or oral, eXpress or implied, inCluding BuT noT limiTed To The<br />
warranTy of merChanTaBiliTy or fiTness for a parTiCular purpose.<br />
The duraTion of any implied warranTies, inCluding any implied<br />
warranTy of merChanTaBiliTy or fiTness for a parTiCular purpose<br />
is eXpressly limiTed To The duraTion of The warranTy period for The<br />
appliCaBle ComponenT. Some states do not allow limitations on how long an<br />
implied warranty lasts, so the above limitation may not apply to you.<br />
The purChaser’s eXClusiVe remedy for BreaCh of This limiTed<br />
warranTy or of any implied warranTy shall Be limiTed as speCified<br />
herein To replaCemenT. in no Case shall Kamado Joe Be liaBle for any<br />
speCial, inCidenTal or ConseQuenTial damages. Some states do not allow<br />
the exclusion or limitation of special, incidental or consequential damages, so the<br />
above limitation or exclusion may not apply to you.<br />
27
for warranty service<br />
for warranty service, please contact your local dealer. Before you call, please<br />
have the following information available:<br />
• Model Number (see rating plate)<br />
• Serial Number (see rating plate)<br />
• Proof of purchase by the original owner<br />
• Date of installation<br />
• Brief description of the problem<br />
your satisfaction is importance to us. if a problem cannot be resolved to your<br />
satisfaction, please write, call or email us.<br />
Kamado Joe<br />
2865 N. Berkeley Lake Rd. NW, Suite 6<br />
Duluth, Georgia 30096<br />
Tel: (678) 866-0642 or (877) 215-6299<br />
Fax: (678) 866-4175<br />
Email: Customer.Support@KamadoJoe.com<br />
This limited warranty gives you specific legal rights and you may have other rights that<br />
vary from state to state.<br />
ONLINE WARRANTY REGISTRATION<br />
REGISTER YOUR <strong>KAMADO</strong> <strong>JOE</strong> GRILL<br />
AT WWW.<strong>KAMADO</strong><strong>JOE</strong>.COM<br />
regisTer online<br />
registering your Kamado Joe grill is easy. Go to our website and fill<br />
out the online registration form. Registration also entitles you to special<br />
offers and promotions.<br />
if you do not have an internet connection your local retailer can help<br />
you. Write down your serial number located on the bottom of your grill<br />
and take it to your local retailer. They will be happy to help you register<br />
your Kamado Joe grill.<br />
regisTer By phone<br />
Call us Toll Free at (877) 215-6299.<br />
28
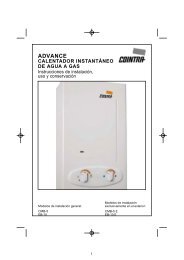
<strong>KAMADO</strong> <strong>JOE</strong><br />
4034 Enterprise Way, Suite 200<br />
Flowery Branch, GA 30542<br />
USA<br />
BSI Rev 10/11