HumidAire 2iC™ - Venta de equipos médicos
HumidAire 2iC™ - Venta de equipos médicos
HumidAire 2iC™ - Venta de equipos médicos

Create successful ePaper yourself
Turn your PDF publications into a flip-book with our unique Google optimized e-Paper software.
<strong>HumidAire</strong> 2iC<br />
User Manual<br />
English • Français • Español • Português
308189/1 06 08<br />
<strong>HumidAire</strong> 2iC<br />
User<br />
AMER ML<br />
Global lea<strong>de</strong>rs in sleep and respiratory medicine<br />
www.resmed.com
<strong>HumidAire</strong> 2iC <br />
User Manual 1<br />
Manuel utilisateur 25<br />
Manual <strong>de</strong>l usuario 49<br />
Manual do utilizador 75<br />
Português Español Français English
ResMed Ltd (Manufacturer) 1 Elizabeth Macarthur Drive Bella Vista NSW 2153 Australia<br />
ResMed Corp (US Designated Agent) 14040 Danielson Street Poway CA 92064-6857 USA<br />
ResMed (UK) Ltd (EU Authorized Representative) 65 Milton Park Abingdon Oxfordshire OX14 4RX UK<br />
ResMed Offices Australia, Austria, Brazil, Finland, France, Germany, Hong Kong, Japan, Malaysia, Netherlands,<br />
New Zealand, Singapore, Spain, Swe<strong>de</strong>n, Switzerland, UK, USA (see www.resmed.com for contact <strong>de</strong>tails).<br />
Patents pending.<br />
Protected by <strong>de</strong>sign registrations: AU 147335, CH 128.711, CH 128.712, DE 40202008, DE 40201723, ES 153516,<br />
ES 153518, FR 021407, GB 3001820, GB 3001821, JP 1164266, JP 1164267, SE 75598, SE 75715, US D476077,<br />
US D477868. Other <strong>de</strong>signs pending.<br />
<strong>HumidAire</strong>, AutoSet and SmartStart are tra<strong>de</strong>marks of ResMed Ltd and are Registered in the U.S. Patent and Tra<strong>de</strong>mark<br />
Office.<br />
© 2006 ResMed Ltd.
English<br />
<strong>HumidAire</strong> 2iC<br />
User Manual<br />
English<br />
1
Contents<br />
Introduction . . . . . . . . . . . . . . . . . . . . . . . . . . . . . . . . . . . . . . . . . . . . . . . 5<br />
Definitions 5<br />
User/Owner Responsibility 5<br />
Medical Information . . . . . . . . . . . . . . . . . . . . . . . . . . . . . . . . . . . . . . . 6<br />
Inten<strong>de</strong>d Use 6<br />
Contraindications 6<br />
Warnings and cautions 6<br />
The <strong>HumidAire</strong> 2iC . . . . . . . . . . . . . . . . . . . . . . . . . . . . . . . . . . . . . . . . 8<br />
<strong>HumidAire</strong> 2iC Components 8<br />
Preparing For Use . . . . . . . . . . . . . . . . . . . . . . . . . . . . . . . . . . . . . . . . . 9<br />
Setting Up the <strong>HumidAire</strong> 2iC 9<br />
Operating Instructions . . . . . . . . . . . . . . . . . . . . . . . . . . . . . . . . . . . . 13<br />
Starting Treatment 13<br />
Stopping Treatment 13<br />
Helpful Hints 14<br />
Cleaning and Maintenance . . . . . . . . . . . . . . . . . . . . . . . . . . . . . . . . 15<br />
Servicing 18<br />
Troubleshooting . . . . . . . . . . . . . . . . . . . . . . . . . . . . . . . . . . . . . . . . . . 19<br />
English<br />
Technical Specifications . . . . . . . . . . . . . . . . . . . . . . . . . . . . . . . . . . . 21<br />
Limited Warranty . . . . . . . . . . . . . . . . . . . . . . . . . . . . . . . . . . . . . . . . . 22<br />
In<strong>de</strong>x . . . . . . . . . . . . . . . . . . . . . . . . . . . . . . . . . . . . . . . . . . . . . . . . . . . . . 23<br />
Contents<br />
3
Introduction<br />
The ResMed <strong>HumidAire</strong> 2iC is <strong>de</strong>signed to humidify the air <strong>de</strong>livered to the<br />
airway during continuous positive airway pressure (CPAP) automatic positive<br />
airway pressure (APAP) and bilevel therapy.<br />
Nasal congestion or dryness of the nose, mouth or throat may be experienced<br />
during therapy. These symptoms are caused by dry climates, cold air<br />
temperatures, the airflow <strong>de</strong>livered from the CPAP, APAP or bilevel system and<br />
mouth leak. Moist air helps relieve symptoms of dryness and can make therapy<br />
more comfortable.<br />
The <strong>HumidAire</strong> 2iC is <strong>de</strong>signed to form a single humidification unit when<br />
attached to a CPAP, APAP, or bilevel unit.<br />
English<br />
Definitions<br />
!<br />
!<br />
This manual contains special terms and icons that appear in the margins to draw<br />
your attention to specific and important information.<br />
WARNING<br />
Alerts you to possible injury.<br />
CAUTION<br />
Explains special measures for the safe and effective use of the <strong>de</strong>vice.<br />
Note: Is an informative or helpful note.<br />
User/Owner Responsibility<br />
The user or owner of this system shall have sole responsibility and liability for any<br />
injury to persons or damage to property resulting from:<br />
• operation which is not in accordance with the operating instructions supplied<br />
• maintenance or modifications carried out unless in accordance with<br />
authorised instructions and by authorised persons.<br />
Please read this manual carefully before use.<br />
Introduction<br />
5
Medical Information<br />
Inten<strong>de</strong>d Use<br />
The <strong>HumidAire</strong> 2iC is indicated for humidification of the air <strong>de</strong>livered from<br />
specific ResMed CPAP, APAP, and bilevel <strong>de</strong>vices. Refer to the relevant <strong>de</strong>vice<br />
manual for information regarding its compatibility with the <strong>HumidAire</strong> 2iC.<br />
Contact your equipment supplier or ResMed office if you require further<br />
information.<br />
The <strong>HumidAire</strong> 2iC is for use only as recommen<strong>de</strong>d by a physician.<br />
!<br />
CAUTION (USA ONLY)<br />
Fe<strong>de</strong>ral law restricts this <strong>de</strong>vice to sale by or on the or<strong>de</strong>r of a physician.<br />
Contraindications<br />
The <strong>HumidAire</strong> 2iC is contraindicated for use with patients whose supraglottic<br />
airways have been bypassed.<br />
Please also refer to the relevant system manual for contraindications associated<br />
with CPAP, APAP, and bilevel therapy.<br />
Warnings and cautions<br />
!<br />
The following are general warnings and cautions. Specific warnings and cautions<br />
appear next to the relevant instructions in the manual.<br />
WARNINGS<br />
• Use the <strong>HumidAire</strong> 2iC only for its inten<strong>de</strong>d use as <strong>de</strong>scribed in this manual.<br />
• The <strong>HumidAire</strong> 2iC is <strong>de</strong>signed only for use with specific ResMed CPAP,<br />
APAP, or bilevel <strong>de</strong>vices. Do not use the <strong>HumidAire</strong> 2iC with any other<br />
<strong>de</strong>vices.<br />
• The <strong>HumidAire</strong> 2iC should only be used with <strong>de</strong>livery tubes or accessories<br />
specified in this manual. Connection of other <strong>de</strong>livery tubes or accessories<br />
could result in injury, or damage to the <strong>de</strong>vice.<br />
• The <strong>HumidAire</strong> 2iC, including the associated tubing, is for single-patient use<br />
and must not be re-used on another person. This is to avoid the risk of crossinfection.<br />
• Always place the <strong>HumidAire</strong> 2iC <strong>de</strong>vice lower than the level of the patient. If<br />
it is placed at or above the level of the patient, water may flow down the air<br />
tubing and into the mask.<br />
• Do not attempt to dismantle the <strong>HumidAire</strong> 2iC docking station. There are no<br />
user-serviceable parts insi<strong>de</strong>. Repairs and internal servicing should only be<br />
performed by an authorised service agent.<br />
6
• If liquids are inadvertently spilled on the <strong>HumidAire</strong> 2iC docking station,<br />
unplug the CPAP, APAP, or bilevel <strong>de</strong>vice from the power outlet and allow the<br />
docking station to drain and dry before using.<br />
• The water chamber should not be connected to the docking station when<br />
transporting the <strong>HumidAire</strong> 2iC in the carry bag. Place the water chamber in a<br />
separate compartment in the carry bag.<br />
• Make sure that the water chamber is empty and thoroughly dried before<br />
transporting the <strong>HumidAire</strong> 2iC.<br />
• Do not operate the <strong>HumidAire</strong> 2iC if the CPAP, APAP, or bilevel <strong>de</strong>vice has a<br />
damaged power cord or plug.<br />
• There exists the possibility that if the <strong>de</strong>vice is placed above the level of the<br />
patient and is tipped over, the mask might fill with water. The <strong>HumidAire</strong> 2iC<br />
should therefore be used with caution in patients who are unable to guard<br />
their airway, or are unable to pull the mask off, for example following a stroke.<br />
Attention should be given to the relative risks and benefits.<br />
• Do not operate the <strong>HumidAire</strong> 2iC if it is not working properly or if any part of<br />
it has been dropped or damaged.<br />
• Keep the power cord away from heated surfaces.<br />
• Do not drop or insert any object into any opening or tubes.<br />
• Do not use the <strong>HumidAire</strong> 2iC in the presence of flammable or explosive<br />
materials.<br />
English<br />
Medical Information<br />
7
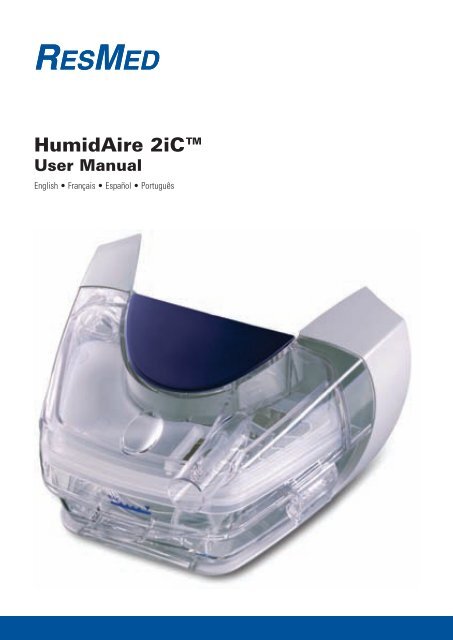
The <strong>HumidAire</strong> 2iC<br />
<strong>HumidAire</strong> 2iC Components<br />
Docking<br />
station<br />
Water<br />
chamber<br />
Air outlet<br />
Figure 1: Components of the <strong>HumidAire</strong> 2iC<br />
Water chamber lid<br />
Seal<br />
Cross-member<br />
Water chamber base<br />
Si<strong>de</strong> catch<br />
Figure 2: Water chamber components<br />
8
Preparing For Use<br />
Setting Up the <strong>HumidAire</strong> 2iC<br />
!<br />
WARNING<br />
Make sure that the CPAP, APAP, or bilevel <strong>de</strong>vice is switched off at the<br />
power outlet before connecting the <strong>HumidAire</strong> 2iC.<br />
English<br />
1 Remove the front cap from the <strong>de</strong>vice. To do this:<br />
1. Press the latch un<strong>de</strong>rneath the front cap.<br />
2. While pressing the latch, lift and pull the front cap away from the <strong>de</strong>vice. The<br />
front cap should <strong>de</strong>tach from the bottom and right si<strong>de</strong>. The front cap should<br />
still be attached to the left si<strong>de</strong>.<br />
Left si<strong>de</strong><br />
Right si<strong>de</strong><br />
Front cap<br />
Latch<br />
3. Hold the <strong>de</strong>vice down with your left hand. With your right hand, firmly pull<br />
the right si<strong>de</strong> of the front cap out and then up until the whole front cap<br />
comes off.<br />
Notes<br />
• To replace the front cap:<br />
a. Align the air outlet connector insi<strong>de</strong> the front cap to the air outlet on the<br />
<strong>de</strong>vice.<br />
b. Push the front cap firmly onto the <strong>de</strong>vice until it clicks into place.<br />
• Remember to take the front cap with you when travelling, in case you need<br />
to use your CPAP, APAP, or bilevel <strong>de</strong>vice without a humidifier.<br />
Preparing For Use<br />
9
2 Separate the <strong>HumidAire</strong> 2iC water chamber from the docking station. To do this,<br />
lift the latch at the bottom of the water chamber and pull the water chamber<br />
away from the docking station.<br />
3 Sli<strong>de</strong> the humidifier docking station (with the water chamber <strong>de</strong>tached) onto the<br />
<strong>de</strong>vice until it clicks into place.<br />
Docking station<br />
Notes<br />
• Un<strong>de</strong>r normal operation, there is no need to remove the <strong>HumidAire</strong> 2iC<br />
docking station once it is attached to the CPAP, APAP, or bilevel <strong>de</strong>vice. If you<br />
need to remove it, press the latch un<strong>de</strong>rneath the docking station and pull it<br />
away from the <strong>de</strong>vice.<br />
• When removing the docking station, ensure that the water chamber is<br />
removed first.<br />
4 Insert the power cord into the socket at the rear of the <strong>de</strong>vice. Plug the other end<br />
of the power cord into a power outlet.<br />
Power<br />
cord<br />
To<br />
power<br />
outlet<br />
!<br />
WARNING<br />
• Make sure that the CPAP, APAP, or bilevel <strong>de</strong>vice is switched off at the<br />
power outlet before connecting the <strong>HumidAire</strong> 2iC.<br />
• Make sure the power cord and plug are in good condition and the<br />
equipment is not damaged.<br />
10
5 Place the <strong>de</strong>vice on a firm, flat surface near your bed. Make sure that it is placed<br />
at a level lower than your sleeping position.<br />
!<br />
6<br />
!<br />
CAUTION<br />
Be careful not to place the <strong>de</strong>vice where it can be bumped into and knocked<br />
over.<br />
WARNING<br />
Do not fill the water chamber while it is attached to the docking station and<br />
the CPAP, APAP, or bilevel <strong>de</strong>vice.<br />
Turn the water chamber so that the air outlet points up. Over a sink, carefully fill<br />
the water chamber through the air outlet up to the maximum water level mark<br />
shown on the si<strong>de</strong> of the water chamber base.<br />
English<br />
Air outlet<br />
Maximum<br />
water level<br />
mark<br />
!<br />
!<br />
The <strong>HumidAire</strong> 2iC should be filled with fresh water before use. Always ensure<br />
that the water chamber is clean. See “Cleaning and Maintenance” on page 15.<br />
WARNING<br />
• Do not fill the water chamber with hot or chilled water.<br />
• Do not overfill the water chamber, as water may enter the CPAP, APAP, or<br />
bilevel <strong>de</strong>vice and air tubing.<br />
CAUTION<br />
Do not use additives, in particular aromatic additives (eg, scented oils and<br />
perfumes). They may reduce the humidification output of the <strong>de</strong>vice and/or<br />
cause <strong>de</strong>terioration of the water chamber materials.<br />
Preparing For Use<br />
11
7 Carefully, sli<strong>de</strong> and push the filled water chamber onto the humidifier docking<br />
station (already attached to the CPAP, APAP, or bilevel <strong>de</strong>vice) until it clicks down<br />
into place. Ensure that the water chamber is fully engaged.<br />
Docking<br />
station<br />
Water<br />
chamber<br />
WARNING<br />
! • Always connect the <strong>HumidAire</strong> 2iC docking station before connecting<br />
the water chamber.<br />
• To prevent water from entering the CPAP, APAP, or bilevel <strong>de</strong>vice, only<br />
move or transport it with the <strong>HumidAire</strong> 2iC attached if the water<br />
chamber is empty and thoroughly dry.<br />
8 Connect one end of the air tubing firmly onto the air outlet on the water chamber<br />
and the other end to the mask system.<br />
Mask system<br />
Air outlet<br />
Air tubing<br />
The <strong>HumidAire</strong> 2iC is now ready for use. To start treatment, see “Operating<br />
Instructions” on page 13.<br />
12
Operating Instructions<br />
Starting Treatment<br />
The <strong>HumidAire</strong> 2iC should be filled with fresh water and attached to the CPAP,<br />
APAP, or bilevel <strong>de</strong>vice, with the air tubing and mask system connected. See<br />
“Setting Up the <strong>HumidAire</strong> 2iC” on page 9.<br />
English<br />
1 Switch on the power at the power outlet. Switch the main power switch at the<br />
back of the <strong>de</strong>vice ON.<br />
Main<br />
power<br />
switch<br />
When the <strong>de</strong>vice is turned on, a WELCOME message is displayed on the LCD.<br />
2 If the option is available, select PASSOVER as the humidifier setting in the menu.<br />
WARNING<br />
! Insufficient therapy may result if the incorrect humidifier setting is selected.<br />
Note: Please refer to the relevant CPAP, APAP, or bilevel user’s manual for<br />
<strong>de</strong>tails on using the menus.<br />
3 Fit your mask as <strong>de</strong>scribed in the mask user instructions.<br />
WARNING<br />
! Before starting therapy ensure that you are wearing the mask and that the<br />
mask and air tubing are fitted correctly.<br />
4 Press the Front key on the control panel. Alternately, if the SmartStart function<br />
is enabled, simply breathe into the mask. Air should begin to flow from the<br />
<strong>de</strong>vice.<br />
5 Lie down and arrange the air tubing so that it is free to move if you turn in your<br />
sleep.<br />
!<br />
WARNING<br />
Do not leave long lengths of air tubing around the top of your bed. It could<br />
twist around your head or neck while you are sleeping.<br />
Stopping Treatment<br />
To stop treatment at any time, remove your mask and press the Front key.<br />
Alternately, if the SmartStart function is enabled, simply remove your mask and<br />
treatment will end.<br />
Operating Instructions<br />
13
Helpful Hints<br />
Symptoms of Dryness Still Present<br />
If you are still experiencing symptoms of dryness you may be breathing through<br />
your mouth. Mouth breathing or mouth leaks cause drying and irritation of the<br />
upper airway. If this is a problem, a full face mask or chin strap may help. Consult<br />
your clinician or equipment supplier for <strong>de</strong>tails.<br />
Nasal Infection or Illness<br />
If you have a cold or nasal infection, be sure to clean the <strong>HumidAire</strong> 2iC<br />
thoroughly each day. Do not put aromatic oils or <strong>de</strong>congestants into the water<br />
chamber.<br />
!<br />
CAUTION<br />
Do not use additives, in particular aromatic additives (eg, scented oils and<br />
perfumes). They may reduce the humidification output of the <strong>de</strong>vice and/or<br />
cause <strong>de</strong>terioration of the water chamber materials.<br />
Scaly Mineral Deposits<br />
You may notice a white pow<strong>de</strong>r or <strong>de</strong>posits in the water chamber base. These<br />
are mineral <strong>de</strong>posits from the tap water. To remove these <strong>de</strong>posits, rub the<br />
water chamber base gently using a mild washing <strong>de</strong>tergent.<br />
To prevent these <strong>de</strong>posits forming, fill the water chamber with <strong>de</strong>mineralised<br />
water.<br />
14
Cleaning and Maintenance<br />
!<br />
You should regularly carry out the cleaning and maintenance <strong>de</strong>scribed in this<br />
section.<br />
WARNING<br />
Beware of electrocution. Do not immerse the <strong>de</strong>vice or power cord in water.<br />
Always unplug the <strong>de</strong>vice before cleaning and be sure that it is dry before<br />
plugging it back into a power outlet.<br />
English<br />
1 Turn the main power switch at the back of the <strong>de</strong>vice to OFF, and unplug the<br />
power cord from the power outlet.<br />
2 Remove the water chamber. To do this, lift the latch at the bottom of the water<br />
chamber and pull the water chamber away from the docking station.<br />
3 Discard any excess water by turning the water chamber upsi<strong>de</strong> down, allowing<br />
the water to drain out of the air outlet.<br />
4 Disassembling the Water Chamber<br />
1. To open the si<strong>de</strong> catches pull out from the lower edge.<br />
Si<strong>de</strong> catch<br />
2. Hold the water chamber as shown below:<br />
front tab<br />
Cleaning and Maintenance<br />
15
3. Separate the water chamber by pulling the two halves apart. Use your thumb<br />
to pull down on the front tab.<br />
front tab<br />
4. Remove the seal by peeling it away from the insi<strong>de</strong> of the lid.<br />
Lid<br />
Seal<br />
5. Remove the cross-member from the water chamber base.<br />
Cross-member<br />
Base<br />
5 Discard any remaining water.<br />
6 Cleaning<br />
WATER CHAMBER<br />
Wash the lid, seal, cross-member and base in warm water using a mild <strong>de</strong>tergent<br />
or in a dishwasher. Rinse them thoroughly with clean water and allow them to<br />
dry away from direct sunlight. Do this daily or after each use. Inspect the water<br />
chamber for wear and <strong>de</strong>terioration. Replace any damaged parts.<br />
!<br />
CAUTION<br />
Do not use any of the following to clean any part of the <strong>HumidAire</strong> 2iC.<br />
These solutions may cause damage and reduce the life of the product.<br />
• bleach, chlorine-, alcohol-, or ammonia based solutions<br />
• moisturizing, antibacterial, or glycerine based soaps<br />
• water softening and <strong>de</strong>scaling agents<br />
If using a dishwasher, avoid heavy duty or high temperature cycles (greater<br />
than 158°F). Do not use strongly alkaline <strong>de</strong>tergents and rinse aids.<br />
16
DOCKING STATION<br />
Wipe the outsi<strong>de</strong> of the docking station with a damp cloth. Do this periodically.<br />
7 Reassembling the Water Chamber<br />
When all the water chamber parts are clean and dry, reassemble the water<br />
chamber:<br />
1. Place the cross-member on its supports insi<strong>de</strong> the water chamber base.<br />
English<br />
Notches<br />
Supports<br />
Supports<br />
2. Fit the seal onto the rim of the water chamber base. Press along the edge to<br />
ensure that the seal is fitted properly.<br />
Seal<br />
Rim<br />
3. Fit the lid onto the water chamber base. Press the lid and base firmly<br />
together to close.<br />
Lid<br />
Cleaning and Maintenance<br />
17
4. To close the si<strong>de</strong> catches see the illustrations below,<br />
Note: If the si<strong>de</strong> catches become <strong>de</strong>tached from the water chamber base,<br />
reattach them as shown.<br />
The si<strong>de</strong> catches consist of two parts. If they become separated clip them back<br />
together as shown. Insert the smaller end (a) of the hinge (b) first, hold it flat,<br />
and press firmly into place.<br />
a<br />
b<br />
Servicing<br />
This product (<strong>HumidAire</strong> 2iC) should be inspected by an authorized ResMed<br />
Service Center 5 years from the date of manufacture. Prior to this, the <strong>de</strong>vice is<br />
inten<strong>de</strong>d to provi<strong>de</strong> safe and reliable operation provi<strong>de</strong>d that it is operated and<br />
maintained in accordance with the instructions provi<strong>de</strong>d by ResMed. Applicable<br />
ResMed warranty <strong>de</strong>tails are provi<strong>de</strong>d with the <strong>de</strong>vice at the time of original<br />
supply. Of course, as with all electrical <strong>de</strong>vices, if any irregularity becomes<br />
apparent, you should exercise caution and have the <strong>de</strong>vice inspected by an<br />
Authorized ResMed Service Center.<br />
18
Troubleshooting<br />
!<br />
If there is a problem, try the following suggestions. If the problem cannot be<br />
solved, contact your equipment supplier or ResMed. Do not attempt to open the<br />
unit.<br />
WARNING<br />
Service and repair should only be performed by an authorised service<br />
agent. Un<strong>de</strong>r no circumstances should you attempt to service or repair the<br />
unit yourself.<br />
English<br />
Problem Possible Cause Solution<br />
Device not working<br />
(no display on LCD<br />
screen)<br />
Leaking water<br />
chamber<br />
Power cord is not plugged<br />
in properly.<br />
Device not switched on.<br />
Faulty power outlet.<br />
The water chamber may<br />
be damaged or cracked.<br />
The lid may not be on<br />
correctly.<br />
Water chamber seal may<br />
be twisted.<br />
Si<strong>de</strong> catches are not<br />
engaged properly.<br />
Check that the power cord is plugged<br />
firmly into the power outlet.<br />
Check that the switch at the back of<br />
the <strong>de</strong>vice is in the ON position.<br />
Try another power outlet.<br />
Contact your supplier for a<br />
replacement.<br />
Press the lid down firmly.<br />
Make sure the seal is seated properly<br />
insi<strong>de</strong> the water chamber.<br />
Make sure the two si<strong>de</strong> catches are<br />
engaged properly.<br />
Troubleshooting<br />
19
Problem Possible Cause Solution<br />
No air flow<br />
Water splashing on<br />
your face<br />
The air tubing is not<br />
connected properly.<br />
The air tubing is blocked,<br />
pinched or punctured.<br />
The CPAP, APAP, or bilevel<br />
<strong>de</strong>vice is not working<br />
correctly.<br />
The water chamber is<br />
overfilled.<br />
The water chamber is<br />
overfilled.<br />
Connect the air tubing as <strong>de</strong>scribed in<br />
“Preparing For Use” on page 9.<br />
Unblock or free the air tubing. Check<br />
the air tubing for punctures.<br />
See the Troubleshooting section in the<br />
CPAP, APAP, or bilevel <strong>de</strong>vice manual.<br />
Empty some water from the water<br />
chamber. Make sure that the water<br />
level is not above the maximum water<br />
level mark.<br />
Empty some water from the water<br />
chamber.<br />
20
Technical Specifications<br />
Dimensions (H x W x D)<br />
4.8 in x 7.2 in x 8.6 in (docking station and water chamber)<br />
Weight<br />
1.57 lb (docking station and unfilled water chamber)<br />
Housing Construction<br />
Docking station: Flame retardant engineering thermoplastic<br />
Water chamber: Injection mol<strong>de</strong>d plastic<br />
Environmental conditions<br />
Operating temperature: +41°F to +104°F<br />
Operating humidity: 10–95% non-con<strong>de</strong>nsing<br />
Storage and transport temperature: -4°F to +140°F<br />
Storage and transport humidity: 10–95% non-con<strong>de</strong>nsing<br />
Note: The manufacturer reserves the right to change these specifications<br />
without notice.<br />
English<br />
Symbols Which Appear on the Device<br />
Attention, consult accompanying documents<br />
Maximum water level<br />
Technical Specifications<br />
21
Limited Warranty<br />
ResMed warrants that your ResMed product shall be free from <strong>de</strong>fects in<br />
material and workmanship for the period specified below from the date of<br />
purchase by the initial consumer. This warranty is not transferable.<br />
Product<br />
ResMed humidifiers, ResControl, ResLink, ResTraxx<br />
ResMed flow generators<br />
Accessories, mask systems (including mask frame, cushion,<br />
headgear and tubing). Exclu<strong>de</strong>s single-use <strong>de</strong>vices.<br />
Warranty Period<br />
1 Year<br />
2 Years<br />
90 Days<br />
Note: Some mo<strong>de</strong>ls are not available in all regions.<br />
If the product fails un<strong>de</strong>r conditions of normal use, ResMed will repair or replace,<br />
at its option, the <strong>de</strong>fective product or any of its components. This Limited<br />
Warranty does not cover:<br />
a) any damage caused as a result of improper use, abuse, modification or<br />
alteration of the product;<br />
b) repairs carried out by any service organization that has not been expressly<br />
authorized by ResMed to perform such repairs;<br />
c) any damage or contamination due to cigarette, pipe, cigar or other smoke;<br />
d) any damage caused by water being spilled on or into a flow generator.<br />
Warranty is void on product sold, or resold, outsi<strong>de</strong> the region of original<br />
purchase. Warranty claims on <strong>de</strong>fective product must be ma<strong>de</strong> by the initial<br />
consumer at the point of purchase.<br />
This warranty is in lieu of all other express or implied warranties, including any<br />
implied warranty of merchantability or fitness for a particular purpose. Some<br />
regions or states do not allow limitations on how long an implied warranty lasts,<br />
so the above limitation may not apply to you.<br />
ResMed shall not be responsible for any inci<strong>de</strong>ntal or consequential damages<br />
claimed to have occurred as a result of the sale, installation or use of any ResMed<br />
product. Some regions or states do not allow the exclusion or limitation of<br />
inci<strong>de</strong>ntal or consequential damages, so the above limitation may not apply to<br />
you. This warranty gives you specific legal rights, and you may also have other<br />
rights which vary from region to region.<br />
For further information on your warranty rights, contact your local ResMed <strong>de</strong>aler<br />
or ResMed office.<br />
R001-307/2 05 06<br />
22
In<strong>de</strong>x<br />
C<br />
Cleaning 15<br />
Contraindications 6<br />
D<br />
Definitions 5<br />
Dimensions 21<br />
water chamber<br />
reassembling 17<br />
Weight 21<br />
English<br />
E<br />
Electromagnetic Compatibility 21<br />
Environmental conditions 21<br />
H<br />
Helpful Hints 14<br />
Housing Construction 21<br />
I<br />
Inten<strong>de</strong>d Use 6<br />
L<br />
Limited Warranty 22<br />
M<br />
Medical Information 6<br />
O<br />
Operating Instructions 13<br />
P<br />
Power Supply 21<br />
Preparing for Use 9<br />
S<br />
Setting Up 9<br />
SmartStart 13<br />
Starting Treatment 13<br />
Symbols Which Appear on the Device 21<br />
T<br />
Technical Specifications 21<br />
Troubleshooting 19<br />
U<br />
User/Owner Responsibility 5<br />
W<br />
Warnings and Precautions 6<br />
In<strong>de</strong>x<br />
23
<strong>HumidAire</strong> 2iC <br />
Gui<strong>de</strong> Utilisateur<br />
Français<br />
Français<br />
25
Sommaire<br />
Introduction . . . . . . . . . . . . . . . . . . . . . . . . . . . . . . . . . . . . . . . . . . . . . . 29<br />
Définitions 29<br />
Responsabilité <strong>de</strong> l’utilisateur/du propriétaire 29<br />
Informations médicales . . . . . . . . . . . . . . . . . . . . . . . . . . . . . . . . . . . 30<br />
Indications 30<br />
Contre-indications 30<br />
Avertissements et précautions 30<br />
<strong>HumidAire</strong> 2iC . . . . . . . . . . . . . . . . . . . . . . . . . . . . . . . . . . . . . . . . . . . . 32<br />
Composants <strong>de</strong> l’<strong>HumidAire</strong> 2iC 32<br />
Préparation avant l’utilisation . . . . . . . . . . . . . . . . . . . . . . . . . . . . . 33<br />
Installation <strong>de</strong> l’<strong>HumidAire</strong> 2iC 33<br />
Consignes d’utilisation . . . . . . . . . . . . . . . . . . . . . . . . . . . . . . . . . . . . 37<br />
Début du traitement 37<br />
Arrêt du traitement 38<br />
Conseils utiles 38<br />
Nettoyage et entretien . . . . . . . . . . . . . . . . . . . . . . . . . . . . . . . . . . . . 39<br />
Reparations 42<br />
Stratégie <strong>de</strong> dépannage . . . . . . . . . . . . . . . . . . . . . . . . . . . . . . . . . . 43<br />
Caractéristiques . . . . . . . . . . . . . . . . . . . . . . . . . . . . . . . . . . . . . . . . . . 45<br />
Garantie limitée . . . . . . . . . . . . . . . . . . . . . . . . . . . . . . . . . . . . . . . . . . 46<br />
In<strong>de</strong>x . . . . . . . . . . . . . . . . . . . . . . . . . . . . . . . . . . . . . . . . . . . . . . . . . . . . . 47<br />
Sommaire<br />
27
Introduction<br />
L’<strong>HumidAire</strong> 2iC <strong>de</strong> ResMed est conçu pour humidifier l’air délivré dans les<br />
voies aériennes supérieures dans le cadre du traitement par pression positive<br />
continue (PPC), par automatic positive airway pressure (APAP) ou à <strong>de</strong>ux niveaux<br />
<strong>de</strong> pression.<br />
Le traitement peut s’accompagner d’une congestion nasale ou d’une<br />
sécheresse au niveau du nez, <strong>de</strong> la bouche ou <strong>de</strong> la gorge. Ces symptômes sont<br />
provoqués par les climats secs, <strong>de</strong>s températures basses, le débit d’air délivré<br />
par l’appareil <strong>de</strong> PPC, d’APAP ou d’ai<strong>de</strong> inspiratoire avec PEP ou encore par les<br />
fuites buccales. L’humidification <strong>de</strong> l’air permet <strong>de</strong> soulager les symptômes <strong>de</strong><br />
sécheresse et rend le traitement plus confortable.<br />
L’<strong>HumidAire</strong> 2iC est conçu pour former un module intégré d'humification une<br />
fois fixé à l’appareil <strong>de</strong> PPC, d’APAP ou d’ai<strong>de</strong> inspiratoire avec PEP.<br />
Français<br />
Définitions<br />
!<br />
!<br />
Ce manuel contient <strong>de</strong>s termes et icônes spécifiques apparaissant dans la marge<br />
qui ont pour but d'attirer votre attention sur <strong>de</strong>s informations spécifiques<br />
importantes.<br />
AVERTISSEMENT<br />
Vous met en gar<strong>de</strong> contre le risque <strong>de</strong> blessure.<br />
ATTENTION<br />
Explication <strong>de</strong>s mesures particulières permettant d’assurer une utilisation<br />
efficace et sûre <strong>de</strong> l’appareil.<br />
Remarque : remarque informative ou utile.<br />
Responsabilité <strong>de</strong> l’utilisateur/du propriétaire<br />
L’utilisateur ou le propriétaire <strong>de</strong> cet appareil sera tenu pour seul responsable <strong>de</strong><br />
toute blessure ou <strong>de</strong> tout dommage matériel résultant :<br />
• d’une utilisation non conforme aux instructions fournies<br />
• d’un entretien ou <strong>de</strong> modifications réalisés non conformément aux<br />
instructions ou par <strong>de</strong>s personnes non autorisées.<br />
Veuillez lire ce manuel attentivement avant d’utiliser l’appareil.<br />
Introduction<br />
29
Informations médicales<br />
Indications<br />
!<br />
L’<strong>HumidAire</strong> 2iC est indiqué pour humidifier l’air délivré par les appareils ResMed<br />
<strong>de</strong> PPC, d’APAP ou d’ai<strong>de</strong> inspiratoire avec PEP. Veuillez vous référer au manuel<br />
<strong>de</strong> l’appareil correspondant pour <strong>de</strong> plus amples informations sur sa compatibilité<br />
avec l’<strong>HumidAire</strong> 2iC. Pour <strong>de</strong> plus amples informations, veuillez contacter votre<br />
fournisseur ou ResMed.<br />
L’<strong>HumidAire</strong> 2iC doit être utilisé uniquement conformément aux<br />
recommandations d’un mé<strong>de</strong>cin.<br />
ATTENTION (USA UNIQUEMENT)<br />
Selon la loi fédérale américaine, ce dispositif ne peut être vendu aux U.S.A.<br />
que par ou sur ordre d'un mé<strong>de</strong>cin.<br />
Contre-indications<br />
L’utilisation <strong>de</strong> l’<strong>HumidAire</strong> 2iC est contre-indiquée chez les patients<br />
trachéotomisés ou intubés.<br />
Veuillez également vous référer au manuel <strong>de</strong> l'appareil utilisé pour les contreindications<br />
relatives au traitement par PPC, par APAP ou à <strong>de</strong>ux niveaux <strong>de</strong><br />
pression.<br />
Avertissements et précautions<br />
!<br />
Les avertissements et précautions suivants sont d’ordre général. Les<br />
avertissements et précautions spécifiques sont donnés en marge <strong>de</strong>s<br />
instructions auxquelles ils se rapportent dans le manuel.<br />
AVERTISSEMENTS<br />
• Utiliser l’<strong>HumidAire</strong> 2iC uniquement pour l’usage pour lequel il est prévu<br />
comme décrit dans ce manuel.<br />
• L’<strong>HumidAire</strong> 2iC est conçu pour être utilisé exclusivement avec les appareils<br />
ResMed <strong>de</strong> PPC, d’APAP et d’ai<strong>de</strong> inspiratoire avec PEP. Ne pas utiliser<br />
l’<strong>HumidAire</strong> 2iC avec d’autres appareils.<br />
• L’<strong>HumidAire</strong> 2iC doit être utilisé uniquement avec les circuits respiratoires et<br />
accessoires spécifiés dans ce manuel. Le raccor<strong>de</strong>ment d’autres circuits<br />
respiratoires ou accessoires peut causer <strong>de</strong>s blessures ou endommager<br />
l’appareil.<br />
• L’<strong>HumidAire</strong> 2iC, tuyaux et circuit compris, est prévu pour une utilisation sur<br />
un seul patient et ne doit pas être utilisé sur une autre personne. Cette<br />
précaution permet d’éliminer le risque d’infections croisées.<br />
30
• Toujours placer l’<strong>HumidAire</strong> 2iC à un niveau inférieur à celui du patient. S’il est<br />
placé au même niveau que le patient ou à un niveau supérieur, <strong>de</strong> l’eau<br />
chau<strong>de</strong> risque <strong>de</strong> s’écouler dans le circuit respiratoire et dans le masque.<br />
• Ne pas essayer <strong>de</strong> démonter le support <strong>de</strong> l’<strong>HumidAire</strong> 2iC. Il ne contient<br />
aucune pièce pouvant être entretenue par l’utilisateur. Les réparations et<br />
l’entretien interne doivent être effectués par un technicien agréé.<br />
• En cas <strong>de</strong> déversement acci<strong>de</strong>ntel <strong>de</strong> liqui<strong>de</strong>s dans le support <strong>de</strong><br />
l’<strong>HumidAire</strong> 2iC, débrancher l’appareil <strong>de</strong> PPC, d’APAP ou d’ai<strong>de</strong> inspiratoire<br />
avec PEP <strong>de</strong> la prise <strong>de</strong> courant et laisser le liqui<strong>de</strong> s’écouler du support, puis<br />
laisser le support sécher avant <strong>de</strong> l’utiliser à nouveau.<br />
• Lors du transport <strong>de</strong> l’<strong>HumidAire</strong> 2iC dans le sac <strong>de</strong> transport, le réservoir ne<br />
doit pas être monté sur le support. Placer le réservoir dans un compartiment<br />
séparé du sac <strong>de</strong> transport.<br />
• Vérifier que le réservoir est vi<strong>de</strong> et bien sec avant <strong>de</strong> transporter<br />
l’<strong>HumidAire</strong> 2iC.<br />
• Ne pas utiliser l’<strong>HumidAire</strong> 2iC si le câble d’alimentation ou la fiche <strong>de</strong><br />
l’appareil <strong>de</strong> PPC, d’APAP ou d’ai<strong>de</strong> inspiratoire avec PEP est endommagé.<br />
• Si l’appareil est placé à un niveau supérieur à celui du patient et qu’il est<br />
renversé le masque risque <strong>de</strong> se remplir d’eau. Par conséquent,<br />
l’<strong>HumidAire</strong> 2iC doit être utilisé avec précaution chez les patients qui ne sont<br />
pas en mesure d’empêcher l’eau <strong>de</strong> pénétrer dans leurs voies aériennes ou<br />
qui ne sont pas capables <strong>de</strong> retirer le masque, par exemple du fait d’un<br />
acci<strong>de</strong>nt vasculaire cérébral. Il est nécessaire <strong>de</strong> considérer les risques et<br />
avantages relatifs.<br />
• Ne pas utiliser l’<strong>HumidAire</strong> 2iC s’il ne fonctionne pas correctement ou si une<br />
<strong>de</strong> ses pièces est tombée par terre ou est endommagée.<br />
• Ne pas placer le câble d’alimentation à proximité <strong>de</strong>s surfaces chau<strong>de</strong>s.<br />
• Ne pas laisser tomber ni insérer d’objets dans les ouvertures ou les tuyaux.<br />
• Ne pas utiliser l’<strong>HumidAire</strong> 2iC en présence <strong>de</strong> matières inflammables ou<br />
explosives.<br />
Français<br />
Informations médicales<br />
31
<strong>HumidAire</strong> 2iC<br />
Composants <strong>de</strong> l’<strong>HumidAire</strong> 2iC<br />
Support<br />
Sortie d’air<br />
Réservoir<br />
Figure 1 : Composants <strong>de</strong> l’<strong>HumidAire</strong> 2iC<br />
Couvercle du réservoir<br />
Joint d’étanchéité<br />
Entretoise<br />
Fermeture latérale<br />
Base du réservoir<br />
Figure 2 : Composants du réservoir<br />
32
Préparation avant l’utilisation<br />
Installation <strong>de</strong> l’<strong>HumidAire</strong> 2iC<br />
!<br />
AVERTISSEMENT<br />
Vérifier que l’appareil <strong>de</strong> PPC, d’APAP ou d’ai<strong>de</strong> inspiratoire avec PEP est<br />
hors tension au niveau <strong>de</strong> la prise <strong>de</strong> courant avant <strong>de</strong> connecter<br />
l’<strong>HumidAire</strong> 2iC.<br />
1 Retirez le capot avant <strong>de</strong> l’appareil. Pour cela :<br />
1. Appuyez sur l’attache <strong>de</strong> verrouillage située sous le capot avant.<br />
2. Tout en continuant à appuyer sur l’attache, soulevez le capot avant et retirezle<br />
<strong>de</strong> l’appareil. Le capot avant <strong>de</strong>vrait se détacher en bas et à droite <strong>de</strong><br />
l’appareil. Il <strong>de</strong>vrait toujours être fixé au niveau du côté gauche.<br />
Français<br />
Côté<br />
gauche<br />
Côté droit<br />
Capot avant<br />
Attache <strong>de</strong> verrouillage<br />
3. Maintenez l’appareil en place à l’ai<strong>de</strong> <strong>de</strong> la main gauche. À l’ai<strong>de</strong> <strong>de</strong> la main<br />
droite, tirez fermement le côté droit du capot avant vers vous, puis vers le<br />
haut, jusqu’à ce qu’il se détache entièrement <strong>de</strong> l’appareil.<br />
Remarques<br />
• Pour remettre le capot avant en place :<br />
a. Alignez le raccord <strong>de</strong> la sortie d’air se trouvant à l’intérieur du capot avant<br />
avec la sortie d’air <strong>de</strong> l’appareil.<br />
b. Remettez le capot avant en place sur l’appareil et poussez jusqu’à ce qu’il<br />
se verrouille en position.<br />
Préparation avant l’utilisation<br />
33
• N’oubliez pas d’emporter le capot avant lorsque vous voyagez au cas où vous<br />
auriez besoin d’utiliser votre appareil <strong>de</strong> PPC, d’APAP ou d’ai<strong>de</strong> inspiratoire<br />
avec PEP sans humidificateur.<br />
2 Détachez le réservoir <strong>de</strong> l’<strong>HumidAire</strong> 2iC du support. Pour cela, soulevez<br />
l’attache située à la base du réservoir et retirez le réservoir du support en tirant.<br />
3 Positionnez le support <strong>de</strong> l’humidificateur (avec le réservoir détaché) sur<br />
l’appareil en le faisant glisser jusqu’à ce qu’il se verrouille en position.<br />
Support<br />
Remarques<br />
• Dans <strong>de</strong>s conditions normales <strong>de</strong> fonctionnement, il n’est pas nécessaire <strong>de</strong><br />
retirer le support <strong>de</strong> l’<strong>HumidAire</strong> 2iC une fois qu’il est fixé à l’appareil <strong>de</strong> PPC,<br />
d’APAP ou d’ai<strong>de</strong> inspiratoire avec PEP. Si néanmoins vous <strong>de</strong>vez le retirer,<br />
appuyez sur l’attache <strong>de</strong> verrouillage située sous le support, puis retirez ce<br />
<strong>de</strong>rnier <strong>de</strong> l’appareil.<br />
• Lors du retrait du support, veillez à retirer le réservoir d’abord.<br />
4 Branchez le câble d’alimentation à la prise d’alimentation située à l’arrière <strong>de</strong><br />
l’appareil. Branchez l’autre extrémité du câble d’alimentation à une prise <strong>de</strong><br />
courant.<br />
Câble<br />
d’alimentation<br />
Vers<br />
la prise <strong>de</strong><br />
<strong>de</strong> courant<br />
34
!<br />
AVERTISSEMENT<br />
• Vérifier que l’appareil <strong>de</strong> PPC, d’APAP ou d’ai<strong>de</strong> inspiratoire avec PEP est<br />
hors tension au niveau <strong>de</strong> la prise <strong>de</strong> courant avant <strong>de</strong> connecter<br />
l’<strong>HumidAire</strong> 2iC.<br />
• Vérifier que le câble d’alimentation et la fiche sont en bon état et que<br />
l’équipement n’est pas endommagé.<br />
5 Placez l'appareil sur une surface plane stable à proximité <strong>de</strong> votre lit. Veillez à le<br />
placer à un niveau inférieur au vôtre lorsque vous êtes couché.<br />
!<br />
6<br />
!<br />
ATTENTION<br />
Veiller à placer l’appareil <strong>de</strong> manière à ce que personne ne puisse le faire<br />
tomber.<br />
AVERTISSEMENT<br />
Ne pas remplir le réservoir lorsqu’il est fixé au support et à l’appareil <strong>de</strong><br />
PPC, d’APAP ou d’ai<strong>de</strong> inspiratoire avec PEP.<br />
Positionnez le réservoir <strong>de</strong> manière à ce que la sortie d’air se trouve en haut. Au<strong>de</strong>ssus<br />
d’un évier ou d’un lavabo, remplissez le réservoir d’eau par la sortie d’air<br />
jusqu’au repère <strong>de</strong> niveau maximum situé sur le <strong>de</strong>vant <strong>de</strong> la base du réservoir.<br />
Français<br />
Sortie d’air<br />
Repère <strong>de</strong><br />
niveau d’eau<br />
maximum<br />
L’<strong>HumidAire</strong> 2iC doit être rempli avec <strong>de</strong> l’eau douce avant utilisation. Veillez à<br />
ce que le réservoir soit toujours propre. Voir « Nettoyage et entretien » page 39.<br />
!<br />
!<br />
AVERTISSEMENT<br />
• Ne pas remplir le réservoir d'eau chau<strong>de</strong> ou glacée.<br />
• Ne pas trop remplir le réservoir sans quoi <strong>de</strong> l'eau risque <strong>de</strong> s'écouler<br />
dans l'appareil <strong>de</strong> PPC, <strong>de</strong> PAP ou d'ai<strong>de</strong> inspiratoire avec PEP ou dans<br />
son circuit respiratoire.<br />
ATTENTION<br />
Ne pas utiliser d’additifs, en particulier <strong>de</strong>s additifs aromatiques (p. ex.<br />
huiles parfumées et parfums). Ils risquent d’altérer la performance <strong>de</strong><br />
l’humidificateur et/ou d’endommager les matériaux du réservoir.<br />
Préparation avant l’utilisation<br />
35
7 Faites glisser le réservoir rempli sur le support <strong>de</strong> l’humidificateur (déjà mis en<br />
place sur l’appareil <strong>de</strong> PPC, d’APAP ou d’ai<strong>de</strong> inspiratoire avec PEP) jusqu’à ce<br />
qu’il se verrouille en position. Vérifiez que le réservoir est bien en place sur le<br />
support.<br />
Support<br />
Réservoir<br />
!<br />
AVERTISSEMENT<br />
• Toujours raccor<strong>de</strong>r le support <strong>de</strong> l’<strong>HumidAire</strong> 2iC avant <strong>de</strong> raccor<strong>de</strong>r le<br />
réservoir.<br />
• Pour empêcher que <strong>de</strong> l’eau ne pénètre dans l’appareil <strong>de</strong> PPC, d’APAP<br />
ou d’ai<strong>de</strong> inspiratoire avec PEP, ne déplacer ou transporter l’ensemble<br />
Appareil/<strong>HumidAire</strong> 2iC que si le réservoir est vi<strong>de</strong> et bien sec.<br />
8 Raccor<strong>de</strong>z fermement une extrémité du circuit respiratoire à la sortie d’air du<br />
réservoir et l’autre extrémité au masque.<br />
Masque<br />
Sortie d’air<br />
Circuit respiratoire<br />
L’<strong>HumidAire</strong> 2iC est maintenant prêt à l’emploi. Pour commencer le traitement,<br />
voir « Consignes d’utilisation » page 37.<br />
36
Consignes d’utilisation<br />
Début du traitement<br />
À ce sta<strong>de</strong>, l’<strong>HumidAire</strong> 2iC <strong>de</strong>vrait être rempli d’eau douce, fixé à l’appareil <strong>de</strong><br />
PPC, d’APAP ou d’ai<strong>de</strong> inspiratoire avec PEP et raccordé au circuit respiratoire et<br />
au masque. Voir « Installation <strong>de</strong> l’<strong>HumidAire</strong> 2iC » page 33.<br />
1 Mettez sous tension au niveau <strong>de</strong> la prise <strong>de</strong> courant. Mettez l’interrupteur<br />
principal situé à l’arrière <strong>de</strong> l’appareil sur MARCHE.<br />
Français<br />
Interrupteur<br />
principal<br />
Lorsque l'appareil est mis sous tension, le message BIENVENUE s'affiche sur<br />
l'écran LCD.<br />
2 Si cette option est disponible, sélectionnez PASSOVER comme humidificateur<br />
dans le menu.<br />
!<br />
AVERTISSEMENT<br />
Le traitement délivré peut s'avérer insuffisant si l'option sélectionnée pour<br />
l'humidificateur est incorrecte.<br />
Remarque : veuillez vous référer au manuel utilisateur <strong>de</strong> l'appareil <strong>de</strong> PPC, <strong>de</strong><br />
PAP ou d'ai<strong>de</strong> inspiratoire avec PEP pour plus <strong>de</strong> détails sur l'utilisation <strong>de</strong>s<br />
menus.<br />
3 Mettez votre masque comme décrit dans son mo<strong>de</strong> d’emploi.<br />
!<br />
AVERTISSEMENT<br />
Avant <strong>de</strong> démarrer le traitement, mettre le masque et vérifier qu’il est bien<br />
en place et que le circuit respiratoire est correctement raccordé.<br />
4 Appuyez sur la touche du bas du panneau <strong>de</strong> contrôle. Autrement, si la fonction<br />
SmartStart est activée, respirez simplement dans le masque. L’appareil <strong>de</strong>vrait<br />
commencer à délivrer <strong>de</strong> l’air.<br />
5 Allongez-vous et placez le circuit respiratoire <strong>de</strong> façon à ce qu’il puisse suivre vos<br />
mouvements pendant que vous dormez.<br />
!<br />
AVERTISSEMENT<br />
Ne pas laisser <strong>de</strong> longueurs inutiles <strong>de</strong> tuyaux en haut <strong>de</strong> votre lit. Elles<br />
risqueraient <strong>de</strong> s’enrouler autour <strong>de</strong> votre tête ou <strong>de</strong> votre cou pendant que<br />
vous dormez.<br />
Consignes d’utilisation<br />
37
Arrêt du traitement<br />
Pour arrêter le traitement à tout moment, retirez le masque et appuyez sur la<br />
touche du bas. Autrement, si la fonction SmartStart est activée, retirez<br />
simplement votre masque pour arrêter le traitement.<br />
Conseils utiles<br />
!<br />
Persistance <strong>de</strong>s symptômes <strong>de</strong> sécheresse<br />
Si vos symptômes persistent, cela signifie que vous respirez sans doute par la<br />
bouche. La respiration par la bouche ou les fuites buccales peuvent causer la<br />
sécheresse et l’irritation <strong>de</strong>s voies aériennes supérieures. Si cela constitue un<br />
réel problème, vous avez la possibilité d’utiliser un masque facial ou une<br />
mentonnière. Contactez votre mé<strong>de</strong>cin ou votre fournisseur pour <strong>de</strong> plus amples<br />
informations.<br />
Infection nasale ou maladie<br />
En cas <strong>de</strong> rhume ou d’infection nasale, veillez à nettoyer l’<strong>HumidAire</strong> 2iC<br />
soigneusement tous les jours. Ne mettez pas d’huiles aromatiques ni <strong>de</strong><br />
décongestionnants dans le réservoir.<br />
ATTENTION<br />
Ne pas utiliser d’additifs, en particulier <strong>de</strong>s additifs aromatiques (p. ex.<br />
huiles parfumées et parfums). Ils risquent d’altérer la performance <strong>de</strong><br />
l’humidificateur et/ou d’endommager les matériaux du réservoir.<br />
Dépôt minéral<br />
Il se peut que vous notiez la présence <strong>de</strong> poudre blanche ou <strong>de</strong> dépôts dans la<br />
base du réservoir. Il s’agit d’un dépôt minéral provenant <strong>de</strong> l’eau du robinet. Pour<br />
le retirer, nettoyez le réservoir en le frottant légèrement à l’ai<strong>de</strong> d’un détergent<br />
doux.<br />
Pour empêcher la formation <strong>de</strong> ce dépôt, utilisez <strong>de</strong> l’eau déminéralisée pour<br />
remplir le réservoir.<br />
38
Nettoyage et entretien<br />
!<br />
Vous <strong>de</strong>vez effectuer le nettoyage et l’entretien décrits dans cette section<br />
régulièrement.<br />
AVERTISSEMENT<br />
Risque d’électrocution. Ne pas immerger l’appareil ni le câble<br />
d’alimentation dans l’eau. Toujours débrancher l’appareil avant <strong>de</strong> le<br />
nettoyer et vérifier qu’il est bien sec avant <strong>de</strong> le rebrancher à une prise <strong>de</strong><br />
courant.<br />
1 Mettez l’interrupteur principal situé au dos <strong>de</strong> l’appareil sur ARRET et débranchez<br />
le câble d’alimentation au niveau <strong>de</strong> la prise <strong>de</strong> courant.<br />
2 Retirez le réservoir. Pour cela, soulevez l’attache située à la base du réservoir et<br />
retirez le réservoir du support en tirant.<br />
Français<br />
3 Jetez l’eau résiduelle éventuelle en retournant le réservoir pour que l’eau<br />
s’écoule par la sortie d’air.<br />
4 Démontage du réservoir<br />
1. Pour ouvrir les fermetures latérales, tirez sur la partie inférieure.<br />
Fermeture latérale<br />
2. Tenez le réservoir comme indiqué ci-<strong>de</strong>ssous.<br />
patte<br />
d’attache<br />
avant<br />
Nettoyage et entretien<br />
39
3. Détachez le réservoir en tirant sur les <strong>de</strong>ux moitiés pour les séparer.<br />
Appuyez sur la patte d’attache avant avec le pouce.<br />
4. Retirez le joint d’étanchéité du couvercle.<br />
patte d’attache<br />
avant<br />
couvercle<br />
joint d’étanchéité<br />
5. Retirez l'entretoise <strong>de</strong> l'intérieur <strong>de</strong> la base du réservoir.<br />
entretoise<br />
base<br />
5 Jetez l’eau résiduelle éventuelle.<br />
6 Nettoyage<br />
RÉSERVOIR<br />
Nettoyez le couvercle, le joint d’étanchéité, l’entretoise et la base dans <strong>de</strong> l’eau<br />
chau<strong>de</strong> à l’ai<strong>de</strong> d’un détergent doux ou dans un lave-vaisselle. Rincez-les<br />
soigneusement à l’eau claire et laissez-les sécher à l’abri <strong>de</strong> la lumière directe du<br />
soleil. Effectuez cette opération tous les jours ou après chaque utilisation. Vérifiez<br />
que le réservoir ne présente ni trace d’usure ni signe <strong>de</strong> détérioration. Remplacez<br />
tout composant endommagé.<br />
!<br />
ATTENTION<br />
Ne pas utiliser les produits suivants pour nettoyer les composants <strong>de</strong><br />
l’<strong>HumidAire</strong> 2iC. Ces solutions peuvent endommager le produit et réduire<br />
sa durée <strong>de</strong> vie.<br />
• solutions à base d’eau <strong>de</strong> Javel, <strong>de</strong> chlore, d’alcool ou d’ammoniac<br />
• savons hydratants, antibactériens ou à base <strong>de</strong> glycérine<br />
• adoucissants et agents décapants.<br />
40
Pour le nettoyage en lave-vaisselle, éviter les cycles intenses ou à haute<br />
température (supérieure à 158°F/70°C). Ne pas utiliser <strong>de</strong> détergents<br />
alcalins ni <strong>de</strong> produits <strong>de</strong> rinçage.<br />
SUPPORT<br />
Nettoyez l’extérieur du support à l’ai<strong>de</strong> d’un chiffon humi<strong>de</strong>. Effectuez cette<br />
opération régulièrement.<br />
7 Remontage du réservoir<br />
Une fois tous ses composants propres et secs, remontez le réservoir.<br />
1. Placez l'entretoise sur ses supports à l'intérieur <strong>de</strong> la base du réservoir.<br />
Français<br />
encoches<br />
supports<br />
supports<br />
2. Remettez le joint d’étanchéité autour <strong>de</strong> la base du réservoir. Appuyez sur le<br />
bord pour vous assurer que le joint est correctement positionné.<br />
joint d’étanchéité<br />
bord<br />
3. Remettez le couvercle sur la base du réservoir. Appuyez pour fermer.<br />
couvercle<br />
base<br />
Nettoyage et entretien<br />
41
4. Pour fermer les fermetures latérales, veuillez vous référer aux schémas ci<strong>de</strong>ssous.<br />
Remarque : Si les fermetures latérales se détachent <strong>de</strong> la base du réservoir,<br />
remettez-les en place comme indiqué.<br />
Les fermetures latérales se composent <strong>de</strong> <strong>de</strong>ux pièces. Si celles-ci se séparent,<br />
remettez-les en place comme indiqué. Insérez la partie la plus petite (a) <strong>de</strong><br />
l'articulation (b) d'abord, maintenez-la à plat et appuyez pour que l'ensemble se<br />
verrouille en position<br />
.<br />
a<br />
b<br />
Reparations<br />
Ce produit (L’<strong>HumidAire</strong> 2iC) doit être inspecté par un service technique agréé<br />
ResMed 5 ans après la date <strong>de</strong> sa fabrication. Avant cette date, l'appareil <strong>de</strong>vrait<br />
assurer un fonctionnement fiable et sûr à condition qu’il soit utilisé et entretenu<br />
conformément aux instructions données par ResMed. Les informations<br />
concernant la garantie ResMed sont fournies avec l'appareil lors <strong>de</strong> sa livraison<br />
initiale. Comme avec tous les appareils électriques, si vous constatez un défaut<br />
quelconque, vous <strong>de</strong>vez faire vérifier l'appareil par un service technique agréé<br />
ResMed.<br />
42
Stratégie <strong>de</strong> dépannage<br />
!<br />
En cas <strong>de</strong> problème, reportez-vous aux suggestions suivantes. Si le problème<br />
persiste, contactez votre fournisseur ou ResMed. N’essayez pas d’ouvrir<br />
l’appareil.<br />
AVERTISSEMENT<br />
L’entretien et les réparations doivent être effectués par un technicien agréé.<br />
Vous ne <strong>de</strong>vez en aucun cas essayer d’entretenir ou <strong>de</strong> réparer l’appareil<br />
vous-même.<br />
Français<br />
Problème Cause possible Solution<br />
L’appareil ne<br />
fonctionne pas (rien<br />
ne s’affiche sur<br />
l’écran LCD).<br />
Le réservoir fuit.<br />
Le câble d’alimentation<br />
n’est pas correctement<br />
branché.<br />
L’appareil n’est pas sous<br />
tension.<br />
La prise <strong>de</strong> courant est<br />
défectueuse.<br />
Le réservoir est peut-être<br />
endommagé ou fissuré.<br />
Le couvercle n’est peutêtre<br />
pas correctement mis<br />
en place.<br />
Le joint d’étanchéité du<br />
réservoir est peut-être<br />
tordu.<br />
Les fermetures latérales<br />
ne sont pas enclenchées<br />
correctement.<br />
Vérifiez que le câble d’alimentation est<br />
correctement branché à la prise <strong>de</strong><br />
courant.<br />
Vérifiez que l’interrupteur à l’arrière <strong>de</strong><br />
l’appareil est sur MARCHE.<br />
Essayez une autre prise <strong>de</strong> courant.<br />
Contactez votre fournisseur pour<br />
obtenir un réservoir <strong>de</strong> rechange.<br />
Appuyez fermement sur le couvercle.<br />
Vérifiez que le joint d’étanchéité est<br />
bien en place à l’intérieur du réservoir.<br />
Vérifiez que les <strong>de</strong>ux fermetures<br />
latérales sont bien enclenchées.<br />
Stratégie <strong>de</strong> dépannage<br />
43
Problème Cause possible Solution<br />
Absence <strong>de</strong> débit<br />
d’air.<br />
Projections d’eau sur<br />
votre visage.<br />
Le circuit respiratoire n’est<br />
pas correctement<br />
raccordé.<br />
Le circuit respiratoire est<br />
obstrué, pincé ou percé.<br />
L’appareil <strong>de</strong> PPC, d’APAP<br />
ou d’ai<strong>de</strong> inspiratoire avec<br />
PEP ne fonctionne pas<br />
correctement.<br />
Le réservoir est trop<br />
rempli.<br />
Le réservoir est trop<br />
rempli.<br />
Raccor<strong>de</strong>z le circuit respiratoire<br />
comme décrit dans la section «<br />
Préparation avant l’utilisation »<br />
page 33.<br />
Débloquez ou libérez le circuit<br />
respiratoire. Vérifiez que le circuit<br />
respiratoire n’est pas percé.<br />
Voir la section Stratégie <strong>de</strong> dépannage<br />
du manuel <strong>de</strong> l’appareil <strong>de</strong> PPC,<br />
d’APAP ou d’ai<strong>de</strong> inspiratoire avec PEP.<br />
Vi<strong>de</strong>z un peu le réservoir. Vérifiez que<br />
l’eau ne dépasse pas le repère <strong>de</strong><br />
niveau d’eau maximum.<br />
Vi<strong>de</strong>z un peu le réservoir.<br />
44
Caractéristiques<br />
Dimensions (H x L x P)<br />
123 mm x 218 mm x 183 mm (4,8 pouces x 7,2 pouces x 8,6 pouces)(avec le<br />
support et le réservoir)<br />
Poids<br />
710 g (1,57 livres)(avec le support et le réservoir vi<strong>de</strong>)<br />
Boîtier<br />
Support : thermoplastique ignifugé<br />
Réservoir : plastique moulé par injection<br />
Conditions ambiantes<br />
Température <strong>de</strong> service : + 5°C à + 40°C (+ 41°F à +104°F)<br />
Humidité <strong>de</strong> service : 10 à 95 % sans con<strong>de</strong>nsation<br />
Température <strong>de</strong> stockage et <strong>de</strong> transport : - 20°C à + 60°C (- 4°F à +140°F)<br />
Humidité <strong>de</strong> stockage et <strong>de</strong> transport : 10 à 95 % sans con<strong>de</strong>nsation<br />
Remarque : le fabricant se réserve le droit <strong>de</strong> modifier ces caractéristiques<br />
sans notification préalable.<br />
Français<br />
Symboles apparaissant sur l’appareil<br />
Attention, veuillez consulter la documentation jointe<br />
Niveau d’eau maximum<br />
Caractéristiques<br />
45
Garantie limitée<br />
ResMed garantit votre produit ResMed contre tout défaut <strong>de</strong> matériaux et <strong>de</strong><br />
main-d’œuvre pour la pério<strong>de</strong> spécifiée ci-après à compter <strong>de</strong> la date d’achat par<br />
le client d’origine. Cette garantie n’est pas cessible.<br />
Produit<br />
Humidificateurs ResMed, ResControl, ResLink, ResTraxx<br />
Appareils <strong>de</strong> traitement ResMed<br />
Accessoires, masques (y compris entourage rigi<strong>de</strong>, bulle, harnais<br />
et circuit respiratoire). Les appareils à usage unique sont exclus.<br />
Durée <strong>de</strong> la<br />
garantie<br />
1 an<br />
2 ans<br />
90 jours<br />
Remarque : certains <strong>de</strong> ces modèles ne sont pas disponibles dans tous les<br />
pays.<br />
En cas <strong>de</strong> défaillance du produit dans <strong>de</strong>s conditions normales d’utilisation,<br />
ResMed, à son entière discrétion, répare ou remplace le produit défectueux ou<br />
toute pièce. Cette garantie limitée ne couvre pas :<br />
a) tout dommage résultant d’une utilisation incorrecte, d’un usage abusif ou<br />
d’une modification ou transformation opérée sur le produit ;<br />
b) les réparations et l’entretien effectués par tout service <strong>de</strong> réparation sans<br />
l’autorisation expresse <strong>de</strong> ResMed ;<br />
c) tout dommage ou contamination causé par <strong>de</strong> la fumée <strong>de</strong> cigarette, <strong>de</strong> pipe,<br />
<strong>de</strong> cigare ou autre ;<br />
d) tout dommage causé par <strong>de</strong> l’eau renversée sur ou dans un appareil.<br />
La garantie est annulée pour les produits vendus ou revendus dans un pays autre<br />
que celui où ils ont été achetés à l’origine. Les réclamations au titre <strong>de</strong> la garantie<br />
pour les produits défectueux doivent être présentées au lieu d’achat par le client<br />
initial.<br />
Cette garantie remplace toute autre garantie expresse ou implicite, y compris<br />
toute garantie implicite <strong>de</strong> qualité marchan<strong>de</strong> ou d’adéquation à un usage<br />
particulier. Certains pays ou états n’autorisent pas les limitations <strong>de</strong> durée pour<br />
les garanties implicites ; il est donc possible que la limitation susmentionnée ne<br />
s’applique pas à votre cas.<br />
ResMed ne peut être tenue pour responsable <strong>de</strong> tout dommage accessoire ou<br />
indirect résultant <strong>de</strong> la vente, <strong>de</strong> l’installation ou <strong>de</strong> l’utilisation <strong>de</strong> tout produit<br />
ResMed. Certains pays ou états n’autorisent ni l’exclusion ni la limitation <strong>de</strong>s<br />
dommages accessoires ou indirects ; il est donc possible que la limitation<br />
susmentionnée ne s’applique pas à votre cas. Cette garantie vous octroie <strong>de</strong>s<br />
droits reconnus par la loi, et vous pouvez également avoir d’autres droits qui<br />
varient en fonction du pays où vous habitez.<br />
Pour <strong>de</strong> plus amples informations sur vos droits <strong>de</strong> garantie, veuillez contacter<br />
votre prestataire <strong>de</strong> santé ou ResMed.<br />
R001-307/2 05 06<br />
46
In<strong>de</strong>x<br />
A<br />
Avertissements et précautions 30<br />
B<br />
Boîtier 45<br />
C<br />
Caractéristiques 45<br />
Conditions ambiantes 45<br />
Conseils utiles 38<br />
Consignes d’utilisation 37<br />
Contre-indications 30<br />
Français<br />
D<br />
Début du traitement 37<br />
Définitions 29<br />
Dimensions 45<br />
G<br />
Garantie limitee 46<br />
I<br />
Informations médicales 30<br />
Installation 33<br />
N<br />
Nettoyage 39<br />
P<br />
Poids 45<br />
Préparation avant l’utilisation 33<br />
R<br />
Réservoir<br />
remontage 41<br />
Responsabilité <strong>de</strong> l’utilisateur/du<br />
propriétaire 29<br />
S<br />
SmartStart 37, 38<br />
Stratégie <strong>de</strong> dépannage 43<br />
Symboles apparaissant sur l’appareil 45<br />
U<br />
Usage prévu 30<br />
In<strong>de</strong>x<br />
47
<strong>HumidAire</strong> 2iC <br />
Guía <strong>de</strong>l Usuario<br />
Español<br />
Español<br />
49
Índice<br />
Introducción . . . . . . . . . . . . . . . . . . . . . . . . . . . . . . . . . . . . . . . . . . . . . . 53<br />
Definiciones 53<br />
Responsabilidad <strong>de</strong>l usuario/propietario 53<br />
Información médica . . . . . . . . . . . . . . . . . . . . . . . . . . . . . . . . . . . . . . 54<br />
Uso indicado 54<br />
Contraindicaciones 54<br />
Advertencias y precauciones 54<br />
El <strong>HumidAire</strong> 2iC . . . . . . . . . . . . . . . . . . . . . . . . . . . . . . . . . . . . . . . . . 56<br />
Componentes <strong>de</strong>l <strong>HumidAire</strong> 2iC 56<br />
Preparación para el uso . . . . . . . . . . . . . . . . . . . . . . . . . . . . . . . . . . . 57<br />
Instalación <strong>de</strong>l <strong>HumidAire</strong> 2iC 57<br />
Instrucciones <strong>de</strong> funcionamiento . . . . . . . . . . . . . . . . . . . . . . . . . . 61<br />
Inicio <strong>de</strong>l tratamiento 61<br />
Detención <strong>de</strong>l tratamiento 62<br />
Consejos Útiles 62<br />
Limpieza y mantenimiento . . . . . . . . . . . . . . . . . . . . . . . . . . . . . . . . 63<br />
Servicio <strong>de</strong> mantenimiento 67<br />
Solución <strong>de</strong> problemas . . . . . . . . . . . . . . . . . . . . . . . . . . . . . . . . . . . 69<br />
Español<br />
Especificaciones técnicas . . . . . . . . . . . . . . . . . . . . . . . . . . . . . . . . . 71<br />
Garantía Limitada . . . . . . . . . . . . . . . . . . . . . . . . . . . . . . . . . . . . . . . . 72<br />
Índice alfabetico . . . . . . . . . . . . . . . . . . . . . . . . . . . . . . . . . . . . . . . . . . 73<br />
Índice<br />
51
Introducción<br />
El <strong>HumidAire</strong> 2iC <strong>de</strong> ResMed está diseñado para humidificar el aire<br />
suministrado a las vías respiratorias durante el tratamiento con presión positiva<br />
continua en la vía aérea (CPAP por sus siglas en inglés), presión positiva<br />
automática en la vía aérea (APAP) y terapia binivel.<br />
Durante el tratamiento se pue<strong>de</strong> experimentar congestión o sequedad nasal, <strong>de</strong><br />
la boca o la garganta. Estos son síntomas ocasionados por los climas secos, las<br />
bajas temperaturas <strong>de</strong>l aire, el flujo <strong>de</strong> aire suministrado por los sistemas CPAP,<br />
APAP o binivel y las fugas por la boca. El aire húmedo ayuda a aliviar los síntomas<br />
<strong>de</strong> sequedad y pue<strong>de</strong> hacer que el tratamiento resulte más cómodo.<br />
El <strong>HumidAire</strong> 2iC está diseñado para formar una sola unidad <strong>de</strong> humidificación<br />
cuando se acopla al equipo CPAP, APAP o binivel.<br />
Definiciones<br />
!<br />
!<br />
Este manual contiene términos e íconos especiales que aparecen en los<br />
márgenes, para llamar su atención hacia información específica e importante.<br />
ADVERTENCIA<br />
Alerta sobre la posibilidad <strong>de</strong> lesiones.<br />
PRECAUCIÓN<br />
Explica medidas especiales a tomar para el uso seguro y eficaz <strong>de</strong>l equipo.<br />
Nota: Se trata <strong>de</strong> una nota informativa o útil.<br />
Español<br />
Responsabilidad <strong>de</strong>l usuario/propietario<br />
El usuario o propietario <strong>de</strong> este sistema será enteramente responsable por<br />
cualquier lesión a personas o daños a bienes que resulten <strong>de</strong>:<br />
• una operación no conforme con las instrucciones <strong>de</strong> funcionamiento<br />
suministradas<br />
• el mantenimiento o modificaciones efectuadas a menos que sean acor<strong>de</strong>s<br />
con las instrucciones autorizadas y hayan sido realizadas por personas<br />
autorizadas.<br />
Tenga a bien leer este manual <strong>de</strong>tenidamente antes <strong>de</strong> usar el equipo.<br />
Introducción<br />
53
Información médica<br />
Uso indicado<br />
!<br />
El <strong>HumidAire</strong> 2iC está indicado para la humidificación <strong>de</strong>l aire suministrado a<br />
partir <strong>de</strong> equipo<strong>equipos</strong> para CPAP, APAP y binivel específicos <strong>de</strong> ResMed.<br />
Remítase al manual <strong>de</strong>l equipo correspondiente para obtener información sobre<br />
su compatibilidad con el <strong>HumidAire</strong> 2iC. En caso <strong>de</strong> requerir información<br />
adicional, póngase en contacto con su proveedor <strong>de</strong> <strong>equipos</strong> o con la oficina <strong>de</strong><br />
ResMed. El <strong>HumidAire</strong> 2iC <strong>de</strong>be ser usado únicamente siguiendo las<br />
recomendaciones <strong>de</strong> un médico.<br />
PRECAUCIÓN (SÓLO EE.UU.)<br />
La ley fe<strong>de</strong>ral estipula que este aparato solamente pue<strong>de</strong> ser vendido por<br />
un médico o por su or<strong>de</strong>n.<br />
Contraindicaciones<br />
El uso <strong>de</strong>l <strong>HumidAire</strong> 2iC está contraindicado en pacientes que no respiran por<br />
sus vías respiratorias supraglóticas.<br />
Remítase también al manual <strong>de</strong>l sistema correspondiente para ver las<br />
contraindicaciones asociadas con los tratamientos CPAP, APAP y binivel.<br />
Advertencias y precauciones<br />
!<br />
Las siguientes son advertencias y precauciones generales. Las advertencias y<br />
precauciones específicas aparecen en el manual junto a las instrucciones<br />
pertinentes.<br />
ADVERTENCIAS<br />
• Utilice el <strong>HumidAire</strong> 2iC únicamente para el fin para el que ha sido diseñado<br />
como se <strong>de</strong>scribe en este manual.<br />
• El <strong>HumidAire</strong> 2iC está diseñado para ser usado únicamente con <strong>equipos</strong> para<br />
CPAP, APAP y binivel específicos <strong>de</strong> ResMed. No use el <strong>HumidAire</strong> 2iC con<br />
ningún otro equipo.<br />
• El <strong>HumidAire</strong> 2iC <strong>de</strong>berá utilizarse únicamente con los accesorios o tubos <strong>de</strong><br />
suministro que se especifican en el presente manual. Su uso con otros<br />
accesorios o tubos <strong>de</strong> suministro podría resultar en una lesión o en daños al<br />
equipo.<br />
• El <strong>HumidAire</strong> 2iC, incluidos sus tubos asociados, es para ser usado por un<br />
único paciente y no <strong>de</strong>be volver a utilizarse con ninguna otra persona. Esto es<br />
para evitar el riesgo <strong>de</strong> infecciones cruzadas.<br />
• El <strong>HumidAire</strong> 2iC <strong>de</strong>berá colocarse siempre por <strong>de</strong>bajo <strong>de</strong>l nivel <strong>de</strong>l paciente.<br />
Si se colocara al mismo nivel o por encima <strong>de</strong>l paciente, cabe la posibilidad<br />
<strong>de</strong> que el agua caliente fluya por el tubo hacia la mascarilla.<br />
54
• No intente <strong>de</strong>smontar la estación <strong>de</strong> carga <strong>de</strong>l <strong>HumidAire</strong> 2iC . Ella no<br />
contiene piezas que el usuario pueda reparar. Las reparaciones y el<br />
mantenimiento interno <strong>de</strong>berán ser efectuados únicamente por un agente <strong>de</strong><br />
servicio autorizado.<br />
• Si por acci<strong>de</strong>nte le caen líquidos a la estación <strong>de</strong> carga <strong>de</strong>l <strong>HumidAire</strong> 2iC,<br />
<strong>de</strong>sconecte el equipo CPAP, APAP o binivel <strong>de</strong> la toma <strong>de</strong> corriente y permita<br />
que la estación <strong>de</strong> carga se drene y se seque antes <strong>de</strong> un nuevo uso.<br />
• La cámara <strong>de</strong> agua no <strong>de</strong>berá estar conectada a la estación <strong>de</strong> carga<br />
mientras se transporta el <strong>HumidAire</strong> 2iC en el bolso para transporte. Coloque<br />
la cámara <strong>de</strong> agua en un compartimento aparte en el bolso <strong>de</strong> transporte.<br />
• Asegúrese <strong>de</strong> que la cámara <strong>de</strong> agua esté vacía y completamente seca antes<br />
<strong>de</strong> transportar el <strong>HumidAire</strong> 2iC.<br />
• No encienda el <strong>HumidAire</strong> 2iC si el equipo CPAP, APAP o binivel tiene un<br />
cable <strong>de</strong> conexión o un enchufe dañados.<br />
• Si el equipo se coloca a un nivel superior al <strong>de</strong>l paciente y se vuelca existirá la<br />
posibilidad <strong>de</strong> que la mascarilla se llene <strong>de</strong> agua. El <strong>HumidAire</strong> 2iC <strong>de</strong>be<br />
entonces ser usado con precaución en pacientes que no pue<strong>de</strong>n cuidar sus<br />
vías respiratorias, o que no pue<strong>de</strong>n quitarse la mascarilla, por ejemplo<br />
<strong>de</strong>spués <strong>de</strong> un ataque cerebrovascular. Se <strong>de</strong>berán pon<strong>de</strong>rar<br />
cuidadosamente los riesgos y beneficios relativos.<br />
• No utilice el <strong>HumidAire</strong> 2iC si el mismo no está funcionando a<strong>de</strong>cuadamente<br />
o si cualquiera <strong>de</strong> sus piezas ha caído al suelo o ha sido dañada.<br />
• Mantenga el cable <strong>de</strong> conexión lejos <strong>de</strong> superficies calefaccionadas.<br />
• No <strong>de</strong>je caer ni inserte ningún objeto en ninguna <strong>de</strong> las aberturas ni en los<br />
tubos.<br />
• No use el <strong>HumidAire</strong> 2iC en presencia <strong>de</strong> materiales inflamables o<br />
explosivos.<br />
Español<br />
Información médica<br />
55
El <strong>HumidAire</strong> 2iC<br />
Componentes <strong>de</strong>l <strong>HumidAire</strong> 2iC<br />
Estación<br />
<strong>de</strong> carga<br />
Salida <strong>de</strong> aire<br />
Cámara<br />
<strong>de</strong> agua<br />
Figura 1: Componentes <strong>de</strong>l <strong>HumidAire</strong> 2iC<br />
Tapa <strong>de</strong> la cámara <strong>de</strong> agua<br />
Junta<br />
Travesaño<br />
Traba lateral<br />
Base <strong>de</strong> la cámara <strong>de</strong> agua<br />
Figura 2: Componentes <strong>de</strong> la cámara <strong>de</strong> agua<br />
56
Preparación para el uso<br />
Instalación <strong>de</strong>l <strong>HumidAire</strong> 2iC<br />
!<br />
ADVERTENCIA<br />
Asegúrese <strong>de</strong> que el equipo CPAP, APAP o binivel esté apagado en la toma<br />
<strong>de</strong> corriente antes <strong>de</strong> conectar el <strong>HumidAire</strong> 2iC.<br />
1 Quite la cubierta <strong>de</strong>lantera <strong>de</strong>l equipo. Para ello:<br />
1. Oprima el cerrojo bajo la cubierta <strong>de</strong>lantera.<br />
2. Mientras oprime el botón <strong>de</strong> cierre, levante y tire <strong>de</strong> la cubierta <strong>de</strong>lantera <strong>de</strong>l<br />
equipo. La cubierta <strong>de</strong>lantera <strong>de</strong>be <strong>de</strong>spren<strong>de</strong>rse en la parte inferior y a la<br />
<strong>de</strong>recha. La cubierta <strong>de</strong>lantera aún <strong>de</strong>be estar sujeta al lado izquierdo.<br />
Lado izquierdo<br />
Lado <strong>de</strong>recho<br />
Español<br />
Cubierta <strong>de</strong>lantera<br />
Cerrojo<br />
3. Sujete el equipo con su mano izquierda. Con su mano <strong>de</strong>recha, tire con<br />
firmeza <strong>de</strong>l lado <strong>de</strong>recho <strong>de</strong> la cubierta <strong>de</strong>lantera y <strong>de</strong>spués tire hacia arriba<br />
hasta que la cubierta <strong>de</strong>lantera entera salga por completo.<br />
Notas<br />
• Para volver a colocar la cubierta <strong>de</strong>lantera:<br />
a. Alinee el conector <strong>de</strong> salida <strong>de</strong> aire <strong>de</strong>ntro <strong>de</strong> la cubierta <strong>de</strong>lantera a la<br />
salida <strong>de</strong> aire <strong>de</strong>l equipo.<br />
b. Empuje la cubierta <strong>de</strong>lantera firmemente sobre el equipo hasta que calce<br />
en su lugar.<br />
• Recuer<strong>de</strong> llevar la cubierta <strong>de</strong>lantera con usted si sale <strong>de</strong> viaje, en caso <strong>de</strong><br />
que necesite utilizar su equipo CPAP, APAP o binivel sin humidificador.<br />
Preparación para el uso<br />
57
2 Separe la cámara <strong>de</strong> agua <strong>de</strong>l <strong>HumidAire</strong> 2iC <strong>de</strong> la estación <strong>de</strong> carga. Para ello,<br />
presione la trabilla en la base <strong>de</strong> la cámara <strong>de</strong> agua y tire <strong>de</strong> la cámara <strong>de</strong> agua<br />
para separarla <strong>de</strong> la estación <strong>de</strong> carga.<br />
3 Deslice la estación <strong>de</strong> carga <strong>de</strong>l humidificador (sin la cámara <strong>de</strong> agua) sobre el<br />
equipo hasta que calce en su lugar.<br />
Estación <strong>de</strong> carga<br />
Notas<br />
• Bajo condiciones normales <strong>de</strong> funcionamiento, no hay necesidad <strong>de</strong> quitar<br />
estación <strong>de</strong> carga <strong>de</strong>l <strong>HumidAire</strong> 2iC, una vez acoplada al equipo CPAP, APAP<br />
o binivel. Si necesita quitarla, oprima el botón bajo la estación <strong>de</strong> carga y tire<br />
<strong>de</strong> la estación <strong>de</strong> carga para separarla <strong>de</strong>l equipo.<br />
• Al retirar la estación <strong>de</strong> carga, asegúrese <strong>de</strong> quitar primero la cámara <strong>de</strong><br />
agua.<br />
4 Conecte el cable <strong>de</strong> corriente al enchufe en la parte trasera <strong>de</strong>l equipo. Conecte<br />
el otro extremo <strong>de</strong>l cable <strong>de</strong> corriente a una toma <strong>de</strong> corriente.<br />
Cable <strong>de</strong><br />
corriente<br />
A la<br />
toma <strong>de</strong><br />
corriente<br />
58
!<br />
ADVERTENCIAS<br />
• Asegúrese <strong>de</strong> que el equipo CPAP, APAP o binivel esté apagado en la<br />
toma <strong>de</strong> corriente antes <strong>de</strong> conectar el <strong>HumidAire</strong> 2iC.<br />
• Asegúrese <strong>de</strong> que el cable <strong>de</strong> corriente y el enchufe estén en buenas<br />
condiciones y que el equipo no esté dañado.<br />
5 Coloque el equipo sobre una superficie firme y plana cerca <strong>de</strong> su cama.<br />
Asegúrese <strong>de</strong> que que<strong>de</strong> ubicado por <strong>de</strong>bajo <strong>de</strong>l nivel <strong>de</strong> su posición al dormir.<br />
!<br />
6<br />
!<br />
PRECAUCIÓN<br />
Tenga cuidado <strong>de</strong> no colocar el equipo en un lugar en don<strong>de</strong> pueda ser<br />
empujado y tirado al suelo.<br />
ADVERTENCIA<br />
No llene la cámara <strong>de</strong> agua mientras está acoplada a la estación <strong>de</strong> carga y<br />
al equipo CPAP, APAP o binivel.<br />
Gire la cámara <strong>de</strong> agua <strong>de</strong> forma que la salida <strong>de</strong> aire que<strong>de</strong> apuntando hacia<br />
arriba. Sobre un lavabo, llene con cuidado la cámara <strong>de</strong> agua por la salida <strong>de</strong> aire<br />
hasta la marca <strong>de</strong> nivel máximo <strong>de</strong> agua, que se muestra a un lado <strong>de</strong> la base <strong>de</strong><br />
la cámara <strong>de</strong> agua.<br />
Español<br />
Salida <strong>de</strong> aire<br />
!<br />
!<br />
Marca <strong>de</strong><br />
nivel máximo<br />
<strong>de</strong> agua<br />
El <strong>HumidAire</strong> 2iC <strong>de</strong>be ser llenado con agua limpia antes <strong>de</strong> ser usado. Siempre<br />
asegúrese <strong>de</strong> que la cámara <strong>de</strong> agua esté limpia. Consulte “Limpieza y<br />
mantenimiento” en la página 63.<br />
ADVERTENCIA<br />
• No llene la cámara <strong>de</strong> agua con agua caliente ni con agua helada.<br />
• No llene <strong>de</strong>masiado la cámara <strong>de</strong> agua, ya que podría entrar agua al<br />
equipo CPAP, APAP o binivel y al tubo <strong>de</strong> aire.<br />
PRECAUCIÓN<br />
No use aditivos, en particular aditivos aromáticos (ejemplo: perfumes y<br />
aceites aromáticos). Estos podrían reducir la producción <strong>de</strong> humidificación<br />
<strong>de</strong>l equipo y/o provocar un <strong>de</strong>terioro <strong>de</strong> los materiales <strong>de</strong> la cámara <strong>de</strong><br />
agua.<br />
Preparación para el uso<br />
59
7 Deslice y empuje con cuidado la cámara <strong>de</strong> agua ya llena, a la estación <strong>de</strong> carga<br />
<strong>de</strong>l humidificador (ya acoplado al equipo CPAP, APAP o binivel) hasta que calce<br />
en su lugar. Asegúrese <strong>de</strong> que la cámara <strong>de</strong> agua esté completamente sujeta a<br />
la estación <strong>de</strong> carga.<br />
Estación<br />
<strong>de</strong> carga<br />
Cámara<br />
<strong>de</strong> agua<br />
ADVERTENCIA<br />
! • Siempre conecte primero la estación <strong>de</strong> carga <strong>de</strong>l <strong>HumidAire</strong> 2iC antes<br />
<strong>de</strong> conectar la cámara <strong>de</strong> agua.<br />
• Para evitar que el agua entre al equipo CPAP, APAP o binivel, solamente<br />
mueva o transporte el equipo con el <strong>HumidAire</strong> 2iC acoplado si la<br />
cámara <strong>de</strong> agua está vacía y totalmente seca.<br />
8 Conecte un extremo <strong>de</strong>l tubo <strong>de</strong> aire firmemente a la salida <strong>de</strong> aire en la cámara<br />
<strong>de</strong> agua y el otro extremo al sistema <strong>de</strong> mascarilla.<br />
Sistema <strong>de</strong><br />
mascarilla<br />
Salida <strong>de</strong> aire<br />
Tubo <strong>de</strong> aire<br />
El <strong>HumidAire</strong> 2iC esta listo ahora para su uso. Para comenzar el tratamiento,<br />
consulte “Instrucciones <strong>de</strong> funcionamiento” en la página 61.<br />
60
Instrucciones <strong>de</strong> funcionamiento<br />
Inicio <strong>de</strong>l tratamiento<br />
El <strong>HumidAire</strong> 2iC <strong>de</strong>be estar lleno con agua limpia y montado al equipo CPAP,<br />
APAP o binivel con el tubo <strong>de</strong> aire y el sistema <strong>de</strong> mascarilla conectados.<br />
Consulte “Instalación <strong>de</strong>l <strong>HumidAire</strong> 2iC” en la página 57.<br />
1 Encienda la corriente en la toma <strong>de</strong> corriente. Encienda el interruptor eléctrico<br />
principal en la parte trasera <strong>de</strong>l equipo.<br />
Interruptor<br />
eléctrico<br />
principal<br />
Cuando se encien<strong>de</strong> el equipo, aparece un mensaje <strong>de</strong> BIENVENIDA en la<br />
pantalla <strong>de</strong> cristal líquido.<br />
Español<br />
2 Si tiene la opción, seleccione PASSOVER como configuración <strong>de</strong> humidificador<br />
en el menú.<br />
!<br />
ADVERTENCIA<br />
La selección <strong>de</strong> una configuración <strong>de</strong> humidificador incorrecta podría<br />
resultar en un tratamiento insuficiente.<br />
Nota: Remítase al Manual <strong>de</strong>l Usuario correspondiente <strong>de</strong>l equipo CPAP, APAP<br />
o binivel para obtener información <strong>de</strong>tallada acerca <strong>de</strong>l uso <strong>de</strong> los menú.<br />
3 Ajuste su mascarilla como se <strong>de</strong>scribe en las instrucciones para el usuario <strong>de</strong><br />
dicha mascarilla.<br />
!<br />
ADVERTENCIA<br />
Antes <strong>de</strong> comenzar el tratamiento, asegúrese <strong>de</strong> tener la mascarilla puesta<br />
y <strong>de</strong> que la mascarilla y el tubo <strong>de</strong> aire están correctamente conectados.<br />
4 Oprima la tecla Delantera en el panel <strong>de</strong> control. De lo contrario, si la función<br />
SmartStart está habilitada, sencillamente respire en la mascarilla. El aire <strong>de</strong>bería<br />
comenzar a circular <strong>de</strong>s<strong>de</strong> el equipo.<br />
5 Acuéstese y acomo<strong>de</strong> el tubo <strong>de</strong> aire <strong>de</strong> forma que pueda moverse libremente<br />
si se da vueltas mientras duerme.<br />
!<br />
ADVERTENCIA<br />
No <strong>de</strong>je mucho tubo <strong>de</strong> aire encima <strong>de</strong> la cabecera <strong>de</strong> su cama. Se podría<br />
enrollar alre<strong>de</strong>dor <strong>de</strong> su cabeza o cuello mientras duerme.<br />
Instrucciones <strong>de</strong> funcionamiento<br />
61
Detención <strong>de</strong>l tratamiento<br />
Para <strong>de</strong>tener el tratamiento en cualquier momento, quítese la mascarilla y pulse<br />
el botón Delantero. De lo contrario, si la función SmartStart está habilitada,<br />
sencillamente quítese la mascarilla y el tratamiento se <strong>de</strong>tendrá.<br />
Consejos Útiles<br />
!<br />
Persistencia <strong>de</strong> síntomas <strong>de</strong> sequedad<br />
Si sigue experimentando síntomas <strong>de</strong> sequedad, es probable que esté<br />
respirando por la boca. La respiración por la boca o las fugas por la boca<br />
ocasionan sequedad e irritación <strong>de</strong> las vías respiratorias superiores. Si esto<br />
resultara ser un problema, una mascarilla facial o una correa para el mentón<br />
podrían serle <strong>de</strong> utilidad. Póngase en contacto con su médico o con su proveedor<br />
<strong>de</strong> <strong>equipos</strong> para obtener más información.<br />
Enfermedad o infección nasal<br />
Si usted tiene un resfriado o una infección nasal, asegúrese <strong>de</strong> limpiar<br />
concienzudamente el <strong>HumidAire</strong> 2i cada día. No ponga <strong>de</strong>congestionantes ni<br />
aceites aromáticos en la cámara <strong>de</strong> agua.<br />
PRECAUCIÓN<br />
No use aditivos, en particular aditivos aromáticos (por ejemplo: perfumes y<br />
aceites aromáticos). Estos podrían reducir la capacidad <strong>de</strong> humidificación<br />
<strong>de</strong>l equipo y/o provocar un <strong>de</strong>terioro <strong>de</strong> los materiales <strong>de</strong> la cámara <strong>de</strong><br />
agua.<br />
Depósitos <strong>de</strong> sarro<br />
Pue<strong>de</strong> notar un polvo blanco o <strong>de</strong>pósito en la base <strong>de</strong> la cámara <strong>de</strong> agua. Estos<br />
son <strong>de</strong>pósitos minerales <strong>de</strong>l agua <strong>de</strong>l grifo. Para quitar estos <strong>de</strong>pósitos, limpie la<br />
base <strong>de</strong> la cámara <strong>de</strong> agua con un <strong>de</strong>tergente suave.<br />
Para evitar que se formen estos <strong>de</strong>pósitos, llene la cámara <strong>de</strong> agua con agua<br />
<strong>de</strong>smineralizada.<br />
62
Limpieza y mantenimiento<br />
Debe efectuar regularmente la limpieza y el mantenimiento <strong>de</strong>scritos en esta<br />
sección.<br />
!<br />
ADVERTENCIA<br />
Peligro <strong>de</strong> electrocución. No sumerja el equipo ni el cable <strong>de</strong> corriente en<br />
agua. Siempre <strong>de</strong>sconecte el equipo antes <strong>de</strong> limpiarlo y asegúrese <strong>de</strong> que<br />
esté seco antes <strong>de</strong> conectarlo nuevamente a una toma <strong>de</strong> corriente.<br />
1 Apague el interruptor eléctrico principal en la parte trasera <strong>de</strong>l equipo, y<br />
<strong>de</strong>sconecte el cable <strong>de</strong> corriente <strong>de</strong> la toma <strong>de</strong> corriente.<br />
2 Retire la cámara <strong>de</strong> agua. Para ello, levante el cerrojo en la base <strong>de</strong> la cámara <strong>de</strong><br />
agua y tire <strong>de</strong> ella para separarla <strong>de</strong> la estación <strong>de</strong> carga.<br />
Español<br />
3 Deseche todo resto <strong>de</strong> agua poniendo la cámara <strong>de</strong> agua boca abajo, para que el<br />
agua pueda salir por la salida <strong>de</strong> aire.<br />
4 Desmontaje <strong>de</strong> la cámara <strong>de</strong> agua<br />
1. Para abrir las trabas laterales, tire <strong>de</strong>l bor<strong>de</strong> inferior.<br />
Traba lateral<br />
2. Sostenga la cámara <strong>de</strong> agua como se muestra a continuación:<br />
lengüeta frontal<br />
Limpieza y mantenimiento<br />
63
3. Desmonte la cámara <strong>de</strong> agua separando las dos mita<strong>de</strong>s. Utilice el pulgar<br />
para tirar <strong>de</strong> la lengüeta frontal.<br />
lengüeta frontal<br />
4. Quite la junta retirándola <strong>de</strong>l interior <strong>de</strong> la tapa.<br />
tapa<br />
junta<br />
5. Quite el travesaño <strong>de</strong>l interior <strong>de</strong> la base <strong>de</strong> la cámara <strong>de</strong> agua.<br />
travesaño<br />
base<br />
5 Deseche el agua residual.<br />
6 Limpieza<br />
CÁMARA DE AGUA<br />
Limpie la tapa, la junta, el travesaño y la base en agua tibia usando un <strong>de</strong>tergente<br />
suave o un lavavajillas. Enjuáguelos cuidadosamente en agua limpia y déjelos<br />
secar sin exponerlos a la luz directa <strong>de</strong>l sol. Haga esto diariamente, o <strong>de</strong>spués <strong>de</strong><br />
cada uso. Inspeccione la cámara <strong>de</strong> agua para verificar que no haya <strong>de</strong>sgaste ni<br />
<strong>de</strong>terioro. Cambie cualquier pieza dañada.<br />
!<br />
PRECAUCIÓN<br />
No utilice ninguno <strong>de</strong> los siguientes productos para limpiar las piezas <strong>de</strong>l<br />
<strong>HumidAire</strong> 2iC. Estas soluciones podrían ocasionar daños al producto y<br />
reducir la vida útil <strong>de</strong>l mismo.<br />
• soluciones a base <strong>de</strong> lejía, cloro, alcohol o amoníaco<br />
• jabones humectantes, antibacterianos o a base <strong>de</strong> glicerina<br />
• agentes <strong>de</strong>smineralizadores y <strong>de</strong>capantes<br />
64
Si utiliza un lavavajillas, evite los ciclos industriales o <strong>de</strong> alta temperatura<br />
(más <strong>de</strong> 158°F/70°C). No utilice <strong>de</strong>tergentes muy alcalinos ni soluciones <strong>de</strong><br />
enjuague.<br />
ESTACIÓN DE CARGA<br />
Limpie la parte exterior <strong>de</strong> la estación <strong>de</strong> carga con un paño húmedo. Haga esto<br />
periódicamente.<br />
7 Montaje <strong>de</strong> la cámara <strong>de</strong> agua<br />
Cuando todas las partes <strong>de</strong> la cámara <strong>de</strong> agua estén limpias y secas, vuelva a<br />
ensamblar la cámara <strong>de</strong> agua, como sigue:<br />
1. Coloque el travesaño en sus soportes <strong>de</strong>ntro <strong>de</strong> la base <strong>de</strong> la cámara <strong>de</strong><br />
agua.<br />
pestañas<br />
Español<br />
soportes<br />
soportes<br />
2. Coloque la junta en el bor<strong>de</strong> <strong>de</strong> la base <strong>de</strong> la cámara <strong>de</strong> agua. Oprímala a lo<br />
largo <strong>de</strong>l bor<strong>de</strong> para asegurarse <strong>de</strong> que la junta esté correctamente instalada.<br />
junta<br />
bor<strong>de</strong><br />
Limpieza y mantenimiento<br />
65
3. Ajuste la tapa en la base <strong>de</strong> la cámara <strong>de</strong> agua. Oprima la tapa y la base<br />
firmemente para que cierren.<br />
tapa<br />
4. Para cerrar las trabas laterales, vea las figuras que siguen,<br />
Nota: Si las trabas laterales se separan <strong>de</strong> la base <strong>de</strong> la cámara <strong>de</strong> agua,<br />
vuélvalas a conectar tal como se muestra.<br />
Las trabas laterales consisten en dos partes. Si se separan, júntelas tal como se<br />
muestra. Introduzca primero el extremo más pequeño (a) <strong>de</strong> la bisagra (b),<br />
manténgala horizontal y haga presión para que ajuste en su lugar<br />
.<br />
a<br />
b<br />
66
Servicio <strong>de</strong> mantenimiento<br />
Al cumplirse 5 años <strong>de</strong> su fabricación, este producto (<strong>HumidAire</strong> 2iC) <strong>de</strong>be ser<br />
inspeccionado por un Centro <strong>de</strong> Servicio ResMed autorizado. Hasta ese<br />
momento, el equipo está diseñado para funcionar <strong>de</strong> manera segura y fiable,<br />
siempre que se maneje y mantenga <strong>de</strong> acuerdo con las instrucciones<br />
suministradas por ResMed. Al entregarse el equipo, se proporcionan los <strong>de</strong>talles<br />
correspondientes <strong>de</strong> la garantía ResMed. Como en el caso <strong>de</strong> todos los<br />
dispositivos eléctricos, si aparece alguna irregularidad en su funcionamiento, se<br />
<strong>de</strong>berán tomar las precauciones necesarias y el equipo <strong>de</strong>berá ser revisado por<br />
un Centro <strong>de</strong> Servicio ResMed autorizado.<br />
Español<br />
Limpieza y mantenimiento<br />
67
Solución <strong>de</strong> problemas<br />
!<br />
Si hay un problema, intente las siguientes sugerencias. Si el problema no pue<strong>de</strong><br />
ser resuelto, póngase en contacto con su proveedor <strong>de</strong> <strong>equipos</strong> o con ResMed.<br />
No intente abrir la unidad.<br />
ADVERTENCIA<br />
El servicio <strong>de</strong> mantenimiento y las reparaciones <strong>de</strong>berán ser efectuados<br />
únicamente por un agente <strong>de</strong> servicio autorizado. Bajo ninguna<br />
circunstancia <strong>de</strong>berá usted intentar reparar ni dar mantenimiento a la<br />
unidad.<br />
Problema Causa posible Solución<br />
El equipo no funciona<br />
(no aparece nada en<br />
el visor LCD).<br />
El cable <strong>de</strong> corriente no<br />
está <strong>de</strong>bidamente<br />
conectado.<br />
Verifique que el cable <strong>de</strong> corriente<br />
esté firmemente enchufado.<br />
Español<br />
Cámara <strong>de</strong> agua con<br />
fuga<br />
La unidad no está<br />
encendida.<br />
Toma <strong>de</strong> corriente<br />
<strong>de</strong>fectuosa.<br />
La cámara <strong>de</strong> agua pue<strong>de</strong><br />
estar dañada o fisurada.<br />
Pue<strong>de</strong> ser que la tapa no<br />
esté correctamente<br />
colocada.<br />
La junta <strong>de</strong> la cámara <strong>de</strong><br />
agua pue<strong>de</strong> estar torcida.<br />
Las trabas laterales no<br />
están <strong>de</strong>bidamente<br />
cerradas.<br />
Verifique que el interruptor en la parte<br />
trasera <strong>de</strong> la unidad esté en la posición<br />
<strong>de</strong> ENCENDIDO (ON).<br />
Pruebe otra toma <strong>de</strong> corriente.<br />
Contacte a su proveedor para obtener<br />
una pieza <strong>de</strong> recambio.<br />
Oprima la tapa firmemente hacia<br />
abajo.<br />
Asegúrese <strong>de</strong> que la junta esté<br />
<strong>de</strong>bidamente ajustada <strong>de</strong>ntro <strong>de</strong> la<br />
cámara <strong>de</strong> agua.<br />
Asegúrese <strong>de</strong> que las dos trabas<br />
laterales estén <strong>de</strong>bidamente cerradas.<br />
Solución <strong>de</strong> problemas<br />
69
Problema Causa posible Solución<br />
No hay flujo <strong>de</strong> aire<br />
El agua le salpica en<br />
el rostro<br />
El tubo <strong>de</strong> aire no está<br />
<strong>de</strong>bidamente conectado.<br />
El tubo <strong>de</strong> aire está<br />
bloqueado, torcido o roto.<br />
El equipo CPAP, APAP o<br />
binivel no funciona<br />
correctamente.<br />
La cámara <strong>de</strong> agua está<br />
<strong>de</strong>masiado llena.<br />
La cámara <strong>de</strong> agua está<br />
<strong>de</strong>masiado llena.<br />
Conecte el tubo <strong>de</strong> aire como se<br />
<strong>de</strong>scribe en “Preparación para el uso”<br />
en la página 57.<br />
Desbloquee o libere el tubo <strong>de</strong> aire.<br />
Verifique que el tubo <strong>de</strong> aire no esté<br />
perforado.<br />
Vea la sección <strong>de</strong> Solución <strong>de</strong><br />
problemas en el manual <strong>de</strong>l equipo<br />
CPAP, APAP o binivel.<br />
Extraiga un poco <strong>de</strong> agua <strong>de</strong> la cámara<br />
<strong>de</strong> agua. Asegúrese <strong>de</strong> que el nivel <strong>de</strong><br />
agua no sobrepase la marca <strong>de</strong>l nivel<br />
máximo <strong>de</strong> agua.<br />
Extraiga un poco <strong>de</strong> agua <strong>de</strong> la cámara<br />
<strong>de</strong> agua.<br />
70
Especificaciones técnicas<br />
Dimensiones (Altura x Ancho x Profundidad)<br />
123 mm x 218 mm x 183 mm (4,8 in x 7,2 in x 8,6 in)<br />
(estación <strong>de</strong> carga y cámara <strong>de</strong> agua)<br />
Peso<br />
710 g (1,57 lb)(estación <strong>de</strong> carga y cámara <strong>de</strong> agua vacía)<br />
Construcción <strong>de</strong> la carcasa<br />
Estación <strong>de</strong> carga: Termoplástico <strong>de</strong> ingeniería ignífuga<br />
Cámara <strong>de</strong> agua: Plástico mol<strong>de</strong>ado por inyección<br />
Condiciones ambientales<br />
Temperatura <strong>de</strong> funcionamiento: +5°C a +40°C (+41°F a +104°F)<br />
Humedad para funcionamiento: 10-95% sin con<strong>de</strong>nsación<br />
Temperatura <strong>de</strong> almacenamiento y <strong>de</strong> transporte: -20°C a +60°C (-4°F a +140°F)<br />
Humedad para el almacenamiento y el transporte: 10-95% sin con<strong>de</strong>nsación<br />
Nota: El fabricante se reserva el <strong>de</strong>recho <strong>de</strong> cambiar las especificaciones sin<br />
previo aviso.<br />
Español<br />
Símbolos que aparecen en el equipo<br />
Atención, consultar la documentación adjunta<br />
Nivel máximo <strong>de</strong> agua<br />
Especificaciones técnicas<br />
71
Garantía Limitada<br />
ResMed garantiza que su producto ResMed estará libre <strong>de</strong> todo <strong>de</strong>fecto <strong>de</strong><br />
material y mano <strong>de</strong> obra durante el plazo estipulado a continuación a partir <strong>de</strong> la<br />
fecha <strong>de</strong> adquisición por parte <strong>de</strong>l consumidor inicial. Esta garantía no es<br />
transferible.<br />
Plazo <strong>de</strong> la<br />
Producto<br />
garantía<br />
Humidificadores ResMed, ResControl, ResLink, ResTraxx<br />
Generadores <strong>de</strong> aire ResMed<br />
Accesorios, sistemas <strong>de</strong> mascarilla (incluye armazón <strong>de</strong> la mascarilla,<br />
almohadilla, arnés para la cabeza y tubos). Excluye los dispositivos<br />
<strong>de</strong>sechables.<br />
1 año<br />
2 años<br />
90 días<br />
Nota: Algunos mo<strong>de</strong>los no se encuentran disponibles en todas las regiones.<br />
Si el producto falla bajo condiciones <strong>de</strong> utilización normales, ResMed reparará o<br />
reemplazará, a opción suya, el producto <strong>de</strong>fectuoso o cualquiera <strong>de</strong> sus<br />
componentes. Esta Garantía limitada no cubre:<br />
a) cualquier daño causado como resultado <strong>de</strong> una utilización in<strong>de</strong>bida, abuso,<br />
modificación o alteración <strong>de</strong>l producto;<br />
b) reparaciones llevadas a cabo por cualquier organización <strong>de</strong> servicio que no<br />
haya sido expresamente autorizada por ResMed para efectuar dichas<br />
reparaciones;<br />
c) cualquier daño o contaminación <strong>de</strong>bida a humo <strong>de</strong> cigarrillo, pipa, cigarro u<br />
otras fuentes <strong>de</strong> humo;<br />
d) cualquier daño causado por el <strong>de</strong>rrame <strong>de</strong> agua sobre el generador <strong>de</strong> aire o<br />
hacia su interior.<br />
La garantía queda anulada si el producto se ven<strong>de</strong> o reven<strong>de</strong> fuera <strong>de</strong> su región<br />
<strong>de</strong> compra original. Las reclamaciones <strong>de</strong> garantía con respecto a productos<br />
<strong>de</strong>fectuosos <strong>de</strong>ben ser realizadas por el consumidor original en el punto <strong>de</strong><br />
compra.<br />
Esta garantía revoca cualquier otra garantía expresa o implícita, incluso cualquier<br />
garantía implícita <strong>de</strong> comerciabilidad o idoneidad para un propósito en particular.<br />
Algunas regiones o estados no permiten limitaciones respecto a la duración <strong>de</strong><br />
una garantía implícita, por lo que es posible que lo que prece<strong>de</strong> no sea aplicable<br />
en su caso.<br />
ResMed no será responsable <strong>de</strong> ningún daño inci<strong>de</strong>ntal ni emergente que se<br />
reclame por haber ocurrido como resultado <strong>de</strong> la venta, instalación o utilización<br />
<strong>de</strong> cualquier producto <strong>de</strong> ResMed. Algunas regiones o estados no permiten la<br />
exclusión ni limitación <strong>de</strong> daños inci<strong>de</strong>ntales o emergentes, por lo que es posible<br />
que lo que prece<strong>de</strong> no sea aplicable en su caso. Esta garantía le otorga <strong>de</strong>rechos<br />
legales específicos, y es posible que usted tenga otros <strong>de</strong>rechos que pue<strong>de</strong>n<br />
variar <strong>de</strong> una región a otra.<br />
Para más información sobre los <strong>de</strong>rechos que le otorga esta garantía, póngase<br />
en contacto con su distribuidor local <strong>de</strong> ResMed o con una oficina <strong>de</strong> ResMed.<br />
R001-307/2 05 06<br />
72
Índice alfabetico<br />
A<br />
Advertencias y precauciones 54<br />
C<br />
Cámara <strong>de</strong> agua,<br />
montaje 65<br />
Condiciones ambientales 71<br />
Consejos útiles 62<br />
Construcción <strong>de</strong> la carcasa 71<br />
Contraindicaciones 54<br />
D<br />
Definiciones 53<br />
Dimensiones 71<br />
E<br />
Especificaciones técnicas 71<br />
Español<br />
G<br />
Garantía Limitada 72<br />
I<br />
Información médica 54<br />
Inicio <strong>de</strong>l tratamiento 61<br />
Instalación 57<br />
Instrucciones <strong>de</strong> funcionamiento 61<br />
L<br />
Limpieza 63<br />
P<br />
Peso 71<br />
Preparación para el uso 57<br />
R<br />
Responsabilidad <strong>de</strong>l usuario/propietario<br />
53<br />
S<br />
Símbolos que aparecen en el dispositivo<br />
71<br />
SmartStart 61, 62<br />
Solución <strong>de</strong> problemas 69<br />
Suministro <strong>de</strong> energía 71<br />
U<br />
Uso indicado 54<br />
Índice alfabetico<br />
73
<strong>HumidAire</strong> 2iC <br />
Manual do Usuário<br />
Português<br />
Português<br />
75
Índice<br />
Introdução . . . . . . . . . . . . . . . . . . . . . . . . . . . . . . . . . . . . . . . . . . . . . . . 79<br />
Definições 79<br />
Responsabilida<strong>de</strong> do Usuário/Proprietário 79<br />
Informação Médica . . . . . . . . . . . . . . . . . . . . . . . . . . . . . . . . . . . . . . . 80<br />
Uso Indicado 80<br />
Contra-indicações 80<br />
Avisos e Precauções 80<br />
O <strong>HumidAire</strong> 2iC . . . . . . . . . . . . . . . . . . . . . . . . . . . . . . . . . . . . . . . . . 82<br />
Componentes do <strong>HumidAire</strong> 2iC 82<br />
Preparar para uso . . . . . . . . . . . . . . . . . . . . . . . . . . . . . . . . . . . . . . . . 83<br />
Montagem do <strong>HumidAire</strong> 2iC 83<br />
Instruções <strong>de</strong> Funcionamento . . . . . . . . . . . . . . . . . . . . . . . . . . . . 89<br />
Iniciar Tratamento 89<br />
Parar o Tratamento 90<br />
Sugestões Úteis 90<br />
Limpeza e manutenção . . . . . . . . . . . . . . . . . . . . . . . . . . . . . . . . . . . 91<br />
Manutenção 95<br />
Detecção e Resolução <strong>de</strong> Problemas . . . . . . . . . . . . . . . . . . . . . . 97<br />
Português<br />
Especificações Técnicas . . . . . . . . . . . . . . . . . . . . . . . . . . . . . . . . . . . 99<br />
Garantia Limitada . . . . . . . . . . . . . . . . . . . . . . . . . . . . . . . . . . . . . . . 100<br />
Índice remissivo . . . . . . . . . . . . . . . . . . . . . . . . . . . . . . . . . . . . . . . . . 101<br />
Índice<br />
77
Introdução<br />
O <strong>HumidAire</strong> 2iC da ResMed foi concebido para humidificar o ar fornecido à via<br />
respiratória durante a terapia por pressão contínua e positiva das vias<br />
respiratórias (CPAP), pressão automática e positiva das vias respiratórias (APAP)<br />
e terapia <strong>de</strong> dois níveis.<br />
Po<strong>de</strong>r-se-á experimentar congestão nasal ou secura do nariz, boca ou garganta<br />
durante a terapia. Estes sintomas são causados por climas secos, temperatura<br />
<strong>de</strong> ar baixa, fluxo <strong>de</strong> ar fornecido a partir do sistema CPAP, APAP ou <strong>de</strong> dois<br />
níveis e fuga <strong>de</strong> ar pela boca. O ar húmido ajuda a aliviar os sintomas <strong>de</strong> secura<br />
e po<strong>de</strong> tornar a terapia mais confortável.<br />
O <strong>HumidAire</strong> 2iC foi <strong>de</strong>senhado para ser integrado com um dispositivo CPAP,<br />
APAP ou <strong>de</strong> dois níveis <strong>de</strong> modo a formar uma única unida<strong>de</strong> <strong>de</strong> humidificação.<br />
Definições<br />
!<br />
!<br />
Este manual contém termos e ícones especiais que aparecerão junto às margens<br />
<strong>de</strong> forma a chamar o leitor à atenção <strong>de</strong> informações específicas e importantes.<br />
AVISO<br />
Alerta o usuário da possibilida<strong>de</strong> <strong>de</strong> danos pessoais.<br />
PRECAUÇÃO<br />
Explica cuidados especiais a ter para a utilização segura e efectiva do<br />
dispositivo.<br />
Nota: É uma nota informativa ou útil.<br />
Português<br />
Responsabilida<strong>de</strong> do Usuário/Proprietário<br />
O usuário ou proprietário <strong>de</strong>ste sistema será o responsável único por quaisquer<br />
danos pessoais ou danos a proprieda<strong>de</strong> resultantes <strong>de</strong>:<br />
• utilização do sistema não respeitando as instruções <strong>de</strong> funcionamento<br />
fornecidas<br />
• manutenção ou modificações a não ser que estas sejam feitas <strong>de</strong> acordo<br />
com instruções autorizadas e por pessoas autorizadas.<br />
Leia este manual cuidadosamente antes <strong>de</strong> usar.<br />
Introdução<br />
79
Informação Médica<br />
Uso Indicado<br />
!<br />
O <strong>HumidAire</strong> 2iC é <strong>de</strong>stinado para a humidificação do ar fornecido a partir <strong>de</strong><br />
certos dispositivos CPAP, APAP ou <strong>de</strong> dois níveis da ResMed. Consulte o<br />
manual do dispositivo relevante para obter informações referentes à sua<br />
compatibilida<strong>de</strong> com o o <strong>HumidAire</strong> 2iC. Entre em contacto com o seu<br />
fornecedor <strong>de</strong> equipamento ou filial da ResMed para mais informações. O<br />
<strong>HumidAire</strong> 2iC só <strong>de</strong>ve ser usado no modo recomendado por um médico.<br />
PRECAUÇÃO (APENAS PARA OS EUA)<br />
A lei fe<strong>de</strong>ral limita a venda <strong>de</strong>ste dispositivo a <strong>médicos</strong> ou por or<strong>de</strong>m<br />
<strong>de</strong>stes.<br />
Contra-indicações<br />
O <strong>HumidAire</strong> 2iC é contra-indicado para utilização em pacientes que não estão a<br />
respirar pelas vias respiratórias supraglóticas <strong>de</strong>vido a um "bypass".<br />
Por favor, consulte também o manual do sistema relevante para contraindicações<br />
associadas à terapia por CPAP, APAP e <strong>de</strong> dois níveis.<br />
Avisos e Precauções<br />
!<br />
Os seguintes são avisos e precauções gerais. Precauções e avisos específicos<br />
aparecerão junto às instruções relevantes no manual.<br />
AVISO<br />
• Use o <strong>HumidAire</strong> 2iC apenas para aquilo que este foi concebido tal como é<br />
<strong>de</strong>scrito neste manual.<br />
• O <strong>HumidAire</strong> 2iC foi concebido para ser usado com certos dispositivos CPAP,<br />
APAP ou <strong>de</strong> dois níveis da ResMed. Não utilize o <strong>HumidAire</strong> 2iC com outros<br />
sistemas.<br />
• O <strong>HumidAire</strong> 2iC só <strong>de</strong>verá ser usado com os tubos <strong>de</strong> fornecimento e<br />
acessórios especificados neste manual. A ligação <strong>de</strong> outros tubos <strong>de</strong><br />
fornecimento ou acessórios po<strong>de</strong>rá causar ferimentos ou danificar o<br />
equipamento.<br />
• O <strong>HumidAire</strong> 2iC, e toda a tubagem associada, <strong>de</strong>vem ser usados por um só<br />
paciente e não <strong>de</strong>vem ser reutilizados por outras pessoas. Isto é <strong>de</strong> modo a<br />
que se possa evitar o risco <strong>de</strong> infecção cruzada.<br />
• Coloque sempre o dispositivo <strong>HumidAire</strong> 2iC a um nível abaixo da posição do<br />
paciente. Se este for colocado ao mesmo nível ou acima do paciente, a água<br />
quente po<strong>de</strong>rá escorrer pela tubagem <strong>de</strong> ar e para <strong>de</strong>ntro da máscara.<br />
80
• Não tente <strong>de</strong>smontar a estação <strong>de</strong> ancoragem do <strong>HumidAire</strong> 2iC. Não<br />
existem peças <strong>de</strong>ntro da mesma que possam ser reparadas pelo utilizador.<br />
Consertos e manutenção do interior só <strong>de</strong>verão ser levados a cabo por um<br />
agente <strong>de</strong> serviços autorizado.<br />
• Se líquidos forem <strong>de</strong>rramados aci<strong>de</strong>ntalmente na estação <strong>de</strong> ancoragem do<br />
<strong>HumidAire</strong> 2iC, retire o cabo <strong>de</strong> energia do CPAP, APAP ou dispositivo <strong>de</strong> dois<br />
níveis da tomada <strong>de</strong> corrente e <strong>de</strong>ixe que a estação <strong>de</strong> ancoragem escoe e<br />
seque antes <strong>de</strong> voltar a usar.<br />
• A câmara <strong>de</strong> água não <strong>de</strong>verá estar conectada à estação <strong>de</strong> ancoragem<br />
quando se estiver a transportar o <strong>HumidAire</strong> 2iC no saco <strong>de</strong> transporte.<br />
Coloque a câmara <strong>de</strong> água num compartimento aparte do saco <strong>de</strong> transporte.<br />
• Certifique-se <strong>de</strong> que a câmara <strong>de</strong> água se encontra vazia e seca antes <strong>de</strong><br />
transportar o <strong>HumidAire</strong> 2iC.<br />
• Não utilize o <strong>HumidAire</strong> 2iC se o dispositivo CPAP, APAP, ou <strong>de</strong> dois níveis<br />
possuir uma ficha ou cabo eléctrico danificados.<br />
• Há a possibilida<strong>de</strong> <strong>de</strong> que no caso do dispositivo ser colocado acima do nível<br />
do paciente e posteriormente <strong>de</strong>rrubado a máscara po<strong>de</strong>r-se-á encher <strong>de</strong> água.<br />
Por esta razão, o <strong>HumidAire</strong> 2iC <strong>de</strong>verá ser usado com cuidado em pacientes<br />
incapazes <strong>de</strong> proteger a sua via respiratória, ou incapazes <strong>de</strong> remover a<br />
máscara, como após uma apoplexia. Dever-se-á dar atenção aos relativos<br />
riscos e benefícios.<br />
• Não use o <strong>HumidAire</strong> 2iC se este não estiver a funcionar a<strong>de</strong>quadamente ou<br />
se qualquer parte do mesmo tiver sido <strong>de</strong>rrubada ou danificada.<br />
• Mantenha o cabo eléctrico afastado <strong>de</strong> superfícies aquecidas.<br />
• Não <strong>de</strong>ixe cair ou introduza objectos <strong>de</strong>ntro <strong>de</strong> aberturas ou tubos.<br />
• Não use o <strong>HumidAire</strong> 2iC na presença <strong>de</strong> materiais inflamáveis ou<br />
explosivos.<br />
Português<br />
Informação Médica<br />
81
O <strong>HumidAire</strong> 2iC<br />
Componentes do <strong>HumidAire</strong> 2iC<br />
Estação <strong>de</strong><br />
ancoragem<br />
Saída <strong>de</strong> ar<br />
Câmara <strong>de</strong> água<br />
Figura 1: Componentes do <strong>HumidAire</strong> 2iC<br />
Tampa <strong>de</strong> câmara<br />
<strong>de</strong> água<br />
Vedador<br />
Travessa<br />
Trinco<br />
corrediço<br />
Base <strong>de</strong> câmara <strong>de</strong> água<br />
Figura 2 : Componentes da câmara <strong>de</strong> água<br />
82
Preparar para uso<br />
Montagem do <strong>HumidAire</strong> 2iC<br />
!<br />
AVISO<br />
Certifique-se <strong>de</strong> que o dispositivo CPAP, APAP ou <strong>de</strong> dois níveis se encontra<br />
<strong>de</strong>sligado na tomada <strong>de</strong> energia eléctrica antes <strong>de</strong> conectar o<br />
<strong>HumidAire</strong> 2iC.<br />
1 Remova a tampa da frente do dispositivo. Para o fazer:<br />
1. Prima o trinco que se encontra por baixo da tampa da frente.<br />
2. Enquanto que prime o trinco, levante e puxe a tampa da frente do<br />
dispositivo. A tampa da frente <strong>de</strong>ver-se-á soltar da parte inferior e direita. A<br />
tampa da frente <strong>de</strong>verá continuar a estar presa ao lado esquerdo.<br />
Lado esquerdo<br />
Lado direito<br />
Tampa da frente<br />
Português<br />
Trinco<br />
3. Segure o dispositivo com a sua mão esquerda. Com a mão direita, puxe com<br />
firmeza o lado direito da tampa da frente para fora e em seguida para cima<br />
até que a totalida<strong>de</strong> da tampa da frente seja removida.<br />
Notas<br />
• Para voltar a colocar a tampa da frente:<br />
a. Alinhe o conector da saída <strong>de</strong> ar do interior da tampa da frente com a saída<br />
<strong>de</strong> ar do dispositivo.<br />
Preparar para uso<br />
83
. Empurre com firmeza a tampa da frente sobre o dispositivo até que esta<br />
se encaixe no seu lugar.<br />
• Não se esqueça <strong>de</strong> levar consigo a tampa <strong>de</strong> frente quando estiver a viajar,<br />
no caso <strong>de</strong> necessitar <strong>de</strong> usar o seu dispositivo CPAP, APAP ou <strong>de</strong> dois níveis<br />
sem o humidificador.<br />
2 Desconecte a câmara <strong>de</strong> água do <strong>HumidAire</strong> 2iC da estação <strong>de</strong> ancoragem. Para<br />
o fazer, levante o trinco que se encontra na parte inferior da câmara <strong>de</strong> água e<br />
separe a câmara <strong>de</strong> água da estação <strong>de</strong> ancoragem.<br />
3 Introduza a estação <strong>de</strong> ancoragem do humidificador (sem a câmara <strong>de</strong> água) no<br />
dispositivo até que esta se encaixe no seu lugar.<br />
Estação <strong>de</strong> ancoragem<br />
Notas<br />
• Em condições normais <strong>de</strong> funcionamento, não há necessida<strong>de</strong> <strong>de</strong> remover a<br />
estação <strong>de</strong> ancoragem do <strong>HumidAire</strong> 2iC assim que esteja fixa ao dispositivo<br />
CPAP, APAP ou <strong>de</strong> dois níveis. Se precisar <strong>de</strong> a remover, prima o trinco que se<br />
encontra por baixo da estação <strong>de</strong> ancoragem e puxe a mesma para fora do<br />
dispositivo.<br />
• Quando estiver a remover a estação <strong>de</strong> ancoragem, certifique-se <strong>de</strong> que a<br />
câmara <strong>de</strong> água é removida em primeiro lugar.<br />
84
4 Conecte o cabo eléctrico à tomada que se encontra na parte <strong>de</strong> trás do<br />
dispositivo. Conecte a outra extremida<strong>de</strong> do cabo eléctrico a uma tomada <strong>de</strong><br />
energia eléctrica.<br />
!<br />
AVISO<br />
• Certifique-se <strong>de</strong> que a unida<strong>de</strong> CPAP, APAP ou <strong>de</strong> dois níveis se encontra<br />
<strong>de</strong>sligada na tomada <strong>de</strong> energia eléctrica antes <strong>de</strong> conectar o<br />
<strong>HumidAire</strong> 2iC.<br />
• Certifique-se <strong>de</strong> que a ficha e o cabo eléctrico se encontram em boas<br />
condições e <strong>de</strong> que o equipamento não se encontra danificado.<br />
5 Coloque este dispositivo numa superfície plana e firme, na proximida<strong>de</strong> da sua<br />
cama. Certifique-se <strong>de</strong> que o dispositivo é colocado a um nível inferior em<br />
relação à posição do seu corpo quando está a dormir.<br />
!<br />
ATENÇÃO<br />
Tenha o cuidado <strong>de</strong> não colocar o dispositivo num local on<strong>de</strong> possa ser<br />
facilmente <strong>de</strong>rrubado.<br />
6 AVISO<br />
!<br />
Cabo<br />
eléctrico<br />
À tomada<br />
<strong>de</strong> energia<br />
elèctrica<br />
Não encha a câmara <strong>de</strong> água enquanto que esta se encontra fixa à estação<br />
<strong>de</strong> ancoragem e ao dispositivo CPAP, APAP ou <strong>de</strong> dois níveis.<br />
Vire a câmara <strong>de</strong> água <strong>de</strong> modo a que a saída <strong>de</strong> ar esteja a apontar para cima.<br />
Sobre uma pia, encha cuidadosamente a câmara <strong>de</strong> água através da saída <strong>de</strong> ar<br />
Português<br />
Preparar para uso<br />
85
até à linha <strong>de</strong> nível máximo <strong>de</strong> água que se encontra na parte lateral da base da<br />
câmara <strong>de</strong> água.<br />
Saída <strong>de</strong> ar<br />
Linha <strong>de</strong><br />
nível máximo<br />
<strong>de</strong> água<br />
O <strong>HumidAire</strong> 2iC <strong>de</strong>verá ser enchido com água fresca antes <strong>de</strong> ser usado.<br />
Certifique-se sempre <strong>de</strong> que a câmara <strong>de</strong> água se encontra limpa. Consulte<br />
"Limpeza e Manutenção" na página 15.<br />
!<br />
!<br />
AVISO<br />
• Não encha a câmara <strong>de</strong> água com água quente ou muito fria.<br />
• Não encha a câmara <strong>de</strong> água em <strong>de</strong>masia, uma vez que a água po<strong>de</strong><br />
entrar nos dispositivos CPAP, APAP ou <strong>de</strong> dois níveis, ou na tubagem <strong>de</strong><br />
ar.<br />
ATENÇÃO<br />
Não use aditivos, e em particular aditivos aromáticos (como óleos<br />
perfumados ou perfumes). Estes po<strong>de</strong>rão reduzir a capacida<strong>de</strong> <strong>de</strong><br />
humidificação do dispositivo e/ou causar a <strong>de</strong>terioração dos materiais da<br />
câmara <strong>de</strong> água.<br />
7 Introduza cuidadosamente e empurre a câmara <strong>de</strong> água cheia na estação <strong>de</strong><br />
ancoragem do humidificador (que já se encontra fixa ao CPAP, APAP ou<br />
dispositivo <strong>de</strong> dois níveis) até que esta encaixe no seu lugar. Certifique-se <strong>de</strong> que<br />
a câmara <strong>de</strong> água se encontra bem presa à estação <strong>de</strong> ancoragem.<br />
Estação <strong>de</strong> ancoragem<br />
Câmara <strong>de</strong> água<br />
86
!<br />
AVISO<br />
• Conecte sempre a estação <strong>de</strong> ancoragem do <strong>HumidAire</strong> 2iC antes <strong>de</strong><br />
conectar a câmara <strong>de</strong> água.<br />
• Para evitar a entrada <strong>de</strong> água no CPAP, APAP ou dispositivo <strong>de</strong> dois<br />
níveis, mova ou transporte a unida<strong>de</strong> com o <strong>HumidAire</strong> 2iC somente<br />
quando a câmara <strong>de</strong> água se encontrar vazia e completamente seca.<br />
8 Conecte com firmeza uma extremida<strong>de</strong> da tubagem <strong>de</strong> ar à saída <strong>de</strong> ar na câmara<br />
<strong>de</strong> água e a outra extremida<strong>de</strong> ao sistema <strong>de</strong> máscara.<br />
Sistema <strong>de</strong><br />
máscara<br />
Saída <strong>de</strong> ar<br />
Tubagem <strong>de</strong> ar<br />
O <strong>HumidAire</strong> 2iC está agora pronto a ser utilizado. Para iniciar o tratamento, ver<br />
“Instruções <strong>de</strong> Funcionamento” na página 89.<br />
Português<br />
Preparar para uso<br />
87
Instruções <strong>de</strong> Funcionamento<br />
Iniciar Tratamento<br />
O <strong>HumidAire</strong> 2iC <strong>de</strong>ver-se-á encontrar cheio com água fresca e fixo ao<br />
dispositivo CPAP, APAP ou <strong>de</strong> dois níveis, e com a tubagem <strong>de</strong> ar e sistema <strong>de</strong><br />
máscara conectados. Ver “Montagem do <strong>HumidAire</strong> 2iC” na página 83.<br />
1 Ligue o interruptor na tomada <strong>de</strong> corrente eléctrica. Ligue o interruptor principal<br />
<strong>de</strong> energia que se encontra na parte <strong>de</strong> trás da unida<strong>de</strong> para ON (Ligado).<br />
Interruptor<br />
principal<br />
<strong>de</strong> energia<br />
Quando o dispositivo se encontra ligado, é apresentada uma mensagem <strong>de</strong> Boas<br />
Vindas no mostrador <strong>de</strong> LCD.<br />
2 Caso a opção seja disponível, seleccione a opção <strong>de</strong> PASSOVER como<br />
humidificador no menu.<br />
!<br />
AVISO<br />
A selecção incorrecta <strong>de</strong> humidificador no menu do dispositivo po<strong>de</strong><br />
resultar numa administração insuficiente <strong>de</strong> terapia.<br />
Nota: Consulte o manual do utilizador relevante <strong>de</strong> CPAP, APAP ou <strong>de</strong> dois<br />
níveis para mais informações em como utilizar os menus.<br />
Português<br />
3 Coloque a sua máscara tal como é <strong>de</strong>scrito nas instruções do utilizador da<br />
máscara.<br />
!<br />
AVISO<br />
Antes <strong>de</strong> iniciar a terapia, certifique-se <strong>de</strong> estar a usar a máscara e <strong>de</strong> que a<br />
máscara e o tubo <strong>de</strong> ar se encontram bem colocados.<br />
4 Carregue na tecla da frente no painel <strong>de</strong> controle. Como alternativa, se o<br />
SmartStart se encontrar activado, basta simplesmente respirar para <strong>de</strong>ntro da<br />
máscara. O ar <strong>de</strong>verá então começar a circular a partir da unida<strong>de</strong>.<br />
Instruções <strong>de</strong> Funcionamento<br />
89
5 Deite-se e disponha a tubagem <strong>de</strong> ar <strong>de</strong> modo a que esta se possa mover no<br />
caso <strong>de</strong> se voltar enquanto dorme.<br />
!<br />
AVISO<br />
Não <strong>de</strong>ixe gran<strong>de</strong>s comprimentos <strong>de</strong> tubagem sobre a cabeceira da sua<br />
cama, visto que a tubagem po<strong>de</strong>r-se-á enrolar à volta da sua cabeça ou<br />
pescoço enquanto dorme.<br />
Parar o Tratamento<br />
Para parar o tratamento a qualquer altura, remova a sua máscara e prima o botão<br />
da frente. Como alternativa, e no caso da função SmartStart se encontrar activada,<br />
basta-lhe simplesmente remover a sua máscara para que o tratamento pare<br />
automaticamente.<br />
Sugestões Úteis<br />
!<br />
Sintomas <strong>de</strong> secura ainda presentes<br />
Se mesmo assim continuar a experimentar sintomas <strong>de</strong> secura, é possível que<br />
esteja a respirar pela boca. O respirar pela boca ou fugas <strong>de</strong> ar pela boca<br />
provocam secura e irritação na via respiratória superior. Se isto for um problema,<br />
talvez possa ser resolvido com uma máscara <strong>de</strong> face inteira ou uma correia para<br />
o queixo. Consulte o seu médico ou fornecedor <strong>de</strong> equipamento para mais<br />
informações.<br />
Infecção nasal ou doença<br />
Se sofrer <strong>de</strong> uma infecção nasal ou estiver constipado, assegure-se <strong>de</strong> limpar o<br />
<strong>HumidAire</strong> 2i cuidadosamente todos os dias. Não coloque óleos aromáticos ou<br />
<strong>de</strong>scongestivos na câmara <strong>de</strong> água.<br />
PRECAUÇÃO<br />
Não use aditivos, e em particular aditivos aromáticos (como óleos<br />
perfumados e perfumes). Estes po<strong>de</strong>rão reduzir a capacida<strong>de</strong> <strong>de</strong><br />
humidificação do dispositivo e/ou causar a <strong>de</strong>terioração dos materiais da<br />
câmara <strong>de</strong> água.<br />
Depósitos minerais escamosos<br />
Po<strong>de</strong>rá vir a observar um pó branco ou <strong>de</strong>pósitos na base da câmara <strong>de</strong> água.<br />
Estes, são <strong>de</strong>pósitos minerais da água da torneira. Para remover estes<br />
<strong>de</strong>pósitos, esfregue a base da câmara <strong>de</strong> água levemente com um <strong>de</strong>tergente<br />
<strong>de</strong> lava-pratos suave.<br />
Para evitar a formação <strong>de</strong>stes <strong>de</strong>pósitos, encha a câmara <strong>de</strong> água com água<br />
<strong>de</strong>smineralizada.<br />
90
Limpeza e manutenção<br />
Deve levar a cabo regularmente a limpeza e manutenção <strong>de</strong>scritas nesta secção.<br />
!<br />
AVISO<br />
Tome precauções contra o risco <strong>de</strong> electrocussão. Não mergulhe a unida<strong>de</strong><br />
ou cabo eléctrico em água. Antes <strong>de</strong> limpar, <strong>de</strong>sconecte sempre o cabo<br />
eléctrico da unida<strong>de</strong> e certifique-se <strong>de</strong> que a unida<strong>de</strong> se encontra seca antes<br />
<strong>de</strong> o voltar a conectar na tomada <strong>de</strong> energia eléctrica.<br />
1 Desligue (OFF) o interruptor principal <strong>de</strong> energia que se encontra na parte <strong>de</strong> trás<br />
da unida<strong>de</strong>, e <strong>de</strong>sconecte o cabo eléctrico da tomada <strong>de</strong> energia eléctrica.<br />
2 Remova a câmara <strong>de</strong> água. Para o fazer, levante o fecho que se encontra na parte<br />
inferior da câmara <strong>de</strong> água e separe a câmara <strong>de</strong> água da estação <strong>de</strong> ancoragem.<br />
3 Deite fora qualquer excesso <strong>de</strong> água virando a câmara <strong>de</strong> água ao contrário,<br />
permitindo que a água escorra através da saída <strong>de</strong> ar.<br />
4 Desmontar a câmara <strong>de</strong> água<br />
1. i. Para abrir os fechos laterais, puxe-os a partir da extremida<strong>de</strong> inferior.<br />
Português<br />
Fecho lateral<br />
2. Segure a câmara <strong>de</strong> água tal como é ilustrado em seguida:<br />
patilha da<br />
frente<br />
Limpeza e manutenção<br />
91
3. Separe a câmara <strong>de</strong> água afastando as duas meta<strong>de</strong>s uma da outra. Use o<br />
seu polegar para mover a patilha da frente para baixo.<br />
patilha da frente<br />
4. Remova o vedador <strong>de</strong>scolando-o a partir do interior da tampa.<br />
tampa<br />
vedador<br />
5. Remova a travessa do interior da base da câmara <strong>de</strong> água.<br />
travessa<br />
base<br />
5 Escorra a água restante.<br />
6 Limpeza<br />
CÂMARA DE ÁGUA<br />
Lave a tampa, vedador, travessa e base em água morna e <strong>de</strong>tergente suave ou<br />
na máquina <strong>de</strong> lavar-pratos. Enxágue bem com água da torneira e <strong>de</strong>ixe-os secar<br />
fora da luz directa do sol. Faça isto diariamente após cada utilização. Inspeccione<br />
a câmara <strong>de</strong> água para a possibilida<strong>de</strong> <strong>de</strong> <strong>de</strong>sgaste ou <strong>de</strong>terioração. Substitua<br />
quaisquer partes que se encontrem danificadas.<br />
!<br />
ATENÇÃO<br />
Não utilize nenhum dos seguintes produtos na limpeza <strong>de</strong> qualquer um dos<br />
componentes do <strong>HumidAire</strong> 2iC. Estas soluções po<strong>de</strong>m causar danos e<br />
reduzir a vida útil do produto<br />
• soluções com bases <strong>de</strong> lixívia, cloro, álcool ou amónia<br />
92
• sabões hidratantes, antibacterianos ou com base <strong>de</strong> glicerina<br />
• agentes <strong>de</strong> <strong>de</strong>smineralização da água e <strong>de</strong>sincrustação. Se estiver a<br />
usar uma máquina <strong>de</strong> lavar-pratos, evite usar os ciclos <strong>de</strong> alta<br />
intensida<strong>de</strong> e altas temperaturas (mais <strong>de</strong> 158°F/70°C). Não use<br />
<strong>de</strong>tergentes alcalinos fortes e auxiliares <strong>de</strong> enxaguamento.<br />
ESTAÇÃO DE ANCORAGEM<br />
Limpe o exterior da estação <strong>de</strong> ancoragem com um pano húmido. Faça-o<br />
periodicamente.<br />
7 Remontar a câmara <strong>de</strong> água<br />
Quando todos os componentes da câmara <strong>de</strong> água estiverem limpos e secos<br />
volte a montar a câmara <strong>de</strong> água da seguinte maneira:<br />
1. Coloque a travessa nos seus suportes <strong>de</strong>ntro da base da câmara <strong>de</strong> água.<br />
entalhes<br />
suportes<br />
suportes<br />
Português<br />
2. Ajuste o vedador no rebordo da base da câmara <strong>de</strong> água. Exerça pressão à<br />
volta da extremida<strong>de</strong> para se assegurar <strong>de</strong> que o vedador está ajustado<br />
a<strong>de</strong>quadamente.<br />
vedador<br />
rebordo<br />
Limpeza e manutenção<br />
93
3. Coloque a tampa sobre a base da câmara <strong>de</strong> água. Empurre uma contra a<br />
outra com firmeza para fechar.<br />
tampa<br />
4. Para fechar os fechos laterais consulte as ilustrações seguintes.<br />
Nota<br />
Se os fechos laterais se soltarem da câmara <strong>de</strong> água, volte a conectá-los tal<br />
como é ilustrado..<br />
Os fechos laterais são compostos por duas partes. Se eles se separarem volte a<br />
uni-los tal como é ilustrado. Introduza a extremida<strong>de</strong> mais pequena (a) da<br />
dobradiça (b) primeiro, segure-o na horizontal e empurre-o firmemente em<br />
lugar.<br />
a<br />
b<br />
94
Manutenção<br />
Este produto (<strong>HumidAire</strong> 2iC) <strong>de</strong>verá ser inspeccionado por um centro <strong>de</strong><br />
assistência técnica autorizado da ResMed 5 anos após a data <strong>de</strong> fabrico. Antes<br />
disto, o dispositivo <strong>de</strong>stina-se a proporcionar um funcionamento seguro e fiável<br />
<strong>de</strong>s<strong>de</strong> que a sua utilização e manutenção respeitem as instruções fornecidas<br />
pela ResMed. Os <strong>de</strong>talhes referentes à garantia ResMed aplicável são<br />
fornecidos com o dispositivo aquando da sua compra original. No entanto, e<br />
como é o caso <strong>de</strong> todos os dispositivos eléctricos, <strong>de</strong>verá ter cuidado e enviar o<br />
dispositivo a um centro <strong>de</strong> assistência técnica autorizado da ResMed no caso <strong>de</strong><br />
<strong>de</strong>tectar anomalias no mesmo.<br />
Português<br />
Limpeza e manutenção<br />
95
Detecção e Resolução <strong>de</strong> Problemas<br />
!<br />
Aquando da ocorrência <strong>de</strong> um problema, tente as sugestões seguintes. Se o<br />
problema não pu<strong>de</strong>r ser resolvido, contacte o seu fornecedor <strong>de</strong> equipamento ou<br />
a ResMed. Não tente abrir a unida<strong>de</strong>.<br />
AVISO<br />
Manutenção e consertos só <strong>de</strong>vem ser levados a cabo por um agente <strong>de</strong><br />
serviços autorizado. Sob nenhuma circunstância <strong>de</strong>verá tentar efectuar<br />
consertos ou manutenção você mesmo.<br />
Problema Possível Causa Solução<br />
A unida<strong>de</strong> não está a<br />
funcionar (nada é<br />
apresentado no<br />
mostrador digital)<br />
Fuga na câmara <strong>de</strong><br />
água<br />
O cabo eléctrico não está<br />
bem conectado.<br />
A unida<strong>de</strong> não está ligada.<br />
A tomada eléctrica po<strong>de</strong>rá<br />
estar avariada.<br />
A câmara <strong>de</strong> água po<strong>de</strong>rá<br />
estar danificada ou<br />
quebrada.<br />
Certifique-se <strong>de</strong> que o cabo eléctrico<br />
está bem conectado à tomada <strong>de</strong><br />
energia eléctrica.<br />
Certifique-se <strong>de</strong> que o interruptor que<br />
se encontra na parte <strong>de</strong> trás da unida<strong>de</strong><br />
está na posição <strong>de</strong> ligado (ON).<br />
Tente usar uma outra tomada eléctrica.<br />
Entre em contacto com o seu<br />
fornecedor para obter uma nova.<br />
Português<br />
A tampa po<strong>de</strong>rá não ter<br />
sido colocada<br />
correctamente.<br />
Empurre a tampa para baixo com<br />
firmeza.<br />
O vedador da câmara <strong>de</strong><br />
água po<strong>de</strong>rá estar torcido.<br />
Certifique-se <strong>de</strong> que o vedador foi<br />
colocado a<strong>de</strong>quadamente <strong>de</strong>ntro da<br />
câmara <strong>de</strong> água.<br />
Os fechos laterais não<br />
encaixam<br />
a<strong>de</strong>quadamente.<br />
Certifique-se <strong>de</strong> que os dois fechos<br />
laterais são bem engatados.<br />
Detecção e Resolução <strong>de</strong> Problemas<br />
97
Problema Possível Causa Solução<br />
O fluxo <strong>de</strong> ar é<br />
inexistente<br />
Água a salpicar na<br />
sua face<br />
Os tubos <strong>de</strong> ar não foram<br />
conectados<br />
a<strong>de</strong>quadamente.<br />
Os tubos <strong>de</strong> ar encontramse<br />
bloqueados, entalados<br />
ou perfurados.<br />
O dispositivo CPAP, APAP<br />
ou <strong>de</strong> dois níveis não está<br />
a funcionar<br />
a<strong>de</strong>quadamente.<br />
A câmara <strong>de</strong> água foi cheia<br />
em <strong>de</strong>masia.<br />
A câmara <strong>de</strong> água foi cheia<br />
em <strong>de</strong>masia.<br />
Conecte os tubos <strong>de</strong> ar tal como é<br />
<strong>de</strong>scrito em “Preparar para uso” na<br />
página 83.<br />
Desbloqueie ou liberte os tubos <strong>de</strong> ar.<br />
Verifique que não existem furos nos<br />
tubos <strong>de</strong> ar.<br />
Consulte a secção <strong>de</strong> Detecção e<br />
Resolução <strong>de</strong> Problemas no manual do<br />
dispositivo CPAP, APAP ou <strong>de</strong> dois<br />
níveis.<br />
Deite fora alguma água da câmara <strong>de</strong><br />
água. Certifique-se <strong>de</strong> que o nível <strong>de</strong><br />
água não se encontra acima da linha <strong>de</strong><br />
nível máximo <strong>de</strong> água.<br />
Deite fora alguma água da câmara <strong>de</strong><br />
água.<br />
98
Especificações Técnicas<br />
Dimensões (A x L x P)<br />
123 mm x 218 mm x 183 mm (4,8 in x 7,2 in x 8,6 in)(estação <strong>de</strong> ancoragem e<br />
câmara <strong>de</strong> água)<br />
Peso<br />
710 g (1,57 lb)(estação <strong>de</strong> ancoragem e câmara <strong>de</strong> água vazia)<br />
Construção da caixa<br />
Estação <strong>de</strong> ancoragem: Construída com termoplástico retardante à chama<br />
Câmara <strong>de</strong> água: Plástico moldado por injecção<br />
Condições ambientais<br />
Temperatura <strong>de</strong> funcionamento: +5°C a +40°C (+41°F a +104°F)<br />
Humida<strong>de</strong> <strong>de</strong> funcionamento: 10 a 95% sem con<strong>de</strong>nsação<br />
Temperatura <strong>de</strong> armazenamento e transporte: -20°C a +60°C (-4°F a +140°F)<br />
Humida<strong>de</strong> <strong>de</strong> armazenamento e transporte: 10 a 95% sem con<strong>de</strong>nsação<br />
Nota: O fabricante reserva o direito <strong>de</strong> alterações a estas especificações sem<br />
aviso prévio.<br />
Glossário <strong>de</strong> símbolos<br />
Atenção, consulte documentos anexos<br />
Português<br />
Nível máximo <strong>de</strong> água<br />
Especificações Técnicas<br />
99
Garantia Limitada<br />
A ResMed garante que o seu produto da ResMed está livre <strong>de</strong> <strong>de</strong>feitos <strong>de</strong><br />
material e mão-<strong>de</strong>-obra durante o período <strong>de</strong> tempo abaixo especificado, a partir<br />
da data <strong>de</strong> compra pelo consumidor original. Esta garantia não é transferível.<br />
Produto<br />
Umidificadores da ResMed, ResControl, ResLink, ResTraxx<br />
Geradores <strong>de</strong> fluxo da ResMed<br />
Acessórios, sistemas <strong>de</strong> máscara (incluindo armação da máscara,<br />
almofada, arnês e tubo). Exclui dispositivos <strong>de</strong> utilização única.<br />
Período da<br />
Garantia<br />
1 Ano<br />
2 Anos<br />
90 Dias<br />
Nota: Alguns mo<strong>de</strong>los não se encontram disponíveis em certas regiões.<br />
Se o produto falhar nas condições normais <strong>de</strong> utilização, a ResMed proce<strong>de</strong>rá,<br />
ao seu critério, à reparação ou substituição do produto <strong>de</strong>feituoso ou <strong>de</strong> qualquer<br />
um dos seus componentes. Esta Garantia Limitada não cobre:<br />
a) qualquer dano provocado em conseqüência <strong>de</strong> utilização ina<strong>de</strong>quada, abuso,<br />
modificação ou alteração do produto;<br />
b) reparações efetuadas por qualquer entida<strong>de</strong> <strong>de</strong> assistência técnica que não<br />
tenha sido expressamente autorizada pela ResMed para efetuar esse tipo <strong>de</strong><br />
reparação;<br />
c) qualquer dano ou contaminação <strong>de</strong>vidas ao fumo <strong>de</strong> cigarros, cachimbos,<br />
charutos ou outros;<br />
d) qualquer dano provocado pelo <strong>de</strong>rrame <strong>de</strong> água sobre ou para <strong>de</strong>ntro do<br />
gerador <strong>de</strong> fluxo.<br />
A garantia <strong>de</strong>ixa <strong>de</strong> ser válida se o produto for vendido, ou revendido, fora da<br />
região da compra original. Os pedidos <strong>de</strong> reparação ou substituição <strong>de</strong> um<br />
produto <strong>de</strong>feituoso no âmbito da garantia <strong>de</strong>vem ser feitos pelo consumidor<br />
original no local <strong>de</strong> compra.<br />
Esta garantia substitui todas as outras, explícitas ou implícitas, incluindo qualquer<br />
garantia implícita <strong>de</strong> comerciabilida<strong>de</strong> ou <strong>de</strong> a<strong>de</strong>quabilida<strong>de</strong> para <strong>de</strong>terminada<br />
utilização. Algumas regiões ou estados não permitem limitações <strong>de</strong> tempo sobre<br />
a duração <strong>de</strong> uma garantia implícita, pelo que a limitação acima po<strong>de</strong> não se<br />
aplicar ao seu caso.<br />
A ResMed não é responsável por quaisquer danos inci<strong>de</strong>ntais ou conseqüentes<br />
reivindicados como <strong>de</strong>correntes da venda, instalação ou uso <strong>de</strong> qualquer produto<br />
ResMed. Algumas regiões ou estados não permitem a exclusão ou limitação <strong>de</strong><br />
danos inci<strong>de</strong>ntais ou conseqüentes, pelo que a limitação acima po<strong>de</strong> não se<br />
aplicar ao seu caso. Esta garantia confere-lhe direitos legais específicos e po<strong>de</strong><br />
ter outros direitos que variam <strong>de</strong> região para região.<br />
Para mais informações sobre seus direitos <strong>de</strong> garantia, entre em contacto com<br />
o reven<strong>de</strong>dor local da ResMed ou os escritórios da ResMed.<br />
R001-307/2 05 06<br />
100
Índice remissivo<br />
A<br />
Avisos e Precauções 80<br />
C<br />
Condições ambientais 99<br />
Construção da caixa 99<br />
Contra-indicações 80<br />
D<br />
Definições 79<br />
Dimensões 99<br />
E<br />
Especificações Técnicas 99<br />
G<br />
Garantia Limitada 100<br />
Glossário <strong>de</strong> símbolos 99<br />
I<br />
Informação Médica 80<br />
Iniciar Tratamento 89<br />
Instruções <strong>de</strong> Funcionamento 89<br />
Português<br />
L<br />
Limpeza 91<br />
M<br />
Montagem 83<br />
P<br />
Peso 99<br />
Preparar para uso 83<br />
R<br />
Responsabilida<strong>de</strong> do Usuário/Proprietário<br />
79<br />
S<br />
SmartStart 90<br />
Sugestões Úteis 90<br />
U<br />
Uso Indicado 80<br />
Índice remissivo<br />
101