AVR 1550 Receptor de audio/vídeo - Hci-services.com
AVR 1550 Receptor de audio/vídeo - Hci-services.com
AVR 1550 Receptor de audio/vídeo - Hci-services.com

Create successful ePaper yourself
Turn your PDF publications into a flip-book with our unique Google optimized e-Paper software.
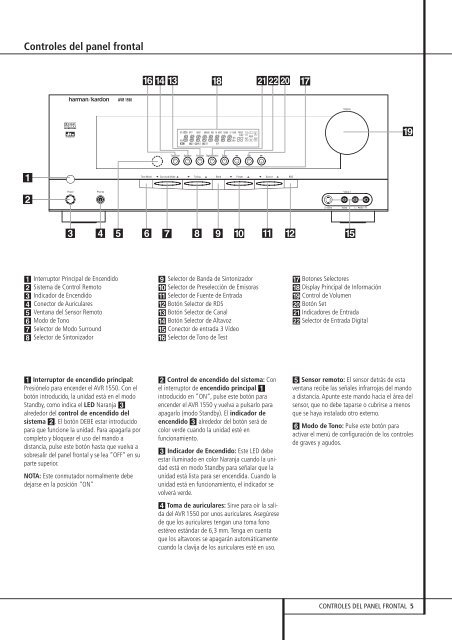
Controles <strong>de</strong>l panel frontal<br />
^ $ # * Ô appleÓ<br />
&<br />
(<br />
1<br />
2<br />
3 4 5 6 7 8 9 ) ! @ %<br />
1 Interruptor Principal <strong>de</strong> Encendido<br />
2 Sistema <strong>de</strong> Control Remoto<br />
3 Indicador <strong>de</strong> Encendido<br />
4 Conector <strong>de</strong> Auriculares<br />
5 Ventana <strong>de</strong>l Sensor Remoto<br />
6 Modo <strong>de</strong> Tono<br />
7 Selector <strong>de</strong> Modo Surround<br />
8 Selector <strong>de</strong> Sintonizador<br />
9 Selector <strong>de</strong> Banda <strong>de</strong> Sintonizador<br />
) Selector <strong>de</strong> Preselección <strong>de</strong> Emisoras<br />
! Selector <strong>de</strong> Fuente <strong>de</strong> Entrada<br />
@ Botón Selector <strong>de</strong> RDS<br />
# Botón Selector <strong>de</strong> Canal<br />
$ Botón Selector <strong>de</strong> Altavoz<br />
% Conector <strong>de</strong> entrada 3 Ví<strong>de</strong>o<br />
^ Selector <strong>de</strong> Tono <strong>de</strong> Test<br />
& Botones Selectores<br />
* Display Principal <strong>de</strong> Información<br />
( Control <strong>de</strong> Volumen<br />
Ó Botón Set<br />
Ô Indicadores <strong>de</strong> Entrada<br />
apple Selector <strong>de</strong> Entrada Digital<br />
1 Interruptor <strong>de</strong> encendido principal:<br />
Presiónelo para encen<strong>de</strong>r el <strong>AVR</strong> <strong>1550</strong>. Con el<br />
botón introducido, la unidad está en el modo<br />
Standby, <strong>com</strong>o indica el LED Naranja 3<br />
alre<strong>de</strong>dor <strong>de</strong>l control <strong>de</strong> encendido <strong>de</strong>l<br />
sistema 2. El botón DEBE estar introducido<br />
para que funcione la unidad. Para apagarla por<br />
<strong>com</strong>pleto y bloquear el uso <strong>de</strong>l mando a<br />
distancia, pulse este botón hasta que vuelva a<br />
sobresalir <strong>de</strong>l panel frontal y se lea ”OFF” en su<br />
parte superior.<br />
NOTA: Este conmutador normalmente <strong>de</strong>be<br />
<strong>de</strong>jarse en la posición "ON"<br />
2 Control <strong>de</strong> encendido <strong>de</strong>l sistema: Con<br />
el interruptor <strong>de</strong> encendido principal 1<br />
introducido en ”ON”, pulse este botón para<br />
encen<strong>de</strong>r el <strong>AVR</strong> <strong>1550</strong> y vuelva a pulsarlo para<br />
apagarlo (modo Standby). El indicador <strong>de</strong><br />
encendido 3 alre<strong>de</strong>dor <strong>de</strong>l botón será <strong>de</strong><br />
color ver<strong>de</strong> cuando la unidad esté en<br />
funcionamiento.<br />
3 Indicador <strong>de</strong> Encendido: Este LED <strong>de</strong>be<br />
estar iluminado en color Naranja cuando la unidad<br />
está en modo Standby para señalar que la<br />
unidad está lista para ser encendida. Cuando la<br />
unidad está en funcionamiento, el indicador se<br />
volverá ver<strong>de</strong>.<br />
4 Toma <strong>de</strong> auriculares: Sirve para oír la salida<br />
<strong>de</strong>l <strong>AVR</strong> <strong>1550</strong> por unos auriculares. Asegúrese<br />
<strong>de</strong> que los auriculares tengan una toma fono<br />
estéreo estándar <strong>de</strong> 6,3 mm. Tenga en cuenta<br />
que los altavoces se apagarán automáticamente<br />
cuando la clavija <strong>de</strong> los auriculares esté en uso.<br />
5 Sensor remoto: El sensor <strong>de</strong>trás <strong>de</strong> esta<br />
ventana recibe las señales infrarrojas <strong>de</strong>l mando<br />
a distancia. Apunte este mando hacia el área <strong>de</strong>l<br />
sensor, que no <strong>de</strong>be taparse o cubrirse a menos<br />
que se haya instalado otro externo.<br />
6 Modo <strong>de</strong> Tono: Pulse este botón para<br />
activar el menú <strong>de</strong> configuración <strong>de</strong> los controles<br />
<strong>de</strong> graves y agudos.<br />
CONTROLES DEL PANEL FRONTAL 5