InterfaccIa DOPPIO PrOtOcOLLO DOUBLe PrOtOcOL ... - Phonocar
InterfaccIa DOPPIO PrOtOcOLLO DOUBLe PrOtOcOL ... - Phonocar
InterfaccIa DOPPIO PrOtOcOLLO DOUBLe PrOtOcOL ... - Phonocar

You also want an ePaper? Increase the reach of your titles
YUMPU automatically turns print PDFs into web optimized ePapers that Google loves.
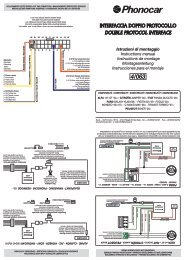
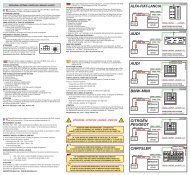
COLLEGAMENTI USCITE SERVIZI •out aux connection • BRANCHEMENTS SORTIES DES SERVICES<br />
ANSCHLUSS DER FUNKTIONS-AUSGÄNGE • CONEXIONES SALIDAS DE LOS SERVICIOS<br />
I cavi non utilizzati devono essere isolati.<br />
The cable not used must be isolated.<br />
Les câbles qui ne sont pas utilisés doivent être isoles.<br />
Die nicht-verwendeten Kabel bitte unbedingt isolieren.<br />
Los cables que no se utilizan tienen que ser necesariamente aislados.<br />
22 21 20 19 18 17 16 15 14 13 12<br />
Interfaccia <strong>DOPPIO</strong> PROTOCOLLO<br />
DOUBLE PROTOCOL INTERFACE<br />
Odometro<br />
Odometer<br />
Odomètre<br />
Tacho<br />
Odómetro<br />
(-) Freno a mano<br />
(-) Hand brake<br />
(-) Frein a main<br />
(-) Handbremse<br />
(-) Freno de mano<br />
(+12 V) Sotto chiave<br />
(+12 V) Under key<br />
(+12 V) Après contact<br />
(+12V) Zünd-Plus<br />
(+12 V) Bajo-llave<br />
ROSSO-GRIGIO / RED-GREY<br />
GIALLO-BIANCO / YELLOW-WHITE<br />
11 10 9 8 7 6 5 4 3 2 1<br />
BLU-GIALLO / BLUE-YELLOW<br />
BLU / BLUE<br />
ARANCIONE / ORANGE<br />
(+12 V) Con accensione fari<br />
(+12 V) Lighting on cable<br />
(+12 V) Avec allumage des phares<br />
(+12V) beim Einschalten<br />
der Scheinwerfer<br />
(+12 V) Con las luces encendidas<br />
(+12 V) Con innesto retromarcia<br />
(+12 V) Into reverse<br />
(+12 V) Avec mise marche arrière<br />
(+12V) beim Einlegen<br />
des Rückwärtsgangs<br />
(+12 V) Con la activación<br />
de la Marcha atrás<br />
Istruzioni di montaggio<br />
Instructions manual<br />
Instructions de montage<br />
Montageanleitung<br />
Instrucciones para el montaje<br />
4/063<br />
COMPATIBILITÀ • COMPATIBILITY • COMPATIBILITÉ • KOMPATIBILITÄT • COMPATIBILIDAD<br />
ALFA 147-GT ‘04> / CITROËN JUMPER ‘06> / FIAT PANDA-DUCATO ‘06><br />
FORD GALAXY-KUGA‘08> - FIESTA‘02>‘09 - FOCUS ‘02><br />
MONDEO ‘06>’07> - C-MAX/S-MAX ‘06> - TRANSIT-TORNEO ‘07><br />
PEUGEOT BOXER ‘06><br />
S.p.A. - Via F.lli Cervi, 167/C - 42124 Reggio Emilia (Italy) - Tel. ++39 0522 941621 - Fax ++39 0522 942452<br />
www.phonocar.com - e-mail:info@phonocar.it<br />
COLLEGAMENTI SU CONNETTORI ORIGINALI • CONNECTION ON ORIGINALS CONNECTORS<br />
BRANCHEMENT SUR LES CONNECTEURS ORIGINAUX • ANSCHLUSS AN ORIGINAL-VERBINDE<br />
CONEXIONES CON CONECTORES DE ORIGEN<br />
ALFA 147-GT - FIAT DUCATO - CITROËN JUMPER - PEUGEOT BOXER<br />
BATTERY<br />
+12 V<br />
NERO / BLACK<br />
ROSSO / RED<br />
INTERFACE<br />
4/063<br />
GRIGIO / GREY<br />
ROSA-BIANCO / PINK-WHITE<br />
VERDE-NERO / GREEN-BLACK<br />
VERDE / GREEN<br />
BIANCO-NERO / WHITE-BLACK<br />
CONNETTORE NEL VANO AUTORADIO<br />
Connector inside the radio-opening<br />
connecteur dans l'emplacement autoradio<br />
Verbinder im Radio-Schacht<br />
CONECTOR EN EL HUECO DEL AUTORADIO<br />
SPEAKERS<br />
CAR RADIO<br />
USCITA COMANDI AL VOLANTE<br />
STEERING WHEEL COMANDS OUTPUT<br />
COLLEGAMENTI AUTORADIO •CAR RADIO CONNECTION<br />
CONNEXION AUTORADIO • AUTORADIO-ANSCHLUSS • CONEXIONES AUTORADIO<br />
ALPINE - CLARION - JVC - PIONEER - SONY - PHONOCAR VM040-VM041<br />
CAR RADIO<br />
Uscita Comandi al volante / Remote<br />
Exit Steering-Wheel Comands / Remote<br />
Sorti des commandes au volant / Remote<br />
Ausgang Lenkrad-Steuerungen / Remote<br />
Salida Mandos de volante / Remoto<br />
Connettore personalizzato marchio autoradio<br />
Personalized Connector per Radio-Model<br />
Connecteur personnalisé marque autoradio<br />
Radio-spezifischer Verbinder<br />
Conector personalizado marca autoradio<br />
SONY<br />
PIONEER<br />
PHONOCAR VM040-VM041<br />
ALPINE<br />
INTERFACE<br />
4/063<br />
CLARION<br />
JVC<br />
Connettore originale dell’auto.<br />
Original Car-Connector<br />
Connecteur original du véhicule<br />
Original-Verbinder des Wagens<br />
Conector original del coche<br />
BLAUPUNKT - PANASONIC - PHONOCAR - KENWOOD ‘06><br />
FORD C-MAX - S-MAX - FIESTA '06> - FOCUS '06> - GALAXI '07> - KUGA - MONDEO '07><br />
TRANSIT - TORNEO<br />
CONNETTORE NEL VANO AUTORADIO<br />
Connector inside the radio-opening<br />
connecteur dans l'emplacement autoradio<br />
Verbinder im Radio-Schacht<br />
CONECTOR EN EL HUECO DEL AUTORADIO<br />
CAR RADIO<br />
Uscita Comandi al volante / Remote<br />
Exit Steering-Wheel Comands / Remote<br />
Sorti des commandes au volant / Remote<br />
Ausgang Lenkrad-Steuerungen / Remote<br />
Salida Mandos de volante / Remoto<br />
Non collegare<br />
Do NOT connect.<br />
Ne connectez pas.<br />
NICHT anschließen<br />
No xconectar<br />
INTERFACE<br />
4/063<br />
BATTERY<br />
+12 V<br />
NERO / BLACK<br />
ROSSO / RED<br />
INTERFACE<br />
4/063<br />
VERDE-NERO<br />
GREEN-BLACK<br />
ROSA -BIANCO/ PINK-WHITE<br />
BIANCO / WHITE<br />
VERDE / GREEN<br />
CAR RADIO<br />
Connettore personalizzato marchio autoradio<br />
Personalized Connector per Radio-Model<br />
Connecteur personnalisé marque autoradio<br />
Radio-spezifischer Verbinder<br />
Conector personalizado marca autoradio<br />
PANASONIC<br />
KENWOOD<br />
PHONOCAR<br />
(escluso VM040-VM041)<br />
BLAUKPUNKT<br />
Connettore originale dell’auto.<br />
Original Car-Connector<br />
Connecteur original du véhicule<br />
Original-Verbinder des Wagens<br />
Conector original del coche<br />
USCITA COMANDI AL VOLANTE<br />
STEERING WHEEL COMANDS OUTPUT<br />
Con connettore diverso non è garantita la compatibilità. • With other connector the compatibility is not warranted<br />
• Avec des connecteurs différents, la compatibilité n’est pas assurée • Bei andersartigem Verbinder ist<br />
die Kompatibilität leider nicht gewährleistet.• Con un conector diferente no se garantiza la compatibilidad.
1<br />
2<br />
3<br />
4<br />
PROGRAMMAZIONE • PROGRAMMING • PROGRAMMATION • PROGRAMMIERUNG • PROGRAMACION<br />
ON<br />
Sequenza d’installazione • INSTALLATION SEQUENCE • Séquence d’installation<br />
Installations-Vorgang • Secuencia de instalación<br />
Collegamenti / Connections / Branchements / Anschluss<br />
Memorizzazione Comandi al volante / Storage Steering Wheel / Mémorisation commandes au volant<br />
Einspeicherung der Lenkrad-Steuerungen<br />
Memorizzazione servizi / Services storage / Mémorisation des services / Einspeicherung Services<br />
Memorizzazione marchio autoradio / Car-radio storage / Einspeicherung der Autoradio-Marke<br />
Mémorisation profil autoradio /<br />
OFF<br />
1 2 3 4<br />
Sequenza di memorizzazione<br />
Sequence storage<br />
I - Posizione dei commutatori per tutti i modelli auto<br />
GB - Swicth position for all car type<br />
FR - Position des commutateurs pour tous les modèles de voiture<br />
D - Schalter-Stellung für die diversen Auto-Modelle<br />
E - Posición de los conmutadores para todos los modelos de coches<br />
DESCRIZIONE DELLE FUNZIONI PRESENTI SUI TASTI AUTORADIO<br />
Functions description of the car radio bottom<br />
DESCRIPTION DES FONCTIONS PRÉSENTES SUR LES TOUCHES DE L’AUTORADIO<br />
BESCHREIBUNG DER EINZELNEN AUTORADIO-TASTEN UND DEREN FUNKTION<br />
DESCRIPCIÓN DE LAS FUNCIONES PRESENTES EN EL TECLADO DEL AUTORADIO<br />
CAR RADIO<br />
Clarion Kenwood JVC Pioneer Sony Alpine Panasonic Panasonic Blaunpunkt <strong>Phonocar</strong><br />
car AV<br />
1<br />
2<br />
3<br />
4<br />
VOLUME -<br />
VOLUME +<br />
SEEK -<br />
SEEK +<br />
5 Func Source Source Mode Source Source Mode Mode Source Mode<br />
6 Mute Mute Mute Mute Mute Mute Mute Mute Mute Mute<br />
7 Band Up Up Up Up Band Pwr Pwr Up Play/Pause<br />
8 Disp Down Down Down Down Up Prog Prog Down Band<br />
MEMORIZZAZIONE MANUALE COMANDI AL VOLANTE<br />
I - Dopo aver effettuato i collegamenti, senza inserire il jack comandi al volante nel retro dell’autoradio<br />
ruotare la chiave di accensione ed il led si illuminerà con un lampeggio di colore rosso.<br />
- Per memorizzare correttamente le funzioni sui tasti dei comandi al volante, eseguire la programmazione<br />
iniziando dalla funzione (VOLUME -).<br />
- Premere il comando al volante VOLUME - ed il led si illuminerà con un lampeggio di colore rosso che conferma<br />
l’avvenuta memorizzazione. Lo stesso metodo dovrà essere utilizzato per memorizzare le restanti funzioni.<br />
ATTENZIONE: La centralina è predisposta per eseguire 8 funzioni che dovranno essere TUTTE Attivate o<br />
Disattivate. L’attivazione avviene premendo i tasti presenti sul volante, mentre la disattivazione avviene premendo<br />
il tasto PRG presente sulla centralina.<br />
Esempio di procedura per la programmazione di un’autoradio Clarion con disponibilità sul volante di 5 tasti<br />
volendo ottenere i comandi di Vol-, Vol+, Seek-, Seek+, MUTE.<br />
Sequenza: premere una sola volta Vol-, Vol+, Seek-, Seek+, il tasto PRG sulla centralina per disattivare la<br />
funzione (FUNC), il tasto destinato al comando MUTE ed infine premere 2 volte il tasto PRG per<br />
completare la programmazione. L’avvenuta corretta programmazione, sarà confermata dal lampeggiare<br />
continuo del LED di colore rosso.<br />
MEMORIZZAZIONE AUTOMATICA DEI SERVIZI<br />
Un programma ad auto apprendimento, eseguirà l’aquisizione dei dati. A memorizzazione avvenuta, il<br />
led lampeggerà con colore verde e continuerà a lampeggiare fino a quando si selezionerà il marchio dell’<br />
autoradio. Se il led della centralina non lampeggierà di colore verde verificare la compatibilità.<br />
GB - STORAGE MANUAL STEERING WHEEL CONTROLS<br />
Once the connections have been carried out, turn the ignition key without inserting the steeringwheel<br />
commands-Jack into the back of the car-radio. The Led will turn on red.<br />
- To correctly memorize the functions of the steering-wheel commands, start programming from function (VOLU-<br />
ME-). Press VOLUME- on the Steering-Wheel, so that the Led will switch Red, confirming that memorization has<br />
successfully been carried out. The same memorization-procedure has to be used also for all remaining functions.<br />
ATTENTION: The Central-Box is ready to effect 8 different Functions, ALL of which have to be Activated or<br />
De-Activated. For Activation, press the Steering-Wheel-keys. For De-Activation, press the PRG-key situated on<br />
the Central-Unit. Example for the programming-procedure of a CLARION-radio, with 5 keys available on the<br />
Steering-Wheel, and the aim of memorizing the functions Vol- Vol+ Seek- Seek+ and Mute. Related procedure:<br />
press one time only, the keys Vol- Vol+ Seek- Seek+, the PRG-key on the Central-unit in order to de-activate the<br />
function (FUNC), and the Mute-key. Finally, press 2 times the PRG-key to complete the programming-phase.<br />
Once the programming-phase has been correctly completed, the LED will turn RED and continue<br />
flashing.<br />
STORAGE AUTOMATIC SERVICES<br />
An automatic software will search and keep the data. Once the function has been correctly completed the led<br />
will turn green and continue flashing till the operator press the car radio trade mark. If the led of the central box<br />
doesn’t flash green colour please check the compatibility table<br />
FR - MÉMORISATION MANUELLE DES COMMANDES AU VOLANT<br />
Après avoir effectués les branchements, tourner la clé de démarrage, sans introduire le Jack des commandes au<br />
volant sur le dos de l’autoradio. Le Led devient rouge.<br />
- Pour mémoriser correctement les fonctions sur les touches des commandes au volant,<br />
faire la programmation en commençant par la touche VOLUME-<br />
- Appuyer le commande au volant VOLUME- et le LED s’illuminera avec un clignotement de couleur rouge<br />
qui confirme la réussite de la mémorisation. La même méthode sera utilisée pour mémoriser les fonctions<br />
restantes ATTENTION la centrale est prédisposée à l’exécution de 8 fonctions qui devront tous être mises<br />
en marches ou être débranchées. La mise en marche se fait en appuyant les touches qu’on trouve sur le volant,<br />
par contre le débranchement se fait en appuyant sur la touche PRG qu’on trouve sur la centrale.<br />
Exemple de procédure pour la programmation d’une autoradio CLARION avec 5 touches sur le volant, si<br />
on veut obtenir les commandes de Vol-, Vol+, Seek-, Seek+, MUTE.<br />
Procédure: appuyer une seule fois Vol-, Vol+, Seek-, Seek+, la touche PRG sur la centrale pour<br />
débrancher la fonction, la touche prédestinée au commande MUTE et enfin appuyer 2 fois la touche PRG<br />
pour compléter la programmation. La correcte programmation sera confirmée par le clignotement continu<br />
du LED de couleur rouge.<br />
MÉMORISATION AUTOMATIQUE DES SERVICES<br />
Un programme de détection automatique fera l’acquisition des données. Une fois que la mémorisation est<br />
terminée, le led clignotera en vert et continuera à clignoter jusqu’à la sélection de la marque de l’autoradio.<br />
D - MANUELLE SPEICHERUNG DER LENKRAD-STEUERUNGEN<br />
Sobald die Verbindungen hergestellt sind, Zündschlüssel drehen. Jack-Verbinder für die Lenkradsteuerungen<br />
dabei NICHT am Autoradio einstecken. Das Led leuchtet nun rot auf.<br />
- Um die Funktionen korrekt auf die Lenkrad-Steuerungstasten abzustimmen, die Einspeicherungs-Prozedur,<br />
beginnend von der Funktion (VOLUME-), vornehmen.<br />
- Taste VOLUME- auf dem Lenkrad drücken: das Led leuchtet somit ROT auf und bestätigt dadurch die erfolgte<br />
Einspeicherung. Dieselbe Einspeicherungs-Prozedur auch bei allen übrigen Funktionen vornehmen.<br />
- HINWEIS: die Zentral-Einheit kann insgesamt 8 verschiedene Funktionen übernehmen, wobei man alle<br />
Funktionen entweder AKTIVIEREN oder DE-AKTIVIEREN muss. Zur Aktivierung, bitte die Lenkrad-Tasten<br />
drücken. Zur De-Aktivierung, PRG-Taste auf der Zentral-Einheit drücken. Beispiel einer Programmierungs-Proze<br />
dur, für ein CLARION-Autoradio, mit 5 verfügbaren Lenkrad-Steuerungstasten und dem Ziel, die Funktionen Vol-<br />
Vol+ Seek- Seek+ und Mute, einzuspeichern.<br />
Hier notwendige Prozedur: ein Mal drücken auf: Vol- Vol+ Seek- Seek+ und auch auf PRG (auf der Zentral-Einheit,<br />
um die Funktion FUNC zu de-aktivieren) und Mute. Dann, vier Mal auf PRG-Taste drücken, um die<br />
Programmierungs-Phase abzuschließen.<br />
Sobald die Programmierung korrekt durchgeführt worden ist, leuchtet das LED ROT auf und blinkt kontinuierlich.<br />
AUTOM. SPEICHERUNG DER FUNKTIONEN<br />
Ein selbst-lernendes Programm ermittelt alle notwendigen Daten und speichert diese ein. Daraufhin blinkt<br />
das Led so lange grün, bis die Autoradio-Marke eingegeben wird. Sollte das Led der Zentral-Einheit nicht<br />
grün blinken, bitte die Kompatibilitätsliste zu Hilfe holen.<br />
MEMORIZACION MANUAL DE LOS MANDOS DE VOLANTE<br />
E - Después de efectuar las conexiones, sin insertar el jack del mando de volante en la parte trasera del autoradio.<br />
Girar la llave de encendido, el Led se iluminará con un destello de color rojo.<br />
- Para memorizar correctamente las funciones de las teclas del los mandos del volante, ejecutar la programación<br />
empezando por la función de VOLUMEN -<br />
- Pulsar el mando de volante VOLUMEN - el Led puesto en la centralita parpadeará una vez color rojo esto<br />
confirma que se ha memorizado correctamente. Con el mismo procedimiento se tendrán que memorizar las<br />
demás funciones.<br />
- ATENCION: La centralita esta predispuesta para ejecutar 8 funciones que tendrán que ser todas Activadas o<br />
Desactivadas.<br />
- La activación se consigue pulsando las teclas puestas en el volante, mientras que la desactivación se consigue<br />
pulsando la tecla PRG presente en la centralita. Ejemplo de cómo configurar la centralita del interfaz con un<br />
autoradio de Clarion con un teclado de 5 funciones en el volante para obtener los mandos de Vol.-, Vol+.<br />
Seek-, Seek+, MUTE.Secuencia: presionar una vez Vol -, Vol +, Seek-, Seek+, la tecla PRG de la centralita para<br />
desactivar la función (Func). La tecla destinada al mando MUTE, y a continuación presionar 2 veces la tecla PRG<br />
para completar la programación. Si el proceso de configuración es correcto el Led de la centralita parpadeará de<br />
continuo de color roco.<br />
MEMORIZACION AUTOMATICA DE LOS SERVICIOS<br />
Un programa de auto aprendizaje , ejecutará la adquisición de los datos. Una vez que la memorización ha<br />
sido ejecutada con éxito, el Led parpadeará de color verde y seguirá parpadeando hasta que se seleccione<br />
la marca del autoradio. En el caso de que el Led no parpadease en color verde verificar la tabla de<br />
compatibilidad.<br />
MEMORIZZAZIONE MARCHIO AUTORADIO • CAR-RADIO SELECTION • SELECTION AUTORADIO<br />
AUTORADIO-WAHL • SELECCIÓN AUTORADIO • MEMORIZACIÓN MARCA AUTORADIO<br />
AUTORADIO / CAR-RADIO PREMERE / PRESS N. LAMPEGGI / FLASH PREMERE / PRESS<br />
CLARION non premere / do not press 1 led verde / green SEEK +<br />
KENWOOD 1 volta / once Vol + 2 led verde / green SEEK +<br />
JVC 2 volte / times Vol + 3 led verde / green SEEK +<br />
PIONEER 3 volte / times Vol + 4 led verde / green SEEK +<br />
SONY - PHONOCAR VM040-041 4 volte / times Vol + 5 led verde / green SEEK +<br />
ALPINE 5 volte / times Vol + 6 led verde / green SEEK +<br />
PANASONIC 7 volte / times Vol + 8 led verde / green SEEK +<br />
PANASONIC Car AV 8 volte / times Vol + 9 led verde / green SEEK +<br />
BLAUPUNKT 9 volte / times Vol + 1 led rosso / red SEEK +<br />
PHONOCAR 11 volte / times Vol + 1 led rosso / red + 2 verdi / green SEEK +<br />
VM020 - VM021 - VM022 - VM023<br />
PHONOCAR VM016 12 volte / times Vol + 2 led rosso / red + 3 verdi / green SEEK +<br />
PHONOCAR VM030 - VM031 - VM032 13 volte / times Vol + 3 led rosso / red + 4 verdi / green SEEK +<br />
PHONOCAR VM017 15 volte / times Vol + 4 led rosso / red + 5 verdi / green SEEK +<br />
I - Per effettuare la selezione agire sui comandi al volante: premendo VOLUME+ si seleziona il marchio<br />
autoradio. Premendo SEEK si memorizza.<br />
Es.: per memorizzare Alpine, premere 5 volte il tasto Volume+, il Led verde eseguirà cicli di 6 lampeggi rapidi<br />
e una pausa, premere SEEK per memorizzare.<br />
Nel caso che la selezione non sia corretta, verificare il numero di lampeggi corrispondenti al marchio e variarli,<br />
utilizzando i tasti VOLUME+ per aumentarli e VOLUME- per diminuirli.<br />
A memorizzazione ultimata, il Led s’illuminerà di verde.<br />
RESET DISPOSITIVO:<br />
Senza togliere il circuito dall’alimentazione, premere il tasto PRG fino a quando led verde non si spegne.<br />
GB - To select the radio-model installed in the car, act on the steering-wheel commands:<br />
press VOLUME+ to select the radio-model; press SEEK to memorize.<br />
Ex.: for the programming-procedure of a ALPINE-radio press 5 times the Volume+ key, the green Led swicth whit<br />
six quickly flash and one stop, press SEEK key to memorize.<br />
Should the selection not be correct, please check the number of blinkings indicated for the radio-model and,<br />
if necessary, rectify by pressing VOLUME+ (to increase) or VOLUME- (to reduce).<br />
When memorization has ben completed, the Led will turn green.<br />
RE-SETTING OF DEVICE: Without interrupting the power-supply to the circuit, press the PRG-key until the<br />
green Led goes off. The Led will flash red, for some seconds, and then turn green, until a different radiomodel<br />
is selected.<br />
FR - Pour sélectionner le modèle d’autoradio installée dans la voiture, utiliser les commandes au volant:<br />
Appuyer sur la touche VOLUME+ pour sélectionner la marque d’autoradio.Appuyer sur la touche SEEK pour<br />
mémoriser.<br />
Exemple: pour mémoriser Alpine, appuyer 3 fois sur la touche Volume+. Le Led commence à clignoter en<br />
cycles de 4 clignotements rapids et une pause. Appuyer sur SEEK pour mémoriser.<br />
Dans le cas où la sélection ne résulte pas correcte, vérifier les clignotements selon la marque autoradio et, si<br />
nécessaire, modifier. Appuyer VOLUME+ (pour augmenter) ou VOLUME- (pour réduire).<br />
Quand la mémorisation a été complètée, le Led tourne vert.<br />
RE-PROGRAMMATION (RESET): Sans interrompre l’alimentation du circuit, appuyer sur la touche PRG<br />
jusqu’à ce que le Led Vert s’éteint. Le Led clignotera Rouge pour quelques secondes, puis il retournera Vert<br />
jusqu’au moment où on sélectionnera un autre modèle d’autoradio.<br />
D - Um das Modell des installierten Autoradios zu wählen, Lenkradfernbedienung wie folgt verwenden:<br />
VOLUME+ so oft drücken, wie für das in Frage kommende Autoradio vorgesehen.<br />
Dann SEEK drücken, um die Eingabe zu bestätigen.<br />
Wurde die Wahl falsch getroffen, Blink-Anzahl nach Radio-Tabelle kontrollien und nach Bedarf korrigieren:<br />
zum Erhöhen VOLUME+ drücken; zum Verringern VOLUME- drücken.<br />
Nach positiv abgeschlossener Einspeicherung leuchtet das Led grün auf.<br />
RE-SET DER VORRICHTUNG: Vorrichtung weiterhin am Strom angeschlossen halten. Taste PRG drücken,<br />
bis das grüne Led erlischt. Das Led wird einige Sekunden lang rot blinken, dann auf Grün umschalten, bis<br />
ein anderes Radiomodell gewählt wird.<br />
E - Para seleccionar el modelo de autoradio instalado accionar los mandos del volante:<br />
VOLUMEN+ para seleccionar el autoradio, en base al número de veces que viene pulsado y SEEK para la<br />
memorización.<br />
En el caso de que la selección no sea correcta, verificar el número de impulsos correspondientes y variarlos,<br />
utilizando las teclas VOLUMEN + para aumentarlos y VOLUMEN - para disminuirlos.<br />
Una vez memorizado, el Led se iluminará de color verde.<br />
RESET DISPOSITIVO: Sin quitar la alimentación del circuito, pulsar la tecla PRG hasta que el Led verde no<br />
se apague.<br />
El Led parpadeará en color rojo durante unos segundos, después cambiará a verde en espera de la selección<br />
del nuevo modelo de radio.<br />
SOLO PER AUTORADIO BLAUPUNKT • ONLY FOR BLAUPUNKT CAR-RADIO<br />
Uniquement pour les autoradios BLAUPUNKT • NUR FÜR BLAUPUNKT-AUTORADIOS<br />
SOLO PARA AUTORADIO BLAUPUNKT.<br />
I - Aprire il dispositivo e inserire il “JUMPER” nella giusta posizione.<br />
GB - Open the device and to insert the “JUMPER” into the correct positions.<br />
F - Ouvrir le dispositif et introduire le “JUMPER” dans la position prévue.<br />
D - Öffnen und die “JUMPER” in die notwendige Position geben.<br />
E - Abrir el dispositivo e introducir los “JUMPER” (puentes) en la posición adecuada.