instruction manual manual de instrucciones - Avanti Products
instruction manual manual de instrucciones - Avanti Products
instruction manual manual de instrucciones - Avanti Products

You also want an ePaper? Increase the reach of your titles
YUMPU automatically turns print PDFs into web optimized ePapers that Google loves.
INSTRUCTION MANUAL<br />
MANUAL DE INSTRUCCIONES<br />
Mo<strong>de</strong>l Number / No. <strong>de</strong> Mo<strong>de</strong>lo:<br />
G2002CW / G2003CSS / G2404CW / G2405CSS<br />
GAS RANGE<br />
COCINA DE GAS<br />
BEFORE USE, PLEASE READ AND FOLLOW ALL SAFETY RULES AND OPERATING<br />
INSTRUCTIONS. AND SAVE FOR LOCAL GAS AND ELECTRICAL INSPECTOR’S USE.<br />
La sección en español empieza en la página 30.<br />
<strong>Avanti</strong> <strong>Products</strong> has a policy of continuous improvement on its products and reserves the right to change materials and<br />
specifications without notice.<br />
<strong>Avanti</strong> <strong>Products</strong>, A Division of The Mackle Co., Inc.<br />
P.O. Box 520604 - Miami, Florida 33152<br />
www.avantiproducts.com
TABLE OF CONTENTS<br />
Range Safety 4<br />
Important Safegui<strong>de</strong>s 5<br />
The Anti-tip Bracket 6<br />
Help Us Help You … 7<br />
Parts and Features 8 - 9<br />
Before Using Your Gas Range 10 - 11<br />
Important Precautions and Recommendations 12 - 14<br />
How to use the top burners 15 - 16<br />
How to use the Gas oven 17 - 19<br />
Oven light 20<br />
Care and Maintenance 22 - 25<br />
Replacing the Oven Light 22<br />
Leveling the Range 25<br />
Anti-bracket installation 26<br />
Troubleshooting Gui<strong>de</strong> 27 - 28<br />
Service for Your Appliance 28<br />
Your <strong>Avanti</strong> <strong>Products</strong> Warranty 29<br />
Instrucciones en Español 30 - 56<br />
Registration Information and Registration Card 57<br />
3
RANGE SAFETY<br />
Your safety and the safety of others are very important.<br />
We have provi<strong>de</strong>d many important safety messages in this <strong>manual</strong> and on your appliance. Always<br />
read and obey all safety messages.<br />
This is the Safety Alert Symbol.<br />
This symbol alerts you to potential hazards that can kill or injure you and others.<br />
All safety messages will follow the Safety Alert Symbol and either the words<br />
“DANGER”, “WARNING” or “CAUTION”. These words mean:<br />
Danger means that failure to heed this<br />
safety statement may result in severe<br />
personal injury or <strong>de</strong>ath.<br />
Warning means that failure to heed this<br />
safety statement may result in extensive<br />
product damage, serious personal injury, or<br />
<strong>de</strong>ath.<br />
Caution means that failure to heed this<br />
safety statement may result in minor or<br />
mo<strong>de</strong>rate personal injury, or property or<br />
equipment damage.<br />
All safety messages will alert you what the potential hazard is, tell you how to reduce the chance of<br />
injury, and let you know what can happen if the <strong>instruction</strong>s are not followed.<br />
IN THE COMMONWEALTH OF MASSACHUSETTS<br />
• This product must be installed by a licensed plumber or gas fitter.<br />
• When using ball-type gas shut-off valves, they shall be the T-handle type.<br />
• A flexible gas connector, when used, must not exceed 3 feet in length.<br />
BEFORE YOU BEGIN!<br />
Installation of this range must conform with all local co<strong>de</strong>s, or in the absence of<br />
local co<strong>de</strong>s, with the National Fuel Gas Co<strong>de</strong>, ANSI Z223.1 / NFPA.54, latest<br />
edition.<br />
In Canada, installation co<strong>de</strong>, CAN/CGA-B149.1 or the current Propane<br />
installation co<strong>de</strong>, CAN/CGA-B149.2, and with local co<strong>de</strong>s where applicable.<br />
Installation in Manufacturered (Mobile) Homes:<br />
The installation must conform with the Manufactured Home Construction and<br />
Safety standard, Title 24 CFR, Part 3280 [formerly the Fe<strong>de</strong>ral Standard for<br />
Mobile Home Construction and Safety, Title 24, HUD (Part 280)} or, when such<br />
standard is not applicable, the Standard for Manufactured Home Installations,<br />
ANSI/NCSBCS A225.1, or with local co<strong>de</strong>s where applicable.<br />
4
IMPORTANT SAFEGUIDES<br />
Before the appliance is used, it must be properly positioned and installed as<br />
<strong>de</strong>scribed in this <strong>manual</strong>, so read the <strong>manual</strong> carefully. To reduce the risk of<br />
fire, electrical shock or injury when using the appliance, follow basic<br />
precaution, including the following:<br />
• It is recommen<strong>de</strong>d that a separate circuit, serving only your appliance be provi<strong>de</strong>d. Use<br />
receptacles that cannot be turned off by a switch or pull chain.<br />
• Never clean appliance parts with flammable fluids. These fumes can create a fire hazard or<br />
explosion. And do not store or use gasoline or other flammable vapors and liquids in the vicinity of<br />
this or any other appliance. The fumes can create a fire hazard or explosion.<br />
• Before proceeding with cleaning and maintenance operations, make sure the power line of the<br />
unit is disconnected.<br />
• Unplug the appliance or disconnect power before cleaning or servicing. Failure to do so can result<br />
in electrical shock or <strong>de</strong>ath.<br />
• Do not attempt to repair or replace any part of your appliance unless it is specifically<br />
recommen<strong>de</strong>d in this <strong>manual</strong>. All other servicing should be referred to a qualified technician.<br />
WARNING: If the information in this <strong>manual</strong> is not followed exactly, a fire or<br />
explosion may result causing property damage, personal injury or <strong>de</strong>ath.<br />
• This appliance shall not be used for space heating. The surface unit should not be operated<br />
without cookware. This information is based on safety consi<strong>de</strong>rations.<br />
• All openings in the wall behind the appliance and in the floor un<strong>de</strong>r the appliance shall be sealed.<br />
• Keep appliance area clear and free from combustible materials, gasoline, and other flammable<br />
vapors.<br />
• Do not obstruct the flow of ventilation air.<br />
• Disconnect the electrical supply to the appliance before servicing.<br />
• When removing appliance for cleaning and/or service:<br />
• Disconnect AC power supply.<br />
• Carefully remove the range by pulling outward.<br />
CAUTION: Range is heavy. Use care in handling.<br />
• The misuse of oven door (e.g. stepping, sitting, or leaning on them) can result in potential hazards<br />
and /or injuries.<br />
• When installing or removing the range for service, a rolling life jack should be used. Do not push<br />
against any of the edges of the range in an attempt to sli<strong>de</strong> it into or out of the installation.<br />
Pushing or pulling a range (rather than using a lift jack) also increases the possibility of bending<br />
the leg spindles or the internal coupling connectors.<br />
• It is important for the appliance to be leveled in or<strong>de</strong>r to work properly. You may need to make<br />
several adjustments to level it.<br />
• Never allow children to operate, play with or crawl insi<strong>de</strong> the appliance.<br />
• Electrical Grounding Instructions - The appliance must be installed and groun<strong>de</strong>d by a qualified<br />
technician in accordance with the National Electrical Co<strong>de</strong> ANSI/NFPA No. 70 (Latest Edition)<br />
and local electrical co<strong>de</strong> requirements.<br />
• Replacement Parts – Only authorized replacement parts may be used in performing service on<br />
the range. Replacement parts are available from factory authorized parts distributors. Contact the<br />
nearest <strong>Avanti</strong> service center in your area.<br />
5
THE ANTI-TIP BRACKET<br />
The range will not tip during normal use. However, the range can tip if you apply too much<br />
force or weight to the open door without the anti-tip bracket fastened down properly.<br />
To reduce the risk of tipping the appliance, the appliance must be secured by properly<br />
installed anti-tip <strong>de</strong>vices packed with the appliance.<br />
WARNING<br />
• ALL RANGES CAN TIP<br />
• INJURY TO PERSON COULD RESULT<br />
• INSTALL ANTI-TIP DEVICE PACKED<br />
WITH RANGE<br />
• SEE INSTALLATION INSTRUCTIONS<br />
Range Foot<br />
Anti-tip Bracket<br />
Making sure the anti-tip bracket is installed:<br />
• Sli<strong>de</strong> range forward.<br />
• Look for the anti-tip bracket securely attached to floor.<br />
• Sli<strong>de</strong> range back so rear range foot is un<strong>de</strong>r anti-tip<br />
bracket.<br />
6
HELP US HELP YOU...<br />
Read this gui<strong>de</strong> carefully.<br />
It is inten<strong>de</strong>d to help you operate and maintain<br />
your new Gas Range properly.<br />
Keep it handy to answer your questions.<br />
If you don't un<strong>de</strong>rstand something or you<br />
need more assistance, please call:<br />
<strong>Avanti</strong> Customer Service<br />
800-220-5570<br />
Keep proof of original purchase date (such as<br />
your sales slip) with this gui<strong>de</strong> to establish the<br />
warranty period.<br />
Write down the mo<strong>de</strong>l and serial numbers.<br />
You'll find them on a plate located on the front<br />
bottom wall of the Gas Range.<br />
Please write these numbers here:<br />
____________________________________<br />
Date of Purchase<br />
____________________________________<br />
Mo<strong>de</strong>l Number<br />
____________________________________<br />
Serial Number<br />
Use these numbers in any correspon<strong>de</strong>nce or<br />
service calls concerning your Gas Range.<br />
If you received a damaged Gas Range,<br />
immediately contact the <strong>de</strong>aler (or buil<strong>de</strong>r) that<br />
sold you the Electric Range.<br />
Save time and money. Before you call for<br />
service, check the Troubleshooting Gui<strong>de</strong>. It<br />
lists causes of minor operating problems that<br />
you can correct yourself.<br />
IF YOU NEED SERVICE<br />
We're proud of our service and want you to be<br />
pleased. If for some reason you are not happy<br />
with the service you receive, here are some<br />
steps to follow for further assistance.<br />
FIRST, contact the people who serviced your<br />
Gas Range. Explain why you are not pleased.<br />
In most cases, this will solve the problem.<br />
NEXT, if you are still not pleased, write all the<br />
<strong>de</strong>tails, including your telephone number, and<br />
send it to:<br />
Customer Service<br />
<strong>Avanti</strong> <strong>Products</strong><br />
10880 NW 30 Street<br />
Miami, FL 33172<br />
7
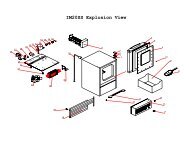
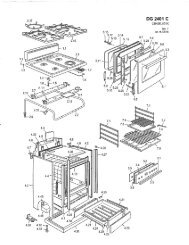
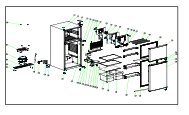
PARTS & FEATURES<br />
1 Cooktop<br />
2 Control Panel<br />
3 Oven Door Handle<br />
4 Oven Door<br />
5 Leveling Legs<br />
6 Anti-tip Bracket<br />
7 Backsplash<br />
8 Oven Vent<br />
9 Oven Light<br />
10 Broiler Burner<br />
11 Broiler Pan<br />
12 Oven Racks (Total 2)<br />
13 Bake Burner<br />
14 Rating Plate Location<br />
15 Removable Storage Drawer<br />
with Integrated Handle<br />
8
‣ COOKTOP<br />
1. Auxiliary burner (AUX) - 3000 BTU/hr<br />
2. Right semi-rapid burner (SR) - 4600 BTU/hr<br />
3. Left semi-rapid burner (SR) - 4600 BTU/hr<br />
4. Rapid burner (R) - 8600 BTU/hr<br />
Note:<br />
-The electric gas-lighting <strong>de</strong>vice is incorporated<br />
into the knobs.<br />
3<br />
2<br />
CAUTION:<br />
If the burner is acci<strong>de</strong>ntally extinguished,<br />
turn the gas off at the control knob and wait<br />
at least 1 minute before attempting to<br />
relight.<br />
CAUTION:<br />
Gas appliances produce heat and humidity<br />
in the environment in which they are<br />
installed.<br />
Ensure that the cooking area is well<br />
ventilated following national/local co<strong>de</strong>s.<br />
4<br />
1<br />
‣ CONTROL PANEL<br />
‣ CONTROLS DESCRIPTION<br />
Cooktop Controls<br />
Oven Controls<br />
5 Front Left Burner Control Knob 9 Oven Light ON / OFF Switch<br />
6 Rear Left Burner Control Knob 10 Oven Temperature Control Knob<br />
7 Rear Right Burner Control Knob<br />
8 Front Right Burner Control Knob<br />
9
BEFORE USING YOUR GAS RANGE<br />
WARNING!!<br />
HAVE THIS RANGE INSTALLED BY A QUALIFIED INSTALLER.<br />
Improper installation, adjustment, alteration, services, or maintenance can cause injury<br />
or property damage. Consult a qualified installer, service agency, or the gas supplier.<br />
‣ Before Using Your Gas Range<br />
Remove the exterior and interior packing.<br />
Remove the protective film on steel and aluminum parts<br />
Check to be sure you have all of the parts listed below<br />
• Backsplash<br />
• LP Gas Conversion Packet<br />
• Anti-tip bracket<br />
• 4 Leveling Legs<br />
• 2 Cooking grids<br />
• 2 Oven racks<br />
• 4 Caps and bases in the burner assembly<br />
• 5 Burner Knobs<br />
• Broiler Tray<br />
• Regulator<br />
Clean the interior surface with lukewarm water using a soft cloth<br />
Have the installer show you the location of the range’s gas shut-off valve and how to shut it<br />
off if necessary.<br />
Have your range installed and properly groun<strong>de</strong>d by a qualified installer in accordance with<br />
the installation <strong>instruction</strong>s.<br />
Do not attempt to repair or replace any part of your range unless it is specifically<br />
recommen<strong>de</strong>d in this <strong>manual</strong>.<br />
Be sure your range is correctly adjusted by a qualified service technician or installer for the<br />
type of gas (natural or LP) that is being used.<br />
Do not remove permanently affixed labels, warnings, or plates from the product. This may<br />
void the warranty.<br />
The installer should leave these <strong>instruction</strong>s with the consumer who should retain for local<br />
inspector’s use and for future reference.<br />
Please observe all local and national co<strong>de</strong>s and ordinances.<br />
10
‣ Important:<br />
This appliance is <strong>de</strong>signed and manufactured solely for the cooking of domestic (household) food and<br />
is not suitable for any non domestic application and therefore CANNOT be used in a commercial<br />
environment.<br />
The appliance guarantee will be void if the appliance is used within a non domestic environment i.e. a<br />
semi commercial, commercial or communal environment.<br />
Read the <strong>instruction</strong>s carefully before installing and using the appliance.<br />
CAUTION: this appliance must only be installed in a permanently ventilated room in<br />
compliance with the applicable regulations.<br />
It is advised to follow these <strong>instruction</strong>s:<br />
<br />
<br />
<br />
Clean the interior of the oven with a clean cloth soaked in water and <strong>de</strong>tergent (neutral, then dry<br />
carefully).<br />
Furnish the interior of the oven by inserting the shelves and tray.<br />
Turn the oven on to the maximum temperature to eliminate any possible traces of grease from<br />
the oven burner. The same operation should be followed for the broiler burner.<br />
‣ Assembling the Backsplash:<br />
It is MANDATORY to install the backsplash as it also serves as the oven vent.<br />
Assemble the backsplash as shown.<br />
a) Screw the two (2) screws “A” in the appropriate holes on each si<strong>de</strong> of the backsplash.<br />
b) Screw the central screw in the middle portion of the backsplash.<br />
11
PRECAUTIONS & RECOMMENDATIONS<br />
‣ IMPORTANT PRECAUTIONS AND RECOMMENDATIONS<br />
After having unpacked the appliance, check to ensure that it is not damaged and that the oven door<br />
closes correctly. In case of doubt, do not use it and consult your supplier or a professionally qualified<br />
technician.<br />
Packing elements (i.e. plastic bags, polystyrene foam, nails, packing straps, etc.) should not be left<br />
around within easy reach of children, as these may cause serious injuries.<br />
The packaging material is recyclable and is marked with the recycling symbol .<br />
<br />
<br />
<br />
<br />
<br />
<br />
<br />
<br />
<br />
<br />
<br />
<br />
<br />
<br />
<br />
Do not attempt to modify the technical characteristics of the appliance as this may cause danger<br />
to users.<br />
Do not carry out cleaning or maintenance operations on the appliance without having previously<br />
disconnected it from the electric power supply.<br />
If you should <strong>de</strong>ci<strong>de</strong> not to use this appliance any longer (or <strong>de</strong>ci<strong>de</strong> to substitute an ol<strong>de</strong>r mo<strong>de</strong>l),<br />
before disposing of it, it is recommen<strong>de</strong>d that it be ma<strong>de</strong> inoperative in an appropriate manner in<br />
accordance to health and environmental protection regulations, ensuring in particular that all<br />
potentially hazardous parts be ma<strong>de</strong> harmless, especially in relation to children who could play<br />
with unused appliances.<br />
Remove the door before disposal to prevent entrapment..<br />
After use, ensure that the knobs are in OFF position.<br />
Do not allow children or other unqualified people to use the appliance without your supervision.<br />
During and after use of the range, certain parts will become very hot. Do not touch hot parts.<br />
Keep children away from the range when it is in use<br />
Fire risk! Do not store flammable material in the oven or in the bottom drawer.<br />
Make sure that electrical cables connecting other appliances in the proximity of the range cannot<br />
come into contact with the hob or become entrapped in the oven door.<br />
Do not line the oven walls top and bottom with aluminium foil. Do not place shelves, pans,<br />
backing trays broil tray or other cooking utensils on the base of the oven chamber.<br />
The manufacturer <strong>de</strong>clines all liability for injury to persons or damage to property caused by<br />
incorrect or improper use of the appliance.<br />
To avoid any possible hazard, the appliance must be installed by qualified personnel only. Any<br />
repairs by unqualified persons may result in electric shock or short circuit. In or<strong>de</strong>r to avoid<br />
possible injuries to your body or to the appliance, do not attempt any repairs by yourself. Such<br />
work should be carried out by qualified service personnel only.<br />
Danger of burns! The oven and cooking accessories may become very hot during operation.<br />
Make sure children are kept out of reach and warn them accordingly.To avoid burns use kitchen<br />
clothes and gloves when handling hot parts or utensils.<br />
Stand away from the range when opening oven door. Hot air or steam which escapes can cause<br />
burns to hands, face, and/or eyes.<br />
Never clean the oven with a high-pressure steam cleaning <strong>de</strong>vice, as it may provoke a short<br />
circuit.<br />
This appliance is inten<strong>de</strong>d for use in your household. Never use the appliance for any other<br />
purpose!<br />
12
‣ IMPORTANT PRECAUTIONS AND RECOMMENDATIONS FOR USE OF<br />
ELECTRICAL APPLIANCES<br />
Use of any electrical appliance implies the necessity to follow a series of fundamental rules.<br />
In particular:<br />
✓ Never touch the appliance with wet hands or feet;<br />
✓ Do not operate the appliance barefooted;<br />
✓ Do not allow children or disabled people to use the appliance without your supervision.<br />
The manufacturer cannot be held responsible for any damages caused by improper,<br />
incorrect or unreasonable use of the appliance<br />
‣ GENERAL INFORMATION<br />
WARNING!!<br />
1. This appliance shall not be used for space heating. This information is based on safety<br />
consi<strong>de</strong>rations.<br />
2. AlI openings in the wall behind the appliance and in the floor un<strong>de</strong>r the appliance shall be<br />
sealed.<br />
3. Keep appliance area clear and free from combustible materials, gasoline, and other<br />
flammable vapors.<br />
4. Do not obstruct the flow of combustion and ventilation air.<br />
5. Disconnect the electrical supply to the appliance before servicing.<br />
6. When removing appliance for cleaning and/or service;<br />
A. Shut off gas at main supply.<br />
B. Disconnect AC power supply.<br />
C. Disconnect gas line to the inlet pipe.<br />
D. Carefully remove the range by pulling outward.<br />
CAUTION: Range is heavy; use care in handling.<br />
7. The misuse of oven door (e.g. stepping, sitting, or leaning on them) can result in potential<br />
hazards and/or injuries.<br />
8. When installing or removing the range for service, a rolling lift jack should be used. Do not<br />
push against any of the edges of the range in an attempt to sli<strong>de</strong> it into or out of the<br />
installation. Pushing or pulling a range (rather than using a lift jack) also increases the<br />
possibility of bending the leg spindles or the internal coupling connectors.<br />
13
WARNING!!<br />
‣ ELECTRICAL GROUNDING INSTRUCTIONS<br />
FOR PERSONAL SAFETY, THIS APPLIANCE MUST BE PROPERLY GROUNDED.<br />
This appliance is equipped with a three-prong grounding plug for your protection against<br />
shock hazard and should be plugged directly into a properly groun<strong>de</strong>d socket. Do not cut or<br />
remove the grounding prong from the plug.<br />
Do not un<strong>de</strong>r any circumstances cut or remove the third (ground) prong from the<br />
power plug. Electrical installation should comply with national and local co<strong>de</strong>s.<br />
‣ REPLACEMENT PARTS<br />
Only authorized replacement parts may be used in performing service on the range.<br />
Replacement parts are available from factory authorized parts distributors. Contact the<br />
nearest AVANTI parts distributor in your area.<br />
CARBON MONOXIDE WARNING:<br />
Carbon Monoxi<strong>de</strong> is a possible danger when using any gas powered<br />
appliance.<br />
All gas appliances MUST be installed by a licensed professional who is<br />
familiar with the Carbon Monoxi<strong>de</strong> levels appropriate for each appliance.<br />
The American Gas Association publishes CO emissions for appliances and<br />
heating equipment through the ANSI Std. Z21.1<br />
The EPA reports that a maximum CO (Carbon Monoxi<strong>de</strong>) level of 9 PPM<br />
over a 24 hour period is the resi<strong>de</strong>ntial interior ambient level standard.<br />
( A properly ventilated home will have a normal CO level of less than 5<br />
PPM.)<br />
NON-VENTED GAS COOKING APPLIANCES:<br />
In a resi<strong>de</strong>ntial application are normally used for a short period of time.<br />
The CO generated during the operation will disperse to the air in the home<br />
and be purged to the outsi<strong>de</strong> through the normal air exchange.<br />
14
‣ GAS BURNERS<br />
HOW TO USE THE TOP BURNERS<br />
Gas flow to the burners is adjusted by turning the knobs which control the valves. Turning the knob so<br />
that the indicator line points to the symbols printed on the panel achieves the following functions:<br />
FIGURE 4 FIGURE 5<br />
= Closed valve<br />
= Maximum rate<br />
LO = Minimum rate<br />
The maximum aperture position permits rapid boiling of liquids, whereas the minimum aperture<br />
position allows simmer warming of food or maintaining boiling conditions of liquids.<br />
To reduce the gas flow to minimum, rotate the knob further counter-clockwise to point the LO position.<br />
Other intermediate operating adjustments can be achieved by positioning the indicator between the<br />
maximum and minimum aperture positions, and never between the maximum aperture and<br />
positions.<br />
When the range is not being used, set the gas knobs to their<br />
shut-off valve placed on the main gas supply line.<br />
positions and also close the gas<br />
‣ LIGHTING GAS BURNERS<br />
In or<strong>de</strong>r to light the burner, you must:<br />
1 – Turn the knob in an anti-clockwise direction up to the position (maximum rate), push in and hold the knob<br />
until the flame has been lit. The sparks produced by the lighter situated insi<strong>de</strong> the relative burner will light the flame.<br />
In the event that the local gas supply conditions makes it difficult to light the burner in<br />
knob in LO position.<br />
2 – Adjust the gas valve to the <strong>de</strong>sired position.<br />
HI position, try again with the<br />
To re-light the burner, return the knob to the<br />
position and repeat the operations for lighting.<br />
Caution! The range becomes very hot during operation. Keep children well out<br />
of reach.<br />
15
‣ CHOICE OF BURNER (Fig.6)<br />
DIAMETERS OF PANS WHICH MAY BE USED ON THE TOP BURNERS<br />
Figure 6<br />
BURNER MINIMUM MAXIMUM<br />
Auxiliary 4" 23/32 (12 cm) 5" 1/2 (14 cm)<br />
Semirapid 6" 19/64 (16 cm) 9" 7/16 (24 cm)<br />
Rapid 9" 7/16 (24 cm) 10" 15/64 (26 cm)<br />
Do not use pans with concave or convex bases<br />
The symbols printed on the panel above the gas knobs indicate the correspon<strong>de</strong>nce between the<br />
knob and the burner.<br />
The most suitable burner is to be chosen according to the diameter and volume capacity of the<br />
container to be warmed.<br />
It is important that the diameter of the pots or pans suitably match the heating potential of the burners<br />
in or<strong>de</strong>r not to jeopardize the efficiency of the burners, bringing about a waste of gas fuel.<br />
A small diameter pot or pan placed on a large burner does not necessarily mean that boiling<br />
conditions are reached quicker.<br />
High – Altitu<strong>de</strong> effects on burners:<br />
The surface burners used on this unit range from 3,000 BTU to 8,600 BTU on<br />
natural gas installation un<strong>de</strong>r 2,000 feet above sea level. Burner strength is <strong>de</strong>rated<br />
by 4% per 1000 feet.<br />
16
HOW TO USE THE GAS OVEN<br />
‣ GENERAL FEATURES<br />
The gas oven is provi<strong>de</strong>d with two burners:<br />
a) Oven burner, mounted on the lower part of the oven:<br />
G2002CW/G2003CSS: 8800 BTU/hr<br />
G2404CW/G2003CSS: 9500 BTU/hr<br />
c) Broil burner, mounted on the upper part of the oven:<br />
G2002CW/G2003CSS: 7200 BTU/hr<br />
G2404CW/G2003CSS: 8000 BTU/hr<br />
‣ USING THE OVEN FOR THE FIRST TIME<br />
It is advised to follow these <strong>instruction</strong>s<br />
– Insert shelves and tray<br />
– Turn the oven on to the maximum temperature (position 550) to eliminate possible traces of<br />
grease from the oven burner. The same operation should be followed for the broiler burner(knob on<br />
position BROIL)<br />
– Switch off the electrical supply, let the oven cool down, then clean the interior of the oven with<br />
cloth soaked in water and <strong>de</strong>tergent (neutral) then dry carefully.<br />
‣ OVEN BURNER<br />
It carries out normal “oven cooking”.<br />
The gas flow to the burner is regulated by a thermostat which allow to maintain the oven temperature<br />
constant.<br />
The control of the temperature is assured by a thermostatic probe positioned insi<strong>de</strong> the oven.<br />
The probe must be always kept in its housing, in a clean condition, as an incorrect position or<br />
encrustment may cause an alteration in the control of the temperature.<br />
FIGURE 8<br />
GAS OVEN SETTING<br />
Number printed on the knob<br />
Temperature<br />
in °F<br />
Corresponding<br />
temperature<br />
in °C<br />
200 93<br />
250 121<br />
300 149<br />
350 177<br />
400 204<br />
450 232<br />
500 260<br />
550 280<br />
17
‣ OVEN THERMOSTAT<br />
The numbers printed on the control panel (fig. 8) indicate the increasing oven temperature value (°F).<br />
To regulate the temperature, set the chosen number onto the control knob indicator.<br />
The position BROIL serves only to turn on the broil burner.<br />
N.B. When the range is not being used, set the gas knobs to their<br />
gas shut-off valve placed on the main gas supply line.<br />
positions and also close the<br />
VERY IMPORTANT The oven/broil shall be used always with the door closed.<br />
‣ IGNITION OF THE OVEN BURNER<br />
The thermostat allows the automatic control of the temperature.<br />
The gas <strong>de</strong>livery to the oven burner is controlled by a two way thermostatic tap (oven and broil<br />
burners) with flame-failure <strong>de</strong>vice.<br />
To light the oven burner operate as follows:<br />
1) Open the oven door to its full extent.<br />
WARNING: Risk of explosion! The oven door must be open during this<br />
operation.<br />
2) Lightly press and turn the thermostat knob anti-clockwise (fig. 9) to max position or 550ºF<br />
FIGURE 9 FIGURE 10<br />
A<br />
3) Press the knob right down to prime the electric ignition and the “Bi, Bi” sound will be heard and<br />
keep the knob pressed until the ovenl burner is lit.<br />
In case of power cut, press the knob and immediately approach a lighted match to the opening “A”<br />
(fig. 10).<br />
Never continue this operation for more than 15 seconds. If the burner has still not ignited, wait<br />
for about 1 minute prior to repeating the ignition.<br />
4) For the first time to use or after long-time not used, wait about 10/15 seconds after the burner<br />
lighting before releasing the knob (time of priming of the valve).<br />
Pus the Gas oven / gas broil burner control knob, the broil burner of the bake burner can be ignited<br />
automatically.<br />
5) Close the oven door slowly and adjust the burner according to the power required. If the flame<br />
extinguishes for any reason, the safety valve will automatically shut off the gas supply to the burner.<br />
To re-light the burner, first turn the oven control knob to position<br />
then repeat the lighting procedure.<br />
, wait for at least 1 minute and<br />
18
Attention: the oven door becomes very hot during operation. Keep children away.<br />
‣ OVEN COOKING<br />
Before introducing the food, preheat the oven to the <strong>de</strong>sired temperature<br />
For a correct preheating operation, it is advisable to remove the tray from the oven and introduce it<br />
together with the food, when the oven has reached the <strong>de</strong>sired temperature.<br />
Check the cooking time and turn off the oven 5 minutes before the theoretical time to recuperate the<br />
stored heat.<br />
‣ IGNITION OF THE BROIL BURNER<br />
The broil burner generates the infra-red rays for broiling. To light the broil burner operate as follow:<br />
1) Open the oven door to the full extent.<br />
WARNING: Risk of explosion! The oven door must be open during this operation<br />
2) Lightly press and turn the thermostat knob clockwise to the (fig. 11).<br />
(FIGURE 11) (FIGURE 12)<br />
3) Press the knob right down to prime the electric ignition and the “Bi, Bi” sound will be heard and<br />
keep the knob pressed until the broil burner is lit.<br />
In case of power cut, press the knob and put a lighted match to the right and left si<strong>de</strong> of the burner<br />
(fig. 12).<br />
Never continue this operation for more than 15 seconds. If the burner has still not ignited, wait<br />
for about 1 minute prior to repeating the ignition.<br />
4) For the first time to use or after long-time not used, wait about 15 seconds after the burner lighting<br />
before releasing the knob (time of priming of the valve).<br />
5) Close the oven door slowly.<br />
If the flame extinguishes for any reason, the safety valve will automatically shut off the gas supply to<br />
the burner.<br />
To re-light the burner, first turn the oven control knob to position , wait for at least 1 minute and<br />
then repeat the lighting procedure.<br />
Do always broil with oven door closed. Attention: the oven door becomes very hot during<br />
operation. Keep children away.<br />
19
‣ OVEN LIGHT<br />
The range is equipped with a light that illuminates the oven to enable visually controlling the food that<br />
is cooking.<br />
This light is controlled by a push button on the control panel (Fig. 13).<br />
FIGURE 13 FIGURE 14<br />
‣ BROILING<br />
Very important: the broil burner must always be used with the oven door closed.<br />
Position the shelf on the second level from the top (fig. 14).<br />
-Turn on the broil burner, as explained in the preceding paragraphs and let the broil burner preheat<br />
for about 5 minutes with the door closed.<br />
-Place the food to be cooked above the broiling pan.<br />
-Introduce the broiling pan in the oven (fig. 15). The broiling pan should be placed above the shelf and<br />
it should be centered with the broil burner (fig.14)<br />
FIGURE 15 Figure 16 Figure 17<br />
20
WARNING!!<br />
WARNING-VERY IMPORTANT NOTICE<br />
Never obstruct the oven vent slots on the backsplash.<br />
Do not broil without using the broiling pan.<br />
Important: Use always suitable protective gloves when inserting / removing the broiling pan,<br />
shelves, pans on other cooking utensils from the oven.<br />
Attention: the range becomes very hot during operation.<br />
Attention: the oven door becomes very hot during operation.<br />
Keep children away.<br />
WARNING: The door is hot, use the handle.<br />
21
‣ GENERAL RECOMMENDATION<br />
CARE & MAINTENANCE<br />
Figure 18 Figure 19<br />
Important: Before any operation of cleaning and maintenance disconnect the appliance from<br />
the electrical supply.<br />
It is advisable to clean when the appliance is cold and especially for cleaning the enameled parts.、<br />
Avoid leaving alkaline or acidic substances (lemon juice, vinegar, etc.) on the surfaces.<br />
Avoid using cleaning products with a chlorine or acidic base.<br />
The oven must always be cleaned after every use, using suitable products and keeping in mind that<br />
its operation for 30 minutes on the highest temperature eliminates most grime reducing it to ashes.<br />
‣ ENAMELED PARTS<br />
All the enameled parts must be cleaned with a sponge and soapy water only or other non-abrasive<br />
products.<br />
Dry preferably with a chamois leather.<br />
If acid substances such as lemon juice, tomato conserve, vinegar etc. are left on the enamel for a<br />
long time they will etch it, making it opaque.<br />
‣ STAINLESS STEEL ELEMENTS<br />
Stainless steel parts must be rinsed with water and dried with a soft and clean cloth or with a chamois<br />
leather.<br />
For difficult dirt, use a specific non-abrasive product available commercially or a little hot vinegar.<br />
Note: regular use could cause discoloring around the burners, because of the high flame<br />
temperature.<br />
‣ INSIDE OF OVEN<br />
This must be cleaned regularly. With the oven warm, wipe the insi<strong>de</strong> walls with a cloth soaked in very<br />
hot soapy water or another suitable product.<br />
‣ GAS VALVES<br />
In the event of operating faults in the gas valves, call the Service Department.<br />
NOTE: Oven bulb replacement is not covered by your guarantee.<br />
Do not use steam jet cleaners<br />
because the humidity could<br />
infiltrate into the appliance<br />
making it dangerous.<br />
22
‣ BURNERS AND GRIDS<br />
<br />
<br />
<br />
<br />
These parts can be removed and cleaned with appropriate products.<br />
After cleaning, the burners and their flame distributors must be well dried and correctly replaced.<br />
It is very important to check that the burner flame distributor and the cap has been correctly<br />
positioned - failure to do so can cause serious problems.<br />
In appliances with electric ignition keep the electro<strong>de</strong> clean so that the sparks always strike.<br />
<br />
Note: To avoid damage to the electric ignition do not use it when the burners are not in<br />
place.<br />
CORRECT REPLACEMENT OF THE BURNERS<br />
It is very important to check that the burner flame sprea<strong>de</strong>r “F” and the cap “C” have been correctly<br />
positioned (see figs. 20 and 21). Failure to do so can cause serious problems.<br />
Figure 20 Figure 21<br />
In appliances with electric ignition, check that the electro<strong>de</strong> “S” (fig. 20) is always clean to ensure<br />
trouble-free sparking.<br />
The ignition plug must be very carefully cleaned.<br />
‣ OVEN SHELF INSTALLATION AND REMOVAL<br />
The oven shelves are provi<strong>de</strong>d with a<br />
security block to prevent acci<strong>de</strong>ntal<br />
extraction. They must be inserted<br />
operating as per figure 22.<br />
To pull them out remove shelf in the<br />
inverse or<strong>de</strong>r.<br />
Figure 22<br />
Keep attention to insert the shelves correctly<br />
(see si<strong>de</strong> figure).<br />
23
‣ OVEN DOOR<br />
The internal glass of the oven door can be easily removed for cleaning by unscrewing<br />
the two lateral fixing screws (fig. 23).<br />
Figure 23 figure 24<br />
‣ REMOVABLE STORAGE DRAWER<br />
The drawer (fig. 24) comes out like a normal drawer. To remove the drawer open and lift it.<br />
Do not store flammable material in the oven or in the bottom drawer.<br />
‣ REMOVING THE OVEN DOOR<br />
To facilitate oven cleaning, it is possible to remove the door. Please follow the <strong>instruction</strong>s carefully:<br />
‣ REMOVING THE OVEN DOOR<br />
– The oven door can easily be removed as follows:<br />
– Open the door to the full extent (fig. 25).<br />
– Attach the retaining rings to the hooks on the left and right hinges (Fig. 25a)<br />
– Hold the door as shown in Fig. 25d.<br />
– Gently close the door and withdraw the lower hinge pins from their location (Fig.25b)<br />
– Withdraw the upper hinge pins from their location (Fig. 25c).<br />
– Reset the door on a soft surface.<br />
– To replace the door, repeat the above steps in reverse or<strong>de</strong>r.<br />
Figure 25 Figure 25a Figure 25b<br />
Figure 25c<br />
Figure 25d<br />
24
‣ REMOVABLE STORAGE DRAWER<br />
For cleaning, you can remove the drawer by pulling it out until the stop point and lifting it up.<br />
Never store any flammable material in the drawer.<br />
‣ REPLACING THE OVEN LIGHT<br />
Before any maintenance is started involving electrical parts of the appliance, it must be disconnected<br />
from the power supply.<br />
• Let the oven cavity and broil burner cool down.<br />
• Switch off the electric supply.<br />
• Remove the protective cover.<br />
• Unscrew and replace the bulb with a new one suitable for high temperature (200°F ~ 550°C)<br />
having the same specifications: 120V 60Hz, 15W, E14.<br />
• Replace the protective cover.<br />
NOTE: Oven bulb replacement is not covered by your guarantee.<br />
‣ LEVELING THE RANGE<br />
The range must be level to obtain proper operating. The four screws type leveling legs located on the<br />
corners at the bottom of range should be adjusted by turning them clockwise to make the range<br />
higher or counter-clockwise to lower the range until the range is level. Use a level on surface units to<br />
check the leveling of the range (Please see Fig.26).<br />
Figure 26<br />
25
‣ ANTI-TIP BRACKET INSALLATION<br />
To reduce the risk of tipping the range by abnormal usage or improper door loading, the range must<br />
be secured by properly installing the anti-tip <strong>de</strong>vice packed with the appliance.<br />
• Place the anti-tip bracket on the floor as shown figure. Anti-tip bracket can be installed on either<br />
right or left si<strong>de</strong>.<br />
• Make the locations of 2 holes of ant-tip bracket on the floor.<br />
• Use a 5/16” masonry drill bit and insert plastic anchor.<br />
• Secure bracket to floor using screws supplied.<br />
• Sli<strong>de</strong> appliance into position.<br />
NOTE: If range is relocated, the bracket must be removed and installed in new location.<br />
Install the anti-tip bracket either right or left si<strong>de</strong>.<br />
The contour line of back panel of appliance<br />
The contour line of left panel of appliance<br />
1.18"<br />
1.30"<br />
5.69"<br />
Anti-tip<br />
Bracket<br />
The contour line of right panel of appliance<br />
Anti-tip Bracket<br />
Move the appliance to the final position.<br />
The contour line of front panel of appliance<br />
26
PROBLEMS WITH YOUR GAS RANGE?<br />
You can solve many common appliance problems easily, saving you the cost of a possible service<br />
call. Try the suggestions below to see if you can solve the problem before calling the servicer.<br />
TROUBLESHOOTING GUIDE<br />
FIND YOUR<br />
PROBLEM HERE<br />
Surface burners do<br />
not light.<br />
Flame burns halfway<br />
round.<br />
Flame is orange.<br />
Oven light does not<br />
work.<br />
Oven or broiler does<br />
not heat.<br />
Oven temperature is<br />
inaccurate.<br />
POSSIBLE CAUSE<br />
Surface control has not been<br />
completely turned to the ON<br />
position.<br />
Burner ports are clogged.<br />
Burners not positioned<br />
properly.<br />
Range not set for appropriate<br />
gas input.<br />
Pilot lights won’t light due to<br />
power failure.<br />
Range power cord is<br />
disconnected from the outlet.<br />
Burner ports are clogged.<br />
Moisture is present after<br />
cleaning.<br />
Range is not set for<br />
appropriate gas input.<br />
Dust particles in main line.<br />
Range is not set for<br />
appropriate gas input.<br />
Burned out or loose bulb<br />
Range is not set for<br />
appropriate gas input.<br />
Temperature control not set<br />
properly.<br />
Pilot light will not light due to<br />
power failure.<br />
House fuse has blown or<br />
circuit breaker has tripped.<br />
Range cord is disconnected<br />
from outlet.<br />
Oven capillary bulb not<br />
positioned properly.<br />
Temperature control not set<br />
properly.<br />
Improper use of foil.<br />
HOW TO FIX IT<br />
Push in and turn control to the ON position<br />
until burner ignites, then turn control to<br />
<strong>de</strong>sired flame setting.<br />
Use a small gauge wire or needle to open<br />
ports.<br />
Verify that the burners are positioned<br />
properly on the orifice hoods and the<br />
burners are sitting flat on the burner support<br />
with tabs engaged in slots.<br />
See range conversion section of installation<br />
<strong>manual</strong>.<br />
Light pilots <strong>manual</strong>ly.<br />
Be sure power cord is plugged into<br />
groun<strong>de</strong>d outlet.<br />
Use a small gauge wire or needle to open<br />
ports.<br />
Lightly fan the flame and allow burner to<br />
operate until flame is full. OR dry burners<br />
thoroughly following <strong>instruction</strong>s in range<br />
“Cleaning” section.<br />
See range conversion section of installation<br />
<strong>manual</strong>.<br />
Allow burner to operate for a few minutes<br />
until flame turns blue.<br />
See range conversion section of installation<br />
<strong>manual</strong>.<br />
Tighten or replace oven light bulb.<br />
See range conversion section of installation<br />
<strong>manual</strong>.<br />
Make sure temperature control is set at<br />
<strong>de</strong>sired temperature.<br />
Light pilots <strong>manual</strong>ly.<br />
Check/reset circuit breaker and/or replace<br />
fuse. Do not increase fuse capacity. If the<br />
problem is a circuit overload, have it<br />
corrected by a qualified electrician.<br />
Be sure the power cord is plugged into a<br />
groun<strong>de</strong>d outlet.<br />
Verify that capillary bulb is snapped in clips<br />
straight and not touching si<strong>de</strong>s or coated<br />
with oven cleaner or food.<br />
Make sure the temperature control knob is<br />
set at the <strong>de</strong>sired temperature.<br />
Keep foil clear of holes in oven bottom and<br />
off of oven si<strong>de</strong>s.<br />
27
Smoke or odor on<br />
initial oven operation.<br />
Range is not level.<br />
Oven smokes<br />
excessively.<br />
Vent blocked.<br />
Range not set for appropriate<br />
gas input.<br />
This is normal.<br />
Poor installation.<br />
Weak or unstable floor.<br />
Kitchen cabinet misalignment<br />
may make range appear to be<br />
unleveled.<br />
Meat too close to broiler<br />
burner.<br />
Meat not prepared properly.<br />
Keep vent on backguard clear.<br />
See range conversion section of installation<br />
<strong>manual</strong>.<br />
Place oven rack in center of oven. Place a<br />
level on the rack. Adjust leveling legs.<br />
Be sure floor is level and can a<strong>de</strong>quately<br />
support range. Contact carpenter to correct<br />
sagging or sloping floor.<br />
Be sure cabinets are square and have<br />
sufficient room for range clearance. Contact<br />
cabinet maker to correct problem<br />
Reposition the broiler pan to provi<strong>de</strong> more<br />
clearance between the meat and the broiler<br />
burner<br />
Remove excess fat from meat.<br />
SERVICE FOR YOUR GAS RANGE<br />
We are proud of our customer service organization and the network of professional service<br />
technicians that provi<strong>de</strong> service on your <strong>Avanti</strong> appliances. With the purchase of your <strong>Avanti</strong><br />
appliance, you can have the confi<strong>de</strong>nce that if you ever need additional information or assistance, the<br />
<strong>Avanti</strong> <strong>Products</strong> Customer Service team will be here for you. Just call us toll-free.<br />
Product Information<br />
800-323-5029<br />
Part Or<strong>de</strong>rs<br />
800-220-5570<br />
In-Home Repair Service<br />
800-220-5570<br />
AVANTI PRODUCTS CUSTOMER SERVICES<br />
Whatever your questions are about our products,<br />
help is available.<br />
You may or<strong>de</strong>r parts and accessories that will be<br />
<strong>de</strong>livered directly to your home by personal<br />
check, money or<strong>de</strong>r, Master Card, or Visa.<br />
An <strong>Avanti</strong> <strong>Products</strong> authorized service center will<br />
provi<strong>de</strong> expert repair service, scheduled at a time<br />
that is convenient for you. Our trained servicers<br />
know your appliance insi<strong>de</strong> and out.<br />
28
YOUR AVANTI WARRANTY<br />
WARRANTY – GAS RANGE<br />
LENGTH OF WARRANTY<br />
FULL ONE YEAR WARRANTY FROM DATE<br />
OF PURCHASE ON ALL PARTS EXCEPT<br />
GLASS PARTS.<br />
IN RENTAL OR COMMERCIAL USE, THE<br />
WARRANTY PERIOD IS 90 DAYS.<br />
FULL 30-DAY WARRANTY FROM DATE OF<br />
PURCHASE ON GLASS PARTS AND FINISH<br />
OF PORCELAIN ENAMEL, PAINTED OR<br />
BRIGHT METAL FINISHED PARTS<br />
WE WILL PAY FOR<br />
REPLACEMENT PARTS AND REPAIR<br />
LABOR TO CORRECT DEFECTS IN<br />
MATERIALS OR WORKMANSHIP.<br />
SERVICE MUST BE PROVIDED BY AN<br />
AUTHORIZED SERVICE COMPANY.<br />
REPLACEMENT PARTS AND REPAIR<br />
LABOR TO CORRECT DEFECTS IN<br />
MATERIAL OR WORKMANSHIP.<br />
SERVICE MUST BE PROVIDED BY AN<br />
AUTHORIZED SERVICE COMPANY.<br />
WE WILL NOY PAY FOR<br />
A. Service calls to:<br />
1. Correct the installation of your range.<br />
2. Instruct you how to use your range.<br />
3. Replace house fuses or correct house wiring.<br />
4. Replace owner-accessible light bulbs.<br />
B. Surcharges including, but not limited to, any after hour, weekend, or holiday service<br />
calls, tolls, ferry trip charges, or mileage expense for serviced calls to remote areas,<br />
including the state of Alaska.<br />
C. Pick up and <strong>de</strong>livery. Your range is <strong>de</strong>signed to be repaired in the home.<br />
D. Damage to your range caused by acci<strong>de</strong>nt, misuse, fire, flood, acts of God, or use of<br />
products not mentioned in this <strong>manual</strong>.<br />
E. Repairs to parts or systems caused as a result of unauthorized modifications ma<strong>de</strong><br />
to the appliance.<br />
F. Shipping and handling costs associated with the replacement of the unit.<br />
G. Repairs when your range is used in other than normal, single-family household use.<br />
AVANTI PRODUCTS SHALL NOT BE LIABLE FOR INCIDENTAL OR CONSEQUENTIAL<br />
DAMAGES.<br />
Some states do not allow the exclusion or limitation of inci<strong>de</strong>ntal or consequential damages,<br />
so this exclusion or limitation may not apply to you. This warranty gives you specific legal<br />
rights, and you may also have other rights that vary from state to state.<br />
This warranty is not valid outsi<strong>de</strong> the Continental United States.<br />
29
SEGURIDAD DE LA COCINA<br />
Su seguridad y la seguridad <strong>de</strong> otros son muy importantes.<br />
Hemos incluido muchos mensajes <strong>de</strong> seguridad en este <strong>manual</strong> y también en su artefacto. Siempre<br />
lea y siga todos los mensajes <strong>de</strong> seguridad.<br />
Este es el símbolo <strong>de</strong> Alerta <strong>de</strong> Seguridad.<br />
Este símbolo lo alerta <strong>de</strong> riesgos potenciales <strong>de</strong> los que pue<strong>de</strong>n resultar en<br />
heridas o muertes. Todos los Mensajes <strong>de</strong> Seguridad estarán precedidos por<br />
el símbolo <strong>de</strong> Alerta <strong>de</strong> Seguridad y por una <strong>de</strong> estas palabras: “PELIGRO”,<br />
“ADVERTENCIA” o “PRECAUCIÓN”. Estas palabras significan:<br />
Peligro significa que el no seguir la medida<br />
<strong>de</strong> seguridad indicada podría resultar en<br />
graves daños personales o inclusive muerte.<br />
Advertencia significa que el no seguir la<br />
medida <strong>de</strong> seguridad indicada podría<br />
resultar en daños extensos al producto,<br />
grave daño personal o inclusive muerte.<br />
Precaución significa que el no seguir la<br />
medida <strong>de</strong> seguridad indicada podría<br />
resultar en daños personales menores o<br />
mo<strong>de</strong>rados, o daños a la propiedad o equipo.<br />
Todos los Mensajes <strong>de</strong> Seguridad lo alertarán y le indicarán que riesgo potencial existe, como reducir<br />
el riesgo y también que podría pasar en caso <strong>de</strong> no seguir las <strong>instrucciones</strong>.<br />
EN MASSACHUSETTS<br />
• Este producto <strong>de</strong>be ser instalado por un plomero o gasfitero que tenga<br />
licencia.<br />
• Cuando se use el gas <strong>de</strong> tipo <strong>de</strong> bola, cierre las válvulas, las cuales<br />
<strong>de</strong>ben ser <strong>de</strong>l tipo <strong>de</strong> manija en forma <strong>de</strong> T.<br />
ANTES DE EMPEZAR!<br />
La instalación <strong>de</strong> esta cocina <strong>de</strong>be conformar con todos los códigos <strong>de</strong><br />
seguridad locales, o en la ausencia <strong>de</strong> códigos <strong>de</strong> seguridad locales <strong>de</strong>ben<br />
cumplir con los Códigos Nacionales <strong>de</strong> Gas Combustible, ANSI Z223.1 /<br />
NFPA.54, la última edición.<br />
En Canadá, con el Código <strong>de</strong> Instalación, CAN/CGA-B149.1 o el Código <strong>de</strong><br />
Instalación <strong>de</strong> Gas Propano actualizado, CAN/CGA-B149.2, y con los códigos<br />
locales don<strong>de</strong> apliquen.<br />
30
Instalación en Casas Móviles Pre-Fabricadas:<br />
La instalación <strong>de</strong>be ser conforme a los estándares <strong>de</strong> Construcción y Seguridad<br />
<strong>de</strong> Fabricación <strong>de</strong> Casas, Titulo 24 CFR, Parte 3280 [previamente el Estándar<br />
Fe<strong>de</strong>ral <strong>de</strong> Construcción y Seguridad <strong>de</strong> Casas Móviles , Titulo 24, HUD (Parte<br />
280)} o, cuando dicho estándar no es aplicable, entonces <strong>de</strong>be ser conforme al<br />
estándar <strong>de</strong> Instalación para Casas en Fabricación, ANSI/NCSBCS A225.1, o a<br />
los códigos <strong>de</strong> seguridad locales don<strong>de</strong> se apliquen..<br />
MEDIDAS DE SEGURIDAD IMPORTANTES<br />
Antes <strong>de</strong> usar su electrodoméstico, <strong>de</strong>be posicionarlo e instalarlo tal como<br />
<strong>de</strong>scribimos en este <strong>manual</strong>, por lo tanto lea el <strong>manual</strong> cuidadosamente.<br />
Para reducir el riesgo <strong>de</strong> fuego, choque eléctrico o daño cuando use el<br />
electrodoméstico, siga estas precauciones básicas, incluyendo las siguientes:<br />
• Se recomienda que use un circuito separado (in<strong>de</strong>pendiente) para su electrodoméstico. Use<br />
receptáculos que no se apaguen con un interruptor o ca<strong>de</strong>na.<br />
• Nunca limpie las piezas <strong>de</strong>l electrodoméstico con líquidos inflamables. Estos vapores pue<strong>de</strong>n<br />
crear el riesgo <strong>de</strong> fuego o explosión. Asimismo, no almacene o use gasolina u otros vapores o<br />
líquidos inflamables cerca a este u otro electrodoméstico. Los vapores pue<strong>de</strong>n crear el riesgo <strong>de</strong><br />
fuego o explosión.<br />
• Antes <strong>de</strong> proce<strong>de</strong>r con la operación <strong>de</strong> limpieza y mantenimiento, asegúrese que la unidad este<br />
apagada y <strong>de</strong>sconectada <strong>de</strong> la fuente <strong>de</strong> po<strong>de</strong>r o energía.<br />
• Desenchufe el electrodoméstico o <strong>de</strong>sconecte la electricidad antes <strong>de</strong> limpiarlo o darle<br />
mantenimiento. El no hacerlo pue<strong>de</strong> resultar en choque eléctrico o muerte.<br />
• No intente reparar o reemplazar ninguna parte <strong>de</strong> su electrodoméstico a no ser que sea<br />
recomendado específicamente en este <strong>manual</strong>. Cualquier otro tipo <strong>de</strong> mantenimiento <strong>de</strong>be ser<br />
hecho por un técnico especializado.<br />
ADVERTENCIA: Si la información <strong>de</strong> este <strong>manual</strong> no se sigue al pie <strong>de</strong> la letra,<br />
fuego o explosión podrían ocasionarse, causando daños a la propiedad, daños<br />
personales o inclusive muerte.<br />
• Este electrodoméstico no se <strong>de</strong>be usar para calendar el ambiente. Las hornillas solo se <strong>de</strong>ben<br />
usar cuando vaya a cocinar y use ollas. Esta información está basada en consi<strong>de</strong>raciones <strong>de</strong><br />
seguridad.<br />
• La pared <strong>de</strong>trás <strong>de</strong> este electrodoméstico y el piso bajo este electrodoméstico <strong>de</strong>ben estar<br />
sellados y no tener aperturas.<br />
• Mantenga el área <strong>de</strong>l electrodoméstico limpia y libre <strong>de</strong> materiales combustibles, gasolina, y otros<br />
vapores inflamables.<br />
31
• No obstruya la circulación <strong>de</strong>l aire o ventilación.<br />
• Desconecte la fuente <strong>de</strong> po<strong>de</strong>r o energía <strong>de</strong>l electrodoméstico antes <strong>de</strong> darle mantenimiento.<br />
• Cuando mueva el electrodoméstico para limpiarlo y/o darle mantenimiento:<br />
• Desenchufe <strong>de</strong> la electricidad AC.<br />
• Cuidadosamente remueva la cocina halándola hacia afuera.<br />
PRECAUCIÓN: La cocina es pesada. Tenga cuidado cuando la mueva.<br />
• El uso inapropiado <strong>de</strong> la puerta <strong>de</strong>l horno (por ej. Pararse, sentarse o apoyarse en la puerta)<br />
pue<strong>de</strong> ocasionar riesgos potenciales y/o daños.<br />
• Cuando instale o retire la cocina para darle mantenimiento, use un carrito <strong>de</strong>slizante. No empuje<br />
ninguno <strong>de</strong> los bor<strong>de</strong>s <strong>de</strong> la cocina tratando <strong>de</strong> sacarla o regresarla a su sitio. Empujar o halar<br />
la cocina, en lugar <strong>de</strong> usar un carrito <strong>de</strong>slizante, también aumenta la posibilidad <strong>de</strong> doblar las<br />
patas o los conectores.<br />
• Es importante que el electrodoméstico este nivelado para que funcione correctamente. Tal vez<br />
sea necesario ajustar las patas para que este nivelado..<br />
• Nunca <strong>de</strong>je que los niños operen, jueguen o entren <strong>de</strong>ntro <strong>de</strong>l electrodoméstico.<br />
• Instrucciones para electricidad a tierra – El electrodoméstico <strong>de</strong>be ser instalado y cableado a<br />
tierra por un técnico calificado, <strong>de</strong> acuerdo con el Código Eléctrico Nacional ANSI/NFPA No. 70<br />
(Edición mas reciente) y <strong>de</strong> acuerdo a los requerimientos eléctricos locales.<br />
• Piezas <strong>de</strong> repuesto – Solo <strong>de</strong>be utilizar piezas <strong>de</strong> reemplazo autorizadas por <strong>Avanti</strong> para darle<br />
mantenimiento a la cocina. Piezas <strong>de</strong> repuesto están disponibles en los Distribuidores <strong>de</strong> Fabrica<br />
autorizados. Contáctese con el Centro <strong>de</strong> Servicio <strong>de</strong> <strong>Avanti</strong> más cercano a ud.<br />
EL ELEMENTO ANTI-VOLQUEO<br />
La cocina no se volquea durante el uso normal. Sin embargo la cocina <strong>de</strong> pue<strong>de</strong> volcar si<br />
aplica <strong>de</strong>masiada fuerza o peso a la puerta abierta. Para evitarlo use y asegure el elemento<br />
anti-volqueo.<br />
Para reducir el riesgo <strong>de</strong> volcar el electrodoméstico, este <strong>de</strong>be ser instalado y asegurado con<br />
los elementos anti-volqueo incluidos en el paquete <strong>de</strong> su electrodoméstico.<br />
ADVERTENCIA<br />
• TODAS LAS COCINAS SE PUEDEN<br />
VOLCAR<br />
• LA PERSONA PUEDE SUFRIR DAÑOS<br />
• UTILICE LOS ELEMENTOS ANTI-VOLQUEO<br />
EMPACADOS CON LA COCINA<br />
• SIGA LAS INSTRUCCIONES DE<br />
INSTALACION<br />
32
Asegúrese que el elemento anti-volqueo esté<br />
instalado:<br />
• Deslice la cocina hacia a<strong>de</strong>lante.<br />
• Verifique que el elemento anti-volqueo está asegurado<br />
contra el piso.<br />
• Deslice la cocina hacia atrás <strong>de</strong> manera que la pata<br />
trasera <strong>de</strong> la cocina que<strong>de</strong> <strong>de</strong>bajo <strong>de</strong>l elemento antivolqueo.<br />
ADVERTENCIA: Si la información <strong>de</strong> este <strong>manual</strong> no se sigue al pie <strong>de</strong> la<br />
letra, un fuego o explosión podrían ocasionarse, causando daños a la<br />
propiedad, daños personales o inclusive muerte.<br />
No almacene ni use gasolina ni otros líquidos o vapores inflamables cerca a este u<br />
otro electrodoméstico.<br />
QUE HACER SI HUELE GAS:<br />
No trate <strong>de</strong> encen<strong>de</strong>r ningún electrodoméstico.<br />
No toque ningún interruptor eléctrico; no use ningún teléfono en el edificio.<br />
Llame a su proveedor <strong>de</strong> gas inmediatamente <strong>de</strong>s<strong>de</strong> <strong>de</strong> la casa <strong>de</strong> algún vecino.<br />
La instalación y servicio <strong>de</strong>ben ser efectuados por un instalador calificado, agencia<br />
<strong>de</strong> servicios o el proveedor <strong>de</strong> gas.<br />
33
Lea este <strong>manual</strong> cuidadosamente.<br />
Con el encontrará ayuda para operar y<br />
mantener su cocina <strong>de</strong> gas apropiadamente.<br />
Manténgalo a mano para po<strong>de</strong>r encontrar<br />
respuesta a sus preguntas.<br />
Si no entien<strong>de</strong> algo o necesitara más<br />
asistencia, por favor llame a:<br />
PERMITANOS AYUDARLO ...<br />
Escriba el mo<strong>de</strong>lo y el número <strong>de</strong> Serie.<br />
Los encontrará en la placa en la parte inferior<br />
frontal <strong>de</strong> la Cocina De Gas.<br />
Escriba esos números aqui:<br />
____________________________________<br />
Fecha <strong>de</strong> compra<br />
<strong>Avanti</strong> – Servicio al Cliente<br />
800-220-5570<br />
Mantenga prueba <strong>de</strong> la compra, tal como el<br />
recibo <strong>de</strong> la tienda, junto a este <strong>manual</strong> para<br />
establecer el período <strong>de</strong> garantía.<br />
____________________________________<br />
Mo<strong>de</strong>lo<br />
____________________________________<br />
Numero <strong>de</strong> Serie<br />
Use estos números en cualquier<br />
correspon<strong>de</strong>ncia o llamada al <strong>de</strong>partamento<br />
<strong>de</strong> servicio concerniente a su cocina <strong>de</strong> gas.<br />
Si recibe una cocina <strong>de</strong> gas dañada, contacte<br />
al constructor o distribuidor que le vendió la<br />
cocina inmediatamente.<br />
Ahorre tiempo y dinero. Antes <strong>de</strong> llamar al<br />
<strong>de</strong>partamento <strong>de</strong> servicio, lea la Guía para<br />
Resolver Problemas. La lista incluye<br />
problemas <strong>de</strong> operación menores que pue<strong>de</strong><br />
corregir ud. mismo.<br />
SI NECESITA SERVICIO<br />
Estamos orgullosos <strong>de</strong> nuestro servicio y<br />
<strong>de</strong>seamos que ud. que<strong>de</strong> complacido. Si por<br />
algún motivo ud. no está contento con el<br />
servicio que recibe, aquí le damos unos pasos<br />
para mayor asistencia. PRIMERO, póngase<br />
en contacto con la compañía que dio<br />
mantenimiento a su cocina. Explique porque<br />
no está contento. En la mayoría <strong>de</strong> los casos,<br />
esto resolverá el problema.<br />
LUEGO, si aun no está satisfecho, escriba<br />
todos los <strong>de</strong>talles incluyendo su número <strong>de</strong><br />
teléfono y envíelo a:<br />
Customer Service<br />
<strong>Avanti</strong> <strong>Products</strong><br />
10880 NW 30 Street<br />
Miami, FL 33172<br />
34
PIEZAS Y CARACTERISTICAS<br />
1 Superficie<br />
2 Panel <strong>de</strong> Control / perillas<br />
3 Manija <strong>de</strong> la puerta <strong>de</strong>l horno<br />
4 Puerta <strong>de</strong>l horno<br />
5 Patas niveladoras<br />
6 Elemento anti-volqueo<br />
7 Panel anti-salpicaduras<br />
8 Ventilacíon <strong>de</strong>l horno<br />
9 Luz <strong>de</strong>l horno<br />
10 CALENTADOR <strong>de</strong> parrilla<br />
11 Ban<strong>de</strong>ja <strong>de</strong>l CALENTADOR<br />
12 Rejillas <strong>de</strong>l horno (Total 2)<br />
13 CALENTADOR para hornear<br />
14 Placa<br />
15 Gaveta removible con manija<br />
35
‣ COCINA<br />
1. Hornilla auxiliar (AUX) - 3000 BTU/hra<br />
2. Hornilla <strong>de</strong>recha semi-rápida (SR) - 4600<br />
BTU/hra<br />
3. Hornilla izquierda semi-rápida (SR) - 4600<br />
BTU/hra<br />
4. Hornilla Rápida (R) - 8600 BTU/hra<br />
3<br />
2<br />
Nota:<br />
-El elemento para encen<strong>de</strong>r el gas está<br />
incorporado a las perillas.<br />
PRECAUCION:<br />
Si la hornilla se apaga por acci<strong>de</strong>nte, gire la<br />
perilla apagando el gas. Espere por lo<br />
menos un minuto antes <strong>de</strong> tratar <strong>de</strong><br />
encen<strong>de</strong>rla otra vez.<br />
PRECAUCION:<br />
Los electrodomésticos <strong>de</strong> gas, producen<br />
calor y humedad en el ambiente en el cual<br />
son instalados.<br />
Asegúrese que el área don<strong>de</strong> se cocina esté<br />
bien ventilada y siga los códigos <strong>de</strong><br />
seguridad nacionales y locales.<br />
4<br />
1<br />
‣ PANEL DE CONTROLES<br />
‣ DESCRIPCION DE LOS CONTROLES<br />
PERILLAS PARA HORNILLAS<br />
HORNO<br />
5 Hornilla <strong>de</strong>lantera izquierda 9 Interruptor para luz <strong>de</strong>l horno<br />
6 Hornilla posterior izquierda 10 Control <strong>de</strong> temperatura <strong>de</strong>l horno<br />
7 Hornilla posterior <strong>de</strong>recha<br />
8 Hornilla <strong>de</strong>lantera <strong>de</strong>recha<br />
36
ANTES DE USAR SU COCINA A GAS<br />
ADVERTENCIA!!<br />
ASEGURESE QUE ESTA COCINA SEA INSTALADA POR UN TECNICO CALIFICADO.<br />
Instalación, ajustes, alteraciones, servicio o mantenimiento inapropiados pue<strong>de</strong>n<br />
causar daños personales o a la propiedad. Consulte con un instalador calificado,<br />
agencia <strong>de</strong> servicios o proveedor <strong>de</strong> gas.<br />
‣ Antes <strong>de</strong> usar su Cocina a gas<br />
Retire el empaque exterior e interior.<br />
Retire la película protectora que cubre la superficie <strong>de</strong> acero y <strong>de</strong> aluminio.<br />
Verifique que tenga las siguientes piezas:<br />
• Panel posterior anti-salpicaduras<br />
• Paquete <strong>de</strong> conversión <strong>de</strong> Gas LP<br />
• Elemento Anti-volqueo<br />
• 4 patas niveladoras<br />
• 2 rejillas para las hornillas<br />
• 2 rejillas para el horno<br />
• 4 tapas y bases para las hornillas<br />
• 5 perillas<br />
• Ban<strong>de</strong>ja para parrilla <strong>de</strong>l horno<br />
• Regulador<br />
Limpie la superficie interior con agua tibia usando un trapito suave.<br />
Haga que el técnico instalador le enseñe don<strong>de</strong> está la válvula general para apagar la cocina<br />
y como apagarla en caso necesario.<br />
Asegúrese que su cocina sea instalada y conectada a tierra correctamente por un técnico<br />
instalador calificado que siga las <strong>instrucciones</strong> <strong>de</strong> instalación.<br />
No intente reparar o reemplazar ninguna pieza <strong>de</strong> su cocina a no ser que sea<br />
específicamente recomendado en este <strong>manual</strong>.<br />
Asegúrese que su cocina esté correctamente ajustada por un técnico instalador calificado,<br />
<strong>de</strong> acuerdo al tipo <strong>de</strong> gas (natural o LP) que se use.<br />
No retire las etiquetas permanentes, advertencias o placas <strong>de</strong> la cocina. Esto pue<strong>de</strong> eliminar<br />
la garantía.<br />
El técnico instalador <strong>de</strong>be <strong>de</strong>jarle estas <strong>instrucciones</strong> a ud, por favor reténgalas para uso<br />
futuro y para uso <strong>de</strong>l inspector local.<br />
Por favor siga todos los códigos <strong>de</strong> seguridad y or<strong>de</strong>nanzas nacionales y locales.<br />
37
‣ Importante:<br />
Este electrodoméstico está diseñado y fabricado solamente para cocinar comida doméstica (en el<br />
hogar) y no es apropiado para uso no domestico, por lo tanto NO se <strong>de</strong>be usar en un ambiente<br />
comercial.<br />
La garantía <strong>de</strong>l electrodoméstico se anula si el electrodoméstico se usa <strong>de</strong>ntro <strong>de</strong> un ambiente no<br />
domestico, por ej. un ambiente semi comercial, comercial o comunal.<br />
Lea estas <strong>instrucciones</strong> cuidadosamente antes <strong>de</strong> instalar y usar su electrodoméstico.<br />
PRECAUCIÓN: este electrodoméstico solo <strong>de</strong>be ser instalado en una habitación ventilada<br />
permanentemente, <strong>de</strong> acuerdo a las reglas aplicables.<br />
Se aconseja seguir las siguientes <strong>instrucciones</strong>:<br />
<br />
<br />
<br />
Limpie el interior <strong>de</strong>l horno con un trapito limpio, hume<strong>de</strong>cido con agua y <strong>de</strong>tergente neutral,<br />
luego seque cuidadosamente.<br />
Coloque las rejillas y ban<strong>de</strong>ja <strong>de</strong>l horno en su lugar.<br />
Encienda el horno a la temperatura máxima para eliminar cualquier resto <strong>de</strong> grasa <strong>de</strong>l<br />
CALENTADOR <strong>de</strong>l horno. Haga lo mismo con el CALENTADOR <strong>de</strong> parrilla.<br />
‣ Colocando el Panel<br />
Anti-salpicaduras:<br />
Es OBLIGATORIO instalar el panel ya que también sirve para ventilar el horno.<br />
Ensámblelo tal como se muestra.<br />
d) Atornille (2) tornillos “A” en el orificio apropiado en cada lado <strong>de</strong>l panel.<br />
e) Atornille el tornillo central en la parte <strong>de</strong>l medio <strong>de</strong>l panel.<br />
38
PRECAUCIONES & RECOMENDACIONES<br />
‣ PRECAUCIONES Y RECOMENDACIONES IMPORTANTES<br />
Después <strong>de</strong> <strong>de</strong>sempacar su electrodoméstico, verifique que no esté dañado y que la puerta <strong>de</strong>l<br />
horno cierra correctamente. En caso <strong>de</strong> duda, no use la cocina hasta que consulte con su proveedor<br />
o técnico calificado profesional.<br />
Los elementos <strong>de</strong>l empaque (por ej. Bolsas plásticas, espuma <strong>de</strong> polietileno, clavos, cintas plásticas,<br />
etc.) no se <strong>de</strong>ben <strong>de</strong>jar al alcance <strong>de</strong> los niños ya que estos pue<strong>de</strong>n causar graves daños.<br />
El material <strong>de</strong> empaque es reciclable y está marcado con el símbolo <strong>de</strong> reciclaje. .<br />
<br />
<br />
<br />
<br />
<br />
<br />
<br />
<br />
<br />
<br />
<br />
<br />
<br />
<br />
No intente modificar las características técnicas <strong>de</strong>l electrodoméstico ya que esto pue<strong>de</strong> causar<br />
peligro a los usuarios.<br />
No lleve a cabo operaciones <strong>de</strong> limpieza o mantenimiento <strong>de</strong>l electrodoméstico sin antes<br />
haberlo <strong>de</strong>sconectado <strong>de</strong> la electricidad.<br />
Si <strong>de</strong>ci<strong>de</strong> que no <strong>de</strong>sea usar más este electrodoméstico (o <strong>de</strong>ci<strong>de</strong> substituir un mo<strong>de</strong>lo antiguo),<br />
antes <strong>de</strong> <strong>de</strong>shacerse <strong>de</strong> el, se recomienda que lo haga <strong>de</strong> forma que no se pueda utilizar y <strong>de</strong><br />
acuerdo con las reglas <strong>de</strong> protección <strong>de</strong> la salud y <strong>de</strong>l ambiente, asegurándose en particular<br />
que todas las piezas riesgosas se hagan inofensivas, especialmente en relación a los niños que<br />
pue<strong>de</strong>n jugar con electrodomésticos abandonados.<br />
Retire la puerta antes <strong>de</strong> <strong>de</strong>shacerse <strong>de</strong> la cocina para prevenir que niños que<strong>de</strong>n atrapados.<br />
Después <strong>de</strong> cada uso asegúrese que las perillas están en la posición OFF (apagado).<br />
No permita que los niños u otras personas no calificadas usen el electrodoméstico sin su<br />
supervisión.<br />
Durante y <strong>de</strong>spués <strong>de</strong> usar la cocina, algunas partes quedan muy calientes. No las toque.<br />
Mantenga a los niños lejos <strong>de</strong> la cocina cuando la esté usando.<br />
Riesgo <strong>de</strong> fuego! No almacene material inflamable <strong>de</strong>ntro <strong>de</strong>l horno o en el cajón inferior.<br />
Asegúrese que los cables eléctricos <strong>de</strong> otros electrodomésticos cercanos a la cocina no estén<br />
en contacto con la cocina, la placa o que se puedan enredar con la puerta <strong>de</strong>l horno o quedar<br />
atrapados <strong>de</strong>ntro <strong>de</strong>l horno.<br />
No forre las pare<strong>de</strong>s <strong>de</strong>l horno con papel <strong>de</strong> aluminio. No coloque estantes, sartenes, ban<strong>de</strong>jas<br />
u otros utensilios <strong>de</strong> cocina en la base <strong>de</strong>l horno.<br />
El fabricante <strong>de</strong>clina cualquier responsabilidad <strong>de</strong> daño a personas o propiedad causado por el<br />
uso inapropiado o incorrecto <strong>de</strong>l electrodoméstico.<br />
Para evitar cualquier posible riesgo, el electrodoméstico solamente <strong>de</strong>be ser instalado por un<br />
técnico calificado. Cualquier reparación hecha por personas no calificadas pue<strong>de</strong> resultar en<br />
choque eléctrico o corto circuito. Para evitar cualquier daño posible a su persona o al<br />
electrodoméstico, no intente efectuar reparaciones ud mismo. Ese trabajo <strong>de</strong>be ser llevado a<br />
cabo solamente por personal calificado.<br />
Peligro <strong>de</strong> quemaduras! El horno y los accesorios <strong>de</strong> cocina se calientan mucho durante la<br />
39
operación. Asegúrese que los niños no estén al alcance y adviértales al respecto. Para evitar<br />
quemaduras utilice pañitos <strong>de</strong> cocina o guantes cuando <strong>de</strong>ba manipular partes o utensilios<br />
calientes.<br />
<br />
<br />
<br />
Aléjese <strong>de</strong> la cocina cuando abra la puerta <strong>de</strong>l horno. El aire caliente o vapor que escapa pue<strong>de</strong><br />
causar quemaduras en las manos, cara u ojos.<br />
Nunca limpie el horno con un limpiador <strong>de</strong> vapor <strong>de</strong> alta presión ya que pue<strong>de</strong> provocar un corto<br />
circuito.<br />
Este electrodoméstico es para uso en su hogar, Nunca use el electrodoméstico para otro<br />
propósito!<br />
‣ PRECAUCIONES Y RECOMENDACIONES IMPORTANTES PARA EL USO<br />
DE ELECTRODOMESTICOS<br />
El uso <strong>de</strong> cualquier electrodoméstico implica la necesidad <strong>de</strong> seguir una serie <strong>de</strong> reglas<br />
fundamentales.<br />
En particular:<br />
✓ Nunca toque el electrodoméstico con las manos o pies mojados;<br />
✓ No opere el electrodoméstico <strong>de</strong>scalzo;<br />
✓ No permita que los niños o personas incapacitadas usen el electrodoméstico sin su<br />
supervisión.<br />
El fabricante <strong>de</strong>clina cualquier responsabilidad <strong>de</strong> daño a personas o propiedad causado por el uso<br />
inapropiado o incorrecto <strong>de</strong>l electrodoméstico.<br />
‣ INFORMACION GENERAL<br />
ADVERTENCIA!!<br />
1. Este electrodoméstico no se <strong>de</strong>be usar para calentar la habitación. Esta información está<br />
basada en consi<strong>de</strong>ración a la seguridad.<br />
2. La pared <strong>de</strong>trás <strong>de</strong> este electrodoméstico y el piso bajo este electrodoméstico <strong>de</strong>ben<br />
estar sellados y no tener aperturas.<br />
3. Mantenga el área <strong>de</strong>l electrodoméstico limpia y libre <strong>de</strong> materiales combustibles,<br />
gasolina, y otros vapores inflamables.<br />
4. No obstruya el flujo <strong>de</strong> combustión y ventilación <strong>de</strong>l aire.<br />
5. Desconecte la fuente <strong>de</strong> electricidad <strong>de</strong>l electrodoméstico antes <strong>de</strong> darle servicio <strong>de</strong><br />
mantenimiento.<br />
6. Cuando remueva el electrodoméstico para limpieza y/o servicio;<br />
A. Apague el suministro <strong>de</strong>l gas.<br />
B. Desconecte la fuente <strong>de</strong> electricidad AC.<br />
C. Desconecte la línea <strong>de</strong> gas <strong>de</strong> la tubería <strong>de</strong> entrada.<br />
D. Cuidadosamente retire la cocina halando hacia afuera.<br />
PRECAUCIÓN: La cocina es pesada; use cuidado en su manejo.<br />
7. El uso inapropiado <strong>de</strong> la puerta <strong>de</strong>l horno (por ej. Pararse, sentarse o apoyarse en ella)<br />
40
pue<strong>de</strong> resultar en riesgos potenciales y/o daños.<br />
8. Cuando instale o retire la cocina para darle mantenimiento, use un carrito <strong>de</strong>slizante. No<br />
empuje ninguno <strong>de</strong> los bor<strong>de</strong>s <strong>de</strong> la cocina tratando <strong>de</strong> sacarla o regresarla a su sitio.<br />
Empujar o halar la cocina, en lugar <strong>de</strong> usar un carrito <strong>de</strong>slizante, también aumenta la<br />
posibilidad <strong>de</strong> doblar las patas o los conectores.<br />
ADVERTENCIA!!<br />
‣ INSTRUCCIONES DE CONEXION ELECTRICA A TIERRA<br />
‣ PARA SEGURIDAD PERSONAL, ESTE ELECTRODOMESTICO DEBE SER<br />
CONECTADO A TIERRA CORRECTAMENTE.<br />
Para su protección contra riesgo <strong>de</strong> choque eléctrico, este electrodoméstico está equipado<br />
con un enchufe <strong>de</strong> tres puntas para conexión a tierra y <strong>de</strong>be ser conectado directamente a<br />
un enchufe a tierra. No corte o remueva la tercera punta (a tierra) <strong>de</strong>l enchufe.<br />
De ninguna manera corte o remueva la tercera punta (a tierra) <strong>de</strong>l enchufe. La<br />
instalación eléctrica <strong>de</strong>be cumplir con los códigos locales y nacionales.<br />
PIEZAS DE REEMPLAZO<br />
Solo <strong>de</strong>be utilizar piezas <strong>de</strong> reemplazo autorizadas por <strong>Avanti</strong> para darle<br />
mantenimiento a la cocina. Piezas <strong>de</strong> repuesto están disponibles en los<br />
Distribuidores <strong>de</strong> Fabrica autorizados. Contáctese con el Centro <strong>de</strong> Servicio <strong>de</strong><br />
<strong>Avanti</strong> más cercano a ud.<br />
ADVERTENCIA MONOXIDO DE CARBONO:<br />
El Monóxido <strong>de</strong> Carbono es un peligro posible cuando use cualquier electrodoméstico a<br />
gas.<br />
Todos los electrodomésticos a gas DEBEN ser instalados por un instalador profesional<br />
licenciado que este familiarizado con los niveles apropiados <strong>de</strong> Monóxido <strong>de</strong> Carbón<br />
para cada electrodoméstico.<br />
La Asociación Americana <strong>de</strong> Gas publica las emisiones <strong>de</strong> CO para electrodomésticos y<br />
equipos <strong>de</strong> calefacción a través <strong>de</strong>l ANSI Std. Z21.1<br />
La Agencia <strong>de</strong> Protección Ambiental EPA reporta que un nivel máximo <strong>de</strong> CO <strong>de</strong> 9 PPM<br />
en un periodo <strong>de</strong> 24 horas es el nivel estándar para el interior <strong>de</strong> una resi<strong>de</strong>ncia.<br />
(Un hogar ventilado apropiadamente tendrá un nivel <strong>de</strong> CO <strong>de</strong> menos <strong>de</strong> 5 PPM.)<br />
ELECTRODOMESTICOS SIN VENTILACION PARA COCINAR A GAS<br />
Para uso resi<strong>de</strong>ncial por un periodo <strong>de</strong> tiempo corto. El CO generado durante la<br />
operación se dispersara en el aire <strong>de</strong> la resi<strong>de</strong>ncia y empujado al exterior a través <strong>de</strong>l<br />
flujo <strong>de</strong> aire normal.<br />
41
‣ HORNILLAS A GAS<br />
COMO USAR LAS HORNILLAS<br />
El flujo <strong>de</strong> gas a las hornillas se ajusta al girar las perillas que controlan las válvulas. Girando la<br />
perilla para que la línea indicadora apunte a los símbolos marcados en el panel logra las siguientes<br />
funciones:<br />
FIGURA 4 FIGURA 5<br />
= Válvula Cerrada<br />
= Máximo<br />
LO = Mínimo<br />
La posición <strong>de</strong> apertura máxima permite que los líquidos hiervan rápido, mientras que la posición<br />
mínima permite cocer a fuego lento.<br />
Para reducir el flujo <strong>de</strong> gas al mínimo, gire la perilla en sentido contra horario para señalar la posición<br />
LO.<br />
Otros ajustes intermedios <strong>de</strong> operación se pue<strong>de</strong>n lograr al posicionar el indicador entre las<br />
posiciones <strong>de</strong> apertura mínima y máxima, pero nunca entre las posición <strong>de</strong> apertura máxima y .<br />
Cuando la cocina no esté siendo usada, ajuste las perillas a la posición y también cierre la<br />
válvula general <strong>de</strong>l cierre <strong>de</strong> gas localizada en la línea <strong>de</strong> entrada <strong>de</strong> gas principal.<br />
ENCENDIENDO LAS HORNILLAS DE GAS<br />
Para encen<strong>de</strong>r las hornillas ud. <strong>de</strong>be:<br />
1 – Girar la perilla en sentido anti-horario hasta la posición (máxima), presione la perilla al mismo tiempo y<br />
manténgala presionada hasta que la llama salga. Las chispas producidas por el encen<strong>de</strong>dor situado en la hornilla<br />
relativa encen<strong>de</strong>rán la llama.<br />
En caso que las condiciones <strong>de</strong>l suministro <strong>de</strong> gas dificulte encen<strong>de</strong>r la hornilla en la posición <strong>de</strong><br />
HI, pruebe en la<br />
posición LO.<br />
2 – Ajuste la perilla <strong>de</strong> control a la posición <strong>de</strong>seada.<br />
Para re-encen<strong>de</strong>r la hornilla, retorne la perilla a la posición<br />
y repita la operación <strong>de</strong> encendido.<br />
Precaución! La cocina se calienta mucho durante la operación. Mantenga a<br />
los niños fuera <strong>de</strong>l alcance.<br />
42
‣ ELIJIENDO HORNILLA (Fig.6)<br />
DIAMETRO DE OLLAS QUE SE PUEDEN USAR EN LAS HORNILLAS<br />
Figura 6<br />
HORNILLA MINIMO MAXIMO<br />
Auxiliar 4" 23/32 (12 cm) 5" 1/2 (14 cm)<br />
Semirápido 6" 19/64 (16 cm) 9" 7/16 (24 cm)<br />
Rápido 9" 7/16 (24 cm) 10" 15/64 (26 cm)<br />
No use ollas con bases cóncava o convexa<br />
Los símbolos marcados en el panel arriba <strong>de</strong> las presillas indica la correspon<strong>de</strong>ncia entre la perilla y<br />
la hornilla<br />
La hornilla más apropiada se <strong>de</strong>be elegir <strong>de</strong> acuerdo al diámetro y capacidad volumétrica <strong>de</strong>l<br />
recipiente que se va a usar.<br />
Es muy importante que el diámetro <strong>de</strong> las ollas o sartenes coincida con el <strong>de</strong> la hornilla para<br />
asegurar el funcionamiento eficiente sin tener que <strong>de</strong>sperdiciar gas. Una olla o cacerola pequeña<br />
colocada en una hornilla gran<strong>de</strong> no necesariamente quiere <strong>de</strong>cir que los líquidos hervirán más<br />
rápido.<br />
Asegúrese que las agarra<strong>de</strong>ras <strong>de</strong> las ollas o<br />
cacerolas no sobrepasen el bor<strong>de</strong> <strong>de</strong> la<br />
cocina, para evitar que se volteen por<br />
acci<strong>de</strong>nte. Esto también hace más difícil<br />
que los niños alcancen las ollas o cacerolas.<br />
Efecto <strong>de</strong> Altitud en las hornillas:<br />
Las hornillas <strong>de</strong> la cocina van <strong>de</strong>s<strong>de</strong> 3,000 BTU a 8,600 BTU en una instalación<br />
<strong>de</strong> gas natural bajo 2,000 pies sobre el nivel <strong>de</strong>l mar. La fuerza <strong>de</strong> la hornilla baja<br />
un 4% por cada 1000 pies adicionales <strong>de</strong> altitud.<br />
COMO USAR EL HORNO DE GAS<br />
‣ CARACTERISTICAS GENERALES<br />
El horno viene con dos Calentadores:<br />
a) Calentador <strong>de</strong>l horno, instalado en la parte baja <strong>de</strong>l horno<br />
G2002CW/G2003CSS: 8800 BTU/hra<br />
G2404CW/G2003CSS: 9500 BTU/hra<br />
b) Calentador <strong>de</strong> parrilla, instalado en la parte alta <strong>de</strong>l horno:.<br />
G2002CW/G2003CSS: 7200 BTU/hra<br />
43
G2404CW/G2003CSS: 8000 BTU/hra<br />
‣ USANDO EL HORNO POR PRIMERA VEZ<br />
Se recomienda seguir estas <strong>instrucciones</strong>:<br />
– Inserte las rejillas y la ban<strong>de</strong>ja<br />
– Encienda el horno a la temperatura máxima (posición 550) para eliminar posibles rastros <strong>de</strong><br />
grasa en los Calentadores. Siga la misma operación para el CALENTADOR <strong>de</strong>l horno y para el <strong>de</strong><br />
la parrilla (perilla en posición BROIL)<br />
– Desconecte la electricidad, <strong>de</strong>je que el horno enfríe y limpie el interior <strong>de</strong>l horno con un trapito<br />
mojado con agua y <strong>de</strong>tergente (neutral), luego seque cuidadosamente.<br />
‣ CALENTADOR DEL HORNO<br />
Permite cocción normal <strong>de</strong>l horno.<br />
El flujo <strong>de</strong> gas al CALENTADOR se regula con un termostato que permite que la temperatura <strong>de</strong>l<br />
horno se mantenga constante.<br />
El control <strong>de</strong> la temperatura se asegura con un termostato localizado en el interior <strong>de</strong>l horno.<br />
El termostato se <strong>de</strong>be mantener <strong>de</strong>ntro <strong>de</strong> su cubierta y limpio ya que, estando en la posición<br />
incorrecta o acumulando suciedad, podrían alterar el control <strong>de</strong> temperatura.<br />
FIGURA 8<br />
TEMPERATURAS DEL HORNO A GAS<br />
Numero marcado en la perilla<br />
<strong>de</strong> Temperatura en °F<br />
Temperatura<br />
correspondiente en °C<br />
200 93<br />
250 121<br />
300 149<br />
350 177<br />
400 204<br />
450 232<br />
500 260<br />
550 280<br />
‣ TERMOSTATO DEL HORNO<br />
Los números impresos en el panel <strong>de</strong> control (fig. 8) indican la temperatura creciente <strong>de</strong>l horno en<br />
grados (°F). Para regular la temperatura, gire la perilla hasta que el indicador apunte al grado <strong>de</strong><br />
temperatura elegido.<br />
La posición BROIL sirve solamente para encen<strong>de</strong>r el Calentador <strong>de</strong> la parrilla.<br />
N.B. Cuando la cocina no se utilice, las perillas <strong>de</strong>l panel <strong>de</strong> control <strong>de</strong>ben estar en la posición<br />
también <strong>de</strong>be cerrar la válvula <strong>de</strong> gas que se encuentra en la línea <strong>de</strong> entrada principal <strong>de</strong> gas.<br />
y<br />
MUY IMPORTANTE El horno/parrilla siempre se <strong>de</strong>be usar con la puerta cerrada.<br />
44
‣ ENCENDIDO DEL CALENTADOR DEL HORNO<br />
El termostato permite el control automático <strong>de</strong> la temperatura.<br />
El suministro <strong>de</strong> gas al calentador <strong>de</strong>l horno se controla con una llave termostática <strong>de</strong> dos lados<br />
(calentador <strong>de</strong>l horno y <strong>de</strong> la parrilla) con un elemento <strong>de</strong> llama-falla.<br />
Para encen<strong>de</strong>r el calentador <strong>de</strong>l horno siga estos pasos:<br />
1) Abra la puerta <strong>de</strong>l horno completamente.<br />
ADVERTENCIA: Riesgo <strong>de</strong> explosión! La puerta <strong>de</strong>l horno <strong>de</strong>ber estar abierta<br />
durante esta operación.<br />
2) Presione ligeramente y gire la perilla <strong>de</strong>l termostato en sentido anti-horario (fig. 9) hasta la<br />
posición máxima ó 550ºF<br />
FIGURA 9 FIGURA 10<br />
A<br />
3) Presione la perilla girándola hacia la <strong>de</strong>recha y abajo para iniciar el encendido eléctrico, escuchará<br />
un sonido “Bi, Bi”, mantenga la perilla presionada hasta que el calentador <strong>de</strong>l horno se encienda.<br />
En caso que se apague, presione la perilla e inmediatamente acerque un fósforo encendido a la<br />
apertura “A” (fig. 10).<br />
Nunca continúe esta operación por más <strong>de</strong> 15 segundos. Si el calentador aún no ha<br />
encendido, espere 1 minuto antes <strong>de</strong> repetir el encendido.<br />
4) Cuando use el horno por primera vez o <strong>de</strong>spués <strong>de</strong> un largo periodo sin uso, espere 10/15<br />
segundos <strong>de</strong>spués que encienda el calentador y antes <strong>de</strong> soltar la perilla (tiempo <strong>de</strong> inicio <strong>de</strong> la<br />
válvula).<br />
5) Cierre la puerta <strong>de</strong>l horno lentamente y ajuste el calentador <strong>de</strong> acuerdo con la potencia requerida.<br />
Si la llama se extingue por cualquier razón, la válvula <strong>de</strong> seguridad automáticamente apagará el<br />
suministro <strong>de</strong> gas al quemador.<br />
Para re-encen<strong>de</strong>r el quemador, primero gire la perilla <strong>de</strong>l horno a la posición<br />
menos 1 minuto y luego repita la operación <strong>de</strong> encendido.<br />
, espere por lo<br />
Atención: la puerta <strong>de</strong>l horno se calienta mucho durante la operación. Mantenga a los niños<br />
fuera <strong>de</strong> alcance.<br />
45
‣ COCINANDO EN EL HORNO<br />
Antes <strong>de</strong> introducir los alimentos, precaliente el horno a la temperatura <strong>de</strong>seada.<br />
Para una operación <strong>de</strong> precalentamiento, se recomienda retirar la ban<strong>de</strong>ja <strong>de</strong>l horno e introducirla al<br />
mismo tiempo con los alimentos cuando el horno haya llegado a la temperatura <strong>de</strong>seada.<br />
Verifique el tiempo <strong>de</strong> cocción y apague el horno 5 minutos antes que se termine el tiempo <strong>de</strong><br />
cocción para recuperar el calor generado.<br />
‣ ENCENDIDO DEL CALENTADOR DE LA PARRILLA<br />
El calentador <strong>de</strong> la parrilla genera rayos infra-rojos para cocinar. Para encen<strong>de</strong>r el calentador <strong>de</strong> la<br />
parilla siga estos pasos:<br />
1) Abra la puerta <strong>de</strong>l horno completamente.<br />
ADVERTENCIA: Riesgo <strong>de</strong> explosión! La puerta <strong>de</strong>l horno <strong>de</strong>be estar abierta durante esta<br />
operación<br />
2) Presione ligeramente y gire la perilla <strong>de</strong>l termostato en sentido horario. (fig. 11).<br />
(FIGURA 11) (FIGURA 12)<br />
3) Presione la perilla girándola hacia la <strong>de</strong>recha y abajo para iniciar el encendido eléctrico, escuchará<br />
el sonido “Bi, Bi”, continúe presionando la perilla hasta que el calentador <strong>de</strong> la parrilla esté<br />
encendido.<br />
En caso que se apague, presione la perilla e inmediatamente acerque un fósforo encendido a la<br />
apertura “A” (fig. 12).<br />
Nunca continúe esta operación por más <strong>de</strong> 15 segundos. Si el calentador aún no ha<br />
encendido, espere 1 minuto antes <strong>de</strong> repetir el encendido.<br />
4) Cuando use el horno por primera vez o <strong>de</strong>spués <strong>de</strong> un largo periodo sin uso, espere 10/15<br />
segundos <strong>de</strong>spués que encienda el calentador y antes <strong>de</strong> soltar la perilla (tiempo <strong>de</strong> inicio <strong>de</strong> la<br />
válvula).<br />
5) Cierre la puerta <strong>de</strong>l horno lentamente y ajuste el calentador <strong>de</strong> acuerdo con la potencia requerida.<br />
Si la llama se extingue por cualquier razón, la válvula <strong>de</strong> seguridad automáticamente apagará el<br />
suministro <strong>de</strong> gas al quemador.<br />
Para re-encen<strong>de</strong>r el quemador, primero gire la perilla <strong>de</strong>l horno a la posición<br />
menos 1 minuto y luego repita la operación <strong>de</strong> encendido.<br />
, espere por lo<br />
Atención: Siempre use la parrilla con la puerta <strong>de</strong>l horno cerrada. La puerta <strong>de</strong>l horno se<br />
calienta mucho durante la operación. Mantenga a los niños fuera <strong>de</strong> alcance.<br />
46
‣ LUZ DEL HORNO<br />
La cocina está equipada con una luz que ilumina el horno la cual permite control visual para los<br />
alimentos que está cocinando. Esta luz se controla con un botón <strong>de</strong> presión en el panel <strong>de</strong> control<br />
(Fig. 13).<br />
FIGURA 13 FIGURA 14<br />
‣ USANDO LA PARRILLA (BROILING)<br />
Muy importante: el calentador <strong>de</strong> la parrilla se <strong>de</strong>be usar siempre con la puerta <strong>de</strong>l honro<br />
cerrada.<br />
Posicione la rejilla en el segundo nivel <strong>de</strong> arriba hacia abajo (fig. 14).<br />
-Encienda el calentador <strong>de</strong> la parrilla, tal como explicado en los párrafos anteriores y precaliente por<br />
5 minutos con la puerta <strong>de</strong>l horno cerrada.<br />
-Coloque los alimentos a ser cocinados en la ban<strong>de</strong>ja <strong>de</strong> cocción.<br />
-Introduzca la ban<strong>de</strong>ja en el horno (fig. 15). La ban<strong>de</strong>ja <strong>de</strong>be ser colocada sobre la rejilla y <strong>de</strong>be<br />
estar centrada en línea con el calentador <strong>de</strong> la parrilla (fig.14)<br />
FIGURA 15 Figura 16 Figura 17<br />
47
ADVERTENCIA!!<br />
ADVERTENCIA-NOTA MUY IMPORTANTE<br />
Nunca obstruya las aperturas <strong>de</strong> ventilación <strong>de</strong>l panel anti-salpicaduras.<br />
No use la parrilla sin la ban<strong>de</strong>ja <strong>de</strong> cocción.<br />
Importante: Siempre use guantes protectores apropiados cuando inserte o<br />
remueva la ban<strong>de</strong>ja <strong>de</strong> parrilla, rejillas, ollas, cacerolas u otros utensilios <strong>de</strong><br />
cocina en el horno.<br />
Atención: la cocina se calienta mucho durante la operación.<br />
Atención: la puerta <strong>de</strong>l horno se calienta mucho durante la<br />
operación.<br />
Mantenga los niños fuera <strong>de</strong> alcance.<br />
ADVERTENCIA: La puerta está caliente, use la manija.<br />
48
CUIDADO Y MANTENIMIENTO<br />
‣ RECOMENDACIONES GENERALES<br />
Figura 18 Figura 19<br />
Receptáculo polarizado <strong>de</strong> 3 puntas conectado a tierra.<br />
ADVERTENCIA:<br />
Riesgo <strong>de</strong> choque eléctrico<br />
Enchufe a un receptáculo <strong>de</strong> 3 puntas conectado a tierra.<br />
No remueva la tercera punta <strong>de</strong>l enchufe.<br />
No use un adaptador.<br />
Fuego, choque eléctrico o muerte pue<strong>de</strong>n resultar <strong>de</strong> no seguir estas <strong>instrucciones</strong>.<br />
Importante: Antes <strong>de</strong> cualquier operación <strong>de</strong> limpieza y mantenimiento <strong>de</strong>sconecte el<br />
electrodoméstico <strong>de</strong> la corriente eléctrica.<br />
Se recomienda limpiar cuando el electrodoméstico esté frío, especialmente cuando limpie las partes<br />
esmaltadas.<br />
Evite <strong>de</strong>jar substancias alcalinas o ácidas (jugo <strong>de</strong> limón, vinagre, etc.) en las superficies.<br />
Evite usar productos <strong>de</strong> limpieza con base <strong>de</strong> cloro o ácida.<br />
El horno siempre <strong>de</strong>be ser limpiado <strong>de</strong>spués <strong>de</strong> cada uso, usando productos apropiados y teniendo<br />
en cuenta que operar la cocina por 30 minutos a la temperatura máxima elimina la mugre<br />
reduciéndola a cenizas.<br />
‣ PARTES ESMALTADAS<br />
Todas las partes esmaltadas <strong>de</strong>ben ser limpiadas con una esponja y agua jabonosa solamente o con<br />
otros productos no abrasivos.<br />
De preferencia, seque con cuero <strong>de</strong> ante.<br />
Si substancias ácidas tales como jugo <strong>de</strong> limón, tomate en conserva, vinagre, etc se <strong>de</strong>jan en la<br />
superficie esmaltada por un período largo, esta se quemará tornándose opaca.<br />
‣ ELEMENTOS DE ACERO INOXIDABLE<br />
Las partes <strong>de</strong> acero inoxidable <strong>de</strong>ben ser enjuagadas con agua y secadas con un trapo limpio o con<br />
cuero <strong>de</strong> ante.<br />
Para suciedad persistente, use un producto comercial específico no abrasivo o vinagre caliente.<br />
Nota: Uso regular pue<strong>de</strong> causar <strong>de</strong>scoloración alre<strong>de</strong>dor <strong>de</strong> las hornillas <strong>de</strong>bido a la alta<br />
temperatura <strong>de</strong> la llama.<br />
49
‣ DENTRO DEL HORNO<br />
Esto se <strong>de</strong>be limpiar regularmente, Con el horno tibio, limpie las pare<strong>de</strong>s internas con un trapito<br />
mojado en agua jabonosa muy caliente u otro producto similar.<br />
‣ VALVULAS DE GAS<br />
En el caso que haya fallas en las válvulas <strong>de</strong> gas, llame al Departamento <strong>de</strong> Servicio.<br />
NOTA: El bombillo <strong>de</strong>l horno no está cubierto por la garantía.<br />
No use limpiadores <strong>de</strong> vapor <strong>de</strong><br />
alta presión porque la humedad<br />
se pue<strong>de</strong> infiltrar <strong>de</strong>ntro <strong>de</strong>l<br />
electrodoméstico volviéndolo<br />
peligroso.<br />
ADVERTENCIA MUY IMPORTANTE:<br />
Antes <strong>de</strong> cualquier operación <strong>de</strong> mantenimiento, <strong>de</strong>senchufe el electrodoméstico <strong>de</strong> la fuente <strong>de</strong> po<strong>de</strong>r/energía o<br />
electricidad.<br />
‣ HORNILLAS Y REJILLAS<br />
<br />
<br />
<br />
<br />
<br />
Estas partes se pue<strong>de</strong>n remover y limpiar con los productos apropiados.<br />
Después <strong>de</strong> limpiarlas, seque bien las hornillas y las tapitas distribuidoras <strong>de</strong> la llama y<br />
colóquelas nuevamente en su sitio<br />
Es muy importante verificar que la tapita distribuidora <strong>de</strong> llama sea colocada correctamente – <strong>de</strong><br />
lo contrario podría causar serios problemas.<br />
En electrodomésticos con encendido eléctrico, mantenga el electrodo limpio para que las<br />
chispas siempre salgan.<br />
Nota: Para evitar daño al sistema <strong>de</strong> encendido eléctrico, no lo use cuando las hornillas<br />
no estén en su lugar.<br />
REEMPLAZO CORRECTO DE LAS HORNILLAS<br />
Es muy importante verificar que la hornilla propagadora <strong>de</strong> la llama “F” y la tapita “C” sean<br />
posicionadas correctamente (ver figs. 20 y 21). De no hacerlo así, podría ocasionar serios<br />
problemas.<br />
Figura 20 Figura 21<br />
50
En electrodomésticos con encendido eléctrico, verifique que el electrodo “S” (fig. 20) esté siempre<br />
limpio para asegurar producción <strong>de</strong> chispas sin problemas.<br />
El enchufe <strong>de</strong> encendido <strong>de</strong>be ser limpiado cuidadosamente.<br />
‣ INSTALACION Y RETIRO DE LA REJILLA DEL HORNO<br />
Figura 22<br />
Las rejillas <strong>de</strong>l horno vienen con un<br />
bloqueo <strong>de</strong> seguridad para evitar que se<br />
saquen <strong>de</strong>l horno por acci<strong>de</strong>nte. Para<br />
reinsertarlas vea la figura 22.<br />
Para sacarlas hálela hacia fuera y arriba.<br />
Asegúrese <strong>de</strong> insertarlas correctamente<br />
(vea figura 22).<br />
PUERTA DEL HORNO<br />
La puerta <strong>de</strong> vidrio <strong>de</strong>l horno se pue<strong>de</strong> remover muy fácilmente para facilitar su limpieza,<br />
simplemente <strong>de</strong>senrosque los tornillos laterales (fig. 23).<br />
Figura 23 figura 24<br />
‣ GAVETA DE ALMACENAJE REMOVIBLE<br />
La gaveta (fig. 24) se usa como cualquier otro gaveta. Para sacarla, hálela hacia afuera y arriba.<br />
No almacene materiales inflamables en el horno o en la gaveta <strong>de</strong> almacenaje.<br />
51
‣ SACANDO LA PUERTA DEL HORNO<br />
– Para facilitar la limpieza <strong>de</strong>l horno se pue<strong>de</strong> remover la puerta. Por favor siga estas<br />
<strong>instrucciones</strong> cuidadosamente:<br />
– La puerta <strong>de</strong>l horno se pue<strong>de</strong> sacar muy fácilmente siguiendo estas <strong>instrucciones</strong>:<br />
– Abra la puerta completamente (fig. 25).<br />
– Coloque los aros <strong>de</strong> retención a los ganchos al lado izquierdo y <strong>de</strong>recho <strong>de</strong> las bisagras. Fig.<br />
25a)<br />
– Mantenga la puerta tal como indicado en la Fig. 25d.<br />
– Suavemente cierre la puerta y saque los alfileres inferiores <strong>de</strong> las bisagras (Fig.25b)<br />
– Saque los alfileres superiores <strong>de</strong> las bisagras (Fig. 25c).<br />
– Coloque la puerta en una superficie suave.<br />
– Para colocar la puerta, repita estos mismos pasos pero en or<strong>de</strong>n reverso.<br />
Figura 25 Figura 25a Figura 25b<br />
Figura 25c<br />
Figura 25d<br />
‣ GAVETA DE ALMACENAJE REMOVIBLE<br />
Para propósitos <strong>de</strong> limpieza, Ud. pue<strong>de</strong> remover la gaveta halándola<br />
hacia afuera hasta que salga mas y <strong>de</strong> ahí halándola hacia arriba.<br />
Nunca almacene materiales inflamables en la gaveta.<br />
‣ REEMPLAZANDO LA LUZ DEL HORNO<br />
Antes que se efectúe cualquier mantenimiento <strong>de</strong> partes eléctricas <strong>de</strong>l electrodoméstico, asegúrese<br />
que esté <strong>de</strong>senchufado <strong>de</strong> la fuente <strong>de</strong> po<strong>de</strong>r/energía o electricidad.<br />
• Deje que el horno y los calentadores <strong>de</strong> parrilla y <strong>de</strong>l horno se enfríen.<br />
• Apague el suministro <strong>de</strong> electricidad.<br />
52
• Retire la cubierta protectora.<br />
• Desenrosque y reemplace el bombillo con uno nuevo que resista altas temperaturas (200°F ~<br />
550°C) y que tenga estas especificaciones: 120V 60Hz, 15W, E14.<br />
• Reemplace la cubierta plástica.<br />
NOTA: El reemplazo <strong>de</strong>l bombillo <strong>de</strong>l horno no está cubierto bajo la garantía.<br />
‣ NIVELANDO LA COCINA<br />
La cocina <strong>de</strong>be estar nivelada para que funcione correctamente. Las cuatro patas niveladoras con<br />
tornillos ajustables que están en las esquinas inferiores <strong>de</strong> la cocina se <strong>de</strong>ben ajustar girándolas en<br />
sentido horario para levantar la cocina o en sentido anti-horario para bajarla hasta que esté nivelada.<br />
Use una herramienta que mi<strong>de</strong> el nivel para<br />
verificar que la cocina esté nivelada. (Vea Fig.26).<br />
Figure 26<br />
‣ INSTALACION DEL ELEMENTO ANTI-VOLQUEO<br />
Para reducir el riesgo que la cocina se volquee <strong>de</strong>bido a uso in<strong>de</strong>bido <strong>de</strong> esta o <strong>de</strong> la puerta <strong>de</strong>l<br />
horno, la cocina <strong>de</strong>be ser asegurada a su sitio instalando correctamente el elemento anti-volqueo<br />
empacado con el electrodoméstico.<br />
• Coloque el elemento anti-volqueo en el piso tal como se muestra en la figura. El elemento antivolqueo<br />
se pue<strong>de</strong> instalar en el lado izquierdo o <strong>de</strong>recho.<br />
• Marque en el piso el lugar don<strong>de</strong> van los dos orificios <strong>de</strong>l elemento anti-volqueo.<br />
• Utilice un taladro con una punta <strong>de</strong> 5/16” para albañilería e inserte el ancla <strong>de</strong> plástico.<br />
• Asegure el elemento anti-volqueo al piso usando los tornillos incluidos en el paquete.<br />
• Deslice el electrodoméstico para encajarlo con el elemento anti-volqueo.<br />
NOTA: Si la cocina luego es movida <strong>de</strong> sitio, el elemento <strong>de</strong>be ser removido e instalado en el nuevo<br />
lugar <strong>de</strong>signado para la cocina.<br />
53
Install the anti-tip bracket either right or left si<strong>de</strong>.<br />
The contour line of back panel of appliance<br />
The contour line of left panel of appliance<br />
1.18"<br />
1.30"<br />
5.69"<br />
Anti-tip<br />
Bracket<br />
The contour line of right panel of appliance<br />
Anti-tip Bracket<br />
Move the appliance to the final position.<br />
The contour line of front panel of appliance<br />
Instale el elemento anti-volqueo en el dado izquierdo o <strong>de</strong>recho cerca <strong>de</strong> la parte posterior <strong>de</strong>l<br />
electrodoméstico .<br />
Deslice la cocina hacia la posición final.<br />
54
PROBLEMAS CON SU COCINA DE GAS?<br />
Ud pue<strong>de</strong> resolver muchos problemas <strong>de</strong> su electrodoméstico fácilmente, ahorrándole el costo <strong>de</strong><br />
una llamada al Servicio Técnico. Pruebe las sugerencias a continuación para ver si ud pue<strong>de</strong><br />
resolver el problema antes <strong>de</strong> llamar al técnico.<br />
GUIA PARA RESOLVER PROBLEMAS<br />
PROBLEMA CAUSA PROBABLE COMO SOLUCIONARLO<br />
La perilla <strong>de</strong> control <strong>de</strong> Presione y gire la perilla a la posición ON<br />
temperatura <strong>de</strong> la hornilla no hasta que el calentador encienda, luego<br />
está en la posición correcta gire la perilla hacia la intensidad <strong>de</strong> llama<br />
ON.<br />
<strong>de</strong>seada.<br />
Los quemadores están Use un alambre <strong>de</strong>lgado o aguja para<br />
tupidos o sucios. <strong>de</strong>stupir los hoyitos <strong>de</strong>l quemador.<br />
Las hornillas no<br />
encien<strong>de</strong>n.<br />
La llama está muy<br />
baja.<br />
La llama es naranja.<br />
La luz <strong>de</strong>l horno no<br />
funciona.<br />
El horno o la parrilla<br />
no calientan.<br />
Los quemadores y/o hornillas<br />
no están en la posición<br />
correcta.<br />
La cocina no está ajustada<br />
para el nivel <strong>de</strong> entrada <strong>de</strong><br />
gas.<br />
Las luces piloto no se<br />
encien<strong>de</strong>n <strong>de</strong>bido a falta <strong>de</strong><br />
energía / electricidad.<br />
El cordón <strong>de</strong> electricidad esta<br />
<strong>de</strong>senchufado.<br />
Los quemadores están<br />
tupidos o sucios.<br />
Quedo humedad cuando<br />
limpiaron la cocina.<br />
La cocina no está ajustada<br />
para el nivel <strong>de</strong> entrada <strong>de</strong><br />
gas.<br />
Hay partículas <strong>de</strong> polvo en la<br />
línea <strong>de</strong> gas.<br />
La cocina no está ajustada<br />
para el nivel <strong>de</strong> entrada <strong>de</strong><br />
gas.<br />
El bombillo se quemo o está<br />
<strong>de</strong>sajustado<br />
La cocina no está ajustada<br />
para el nivel <strong>de</strong> entrada <strong>de</strong><br />
gas.<br />
La perilla <strong>de</strong> control <strong>de</strong><br />
temperatura no está en la<br />
posición correcta.<br />
Las luz piloto no se encien<strong>de</strong><br />
<strong>de</strong>bido a falta <strong>de</strong> energía /<br />
electricidad.<br />
Un fusible <strong>de</strong> la casa exploto<br />
o salto un interruptor.<br />
55<br />
Verifique que los quemadores y/o hornillas<br />
estén colocados correctamente y que<br />
encajen con los orificios <strong>de</strong>l calentador.<br />
Vea la sección <strong>de</strong> conversión en el <strong>manual</strong><br />
<strong>de</strong> instalación.<br />
Encienda los pilotos <strong>manual</strong>mente.<br />
Asegúrese que el cordón <strong>de</strong> electricidad<br />
este enchufado a un receptáculo conectado<br />
a tierra.<br />
Use un alambre <strong>de</strong>lgado o aguja para<br />
<strong>de</strong>stupir los hoyitos <strong>de</strong>l quemador.<br />
Eche aire a la llama suavemente y <strong>de</strong>je que<br />
el calentador funcione hasta que la llama<br />
crezca. Otra opción es secar los<br />
quemadores completamente tal como se<br />
indica en la sección <strong>de</strong> Limpiando su<br />
Cocina.<br />
Vea la sección <strong>de</strong> conversión en el <strong>manual</strong><br />
<strong>de</strong> instalación.<br />
Deje que el calentador funcione por unos<br />
cuantos minutos hasta que la llama se<br />
vuelva azul.<br />
Vea la sección <strong>de</strong> conversión en el <strong>manual</strong><br />
<strong>de</strong> instalación.<br />
Ajuste o reemplace el bombillo <strong>de</strong>l horno.<br />
Vea la sección <strong>de</strong> conversión en el <strong>manual</strong><br />
<strong>de</strong> instalación.<br />
Asegúrese que el control <strong>de</strong> temperatura<br />
esté en la temperatura <strong>de</strong>seada.<br />
Encienda los pilotos <strong>manual</strong>mente.<br />
Verifique / reprograme el interruptor y/o<br />
reemplace el fusible. No incremente la
La temperatura <strong>de</strong>l<br />
horno no es correcta.<br />
Cuando encien<strong>de</strong> el<br />
horno por primera vez<br />
sale humo o tiene un<br />
olor peculiar.<br />
Cocina no está<br />
nivelada.<br />
Sale <strong>de</strong>masiado<br />
humo <strong>de</strong>l horno.<br />
El cordón <strong>de</strong> electricidad está<br />
<strong>de</strong>senchufado.<br />
El bombillo incan<strong>de</strong>scente <strong>de</strong>l<br />
horno está en posición<br />
incorrecta.<br />
La perilla <strong>de</strong> control <strong>de</strong><br />
temperatura no está en la<br />
posición correcta.<br />
Está usando papel <strong>de</strong><br />
aluminio en el horno.<br />
La ventilación está<br />
bloqueada.<br />
La cocina no está ajustada<br />
para el nivel <strong>de</strong> entrada <strong>de</strong><br />
gas.<br />
Esto es normal.<br />
Instalación <strong>de</strong>ficiente.<br />
El piso no es uniforme o se<br />
hun<strong>de</strong>.<br />
Los gabinetes <strong>de</strong> la cocina no<br />
están alineados<br />
correctamente y hacen que la<br />
cocina luzca <strong>de</strong>snivelada.<br />
Los alimentos están muy<br />
cerca al calentador <strong>de</strong> la<br />
parrilla.<br />
Los alimentos tienen mucha<br />
grasa.<br />
capacidad <strong>de</strong>l fusible. Si el problema es<br />
una sobrecarga <strong>de</strong>l circuito, haga que un<br />
electricista calificado lo corrija.<br />
Asegúrese que el cordón <strong>de</strong> electricidad<br />
este enchufado a un receptáculo conectado<br />
a tierra.<br />
Verifique que el bombillo incan<strong>de</strong>scente<br />
está <strong>de</strong>recho y sin tocar los lados o<br />
cubierto con liquido limpiador o comida.<br />
Asegúrese que el control <strong>de</strong> temperatura<br />
este en la temperatura <strong>de</strong>seada.<br />
No utilice papel <strong>de</strong> aluminio en el horno, las<br />
pare<strong>de</strong>s o para tapar orificios en el horno.<br />
Mantenga la ventilación <strong>de</strong>l panel antisalpicadura<br />
libre <strong>de</strong> cualquier obstrucción.<br />
Vea la sección <strong>de</strong> conversión en el <strong>manual</strong><br />
<strong>de</strong> instalación.<br />
Coloque la rejilla <strong>de</strong>l horno en la posición<br />
central. Coloque una herramienta que mi<strong>de</strong><br />
el nivel. Ajuste las patas niveladoras.<br />
Asegúrese que el piso esté nivelado y que<br />
soporte el peso <strong>de</strong> la cocina. Contacte a un<br />
especialista para corregir la falta <strong>de</strong> tensión<br />
en el piso o cualquier inclinación o <strong>de</strong>snivel.<br />
Asegúrese que los gabinetes sean<br />
cuadrados y tengan suficiente espacio.<br />
Contacte a su proveedor <strong>de</strong> gabinetes <strong>de</strong><br />
cocina para corregir el problema.<br />
Reposicione la ban<strong>de</strong>ja <strong>de</strong>l horno para<br />
crear mayor espacio entre los alimentos y el<br />
calentador <strong>de</strong> la parrilla <strong>de</strong>l horno.<br />
Retire el exceso <strong>de</strong> grasa <strong>de</strong> la carne.<br />
56
REGISTRATION INFORMATION<br />
Thank you for purchasing this fine <strong>Avanti</strong> products. Please fill out this form and return it within 100<br />
days of purchase and receive these important benefits to the following address:<br />
<strong>Avanti</strong> <strong>Products</strong>, A Division of The Mackle Co., Inc.<br />
P.O. Box 520604 - Miami, Florida 33152 USA<br />
‣ Protect your product:<br />
We will keep the mo<strong>de</strong>l number and date of purchase of your new <strong>Avanti</strong> <strong>Products</strong> product on<br />
file to help you refer to this information in the event of an insurance claim such as fire or theft.<br />
‣ Promote better products:<br />
We value your input. Your responses will help us <strong>de</strong>velop products <strong>de</strong>signed to best meet<br />
your future needs.<br />
----------------------------------------------------------(<strong>de</strong>tach here)----------------------------------------------------------<br />
<strong>Avanti</strong> Registration Form<br />
__________________________________ _____________________________________<br />
Name Mo<strong>de</strong>l # Serial #<br />
__________________________________ _____________________________________<br />
Address Date Purchased Store/Dealer Name<br />
__________________________________ ______________________________________<br />
City State Zip Occupation<br />
__________________________________ As Your Primary Resi<strong>de</strong>nce, Do You:<br />
Area Co<strong>de</strong> Phone Number Own Rent<br />
Did You Purchase An Additional Warranty: Your Age:<br />
Exten<strong>de</strong>d Food Loss None un<strong>de</strong>r 18 18-25 26-30<br />
Reason For Choosing This <strong>Avanti</strong> Product: 31-35 36-50 over 50<br />
Please indicate the most important factors Marital Status:<br />
that influenced your <strong>de</strong>cision to purchase Married Single<br />
this product.<br />
Is This Product Used In The:<br />
Price Home Business<br />
Product Features<br />
How Did You Learn About This Product:<br />
<strong>Avanti</strong> <strong>Products</strong> Reputation<br />
Advertising<br />
Product Quality In Store Demo Personal Demo<br />
Salesperson Recommendation<br />
Other_______________________________<br />
Friend/Relative Recommendation<br />
Comments____________________________<br />
Warranty<br />
_____________________________________<br />
Other_______________________<br />
_____________________________________<br />
57
58<br />
PRINTED IN CHINA