directions for use for the wall mounted wallfix dryer - Brabantia
directions for use for the wall mounted wallfix dryer - Brabantia
directions for use for the wall mounted wallfix dryer - Brabantia

Create successful ePaper yourself
Turn your PDF publications into a flip-book with our unique Google optimized e-Paper software.
4 5<br />
uNfOLDING aND usE<br />
DÉPLOIEMENT ET usaGE<br />
auskLaPPEN uND GEBrauch<br />
aPErTura ED usO<br />
DEsPLEGar y usar<br />
DEsDOBrar E usE<br />
OPENEN EN GEBruIk<br />
CLICK!<br />
01 02<br />
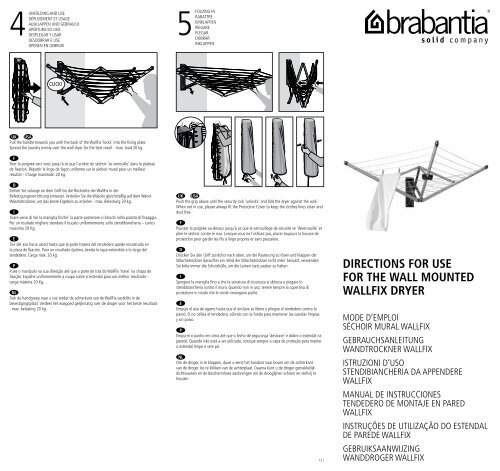
Pull <strong>the</strong> handle towards you until <strong>the</strong> back of <strong>the</strong> Wallfix ‘locks’ into <strong>the</strong> fixing plate.<br />
spread <strong>the</strong> laundry evenly over <strong>the</strong> <strong>wall</strong> <strong>dryer</strong> <strong>for</strong> <strong>the</strong> best result - max. load 20 kg.<br />
03<br />
Tirer la poignée vers vous jusqu’à ce que l’arrière du séchoir ‘se verrouille’ dans le plateau<br />
de fixation. répartir le linge de façon uni<strong>for</strong>me sur le séchoir mural pour un meilleur<br />
résultat - charge maximale: 20 kg.<br />
04<br />
Ziehen sie solange an dem Griff bis die rückseite der Wallfix in der<br />
Befestigungsvorrichtung einrastet. Verteilen sie die Wäsche gleichmäßig auf dem Wand-<br />
Wäschetrockner, um das beste Ergebnis zu erzielen - max. Belastung 20 kg.<br />
05<br />
Tirare verso di Voi la maniglia finche’ la parte posteriore si blocchi nella piastra di fissaggio.<br />
Per un risultato migliore stendere il bucato uni<strong>for</strong>memente sullo stendibiancheria – carico<br />
massimo 20 kg.<br />
06<br />
Tire del asa hacia usted hasta que la parte trasera del tendedero quede encastrada en<br />
la placa de fijación. Para un resultado óptimo, tienda la ropa extendida a lo largo del<br />
tendedero. carga máx. 20 kg.<br />
07<br />
Puxe o manípulo na sua direcção até que a parte de trás do Wallfix ‘trave’ na chapa de<br />
fixação. Espalhe uni<strong>for</strong>memente a roupa sobre o estendal para um melhor resultado -<br />
carga máxima 20 kg.<br />
08<br />
Trek de handgreep naar u toe totdat de achterkant van de Wallfix vastklikt in de<br />
bevestigingsplaat. Verdeel het wasgoed gelijkmatig over de droger voor het beste resultaat<br />
- max. belasting 20 kg.<br />
fOLDING IN<br />
raBaTTrE<br />
EINkLaPPEN<br />
PIEGarE<br />
PLEGar<br />
DOBrar<br />
INkLaPPEN<br />
01 02<br />
Push <strong>the</strong> grip above until <strong>the</strong> security lock ‘unlocks’ and fold <strong>the</strong> <strong>dryer</strong> against <strong>the</strong> <strong>wall</strong>.<br />
When not in <strong>use</strong>, please always fit <strong>the</strong> Protective cover to keep <strong>the</strong> clo<strong>the</strong>s lines clean and<br />
dust free.<br />
03<br />
Pousser la poignée au-dessus jusqu’à ce que le verrouillage de sécurité se ‘déverrouille’ et<br />
plier le séchoir contre le mur. Lorsque vous ne l’utilisez pas, placer toujours la housse de<br />
protection pour garder les fils à linge propres et sans poussière.<br />
04<br />
Drücken sie den Griff zunächst nach oben, um die rasterung zu lösen und klappen der<br />
Wäschetröckner daraufhin ein. Wird der Wäschetröckner nicht mehr benutzt, verwenden<br />
sie bitte immer die schutzhülle, um die Leinen stets sauber zu halten.<br />
05<br />
spingere la maniglia fino a che la serratura di sicurezza si sblocca e piegare lo<br />
stendibiancheria contro il muro. Quando non in uso, tenere sempre la copertina di<br />
protezione in modo che le corde rimangano pulite.<br />
06<br />
Empuje el asa de agarre hasta que el enclave se libere y pliegue el tendedero contra la<br />
pared. si no utiliza el tendedero, cúbralo con la funda para mantener las cuerdas limpias<br />
y sin polvo.<br />
07<br />
Empurre o punho em cima até que o fecho de segurança ‘destrave’ e dobre o estendal na<br />
parede. Quando não está a ser utilizado, coloque sempre a capa de proteção para manter<br />
o estendal limpo e sem pó.<br />
08<br />
Om de droger in te klappen, duwt u eerst het handvat naar boven om de achterkant<br />
van de droger los te klikken van de achterplaat. Daarna kunt u de droger gemakkelijk<br />
dichtvouwen en de beschermhoes aanbrengen om de drooglijnen schoon en stofvrij te<br />
houden.<br />
121<br />
DIRECTIONS FOR USE<br />
FOR THE WALL MOUNTED<br />
WALLFIX DRYER<br />
MODE D’EMPLOI<br />
sÉchOIr MuraL WaLLfIx<br />
GEBrauchsaNLEITuNG<br />
WaNDTrOckNEr WaLLfIx<br />
IsTruZIONI D’usO<br />
sTENDIBIaNchErIa Da aPPENDErE<br />
WaLLfIx<br />
MaNuaL DE INsTruccIONEs<br />
TENDEDErO DE MONTajE EN ParED<br />
WaLLfIx<br />
INsTruÇÕEs DE uTILIZaÇÃO DO EsTENDaL<br />
DE ParEDE WaLLfIx<br />
GEBruIksaaNWIjZING<br />
WaNDDrOGEr WaLLfIx
1<br />
PackaGING cONTENTs<br />
cONTENu DE L’EMBaLLaGE<br />
INhaLT VErPackuNG<br />
cONTENuTO cONfEZIONE<br />
cONTENIDO DEL PaQuETE<br />
cONTEÚDO Da EMBaLaGEM<br />
INhOuD VErPakkING<br />
1 x<br />
1 x<br />
4x<br />
01 02<br />
Important:<br />
• <strong>for</strong> a secure attachment to a brick <strong>wall</strong>, always drill into <strong>the</strong> bricks – never into <strong>the</strong> joints<br />
• <strong>use</strong> a ø 8 mm drill and only <strong>use</strong> <strong>the</strong> enclosed fixing materials. fix <strong>the</strong> Wallfix onto a solid<br />
<strong>wall</strong> or surface!<br />
03<br />
Important:<br />
• Pour une fixation en toute sécurité sur un mur en briques, toujours percer dans la brique –<br />
jamais dans les joints!<br />
• utiliser un <strong>for</strong>et de diamètre 8 mm et utiliser uniquement le matériel fournis. fixer le<br />
séchoir mural dans un mur ou une surface solide!<br />
04<br />
Wichtig:<br />
• für eine sichere Wandbefestigung bohren sie bitte direkt in die steine – nicht in die fugen!<br />
• Verwenden sie einen 8 mm Bohrer und benutzen ausschließlich das beiliegende<br />
Befestigungsmaterial. Befestigen sie den Wandwäschetrockner an einer soliden Wand!<br />
05<br />
Importante:<br />
• Per un fissaggio sicuro ad una parete in mattoni, non <strong>for</strong>are mai le giunture ma solo il<br />
mattone!<br />
• usare un trapano di ø 8 mm. utilizzando solo il materiale di fissaggio incluso. fissare lo<br />
stendibiancheria ad un muro o superficie solidi!<br />
06<br />
Importante:<br />
• Para una sujeción segura a una pared de ladrillo debe taladrar siempre en el ladrillo y no<br />
en las juntas!<br />
• <strong>use</strong> una broca de ø 8 mm y utilice únicamente el material de fijación suministrado con el<br />
tendedero. ¡fije el tendedero a una pared o a una superficie sólida!<br />
07<br />
Importante:<br />
• Para uma fixação segura numa parede de tijolo, perfure sempre nos tijolos – nunca nas<br />
juntas!<br />
• utilize uma broca com 8 mm de diâmetro e somente as peças de fixação em anexo. fixe o<br />
estendal de parede numa parede ou superfície resistente!<br />
08<br />
Belangrijk:<br />
• Voor een stevige bevestiging in een (bak)stenen muur altijd in de stenen boren - nooit in<br />
de voegen!<br />
• Gebruik een ø 8 mm boor en gebruik uitsluitend het bijgeleverde bevestigingsmateriaal.<br />
Bevestig de wanddroger op een stevige muur of ondergrond!<br />
1 x<br />
4x<br />
1x<br />
2x<br />
4x<br />
4x<br />
2<br />
rEQuIrED sPacE aND BEsT fIxING hEIGhT<br />
EsPacE rEQuIs ET hauTEur DE fIxaTION IDÉaLE<br />
BENÖTIGTE fLÄchE uND EMPfOhLENE BEfEsTIGuNGshÖhE<br />
sPaZIO D’INGOMBrO ED aLTEZZa IDEaLE DI fIssaGGIO<br />
EsPacIO NEcEsarIO y aLTura DE fIjacIÓN MÁs aPrOPIaDa<br />
EsPaÇO NEcEssÁrIO E aLTura IDEaL Para fIxaÇÃO<br />
BENODIGDE ruIMTE EN DE IDEaLE hOOGTE<br />
184 cm<br />
182 cm<br />
01 02<br />
The correct fixing height is easy to determine: <strong>the</strong> upper drilling holes should be at your<br />
ideal working height. Please note that <strong>the</strong>re must be at least 350 mm of free space above<br />
<strong>the</strong> fixing plate <strong>for</strong> holding <strong>the</strong> Wallfix!<br />
03<br />
La hauteur de fixation correcte est facilement déterminée: les trous percés en haut doivent<br />
être à votre hauteur idéale d’utilisation. Prenez en compte un minimum de 350 mm<br />
d’espace libre au-dessus du plateau de fixation pour plier le séchoir!<br />
04<br />
Die optimale Befestigungshöhe ist einfach zu bestimmen: die oberen Bohrlöcher<br />
sollten auf Ihrer idealen arbeitshöhe liegen. Bitte beachten sie, dass über der<br />
Befestigungsvorrichtung mindestens 350 mm frei bleiben, um den Wandwäschetrockner<br />
a<strong>use</strong>inanderschieben zu können!<br />
05<br />
facile determinare l’altezza di fissaggio corretta: i <strong>for</strong>i di per<strong>for</strong>azione superiori devono<br />
trovarsi alla vostra altezza di lavoro ideale. considerare uno spazio libero di almeno 350<br />
mm sopra la piastra di fissaggio per piegare lo stendibiancheria!<br />
06<br />
La altura de fijación correcta puede determinarse fácilmente: debe colocar los taladros<br />
superiores a su altura ideal de trabajo. ¡recuerde que debe haber un espacio libre mínimo<br />
de 350 mm por encima de la placa de fijación para que el tendedero pueda plegarse!<br />
07<br />
a altura correcta para fixação é fácil de determinar: os furos superiores deverão estar à<br />
altura de trabalho ideal. Tenha em atenção que deverá existir um espaço livre com pelo<br />
menos 350 mm acima da chapa de fixação para desdobrar o Wallfix!<br />
08<br />
De ideale hoogte is gemakkelijk vast te stellen: de bovenste boorgaten moeten op<br />
dezelfde hoogte komen als uw ideale reikhoogte. Let op dat er altijd minstens 350 mm vrij<br />
is boven de bevestigingsplaat om de Wallfix uit te kunnen klappen!<br />
8a<br />
± 350 mm<br />
8 mm<br />
3<br />
fIxING TO ThE WaLL<br />
fIxaTION MuraLE<br />
WaNDBEfEsTIGuNG<br />
fIssaGGIO a ParETE<br />
fIjacIÓN a La ParED<br />
fIxaÇÃO À ParEDE<br />
BEVEsTIGING<br />
100 mm<br />
90 mm<br />
392 mm