EVAPORADORES ROTATIVOS ROTARY EVAPORATORS ... - Auxilab
EVAPORADORES ROTATIVOS ROTARY EVAPORATORS ... - Auxilab
EVAPORADORES ROTATIVOS ROTARY EVAPORATORS ... - Auxilab

Create successful ePaper yourself
Turn your PDF publications into a flip-book with our unique Google optimized e-Paper software.
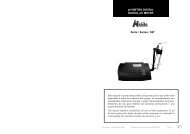
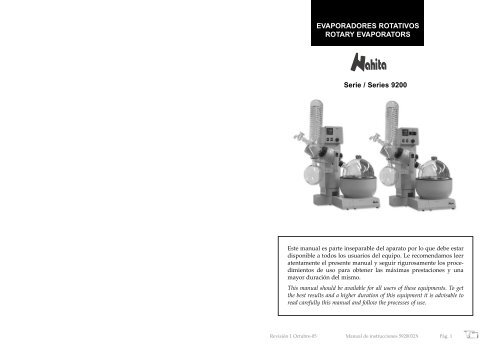
<strong>EVAPORADORES</strong> <strong>ROTATIVOS</strong><br />
<strong>ROTARY</strong> <strong>EVAPORATORS</strong><br />
Serie / Series 9200<br />
Este manual es parte inseparable del aparato por lo que debe estar<br />
disponible a todos los usuarios del equipo. Le recomendamos leer<br />
atentamente el presente manual y seguir rigurosamente los procedimientos<br />
de uso para obtener las máximas prestaciones y una<br />
mayor duración del mismo.<br />
This manual should be available for all users of these equipments. To get<br />
the best results and a higher duration of this equipment it is advisable to<br />
read carefully this manual and follow the processes of use.<br />
Revisión 1 Octubre-05 Manual de instrucciones 5920032X Pág. 1
CASTELLANO<br />
Gracias por haber adquirido este equipo. Deseamos sinceramente que disfrute del evaporador<br />
rotativo Nahita serie 9200. Le recomendamos que cuide el equipo conforme a lo<br />
expuesto en este manual.<br />
Nahita desarrolla sus productos según las directrices del marcado CE y haciendo hincapié<br />
en la ergonomía y seguridad del usuario. La calidad de los materiales empleados en<br />
la fabricación y el correcto proceder le permitirán disfrutar del equipo por muchos años.<br />
El uso incorrecto o indebido del equipo puede dar lugar a accidentes, descargas eléctricas,<br />
cortocircuitos, fuegos, lesiones, etc. Lea el punto de Mantenimiento, donde se recogen<br />
aspectos de seguridad.<br />
LEA DETALLADAMENTE ESTE MANUAL DE INSTRUCCIONES ANTES DE<br />
OPERAR CON ESTE EQUIPO CON EL FIN DE OBTENER LAS MÁXIMAS PRES-<br />
TACIONES Y UNA MAYOR DURACIÓN DEL MISMO.<br />
Tenga especialmente presente lo siguiente:<br />
• Este manual es parte inseparable del evaporador rotativo Nahita serie 9200, por lo que<br />
debe estar disponible para todos los usuarios del equipo.<br />
• Debe manipularse siempre con cuidado evitando los movimientos bruscos, golpes, caídas<br />
de objetos pesados o punzantes; evitar el derrame de líquidos en su interior<br />
• Nunca desmonte el equipo para repararlo usted mismo, además de perder la garantía<br />
podría producir un funcionamiento deficiente de todo el equipo, así como daños a las personas<br />
que lo manipulan.<br />
• Para prevenir fuego o descargas eléctricas, evite los ambientes secos y polvorientos. Si<br />
esto ocurre, desenchufar inmediatamente el equipo de la toma de corriente.<br />
• Cualquier duda puede ser aclarada por su distribuidor (instalación, puesta en marcha,<br />
funcionamiento). Usted puede también mandarnos sus dudas o sugerencias a la siguiente<br />
dirección de correo del Servicio Técnico Nahita (asistencia@auxilab.es) o bien llamando<br />
al Tel: 807117040 (0,30Euros/min).<br />
• Este equipo está amparado por la Ley de garantías y bienes de consumo (10/2003).<br />
• No se consideran en garantía las revisiones del equipo.<br />
• La manipulación del equipo por personal no autorizado provocará la pérdida total de<br />
la garantía.<br />
• Los fusibles o accesorios, así como la pérdida de los mismos, no están cubiertos por<br />
dicha garantía. Tampoco estarán cubiertos por el periodo de garantía las piezas en su desgaste<br />
por uso natural.<br />
• Asegúrese de guardar la factura de compra para tener derecho de reclamación o prestación<br />
de la garantía. En caso de enviar el equipo al Servicio Técnico adjuntar factura o<br />
copia de la misma como documento de garantía.<br />
• Rellene y envíe la garantía antes de los 15 días después de la compra.<br />
• El fabricante se reserva los derechos a posibles modificaciones y mejoras sobre este<br />
manual y equipo.<br />
¡ATENCIÓN!<br />
NO SE ADMITIRA NINGUN APARATO PARA REPARAR QUE NO<br />
ESTE DEBIDAMENTE LIMPIO Y DESINFECTADO.<br />
ANNEX I: CE CERTIFICATE<br />
AUXILAB S.L.<br />
CE DECLARATION OF CONFORMITY<br />
NAHITA <strong>ROTARY</strong> <strong>EVAPORATORS</strong> 9200 of AUXILAB, S.L.<br />
for the Directive of Machines (89/392/CEE modified)<br />
and the regulations adopted for their transposition<br />
NAME OF THE MANUFACTURER / IMPORTER:<br />
AUXILAB, S.L.<br />
ADDRESS: Polígono Morea Norte, 8<br />
31191 Beriáin (Navarra)<br />
WE STATE THAT:<br />
Are designed and manufactured according to:<br />
Directive 89/392/CEE, including the modifications and the national regulations<br />
that transpose them.<br />
Directive 73/23/CEE modified over the electric security.<br />
Directive 89/336/CEE modified over the electromagnetic compatibility.<br />
And that the following harmonized rules have been applied (or part of them):<br />
•<br />
•<br />
•<br />
UNE 292-1/-2/-2/A1,UNE-EN 1050, UNE-EN 614-1,UNE-EN 1037,<br />
UNE-EN 1088, UNE-EN 547, UNE-EN 953, UNE-EN 294, UNE-EN 418,<br />
UNE-EN 894-1, UNE-EN 894-2, UNE-EN 954-1, UNE-EN 60204-1,<br />
UNE 61010-1/A2, UNE-EN61010-2-051.<br />
BERIAIN 21st October 2005<br />
NAHITA <strong>ROTARY</strong> <strong>EVAPORATORS</strong> SERIES 9200<br />
CODES 59200320 and 59200321<br />
ENGLISH<br />
INDICE DE IDIOMAS<br />
Castellano<br />
Inglés<br />
2-8<br />
9-15<br />
Signed by: ALFONSO AINCIBURU SANZ<br />
DIRECTOR/MANAGER<br />
Polígono Morea Norte, 8 31191 Beriain (Navarra) - Spain. Tel. 948 310 513 Fax 948 312 071<br />
Internet: www.auxilab.es · Email: correo@auxilab.es<br />
Pág. 2 Manual de instrucciones 5920032X Revisión 1 Octubre-05<br />
Version 1 October-05 Instruction manual 5920032X Page 15
ENGLISH<br />
• You should put the equipment in a horizontal plane stable table, having a safety area of<br />
at least 30 cm per side.<br />
• Do not place the equipment near any warm supply (burners, blowlamps, etc), nor expose<br />
it directly to the sun. Avoid vibrations, dust and dry environments.<br />
• During its functioning dangerous materials such as flammable or pathological substances<br />
must be out of the safety area.<br />
• When you are not using the rotary evaporator for a long period of time please make<br />
sure it is unplugged in order to avoid possible accidents.<br />
• It is essential to have the equipment switched off and unplugged from the net before<br />
cleaning, checking components or replacing any piece (e.g. replacement of a fuse).<br />
• Never try to repair the equipment by yourself, since you will lose the warranty and may<br />
provoke damages to the general operating system or the electrical installation, as well as<br />
injuries to the people that usually handle the equipment (burns, hurts…).<br />
• Try not to spill any liquid on the control panel, though it is properly insulated. In case<br />
you have any doubts do please immediately unplug the evaporator (see Maintenance).<br />
• Made under the European regulations for electrical security, electromagnetic compatibility<br />
and security on machines.<br />
5. MAINTENANCE AND CLEANING<br />
To get the best results and a higher duration of this equipment it is essential to follow<br />
the processes of use.<br />
Note: All the processes of use mentioned below will not have any value unless you keep<br />
a continued and careful maintenance.<br />
• Please follow the processes of use of this manual.<br />
• This manual should be available for all users of this equipment.<br />
• Always use original components and supplies. Other devices can be similar but they<br />
can damage the equipment.<br />
• The Nahita rotary evaporator is supplied with a Schuko standard wire. It has to be plugged<br />
to an earth connection and the socket should be handy and ready to unplug the<br />
equipment in case of emergency.<br />
• Never try to repair the equipment by yourself, since you will lose the warranty and may<br />
provoke damages to the general operating system or the electrical installation, as well as<br />
injuries to the people that usually handle the evaporator (burns, hurts…) or damages in<br />
nearby equipments.<br />
• In the event of breakdown please contact your distributor to overhaul through Nahita<br />
Technical Assistance Department.<br />
Cleaning<br />
• Never use scourers or substances that can grate for cleaning metallic parts such as stainless<br />
steel, aluminium, coatings, etc. as they damage the evaporator and produce an early<br />
ageing of the equipment.<br />
• Use a fluff-free cloth dampened with soaped water that does not contain abrasives.<br />
ATTENTION!! IF EQUIPMENTS ARE NOT PROPERLY CLEAN AND DISINFECTED<br />
THEY WOULD NOT BE ALLOWED TO REPAIR BY OUR TECHNICAL SERVICE.<br />
Page 14 Instruction manual 52920032X Version 1 October-05<br />
INDICE DE CONTENIDOS<br />
1. APLICACIONES DEL INSTRUMENTO<br />
2. DESCRIPCIÓN<br />
3. ESPECIFICACIONES TÉCNICAS<br />
4. INSTALACIÓN / PUESTA EN MARCHA<br />
5. MANTENIMIENTO Y LIMPIEZA<br />
ANEXO I: CERTIFICADO CE<br />
1. APLICACIONES DEL INSTRUMENTO<br />
Los evaporadores rotativos Nahita son unos aparatos indispensables en los laboratorios<br />
de Bioquímica, Química Orgánica, Farmacia, etc. en todas aquellas tareas en las que se<br />
requiere una rápida destilación o la concentración de muestras.<br />
El evaporador rotativo es uno de los instrumentos más importantes dentro de un laboratorio.<br />
Con él conseguimos aumentar la superficie de evaporación aplicando calor al<br />
matraz de evaporación mediante un baño de agua y haciéndolo girar. Esto, unido al vacío<br />
que se le aplica al sistema, dobla la velocidad de evaporación en comparación con los<br />
métodos tradicionales.<br />
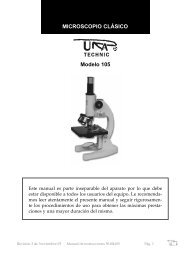
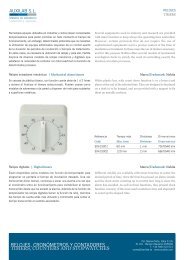
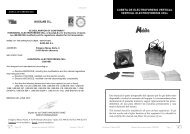
2. DESCRIPCIÓN<br />
Figura 1<br />
4<br />
5<br />
3<br />
Revisión 1 Octubre-05 Manual de instrucciones 5920032X Pág. 3<br />
1<br />
2<br />
CASTELLANO<br />
3<br />
3<br />
4<br />
4<br />
7<br />
8<br />
1. Matraz evaporación<br />
2. Adaptador unión esmerilado<br />
con pieza se sujeción<br />
del matraz de evaporación<br />
y conector<br />
3. Refrigerante<br />
4. Pipeta<br />
5. Matraz receptor
FUSE<br />
PV<br />
ALM<br />
OUT<br />
SV<br />
AT<br />
3. ESPECIFICACIONES TÉCNICAS<br />
Modelo 9200 Modelo 9200/1<br />
Mecanismo elevador motorizado<br />
Con poder de elevación de 130 mm<br />
Angulo de giro para el juego de vidrio 45º 45º<br />
Rango de velocidad 10-200 r.p.m 10-200 r.p.m<br />
Regulación de velocidad analógica Si Si<br />
Indicador de velocidad (display) No Si<br />
Rango de temperatura del baño calefactor<br />
Ambiente -100ºC<br />
Indicador de temperatura digital Si Si<br />
Regulación de temperatura digital Si Si<br />
Sensor de temperatura digital<br />
mediante programador cada ±0.1ºC ±0.1ºC<br />
Precisión ±0.1% ±0.1%<br />
Consumo 1400W 1400W<br />
Alimentación 220-240V 50-60Hz ±10%<br />
Medidas<br />
860x600x430 mm<br />
4. INSTALACIÓN / PUESTA EN MARCHA<br />
Inspección preliminar<br />
• Desembale el evaporador rotativo, retire el plástico que lo envuelve y quite la protección<br />
de poliespán en que viene encajada. Retire todas las protecciones y, sin conectar el<br />
evaporador rotativo a la red eléctrica, asegúrese de que no presenta ningún daño debido<br />
al transporte. De ser así, comuníquelo inmediatamente a su transportista o suministrador<br />
para que pueda hacer las debidas reclamaciones en el plazo establecido.<br />
• Guarde el embalaje, ya que siempre se deben realizar las devoluciones en su embalaje<br />
original con todos los accesorios suministrados.<br />
• Compruebe los accesorios que usted debe recibir junto al equipo:<br />
- Rotavapor<br />
- Baño calefactor o termostatico<br />
- Refrigerante<br />
- Tubo entrada vacío<br />
- Matraces de evaporación 2000mL<br />
CASTELLANO<br />
- Matraces receptor 2 unidades de 1000mL<br />
- Pieza esmerilada de unión matraz- motor<br />
- Clips 24/29 63226224<br />
- Garantía<br />
- Manual de instrucciones<br />
No aceptaremos ningún equipo en periodo de devolución sin que vaya en su embalaje<br />
original.<br />
Instalación<br />
• Antes de comenzar a utilizar el instrumento, es conveniente familiarizarse con sus componentes<br />
y fundamentos básicos, así como con las funciones de sus controles.<br />
LEA DETALLADAMENTE ESTE MANUAL DE INSTRUCCIONES ANTES DE<br />
OPERAR CON ESTE EQUIPO CON EL FIN DE OBTENER LAS MÁXIMAS PRES-<br />
TACIONES Y UNA MAYOR DURACIÓN DEL MISMO.<br />
Pág. 4 Manual de instrucciones 5920032X Revisión 1 Octubre-05<br />
ENGLISH<br />
• The rotary evaporator's model 9200 glass kit can be rotated up to 45º. Select the angle<br />
Picture 4<br />
B A<br />
you want to work with by using the glass kit's turning angle<br />
device.<br />
• The rotary evaporator is supplied with a Schuko standard<br />
wire.<br />
• Please insert the wire that feeds the AC electric current in the<br />
base of current 220V 50Hz ±10% provided with earth wire and<br />
to the other end to the equipment connector (A ), pic.4.<br />
FUSE<br />
FUSE<br />
• Another Schuko wire is available in order to connect the<br />
equipment to the water bath/heater. Insert one of the extremes<br />
to connector (B) -that is located on the rotary evaporator- then<br />
the other to connector (C), located on the water bath/heater.<br />
C<br />
Neither the manufacturer nor the distributor will assume any responsibility for the<br />
damages produced to the equipment during its installation or damages to persons suffered<br />
by the improper use of the electric connection. The tension should be 220V 50Hz ±10%.<br />
Switching on the equipment<br />
Picture 5<br />
7<br />
6<br />
3<br />
5<br />
POWER<br />
ON<br />
OFF<br />
ºC<br />
HEATING<br />
ON<br />
OFF<br />
r.p.m.<br />
SPEED<br />
2<br />
1<br />
1. Potenciometer, speed adjuster<br />
2. Digital screen, speed indicator (only on model<br />
9200/1)<br />
3. On/off rotor switch<br />
4. On/off thermostatic water bath/heater's resistance<br />
switch<br />
5. Digital screen, temperature indicator<br />
6. Increase temperature<br />
7. Decrease temperature<br />
4<br />
• Select the working temperatura for the thermostatic water bath/heater by pressing button<br />
Heating to On position (I).<br />
• You will see on creen the last temperature selected. In order to program the water<br />
bath/heater's temperature, press (arrow pointing clockwise direction); then, temperature<br />
will be displayed on screen.<br />
• Select the desired temperature by pressing "" and "" , then arrow pointing clockwise<br />
direction) and "000" will be displayed on screen. Now you have temperature programmed.<br />
• In order to start the rotor press On/Off ebutton to position I (adjust the speed with the<br />
help of the speed potenciometer).<br />
• Now we will connect the condenser to the water outflow. As the condenser has two<br />
holes, connect the rubber hoses to each extreme, in and out. Now the equipment is ready<br />
to start working.<br />
Security<br />
• The rotary evaporator must be used by previously qualified staff that knows how the<br />
equipment works thanks to the user manual.<br />
Version 1 October-05 Instruction manual 5920032X Page 13
ENGLISH<br />
• Please put the rotary evaporator on top of a horizontal, plane and stable table making a<br />
free space at least at 30 cm per side. Do not put the equipment near any warm supply (burners,<br />
blowlamps…), nor expose it directly to the sun, etc.<br />
• Avoid inflammable or toxic substances in the working area.<br />
• If you are not using the equipment for a long period of time please make sure it is disconnected<br />
from the net and protected from dust (this way you will avoid accidents and<br />
will extend its working-life).<br />
• Assemble the evaporation system:<br />
a) By the up/down button rise the equipment up to the top.<br />
b) Insert the ground piece for fixing flask & rotor on the evaporation system that is fixed<br />
by inserting the wider part in the system.<br />
c) Fix it by using the black piece. In order to do this you will have to insert either a rod<br />
or a screwdriver into a hole that is located on the metallic part of the rotor (pic. 2). Turn<br />
the black thread until you find the mentioned hole, then put the rod/screwdriver in. Now<br />
you can proceed to tightening the ground piece. Before placing the evaporation flask on<br />
the ground part of the union ground piece for fixing flask& rotor do please not forget to<br />
put some Vaseline to avoid breakage when disassembling. Then, place properly the flask<br />
and fasten it with a clip for grinding unions.<br />
Picture 2<br />
1 2 3 4<br />
CASTELLANO<br />
• Coloque el evaporador sobre una mesa horizontal, plana y estable, creando un espacio<br />
libre al menos de 30 cm por cada lado. No coloque el equipo en zonas próximas a fuentes<br />
de calor (mecheros, sopletes...), ni lo exponga directamente a la luz del sol, etc.<br />
• Evite en el lugar de trabajo productos inflamables o tóxicos.<br />
• Cuando no vaya a hacer uso del evaporador rotativo durante largos períodos de tiempo,<br />
asegúrese de que esté desconectado de la red y protéjalo del polvo (evitando así posibles<br />
accidentes y prolongando la vida útil del equipo).<br />
• Realice el montaje del sistema de evaporación.<br />
a) Suba mediante el botón ascenso/descenso el equipo hasta arriba.<br />
b) Inserte la pieza esmerilada de unión matraz- motor en el sistema fijo de evaporación<br />
e introduzca la parte más ancha en el interior del sistema.<br />
c) Fíjelo con la pieza negra. Para ello tendremos que sujetar con una varilla/ destornillador<br />
. Busque el orificio que se encuentra en la parte metálica del rotor (ver fig.2), gire la<br />
rosca negra hasta que encuentre el orificio, una vez localizado introduzca en el orificio la<br />
varilla, destornillador ya puede sujetar la pieza unión matraz-motor esmerilado. Antes<br />
de poner el matraz de evaporación en la parte esmerilada de la pieza de unión matrazrotavapor,<br />
ponga vaselina para evitar su rotura cuando se vaya a desmontar. Ponga el<br />
matraz y sujételo con un clip unión esmerilado.<br />
Figura 2<br />
1 2 3 4<br />
Assembling the condenser<br />
• Place the condenser and fasten it with a clip for grinding unions. Before placing the vaccuuming<br />
pipette and receptor flask put some Vaseline to avoid breakage when disassembling<br />
(pic.3). Place the vaccuuming pipette and the receptor flask, then fasten it with a clip<br />
for grinding unions.<br />
Picture 3<br />
1 2<br />
• Fill the thermostatic water<br />
bath with water<br />
• Make descend the equipment<br />
to the desired height by<br />
pressing the button up/<br />
down. Thus we will ease the<br />
changing of flasks, replacing<br />
pieces, etc.<br />
Montaje del refrigerante<br />
• Coloque el refrigerante y fíjelo con la pieza negra (rosca). Antes de poner el la pipeta de<br />
vacío y el matraz receptor ponga vaselina para evitar su rotura cuando se vaya a desmontar.<br />
Ponga la pipeta de vacío y el matraz receptor (fig.3); sujételo con un clip unión<br />
esmerilado.<br />
Figura 3<br />
1 2<br />
• Llene el baño termostático<br />
con agua.<br />
• Baje mediante el botón<br />
ascenso/descenso el equipo<br />
hasta la altura deseada. De<br />
esta manera facilitamos el<br />
trabajo de cambio de matraz,<br />
sustitución de piezas, etc.<br />
Page 12 Instruction manual 52920032X Version 1 October-05<br />
Revisión 1 Octubre-05 Manual de instrucciones 5920032X Pág. 5
FUSE<br />
PV<br />
ALM<br />
OUT<br />
SV<br />
AT<br />
CASTELLANO<br />
• El evaporador rotativo tiene la posibilidad de giro del juego de vidrio hasta 45º. Ponga<br />
Figura 4<br />
B A<br />
el ángulo con el que quiera trabajar mediante el dispositivo de<br />
giro del sistema de vidrio.<br />
• Una vez montado el sistema de evaporación enchufamos el<br />
equipo a la red eléctrica.<br />
• El evaporador rotativo Nahita se suministra con un cable<br />
Schuko estándar.<br />
• Inserte el cable de alimentación de corriente alterna (CA) a la<br />
base de corriente 220V 50Hz ±10% provista de toma de tierra y<br />
por el otro extremo al conector del evaporador rotativo (A ), fig.4.<br />
• Para conectar el equipo al baño termostático, disponemos de<br />
otro cable Schuko, insertamos uno de los extremos al conector<br />
(B) y el otro al conector (C) que dispone el baño termostático.<br />
C<br />
Ni el fabricante ni el distribuidor asumirán responsabilidad alguna por los daños ocasionados<br />
al equipo, instalaciones o lesiones sufridas a personas debido a la inobservancia<br />
del correcto procedimiento de conexión eléctrica. La tensión debe ser de 220V 50Hz ±10%.<br />
FUSE<br />
Encendido el equipo<br />
Figura 5<br />
7<br />
6<br />
3<br />
5<br />
POWER<br />
ON<br />
OFF<br />
FUSE<br />
ºC<br />
HEATING<br />
ON<br />
OFF<br />
r.p.m.<br />
SPEED<br />
2<br />
1<br />
1. Potenciómetro regulador de velocidad<br />
2. Pantalla digital indicador de velocidad (solo<br />
modelo 9200/1)<br />
3. Interruptor de encendido y apagado del motor<br />
Interruptor de encendido y apagado de la resistencia<br />
del baño termostático<br />
4. Pantalla digital indicador de la temperatura<br />
5. Incremento temperatura<br />
6. Disminución temperatura<br />
4<br />
• Seleccione la temperatura del baño de agua con la que quiera trabajar, para ello pulse el<br />
interruptor Heating en la posición On (I).<br />
• En la pantalla se visualizara la ultima temperatura seleccionada. Para programar la temperatura<br />
del baño pulse (flecha sentido agujas del reloj); visualizará la temperatura.<br />
• Con los pulsadores "" y "" ponga la temperatura deseada, pulse de nuevo (flecha<br />
sentido agujas del reloj) y en pantalla aparecerá "000". Ya tiene programada la temperatura.<br />
• Para poner en funcionamiento el motor pulse el interruptor On/Off en la posición I<br />
(regule la velocidad con el potenciómetro de velocidad).<br />
• Conectaremos el refrigerante a la salida de agua. El refrigerante tiene dos salidas, conectar<br />
las gomas de entrada y salida. Ya tiene preparado el equipo.<br />
Seguridad<br />
• El evaporador rotativo debe ser utilizado por personal cualificado previamente, que<br />
conozca el equipo y su manejo mediante el manual de uso.<br />
• Coloque el equipo sobre una mesa horizontal, plana y estable, creando un espacio libre<br />
al menos de 30 cm por cada lado.<br />
Pág. 6 Manual de instrucciones 5920032X Revisión 1 Octubre-05<br />
3. TECHNICAL SPECIFICATIONS<br />
Model 9200 Model 9200/1<br />
Motor raising mechanism<br />
With a raising power of 130 mm<br />
Turning angle for the glass set 45º 45º<br />
Speed range 10-200 r.p.m 10-200 r.p.m<br />
Analogic speed control Yes Yes<br />
Speed indicator (display) No Yes<br />
Bath / heater temperature range<br />
Room -100ºC<br />
Digital temperature indicator Yes Yes<br />
Digital temperature control Yes Yes<br />
Temperature sensor by programmer each ±0.1ºC ±0.1ºC<br />
Precision ±0.1% ±0.1%<br />
Consumption 1400W 1400W<br />
Power supply 220-240V 50-60Hz ±10%<br />
Size<br />
860x600x430 mm<br />
4. INSTALLATION / SETTING UP<br />
Preliminary inspection<br />
• Unwrap the rotary evaporator, take off the involving plastic and take off the polispan<br />
protection in which it comes fitted. Take off all the protective items and, without connecting<br />
the equipment to the net, make sure that it does not present any damage because of<br />
the shipment. In case the equipment presents any damage tell it immediately to your<br />
transport agent or dealer so that they can make the claims in the correct time limit.<br />
• Please keep the original wrapping; you will always need it for returns enclosed with all<br />
the accessories supplied.<br />
• Please check that all the accessories are enclosed with the equipment:<br />
- Rotary Evaporator<br />
- Thermostatic water bath or heater<br />
- Condenser<br />
- Vaccuuming pipette<br />
- Evaporation flasks 2000 mL<br />
- 2 receptor flasks 1000 mL<br />
- Ground piece for fixing flask &rotor<br />
- Clips 24/29 63226224<br />
- Warranty<br />
- Instruction manual<br />
We will not accept the return of any equipment that does not come in its original wrapping.<br />
Installation<br />
• Before using this instrument, it is convenient for you to familiarize with its components<br />
and basic essentials.<br />
TO GET THE BEST RESULTS AND A HIGHER DURATION OF THE EQUIP-<br />
MENT IT IS ADVISABLE TO READ THOROUGHLY THIS MANUAL BEFORE<br />
OPERATING WITH THE EQUIPMENT.<br />
Version 1 October-05 Instruction manual 5920032X Page 11<br />
ENGLISH
INDEX OF CONTENTS<br />
1. USES OF THE INSTRUMENT<br />
2. DESCRIPTION<br />
3. TECHNICAL SPECIFICATIONS<br />
4. INSTALLATION/SETTING UP<br />
5. MANTEINANCE AND CLEANING<br />
ANNEXE I: CE CERTIFICATE<br />
1. USES OF THE INSTRUMENT<br />
Nahita rotary evaporators are essential equipments in fields such as Biochemistry,<br />
Organic Chemistry, Pharmacy, etc. for all the taskss where you need either a quick distillation<br />
or a sample concentration.<br />
The rotary evaporator is one of the most important equipments in the laboratory. With<br />
this instrument, we can increase the evaporation surface by applying heat to the evaporation<br />
flask with the help of a water bath and by making the flask spinning. This fact linked<br />
to the vaccuum applied to the complete system doubles the evaporation speed in comparison<br />
with traditional methods.<br />
2. DESCRIPTION<br />
Picture 1<br />
4<br />
3<br />
1<br />
ENGLISH<br />
1. Evaporation flask<br />
2. Ground joint adapter<br />
with a fastening piece for<br />
the evaporation flask and<br />
connector<br />
3. Condenser<br />
4. Pipette<br />
5. Receptor flask<br />
10<br />
10<br />
11<br />
11<br />
14<br />
15<br />
CASTELLANO<br />
• No coloque el evaporador en zonas próximas a fuentes de calor (mecheros, sopletes...),<br />
ni exponga el equipo directamente a la luz del sol. Evite las vibraciones, el polvo y<br />
ambientes muy secos.<br />
• Durante su funcionamiento el material peligroso como líquidos inflamables o material<br />
patológico, deben estar fuera de esta área.<br />
• Cuando no vaya a hacer uso del equipo por largos períodos de tiempo, asegúrese de<br />
que está desconectado de la red para evitar posibles accidentes.<br />
• Para cualquier manipulación de limpieza, verificación de los componentes o sustitución<br />
de cualquier componente (Ej.: sustitución de fusible) es imprescindible apagar el equipo y<br />
desconectarlo de la toma de corriente.<br />
• No intente repararlo usted mismo; además de perder la garantía puede causar daños en<br />
el funcionamiento general del equipo, así como lesiones a la persona (quemaduras, heridas...)<br />
y daños a la instalación eléctrica.<br />
• Procure que no entre agua en el cuadro de controles, aunque éste se encuentre debidamente<br />
aislado. Si por cualquier causa sospecha que ha entrado agua o cualquier líquido<br />
desconecte el equipo inmediatamente (ver Mantenimiento).<br />
• Fabricado según las directivas europeas de seguridad eléctrica, compatibilidad electromagnética<br />
y seguridad en máquinas.<br />
5. MANTENIMIENTO Y LIMPIEZA<br />
Para un adecuado funcionamiento del evaporador rotativo Nahita es necesario seguir<br />
algunas recomendaciones.<br />
Nota: Todas las normas de utilización citadas anteriormente carecerán de valor si no se<br />
realiza una continua labor de mantenimiento.<br />
• Siga las instrucciones y advertencias relativas a este manual.<br />
• Tenga este manual siempre a mano para que cualquier persona pueda consultarlo.<br />
• Utilice siempre componentes y repuestos originales. Puede ser que otros dispositivos<br />
sean parecidos, pero su empleo puede dañar el equipo.<br />
• El evaporador rotativo Nahita dispone de un cable de red Schuko; este debe conectarse<br />
a una toma de corriente que esté conectada a tierra, debiendo quedar a mano para poder<br />
desconectarlo en caso de emergencia.<br />
• No intente repararlo usted mismo; además de perder la garantía puede causar daños en<br />
el funcionamiento general del evaporador, así como lesiones a la persona (quemaduras,<br />
heridas...) y daños a la instalación eléctrica, o equipos eléctricos cercanos.<br />
• En caso de avería diríjase a su proveedor para la reparación través del Servicio Técnico<br />
de Nahita.<br />
5<br />
2<br />
Limpieza<br />
• Para la limpieza de las partes metálicas, acero inoxidable, aluminio, pinturas, etc. nunca<br />
utilice estropajos o productos que puedan rallar, ya que deterioran el evaporador rotativo<br />
Nahita, limitando la vida útil del equipo.<br />
• Para la limpieza del equipo recomendamos se utilice un trapo libre de pelusa humedecido<br />
con agua jabonosa que no contenga productos abrasivos.<br />
¡ATENCIÓN! NO SE ADMITIRA NINGUN APARATO PARA REPARAR QUE NO<br />
ESTE DEBIDAMENTE LIMPIO Y DESINFECTADO.<br />
Page 10 Instruction manual 52920032X Version 1 October-05<br />
Revisión 1 Octubre-05 Manual de instrucciones 5920032X Pág. 7
ANEXO I: CERTIFICADO CE<br />
AUXILAB S.L.<br />
DECLARACIÓN CE DE CONFORMIDAD<br />
EVAPORADOR ROTATIVO NAHITA de <strong>Auxilab</strong>, S.L<br />
a la Directiva de Máquinas (89/392/CEE modificada)<br />
y a las reglamentaciones adoptadas para su transposición<br />
NOMBRE DEL FABRICANTE / IMPORTADOR:<br />
AUXILAB, S.L.<br />
DIRECCIÓN: Polígono Morea Norte, 8<br />
31191 Beriáin (Navarra)<br />
DECLARAMOS QUE:<br />
EVAPORADOR ROTATIVO NAHITA SERIE 9200<br />
REFERENCIAS 59200320 y 59200321<br />
Están diseñados y fabricados de acuerdo a:<br />
Directiva 89/392/CEE, incluidas las modificaciones de la misma, y las reglamentaciones<br />
nacionales que la transponen.<br />
Directiva 89/336/CEE modificada sobre compatibilidad electromagnética.<br />
Directiva 73/23/CEE modificada sobre seguridad eléctrica.<br />
Y que se han aplicado las siguientes normas armonizadas (o parte de ellas):<br />
•<br />
•<br />
•<br />
UNE 292-1/-2/-2/A1,UNE-EN 1050, UNE-EN 614-1,UNE-EN 1037,<br />
UNE-EN 1088, UNE-EN 547, UNE-EN 953, UNE-EN 294, UNE-EN 418,<br />
UNE-EN 894-1, UNE-EN 894-2, UNE-EN 954-1, UNE-EN 60204-1,<br />
UNE 61010-1/A2, UNE-EN61010-2-051.<br />
BERIAIN a 21 de Octubre de 2005<br />
Fdo: ALFONSO AINCIBURU SANZ<br />
DIRECTOR/GERENTE<br />
CASTELLANO<br />
Polígono Morea Norte, 8 31191 Beriain (Navarra) - Spain. Tel. 948 310 513 Fax 948 312 071<br />
Internet: www.auxilab.es · Email: correo@auxilab.es<br />
Pág. 8 Manual de instrucciones 5920032X Revisión 1 Octubre-05<br />
ENGLISH<br />
Thank you for choosing this equipment. We sincerely wish you enjoy the Rotary<br />
Evaporator Model 9200. We highly recomend looking after this equipment according to<br />
what is stated in this manual.<br />
Nahita developes its products according to the CE marking regulations as well as<br />
enphasizing the ergonomics and security for its user. The correct using of the equipment<br />
and its good quality will permit you to enjoy this equipment for years.<br />
The improper use of the equipment can cause accidents and electric discharges, circuit<br />
breakers, fires, damages, etc. Please read the point of Maintenance, where we expose the<br />
security notes.<br />
TO GET THE BEST RESULTS AND A HIGHER DURATION OF THE EQUIP-<br />
MENT IT IS ADVISABLE TO READ THOROUGHLY THIS MANUAL BEFORE<br />
OPERATING WITH THE EQUIPMENT.<br />
Please bear in mind the following:<br />
• This manual should be inseparable from the rotary evaporator model 9200. This manual<br />
should be available for all the users of this equipments<br />
• We should manipulate carefully avoiding the sudden movements, knocks, free fall of<br />
heavy objects, manipulation of sharp objects, please avoid spilling liquids inside the<br />
equipment.<br />
• Never dismantle the different pieces of the rotary evaporator to repair yourself, since it<br />
could produce a defective use of the whole equipment, damage to the users and a loss of<br />
the product warranty.<br />
• To prevent fire or electric discharges avoid dry or dusty environments. In case it may<br />
happen unplug the equipment immediately.<br />
• If you have any doubt about setting up, installation or functioning do not hesitate in<br />
contacting your wholesaler. You can also tell us any doubts or suggestions you have by<br />
contacting Nahita Technical Assistance Department by email to asistencia@auxilab.es or<br />
by telephone: +34 807 117 040 (0,30 Euros/min).<br />
• This equipment is protected under the Warranties and consumer goods regulation<br />
(10/2003).<br />
• Overhaul is not covered by the equipment warranty.<br />
• Operations made by non-qualified staff will automatically produce a loss of the rotary<br />
evaporator's warranty.<br />
• Neither fuses (1A) nor accessories (including their loss), are covered by the product's<br />
warranty. The warranty neither covers piece's deterioration due to the course of time.<br />
• Please make sure you keep the invoice, either for having the right to claim or asking for<br />
warranty coverage. In case you have to send the equipment to Nahita Technical Assistance<br />
Department you should enclose the original invoice or a copy as guarantee.<br />
• Please do not forget filling the warranty certificate and send it before 15 days after the<br />
date of purchase.<br />
• Manufacturer reserves the right to modify or improve the manual or equipment.<br />
ATTENTION!<br />
IF EQUIPMENTS ARE NOT PROPERLY CLEAN AND DISINFECTED THEY<br />
WOULD NOT BE ALLOWED TO REPAIR BY OUR TECHNICAL SERVICE.<br />
INDEX OF LANGUAGES<br />
Spanish<br />
English<br />
Version 1 October-05 Instruction manual 5920032X Page 9<br />
2-8<br />
9-15