POP - Halo Lighting
POP - Halo Lighting
POP - Halo Lighting
You also want an ePaper? Increase the reach of your titles
YUMPU automatically turns print PDFs into web optimized ePapers that Google loves.
BIC B12 led LOCS<br />
Cassaforma per cartongesso<br />
Housing for plasterboard<br />
Gehäuse für eingezogene Decke<br />
Boîte à encastré pour Gyproc<br />
Cajetin para falso techo<br />
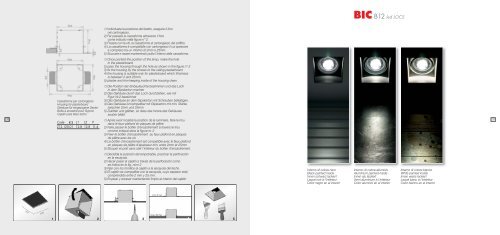
1) Individuata la posizione del faretto, eseguire il foro<br />
nel cartongesso.<br />
2) Far passare la cassaforma attraverso il foro<br />
come indicato nella figura n° 2.<br />
3) Fissare con le viti, la cassaforma al cartongesso del soffitto.<br />
4) La cassaforma è compatibile con cartongesso il cui spessore<br />
è compreso tra un minimo di 2mm e 25mm.<br />
5) Stuccare e rasare mantenendo pulito l’interno della cassaforma.<br />
1) Once pointed the position of the lamp, make the hole<br />
in the plasterboard<br />
2) pass the housing through the hole as shown in the figure n° 2<br />
3) fix the housing by the screws to the ceiling plasterboard.<br />
4) the housing is suitable only for plasterboard which thickness<br />
is between 2 and 25mm.<br />
5) plaster and trim keeping inside of the housing clean.<br />
1) Die Position der Einbauleuchte bestimmen und das Loch<br />
in dem Gipskarton machen<br />
2) Das Gehäuse durch das Loch durchziehen, wie mit<br />
Figur Nr.2 bezeichnet<br />
3) Das Gehäuse an dem Gipskarton mit Schrauben befestigen.<br />
4) Das Gehäuse ist kompatibel mit Gipskarton mit min. Stärke<br />
zwischen 2mm und 25mm<br />
5) Zukitten und glätten, so dass das Innere des Gehäuses<br />
sauber bleibt<br />
230 1) Après avoir localisé la position de la luminaire, faire le trou<br />
231<br />
Code L1 L2 P<br />
dans le faux-plafond en plaques de plâtre<br />
Z12.120.01 12,8 12,8 11,4 2) Faire passer le boîtier d'encastrement à travers le trou<br />
comme indiqué dans la figure nr. 2<br />
3) Fixer le boîtier d'encastrement au faux-plafond en plaques<br />
de plâtre avec les vis<br />
4) Le boîtier d'encastrement est compatible avec le faux-plafond<br />
en plaques de plâtre d’épaisseur min. entre 2mm et 25mm<br />
5) Stuquer et polir sans salir l’intérieur du boîtier d'encastrement.<br />
1) Decidida la posición del empotrable, practicar la perforación<br />
en la escayola.<br />
2) Hacer pasar el cajetín a través de la perforación como<br />
se indica en la fig. núm 2<br />
3) Fijar con los tornillos el cajetín a la escayola del techo.<br />
4) El cajetín es compatible con la escayola, cuyo espesor está<br />
comprendido entre 2 mm y 25 mm.<br />
5) Enyesar y enrasar manteniendo limpio el interior del cajetín<br />
Interno di colore nero<br />
Black painted inside<br />
Innen schwarz lackiert<br />
Laqué noir à l’intérieur<br />
Color negro en el interior<br />
Interno di colore alluminio<br />
Aluminium painted inside<br />
Innen alu lackiert<br />
Verni aluminium à l’intérieur<br />
Color aluminio en el interior<br />
Interno di colore bianco<br />
White painted inside<br />
Innen weiss lackiert<br />
Laqué blanc à l’intérieur<br />
Color blanco en el interior<br />
1 2 3<br />
4 5


