POP - Halo Lighting
POP - Halo Lighting
POP - Halo Lighting

You also want an ePaper? Increase the reach of your titles
YUMPU automatically turns print PDFs into web optimized ePapers that Google loves.
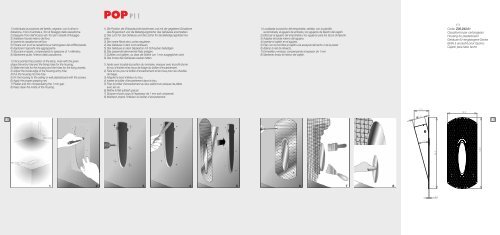
<strong>POP</strong> P11<br />
1) Individuata la posizione del faretto, segnare, con la dima in<br />
dotazione, il foro di entrata e i fori di fissaggio della cassaforma.<br />
2) Eseguire il foro dell’incasso ed i fori per i tasselli di fissaggio.<br />
3) Adattare il bordo interno del foro.<br />
4) Inserire la cassaforma nel foro.<br />
5) Fissare con le viti la cassaforma al cartongesso del soffitto/parete.<br />
6) Applicare l'apposita rete aggrappante.<br />
7) Stuccare e rasare, compensando lo spessore di 1 millimetro.<br />
8) Mantenere pulito l'interno della cassaforma.<br />
1) Once pointed the position of the lamp, mark with the given<br />
shape the entry hole and the fixing holes for the housing.<br />
2) Make the hole for the housing and the holes for the fixing dowels.<br />
3) Adjust the inside edge of the housing entry hole.<br />
4) Put the housing into the hole.<br />
5) Fix the housing to the ceiling or wall plasterboard with the screws.<br />
6) Apply the proper grasping net.<br />
7) Plaster and trim compensating the 1 mm gap.<br />
8) Keep clean the inside of the housing.<br />
1) Die Position der Einbauleuchte bestimmen und mit der gegebene Schablone<br />
das Eingansloch und die Befestigungslöcher des Gehäuses anschreiben.<br />
2) Das Loch für das Gehäuse und die Löcher für die Befestigungsdübel machen.<br />
3) Der innere Rand des Loches regulieren.<br />
4) Das Gehäuse in dem Loch einbauen.<br />
5) Das Gehäuse an dem Gipskarton mit Schrauben befestigen.<br />
6) Das passende klammernde Netz anlegen.<br />
7) Zukitten und glätten, so dass die Stärke von 1 mm ausgeglichen wird<br />
8) Das Innere des Gehäuses sauber halten.<br />
1) Après avoir localisé la position du luminaire, marquer avec le profil donné<br />
le trou d’entrée et les trous de fixage du boîtier d’encastrement.<br />
2) Faire le trou pour le boîtier d’encastrement et les trous pour les chevilles<br />
de fixage.<br />
3) Adapter le bord intérieur du trou.<br />
4) Insérer le boîtier d’encastrement dans le trou.<br />
5) Fixer le boîtier d’encastrement au faux-plafond en plaques de plâtre<br />
avec les vis.<br />
6) Mettre le filet adhésif spécial.<br />
7) Stuquer et polir jusqu’à l’épaisseur de 1 mm soit compensé.<br />
8) Maintenir propre l’intérieur du boîtier d’encastrement.<br />
1) Localizada la posición del empotrable, señalar, con la plantilla.<br />
suministrada, el agujero de entrada y los agujeros de fijación del cajetín.<br />
2) Efectuar el agujero del empotrable y los agujeros para los tacos de fijación.<br />
3) Adaptar el borde interno del agujero.<br />
4) Insertar el cajetín en el agujero.<br />
5) Fijar con los tornillos el cajetín a la escayola del techo o de la pared<br />
6) Aplicar la red de refuerzo.<br />
7) Enmasillar y enrasar, compensando el espesor de 1 mm<br />
8) Mantener limpio el interior del cajetín.<br />
Code: Z00.043.01<br />
Cassaforma per cartongesso<br />
Housing for plasterboard<br />
Gehäuse für eingezogene Decke<br />
Boîte à encastré pour Gyproc<br />
Cajetin para falso techo<br />
7,0<br />
14,0<br />
132<br />
6,0<br />
133<br />
15°<br />
34,0<br />
34,0<br />
1 2<br />
3 4<br />
5 6<br />
7<br />
8<br />
0,1