freezer instruction manual manual de instrucciones - Avanti Products
freezer instruction manual manual de instrucciones - Avanti Products
freezer instruction manual manual de instrucciones - Avanti Products

You also want an ePaper? Increase the reach of your titles
YUMPU automatically turns print PDFs into web optimized ePapers that Google loves.
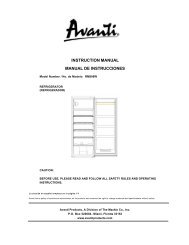
FREEZER<br />
INSTRUCTION MANUAL<br />
MANUAL DE INSTRUCCIONES<br />
Mo<strong>de</strong>l Numbers/ No. <strong>de</strong> Mo<strong>de</strong>los: CF97/CF142/CF199<br />
CAUTION:<br />
BEFORE USE, PLEASE READ AND FOLLOW ALL SAFETY RULES AND OPERATING<br />
INSTRUCTIONS.<br />
La sección en español empieza en la página 16.<br />
<strong>Avanti</strong> has a policy of continuous improvement on its products and reserves the right to change materials and specifications<br />
without notice.<br />
<strong>Avanti</strong> <strong>Products</strong>, A Division of the Mackle Co., Inc.<br />
P.O. Box 520604 - Miami, Florida 33152<br />
www.avantiproducts.com
REGISTRATION INFORMATION<br />
Thank you for purchasing this fine <strong>Avanti</strong> product. Please fill out this card and return it within 100<br />
days of purchase and receive these<br />
important benefits:<br />
Protect your product:<br />
We will keep the mo<strong>de</strong>l number and date of purchase of your new <strong>Avanti</strong> product on file to<br />
help you refer to this information in the event of an insurance claim such as fire or theft.<br />
Promote better products:<br />
We value your input. Your responses will help us <strong>de</strong>velop products <strong>de</strong>signed to best meet<br />
your future needs.<br />
-------------------------------------------------(<strong>de</strong>tach here)----------------------------------------------------------<br />
<strong>Avanti</strong> Registration Card<br />
__________________________________ _____________________________________<br />
Name Mo<strong>de</strong>l # Serial #<br />
__________________________________ _____________________________________<br />
Address Date Purchased Store/Dealer Name<br />
__________________________________ ______________________________________<br />
City State Zip Occupation<br />
__________________________________ As Your Primary Resi<strong>de</strong>nce, Do You:<br />
Area Co<strong>de</strong> Phone Number Own Rent<br />
Did You Purchase An Additional Warranty: Your Age:<br />
Exten<strong>de</strong>d Food Loss None un<strong>de</strong>r 18 18-25 26-30<br />
Reason For Choosing This <strong>Avanti</strong> Product: 31-35 36-50 over 50<br />
Please indicate the most important factors Marital Status:<br />
that influenced your <strong>de</strong>cision to purchase Married Single<br />
this product.<br />
Is This Product Used In The:<br />
Price Home Business<br />
Product Features<br />
How Did You Learn About This Product:<br />
<strong>Avanti</strong> Reputation<br />
Advertising<br />
Product Quality In Store Demo Personal Demo<br />
Salesperson Recommendation<br />
Other______________________________<br />
Friend/Relative Recommendation<br />
Comments____________________________<br />
Warranty<br />
_____________________________________<br />
Other_______________________<br />
_____________________________________<br />
2
HELP US HELP YOU...<br />
Read this gui<strong>de</strong> carefully.<br />
It is inten<strong>de</strong>d to help you operate and maintain<br />
your new <strong>freezer</strong> properly.<br />
Keep it handy to answer your questions.<br />
If you don't un<strong>de</strong>rstand something or you need<br />
more assistance, please call:<br />
<strong>Avanti</strong> Customer Service<br />
800-220-5570<br />
Keep proof of original purchase date (such as<br />
your sales slip) with this gui<strong>de</strong> to establish the<br />
warranty period.<br />
CAUTION:<br />
THIS FREEZER IS NOT<br />
DESIGNED FOR THE STORAGE<br />
OF MEDICINE OR OTHER<br />
MEDICAL PRODUCTS.<br />
Write down the mo<strong>de</strong>l and serial numbers.<br />
You'll find them on a plate located on the<br />
bottom outsi<strong>de</strong> wall of the <strong>freezer</strong>.<br />
Please write these numbers here:<br />
____________________________________<br />
Date of Purchase<br />
____________________________________<br />
Mo<strong>de</strong>l Number<br />
____________________________________<br />
Serial Number<br />
Use these numbers in any correspon<strong>de</strong>nce or<br />
service calls concerning your <strong>freezer</strong>.<br />
If you received a damaged <strong>freezer</strong>,<br />
immediately contact the <strong>de</strong>aler (or buil<strong>de</strong>r) that<br />
sold you the <strong>freezer</strong>.<br />
Save time and money. Before you call for<br />
service, check the Troubleshooting Gui<strong>de</strong>. It<br />
lists causes of minor operating problems that<br />
you can correct yourself.<br />
IF YOU NEED SERVICE<br />
We're proud of our service and want you to be<br />
pleased. If for some reason you are not happy<br />
with the service you receive, here are some<br />
steps to follow for assistance.<br />
FIRST, contact the people who serviced your<br />
<strong>freezer</strong>. Explain why you are not pleased. In<br />
most cases, this will solve the problem.<br />
NEXT, if you are still not pleased, write all the<br />
<strong>de</strong>tails, including your telephone number, and<br />
send it to:<br />
Customer Service<br />
<strong>Avanti</strong> <strong>Products</strong><br />
10880 NW 30 Street<br />
Miami, FL 33172 USA<br />
4
TABLE OF CONTENTS<br />
Registration Information ______________________________________________________________2<br />
Help Us Help You... ___________________________________________________________________4<br />
Parts & Features _____________________________________________________________________6<br />
Important Safety Instructions __________________________________________________________7<br />
Installation Instructions _______________________________________________________________7<br />
Before Using Your Freezer ____________________________________________________________7<br />
Installing Your Freezer ________________________________________________________________7<br />
Electrical Connection_________________________________________________________________8<br />
Operating Your Freezer _______________________________________________________________8<br />
Temperature Control _________________________________________________________________8<br />
The Fast Freeze Switch (Amber) _______________________________________________________9<br />
Defrosting Your Freezer_______________________________________________________________9<br />
The Freezer Compartment _____________________________________________________________9<br />
Care And Maintenance _______________________________________________________________10<br />
Cleaning Your Freezer _______________________________________________________________10<br />
Vacation Time ______________________________________________________________________ 10<br />
Moving Your Freezer ________________________________________________________________10<br />
Energy Saving Tips __________________________________________________________________10<br />
Troubleshooting Gui<strong>de</strong> ______________________________________________________________ 11<br />
Service For Your Freezer _____________________________________________________________13<br />
Your <strong>Avanti</strong> <strong>Products</strong> Warranty _______________________________________________________14<br />
Wiring Diagram _____________________________________________________________________15<br />
Instrucciones En Español _________________________________________________________ 16-21<br />
5
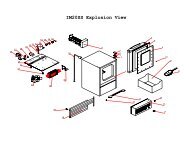
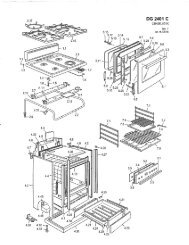
PARTS & FEATURES<br />
1. COUNTER BALANCED LID<br />
2. RECESSED HANDLE<br />
3. ROLLERS<br />
4. THERMOSTAT CONTROL<br />
5. FAST FREEZE SWITCH<br />
6
IMPORTANT SAFETY INSTRUCTIONS<br />
WARNING<br />
To reduce the risk of fire, electrical shock,<br />
or injury when using your <strong>freezer</strong>, follow<br />
these basic precautions:<br />
Read all <strong>instruction</strong>s before using the <strong>freezer</strong>.<br />
DANGER or WARNING: Risk of child entrapment.<br />
Child entrapment and suffocation are not problems of the past. Junked or abandoned<br />
<strong>freezer</strong> are still dangerous, even if they will “just sit in the garage a few days.”<br />
Before you throw away your old <strong>freezer</strong>: Take off the doors. Leave the shelves in<br />
place so that children may not easily climb insi<strong>de</strong>.<br />
Never allow children to operate, play with, or crawl insi<strong>de</strong> the <strong>freezer</strong>.<br />
Never clean <strong>freezer</strong> parts with flammable fluids. The fumes can create a fire hazard<br />
or explosion.<br />
Do not store or use gasoline or any other flammable vapors and liquids in the vicinity<br />
of this or any other <strong>freezer</strong>. The fumes can create a fire hazard or explosion.<br />
-Save these <strong>instruction</strong>s-<br />
INSTALLATION INSTRUCTIONS<br />
Before Using Your Freezer<br />
Remove the exterior and interior packing.<br />
Check to be sure you have all of the following parts:<br />
1 Storage Basket<br />
1 Divi<strong>de</strong>r (CF142 & CF199 only)<br />
1 Instruction Manual<br />
1 Plastic Scraper<br />
Before connecting the <strong>freezer</strong> to the power source, let it stand upright for approximately 2 hours.<br />
This will reduce the possibility of a malfunction in the cooling system from handling during<br />
transportation.<br />
Clean the interior surface with lukewarm water using a soft cloth.<br />
Installing Your Freezer<br />
This appliance is <strong>de</strong>signed to be free standing only, a nd should not be recessed or built-in.<br />
Place your <strong>freezer</strong> on a floor that is strong enough to support the <strong>freezer</strong> when it is fully loa<strong>de</strong>d.<br />
Allow 5 inches of space between the back and si<strong>de</strong>s of the <strong>freezer</strong>, which allows the proper air<br />
circulation.<br />
Locate the <strong>freezer</strong> away from direct sunlight and sources of heat (stove, heater, radiator, etc.).<br />
Direct sunlight may affect the acrylic coating and heat sources may increase electrical<br />
consumption. Extreme cold ambient temperatures may also cause the <strong>freezer</strong> not to perform<br />
properly.<br />
Avoid locating the <strong>freezer</strong> in moist areas.<br />
Plug the <strong>freezer</strong> into an exclusive, properly installed-groun<strong>de</strong>d wall outlet. Do not un<strong>de</strong>r any<br />
circumstances cut or remove the third (ground) prong from the power cord. Any questions<br />
concerning power and/or grounding should be directed toward a certified electrician or an<br />
authorized <strong>Avanti</strong> <strong>Products</strong> service center.<br />
After plugging the appliance into a wall outlet, allow the uni t to cool down for 2~3 hours before<br />
placing food in the <strong>freezer</strong> compartment.<br />
7
Electrical Connection<br />
Warning<br />
Improper use of the groun<strong>de</strong>d plug can result in the risk of electrical shock. If the power cord is<br />
damaged, have it replaced by an authorized <strong>Avanti</strong> <strong>Products</strong> service center.<br />
This <strong>freezer</strong> should be properly groun<strong>de</strong>d for your safety. The power cord of this <strong>freezer</strong> is equipped<br />
with a three-prong plug which mates with standard three prong wall outlets to minimize the possibility<br />
of electrical shock.<br />
Do not un<strong>de</strong>r any circumstances cut or remove the third ground prong from the power cord supplied.<br />
This <strong>freezer</strong> requires a standard 115/120Volt~60Hz electrical outlet with three-prong ground.<br />
The cord should be secured behind the <strong>freezer</strong> and not left exposed or dangling to prevent acci<strong>de</strong>ntal<br />
injury.<br />
Never unplug the <strong>freezer</strong> by pulling the power cord. Always grip the plug firmly and pull straight out<br />
from the receptacle.<br />
Do not use an extension cord with this appliance. If the power cord is too short, have a qualified<br />
electrician or service technician install an outlet near the appliance.<br />
The “Green” light indicates that the <strong>freezer</strong> is properly connected to the electrical power. The light<br />
indicates power supply, and will glow even if the temperature control dial is turned to “OFF”, or the<br />
compressor has failed to work and the compartment is not being cooled.<br />
The “Compressor On” light indicates that the compressor is on and running. The compressor should<br />
not, un<strong>de</strong>r normal conditions, be running continuously unless the unit is in “Fast Freeze” mo<strong>de</strong>.<br />
OPERATING YOUR FREEZER<br />
Temperature Control<br />
Your <strong>freezer</strong> has one control for regulating the temperature. The temperature control is located on<br />
the lower right hand corner.<br />
The first time you turn the unit on, switch on the Fast Freeze switch (amber light) and run for at<br />
least 2 hours before putting frozen foods insi<strong>de</strong>. This will ensure the cabinet is thoroughly chilled<br />
before food is put in.<br />
Turn off the Fast Freeze switch.<br />
The range of the temperature control is from position" 1" the warmest to "6" the col<strong>de</strong>st. Adjust<br />
the temperature control to the setting that best suits your needs. The setting of “4” should be<br />
appropriate for home or office <strong>freezer</strong> use.<br />
To turn the <strong>freezer</strong> off, turn the temperature control to "OFF".<br />
NOTE:<br />
Turning the temperature control to "OFF " position stops the cooling cycle but does not shut off<br />
the power to the <strong>freezer</strong>.<br />
If the unit is unplugged, lost power, or turned off; you must wait 3 to 5 minutes before restarting<br />
the unit. If you attempt to restart before this time <strong>de</strong>lay, the <strong>freezer</strong> will not start.<br />
Large amounts of food will lower the cooling efficiency of the appliance.<br />
If you choose to change the thermostat setting, adjust thermostat control by one numerical<br />
8
increment at a time. Allow several hours for temperature to stabilize between adjustments.<br />
The Fast Freeze Switch (Amber)<br />
The light glows while the Fast Freeze switch is in the ‘ON’ position.<br />
The switch overri<strong>de</strong>s the thermostat and will make the compressor operate continuously, lowering<br />
the cabinet temperature still further than the thermostat setting.<br />
This switch is used to freeze unfrozen food in appreciable quantities.<br />
When loading the <strong>freezer</strong>, freeze only three pounds of fresh food per cubic foot of <strong>freezer</strong> space<br />
at one time.<br />
Distribute packages to be frozen evenly throughout the <strong>freezer</strong>.<br />
It is not necessary to adjust the thermostat setting when using the Fast Freeze switch.<br />
Defrosting Your Freezer<br />
When For the most efficient operation and minimum energy consumption, <strong>de</strong>frost the <strong>freezer</strong><br />
when the frost on the <strong>freezer</strong> walls is excessive or ¼ to ½ inch thick.<br />
Choose a time when the stock of frozen food is low.<br />
CAUTION<br />
Do not use boiling water because it may damage the plastic parts. In addition, never use a<br />
sharp or metallic instrument to remove frost as it may damage the cooling coils and will void<br />
the warranty. We recommend using the plastic scraper provi<strong>de</strong>d with your unit.<br />
Remove the frozen food from the <strong>freezer</strong> and place it in a cooler to protect the food.<br />
Turn the thermostat knob to “OFF”.<br />
Unplug the <strong>freezer</strong>. The Power Supply light should be off (green light out).<br />
During <strong>de</strong>frosting, the ice melts into the cabinet.<br />
Remove the drain plug on the insi<strong>de</strong> floor of the <strong>freezer</strong> by pulling straight out.<br />
Place a shallow pan outsi<strong>de</strong> drain outlet. The <strong>de</strong>frost water will drain out.<br />
Check the pan occasionally so the water does not overflow.<br />
Clean the interior of the <strong>freezer</strong>.<br />
Replace the plug on the insi<strong>de</strong> floor.<br />
Reset the thermostat to <strong>de</strong>sired setting.<br />
Allow the cabinet to cool for one hour.<br />
Switch on the Fast Freeze for a minimum of 2 hours.<br />
Return food to the <strong>freezer</strong>.<br />
HELPFUL HINT:<br />
Defrosting usually takes a few hours. Leaving the door open will help speed the process.<br />
Also, pouring warm water (not boiling) on the ice/frost will help speed melting. If you must<br />
use a scraper- please use caution - it is very easy to damage the <strong>freezer</strong> compartment and<br />
void your warranty.<br />
The Freezer Compartment<br />
This compartment is <strong>de</strong>signed for the long-term storage of frozen food. Storage time is up to<br />
three months.<br />
The storage life of frozen foods varies and the recommen<strong>de</strong>d storage time should not be<br />
excee<strong>de</strong>d. The <strong>instruction</strong>s regarding the care of frozen foods should be followed when<br />
<strong>de</strong>frosting the <strong>freezer</strong>.<br />
Pre-packed commercially frozen food should be stored in accordance with the frozen foods<br />
manufacturer’s <strong>instruction</strong>s for a three star frozen food storage compartment or home <strong>freezer</strong>.<br />
Place frozen food into the <strong>freezer</strong> as quickly as possible after purchase. If there are <strong>instruction</strong>s<br />
on the packet, carefully follow these <strong>instruction</strong>s regarding storage times.<br />
The <strong>freezer</strong> door is susceptible to breaking due to excessive ice build up. Be sure to <strong>de</strong>frost<br />
when the ice reaches ¼ to ½ inch thick.<br />
A storage basket is provi<strong>de</strong>d for the organization of odd-shaped items. To reach other packages<br />
in the <strong>freezer</strong>, just sli<strong>de</strong> the basket to one si<strong>de</strong>, or lift it out.<br />
9
CARE AND MAINTENANCE<br />
Cleaning Your Freezer<br />
Upon installation of your new appliance, it is recommen<strong>de</strong>d that it be cleaned thoroughly.<br />
Turn the temperature control to "OFF", unplug the <strong>freezer</strong>, remove the food and storage basket.<br />
Wash the insi<strong>de</strong> with a damp warm cloth containing a water and baking soda solution. The<br />
solution should be about 2 tablespoons of baking soda to a quart of water.<br />
Wash the storage basket with a mild <strong>de</strong>tergent solution.<br />
Be sure to keep the door gasket (seal) clean to keep the unit running efficiently.<br />
The outsi<strong>de</strong> of the <strong>freezer</strong> should be cleaned with mild <strong>de</strong>tergent and warm water.<br />
Dry the interior and exterior with a soft cloth.<br />
The con<strong>de</strong>nser coils should be vacuumed when they are dusty or dirty.<br />
It is recommen<strong>de</strong>d that the unit be cleaned each time it is <strong>de</strong>frosted to help keep the unit odor free<br />
and running efficiently.<br />
Vacation Time<br />
Remove all the food.<br />
Unplug the <strong>freezer</strong>.<br />
Clean the <strong>freezer</strong>.<br />
Leave the door open slightly to avoid possible formation of con<strong>de</strong>nsation, mold, or odors.<br />
Use extreme caution in the case of children. The unit should not be accessible to child’s play.<br />
Short vacations: Leave the <strong>freezer</strong> operating during vacations of less than three weeks.<br />
Long vacations: If the appliance will not be used for several months, remove all food and unplug<br />
the power cord. Clean and dry the interior thoroughly. To prevent odor and mold growth, leave<br />
the door open slightly: blocking it open if necessary or have the door removed.<br />
Moving Your Freezer<br />
Remove all the food.<br />
Securely tape down all loose items insi<strong>de</strong> your <strong>freezer</strong>.<br />
Remove the rollers to prevent damage.<br />
Tape the doors shut.<br />
Be sure the <strong>freezer</strong> stays in the upright position during transportation.<br />
Energy Saving Tips<br />
The <strong>freezer</strong> should be located in the coolest area of the room, away from heat producing<br />
appliances or heating ducts, and out of the direct sunlight.<br />
Let hot foods cool to room temperature before placing in the <strong>freezer</strong>. Overloading the <strong>freezer</strong><br />
forces the compressor to run longer. Foods that freeze too slowly may lose quality, or spoil.<br />
Be sure to wrap foods properly, and wipe containers dry before placing them in the <strong>freezer</strong>. This<br />
cuts down on frost build-up insi<strong>de</strong> the <strong>freezer</strong>.<br />
Freezer storage bin should not be lined with aluminum foil, wax paper, or paper toweling. Liners<br />
interfere with cold air circulation, making the <strong>freezer</strong> less efficient.<br />
Organize and label food to reduce door openings and exten<strong>de</strong>d searches. Remove as many<br />
items as nee<strong>de</strong>d at one time, and close the door as soon as possible.<br />
10
PROBLEMS WITH YOUR FREEZER<br />
You can solve many common <strong>freezer</strong> problems easily, saving you the cost of a possible service call.<br />
Try the suggestions below to see if you can solve the problem before calling the servicer.<br />
TROUBLESHOOTING GUIDE<br />
PROBLEM<br />
Freezer does not operate.<br />
Compressor turns on and off frequently.<br />
Temperature insi<strong>de</strong> the <strong>freezer</strong> is too warm.<br />
Temperature insi<strong>de</strong> the <strong>freezer</strong> is too cold.<br />
Temperature of external <strong>freezer</strong> surface is warm.<br />
Popping or cracking sound when compressor<br />
comes on.<br />
Bubbling or gurgling sound, like water boiling.<br />
Vibrations.<br />
POSSIBLE CAUSE<br />
Not plugged in.<br />
The circuit breaker tripped or a blown fuse.<br />
The <strong>freezer</strong> temperature control is set at "0/OFF".<br />
The room temperature is hotter than normal.<br />
A large amount of food has been ad<strong>de</strong>d to the<br />
<strong>freezer</strong>.<br />
The door is open too often.<br />
The door is not closed completely.<br />
The temperature control is not set correctly.<br />
The door gasket does not seal properly.<br />
The <strong>freezer</strong> does not have the correct<br />
clearances.<br />
The <strong>freezer</strong> has recently been disconnected for a<br />
period of time. Four hours are required for the<br />
<strong>freezer</strong> to cool down completely.<br />
Temperature control is set too warm. Turn the<br />
control to a cooler setting and allow several hours<br />
for the temperature to stabilize.<br />
Door is kept open too long or is opened too<br />
frequently. Warm air enters the <strong>freezer</strong> every<br />
time the door is opened. Open the door less<br />
often.<br />
The door is not closed completely.<br />
The door gasket does not seal properly.<br />
A large amount of warm or hot food might have<br />
been stored recently. Wait until the <strong>freezer</strong> has<br />
had a chance to reach its selected temperature.<br />
The <strong>freezer</strong> has recently been disconnected for a<br />
period of time. Four hours are required for the<br />
<strong>freezer</strong> to cool down completely.<br />
Temperature control is set too cold. Turn the<br />
control to a warmer setting and allow several<br />
hours for the temperature to stabilize.<br />
Fast Freeze switch is turned on. This causes<br />
continuous running of the compressor and<br />
bypasses the temperature control.<br />
The exterior <strong>freezer</strong> walls can be as much as<br />
30 F warmer than room temperature. This is<br />
normal while the compressor works to transfer<br />
heat from insi<strong>de</strong> the <strong>freezer</strong> cabinet.<br />
Metal parts un<strong>de</strong>rgo expansion and contraction,<br />
as in hot water pipes. This is normal. Sound will<br />
level off or disappear as <strong>freezer</strong> continues to run.<br />
Refrigerant (used to cool <strong>freezer</strong>) is circulating<br />
throughout the system. This is normal.<br />
Check to assure that the <strong>freezer</strong> is on a level<br />
11
Moisture forms on insi<strong>de</strong> <strong>freezer</strong> walls.<br />
Moisture forms on outsi<strong>de</strong> of <strong>freezer</strong>.<br />
The door will not close properly.<br />
surface.<br />
Floor is uneven or weak. Freezer rocks on the<br />
floor when it is moved slightly. Be sure floor can<br />
a<strong>de</strong>quately support <strong>freezer</strong>. Level the <strong>freezer</strong> by<br />
putting wood or metal shims un<strong>de</strong>r part of the<br />
<strong>freezer</strong>.<br />
The <strong>freezer</strong> is touching the wall. Re -level the<br />
<strong>freezer</strong> and move it from the wall.<br />
See “Installation Instructions”.<br />
Weather is hot and humid, which increases<br />
internal rate of frost build-up. This is normal.<br />
Door is slightly open.<br />
Door is kept open too long, or is opened too<br />
frequently. Open the door less often.<br />
The door is not sealed properly.<br />
Door is slightly open, causing cold air from insi<strong>de</strong><br />
the <strong>freezer</strong> to meet warm moist air from outsi<strong>de</strong>.<br />
The <strong>freezer</strong> is not on a level surface.<br />
The gasket is dirty.<br />
The storage basket is out of position.<br />
12
SERVICE FOR YOUR FREEZER<br />
We are proud of our customer service organization and the network of professional service<br />
technicians that provi<strong>de</strong> service on your <strong>Avanti</strong> <strong>freezer</strong>s. With the purchase of your <strong>Avanti</strong> <strong>freezer</strong>, you<br />
can be confi<strong>de</strong>nt that if you ever need additional information or assistance, the <strong>Avanti</strong> <strong>Products</strong><br />
Customer Service Team will be here for you. Just call us toll-free.<br />
Product Information<br />
800-323-5029<br />
Part Or<strong>de</strong>rs<br />
800-220-5570<br />
In-Home Repair Service<br />
800-220-5570<br />
AVANTI PRODUCTS CUSTOMER SERVICES<br />
Whatever your questions are about our products,<br />
help is available.<br />
You may or<strong>de</strong>r parts and accessories that will be<br />
<strong>de</strong>livered directly to your home, by personal<br />
check, money or<strong>de</strong>r, Master Card, or Visa.<br />
An <strong>Avanti</strong> <strong>Products</strong> authorized service center will<br />
provi<strong>de</strong> expert repair service, scheduled at a time<br />
that is convenient for you. Our trained servicers<br />
know your <strong>freezer</strong> insi<strong>de</strong> and out.<br />
13
YOUR <strong>Avanti</strong> <strong>Products</strong> WARRANTY<br />
WHAT IS COVERED<br />
LIMITED ONE-YEAR<br />
WARRANTY<br />
For one year from the date of<br />
purchase by the original owner, <strong>Avanti</strong><br />
<strong>Products</strong> will, at its option, repair or<br />
replace any part of the <strong>freezer</strong>, which<br />
proves to be <strong>de</strong>fective in material or<br />
workmanship un<strong>de</strong>r normal use.<br />
During this period <strong>Avanti</strong> <strong>Products</strong> will<br />
provi<strong>de</strong> all parts and labor necessary<br />
to correct such <strong>de</strong>fects free of charge,<br />
so long as the <strong>freezer</strong> has been<br />
installed and operate d in accordance<br />
with the written <strong>instruction</strong>s in this<br />
<strong>manual</strong>. In rental or commercial use,<br />
the warranty period is 90 days. All<br />
<strong>Avanti</strong> Appliances of 3.5 cubic foot<br />
capacity or less must be brought/sent<br />
to the appliance service shop for<br />
repair.<br />
Staple your sales receipt here. Proof of<br />
original purchase date is nee<strong>de</strong>d to obtain<br />
service un<strong>de</strong>r warranty.<br />
LIMITED SECOND THROUGH<br />
FIFTH YEAR WARRANTY<br />
For the second through the fifth year from date<br />
of original purchase, <strong>Avanti</strong> <strong>Products</strong> will<br />
provi<strong>de</strong> a replacement compressor free of<br />
charge due to a failure. You are responsible<br />
for the service labor and freight charges. In<br />
rental or commercial use, the limited<br />
compressor warranty is one year and nine<br />
months. Cost to move the <strong>freezer</strong> to the<br />
servicers’ shop and back to the users’ home,<br />
as may be required, are the users’<br />
responsibility.<br />
WHAT IS NOT COVERED<br />
Conten t losses of food due to spoilage.<br />
Inci<strong>de</strong>ntal or consequential damages.<br />
Parts and labor costs for the following will<br />
not be consi<strong>de</strong>red as warranty:<br />
Chest <strong>freezer</strong> lid liners.<br />
Light bulbs and/or plastic housing.<br />
Plastic cabinet liners.<br />
Punctured evaporator that voids the<br />
warranty on the complete sealed system.<br />
Repairs performed by unauthorized<br />
servicers.<br />
Service calls that do not involve <strong>de</strong>fects in<br />
material or workmanship such as<br />
customer education, door reversal, or<br />
proper installation.<br />
Service calls that are related to external<br />
problems, such as abuse, misuse,<br />
ina<strong>de</strong>quate electrical power, acci<strong>de</strong>nts,<br />
fire, floods, or acts of God.<br />
Replacement of house fuses or resetting<br />
circuit breakers.<br />
Failure of the product if it is used for other<br />
than its inten<strong>de</strong>d purpose.<br />
This warranty does not apply outsi<strong>de</strong> the<br />
Continental USA.<br />
14
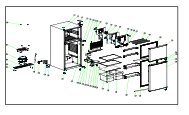
WIRING DIAGRAM<br />
15
INSTRUCCIONES EN ESPAÑOL<br />
PRECAUCIÓN<br />
Para reducir el riesgo <strong>de</strong> incendio, <strong>de</strong>scarga<br />
eléctrica, o daño cuando use su<br />
electrodoméstico, siga las siguientes<br />
precauciones.<br />
Lea todas las <strong>instrucciones</strong> antes <strong>de</strong> usar su electrodoméstico.<br />
Peligro o Precaución: Existe el riesgo que los niños que<strong>de</strong>n atrapados.<br />
Niños atrapados o sofocamiento no son un problema <strong>de</strong>l pasado. Los electrodomésticos<br />
son peligrosos aún si sólo los <strong>de</strong>ja en el garaje por un par <strong>de</strong> días.<br />
Antes <strong>de</strong> <strong>de</strong>sechar su congelador o refrigerador usado: quítele las puertas. Deje las<br />
repisas en su lugar para evitar que los niños se que<strong>de</strong>n atrapados.<br />
No permita que los niños manejen, jueguen o entren <strong>de</strong>ntro <strong>de</strong>l electrodoméstico.<br />
No limpie su electrodoméstico con líquidos inflamables. Los gases pue<strong>de</strong>n ocasionar<br />
fuego o una explosión.<br />
No guar<strong>de</strong> ni use gasolina u otros líquidos inflamables cerca <strong>de</strong> este o <strong>de</strong> cualquier otro<br />
electrodoméstico. Los vapores pue<strong>de</strong>n ocasionar fuego o explosión.<br />
- Guar<strong>de</strong> estas <strong>instrucciones</strong>.-<br />
INSTRUCCIONES PARA LA INSTALACIÓN<br />
Antes <strong>de</strong> Usar su Artefacto<br />
Retire la envoltura interna y externa.<br />
Verifique que tenga las siguientes partes: 1 canasta <strong>de</strong> almacenaje, 1 <strong>manual</strong> <strong>de</strong> <strong>instrucciones</strong>,un<br />
separador y 1 espátula <strong>de</strong> plástico<br />
Antes <strong>de</strong> conectar su electrodoméstico a la corriente eléctrica, ubíquelo en una superficie plana<br />
por lo menos por 2 horas. Esto reducirá la posibilidad <strong>de</strong> malfuncionamiento en el sistema <strong>de</strong><br />
enfriamiento por la manipulación durante el transporte.<br />
Limpie la superficie interior con agua tibia usando un paño suave.<br />
Instalación <strong>de</strong> su Congelador<br />
Ubique su congelador en un piso que sea lo suficientemente fuerte para soportar su peso cuando<br />
este totalmente lleno o cargado.<br />
Deje aproximadamente 3 pulgadas <strong>de</strong> espacio entre la parte trasera y los costados <strong>de</strong> su<br />
electrodoméstico, así permitirá la circulación <strong>de</strong> aire necesaria para enfriar el compresor.<br />
Mantenga su congelador alejado <strong>de</strong>l aire caliente, vapor o líquidos que puedan salpicarlo, ya que<br />
la unidad podría averiarse.<br />
Los rayos solares directos pue<strong>de</strong>n dañar la capa acrílica, y las fuentes <strong>de</strong> calor pue<strong>de</strong>n ocasionar<br />
un aumento en el consumo eléctrico. Manténgalo lo más alejado posible <strong>de</strong>l agua para prevenir<br />
algún choque eléctrico. Evite los sitios húmedos y los ambientes extremadamente fríos ya que<br />
esto pue<strong>de</strong> afectar la eficiencia <strong>de</strong>l enfriamiento <strong>de</strong> su congelador.<br />
Evite ubicar su congelador en áreas mojadas o muy húmedas. Mucha humedad en el aire pue<strong>de</strong><br />
causar la formación <strong>de</strong> escarcha rapidamente y necesitará <strong>de</strong>scongelar su congelador más<br />
frecuentemente.<br />
Conecte el congelador a un enchufe <strong>de</strong> pared exclusivo e instale el cable <strong>de</strong> tierra. Bajo ninguna<br />
razón se <strong>de</strong>be retirar la tercera punta <strong>de</strong>l enchufe. Cualquier consulta con respecto a la energía<br />
y/o cable <strong>de</strong> tierra <strong>de</strong>be ser dirigida a un electricista certificado o autorizado por el Servicio<br />
Técnico <strong>de</strong> <strong>Avanti</strong> <strong>Products</strong>.<br />
Conexión eléctrica<br />
Este electrodoméstico <strong>de</strong>be ser conectado a tierra. En el caso que ocurra un corto circuito, la<br />
conexión a tierra reduce el riesgo <strong>de</strong> recibir un choque eléctrico ya que cuenta con un alambre<br />
para el escape <strong>de</strong> la corriente eléctrica. Este electrodoméstico está equipado con un enchufe<br />
que consta <strong>de</strong> tres puntas, la tercera punta es la conexión a tierra. Este enchufe <strong>de</strong>be ser<br />
insertado a un enchufe <strong>de</strong> pared que este correctamente instalado con la conexión a tierra.<br />
16
ADVERTENCIA<br />
El uso inapropiado <strong>de</strong>l enchufe a tierra pue<strong>de</strong> <strong>de</strong>senca<strong>de</strong>nar un choque eléctrico. Consulte a<br />
personal autorizado por <strong>Avanti</strong> Productos si tiene alguna duda sobre las <strong>instrucciones</strong> o si tiene<br />
alguna consulta si el electrodoméstico está correctamente instalado a la corriente eléctrica y a<br />
tierra. Si el cordón <strong>de</strong>l enchufe <strong>de</strong>l electrodoméstico se encuentra dañado, <strong>de</strong>be ser reemplazado<br />
por el Servicio Técnico <strong>de</strong> <strong>Avanti</strong> <strong>Products</strong>.<br />
El cordón <strong>de</strong>l enchufe está equipado con tres puntas que encajan perfectamente en un enchufe<br />
<strong>de</strong> pared standard para reducir el riesgo <strong>de</strong> un choque eléctrico.<br />
Bajo ninguna circunstancia corte o saque la tercera punta <strong>de</strong>l enchufe que le proveemos ya que<br />
éste es para que vaya conectado a tierra.<br />
No use una extensión.<br />
La corriente <strong>de</strong> este electrodoméstico es <strong>de</strong> 115/120 voltios, tiene una salida eléctrica <strong>de</strong> 60 hz. y<br />
consta <strong>de</strong> un enchufe <strong>de</strong> tres puntas que va conectado al enchufe <strong>de</strong> pared.<br />
El cordón <strong>de</strong>l enchufe <strong>de</strong>be ser asegurado atrás <strong>de</strong>l electrodoméstico y no <strong>de</strong>jarlo expuesto para<br />
evitar acci<strong>de</strong>ntes.<br />
Si la luz ver<strong>de</strong> que indica “Power On” (Encendido) está encendida quiere <strong>de</strong>cir que el congelador<br />
está apropiadamente conectado a la corriente eléctrica. La luz indica que está recibiendo energía<br />
eléctrica, y se iluminará aún cuando Ud. cambie el control <strong>de</strong> temperatura a “0”, ó cuando pare <strong>de</strong><br />
trabajar el compresor y el compartimiento no esté enfriando.<br />
Si la luz ambar que indica “Fast Freeze” (Compresor encendido) está encendida quiere <strong>de</strong>cir que el<br />
compresor está funcionando. Bajo condiciones normales, el compresor no <strong>de</strong>be funcionar<br />
continuamente a menos que la unidad esté en el modo <strong>de</strong> Congelamiento Rápido.<br />
USANDO SU CONGELADOR<br />
Control <strong>de</strong> Temperatura<br />
Su congelador tiene un control que regula la temperatura. El control <strong>de</strong> temperatura está ubicado<br />
en la esquina inferior a mano <strong>de</strong>recha.<br />
La primera vez que encienda el congelador, use el modo <strong>de</strong> Congelamiento Rápido (luz ámbar)<br />
marcado FAST FREEZE SWITCH (AMBER), déjelo encendido por lo menos 4 horas antes <strong>de</strong><br />
colocar alimentos <strong>de</strong>ntro <strong>de</strong> su congelador. Esto asegurará que la cabina esté completamente<br />
fría antes <strong>de</strong> colocar los alimentos.<br />
Apague el botón <strong>de</strong> Congelamiento Rápido.<br />
El control <strong>de</strong> temperatura va <strong>de</strong>s<strong>de</strong> lo más caliente “1” hasta lo más frío “6” también tiene “OFF”.<br />
Ajuste el control <strong>de</strong> temperatura al nivel que usted necesite. El nivel “4” es el más a<strong>de</strong>cuado para<br />
uso en la casa u oficina.<br />
Para <strong>de</strong>tener el enfriamiento <strong>de</strong> su congelador, mueva el control <strong>de</strong> temperatura a la posición<br />
“OFF”<br />
NOTA:<br />
Si gira la temperatura a la posición “OFF” <strong>de</strong>tendrá el ciclo <strong>de</strong> enfriamiento, esto no significa<br />
que apagará el congelador.<br />
Si la unidad se <strong>de</strong>sconecta, pier<strong>de</strong> corriente o se apaga la llave principal, tendrá que esperar<br />
3 a 5 minutos para volver a reiniciar la unidad. Si usted intenta reiniciar antes <strong>de</strong> este tiempo<br />
su congelador no encen<strong>de</strong>rá.<br />
El Botón <strong>de</strong> Congelamiento Rápido (Ambar ) (FAST FREEZE SWITCH (AMBER))<br />
Mientras el Botón <strong>de</strong> Congelamiento Rápido esté encendido, la luz estará encendida<br />
El Botón <strong>de</strong> Congelamiento Rápido ignora al termostato y permite que el compresor trabaje<br />
continuamente, bajando la temperatura <strong>de</strong> la cavidad aún cuando el termostato no esté<br />
funcionando.<br />
Este Botón se usa para congelar alimentos frescos en cantida<strong>de</strong>s gran<strong>de</strong>s.<br />
Cuando coloque alimentos en su congelador, congele tres libras <strong>de</strong> alimentos frescos por pie<br />
cúbico.<br />
Distribuya los alimentos para que se congelen <strong>de</strong> manera uniforme.<br />
17
No es necesario ajustar el termostato cuando utiliza el modo <strong>de</strong> Congelamiento Rápido.<br />
Descongelando<br />
¿Cuando <strong>de</strong>scongelar Para el mejor funcionamiento y consumo mínimo <strong>de</strong> energía <strong>de</strong> su<br />
congelador, <strong>de</strong>scongele cuando las pare<strong>de</strong>s internas estén llenas <strong>de</strong> escarcha o tengan un<br />
espesor <strong>de</strong> ¼ a ½ pulgada.<br />
Escoja un momento cuando no tenga muchos alimentos en el congelador.<br />
Cómo <strong>de</strong>scongelar Siguiendo estas indicaciones:<br />
ADVERTENCIA<br />
No use agua hirviendo porque dañará las partes <strong>de</strong> plástico. Tampoco use puntas o<br />
instrumentos metálicos par a retirar la escarcha ya que dañará el espiral <strong>de</strong> enfriamiento y<br />
cancelará la garantía. Le recomendamos usar la espátula <strong>de</strong> plástico incluída con esta<br />
unidad.<br />
Retire los alimentos <strong>de</strong>l congelador y colóquelos en una caja térmica para conservarlos y<br />
protegerlos.<br />
Gire el termostato a la posición “0”.<br />
Desconecte el congelador. La luz indicadora <strong>de</strong> suministro <strong>de</strong> energía se apagará (luz ver<strong>de</strong><br />
apagada).<br />
Durante el <strong>de</strong>scongelamiento, el hielo se <strong>de</strong>rrite <strong>de</strong>ntro <strong>de</strong> la cabina.<br />
Para drenar el líquido retire la tapa d e drenaje situada en el piso <strong>de</strong>l congelador.<br />
Retire la tapa <strong>de</strong> la pared izquierda.<br />
Coloque una ban<strong>de</strong>ja afuera <strong>de</strong> la pared izquierda para que drene.<br />
Vigile la ban<strong>de</strong>ja <strong>de</strong> vez en cuando para que no se <strong>de</strong>sbor<strong>de</strong>.<br />
Limpie el interior <strong>de</strong> su congelador (vea la Pág. 18 Limpiando su congelador)<br />
Coloque la tapa <strong>de</strong> drenaje <strong>de</strong>ntro <strong>de</strong>l congelador y fuera <strong>de</strong>l gabinete.<br />
Reconfigure el termostato según lo <strong>de</strong>seado.<br />
Deje que la cabina se enfríe por una hora, luego coloque los alimentos.<br />
Encienda el modo <strong>de</strong> Congelamiento Rápido por lo menos dos horas.<br />
Coloque los alimentos en el congelador.<br />
INFORMACION ADICIONAL:<br />
El <strong>de</strong>scongelamiento toma pocas horas. Le ayudará, <strong>de</strong>jar abierta la puerta <strong>de</strong>l congelador<br />
para apresurar el proceso <strong>de</strong> <strong>de</strong>scongelamiento. Para acelerar el <strong>de</strong>scongelamiento, eche<br />
agua caliente (no hirviendo), al hielo y la escarcha. Tenga mucho cuidado si usa la espátula<br />
para raspar el hielo, si lo hace muy fuerte pue<strong>de</strong> dañar el compartimiento <strong>de</strong> su congelador y<br />
anular la garantía.<br />
Compartimiento <strong>de</strong> su Congelador<br />
Este compartimiento está diseñado para un período largo (3 meses) <strong>de</strong> almacenamiento <strong>de</strong><br />
alimentos congelados.<br />
El tiempo <strong>de</strong> almacenamiento <strong>de</strong> los alimentos congelados varía y se recomienda almacenar no<br />
más <strong>de</strong>l tiempo recomendado. Cuando <strong>de</strong>scongele su congelador <strong>de</strong>berá seguir<br />
cuidadosamente las <strong>instrucciones</strong>.<br />
Alimentos congelados preenvasados comercialmente <strong>de</strong>ben ser almacenados <strong>de</strong> acuerdo con<br />
las indicaciones <strong>de</strong> su fabricante.<br />
Coloque los alimentos congelados <strong>de</strong>ntro <strong>de</strong> su congelador inmediatamente <strong>de</strong>spués <strong>de</strong><br />
comprarlos. Si hay indicaciones en el envase, sígalas cuidadosamente consi<strong>de</strong>rando el tiempo<br />
<strong>de</strong> almacenamiento.<br />
La puerta <strong>de</strong>l congelador pue<strong>de</strong> quebrarse cuando hay mucho hielo. Asegúrese <strong>de</strong><br />
<strong>de</strong>scongelarlo cuando el hielo haya excedido <strong>de</strong> ¼ a ½ pulgada <strong>de</strong> espesor.<br />
La canasta <strong>de</strong> almacenaje está diseñada para organizar toda clase <strong>de</strong> alimentos. Para colocar<br />
otros paquetes en su congelador, mueva la canasta a un lado o sáquela.<br />
18
CUIDADO Y MANTENIMIENTO<br />
Limpiando su Congelador<br />
Después <strong>de</strong> instalar su congelador, se le recomienda que este sea limpiado a fondo.<br />
Gire el control <strong>de</strong> temperatura a “0”, <strong>de</strong>sconecte el congelador y retire los alimentos y la canasta<br />
<strong>de</strong> almacenaje.<br />
Lave el interior con agua tibia y un trapo suave remojado en una solución <strong>de</strong> Bicarbonato <strong>de</strong><br />
Sodio. La solución consiste en dos cucharadas <strong>de</strong> la referida sal en un litro <strong>de</strong> agua.<br />
Lave la canasta <strong>de</strong> almacenaje con un <strong>de</strong>tergente suave.<br />
Asegúrese que la puerta que<strong>de</strong> herméticamente cerrada para que su congelador funcione<br />
eficientemente.<br />
Las partes externas <strong>de</strong> su congelador <strong>de</strong>ben ser limpiadas con un <strong>de</strong>tergente suave y agua tibia.<br />
Seque el interior y el exterior con un paño suave.<br />
Se recomienda que la unidad sea limpiada en el momento en que se <strong>de</strong>scongela, con la finalidad<br />
<strong>de</strong> que que<strong>de</strong> libre <strong>de</strong> mal olor y operando eficientemente.<br />
Si usted sale <strong>de</strong> Vacaciones<br />
Retire todos los alimentos<br />
Desconecte su congelador<br />
Limpie su congelador<br />
Deje la puerta <strong>de</strong> su congelador ligeramente abierta para evitar la formación <strong>de</strong> mal olor, moho.<br />
Sea extremadamente cuidadoso si hay niños. El congelador no <strong>de</strong>be ser accesible a los niños.<br />
En el caso <strong>de</strong> ser un largo tiempo <strong>de</strong> almacenamiento, la puerta <strong>de</strong>berá ser sellada con cinta<br />
adhesiva para que no se abra o se <strong>de</strong>berá retirar la puerta.<br />
Para mover su Congelador<br />
Retire los alimentos<br />
Asegúrese <strong>de</strong> colocar cinta adhesiva a todo lo que se pue<strong>de</strong> caer <strong>de</strong>ntro <strong>de</strong> su congelador.<br />
Retire las ruedillas para prevenir acci<strong>de</strong>ntes.<br />
Selle las puertas con cinta adhesiva.<br />
Asegúrese que el congelador se mantenga parado durante el traslado.<br />
Consejos Para Ahorrar Energía<br />
Su congelador <strong>de</strong>be estar ubicado en el área más fría <strong>de</strong> la habitación, alejado <strong>de</strong><br />
electrodomésticos que produzcan calor o conductos <strong>de</strong> aire caliente y lejos <strong>de</strong> los rayos solares.<br />
Deje enfriar los alimentos <strong>de</strong> acuerdo a la temperatura ambiental antes <strong>de</strong> colocarlos <strong>de</strong>ntro <strong>de</strong>l<br />
congelador. Si sobrecarga su congelador forzará al compresor a funcionar más tiempo <strong>de</strong>l<br />
normal. Los alimentos que se congelan lentamente pier<strong>de</strong>n calidad y se <strong>de</strong>scomponen.<br />
Asegúrese <strong>de</strong> envolver a<strong>de</strong>cuadamente los alimentos y <strong>de</strong> secar los empaques o contenedores<br />
antes <strong>de</strong> colocarlos <strong>de</strong>ntro <strong>de</strong>l congelador. Colocarlos mojados ocasiona escarcha en el<br />
congelador.<br />
La canasta <strong>de</strong> almacenaje <strong>de</strong> su congelador no <strong>de</strong>be ser forrada con papel aluminio, papel <strong>de</strong><br />
cera o papel toalla ya que esto interfiere con la circulación <strong>de</strong>l aire frío restando eficiencia a su<br />
congelador.<br />
Organice y coloque etiquetas en los envases <strong>de</strong> los alimentos con la finalidad <strong>de</strong> abrir el<br />
congelador lo menos posible y encontrar rápidamente lo que usted está buscando. Retire la<br />
mayor cantidad posible <strong>de</strong> cosas que necesita a la vez y cierre la puerta <strong>de</strong>l congelador tan<br />
pronto le sea posible.<br />
PROBLEMAS CON SU CONGELADOR<br />
Usted pue<strong>de</strong> resolver muchos problemas comunes <strong>de</strong> su electrodoméstico fácilmente, ahorrándole el<br />
gasto <strong>de</strong> una posible visita <strong>de</strong>l servicio técnico.<br />
Pruebe las siguientes sugerencias para verificar si usted pue<strong>de</strong> resolver el problema antes <strong>de</strong> llamar<br />
al servicio técnico.<br />
19
GUIA PARA SOLUCIONAR PROBLEMAS<br />
PROBLEMA<br />
SOLUCION<br />
Su electrodoméstico no funciona No está conectado a la corriente eléctrica.<br />
El interruptor saltó o se quemó un fusible<br />
El control <strong>de</strong> temperatura está en “0 / APAGADO”<br />
El compresor se encien<strong>de</strong> y se apaga La temperatura <strong>de</strong> la habitación es más caliente <strong>de</strong> lo normal.<br />
frecuentemente<br />
Colocó una cantidad muy gran<strong>de</strong> <strong>de</strong> alimentos en el<br />
congelador.<br />
La puerta permanece abierta mucho tiempo.<br />
La puerta no quedó completamente cerrada.<br />
El control <strong>de</strong> temperatura no está funcionando correctamente.<br />
La empaquetadura <strong>de</strong> la puerta no la está sellando<br />
a<strong>de</strong>cuadamente.<br />
El congelador no tiene el suficiente espacio libre.<br />
El congelador recientemente fue <strong>de</strong>sconectado.<br />
Para que el congelador esté completamente frío necesitará<br />
enfriarse por cuatro horas.<br />
La temperatura <strong>de</strong>ntro <strong>de</strong>l congelador<br />
está muy caliente.<br />
La temperatura <strong>de</strong>ntro <strong>de</strong>l congelador<br />
está muy fría.<br />
La temperatura <strong>de</strong> la superficie externa<br />
está caliente.<br />
Ruido fuerte cuando el congelador<br />
funciona.<br />
Ruido fuerte cuando comienza a trabajar<br />
el compresor.<br />
Sonidos similares a crujidos y estallidos<br />
cuando empieza a funcionar el<br />
compresor<br />
Burbujeo o gorgoteo, como agua que<br />
hierve.<br />
Vibración.<br />
La temperatura está programada muy caliente. Baje la<br />
temperatura con el control y espere unas horas hasta que<br />
está se estabilice.<br />
Ha <strong>de</strong>jado la puerta abierta frecuentemente. El calor entra en<br />
el congelador cada vez que se abre la puerta. Abra la puerta<br />
lo menos posible.<br />
La puerta no está cerrada completamente.<br />
La empaquetadura <strong>de</strong> la puerta la está sellando<br />
a<strong>de</strong>cuadamente.<br />
Probablemente colocó alimentos calientes recientemente<br />
El congelador recientemente fue <strong>de</strong>sconectado.<br />
Para que el congelador e sté completamente frío necesitará<br />
enfriarse por cuatro horas.<br />
El control <strong>de</strong> temperatura está programado muy frío. Suba la<br />
temperatura con el control y espere unas horas hasta que la<br />
temperatura se estabilice.<br />
El interruptor <strong>de</strong> Congelamiento Rápido está encendido, esto<br />
ocasiona que el compresor funcione continuamente y<br />
sobrepase el control <strong>de</strong> temperatura.<br />
La pared externa <strong>de</strong>l congelador pue<strong>de</strong> estar 30º Fahrenheit<br />
más alta que la temperatura <strong>de</strong> la habitación.<br />
Esto es normal mientras el compresor funciona para transferir<br />
calor <strong>de</strong>ntro <strong>de</strong> la cavidad <strong>de</strong>l congelador.<br />
Los congeladores mo<strong>de</strong>rnos tienen más capacidad <strong>de</strong><br />
almacenaje y la temperatura es más uniforme. Estos<br />
requieren compresores más eficientes. Ud. pue<strong>de</strong> oír el<br />
compresor cuando no hay ruido alre<strong>de</strong>dor.<br />
Esto es normal. Cuando el congelador funciona con<br />
presiones altas durante el ciclo <strong>de</strong> encendido. El sonido se<br />
acabará e irá <strong>de</strong>sapareciendo <strong>de</strong> acuerdo a como vaya<br />
avanzando el congelamiento.<br />
Las partes metálicas, como los ductos <strong>de</strong> agua caliente, se<br />
dilatan y contraen. Esto es normal. El sonido <strong>de</strong>saparecerá<br />
paulatinamente.<br />
Esto es normal. Es el refrigerante (usado para enfriar el<br />
congelador) que está circulando a través <strong>de</strong>l sistema.<br />
Asegúrese que el congelador esté nivelado. El piso pue<strong>de</strong><br />
estar <strong>de</strong>snivelado. El congelador se pue<strong>de</strong> estar meciendo.<br />
Asegúrese que la superficie don<strong>de</strong> tiene el congelador<br />
aguante el peso <strong>de</strong> este. Nivele el congelador colocando un<br />
pedazo <strong>de</strong> ma<strong>de</strong>ra o <strong>de</strong> metal por <strong>de</strong>bajo.<br />
Asegúrese que el electrodoméstico esté ubicado en un lugar<br />
20
Formación <strong>de</strong> humedad <strong>de</strong>ntro <strong>de</strong>l<br />
congelador.<br />
Formación <strong>de</strong> humedad fuera <strong>de</strong>l<br />
congelador.<br />
La puerta no cierra completamente<br />
totalmente plano.<br />
Esto es normal. Cuando el clima es húmedo y caliente, la<br />
acumulación <strong>de</strong> escarcha aumenta. Se ha <strong>de</strong>jado la puerta<br />
frecuentemente abierta. El calor entra en el congelador cada<br />
vez que se abre la puerta. Abra la puerta lo menos posible.<br />
La puerta no está cerrada completamente.<br />
La empaquetadura <strong>de</strong> la puerta no está sellando<br />
a<strong>de</strong>cuadamente<br />
La puerta no está cerrada completamente. El calor entra en<br />
el congelador cada vez que se abre la puerta.<br />
El congelador no está totalmente nivelado.<br />
El sellador <strong>de</strong> la puerta está sucio.<br />
La canasta <strong>de</strong> almacenaje está fuera <strong>de</strong> su sitio,<br />
obstaculizando el cierre <strong>de</strong> la puerta.<br />
SERVICIO TECNICO PARA SU ELECTRODOMESTICO<br />
Estamos orgullosos <strong>de</strong> nuestro servicio <strong>de</strong> atención al cliente y servicio que brindan nuestros<br />
técnicos profesionales en sus electrodomésticos <strong>Avanti</strong>. Con la compra <strong>de</strong> sus electrodomésticos<br />
<strong>Avanti</strong>, usted pue<strong>de</strong> confiar pues si usted necesita información adicional o asistencia, el equipo <strong>de</strong>l<br />
Departamento <strong>de</strong> Servicio al Cliente <strong>de</strong> <strong>Avanti</strong> <strong>Products</strong>, estará con usted para respon<strong>de</strong>r cualquier<br />
consulta o inquietud que usted tenga. Sólo llámenos gratis a los siguientes números telefónicos.<br />
SERVICIO AL CLIENTE AVANTI PRODUCTS<br />
Información <strong>de</strong>l Producto<br />
800-323-5029<br />
Para solicitud <strong>de</strong> Partes<br />
800-220-5570<br />
Servicio <strong>de</strong> Reparación a domicilio<br />
800-220-5570<br />
Estamos dispuestos a ayudarlos si tiene dudas<br />
o preguntas acerca <strong>de</strong> nuestros productos.<br />
Usted <strong>de</strong>be solicitar las partes y accesorios<br />
que necesite y nosotros se los enviaremos<br />
directamente a su domicilio.<br />
Usted pue<strong>de</strong> solocotar lo que necesite y pagar<br />
con cheques personales, efectivo, Master Card<br />
o Visa.<br />
<strong>Avanti</strong> <strong>Products</strong> autoriza al Centro <strong>de</strong> Servicio<br />
para brindarle un servicio experto <strong>de</strong><br />
reparación, a<strong>de</strong>cuándose al horario que usted<br />
encuentre conveniente. Nuestros técnicos<br />
conocen perfectamente nuestros productos<br />
tanto por <strong>de</strong>ntro como por fuera.<br />
PRINTED IN CHINA<br />
21