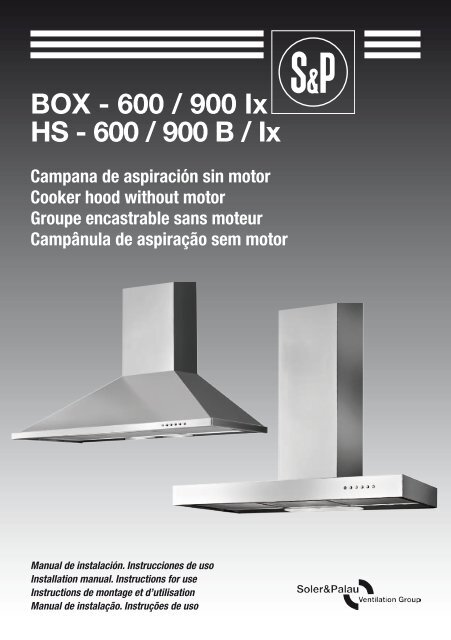
BOX - 600 / 900 Ix HS - 600 / 900 B / Ix - Soler & Palau Sistemas de ...
BOX - 600 / 900 Ix HS - 600 / 900 B / Ix - Soler & Palau Sistemas de ...
BOX - 600 / 900 Ix HS - 600 / 900 B / Ix - Soler & Palau Sistemas de ...

You also want an ePaper? Increase the reach of your titles
YUMPU automatically turns print PDFs into web optimized ePapers that Google loves.
<strong>BOX</strong> - <strong>600</strong> / <strong>900</strong> <strong>Ix</strong><br />
<strong>HS</strong> - <strong>600</strong> / <strong>900</strong> B / <strong>Ix</strong><br />
Campana <strong>de</strong> aspiración sin motor<br />
Cooker hood without motor<br />
Groupe encastrable sans moteur<br />
Campânula <strong>de</strong> aspiração sem motor<br />
Manual <strong>de</strong> instalación. Instrucciones <strong>de</strong> uso<br />
Installation manual. Instructions for use<br />
Instructions <strong>de</strong> montage et d’utilisation<br />
Manual <strong>de</strong> instalação. Instruções <strong>de</strong> uso<br />
1
Fig. 1<br />
Fig.1<br />
Fig.1<br />
Fig.2<br />
Fig. 2<br />
Fig.2<br />
Fig.3<br />
Fig.3<br />
MAX 90cm<br />
MAX 90cm<br />
650<br />
750<br />
650<br />
750<br />
Fig.3 Fig.4 Fig.5-1<br />
Fig.3 3<br />
Fig.5-2 Fig.5-2<br />
Fig.4 Fig.1 4<br />
Fig.6 Fig.6 Fig.2 Fig.5- 2<br />
20<br />
20<br />
MAX 90cm<br />
650<br />
750<br />
275<br />
275<br />
168<br />
168<br />
Fig. 5-1<br />
Fig.5-1<br />
ig.6<br />
Fig.6<br />
20<br />
B<br />
B<br />
Fig. 5-2<br />
Fig.5-2<br />
20<br />
Fig.7<br />
Fig.7<br />
Fig.8-2<br />
Fig.8-2<br />
20 mmB<br />
20 mm<br />
235<br />
168<br />
325<br />
275<br />
2<br />
B<br />
A<br />
A
20 mm<br />
650<br />
750<br />
Fig.4<br />
4 Fig. 6<br />
Fig.5-1<br />
Fig.4 Fig.6Fig.4<br />
Fig.5-1<br />
20<br />
20<br />
Fig.5-1<br />
Fig.5-1 Fig.5-1<br />
20<br />
20 20<br />
Fig.7<br />
Fig.5-2<br />
20<br />
325<br />
20 mm<br />
235<br />
235<br />
Fig.6 B<br />
B<br />
325<br />
325<br />
325<br />
235<br />
235<br />
235<br />
B<br />
B<br />
B<br />
325<br />
Fig.7<br />
Fig.7<br />
168<br />
Fig. 7 Fig.7 Fig.7 Fig.8-1<br />
Fig. 8-1<br />
Fig.7<br />
Fig.8-1<br />
275<br />
Fig.8-2<br />
Fig.9-1<br />
B<br />
20 mm<br />
0 mm20 mm<br />
A<br />
A<br />
Fig.8-2<br />
Fig. 8-2<br />
Fig.8-1<br />
Fig.8-1 Fig.8-1<br />
A<br />
A B A<br />
B<br />
A<br />
A<br />
A<br />
A<br />
A<br />
Fig.9-2<br />
Fig.9-2<br />
Fig.9-1<br />
Fig.9-2<br />
Fig.9-2<br />
Fig.9-1 Fig.9-1 Fig.9-2<br />
3
ESPAÑOL<br />
CAMPANA DE ASPIRACIÓN SIN MOTOR<br />
MODELO: <strong>BOX</strong> - <strong>600</strong> / <strong>900</strong> lx • <strong>HS</strong> - <strong>600</strong> / <strong>900</strong> B / <strong>Ix</strong><br />
ESPAÑOL<br />
GENERALIDADES<br />
Le agra<strong>de</strong>cemos la confianza que ha <strong>de</strong>positado en nosotros mediante la compra <strong>de</strong> esta campana. Usted<br />
ha adquirido un producto <strong>de</strong> calidad que ha sido totalmente fabricado según las reglas técnicas <strong>de</strong> seguridad<br />
reconocidas y conformes a las normas <strong>de</strong> la CE. Lea atentamente el contenido <strong>de</strong>l presente libro <strong>de</strong><br />
instrucciones, pues contiene indicaciones importantes para su seguridad durante la instalación, el uso y el<br />
mantenimiento <strong>de</strong> este producto. Consérvelo para una posible consulta posterior. Rogamos compruebe el<br />
perfecto estado <strong>de</strong>l aparato al <strong>de</strong>sembalarlo, ya que cualquier <strong>de</strong>fecto <strong>de</strong> origen que presente está amparado<br />
por la garantía S&P. Este aparato ha sido proyectado como campana <strong>de</strong> aspiración remota (evacuación <strong>de</strong>l<br />
aire hacia el exterior). Se recomienda que la instalación la realice personal especializado.<br />
RECOMENDACIONES DE SEGURIDAD<br />
• Este producto no lo <strong>de</strong>ben <strong>de</strong> utilizar personas (niños incluidos) con capacida<strong>de</strong>s físicas, sensoriales o<br />
mentales reducidas, o con experiencia y conocimientos ina<strong>de</strong>cuados, si no están bajo la supervisión <strong>de</strong><br />
una persona responsable <strong>de</strong> su seguridad o si dicha persona no se les ha instruido a<strong>de</strong>cuadamente. Los<br />
niños <strong>de</strong>ben ser vigilados para asegurarse <strong>de</strong> que no jueguen con el producto.<br />
• No conecte la <strong>de</strong>scarga <strong>de</strong> la campana a un conducto don<strong>de</strong> circule aire caliente o que sea utilizado para<br />
evacuar humos <strong>de</strong> aparatos alimentados con energía no eléctrica.<br />
• Cuando funcionen simultáneamente en la misma habitación, la campana <strong>de</strong> aspiración y un quemador<br />
/ cal<strong>de</strong>ra / estufa / horno… etc, la correcta combustión <strong>de</strong> los cuales <strong>de</strong>pen<strong>de</strong> <strong>de</strong>l aire <strong>de</strong>l ambiente,<br />
recomendamos para un funcionamiento seguro ventilar correctamente la habitación, asegurando la entrada<br />
<strong>de</strong> aire <strong>de</strong>l exterior. Esto es necesario pues la campana aspira el aire <strong>de</strong>l ambiente que estos otros<br />
aparatos necesitan para una correcta combustión.<br />
• Para la evacuación hacia el exterior, aténgase a las disposiciones vigentes <strong>de</strong>l país don<strong>de</strong> se lleva a cabo<br />
la instalación.<br />
• Asegúrese que el conducto <strong>de</strong> evacuación esté limpio y no esté obstruido.<br />
• Para una eficacia óptima <strong>de</strong> la campana, utilice un conducto <strong>de</strong> extracción lo más corto posible, evitando<br />
los codos. Si se instala un conducto flexible, estirarlo al máximo.<br />
• No intente manipular los filtros cuando la campana esté en funcionamiento.<br />
• No toque las lámparas <strong>de</strong>spués <strong>de</strong> un uso prolongado <strong>de</strong>l aparato.<br />
• Está prohibido cocinar alimentos a la llama <strong>de</strong>bajo <strong>de</strong> la campana.<br />
• Evite las llamas libres, ya que resultan perjudiciales para los filtros y pue<strong>de</strong>n provocar incendios.<br />
• Controle en todo momento que el aceite caliente no prenda fuego. Si se diera el caso, <strong>de</strong>sconecte rápidamente<br />
la campana <strong>de</strong> la red eléctrica.<br />
• Antes <strong>de</strong> realizar cualquier operación <strong>de</strong> mantenimiento o limpieza, siempre <strong>de</strong>sconecte la campana <strong>de</strong><br />
la red eléctrica.<br />
• Aunque se trata <strong>de</strong> un aparato provisto <strong>de</strong> interruptor, se <strong>de</strong>be interponer entre el aparato y la red eléctrica un<br />
interruptor unipolar con abertura mínima <strong>de</strong> 3 mm entre los contactos, a<strong>de</strong>cuado a la carga total (Campana<br />
más unidad <strong>de</strong> extracción remota) y que responda a las normas vigentes <strong>de</strong> cada país.<br />
• No monte nunca lámparas <strong>de</strong> más potencia que la indicada, y siempre <strong>de</strong>l mismo tipo. Fig 9-1 o Fig 9-2<br />
(según el mo<strong>de</strong>lo adquirido).<br />
Se <strong>de</strong>clina toda responsabilidad por eventuales daños provocados por la inobservancia <strong>de</strong> las advertencias<br />
arriba indicadas.<br />
4
INSTRUCCIONES PARA LA INSTALACIÓN<br />
Fijación en la pared<br />
• La campana <strong>de</strong>be fijarse centrada respecto al plano <strong>de</strong> cocción y a una altura mínima <strong>de</strong> 650 mm <strong>de</strong> las<br />
hornillas eléctricas o a una altura <strong>de</strong> 750 mm para hornillos a gas o mixtas. (Fig.1)<br />
(Esta distancia pue<strong>de</strong> variar en función <strong>de</strong> las normas vigentes en cada país).<br />
• Es aconsejable que al efectuar la instalación <strong>de</strong> la campana, ésta que<strong>de</strong> situada <strong>de</strong> forma que la clavija<br />
<strong>de</strong> conexión sea accesible por el usuario. (Fig.2)<br />
ESPAÑOL<br />
• Si no está incluida, monte en el cable una clavija normalizada que soporte la carga indicada en la placa<br />
<strong>de</strong>l características <strong>de</strong> la campana y la carga <strong>de</strong>l extractor S&P escogido como unidad remota.<br />
• Antes <strong>de</strong> fijar la campana, quitar los filtros <strong>de</strong> aluminio. (Fig.3)<br />
• Mediante los cuatro tornillos suministrados. Acople la brida cuadrada con la campana. (Fig.4)<br />
• Respetando las cotas indicadas en la figura 5-1 o 5-2 (según el mo<strong>de</strong>lo adquirido), practique los dos<br />
agujeros A <strong>de</strong> ø 6. Utilice tornillos y tacos, pero antes asegúrese que estos son a<strong>de</strong>cuados para el tipo<br />
<strong>de</strong> pared don<strong>de</strong> va a instalar la campana. Inserte los tacos y los tornillos sin ajustar totalmente, <strong>de</strong> forma<br />
que pueda colgar la campana en ellos.<br />
• Una vez colgada, anivélela y marque los dos agujeros interiores B indicados en la figura 5-1 o 5-2 (según<br />
el mo<strong>de</strong>lo adquirido). Descuelgue la campana y practique los dos agujeros marcados con una broca <strong>de</strong><br />
ø 6, seguidamente inserte los tacos. Vuela a colgar la campana y fíjela <strong>de</strong>finitivamente mediante los dos<br />
tornillos.<br />
• Instale el tubo <strong>de</strong> evacuación, Si la longitud <strong>de</strong>l tubo <strong>de</strong> evacuación es corta y <strong>de</strong>be unir dos o más tubos,<br />
asegúrese <strong>de</strong> no reducir el diámetro en los empalmes y evite las fugas en el punto <strong>de</strong> conexión.<br />
Para facilitar la conexión <strong>de</strong> la campana con la unidad <strong>de</strong> aspiración remota, disponemos <strong>de</strong>l kit <strong>de</strong> montaje “H”<br />
con los accesorios necesarios. Refiérase a nuestro catalogo para ver los accesorios que componen este kit.<br />
www.solerpalau.com<br />
Instalación Eléctrica<br />
• Compruebe que el voltaje y la frecuencia <strong>de</strong> la red, coinci<strong>de</strong>n con los datos <strong>de</strong> la placa <strong>de</strong> características<br />
<strong>de</strong> la campana y <strong>de</strong> la unidad <strong>de</strong> extracción remota.<br />
• El aparato está construido con una protección contra los choques eléctricos <strong>de</strong> Clase II, por consiguiente<br />
no se <strong>de</strong>be conectar ningún cable a la toma <strong>de</strong> tierra.<br />
• Conecte el cable <strong>de</strong>l motor en la ficha <strong>de</strong> bornes ubicada <strong>de</strong>ntro <strong>de</strong> la caja <strong>de</strong> conexión eléctrica marcada<br />
con la etiqueta MOTOR. Asegúrese <strong>de</strong> hacer la conexión correctamente.<br />
Azul = N (Neutro)<br />
Marrón = L (línea)<br />
Fijación <strong>de</strong> la chimenea telescópica <strong>de</strong>corativa<br />
• A 20 mm <strong>de</strong>l techo y alineado con el centro <strong>de</strong> la campana, fije el soporte <strong>de</strong> la chimenea A (Fig 6). Una<br />
vez fijado y mediante los tornillos B, fije la parte superior <strong>de</strong> la chimenea telescópica en dicho soporte,<br />
teniendo en cuenta que la parte superior va por <strong>de</strong>ntro <strong>de</strong> la parte inferior.<br />
• Una vez fijada la parte superior, <strong>de</strong>slice la parte inferior y únela con la campana mediante los tornillos A<br />
indicados en la figura 7.<br />
USO Y MANTENIMIENTO<br />
• La campana dispone <strong>de</strong> un interruptor multiposición don<strong>de</strong> podrá variar y seleccionar la velocidad <strong>de</strong><br />
extracción <strong>de</strong>l aire viciado. También dispone un interruptor para accionar las lámparas e iluminar así la<br />
zona <strong>de</strong> cocción.<br />
5
Mo<strong>de</strong>lo Box (Figura 8-1)<br />
A = Luz piloto <strong>de</strong> funcionamiento.<br />
0-1-2-3 = Control velocidad <strong>de</strong> extracción (mo<strong>de</strong>los <strong>BOX</strong>)<br />
B = Control lámparas iluminación.<br />
ESPAÑOL<br />
Mo<strong>de</strong>lo <strong>HS</strong> (Figura 8-2)<br />
A = Control lámparas Iluminación.<br />
B = Luz piloto <strong>de</strong> funcionamiento.<br />
C = Control velocidad <strong>de</strong> extracción.<br />
• Se aconseja poner en funcionamiento el aparato antes empezar a cocinar cualquier tipo <strong>de</strong> alimento y<br />
<strong>de</strong>jar funcionando durante 15 minutos <strong>de</strong>spués <strong>de</strong> haber terminado <strong>de</strong> cocinar.<br />
Atención: Antes <strong>de</strong> realizar cualquier operación <strong>de</strong> mantenimiento o limpieza, siempre <strong>de</strong>sconecte la campana<br />
<strong>de</strong> la red eléctrica.<br />
• El buen funcionamiento <strong>de</strong> la campana <strong>de</strong>pen<strong>de</strong> <strong>de</strong> la asiduidad con que se realice el mantenimiento,<br />
sobre todo <strong>de</strong>l filtro anti grasa. El filtro anti grasa tiene la función <strong>de</strong> retener las partículas <strong>de</strong> grasa que<br />
están en suspensión en el aire, por lo tanto pue<strong>de</strong> obstruirse en un tiempo que varía según el uso que<br />
se haga <strong>de</strong>l aparato.<br />
• Quite los filtros <strong>de</strong> la campana y lávelos con una solución <strong>de</strong> agua templada y <strong>de</strong>tergente líquido neutro,<br />
<strong>de</strong>jando ablandar la suciedad. Enjuague con abundante agua templada y <strong>de</strong>je secar. También pue<strong>de</strong>n<br />
ser lavados en el lavavajillas.<br />
• Después <strong>de</strong> algunos lavados, los filtros <strong>de</strong> aluminio pue<strong>de</strong>n alterar su color inicial. Este hecho no da lugar<br />
a ninguna reclamación para un posible cambio.<br />
• Si no se atiene a las instrucciones <strong>de</strong> cambio y lavado, los filtros antigrasa se pue<strong>de</strong>n incendiar.<br />
• Limpie con frecuencia todos los restos <strong>de</strong> suciedad / grasa en las otras superficies <strong>de</strong> la campana usando<br />
un paño hume<strong>de</strong>cido con <strong>de</strong>tergentes líquidos neutros no abrasivos.<br />
• (Mo<strong>de</strong>los Box) Si tiene que sustituir las lámparas halógenas, no toque las nuevas directamente con las<br />
manos, para no reducir la vida <strong>de</strong> uso <strong>de</strong> las mismas. (Fig 9-1)<br />
ASISTENCIA TÉCNICA<br />
La extensa red <strong>de</strong> Servicios Oficiales S&P garantiza una a<strong>de</strong>cuada asistencia técnica.<br />
En caso <strong>de</strong> observar alguna anomalía en el aparato, rogamos se ponga en contacto con cualquiera <strong>de</strong> los<br />
servicios oficiales mencionados, don<strong>de</strong> será <strong>de</strong>bidamente atendido.<br />
Cualquier manipulación efectuada por personas ajenas a los Servicios Oficiales S&P nos obligaría a cancelar<br />
su garantía.<br />
Para aclarar cualquier duda con respecto a los productos S&P diríjase a la Red <strong>de</strong> Servicios Post Venta<br />
si es en territorio español, o a su distribuidor habitual en el resto <strong>de</strong>l mundo. Para su localización pue<strong>de</strong><br />
consultar la página WEB www.solerpalau.com<br />
PUESTA FUERA DE SERVICIO Y RECICLAJE<br />
• En caso <strong>de</strong> puesta en fuera <strong>de</strong> servicio, aunque sea <strong>de</strong> forma temporal, es aconsejable<br />
conservar el aparato en lugar seco y libre <strong>de</strong> polvo, <strong>de</strong>ntro <strong>de</strong> su embalaje original.<br />
• La normativa <strong>de</strong> la CEE y el compromiso que <strong>de</strong>bemos adquirir con las futuras generaciones,<br />
nos obligan al reciclado <strong>de</strong> materiales; le rogamos que no olvi<strong>de</strong> <strong>de</strong>positar todos los<br />
elementos sobrantes <strong>de</strong>l embalaje en los correspondientes contenedores <strong>de</strong> reciclaje, así<br />
como <strong>de</strong> llevar los aparatos sustituidos al Gestor <strong>de</strong> Residuos más próximo.<br />
EL FABRICANTE NO SE HACE RESPONSABLE DE LOS DAÑOS PRODUCIDOS A PERSONAS Y/O COSAS<br />
DEBIDOS AL INCUMPLIMIENTO DE ESTAS ADVERTENCIAS.<br />
S&P SE RESERVA EL DERECHO A MODIFICACIONES DEL PRODUCTO SIN PREVIO AVISO.<br />
6
ENGLISH<br />
COOKER HOOD WITHOUT MOTOR<br />
MODEL: <strong>BOX</strong> - <strong>600</strong> / <strong>900</strong> lx • <strong>HS</strong> - <strong>600</strong> / <strong>900</strong> B / <strong>Ix</strong><br />
INTRODUCTION<br />
Thank you for purchasing this cooker hood. You have purchased a high-quality product manufactured in full<br />
compliance with applicable safety regulations and EU standards. Please read this instruction book carefully,<br />
as it contains important information for your safety during the installation, use and maintenance of this<br />
product. Keep it at hand for future ref erence. Please check that the appliance is in perfect condition when<br />
you unpack it, as all factory <strong>de</strong>fects are covered by the S&P guarantee. This appliance has been <strong>de</strong>signed<br />
to work as a remote cooker hood (to exhaust stale air to outsi<strong>de</strong>). We recommend that the installation be<br />
carried out by suitably qualified personnel.<br />
SAFETY RECOMMENDATIONS<br />
• This product should not be used by people (including children) with reduced physical, sensorial or mental<br />
capacity, or people with insufficient experience and knowledge, if they are not un<strong>de</strong>r the supervision of<br />
someone responsible for their safety or if this person has not given them a<strong>de</strong>quate instructions. Make sure<br />
children do not play with the appliance.<br />
• Do not connect the outlet of the hood to a duct where hot air is circulating or is used for evacuating fumes<br />
from <strong>de</strong>vices powered by non/electric energy.<br />
• If the hood and a burner/boiler/stove/oven... are in operation simultaneously in the same room and the<br />
correct combustion of the latter appliances <strong>de</strong>pends on ambient air, for safe operation, we recommend<br />
ventilating the room sufficiently to ensure that there is an a<strong>de</strong>quate supply of fresh air from outsi<strong>de</strong>. This is<br />
necessary, as the hood exhausts ambient air that these <strong>de</strong>vices need for correct combustion.<br />
ENGLISH<br />
• For exhausting waste air to the outsi<strong>de</strong>, follow regulations in the country where it is being installed.<br />
• Make sure that the exhaust duct is clean and unobstructed.<br />
• For optimum efficiency of the hood, use an extraction conduit as short as possible, avoiding angles. If a<br />
flexible conduit is fitted, stretch it out as much as possible.<br />
• Do not try to manipulate the filters when the hood is in operation.<br />
• Do not touch the lamps if the appliance has been in operation for a long time.<br />
• It is forbid<strong>de</strong>n to cook food with open flames un<strong>de</strong>r the hood.<br />
• Avoid open flames, as they are harmful for the filters and can cause fires.<br />
• Keep hot oil un<strong>de</strong>r control at all times to avoid it catching light. If this were to happen, disconnect the<br />
hood from the mains immediately.<br />
• Before carrying out any maintenance or cleaning operations, always disconnect the hood from the mains.<br />
• Although the appliance has a power switch, a unipolar switch with a minimum gap of 3 mm between<br />
contacts and a<strong>de</strong>quate for the total current (Hood plus remote extraction unit) must be fitted between the<br />
appliance and the mains, in compliance with national regulations.<br />
• When replacing lamps always use lamps of the same type and power, never more powerful.<br />
Fig 9-1 or Fig 9-2 (According to mo<strong>de</strong>l purchased).<br />
The manufacturer <strong>de</strong>clines all responsibility for any damage caused by non-compliance of the abovementioned<br />
instructions.<br />
7
INSTRUCTIONS FOR INSTALLATION<br />
Securing to the wall<br />
• The hood should be fixed centred on the cooking area and at a minimum height of 650 mm from electric<br />
hotplates or 750 mm in the case of gas burners or mixed installations. (Fig.1)<br />
(This distance may vary according to national regulations).<br />
• When installing the hood, it is advisable to fit it in such a manner that the mains plug is accessible by the<br />
user. (Fig. 2)<br />
• If not already fitted, attach a standard mains plug to the cable, able to support the current as indicated<br />
on the specifications plate on the hood in addition to the current drawn by the S&P extractor chosen as<br />
a remote unit.<br />
• Before securing the hood, remove the aluminium filters. (Fig.3)<br />
• Using the four screws supplied, fit the square flange to the hood. (Fig.4)<br />
ENGLISH<br />
• Following the dimensions indicated in figure 5-1 or 5-2 (According to mo<strong>de</strong>l purchased), make the two<br />
holes A of ø 6. Use screws and plugs, but first make sure that they are correct for the type of wall where<br />
the hood is to be fitted. Insert plugs and screws without tightening completely, in such a manner that the<br />
hood can be supported from them.<br />
• Once hooked on, level the hood and mark the two inner holes B indicated in figure 5-1 or 5-2 (According<br />
to mo<strong>de</strong>l purchased). Remove the hood and drill the two holes where marked, use a ø6 drill, then insert<br />
the plugs. Hang the hood again and tighten the two screws to secure.<br />
• Fit the evacuation tube. If the evacuation tube is short and two or more tubes must be joined, make sure<br />
that the diameter is not narrowed at the joints and avoid air leaks at the connection point.<br />
To facilitate the connection of the hood to the remote fan unit, we have an assembly kit “H” containing the<br />
necessary accessories. Consult our catalogue to see the accessories inclu<strong>de</strong>d in this kit.<br />
www.solerpalau.com<br />
Electrical Installation<br />
• Make sure the mains voltage and frequency coinci<strong>de</strong> with those on the characteristics plate on the hood<br />
and the remote extraction unit.<br />
• This <strong>de</strong>vice has been <strong>de</strong>signed with Class II electrical shock protection, therefore do not connect any<br />
cable to the earth connection.<br />
• Connect the cable from the motor to the terminal block located insi<strong>de</strong> the electrical connection box labelled<br />
MOTOR. Make sure the connections are correct.<br />
Blue = N (Neutral).<br />
Brown = L (Live)<br />
Securing the <strong>de</strong>corative telescopic chimney<br />
• Secure the chimney support 20 mm from the ceiling and aligned with the centre of the hood A (Fig. 6). Once<br />
it has been secured with the screws B, secure the upper part of the telescopic chimney to this support,<br />
taking into account that the upper part goes insi<strong>de</strong> the lower part.<br />
• Once the upper part has been secured, sli<strong>de</strong> the lower part and join it to the hood using the screws A<br />
indicated in figure 7.<br />
USE AND MAINTENANCE<br />
• TThe hood has a multi-position switch to select the extraction speed of the air. It also has a switch for the<br />
8
lamps that illuminate the cooking area (Fig. 5).<br />
Box Mo<strong>de</strong>l (Figure 8-1)<br />
A = Pilot light.<br />
0-1-2-3 = Extraction speed control (<strong>BOX</strong> mo<strong>de</strong>ls)<br />
B = Illumination bulb check.<br />
<strong>HS</strong> Mo<strong>de</strong>l (Figure 8-2)<br />
A = Control illumination lamps.<br />
B = On/Off indicator<br />
C = Extract fan speed control.<br />
• It is advisable to start the appliance before cooking and leave it in operation for 15 minutes after finishing<br />
cooking,<br />
Attention: Before carry out any maintenance or cleaning operations, always disconnect the hood from the mains.<br />
• Correct operation of the hood <strong>de</strong>pends on its regular maintenance, especially the grease filter. The aim of<br />
the grease filter is to retain particles of grease and prevente them from passing into the duct or the fan;<br />
therefore it will get blocked after a time, which will vary <strong>de</strong>pending on the specific usage of the appliance.<br />
• Remove the filters from the hood and wash them in a solution of warm water and neutral liquid <strong>de</strong>tergent<br />
to soften the grease. Rinse in warm water and leave to dry. They can also be washed in a dishwasher.<br />
• After a few washes, aluminium filters may change colour. This is not a cause for warranty claims for<br />
replacement.<br />
ENGLISH<br />
• If you do not follow the instructions regarding washing and changing filters, there is a risk that they could<br />
catch fire.<br />
• Clean all traces of dirt / grease off the hood using a damp cloth with neutral non-abrasive liquid <strong>de</strong>tergent.<br />
• (Box Mo<strong>de</strong>ls) If the halogen bulbs need replacing, do not touch the glass of the new bulbs directly, as this<br />
may reduce their life. (Fig 9-1).<br />
TECHNICAL ASSISTANCE<br />
S&P’s large Technical Service network will guarantee a<strong>de</strong>quate technical assistance.<br />
If a fault is observed in the unit, please contact any of the mentioned technical service offices and they will<br />
attend to your problem.<br />
Any manipulation of the appliance by personnel not belonging to the Official S&P Services will result in your<br />
guarantee being void.<br />
For any queries regarding S&P products please contact any branch of our After Sales<br />
Service network if you are in Spain, or your regular <strong>de</strong>aler in the rest of the world. To find your nearest <strong>de</strong>aler,<br />
visit our website at www.solerpalau.com<br />
REMOVAL FROM SERVICE, DISPOSAL AND RECYCLING<br />
• If the appliance is not to be used for any length of time, we recommend returning it to its<br />
original package and storing it in a dry, dust-free place.<br />
• EU regulations and our commitment to future generations oblige us to recycle used materials;<br />
please remember to dispose of all unwanted packaging materials at the appropriate recycling<br />
points, and to drop off obsolete equipment at the nearest waste management point.<br />
THE MANUFACTURER WILL NOT BE HELD LIABLE FOR DAMAGES TO PEOPLE AND/OR PROPERTY<br />
DUE TO NON-COMPLIANCE WITH THESE WARNINGS.<br />
S&P RESERVES THE RIGHT TO MODIFY THE PRODUCT WITHOUT PRIOR NOTIFICATION.<br />
9
FRANÇAIS<br />
HOTTE SANS MOTEUR<br />
MODÈLE: <strong>BOX</strong> - <strong>600</strong> / <strong>900</strong> lx • <strong>HS</strong> - <strong>600</strong> / <strong>900</strong> B / <strong>Ix</strong><br />
GÉNÉRALITÉS<br />
Lire attentivement ces instructions avant <strong>de</strong> monter la hotte et les conserver. Il contient <strong>de</strong>s indications<br />
importantes concernant votre sécurité au cours <strong>de</strong> l’installation, <strong>de</strong> l’utilisation et <strong>de</strong> l’entretien <strong>de</strong><br />
ce produit. Conservez-le pour pouvoir le consulter à tout moment.<br />
La hotte a été totalement fabriqué en conformité avec les Normes <strong>de</strong> la CE.<br />
Vérifier, dès l’avoir sorti <strong>de</strong> son emballage, le parfait état <strong>de</strong> l’appareil ainsi que son fonctionnement, étant<br />
donné que tout éventuel défaut d’origine est couvert par la garantie S&P.<br />
Cet appareil a été conçu comme groupe encastrable avec comman<strong>de</strong>s électriques (évacuation <strong>de</strong> l’air vers<br />
l’extérieur). Il est recommandé <strong>de</strong> faire installer l’appareil par un professionnel qualifié.<br />
RECOMMANDATIONS DE SÉCURITÉ<br />
• Ce produit ne doit pas être utilisé par <strong>de</strong>s personnes (enfants compris) souffrant d’un handicap physique,<br />
sensoriel ou mental, ou ne disposant pas <strong>de</strong> l’expérience ou <strong>de</strong>s connaissances adéquates, si elles ne<br />
sont pas supervisées par une personne responsable <strong>de</strong> leur sécurité ou si cette personne ne leur a pas<br />
donné les instructions adéquates. Les enfants doivent être surveillés pour s’assurer qu’ils ne jouent pas<br />
avec le produit.<br />
• Ne pas raccor<strong>de</strong>r la hotte sur le même conduit que celui servant à l’évacuation <strong>de</strong>s gaz brûlés d’une chaudière<br />
(gaz, fuel, charbon etc...) ou autres appareils à combustion alimentés par une énergie non électrique.<br />
• Si la hotte fonctionne simultanément dans la même pièce avec un brûleur/ une chaudière / un poêle /<br />
un four, etc., vérifier que l’entrée d’air neuf extérieur dans la pièce est correctement dimensionnée pour<br />
assurer une bonne combustion. Cette entrée d’air neuf ne doit pas pouvoir être obstruée.<br />
• Pour les évacuations vers l’extérieur, respecter les règles en vigueur dans le pays où est installée la hotte.<br />
FRANÇAIS<br />
• S’assurer que le conduit d’évacuation est propre et non obstrué.<br />
• Pour une efficacité optimum <strong>de</strong> la hotte, utiliser un conduit le plus court possible en évitant les cou<strong>de</strong>s.<br />
S’il est employé un conduit flexible, le tendre au maximum.<br />
• Ne pas manipuler les filtres lorsque l’extraction est en fonctionnement.<br />
• Ne pas toucher les lampes après une utilisation prolongée <strong>de</strong> l’appareil.<br />
• Ne pas flamber les aliments directement sous la hotte.<br />
• Eviter l’utilisation <strong>de</strong> feux libres, ils peuvent endommager la hotte et provoquer un incendie.<br />
• Surveiller en permanence les plats frits afin d’éviter que l’huile chau<strong>de</strong> prenne feu. En cas d’incendie<br />
débrancher immédiatement la hotte.<br />
• Avant toute opération <strong>de</strong> maintenance ou d’entretien, débranchez toujours l’alimentation électrique <strong>de</strong> la hotte.<br />
• Même si la hotte est fourni avec un interrupteur, la ligne électrique <strong>de</strong>vra prévoir un interrupteur omnipolaire<br />
ayant une ouverture entre contacts d’au moins 3 mm, bien dimensionné par rapport à la charge (en<br />
incluant l’extracteur déporté) et conforme aux normes en vigueurs.<br />
• Ne jamais monter <strong>de</strong> lampe d’une puissance supérieure à celle indiquée. Toujours utiliser le même type<br />
<strong>de</strong> lampe que celles installées d’origine. Fig 9-1 ou Fig 9-2 (selon le modèle acquis).<br />
Le fabricant ne pourra être tenu pour responsable <strong>de</strong>s dommages résultants du non-respect <strong>de</strong> ces recommandations.<br />
10
INSTRUCTIONS DE MONTAGE<br />
Fixation au mur<br />
• La hotte doit être centré par rapport au plan <strong>de</strong> cuisson et fixé à au moins 650 mm au-<strong>de</strong>ssus <strong>de</strong>s plaques<br />
<strong>de</strong> cuisson électriques ou 750 mm <strong>de</strong>s plaques gaz ou mixtes. (Fig.1)<br />
(Cette distance peut varier en fonction <strong>de</strong>s normes en vigueur dans chaque pays).<br />
• Installer la hotte <strong>de</strong> façon à ce que le bornier <strong>de</strong> raccor<strong>de</strong>ment soit facilement accessible. (Fig. 2)<br />
• Si nécessaire, monter sur le câble une prise normalisée pouvant supporter l’intensité consommée par la<br />
hotte et l’extracteur choisi.<br />
• Avant <strong>de</strong> fixer la hotte, retirez les filtres. (Fig.3)<br />
• Utilisez les quatre vis fournies pour monter la bri<strong>de</strong> carrée sur la hotte. (Fig.4)<br />
• En respectant les cotes indiquées sur la figure 5-1 ou 5-2 (selon le modèle <strong>de</strong> la hotte à installer), réaliser<br />
<strong>de</strong>ux trous A <strong>de</strong> ø 6. Utiliser les vis et les chevilles mais s’assurer auparavant qu’elles conviennent bien au<br />
type <strong>de</strong> mur sur lequel la hotte est fixée. Insérer les chevilles et les vis sans les serrer totalement, <strong>de</strong> sorte<br />
que la hotte puisse être suspendue.<br />
• Une fois suspendue, mettre la hotte à niveau et marquer les <strong>de</strong>ux trous intérieurs B indiqués sur la figure 5-1<br />
ou 5-2 (selon le modèle <strong>de</strong> la hotte à installer). Décrocher la hotte et percer avec un foret <strong>de</strong> ø 6 les <strong>de</strong>ux<br />
trous marqués. Insérer les chevilles. Replacer la hotte et fixez-la définitivement avec les <strong>de</strong>ux vis fournies.<br />
• Installez le conduit d’évacuation d’air. En cas d’utilisation <strong>de</strong> conduits s’emboîtant les uns dans les autres,<br />
le tronçon supérieur doit être mâle et le tronçon inférieur, femelle. Ne pas réduire le diamètre entre les<br />
conduits et éviter les fuites au point <strong>de</strong> connexion.<br />
Pour faciliter le raccor<strong>de</strong>ment du groupe à l’extracteur, consulter le catalogue S&P qui propose tous les<br />
accessoires nécessaires à l’installation.<br />
Installation électrique<br />
• Vérifier que la tension et la fréquence du réseau coïnci<strong>de</strong>nt avec les données <strong>de</strong> la plaque signalétique <strong>de</strong><br />
la hotte et <strong>de</strong> l’extracteur déporté.<br />
• La hotte possè<strong>de</strong> un double isolement électrique (classe II), et n’a pas besoin d’être raccordée à une<br />
prise <strong>de</strong> terre.<br />
• Connecter le câble du moteur au bornier situé à l’intérieur du boîtier <strong>de</strong> raccor<strong>de</strong>ment électrique portant<br />
l’étiquette MOTEUR. S’assurer que le branchement est correct.<br />
Bleu = N (Neutre)<br />
Marron = L (ligne)<br />
FRANÇAIS<br />
Fixation <strong>de</strong> la cheminée télescopique décorative.<br />
• Fixer le support A <strong>de</strong> la cheminée télescopique (Fig. 6) à 20 mm du plafond et en l’alignant par rapport au<br />
centre <strong>de</strong> la hotte. Une fois le support en place, fixer la partie supérieure <strong>de</strong> la cheminée télescopique en<br />
utilisant les vis B. La partie supérieure <strong>de</strong> la cheminée télescopique doit rentrer dans la partie inférieure.<br />
• Une fois la partie supérieure fixée, faites glisser la partie inférieure et fixez-la à la hotte par les vis A comme<br />
indiqué sur la figure 7.<br />
UTILISATION ET ENTRETIEN<br />
• La hotte dispose d’un interrupteur multipositions pour sélectionner et modifier la vitesse d’extraction <strong>de</strong><br />
l’air vicié. Il dispose aussi d’un interrupteur pour les lampes afin d’éclairer le plan <strong>de</strong> cuisson (Fig.5).<br />
11
Modèle Box (Figure 8-1)<br />
A = Voyant <strong>de</strong> fonctionnement.<br />
0-1-2-3 = Contrôle vitesse d’extraction (modèles <strong>BOX</strong>)<br />
B = Contrôle lampes d’éclairage.<br />
Modèle <strong>HS</strong> (Figure 8-2)<br />
A = Contrôle éclairage.<br />
B = Voyant <strong>de</strong> fonctionnement.<br />
C = Contrôle vitesse d’extraction.<br />
• Il est conseillé <strong>de</strong> mettre en marche la hotte avant <strong>de</strong> commencer à cuisiner. Une fois terminé <strong>de</strong> cuisiner,<br />
il est conseillé <strong>de</strong> laisser fonctionner la hotte au moins 15 minutes pour bien évacuer tout l’air contaminé.<br />
Attention ! Avant toute opération <strong>de</strong> maintenance ou d’entretien, débranchez toujours la hotte du réseau<br />
électrique même s’il est arrêté, et que personne ne puisse le mettre en marche pendant l’opération<br />
• Le bon fonctionnement du groupe dépend <strong>de</strong> la fréquence <strong>de</strong>s opérations d’entretien, surtout pour les<br />
filtres à graisses et à charbon actif. La fonction du filtre est <strong>de</strong> retenir les particules <strong>de</strong> graisse en suspension<br />
dans l’air; il peut donc se colmater plus ou moins rapi<strong>de</strong>ment selon le <strong>de</strong>gré d’utilisation <strong>de</strong> l’appareil.<br />
• Ôter les filtres du groupe et les laver dans un mélange d’eau tiè<strong>de</strong> et <strong>de</strong> détergent liqui<strong>de</strong> neutre, en les<br />
laissant tremper pour ramollir la graisse. Rincer abondamment à l’eau tiè<strong>de</strong> et les faire sécher. Il est aussi<br />
possible <strong>de</strong> les passer au lave-vaisselle.<br />
• Après plusieurs lavages, les panneaux d’aluminium peuvent présenter une petite altération <strong>de</strong> couleur.<br />
Ceci ne pourra faire l’objet d’aucune réclamation en vue <strong>de</strong> remplacement <strong>de</strong>s filtres.<br />
• Si vous ne suivez pas les instructions <strong>de</strong> remplacement et d’entretien, les filtres anti-graisse risquent <strong>de</strong><br />
prendre feu.<br />
• Nettoyez fréquemment tous les restes <strong>de</strong> saleté/ graisse <strong>de</strong>s autres surfaces du groupe, en utilisant un<br />
linge humidifié <strong>de</strong> détergents liqui<strong>de</strong>s neutres non abrasifs.<br />
FRANÇAIS<br />
• (Modèles Box) En cas <strong>de</strong> remplacement <strong>de</strong>s lampes halogènes, ne pas prendre les lampes neuves directement<br />
avec les mains pour ne pas réduire leur durée <strong>de</strong> vie. (Fig 9-1)<br />
ASSISTANCE TECHNIQUE<br />
Pour toute anomalie <strong>de</strong> l’appareil prendre contact avec votre distributeur.<br />
Toute manipulation effectuée par <strong>de</strong>s personnes n’appartenant pas aux services officiels S&P entraînera<br />
l’annulation <strong>de</strong> votre garantie.<br />
Pour toute précision ou répondre à toutes vos questions concernant les produits S&P veuillez vous adresser<br />
à votre distributeur habituel.<br />
Vous trouverez son adresse sur notre site www.solerpalau.com<br />
MISE HORS SERVICE ET RECYCLAGE<br />
• En cas <strong>de</strong> mise hors service, même temporaire, il est conseillé <strong>de</strong> ranger l’appareil dans un<br />
endroit sec et sans poussière, dans son emballage original.<br />
• La norme <strong>de</strong> la CEE et l’engagement que nous <strong>de</strong>vons maintenir envers les futures générations<br />
nous obligent à recycler le matériel; nous vous prions <strong>de</strong> ne pas oublier <strong>de</strong> déposer<br />
tous les éléments restants <strong>de</strong> l’emballage dans les containers correspondants <strong>de</strong> recyclage,<br />
et d’emmener les appareils remplacés au Gestionnaire <strong>de</strong> Déchets le plus proche.<br />
LE FABRICANT NE SERA PAS RESPONSABLE DES DOMMAGES SURVENUS À DES PERSONNES ET/OU<br />
DES OBJETS DUS AU NON RESPECT DE CES AVERTISSEMENTS.<br />
S&P EST HABILITÉ À RÉALISER DES MODIFICATIONS DU PRODUIT SANS EN AVERTIR LE CLIENT À<br />
L’AVANCE.<br />
12
PORTUGUÊS<br />
CAMPÂNULA DE ASPIRAÇÃO SEM MOTOR<br />
MODELO: <strong>BOX</strong> - <strong>600</strong> / <strong>900</strong> lx • <strong>HS</strong> - <strong>600</strong> / <strong>900</strong> B / <strong>Ix</strong><br />
GENERALIDADES<br />
Agra<strong>de</strong>cemos a confiança <strong>de</strong>positada em nós com a compra <strong>de</strong>sta campânula. Acaba <strong>de</strong> adquirir um<br />
produto <strong>de</strong> qualida<strong>de</strong>, totalmente fabricado segundo as regras técnicas <strong>de</strong> segurança reconhecidas e em<br />
conformida<strong>de</strong> com as normas CE. Leia atentamente este manual <strong>de</strong> instruções, pois contém informações<br />
importantes para a sua segurança durante a instalação, utilização e manutenção do produto. Guar<strong>de</strong>-o<br />
para eventuais consultas futuras. Por favor, verifique se o aparelho está em perfeito estado ao <strong>de</strong>sembalálo,<br />
já que qualquer <strong>de</strong>feito <strong>de</strong> origem está coberto pela garantia S&P. Este aparelho foi concebido como<br />
campânula <strong>de</strong> aspiração remota (evacuação do ar para o exterior). Recomendamos que a instalação seja<br />
realizada por pessoal especializado.<br />
RECOMENDAÇÕES DE SEGURANÇA<br />
• Este produto não <strong>de</strong>ve ser utilizado por pessoas (incluindo crianças) com capacida<strong>de</strong>s físicas, sensoriais<br />
ou mentais reduzidas, ou com falta <strong>de</strong> experiência e conhecimentos sobre o aparelho, a menos que sejam<br />
vigiadas ou tenham recebido as instruções a<strong>de</strong>quadas por parte <strong>de</strong> uma pessoa responsável pela sua<br />
segurança. As crianças <strong>de</strong>vem ser vigiadas a fim <strong>de</strong> garantir que não brincam com o aparelho.<br />
• Não ligue a <strong>de</strong>scarga da campânula a uma conduta on<strong>de</strong> circule ar quente ou que seja utilizada para<br />
evacuar os fumos <strong>de</strong> aparelhos alimentados com energia não eléctrica.<br />
• Quando a campânula estiver a funcionar no mesmo local e em simultâneo com um esquentador / cal<strong>de</strong>ira<br />
/ aquecedor / placa ou forno, etc. cuja correcta combustão <strong>de</strong>pen<strong>de</strong> do ar do ambiente, recomendamos<br />
ventilar a<strong>de</strong>quadamente o local, assegurando a entrada <strong>de</strong> ar exterior, para garantir um funcionamento<br />
seguro. Isto é necessário porque a campânula aspira o ar que estes aparelhos necessitam para a sua<br />
correcta combustão.<br />
• Para a evacuação para o exterior, observar as disposições em vigor no país on<strong>de</strong> se realiza a instalação.<br />
• Certifique-se <strong>de</strong> que a conduta <strong>de</strong> evacuação está limpa e sem obstruções.<br />
• Para o funcionamento i<strong>de</strong>al da campânula, utilize uma conduta <strong>de</strong> extracção o mais curta possível, evitando<br />
os cotovelos. Se instalar um tubo flexível, <strong>de</strong>ve esticá-lo ao máximo.<br />
• Não tente manusear os filtros com a campânula em funcionamento.<br />
• Não toque nas lâmpadas após uma utilização prolongada do aparelho.<br />
• É proibido cozinhar alimentos sob a campânula com métodos flamejantes (flambé).<br />
• Evite as chamas livres, pois são prejudiciais para os filtros e po<strong>de</strong>m provocar incêndios.<br />
• Vigie sempre os recipientes com óleo quente, para evitar que o óleo se inflame. Se isso ocorrer, <strong>de</strong>sligue<br />
imediatamente a campânula da re<strong>de</strong> eléctrica.<br />
• Antes <strong>de</strong> realizar qualquer operação <strong>de</strong> manutenção ou limpeza, <strong>de</strong>sligue sempre a campânula da re<strong>de</strong><br />
eléctrica.<br />
• Embora se trate <strong>de</strong> um aparelho dotado <strong>de</strong> interruptor, entre o aparelho e a re<strong>de</strong> eléctrica <strong>de</strong>verá ser<br />
instalado um interruptor unipolar com abertura entre contactos <strong>de</strong> pelo menos 3 mm, a<strong>de</strong>quado à carga<br />
total (campânula mais unida<strong>de</strong> <strong>de</strong> extracção remota) e que cumpra as normas em vigor em cada país.<br />
• Não instale nunca lâmpadas <strong>de</strong> maior potência que a indicada e utilize sempre lâmpadas do mesmo tipo.<br />
Fig. 9-1 ou Fig. 9-2 (consoante o mo<strong>de</strong>lo adquirido).<br />
PORTUGUÊS<br />
Declina-se qualquer responsabilida<strong>de</strong> por eventuais danos causados pela inobservância das advertências<br />
acima indicadas.<br />
13
INSTRUÇÕES DE INSTALAÇÃO<br />
Fixação à pare<strong>de</strong><br />
• A campânula <strong>de</strong>ve ser instalada centrada em relação ao plano <strong>de</strong> cozedura e a uma altura mínima <strong>de</strong> 650<br />
mm das placas eléctricas ou a uma altura <strong>de</strong> 750 mm para placas a gás ou mistas. (Fig. 1)<br />
(Esta distância po<strong>de</strong> variar em função das normas em vigor em cada país).<br />
• Ao efectuar a instalação, recomendamos colocar a campânula numa posição que permita o acesso à<br />
ficha <strong>de</strong> ligação pelo utilizador. (Fig. 2)<br />
• Se a ficha não estiver incluída, monte no cabo uma ficha normalizada que suporte a carga indicada na<br />
placa <strong>de</strong> características da campânula e a carga do extractor S&P escolhido como unida<strong>de</strong> remota.<br />
• Antes <strong>de</strong> fixar a campânula, retire os filtros <strong>de</strong> alumínio. (Fig. 3)<br />
• Fixe a brida quadrada à campânula com os quatro parafusos fornecidos. (Fig. 4)<br />
• Respeitando as distâncias indicadas na figura 5-1 ou 5-2 (consoante o mo<strong>de</strong>lo adquirido), faça os dois<br />
furos A <strong>de</strong> ø 6. Utilize as buchas e os parafusos, assegurando-se previamente <strong>de</strong> que são a<strong>de</strong>quados para<br />
o tipo <strong>de</strong> pare<strong>de</strong> on<strong>de</strong> a campânula será instalada. Introduza as buchas e os parafusos sem os apertar<br />
totalmente, <strong>de</strong> forma a po<strong>de</strong>r pendurar a campânula.<br />
• Depois <strong>de</strong> pendurar a campânula, nivele-a e marque os dois furos interiores B indicados na figura 5-1 ou<br />
5-2 (consoante o mo<strong>de</strong>lo adquirido). Retire a campânula, faça os dois furos marcados com uma broca <strong>de</strong><br />
ø6 e introduza as buchas. Volte a pendurar a campânula e fixe-a <strong>de</strong>finitivamente com os dois parafusos.<br />
• Instale o tubo <strong>de</strong> evacuação. Se o tubo <strong>de</strong> evacuação for curto e tiver <strong>de</strong> unir dois ou mais tubos, certifiquese<br />
<strong>de</strong> não reduzir o diâmetro nas junções e evite fugas no ponto <strong>de</strong> união.<br />
Para facilitar a ligação da campânula à unida<strong>de</strong> <strong>de</strong> aspiração remota, dispomos do kit <strong>de</strong> montagem “H”<br />
com os acessórios necessários. Consulte o nosso catálogo para ver os acessórios que compõem o kit.<br />
www.solerpalau.com<br />
Instalação Eléctrica<br />
• Verifique se a tensão e a frequência da re<strong>de</strong> eléctrica correspon<strong>de</strong>m aos dados da placa <strong>de</strong> características<br />
da campânula e da unida<strong>de</strong> <strong>de</strong> extracção remota.<br />
• O aparelho foi construído com uma protecção contra choques eléctricos da Classe II, portanto nenhum<br />
cabo <strong>de</strong>ve ser ligado à terra.<br />
• Ligue o cabo do motor à placa <strong>de</strong> bornes localizada <strong>de</strong>ntro da caixa <strong>de</strong> ligação eléctrica assinalada com<br />
a etiqueta MOTOR. Assegure-se <strong>de</strong> efectuar a ligação correctamente.<br />
Azul = N (Neutro).<br />
Castanho = L (Fase)<br />
Fixação da chaminé telescópica <strong>de</strong>corativa.<br />
PORTUGUÊS<br />
• A 20 mm do tecto e alinhado com o centro da campânula, fixe o suporte da chaminé A (Fig. 6). A seguir,<br />
fixe a parte superior da chaminé telescópica ao suporte com os parafusos B. Tenha em conta que a parte<br />
superior <strong>de</strong>ve ficar inserida na parte inferior.<br />
• Uma vez fixada a parte superior, <strong>de</strong>slize a parte inferior e una-a à campânula com os parafusos A indicados<br />
na figura 7.<br />
UTILIZAÇÃO E MANUTENÇÃO<br />
• A campânula dispõe <strong>de</strong> um interruptor multiposição que permite seleccionar e alterar a velocida<strong>de</strong> <strong>de</strong><br />
extracção do ar viciado. Dispõe também <strong>de</strong> um interruptor para acen<strong>de</strong>r as lâmpadas e iluminar a zona<br />
<strong>de</strong> cozedura (Fig. 5).<br />
14
Mo<strong>de</strong>lo Box (Fig. 8-1)<br />
A = Indicador luminoso <strong>de</strong> funcionamento<br />
0-1-2-3 = Controlo velocida<strong>de</strong> <strong>de</strong> extracção (mo<strong>de</strong>los <strong>BOX</strong>)<br />
B = Controlo lâmpadas Iluminação<br />
Mo<strong>de</strong>lo <strong>HS</strong> (Fig. 8-2)<br />
A = Controlo lâmpadas Iluminação<br />
B = Indicador luminoso <strong>de</strong> funcionamento<br />
C = Controlo velocida<strong>de</strong> <strong>de</strong> extracção<br />
• Recomendamos ligar o aparelho antes <strong>de</strong> começar a cozinhar qualquer tipo <strong>de</strong> alimento e <strong>de</strong>ixá-lo em<br />
funcionamento durante 15 minutos <strong>de</strong>pois <strong>de</strong> ter terminado <strong>de</strong> cozinhar.<br />
Atenção:- Antes <strong>de</strong> realizar qualquer operação <strong>de</strong> manutenção ou limpeza, <strong>de</strong>sligue sempre a campânula<br />
da re<strong>de</strong> eléctrica.<br />
• O bom funcionamento da campânula <strong>de</strong>pen<strong>de</strong> da frequência das operações <strong>de</strong> manutenção e limpeza,<br />
nomeadamente do filtro <strong>de</strong> gordura. A função do filtro <strong>de</strong> gordura é reter as partículas <strong>de</strong> gordura que<br />
se encontram em suspensão no ar. Em função da intensida<strong>de</strong> <strong>de</strong> utilização do aparelho, o filtro po<strong>de</strong>rá<br />
obstruir-se com maior ou menor frequência.<br />
• Retire os filtros da campânula e lave-os com uma solução <strong>de</strong> água tépida e <strong>de</strong>tergente líquido neutro,<br />
<strong>de</strong>ixando amolecer a sujida<strong>de</strong>. Passe-os por abundante água tépida e <strong>de</strong>ixe secar. Também po<strong>de</strong>m ser<br />
lavados na máquina <strong>de</strong> lavar loiça.<br />
• Depois <strong>de</strong> algumas lavagens, a cor original dos filtros <strong>de</strong> alumínio po<strong>de</strong> sofrer alterações. Isto não dá lugar<br />
a reclamações para uma possível substituição.<br />
• Se as instruções <strong>de</strong> substituição e lavagem não forem respeitadas, os filtros <strong>de</strong> gordura po<strong>de</strong>rão incendiar-se.<br />
• Limpe regularmente todos os resíduos <strong>de</strong> sujida<strong>de</strong> / gordura presentes nas superfícies da campânula<br />
com um pano hume<strong>de</strong>cido com <strong>de</strong>tergente líquido neutro não abrasivo.<br />
• (Mo<strong>de</strong>los Box) Quando tiver <strong>de</strong> substituir as lâmpadas halogéneas, não toque nas lâmpadas novas com<br />
as mãos nuas, já que isso reduz a sua vida útil. (Fig. 9-1)<br />
ASSISTÊNCIA TÉCNICA<br />
A extensa re<strong>de</strong> <strong>de</strong> Serviços Oficiais S&P garante uma a<strong>de</strong>quada assistência técnica.<br />
No caso <strong>de</strong> observar alguma anomalia neste aparelho, por favor contacte qualquer dos nossos serviços<br />
oficiais mencionados, on<strong>de</strong> será <strong>de</strong>vidamente atendido.<br />
Qualquer manipulação efectuada por pessoas alheias aos Serviços Oficiais S&P obrigaria ao cancelamento<br />
da sua garantia.<br />
Para esclarecer qualquer dúvida relativa aos produtos S&P dirija-se à Re<strong>de</strong> <strong>de</strong> Serviços<br />
Pós Venda se estiver em território Espanhol, ou ao seu distribuidor habitual no resto do mundo. Localize o<br />
distribuidor da sua área na página www.solerpalau.com<br />
PARAGEM DE UTILIZAÇÃO E RECICLAGEM<br />
• Caso <strong>de</strong>ixe <strong>de</strong> utilizar o aparelho, nem que seja temporariamente, aconselhamos a conservar<br />
o aparelho num lugar seco e livre <strong>de</strong> pó, <strong>de</strong>ntro da sua embalagem original.<br />
• A normativa da CE e o nosso compromisso com as gerações futuras obriganos à reciclagem<br />
dos materiais; agra<strong>de</strong>cemos que <strong>de</strong>posite todos os elementos sobrantes da embalagem<br />
em contentores próprios <strong>de</strong> reciclagem, e que leve os seus aparelhos que está a substituir<br />
ao Gestor <strong>de</strong> Resíduos mais próximo.<br />
O FABRICANTE NÃO SE RESPONSABILIZA PELOS DANOS PRODUZIDOS A PESSOAS E/OU COISAS<br />
ESULTANTES DO INCUMPRIMENTO DESTAS ADVERTÊNCIAS.<br />
A S&P RESERVA-SE O DIREITO DE MODIFICAR O PRODUCTO SEM AVISO RÉVIO.<br />
PORTUGUÊS<br />
15
Ref: 1431215<br />
C/Llevant,4<br />
Polígono Industrial Llevant<br />
08150 Parets <strong>de</strong>l Vallès<br />
(Barcelona) ESPAÑA<br />
Tel. 93 571 93 00<br />
Fax. 93 571 93 01<br />
Tel. int. +34 93 571 93 00<br />
Fax. int. +34 93 571 93 11<br />
http://www.solerpalau.com<br />
consultas@solerpalau.com<br />
16