SKIMMER FLOTANDO - Ferromar
SKIMMER FLOTANDO - Ferromar
SKIMMER FLOTANDO - Ferromar

You also want an ePaper? Increase the reach of your titles
YUMPU automatically turns print PDFs into web optimized ePapers that Google loves.
ENGLISH<br />
IMPORTANT: The instruction manual you are holding includes essential information on the safety measures to be implemented for<br />
installation and start-up. Therefore, the installer as well as the user must read the instructions before beginning installation and start-up.<br />
Keep this manual for future reference.<br />
To achieve optimum performance of the Underwater Projector with led PAR56, follow the instructions provided below:<br />
1. VERIFY THE CONTENTS OF THE PACKING:<br />
The following accessories are included inside the box:<br />
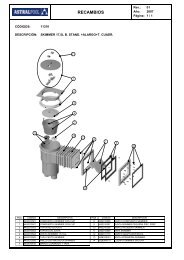
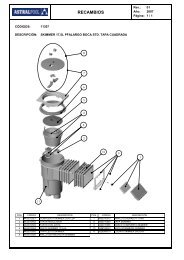
Concrete pool floodlamp<br />
Housing body<br />
Floodlamp unit<br />
Installation and maintenance manual<br />
Prefabricated pool floodlamp<br />
Housing body<br />
Floodlamp unit<br />
2 watertight joints<br />
Clamp<br />
Bag of screws<br />
Installation and maintenance manual<br />
2. GENERAL CHARACTERISTICS:<br />
This floodlamp has been designed to be used fully submerged underwater in swimming pools. It is a Class III electric apparatus with very low<br />
safety voltage (12V with alternating current).<br />
The floodlamp compiles with IPX8 degree of protection (resistance to penetration of dust, solid bodies and humidity) at a nominal immersion<br />
depth of 2 m.<br />
This floodlamp compiles with international safety standards for lights, especially the EN 60598-2-18 standard. LIGHTS PART 2: SPECIFIC<br />
REQUIREMENTS SECTION 18 LIGHTS FOR SWIMMING POOLS AND SIMILAR APPLICATIONS.<br />
The manufacturer is not responsible in any circumstances for assembly, installation or start-up of any electric components which have been<br />
inserted or handied at locations other than its own premises.<br />
3. INSTALLATION:<br />
Never install in vertical positlon with the lamp facing downwards,<br />
In order to clearly light a pool it is recommended lo install floodlamp every 20 m² of water surface. In swimming pools which are especially<br />
deep, floodlamp is required for every 25 m³ of water volume.<br />
In order to prevent glare, the floodlamps should be installed so that they face away from the residence or usual view of the swimming pool.<br />
In the event that lighting is used in training or competition pools, the floodlamps should be installed on the sides to prevent glare on the<br />
swimmers.<br />
To avoid the need to empty the pool to change the lamp, we recommend that the floodlamp be installed in areas which are accessible from<br />
the upper edge of the pool, at approximately 400-700 mm from the water surface (Fig. 1).<br />
Prior to installation verify that the gland seal (no. 15) has been fully tightened.<br />
The method of fastening the housing to the pool wall varies depending on whether it is a floodlamp for concrete pools, prefabricated pools.<br />
Concrete swimming pool<br />
To install a floodlamp in a concrete swimming pool the housing (no. 13) should be fixed in the wall of the swimming pool (Fig. 2). Make sure<br />
that the cable outlet of the housing remains on the upper part.<br />
Concrete swimming pool with Liner<br />
To install a floodlamp in a concrete swimming pool the housing (no. 13) should be fixed in the wall of the swimming pool (Fig. 3). Make sure<br />
that the cable outlet of the housing remains on the upper part.<br />
Prefabricated swimming pool<br />
To install a fioodlamp in prefabricated swimming pool make a circular hole with a diameter of 230 mm (Fig. 4).<br />
Install the housing (no. 13) and of the adhesive joint (no. 22) on the outer side of the pool. Make sure that the cable outlet of the housing<br />
remains on the upper part. On the inner side and use two screws DIN 7981 4,8x16 (no. 21) to secure the two components. (Fig. 5).<br />
To install the clamp (no. 20) on the inner side of the swimming pool, make sure that the heads of the screws DIN 7981 4,8x16, which have<br />
been installed previously (no. 21), coincide with the área reserved for them on the back part of the clamp.<br />
Secure the clamp (no. 20) to the pool wall using 16 screws.<br />
4. ASSEMBLY:<br />
After installation of the housing and the clamp, if it is a prefabricated swimming pool, assemble the floodlamp.<br />
To connect the floodlamp to the electric power supply insert the cable through the gland seal nut (no. 15). Tighten the gland seal nut until you<br />
can verify that the cable will not yield when you pull on it with your hand.<br />
Take the precaution of leaving 1.5 m of cable wound on the base of the floodlamp (no. 7) in order to be able to remove the floodlamp to the<br />
edge of the pool in the event that lamp replacement or handling is required (Fig. 1).<br />
Insert the entire floodlamp assembly in the housing (Fig 6). In order to obtain good pool lighting it is important that the anagram of the<br />
decorative ring (no. 1) is located on the upper part (Fig 6).<br />
Screw in the two M-6 x 80 screws (no. 2) until the fastening dog is secured in the inner walls of the housing (Fig. 7)<br />
5. CONTROL SYSTEMS OF THE LED LAMP:<br />
The LED lamp can be controlled in two different ways: either by a normally closed pushbutton or by means of the modulator receiver and/or<br />
remote control<br />
In both cases, you should make sure that the voltage received by the lamp is never more than 12V.<br />
The lamp should only be operated underwater and anchored to the vertical walls of the pool. The lamp is supplied with heat protection, which in<br />
the event of excess temperature reduces the lighting level to avoid overheating.<br />
2