STABILIZER™
STABILIZER™
STABILIZER™

Create successful ePaper yourself
Turn your PDF publications into a flip-book with our unique Google optimized e-Paper software.
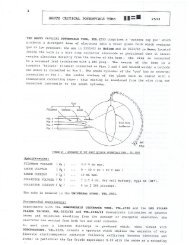
8. Training of the Deep Cervical Flexors<br />
• Position the folded cell (secure with pressure studs) under<br />
the neck so that it abuts against the occiput. Do not let it<br />
slide down to the lower cervical area.<br />
• Inflate to a baseline of 20 mmHg. (red band)<br />
NOTE: Do not inflate the Stabilizer before insertion behind the<br />
neck. Because the air has to completely enter all of the<br />
bag’s pressure cells , it is helpful to squeeze the<br />
pressure bag to speed up the air distribution. Reinflate<br />
and repeat the gentle squeeze. This may take two to<br />
three repetitions to complete the process.<br />
• The movement the patient is to perform is a gentle<br />
nodding of the head as if they were saying “yes”.<br />
• Instruct the patient to place the tongue on the roof of<br />
the mouth, lips together but teeth just separated. This will<br />
discourage substitution with the platysma or hyoids.<br />
• Instruct the patient to gently nod to target<br />
22 mmHg, just one mark on the pressure dial. (green<br />
band) See if the patient can hold the position steadily. If<br />
successful, relax and repeat at each target position of 24<br />
mmHg through 30 mmHg. (yellow, blue and gray bands)<br />
• The pressure that the patient can hold steady, with<br />
minimal superficial muscle activity, is the one on which you<br />
will measure endurance capacity. (i.e.<br />
10 repetitions held for 10 seconds each)<br />
Lying on back (neck exercise)<br />
10