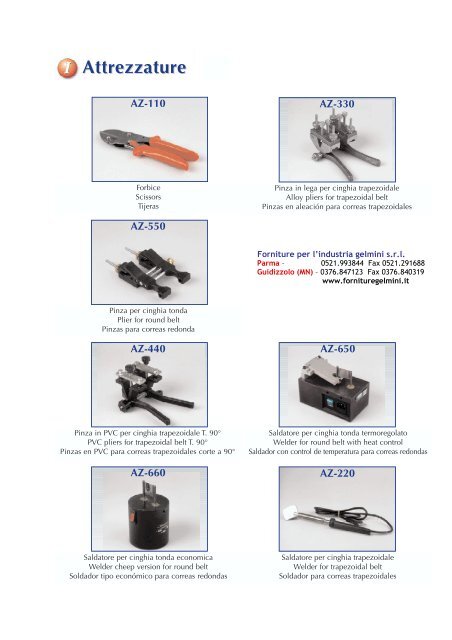
Attrezzature - Forniture per l'industria Gelmini
Attrezzature - Forniture per l'industria Gelmini
Attrezzature - Forniture per l'industria Gelmini

Create successful ePaper yourself
Turn your PDF publications into a flip-book with our unique Google optimized e-Paper software.
<strong>Attrezzature</strong>zzatureAZ-110AZ-330ForbiceScissorsTijerasPinza in lega <strong>per</strong> cinghia trapezoidaleAlloy pliers for trapezoidal beltPinzas en aleación para correas trapezoidalesAZ-550<strong>Forniture</strong> <strong>per</strong> l’industria gelmini s.r.l.Parma – 0521.993844 Fax 0521.291688Guidizzolo (MN) – 0376.847123 Fax 0376.840319www.fornituregelmini.itPinza <strong>per</strong> cinghia tondaPlier for round beltPinzas para correas redondaAZ-440AZ-650Pinza in PVC <strong>per</strong> cinghia trapezoidale T. 90°PVC pliers for trapezoidal belt T. 90°Pinzas en PVC para correas trapezoidales corte a 90°AZ-660Saldatore <strong>per</strong> cinghia tonda termoregolatoWelder for round belt with heat controlSaldador con control de tem<strong>per</strong>atura para correas redondasAZ-220Saldatore <strong>per</strong> cinghia tonda economicaWelder cheep version for round beltSoldador tipo económico para correas redondasSaldatore <strong>per</strong> cinghia trapezoidaleWelder for trapezoidal beltSoldador para correas trapezoidales
Istruzioni <strong>per</strong> l’usoAccingendosi <strong>per</strong> la prima volta ad eseguire una giunzione su una cinghia M.E.C. POLBELT ® è consigliato o<strong>per</strong>are secondo questesemplici istruzioni:a: Srotolate la cinghia e tagliarla alla misura misura desiderata con la forbice Z 110 (foto A), sottraendo allo sviluppo teorico la<strong>per</strong>centuale di pretensionamento (riportata sul catalogo nella scheda tecnica di ogni cinghia).b: Se la cinghia dorà essere saldata in o<strong>per</strong>a, occorrerà montare la stessa in posizione di lavoro esternamente alle pulegge, alfine di esguire una giunzione a cinghia lenta.Per le cinghie con l’anima in ARAMID occorrerà invece un’o<strong>per</strong>azione aggiunta: dopo la determinazione dello svilupporeale, bisognerà, mediante un trapano con una punta di 3 mm, asportare <strong>per</strong> una profondità di almeno 2 mm (foto B) il trefoloin ARAMID <strong>per</strong> consentire una corretta esecuzione della giunzione.c: Dopo avere accuratamente preparato la cinghia come descritto nel punto “b”, occorrerà assicurarsi delo stato del saldatore,il quale si dovrà presentare senza la presenza di alcun residuo, portarlo ad una tem<strong>per</strong>atura di 240° C (AZ 220 - AZ 650 -AZ 660) ed inserire la cinghia nella apposita pinza (foto C) (<strong>per</strong> le cinghie M.E.C. POLBELT ® trapezoidali AZ 330 - AZ 440,<strong>per</strong> le cinghie tonde AZ 550) inserire il saldatore tra le due estremità (foto D) e stringere la pinza fino ad incontrare il saldatore,consentire con una leggera pressione il contatto sino allo sciogliemento visivo del poliuretano, aprire leggermente lapinza, togliere il saldatore accertandosi di non asportare il materiale fuso, richiudere e lasciare raffreddare la cinghia <strong>per</strong> circa15 minuti, aprire la pinza, (foto E), pulire la cinghia (con una lama <strong>per</strong> renderla nel punto della giunzione omogenea al restodella cinghia) (foto F-G) ed infine montarla sulle pulegge.d: Per le cinghie che dovranno <strong>per</strong> motivi di ingombri lavorare sotto i diametri minimi consigliati sarà opportuno eseguire lagiunzione con un taglio a 45° (forbice AZ 441) <strong>per</strong> aumentare la su<strong>per</strong>ficie di contatto.O<strong>per</strong>ating instructionsWhen you make the splicing for the first time on the M.E.C. POLBELT ® belts it’s advisable to o<strong>per</strong>ate according to the followingdirections:a: Uncoil the bels and cut il according the needed lenght with the scissors AZ 110 (photo A), deducting from the theoreticallenght the tensioning <strong>per</strong>centage (as shown on the catalogue in the technical card for every belt).b: If the belt has to be welded while o<strong>per</strong>ating, must be necessary toassembly the belt on the working position external to thepulley, in order to execute the splicing with slack belt. For the belts with internal reinforcement in ARAMID, should be necessaryan additional step: after the determination of the real development, there shoul be a need to take away the internal reinforcementin ARAMID for at least 2 mm (photo B) by means of a drill bit in order to make a right execution of the splicing.c: After the above o<strong>per</strong>ation make sure the welder has no residuals, it must reach a tem<strong>per</strong>ature of 240° C (AZ 220 - AZ 650 -AZ 660) then clamp the belt ends in the pliers (photo C) provided for the purpose (for the M.E.C. POLBELT ® trapezoidal typeuse AZ 330 - AZ 440, for the round type use AZ 550) insert the welder between the two ends of the belt (photo D) and closethe pliers untl to touch the welder, the belt has to stay in contact with the welder until visual of the belt, open the pliers removethe welder de careful do not remove material, close the pliers again and let the belt cooling for about 15 minutes, thenopen the pliers (photo E), clean the belt (by means of a blade in order to homogenise the welding point with the belt) (photoF-G) and finally assembly the belt on the pulley.d: For such belts which have to work below the advised pulley diameters due ti the space it should be necessary execute thesplicing with a cut at 45° (scissors AZ 441) in order to increase the contact surface.Instrucciones para a la utilizaciónCuando se hace una soldaduras por la primera vez en una correa M.E.C. POLBELT ® se deben seguir siguientes indicaciones:a: Extender la correa y cortarla a la medida deseada con la tijeras AZ 110 (foto A), sustrayendo desde el desarrollo teórico elporcentaje de pretensión (indicada en el catalogo en la ficha técnica de la correa).b: Si la correa se tiene que soldar mientras se esta o<strong>per</strong>ando, es necesario desmontar la correa en posición de trabajo exteriormentea las poleas, con el fin de realizar la soldadura con la correa blanda. Para las correa con alma en ARAMID es necesarioun paso adicional; o sea una vez determminando el desarrollo real de la correa, por medio de un taladro con una puntapor lo menos de 3 milimentros quitar el refuerzo con una profundidad de 2 mm (foto B) para <strong>per</strong>mitir una correcta ejecuciónde la soldadura.c: Después de haber preparado la correas según posición b es necessario averiguar si el soldador está limpio sin algún residuo,la tem<strong>per</strong>atura de trabajo tiene que ser 240° C (AZ 220 - AZ 650 - AZ 660) apretar los extremos de la correa en la pinza (fotoC) (para las correa M.E.C. POLBELT® trapezoidales AZ 330 - AZ 440, para las correas redondas AZ 550) insertar el soldadory calentar las extremidades (foto D) hasta que se comience a derretir, abrir un poco las pinzas y extraer el soldador, con cuidadopara no extraer también el ,aterial apretar otra vez y dejar enfriar por 15 minutos (foro E), limpiar la soldadura con unacuchilla para que se homogeneice a la correa (foto F-G), y finalmente montarla sobre las poleas.d: Para las correas que tendrán que trabajar con diàmetros mínimos es aconsejable realizar la soldadura con un corte a 45° (tijerasAZ 441) para incrementar la su<strong>per</strong>ficie de contacto.
<strong>Forniture</strong> <strong>per</strong> l’industria gelmini s.r.l.Parma – 0521.993844 Fax 0521.291688 Guidizzolo (MN) – 0376.847123 Fax 0376.840319www.fornituregelmini.itADDEEFBGCG