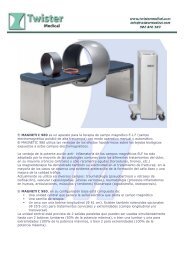
CENTRÍFUGAS CENTRIFUGES - Twister Medical
CENTRÍFUGAS CENTRIFUGES - Twister Medical
CENTRÍFUGAS CENTRIFUGES - Twister Medical

Create successful ePaper yourself
Turn your PDF publications into a flip-book with our unique Google optimized e-Paper software.
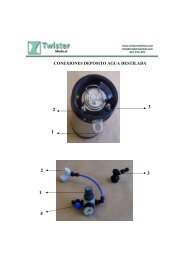
ENGLISHto end the run before the time finish. The remaining run time appears in the display.After the run, the lid lock of centrifuge opens automatically.The time setting and the rotational speed may be changed during the run. The remainingrun time appears in the display.5. Short-spin centrifugation• Turn on the mains switch, pressing "OPEN" to open the lid, load the rotor symmetrically.Fasten the rotor lid and close the centrifuge lid.• Pressing "SHORT-SPIN". Short-spin centrifugation is possible for as long as this key isheld down. The maximum rpm is 13400.F.C.R.= 1.118·10 -5·r·n 2Siendo 1.118·10 -5 una constante.r radio de giro, distancia horizontal en centímetrosdesde el eje de rotación hasta el fondo del tubo.n velocidad de rotación expresada en revoluciones porminuto (r.p.m.).CASTELLANO6. Switching to the rcf display• Pressing speed's simultaneously,the display switches from rpm to rcf. Also pressingspeed's simultaneously again, the display switches from rcf to rpm.You can calculate with the following formula :RCF = 1118 x 10-5 x n2 x rmaxn: rotational speed in 1/minrmax= 6 cm, max. centrifuging radius in cm7. Open the centrifuge in the event of a power failure• Disconnect the centrifuge from the mains supply. Wait until the rotor has come to astandstill, then left up the device, remove the lock pole to right, the lid lock will be opened.NOTE: If you are not using the equipment for a long period of time please make sure itis disconnected from the net and protected from dust (this way you will avoid accidentsand will extend its working-life).Security• The centrifuge must be used by previously qualified staff that knows how the equipmentworks thanks to the user manual.• You should put the equipment in a horizontal plane stable table, having a safety area ofat least 30 cm per side.• Do not place the centrifuge near any warm supply (burners, blowlamps, etc), norexpose it directly to the sun. Avoid vibrations, dust and dry environments.• During its functioning dangerous materials such as flammable or pathological substancesmust be out of the safety area.• When you are not using the equipment for a long period of time please make sure it isunplugged in order to avoid possible accidents.• It is essential to have the equipment switched off and unplugged from the net beforecleaning, checking components or replacing any piece (e.g. replacement of a fuse).5. INSTALACIÓN Y PUESTA EN MARCHAInspección preliminar• Desembale la centrífuga, retire el plástico que lo envuelve y quite la protección depoliespán en que viene encajado. Retire todas las protecciones y, sin conectar el equipo ala red eléctrica, asegúrese de que no presenta ningún daño debido al transporte. De serasí, comuníquelo inmediatamente a su transportista o suministrador para que puedahacer las debidas reclamaciones en el plazo establecido.• Guarde el embalaje, ya que siempre se deben realizar las devoluciones en su embalajeoriginal con todos los accesorios suministrados.• Compruebe los accesorios que usted debe recibir junto al equipo:- Rotor- Tapa del rotor- Tuerca del rotor- Adaptador- Manual de instrucciones- Certificado de garantíaSolo aceptamos devoluciones de equipos en los 15 días posteriores al envío y siempreque vengan completos en su embalaje original.InstalaciónAntes de comenzar a utilizar el instrumento, es conveniente familiarizarse con sus componentesy fundamentos básicos, así como con las funciones de sus controles.LEA DETALLADAMENTE ESTE MANUAL DE INSTRUCCIONES ANTES DEOPERAR CON ESTE EQUIPO CON EL FIN DE OBTENER LAS MÁXIMAS PRES-TACIONES Y UNA MAYOR DURACIÓN DEL MISMO.• Coloque la centrífuga sobre una mesa horizontal, plana y estable, creando un espaciolibre de al menos 30 cm por cada lado. Este seguro que las rendijas de ventilación no esténbloqueadas.Page 16 Instruction manual 52507100 Version 1 March-08Revisión 1, Marzo-08 Manual de instrucciones 52507100 Pág. 5