CENTRÍFUGAS CENTRIFUGES - Twister Medical
CENTRÍFUGAS CENTRIFUGES - Twister Medical
CENTRÍFUGAS CENTRIFUGES - Twister Medical

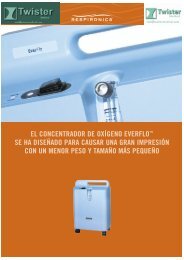
Create successful ePaper yourself
Turn your PDF publications into a flip-book with our unique Google optimized e-Paper software.
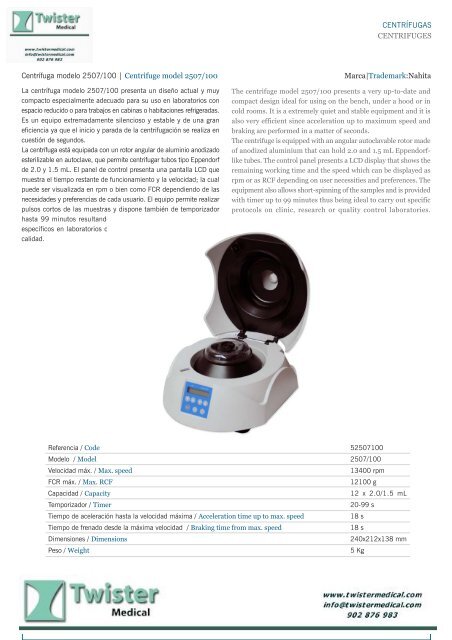
AUXILAB S.L.Material de laboratorioLaboratory supplies<strong>CENTRÍFUGAS</strong><strong>CENTRIFUGES</strong>Centrífuga modelo 2507/100 | Centrifuge model 2507/100La centrífuga modelo 2507/100 presenta un diseño actual y muycompacto especialmente adecuado para su uso en laboratorios conespacio reducido o para trabajos en cabinas o habitaciones refrigeradas.Es un equipo extremadamente silencioso y estable y de una graneficiencia ya que el inicio y parada de la centrifugación se realiza encuestión de segundos.La centrífuga está equipada con un rotor angular de aluminio anodizadoesterilizable en autoclave, que permite centrifugar tubos tipo Eppendorfde 2.0 y 1.5 mL. El panel de control presenta una pantalla LCD quemuestra el tiempo restante de funcionamiento y la velocidad; la cualpuede ser visualizada en rpm o bien como FCR dependiendo de lasnecesidades y preferencias de cada usuario. El equipo permite realizarpulsos cortos de las muestras y dispone también de temporizadorhasta 99 minutos resultando ideal para llevar a cabo protocolosespecíficos en laboratorios clínicos, de investigación o control decalidad.Marca|Trademark:NahitaThe centrifuge model 2507/100 presents a very up-to-date andcompact design ideal for using on the bench, under a hood or incold rooms. It is a extremely quiet and stable equipment and it isalso very efficient since acceleration up to maximum speed andbraking are performed in a matter of seconds.The centrifuge is equipped with an angular autoclavable rotor madeof anodized aluminium that can hold 2.0 and 1.5 mL Eppendorfliketubes. The control panel presents a LCD display that shows theremaining working time and the speed which can be displayed asrpm or as RCF depending on user necessities and preferences. Theequipment also allows short-spinning of the samples and is providedwith timer up to 99 minutes thus being ideal to carry out specificprotocols on clinic, research or quality control laboratories.Referencia / Code 52507100Modelo / Model 2507/100Velocidad máx. / Max. speed13400 rpmFCR máx. / Max. RCF12100 gCapacidad / Capacity12 x 2.0/1.5 mLTemporizador / Timer20-99 sTiempo de aceleración hasta la velocidad máxima / Acceleration time up to max. speed18 sTiempo de frenado desde la máxima velocidad / Braking time from max. speed18 sDimensiones / Dimensions240x212x138 mmPeso / Weight5 Kg<strong>CENTRÍFUGAS</strong><strong>CENTRIFUGES</strong>Pol. Morea Norte, Calle D nº631191 · Beriain (Navarra) ESPAÑAT: +34 948 310 513correo@auxilab.es · www.auxilab.com
CENTRÍFUGACENTRIFUGEModelo / Model 2507/100Este manual es parte inseparable del aparato por lo que debe estardisponible a todos los usuarios del equipo. Le recomendamos leeratentamente el presente manual y seguir rigurosamente los procedimientosde uso para obtener las máximas prestaciones y unamayor duración del mismo.This manual should be available for all users of these equipments. To getthe best results and a higher duration of this equipment it is advisable toread carefully this manual and follow the processes of use.Revisión 1, Marzo-08 Manual de instrucciones 52507100 Pág. 1
CASTELLANOGracias por haber adquirido este equipo. Deseamos sinceramente que disfrute de lacentrífuga Nahita 2507/100. Le recomendamos que cuide el equipo conforme a lo expuestoen este manual.Nahita desarrolla sus productos según las directrices del marcado CE y haciendo hincapiéen la ergonomía y seguridad del usuario.La calidad de los materiales empleados en la fabricación y el correcto proceder le permitirándisfrutar del equipo por muchos años.El uso incorrecto o indebido del equipo puede dar lugar a accidentes, descargas eléctricas,cortocircuitos, fuegos, lesiones, etc. Lea el punto de Mantenimiento, donde se recogenaspectos de seguridad.LEA DETALLADAMENTE ESTE MANUAL DE INSTRUCCIONES ANTES DEOPERAR CON ESTE EQUIPO CON EL FIN DE OBTENER LAS MÁXIMAS PRES-TACIONES Y UNA MAYOR DURACIÓN DEL MISMO.Tenga especialmente presente lo siguiente:• Este manual es parte inseparable de la centrífuga Nahita 2507/100, por lo que debe estardisponible para todos los usuarios del equipo.• Debe manipularse siempre con cuidado evitando los movimientos bruscos, golpes, caídasde objetos pesados o punzantes; evite el derrame de líquidos en su interior.• Nunca desmonte el equipo para repararlo usted mismo, además de perder la garantíapodría producir un funcionamiento deficiente de todo el equipo, así como daños a las personasque lo manipulan.• Para prevenir fuego o descargas eléctricas, evite los ambientes secos y polvorientos. Siesto ocurre, desenchufe inmediatamente el equipo de la toma de corriente.• Cualquier duda puede ser aclarada por su distribuidor (instalación, puesta en marcha,funcionamiento). Usted puede también mandarnos sus dudas o sugerencias a la siguientedirección de correo del Servicio Técnico Nahita (asistencia@auxilab.es) o bien llamandoal Tel: 807117040 (0.30 Euros/min).• Este equipo está amparado por la Ley de garantías y bienes de consumo (10/2003).• No se consideran en garantía las revisiones del equipo.• La manipulación del equipo por personal no autorizado provocará la pérdida total dela garantía.• Los fusibles o accesorios, así como la pérdida de los mismos, no están cubiertos pordicha garantía. Tampoco estarán cubiertos por el periodo de garantía las piezas en su desgastepor uso natural.• Asegúrese de guardar la factura de compra para tener derecho de reclamación o prestaciónde la garantía. En caso de enviar el equipo al Servicio Técnico adjunte factura ocopia de la misma como documento de garantía.• Rellene y envíe la garantía antes de los 15 días después de la compra.• El fabricante se reserva los derechos a posibles modificaciones y mejoras sobre estemanual y equipo.ERROR CAUSE SOLUTIONEr=02 Close lock failure Contact serviceEr=08 Motor failure Contact serviceANEXO I: WIRING DIAGRAM FOR CENTRIFUGELIDLOCKJ3ADAPTERJBMAINBOARDJ1DISPLAY100-240VMAINS SWITCHJ10J4MOTORENGLISH¡ATENCIÓN! NO SE ADMITIRÁ NINGÚN APARATO PARA REPARARQUE NO ESTÉ DEBIDAMENTE LIMPIO Y DESINFECTADO.Pág. 2 Manual de instrucciones 52507100 Revisión 1 Marzo-08Version 1 March-08 Instruction manual 52507100 Page 19
ENGLISHATTENTION!! IF EQUIPMENTS ARE NOT PROPERLY CLEAN ANDDISINFECTED THEY WOULD NOT BE ALLOWED TO REPAIR BY OURTECHNICAL SERVICE.ÍNDICE DE IDIOMASCastellanoInglésCertificado CECASTELLANO2-1011-1920INSTRUCTIONS ON ENVIRONMENT PROTECTIONDo not dispose of this product in the usual household garbage at the end of it´slife cycle; hand it over at a collection point for the recycling of electrical and electronicappliances. The symbol on the product, the instructions for use or the packingwill inform about the methods for disposal.The materials are recyclable as mentioned in it´s marking. By recycling, material recycling orother forms or re-utilization of old appliances, you are making an important contribution to protectour environment.Please inquire at the community administration for the authorized disponsal location.ÍNDICE DE CONTENIDOS1. APLICACIONES DEL INSTRUMENTO2. DESCRIPCIÓN3. ESPECIFICACIONES TÉCNICAS4. FUNDAMENTOS TEÓRICOS5. INSTALACIÓN / PUESTA EN MARCHA6. MANTENIMIENTO Y LIMPIEZA7. SOLUCIÓN DE PROBLEMASANEXO I: DIAGRAMA ELÉCTRICO3344589107. TROUBLESHOOTINGERROR CAUSE SOLUTIONNo displayNo main power connectionPower failurePlug in mains cable onboth sidesCheck the mains fuse1. APLICACIONES DEL INSTRUMENTOCentrífuga diseñada para estaciones de trabajo en formación y laboratorios de investigaciónen los campos de la biología, medicina y química. Con capacidad de centrifugaciónsimultánea para doce tubos eppendorf de 1.5ml o 2.0ml, en un rotor de ángulo fijo de 45°.2. DESCRIPCIÓNLid can't be openedCentrifuge shakesduring accelerationPower failure.Rotor is still spinning.Lid locks failureRotor not loadedsymmetricallyEmergency lid release(see sec.4.7)Stop centrifuge runContact serviceStop centrifuge run andload centrifuge symmetrically.1. Tuerca del rotor2. Rotor3. TIME - Selector de aumentodisminución del tiempo4. RPM / FCR5. OPEN - Botón de apertura de tapa6. SHORT SPIN - Centrifugación instantánea7. START / STOP124Er=01 Open lock failure Contact service3567Page 18 Instruction manual 52507100 Version 1 March-08Revisión 1, Marzo-08 Manual de instrucciones 52507100 Pág. 3
88. Rendijas de ventilación9. Interruptor de encendido / apagado10. Toma de corriente9CASTELLANOENGLISH• Never try to repair the centrifuge by yourself, since you will lose the warranty and mayprovoke damages to the general operating system or the electrical installation, as well asinjuries to the people that usually handle the equipment (burns, hurts…).• Try not to spill any liquid on the control panel, though it is properly insulated. In caseyou have any doubts do please immediately unplug the equipment (see Maintenance).• Made under the European regulations for electrical security, electromagnetic compatibilityand security on machines.106. MAINTENANCI AND CLEANING3. ESPECIFICACIONES TÉCNICASModelo 2507/100Alimentación100-240 V, 50-60HzPotencia100WMáxima velocidad13,400 rpmMáxima FCR12,100 fcrVisor de rpm/rcfSiTemporizador20 segundos - 99 minutosMáxima capacidad12 tubos × 1.5 / 2.0mlMáxima densidad permitida1.2g/mLTiempo de aceleración para alcanzar la máxima velocidad 20 segundosTiempo de frenado desde la máxima velocidad19 segundosTemperatura ambiente 5 ºC - 35 ºCMedidas212mm×240mm×138mmPeso (con rotor)4.8kg4. FUNDAMENTOS TEÓRICOSLa centrifugación es una técnica de separación basada en el movimiento de las partículas,de modo que éstas son desplazadas hacia el extremo distal del eje de rotación segúnsus diferentes masas y formas.La Fuerza Centrífuga Relativa (F.C.R.) es la fuerza requerida para que se produzca laseparación. Las unidades de esta fuerza se expresan en número de veces mayor que la gravedad(g).La F.C.R. se calcula mediante la siguiente fórmula:To get the best results and a higher duration of this equipment it is essential to followthe processes of use.Note: All the processes of use mentioned below will not have any value unless you keepa continued and careful maintenance.• Please follow the processes of use of this manual.• This manual should be available for all users of this equipment.• Always use original components and supplies. Other devices can be similar but theycan damage the equipment.• Even slight scratches and tears of the rotor can lead to serious internal material damage.• Avoid damage caused by aggressive chemicals, including among others: strong andweak alkali, strong acid. In the event of contamination caused by aggressive agents, therotor must be cleaned immediately using a neutral cleaning liquid.• The equipment has to be plugged to an earth connection and the socket should behandy and ready to unplug the equipment in case of emergency.• Never try to repair the centrifuge by yourself, since you will lose the warranty and mayprovoke damages to the general operating system or the electrical installation, as well asinjuries to the people that usually handle the equipment (burns, hurts…) or damages innearby equipments.• In the event of breakdown please contact your distributor to overhaul through NahitaTechnical Assistance Department.Cleaning• Never use scourers or substances that can grate for cleaning metallic parts such as stainlesssteel, aluminium, coatings, etc. as they damage the equipment and produce an earlyageing of the equipment.• The rotor and the outside of centrifuge should be cleaned regularly with a fluff-freecloth dampened with soaped water that does not contain abrasives. Disconnect the centrifugefrom the mains supply, remove the rotor and clean it separately. Only neutralagents may be used for cleaning.• Please check the rotor and especially the rotor bores regularly for deposits or damage,then reinsert the rotor and tighten the rotor nut.Pág. 4 Manual de instrucciones 52507100 Revisión 1 Marzo-08Version 1 March-08 Instruction manual 52507100 Page 17
ENGLISHto end the run before the time finish. The remaining run time appears in the display.After the run, the lid lock of centrifuge opens automatically.The time setting and the rotational speed may be changed during the run. The remainingrun time appears in the display.5. Short-spin centrifugation• Turn on the mains switch, pressing "OPEN" to open the lid, load the rotor symmetrically.Fasten the rotor lid and close the centrifuge lid.• Pressing "SHORT-SPIN". Short-spin centrifugation is possible for as long as this key isheld down. The maximum rpm is 13400.F.C.R.= 1.118·10 -5·r·n 2Siendo 1.118·10 -5 una constante.r radio de giro, distancia horizontal en centímetrosdesde el eje de rotación hasta el fondo del tubo.n velocidad de rotación expresada en revoluciones porminuto (r.p.m.).CASTELLANO6. Switching to the rcf display• Pressing speed's simultaneously,the display switches from rpm to rcf. Also pressingspeed's simultaneously again, the display switches from rcf to rpm.You can calculate with the following formula :RCF = 1118 x 10-5 x n2 x rmaxn: rotational speed in 1/minrmax= 6 cm, max. centrifuging radius in cm7. Open the centrifuge in the event of a power failure• Disconnect the centrifuge from the mains supply. Wait until the rotor has come to astandstill, then left up the device, remove the lock pole to right, the lid lock will be opened.NOTE: If you are not using the equipment for a long period of time please make sure itis disconnected from the net and protected from dust (this way you will avoid accidentsand will extend its working-life).Security• The centrifuge must be used by previously qualified staff that knows how the equipmentworks thanks to the user manual.• You should put the equipment in a horizontal plane stable table, having a safety area ofat least 30 cm per side.• Do not place the centrifuge near any warm supply (burners, blowlamps, etc), norexpose it directly to the sun. Avoid vibrations, dust and dry environments.• During its functioning dangerous materials such as flammable or pathological substancesmust be out of the safety area.• When you are not using the equipment for a long period of time please make sure it isunplugged in order to avoid possible accidents.• It is essential to have the equipment switched off and unplugged from the net beforecleaning, checking components or replacing any piece (e.g. replacement of a fuse).5. INSTALACIÓN Y PUESTA EN MARCHAInspección preliminar• Desembale la centrífuga, retire el plástico que lo envuelve y quite la protección depoliespán en que viene encajado. Retire todas las protecciones y, sin conectar el equipo ala red eléctrica, asegúrese de que no presenta ningún daño debido al transporte. De serasí, comuníquelo inmediatamente a su transportista o suministrador para que puedahacer las debidas reclamaciones en el plazo establecido.• Guarde el embalaje, ya que siempre se deben realizar las devoluciones en su embalajeoriginal con todos los accesorios suministrados.• Compruebe los accesorios que usted debe recibir junto al equipo:- Rotor- Tapa del rotor- Tuerca del rotor- Adaptador- Manual de instrucciones- Certificado de garantíaSolo aceptamos devoluciones de equipos en los 15 días posteriores al envío y siempreque vengan completos en su embalaje original.InstalaciónAntes de comenzar a utilizar el instrumento, es conveniente familiarizarse con sus componentesy fundamentos básicos, así como con las funciones de sus controles.LEA DETALLADAMENTE ESTE MANUAL DE INSTRUCCIONES ANTES DEOPERAR CON ESTE EQUIPO CON EL FIN DE OBTENER LAS MÁXIMAS PRES-TACIONES Y UNA MAYOR DURACIÓN DEL MISMO.• Coloque la centrífuga sobre una mesa horizontal, plana y estable, creando un espaciolibre de al menos 30 cm por cada lado. Este seguro que las rendijas de ventilación no esténbloqueadas.Page 16 Instruction manual 52507100 Version 1 March-08Revisión 1, Marzo-08 Manual de instrucciones 52507100 Pág. 5
CASTELLANO• No coloque el equipo en zonas próximas a fuentes de calor (mecheros, sopletes...), ni loexponga directamente a la luz del sol, etc.• Evite en el lugar de trabajo la presencia de productos inflamables o tóxicos.• Inserte el enchufe del adaptador a la red de suministro de energía y el conector a la tomade corriente del equipo.• Encienda el interruptor de encendido / apagado. La centrifuga estará preparada paratrabajar cuando se visualice el display. Coloque el rotor en su eje y apriételo usando latuerca.IMPORTANTE: Antes de empezar a trabajar con la centrífuga, asegúrese de que latuerca del rotor esta firmemente sujeta.Ni el fabricante ni el distribuidor asumirán responsabilidad alguna por los dañosocasionados al equipo, instalaciones o lesiones sufridas a personas debido a la inobservanciadel correcto procedimiento de conexión eléctrica. La tensión debe ser de 220V, 50 Hz ± 10%.Setting up1. Control elements2. Rotor insertion and removal3. Loading the rotor4. Centrifugation with a preset time5. Short-spin centrifugation6. Switching to the rcf display7. Open the centrifuge in the event of a power failure1. Control elementsSTART/STOP: for start or stop centrifugationSHORT-SPIN: for reduced-time centrifugationOPEN: to open the lid : for setting the time and speedENGLISHPuesta en marcha (Modo de uso)1. Botones de control2. Inserción y extracción del rotor3. Carga del rotor4 Centrifugación con tiempo preprogramado5. Centrifugación instantánea6. Cambio al visor FCR7. Apertura de la centrífuga en caso de fallo energético1. Botones de controlSTART/STOP: para empezar o parar la centrifugaciónSHORT-SPIN: para realizar una centrifugación corta e instantáneaOPEN: para abrir la tapa de la centrífuga : 0para ajustar el tiempo y la velocidad2 Inserción y extracción del rotor• Encaje el rotor en el eje del motor, después inserte la tuerca del rotor. Apriete la tuercagirándola en el sentido de las agujas del reloj. Para extraer el rotor, gire la tuerca en sentidocontrario a las agujas del reloj.IMPORTANTE Antes de que empiece, ¡asegúrese de que el rotor está firmementesujeto!• El rotor y la tapa del rotor deben estar siempre firmemente sujetos. Si la centrífugaemite ruidos inusuales cuando se inicia, el rotor o la tapa del rotor no están sujetos correctamente.Apague inmediatamente el aparato pulsando el botón "START/STOP" (7).IMPORTANTE ¡No use rotores dañados!IMPORTANTE ¡No mueva la centrífuga durante su funcionamiento!Pág. 6 Manual de instrucciones 52507100 Revisión 1 Marzo-082. Rotor insertion and removal• Fit the rotor onto the motor shaft, followed by the rotor nut. Tighten the rotor nut byturning clockwise. To release the rotor, turn the rotor nut counter clockwise.IMPORTANT Before each start, check that the rotor is firmly tightened!• The rotor and the rotor lid must always be securely fastened. If the centrifuge makesunusual noises when started, the rotor or rotor lid is not fastened correctly. Switch thedevice off immediately by pressing "START/STOP" key.IMPORTANT Do not use damaged rotors!IMPORTANT Do not move the centrifuge during the run!3. Loading the rotor• Rotor must always be loaded symmetrically. Minimize differences in weight betweenthe filled sample tubes-taring with a scale is recommended. This will reduce wear on thedrive and cut running noise.• A liquid density of 1.2g/ml must not be exceeded at the max. speed.• Damaged tubes can not be centrifuged. This is because broken tubes can, in addition tosample loss, result in further damage to the centrifuge.• Close the test tube lids before centrifuging. Open lids can be ripped off during centrifugingand damage the centrifuge.4. Centrifugation with a preset time• Turn on the mains switch, pressing "OPEN" to open the lid, load the rotor symmetrically.Fasten the rotor lid and close the centrifuge lid.• Pressing Time's change the run time, the time can be pre-selected between 20 secondsand 99 minutes, and pressing speed's qp to change the run speed,the max. speed is13,400rpm.• Pressing the first "START/STOP" to start the run. Pressing the second "START / STOP"Version 1 March-08 Instruction manual 52507100 Page 15
5. INSTALLATION / SETTING UPENGLISHPreliminary inspectionUnwrap the centrifuge, take off the involving plastic and take off the polispan protectionin which it comes fitted. Take off all the protective items and, without connecting theequipment to the net, make sure that it does not present any damage because of the shipment.In case the equipment presents any damage tell it immediately to your transportagent or dealer so that they can make the claims in the correct time limit.Please keep the original wrapping; you will always need it for returns enclosed with allthe accessories supplied.Please check that all the accessories are enclosed with the equipment:- Rotor- Rotor nut- Rotor lid- Adapter- Operations manual- Warranty certificateWe will only accept any equipment return within 15 days after delivery and providedit comes in its original wrapping.InstallationBefore using this instrument, it is convenient for you to familiarize with its componentsand basic essentials.PLEASE READ THOROUGHLY THE INSTRUCTIONS BEFORE CONNECTINGAND OPERATING WITH THIS EQUIPMENT• Please put the centrifuge on top of a horizontal, plane and stable table making a freespace at least at 30 cm per side. Make sure that the ventilation slits are not blocked.• Do not put the equipment near any warm supply (burners, blowlamps…), nor exposeit directly to the sun, etc.• Avoid inflammable or toxic substances in the working area.• Insert the column connector of the adapter to power connector of the device, and insertanother connector of the adapter to mains power supply.• Power on the main switch. The centrifuge is ready to operate when the display becomesvisible. Place the rotor onto the rotor axle and tighten using the rotor nut.IMPORTANT: Before starting up the centrifuge for the first time, make sure the rotornut is securely fastened.Neither the manufacturer nor the distributor will assume any responsibility for thedamages produced to the equipment during its installation or damages to persons sufferedby the improper use of the electric connection. The tension should be 220 V, 50Hz ± 10%.CASTELLANO3 Carga del rotor• El rotor debe siempre cargarse simétricamente. La descompensación del rotor puedecausar vibraciones que si son pequeñas pueden no notarse, produciéndose poco a poco undesgaste de la centrífuga. Se recomienda minimizar las diferencias de peso en los tubosmediante el uso de una balanza. Esto reduce el desgaste en la transmisión y rebaja el ruidode funcionamiento.• No puede excederse de la densidad de 1.2 g / mL a la máxima velocidad.• No se pueden centrifugar tubos dañados. Esto es porque los tubos rotos pueden, ademásde perder muestra, producir un daño en la centrífuga.• Cierre las tapas de los tubos antes de centrifugar. Las tapas abiertas se pueden despojardurante la centrifugación y dañar la centrífuga.4 Centrifugación con tiempo preprogramado• Encienda el interruptor encendido/apagado, pulse "OPEN" para abrir la tapa, y cargueel rotor simétricamente. Fije la tapa del rotor y cierre la tapa de la centrífuga.• Pulse los botones de Time (3) para cambiar el Tiempo de centrifugación, el tiempopuede ser pre-seleccionado desde los 20 segundos hasta los 99 minutos, y si pulsa losbotones qp de Speed (4) cambia la velocidad, la velocidad máxima es 13,400rpm.• Pulsando por primera vez "START/STOP" (7) empieza la centrifugación. Pulsando porsegunda vez "START/STOP" (7) se para la centrifugación antes de tiempo.Al terminar de centrifugar, el cierre de la tapa de la centrífuga se abre automáticamente.Se pueden cambiar el tiempo y la velocidad de centrifugación mientras la centrifuga trabaja.El tiempo restante aparece en el display.6 Cambio al visor FCR• Pulse simultáneamente los botones de Speed (4) para cambiar entre visor RPM aFCR y viceversa.Lo puede calcular con la fórmula siguiente:FCR = 1118 x 10-5 x n 2 x rmaxn: velocidad en 1 / minrmax= 6 cm, máximo radio de centrifugación, en cm7 Apertura de la centrífuga en caso de fallo energético• Desconecte la centrífuga de la corriente eléctrica. Espere hasta que el rotor permanezcaquieto, luego déle la vuelta a la centrifuga, y mueva hacia la derecha la palanca de bloqueo(situada al lado de la ventosa delantera izquierda), así se abrirá la tapa de la centrífuga.NOTA: Cuando no vaya a hacer uso de la centrífuga durante largos períodos de tiempo,asegúrese de que esté desconectado de la red y protéjalo del polvo (evitando así posiblesaccidentes y prolongando la vida útil del equipo).Page 14 Instruction manual 52507100 Version 1 March-08Revisión 1, Marzo-08 Manual de instrucciones 52507100 Pág. 7
ENGLISHSeguridad• La centrífuga debe ser utilizada por personal cualificado previamente, que conozca elequipo y su manejo mediante el manual de uso.• Coloque el equipo sobre una mesa horizontal, plana y estable, creando un espacio librede al menos 30 cm por cada lado.• No coloque la centrífuga en zonas próximas a fuentes de calor (mecheros, sopletes...), niexponga el equipo directamente a la luz del sol. Evite las vibraciones, el polvo y ambientesmuy secos.• Durante su funcionamiento, el material peligroso como líquidos inflamables o materialpatológico, deben estar fuera del área de trabajo.• Cuando no vaya a hacer uso del equipo por largos períodos de tiempo, asegúrese deque está desconectado de la red para evitar posibles accidentes.• Para cualquier manipulación de limpieza, verificación de los componentes o sustituciónde cualquier componente (ej: sustitución de fusible) es imprescindible apagar el equipo ydesconectarlo de la toma de corriente.• No intente repararlo usted mismo; además de perder la garantía puede causar daños enel funcionamiento general del equipo, así como lesiones a la persona (quemaduras, heridas...)y daños a la instalación eléctrica.• Procure que no entre agua en el cuadro de controles, aunque éste se encuentre debidamenteaislado. Si por cualquier causa sospecha que ha entrado agua o cualquier líquidodesconecte el equipo inmediatamente (ver Mantenimiento).• Fabricado según las directivas europeas de seguridad eléctrica, compatibilidad electromagnéticay seguridad en máquinas.6. MANTENIMIENTO Y LIMPIEZAPara un adecuado funcionamiento de la centrífuga es necesario seguir algunas recomendaciones.Nota: Todas las normas de utilización citadas anteriormente carecerán de valor si nose realiza una continua labor de mantenimiento.3. TECHNICAL SPECIFICATIONS88. Ventilation slits9. Power switch10. Power connectorModel 2507/100Power supply100-240 V, 50-60HzPotencia100WMax. speedd13,400 rpmMax. centrifugal force12,100 fcrrpm/rcfSiTime20 segundos - 99 minutosMax. load12 tubos × 1.5 / 2.0mlMax. permitted density1.2g/mLAcceleration time to max. speed20 segundosBraking time from max. speed19 segundosAmbient temperature 5 ºC - 35 ºCDimensions(W×D×H)212mm×240mm×138mmWeight(with rotor)4.8kg4. THEORETICAL FOUNDATIONS910ENGLISH• Siga las instrucciones y advertencias relativas a este manual.• Tenga este manual siempre a mano para que cualquier persona pueda consultarlo.• Utilice siempre componentes y repuestos originales. Puede ser que otros dispositivossean parecidos, pero su empleo puede dañar el equipo.• Pequeñas ralladuras o roturas en el rotor pueden provocar serios daños interiores.• Evite daños causados por productos químicos agresivos, incluyendo entre otros: álcalisfuertes o débiles, ácidos fuertes. Si el rotor se contamina con agentes agresivos, se debelimpiar inmediatamente utilizado un líquido de limpieza neutro.• El equipo debe conectarse a una toma de corriente que esté conectada a tierra, debiendoquedar a mano para poder desconectarlo en caso de emergencia.Centrifugation is a separation technique based on the movement of the particles that aredisplaced to the distal end of the rotation axis depending on their shape and mass.The Relative Centrifugal Force (R.C.F.) is the required force to separate particles. It isgiven as some value times that of gravity (g).R.C.F.= 1.118·10 -5·r·n 21,118 * 10 -5 is a constant.r= radius, the horizontal distance in centimetres from the rotationaxis to the bottom of the sample tube.n= rotation speed expressed in revolutions per minute (r.p.m.).Pág. 8 Manual de instrucciones 52507100 Revisión 1 Marzo-08Version 1 March-08 Instruction manual 52507100 Page 13
ATTENTION!! IF EQUIPMENTS ARE NOT PROPERLY CLEAN ANDDISINFECTED THEY WOULD NOT BE ALLOWED TO REPAIR BY OURTECHNICAL SERVICE.INDEX OF LANGUAGESSpanishEnglishCE certificateINDEX OF CONTENTS1. USES OF THE INSTRUMENT2. DESCRIPTION3. TECHNICAL SPECIFICATIONS4. THEORETICAL FOUNDATIONS5. INSTALLATION / SETTING UP6. MAINTENANCE AND CLEANING7. TROUBLESHOOTINGANNEX I: WIRING DIAGRAM FOR CENTRIFUGE1. USES OF THE INSTRUMENTThis centrifuge is designed for workstations in training and research laboratories inthe fields of bioscience, medicine and chemistry. Twelve 1.5ml or 2.0ml micro test tubescan be centrifuged simultaneously in a 45° fixed-angle rotor.2. DESCRIPTIONENGLISH2-1011-19201212131314171819CASTELLANO• No intente repararlo usted mismo; además de perder la garantía puede causar daños enel funcionamiento general de la centrífuga, así como lesiones a la persona (quemaduras,heridas...) y daños a la instalación eléctrica, o equipos eléctricos cercanos.• En caso de avería diríjase a su proveedor para la reparación través del Servicio Técnicode Nahita.Limpieza• Para la limpieza de las partes metálicas, acero inoxidable, aluminio, pinturas, etc nuncautilice estropajos o productos que puedan rayar, ya que deterioran el equipo, limitando suvida útil.• Tanto el rotor como el exterior de la centrífuga han de ser limpiados regularmente conun trapo, libre de pelusas, húmedo. Desconecte la centrífuga de la corriente, extraiga elrotor y límpielo por separado. Para su limpieza sólo debe usar agentes neutros.• Por favor, revise con regularidad el rotor y especialmente sus orificios por si hay depósitoso daños, después reinserte el rotor y apriételo con la tuerca.¡ATENCIÓN! NO SE ADMITIRÁ NINGÚN APARATO PARA REPARARQUE NO ESTÉ DEBIDAMENTE LIMPIO Y DESINFECTADO.INSTRUCCIONES SOBRE PROTECCIÓN DEL MEDIO AMBIENTENo se deshaga de este equipo tirándolo a la basura ordinaria cuando hayaterminado su ciclo de vida; llévelo a un punto de recogida para el reciclaje deaparatos eléctricos y electrónicos. No contiene elementos peligrosos, tóxicospara el humano pero una eliminación no adecuada, perjudicaría al medioambiente.Los materiales son reciclables tal como se indica en la marcación. Al reciclar materiales uotras formas de reutilización de aparatos antiguos, esta Ud. Haciendo una contribuciónimportante a la protección del medio ambiente.Por favor póngase en contacto con la administración de su comunidad para que le asesorensobre los puntos de recogida.1. Rotor nut2. Rotor3. TIME4. RPM / RCF5. OPEN6. SHORT - SPIN7. START / STOP3124567. RESOLUCIÓN DE PROBLEMASERROR CAUSA SOLUCIÓNNo se visualiza nada enel displayNo esta conectada a lacorriente.Fallo de energía.Conecte el cable principalen ambos lados.Revise el fusible principal.7Page 12 Instruction manual 52507100 Version 1 March-08Revisión 1, Marzo-08 Manual de instrucciones 52507100 Pág. 9
CASTELLANOERROR CAUSA SOLUCIÓNNo se puede abrir la tapaLa centrífuga da sacudidasdurante la aceleraciónEr=01Er=02Fallo de energía.El rotor continúa girando.Fallo del cierre de latapa.El rotor no se ha cargadosimétricamente.Fallo del cierre de la tapaal abrir.Fallo del cierre de la tapaal cerrar.Apertura de la tapa encaso de emergencia (vea elapartado 7).Pare la centrífugaContacte con el serviciotécnicoPare la centrífuga y carguela centrífuga simétricamenteContacte con el serviciotécnico.Contacte con el serviciotécnico.Er=08 Fallo del motor. Contacte con el serviciotécnico.ANEXO I: PANEL ELÉCTRICOENGLISHThank you for choosing this equipment. We sincerely wish that you enjoy yourcentrifuge Nahita 2507/100. We highly recommend looking after this equipment accordingto what is stated in this manual.Nahita develops its products according to the CE marking regulations as well asemphasizing the ergonomics and security for its user.The correct using of the equipment and its good quality will permit you to enjoy thisequipment for years.The improper use of the equipment can cause accidents and electric discharges, circuitbreakers, fires, damages, etc. Please read the point of Maintenance, where we expose thesecurity notes.TO GET THE BEST RESULTS AND A HIGHER DURATION OF THE EQUIPMENTIT IS ADVISABLE TO READ THOROUGHLY THIS MANUAL BEFORE OPERA-TING WITH THE EQUIPMENT.Please bear in mind the following:• This manual is inseparable from the centrifuge Nahita 2507/100, so it should be availablefor all the users of this equipment.• You should carefully handle the equipment avoiding sudden movements, knocks, freefall of heavy / sharp objects on it. Avoid spilling liquids inside the equipment.• Never dismantle the different pieces of the centrifuge to repair it yourself, since it couldproduce a defective use of the whole equipment and a loss of the product warranty, aswell as injuries on people that handle the equipment.• To prevent fire or electric discharges avoid dry or dusty environments. In case it mayhappen unplug the equipment immediately.• If you have any doubt about setting up, installation or functioning do not hesitate incontacting your wholesaler. You can also tell us any doubts or suggestions you have bycontacting Nahita Technical Assistance Department by email to asistencia@auxilab.es orby telephone: +34 807 117 040 (0.30 Euros/min).• This equipment is protected under the Warranties and consumer goods regulation(10/2003).• Overhaul is not covered by the equipment warranty.• Operations made by non-qualified staff will automatically produce a loss of the equipmentwarranty.• Neither fuses nor accessories (including their loss), are covered by the product'swarranty. The warranty neither covers piece's deterioration due to the course of time.• Please make sure you keep the invoice, either for having the right to claim or asking forwarranty coverage. In case you have to send the equipment to Nahita Technical AssistanceDepartment you should enclose the original invoice or a copy as guarantee.• Please do not forget filling the warranty certificate and send it before 15 days after thedate of purchase.• Manufacturer reserves the right to modify or improve the manual or equipmentPág. 10 Manual de instrucciones 52507100 Revisión 1 Marzo-08Version 1 March-08 Instruction manual 52507100 Page 11