4-12x42 Laser Rangefinder Riflescope - Bushnell
4-12x42 Laser Rangefinder Riflescope - Bushnell
4-12x42 Laser Rangefinder Riflescope - Bushnell

You also want an ePaper? Increase the reach of your titles
YUMPU automatically turns print PDFs into web optimized ePapers that Google loves.
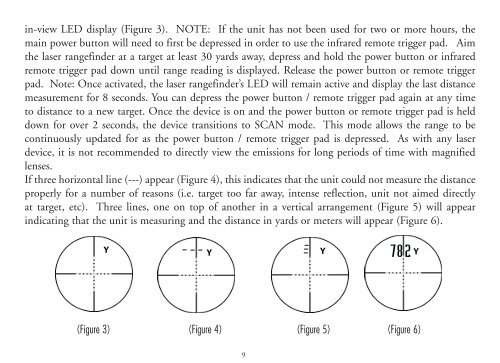
in-view LED display (Figure 3). NOTE: If the unit has not been used for two or more hours, the<br />
main power button will need to first be depressed in order to use the infrared remote trigger pad. Aim<br />
the laser rangefinder at a target at least 30 yards away, depress and hold the power button or infrared<br />
remote trigger pad down until range reading is displayed. Release the power button or remote trigger<br />
pad. Note: Once activated, the laser rangefinder’s LED will remain active and display the last distance<br />
measurement for 8 seconds. You can depress the power button / remote trigger pad again at any time<br />
to distance to a new target. Once the device is on and the power button or remote trigger pad is held<br />
down for over seconds, the device transitions to SCAN mode. This mode allows the range to be<br />
continuously updated for as the power button / remote trigger pad is depressed. As with any laser<br />
device, it is not recommended to directly view the emissions for long periods of time with magnified<br />
lenses.<br />
If three horizontal line (---) appear (Figure 4), this indicates that the unit could not measure the distance<br />
properly for a number of reasons (i.e. target too far away, intense reflection, unit not aimed directly<br />
at target, etc). Three lines, one on top of another in a vertical arrangement (Figure 5) will appear<br />
indicating that the unit is measuring and the distance in yards or meters will appear (Figure ).<br />
(Figure 3) (Figure 4) (Figure 5) (Figure 6)<br />
If the unit of measure appears in Yards (Y) and you would like to switch the Meters (M), simply press<br />
the Yards / Meters button (Figure .3) portion of the main POWER button. Conversely, when the<br />
readout is in meters, it can be switched to yards by the same process.<br />
INFRARED REMOTE TRIggER PAD<br />
An infrared remote trigger pad (Figure ) is included with the product. It was designed to attach to the<br />
forearm of the rifle and will work for either right or left hand shooters. It allows the user to maintain<br />
a stable shooting position while operating the laser rangefinder. The red triangle on the remote trigger<br />
must be faced toward the shooter and be placed on the forearm of the rifle for it to work properly and<br />
needs to be positioned within the inch space outlined in Figure 7 so that it can properly communicate<br />
with the infrared sensor (Figure . ). The remote trigger operates on one CR 0 watch battery. To<br />
replace this battery, open the cover with a small screw driver, remove existing battery and replace with<br />
a new one and replace cover.<br />
(Figure 7) inches / 5 mm<br />
9 0