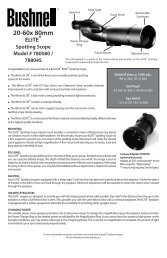
4-12x42 Laser Rangefinder Riflescope - Bushnell
4-12x42 Laser Rangefinder Riflescope - Bushnell
4-12x42 Laser Rangefinder Riflescope - Bushnell

You also want an ePaper? Increase the reach of your titles
YUMPU automatically turns print PDFs into web optimized ePapers that Google loves.
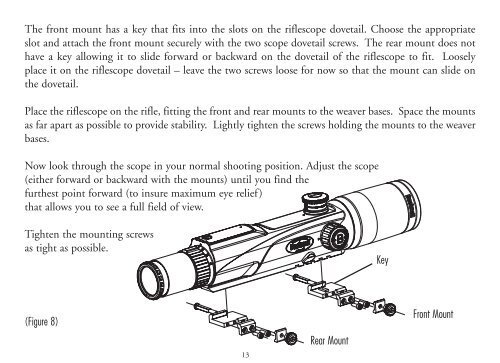
The front mount has a key that fits into the slots on the riflescope dovetail. Choose the appropriate<br />
slot and attach the front mount securely with the two scope dovetail screws. The rear mount does not<br />
have a key allowing it to slide forward or backward on the dovetail of the riflescope to fit. Loosely<br />
place it on the riflescope dovetail – leave the two screws loose for now so that the mount can slide on<br />
the dovetail.<br />
Place the riflescope on the rifle, fitting the front and rear mounts to the weaver bases. Space the mounts<br />
as far apart as possible to provide stability. Lightly tighten the screws holding the mounts to the weaver<br />
bases.<br />
Now look through the scope in your normal shooting position. Adjust the scope<br />
(either forward or backward with the mounts) until you find the<br />
furthest point forward (to insure maximum eye relief)<br />
that allows you to see a full field of view.<br />
Tighten the mounting screws<br />
as tight as possible.<br />
(Figure 8)<br />
Rear Mount<br />
Key<br />
Front Mount<br />
ELEVATION AND WINDAgE ADJUSTMENT<br />
Your <strong>Bushnell</strong> ® YARDAGE PRO ® LASER RANGEFINDER RIFLESCOPE features finger-adjustable,<br />
audible-click elevation and windage adjustments. If the point of impact of the bullet deviates from the<br />
aiming point, then adjustment of the windage and elevation must be made.<br />
To adjust windage, remove the threaded cap from the Windage Adjustment (Figure .7).<br />
Grasp the knob and turn it in the appropriate “L” (Left) and/or “R” (Right) direction indicated by the<br />
arrows. Each “click” or increment on the adjustment scale ring will change the bullet impact by /4”<br />
Minute of Angle. /4 MOA corresponds to /4 inch at 00 yards, / inch at 00 yards, 3/4 inch at<br />
300 yards and so on.<br />
RESETTINg ThE ADJUSTMENT SCALE RINg<br />
This step is not necessary, but, for future reference, you may want to realign the zero marks on the<br />
Adjustment Scale Rings with the index dots.<br />
- Using a coin, remove the center screw from the windage or elevation control. Lift the turret up being<br />
careful not to rotate it.<br />
- Position the turret to zero, or where you would like it to be.<br />
- Replace and tighten the center screw, making sure you do not rotate the turret.<br />
3 4