
You also want an ePaper? Increase the reach of your titles
YUMPU automatically turns print PDFs into web optimized ePapers that Google loves.
7<br />
GB<br />
E<br />
F<br />
D<br />
I<br />
NL<br />
P<br />
TRU x2<br />
TM6x2<br />
Aleta AP<br />
PG<br />
CN<br />
PER<br />
PV1<br />
PV1<br />
PV1240<br />
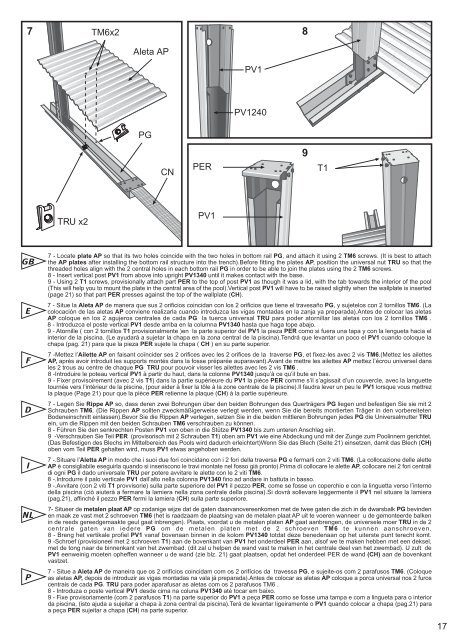
7 - Locate plate AP so that its two holes coincide with the two holes in bottom rail PG, and attach it using 2 TM6 screws. (It is best to attach<br />
the AP plates after installing the bottom rail structure into the trench).Before fitting the plates AP, position the universal nut TRU so that the<br />
threaded holes align with the 2 central holes in each bottom rail PG in order to be able to join the plates using the 2 TM6 screws.<br />
8 - Insert vertical post PV1 from above into upright PV1340 until it makes contact with the base.<br />
9 - Using 2 T1 screws, provisionally attach part PER to the top of post PV1 as though it was a lid, with the tab towards the interior of the pool<br />
(This will help you to mount the plate in the central area of the pool).Vertical post PV1 will have to be raised slightly when the wallplate is inserted<br />
(page 21) so that part PER presses against the top of the wallplate (CH).<br />
7 - Situe la Aleta AP de manera que sus 2 orificios coincidan con los 2 orificios que tiene el travesaño PG, y sujetelos con 2 tornillos TM6. (La<br />
colocación de las aletas AP conviene realizarla cuando introduzca las vigas montadas en la zanja ya preparada).Antes de colocar las aletas<br />
AP coloque en los 2 agujeros centrales de cada PG la tuerca universal TRU para poder atornillar las aletas con los 2 tornillos TM6 .<br />
8 - Introduzca el poste vertical PV1 desde arriba en la columna PV1340 hasta que haga tope abajo.<br />
9 - Atornille ( con 2 tornillos T1 provisionalmente )en la parte superior del PV1 la pieza PER como si fuera una tapa y con la lengueta hacia el<br />
interior de la piscina. (Le ayudará a sujetar la chapa en la zona central de la piscina).Tendrá que levantar un poco el PV1 cuando coloque la<br />
chapa (pag. 21) para que la pieza PER sujete la chapa ( CH ) en su parte superior.<br />
7 -Mettez l’Ailette AP en faisant coïncider ses 2 orifices avec les 2 orifices de la traverse PG, et fixez-les avec 2 vis TM6.(Mettez les ailettes<br />
AP, après avoir introduit les supports montés dans la fosse préparée auparavant).Avant de mettre les ailettes AP mettez l’écrou universel dans<br />
les 2 trous au centre de chaque PG TRU pour pouvoir visser les ailettes avec les 2 vis TM6 .<br />
8 -Introduire le poteau vertical PV1 à partir du haut, dans la colonne PV1340 jusqu’à ce qu’il bute en bas.<br />
9 - Fixer provisoirement (avec 2 vis T1) dans la partie supérieure du PV1 la pièce PER comme s’il s’agissait d’un couvercle, avec la languette<br />
tournée vers l’intérieur de la piscine, (pour aider à fixer la tôle à la zone centrale de la piscine).Il faudra lever un peu le PV1 lorsque vous mettrez<br />
la plaque (Page 21) pour que la pièce PER retienne la plaque (CH) à la partie supérieure.<br />
7 - Legen Sie Rippe AP so, dass deren zwei Bohrungen über den beiden Bohrungen des Querträgers PG liegen und befestigen Sie sie mit 2<br />
Schrauben TM6. (Die Rippen AP sollten zweckmäßigerweise verlegt werden, wenn Sie die bereits montierten Träger in den vorbereiteten<br />
Bodeneinschnitt einlassen).Bevor Sie die Rippen AP verlegen, setzen Sie in die beiden mittleren Bohrungen jedes PG die Universalmutter TRU<br />
ein, um die Rippen mit den beiden Schrauben TM6 verschrauben zu können.<br />
8 - Führen Sie den senkrechten Posten PV1 von oben in die Stütze PV1340 bis zum unteren Anschlag ein.<br />
9 -Verschrauben Sie Teil PER (provisorisch mit 2 Schrauben T1) oben am PV1 wie eine Abdeckung und mit der Zunge zum Poolinnern gerichtet.<br />
(Das Befestigen des Blechs im Mittelbereich des Pools wird dadurch erleichtert)Wenn Sie das Blech (Seite 21) einsetzen, damit das Blech (CH)<br />
oben vom Teil PER gehalten wird, muss PV1 etwas angehoben werden.<br />
7 -.Situare l’Aletta AP in modo che i suoi due fori coincidano con i 2 fori della traversa PG e fermarli con 2 viti TM6. (La collocazione delle alette<br />
AP è consigliabile eseguirla quando si inseriscono le travi montate nel fosso già pronto).Prima di collocare le alette AP, collocare nei 2 fori centrali<br />
di ogni PG il dado universale TRU per potere avvitare le alette con le 2 viti TM6.<br />
8 -.Introdurre il palo verticale PV1 dall’alto nella colonna PV1340 fino ad andare in battuta in basso.<br />
9 -.Avvitare (con 2 viti T1 provvisorie) sulla parte superiore del PV1 il pezzo PER, come se fosse un coperchio e con la linguetta verso l’interno<br />
della piscina (ciò aiuterà a fermare la lamiera nella zona centrale della piscina).Si dovrà sollevare leggermente il PV1 nel situare la lamiera<br />
(pag.21), affinché il pezzo PER fermi la lamiera (CH) sulla parte superiore.<br />
7- Situeer de metalen plaat AP op zodanige wijze dat de gaten daarvanovereenkomen met de twee gaten die zich in de dwarsbalk PG bevinden<br />
en maak ze vast met 2 schroeven TM6 (het is raadzaam de plaatsing van de metalen plaat AP uit te voeren wanneer u de gemonteerde balken<br />
in de reeds gereedgemaakte geul gaat inbrengen). Plaats, voordat u de metalen platen AP gaat aanbrengen, de universele moer TRU in de 2<br />
centrale gaten van iedere PG om de metalen platen met de 2 schroeven TM6 te kunnen aanschroeven.<br />
8 - Breng het vertikale profiel PV1 vanaf bovenaan binnen in de kolom PV1340 totdat deze benedenaan op het uiterste punt terecht komt.<br />
9 -Schroef (provisioneel met 2 schroeven T1) aan de bovenkant van PV1 het onderdeel PER aan, alsof we te maken hebben met een deksel,<br />
met de tong naar de binnenkant van het zwembad. (dit zal u helpen de wand vast te maken in het centrale deel van het zwembad). U zult de<br />
PV1 eenweinig moeten opheffen wanneer u de wand (zie blz. 21) gaat plaatsen, opdat het onderdeel PER de wand (CH) aan de bovenkant<br />
vastzet.<br />
7 - Situe a Aleta AP de maneira que os 2 orifícios coincidam com os 2 orifícios da travessa PG, e sujeite-os com 2 parafusos TM6. (Coloque<br />
as aletas AP, depois de introduzir as vigas montadas na vala já preparada).Antes de colocar as aletas AP coloque a porca universal nos 2 furos<br />
centrais de cada PG. TRU para poder aparafusar as aletas com os 2 parafusos TM6 .<br />
8 - Introduza o poste vertical PV1 desde cima na coluna PV1340 até tocar em baixo.<br />
9 - Fixe provisoriamente (com 2 parafusos T1) na parte superior do PV1 a peça PER como se fosse uma tampa e com a lingueta para o interior<br />
da piscina, (isto ajuda a sujeitar a chapa à zona central da piscina).Terá de levantar ligeiramente o PV1 quando colocar a chapa (pag.21) para<br />
a peça PER sujeitar a chapa (CH) na parte superior.<br />
8<br />
9<br />
T1<br />
17