Fender Bassman 150 Bass Amps Manual at AmericanMusical.com
Fender Bassman 150 Bass Amps Manual at AmericanMusical.com
Fender Bassman 150 Bass Amps Manual at AmericanMusical.com

Create successful ePaper yourself
Turn your PDF publications into a flip-book with our unique Google optimized e-Paper software.
ENGLISH - PAGES . . . . . . 6-7<br />
ESPAÑOL - PAGINAS . . . . 8-9<br />
FRANÇAIS - PAGES . . . . . 10-11<br />
ITALIANO - PAGINE . . . . . 12-13<br />
DEUTSCH - SEITEN . . . . . 14-15<br />
PORTUGUÊS - PAGINA . . 16-17<br />
. . . . . . . . . . 18-19<br />
Important Safety Instructions<br />
This symbol warns the user of dangerous voltage levels<br />
localized within the enclosure.<br />
This symbol advises the user to read all ac<strong>com</strong>panying<br />
liter<strong>at</strong>ure for safe oper<strong>at</strong>ion of the unit.<br />
∆ Read, retain, and follow all instructions. Heed all warnings.<br />
∆ Only connect the power supply cord to an earth grounded AC<br />
receptacle in accordance with the voltage and frequency r<strong>at</strong>ings<br />
listed under INPUT POWER on the rear panel of this product.<br />
∆ WARNING: To prevent damage, fire or shock hazard, do not<br />
expose this unit to rain or moisture.<br />
∆ Unplug the power supply cord before cleaning the unit exterior<br />
(use a damp cloth only). Wait until the unit is <strong>com</strong>pletely dry<br />
before reconnecting it to power.<br />
∆ During oper<strong>at</strong>ion: Maintain <strong>at</strong> least 6 inches (15.25 cm) of<br />
unobstructed air space around the unit to allow for proper<br />
ventil<strong>at</strong>ion and cooling of the unit; do not block any vents in the<br />
unit chassis. Also, if rack mounted, remove the rack enclosure<br />
front and rear covers and leave empty one full rack space above<br />
the unit.<br />
∆ This product should be loc<strong>at</strong>ed away from he<strong>at</strong> sources such as<br />
radi<strong>at</strong>ors, he<strong>at</strong> registers, or other products th<strong>at</strong> produce he<strong>at</strong>.<br />
∆ This product may be equipped with a polarized plug (one blade<br />
wider than the other). This is a safety fe<strong>at</strong>ure. If you are unable<br />
to insert the plug into the outlet, contact an electrician to replace<br />
your obsolete outlet. Do not defe<strong>at</strong> the safety purpose of this<br />
plug.<br />
∆ Protect the power supply cord from being pinched or abraded.<br />
∆ This product should only be used with a cart or stand th<strong>at</strong> is<br />
re<strong>com</strong>mended by the manufacturer.<br />
∆ The power supply cord of this product should be unplugged from<br />
the outlet when left unused for a long period of time, or during<br />
electrical storms.<br />
∆ This product should be serviced by qualified service personnel<br />
when: the power supply cord or the plug has been damaged; or<br />
objects have fallen, or liquid has been spilled onto the product;<br />
or the product has been exposed to rain; or the product does not<br />
appear to oper<strong>at</strong>e normally or exhibits a marked change in<br />
performance; or the product has been dropped, or the enclosure<br />
damaged.<br />
∆ Do not drip nor splash liquids, nor place liquid filled containers on<br />
the unit.<br />
∆ CAUTION: No user serviceable parts inside, refer servicing to<br />
qualified personnel only.<br />
∆ <strong>Fender</strong> ® amplifiers and loudspeaker systems are capable of<br />
producing very high sound pressure levels which may cause<br />
temporary or permanent hearing damage. Use care when<br />
setting and adjusting volume levels during use.
Instrucciones Importantes de Seguridad<br />
Este símbolo advierte al usuario de la presencia de<br />
niveles peligrosos de voltaje dentro de la carcasa del<br />
apar<strong>at</strong>o.<br />
Este símbolo advierte al usuario de que debería leer<br />
todos los documentos que a<strong>com</strong>pañan a este apar<strong>at</strong>o<br />
para un manejo seguro del mismo.<br />
∆ Lea, conserve y siga lo indicado en las instrucciones. Observe<br />
todas las advertencias.<br />
∆ Conecte el cable de corriente solo a una salida de corriente con<br />
toma de tierra y cuyo voltaje y frecuencia se correspondan con<br />
lo indicado en la etiqueta INPUT POWER que está en el panel<br />
trasero de este apar<strong>at</strong>o.<br />
∆ PRECAUCION: Para evitar daños, incendios o descargas<br />
eléctricas, no permita que este apar<strong>at</strong>o quede expuesto a la<br />
lluvia o la humedad.<br />
∆ Desconecte el cable de corriente cuando vaya a limpiar la<br />
superficie exterior de este apar<strong>at</strong>o (use solo un trapo<br />
ligeramente húmedo). Antes de volver a conectar el cable de<br />
corriente, espere hasta que la unidad esté <strong>com</strong>pletamente seca.<br />
∆ Deje un espacio libre de al menos 6 pulgadas (15.24 cm) por<br />
detrás de esta unidad para permitir una correcta ventilación y<br />
refrigeración de la misma.<br />
∆ Debería situar este apar<strong>at</strong>o lejos de fuentes de calor <strong>com</strong>o<br />
radiadores, hornos, calentadores u otros apar<strong>at</strong>os que<br />
produzcan calor.<br />
∆ Este apar<strong>at</strong>o puede que esté equipado con un enchufe<br />
polarizado (un borne más ancho que el otro). Esto es una<br />
medida de seguridad. Si no lo puede introducir en su salida de<br />
corriente, póngase en contacto con un electricista para que le<br />
sustituya su salida anticuada. Nunca cambie el enchufe del<br />
apar<strong>at</strong>o ya que esto anularía el sistema de seguridad.<br />
∆ Evite que el cable de alimentación pueda quedar aplastado o<br />
muy retorcido.<br />
∆ Este producto solo debería ser usado con un soporte o bastidor<br />
que haya sido re<strong>com</strong>endado por el propio fabricante.<br />
∆ Desconecte el cable de alimentación de este apar<strong>at</strong>o de la salida<br />
cuando no lo vaya a usar durante un largo tiempo o durante las<br />
tormentas eléctricas.<br />
∆ Este apar<strong>at</strong>o debería ser revisado por el servicio técnico oficial<br />
cuando: El cable de alimentación o el enchufe se hayan dañado;<br />
o se hayan introducido objetos o líquidos dentro del producto; o<br />
este apar<strong>at</strong>o haya quedado expuesto a la lluvia; o el producto dé<br />
muestras de no funcionar correctamente o se observe un<br />
evidente cambio en su rendimiento; o el apar<strong>at</strong>o haya caído al<br />
suelo o su carcasa se haya dañado.<br />
∆ No derrame líquidos, ni coloque objetos que los contengan sobre<br />
este apar<strong>at</strong>o.<br />
∆ PRECAUCION: Dentro de este apar<strong>at</strong>o no hay piezas<br />
susceptibles de ser reparadas por el usuario; dirija cualquier<br />
reparación solo al servicio técnico oficial.<br />
∆ Los amplificadores <strong>Fender</strong> ® son capaces de producir niveles de<br />
presión sonora muy elevados que pueden provocar daños<br />
temporales o permanentes en el oído. Ajuste los niveles de<br />
volumen con cuidado cuando use este apar<strong>at</strong>o.<br />
Consignes de Sécurité Importantes<br />
Ce symbole prévient l’utilis<strong>at</strong>eur de tensions électriques<br />
dangereuses présentes dans l’appareil.<br />
Ce symbole conseille à l’utilis<strong>at</strong>eur de lire les<br />
instructions fournies pour éviter tout danger d’utilis<strong>at</strong>ion<br />
du produit.<br />
∆ Lisez, respectez et conservez les instructions. Respectez toutes<br />
les mises en garde.<br />
∆ Utilisez uniquement le cordon secteur fourni. Utilisez une<br />
connexion secteur pourvue d’une mise à la terre. Veillez à ce que<br />
la tension secteur et la fréquence de votre zone géographique<br />
correspondent à celles indiquées sous la sérigraphie INPUT<br />
POWER située en face arrière.<br />
∆ ATTENTION : Pour éviter tout dommage, risque d’incendie ou<br />
d’électrocution, ne pas exposer cet appareil à la pluie ou à<br />
l’humidité.<br />
∆ Déconnectez le cordon de la prise secteur avant de nettoyer<br />
l’extérieur de l’appareil (utilisez un tissu humide uniquement).<br />
Attendez que le produit soit <strong>com</strong>plètement sec avant de le<br />
replacer sous tension.<br />
∆ Veillez à laisser un vide d’au moins 15 cm derrière l’appareil pour<br />
assurer sa ventil<strong>at</strong>ion et son refroidissement.<br />
∆ Ce produit doit être éloigné des sources de chaleur <strong>com</strong>me les<br />
radi<strong>at</strong>eurs, ou de toute autre source dégageant de la chaleur.<br />
∆ Si ce produit est équipé d’une borne de terre, veillez à la<br />
conserver. Cette borne de terre assure votre protection. Si les<br />
prises murales ne sont pas équipées de la terre, contactez un<br />
électricien et faites les changer.<br />
∆ Protégez le cordon secteur pour qu’il ne soit pas pincé ou pour<br />
éviter que les personnes marchent dessus.<br />
∆ Ce produit ne doit être utilisé qu’avec un chariot de transport ou<br />
un support préconisé par le fabricant.<br />
∆ Si vous n’utilisez pas ce produit pendant longtemps ou en cas<br />
d’orage, débranchez le cordon du secteur.<br />
∆ Ce produit doit être réparé par un personnel qualifié lorsque : Le<br />
cordon ou l’embase secteur sont endommagés; Un objet ou un<br />
liquide s’est infiltré dans le produit; Le produit a été exposé à la<br />
pluie; Le produit ne semble pas fonctionner correctement ou<br />
dénote une baisse de performances; Le produit est tombé ou<br />
son boîtier a été endommagé<br />
∆ Ne pas projeter de liquides sur le produit. Ne pas poser de<br />
récipients contenant un liquide sur l’appareil.<br />
∆ ATTENTION : Ce produit ne contient aucune pièce pouvant être<br />
remplacée par l’utilis<strong>at</strong>eur. Les répar<strong>at</strong>ions doivent être confiées<br />
à un personnel qualifié uniquement.<br />
∆ Les amplific<strong>at</strong>eurs <strong>Fender</strong> ® peuvent produire des niveaux<br />
sonores très élevés pouvant causer des dommages à votre<br />
audition et à celle des tiers. Réglez le volume avec modér<strong>at</strong>ion.
Istruzioni Importanti di Sicurezza<br />
Questo simbolo indica la presenza di tensione<br />
pericolosa all'interno della cassa.<br />
Questo simbolo indica l'importanza per l'utilizz<strong>at</strong>ore<br />
della lettura di tutta la documentazione alleg<strong>at</strong>a al<br />
prodotto, finalizz<strong>at</strong>a all'utilizzo sicuro del dispositivo.<br />
∆ Leggere, conservare ed <strong>at</strong>tenersi alle istruzioni, specialmente<br />
alle <strong>com</strong>unicazioni di avvertimento.<br />
∆ Effettuare il collegamento dell'apparecchio ad una presa<br />
idonea CA munita di messa a terra e con car<strong>at</strong>teristiche di<br />
tensione e di frequenza corrispondenti ai valori indic<strong>at</strong>i sul<br />
retro dell'apparecchio alla voce INPUT POWER.<br />
∆ ATTENZIONE: Non esporre l'apparecchio a pioggia o umidità,<br />
al fine di evitare pericoli di danneggiamento, incendio, o<br />
scosse elettriche.<br />
∆ Prima di effettuare la pulizia della sc<strong>at</strong>ola esterna<br />
dell'apparecchio, scollegare il cavo di alimentazione dalla<br />
presa (utilizzare solamente un panno umido). Prima di<br />
ricollegare l'apparecchio alla presa, assicurarsi che il<br />
dispositivo sia <strong>com</strong>pletamente asciutto.<br />
∆ Lasciare uno spazio libero dietro all'apparecchio di almeno<br />
15,24 cm per permettere una giusta ventilazione e<br />
raffreddamento dell'apparecchio.<br />
∆ Posizionare l'apparecchio lontano da fonti di calore <strong>com</strong>e<br />
radi<strong>at</strong>ori, diffusori di aria calda, o <strong>com</strong>unque altri apparecchi<br />
che producono calore.<br />
∆ Per fornire maggiore sicurezza, questo apparecchio può<br />
essere dot<strong>at</strong>o di spina polarizz<strong>at</strong>a (uno spinotto pi<strong>at</strong>to più largo<br />
dell'altro). Se impossibilit<strong>at</strong>i ad inserirlo nella presa, cont<strong>at</strong>tare<br />
un elettricista per la sostituzione della vostra presa elettrica.<br />
Non annullare la finalità di sicurezza di questo dispositivo<br />
eliminandolo.<br />
∆ Proteggere il cavo di alimentazione al fine di evitare abrasioni,<br />
strappi o schiacciamento dello stesso.<br />
∆ Dotare questo apparecchio unicamente di carrello o supporto<br />
rac<strong>com</strong>and<strong>at</strong>i dal produttore.<br />
∆ Nel corso di tempeste elettriche o in caso di prolung<strong>at</strong>i periodi<br />
di in<strong>at</strong>tività, scollegare il cavo di alimentazione dalla presa.<br />
∆ La manutenzione dell'apparecchio dovrà essere affid<strong>at</strong>a a<br />
tecnici specializz<strong>at</strong>i nei seguenti casi: danneggiamento del<br />
cavo di alimentazione, caduta di oggetti o liquidi<br />
sull'apparecchio, esposizione dell'apparecchio alla pioggia,<br />
funzionamento anomalo dell'apparecchio o con prestazioni<br />
alter<strong>at</strong>e, caduta dell'apparecchio o cassa danneggi<strong>at</strong>a.<br />
∆ Proteggere l'apparecchio da schizzi e gocciolamenti e non<br />
appoggiare contenitori di liquidi sull'apparecchio stesso.<br />
∆ IMPORTANTE: L'apparecchio non contiene al suo interno<br />
dispositivi finalizz<strong>at</strong>i all'utilizzo dello stesso. Affidare la<br />
manutenzione unicamente a personale qualific<strong>at</strong>o.<br />
∆ Gli amplific<strong>at</strong>ori <strong>Fender</strong> ® sono in grado di produrre elev<strong>at</strong>i livelli<br />
di pressione acustica (SPL) in grado di causare danni<br />
temporanei o permanenti all'udito. Fare quindi <strong>at</strong>tenzione<br />
durante la regolazione del livello acustico in fase di utilizzo.<br />
W ichtige Sicherheitsvorkehrungen<br />
Dieses Symbol warnt Sie vor gefährlichen<br />
Spannungen im Innenraum des Gehäuses.<br />
Dieses Symbol fordert Sie zum Lesen der<br />
Begleittexte für einen sicheren Gerätebetrieb auf.<br />
∆ Lesen, befolgen und bewahren Sie alle Anweisungen auf.<br />
Beachten Sie alle Warnungen.<br />
∆ Verbinden Sie das Netzkabel nur mit einer geerdeten<br />
Netzsteckdose entsprechend den Spannungs- und Frequenz-<br />
Nennwerten, die unter INPUT POWER auf der<br />
Produktrückseite angegeben sind.<br />
∆ WARNUNG: Um Beschädigungen, Brände oder Stromschläge<br />
zu verhindern, setzen Sie das Gerät weder Regen noch<br />
Feuchtigkeit aus.<br />
∆ Ziehen Sie den Netzstecker, bevor Sie die Geräte-Oberfläche<br />
säubern (nur feuchtes Tuch). Warten Sie, bis das Gerät völlig<br />
trocken ist, bevor Sie es wieder ans Netz anschließen.<br />
∆ Lassen Sie hinter dem Gerät mindestens 15,24 cm (6”)<br />
Freiraum, um eine ausreichende Belüftung und Kühlung<br />
sicherzustellen.<br />
∆ Stellen Sie das Produkt in ausreichender Entfernung von<br />
Wärmequellen, wie Heizkörpern, Wärme-klappen oder<br />
anderen Geräten auf, die Hitze erzeugen.<br />
∆ Dieses Produkt ist eventuell mit einem polarisierten Stecker<br />
(unterschiedlich breite Pole) ausgerüstet. Dies ist eine<br />
Sicherheitsfunktion. Wenn der vorhandene Stecker nicht in<br />
Ihre Steckdose passt, lassen Sie die veraltete Steckdose von<br />
einem Elektriker ersetzen. Setzen Sie die Sicherheitsfunktion<br />
des Steckers nicht außer Kraft.<br />
∆ Das Netzkabel darf nicht geknickt oder abgeschürft werden.<br />
∆ Dieses Produkt sollte nur mit den vom Hersteller empfohlenen<br />
Wagen oder Ständern benutzt werden.<br />
∆ Das Netzkabel des Produkts sollte bei längerem<br />
Nichtgebrauch oder bei Gewittern aus der Netzsteckdose<br />
gezogen werden.<br />
∆ Dieses Produkt sollte von qualifiziertem Wartungspersonal<br />
gewartet werden, wenn: Netzkabel oder Netzstecker<br />
beschädigt wurden oder; Objekte oder Flüssigkeiten ins<br />
Produkt gelangt sind oder; das Produkt dem Regen<br />
ausgesetzt war oder; das Produkt nicht normal funktioniert<br />
oder sein Betrieb sich deutlich verändert h<strong>at</strong> oder; das Produkt<br />
fallen gelassen wurde oder das Gehäuse beschädigt wurde.<br />
∆ Verschütten Sie keine Flüssigkeiten und stellen Sie keine<br />
Behälter mit Flüssigkeit auf das Gerät.<br />
∆ VORSICHT: Die inneren Bauteile können nur von<br />
qualifiziertem Fachpersonal gewartet werden.<br />
∆ <strong>Fender</strong> ® Verstärker können sehr hohe Schalldruckpegel<br />
erzeugen, die zu vorübergehenden oder dauerhaften<br />
Hörschäden führen können. Gehen Sie beim Einstellen der<br />
Pegel vorsichtig vor.
Instruções Importantes de Segurança<br />
Este símbolo adverte o usuário da presença de níveis<br />
perigosos de voltagem dentro da caixa.<br />
Este símbolo adverte o usuário de que toda liter<strong>at</strong>ura<br />
que vem a<strong>com</strong>panhada deste aparelho deverá ser lida<br />
para um manuseio seguro do mesmo.<br />
∆ Leia, conserve na memória e siga todas as instruções. Observe<br />
todas as advertências.<br />
∆ Conecte o cabo de força somente à uma saída de corrente <strong>com</strong><br />
terminal de terra e cujas voltagem e freqüência correspondam<br />
ao indicado no INPUT POWER no painel traseiro deste produto.<br />
∆ ADVERTÊNCIA: Para evitar danos, incêndio ou choque elétrico,<br />
não permita que este aparelho seja exposto à chuva ou<br />
umidade.<br />
∆ Desconecte o cabo de energia antes de limpar a superfície<br />
exterior deste aparelho (use um pano úmido somente). Espere<br />
<strong>at</strong>é que esteja <strong>com</strong>pletamente seco para reconecta-lo.<br />
∆ Durante a operação: Mantenha pelo menos 6 polegadas<br />
(15.25cm) de espaço livre por detrás desta unidade para permitir<br />
uma correta ventilação e refrigeração da mesma.<br />
∆ Este produto deve estar localizado longe de fontes de calor tais<br />
<strong>com</strong>o radiadores, aquecedores ou outros aparelhos que<br />
produzam calor.<br />
∆ Este aparelho pode estar equipado <strong>com</strong> um plug polarizado<br />
(uma extremidade mais larga que a outra). Esta é uma medida<br />
de segurança. Se você não conseguir inserir o plug na saída,<br />
entre em cont<strong>at</strong>o <strong>com</strong> um eletricista para substituir sua saída<br />
ultrapassada. Não anule o propósito de segurança deste plug.<br />
∆ Evite que o cabo de alimentação fique retorcido ou esmagado.<br />
∆ Este produto deve ser usado somente <strong>com</strong> um suporte ou<br />
carreta que tenham sido re<strong>com</strong>endados pelo próprio fabricante.<br />
∆ Desconecte o cabo de alimentação deste aparelho da saída<br />
quando este não for ser utilizado durante um longo período de<br />
tempo ou durante tempestades elétricas.<br />
∆ Este aparelho deve ser revisado por técnicos especializados<br />
quando: o cabo de alimentação ou o plug forem danificados;<br />
objetos caírem sobre ele ou líquidos forem derramados no<br />
aparelho; ou o produto tiver sido exposto à chuva; ou o produto<br />
não parecer operar corretamente ou se for observada alguma<br />
alteração evidente em sua performance; ou se o aparelho for<br />
derrubado, ou a caixa danificada.<br />
∆ Não derrame ou espirre líquidos, nem coloque objetos que os<br />
contenham sobre este aparelho.<br />
∆ AVISO: Manutenção e/ou reparo de quaisquer partes<br />
integrantes desde produto não devem ser realizadas por<br />
usuários, encaminhe o serviço somente a técnicos<br />
especializados.<br />
∆ Os sistemas de amplificadores e auto-falantes <strong>Fender</strong> têm<br />
capacidade para produzir altíssimos níveis de pressão de som<br />
os quais podem causar perda temporária ou permanente de<br />
audição. Seja prudente ao definir e ajustar os níveis de volume<br />
durante a utilização.<br />
∆<br />
∆<br />
∆<br />
∆<br />
∆<br />
∆<br />
∆<br />
∆<br />
∆<br />
∆<br />
∆<br />
∆<br />
∆<br />
∆<br />
15.24 cm
6 <strong><strong>Bass</strong>man</strong> ® <strong>150</strong><br />
<strong>Fender</strong> ® <strong>Bass</strong> Amplific<strong>at</strong>ion thanks you for purchasing the<br />
<strong><strong>Bass</strong>man</strong> ® <strong>150</strong> amplifier. The <strong><strong>Bass</strong>man</strong> ® line was designed for<br />
players who recognize the need for a portable amplifier with<br />
plenty of power and instinctive tone controls. The high quality,<br />
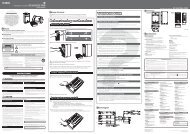
F ront Panel<br />
A. INPUT - Plug your bass in here.<br />
B. –6dB - Reduces input sensitivity to allow cleaner response<br />
with high-output bass guitars:<br />
NORMAL—Full input sensitivity.<br />
–6dB—Lower input sensitivity.<br />
C. VOLUME - Adjusts the preamp signal level. Use together<br />
with MASTER {N} to set the overall loudness of the<br />
amplifier.<br />
�•�CLIP - Indic<strong>at</strong>es preamp clipping. Occasional flashing<br />
is normal when you play hard. Reduce VOLUME level<br />
if you hear distortion when this LED is on.<br />
�•�PRE AMP SIGNAL - Indic<strong>at</strong>es sufficient signal strength.<br />
Turn up your instrument or the VOLUME level if this<br />
LED is off when playing.<br />
D. COMPRESSOR RATIO - Typically used to even out a<br />
musical performance, a <strong>com</strong>pressor provides a smoothing<br />
effect between thumb and fingerstyle type <strong>at</strong>tack. The<br />
<strong>com</strong>pressor control on a <strong><strong>Bass</strong>man</strong> ® series amplifier<br />
determines the <strong>com</strong>pressor RATIO. When a signal is loud<br />
enough to enable the <strong>com</strong>pressor to <strong>com</strong>e on, the RATIO<br />
determines how THICK the <strong>com</strong>pression will be. When<br />
turned all of the way down, the RATIO is 1:1 (off), as you<br />
turn the control up, the RATIO increases (2:1, 3:1, 4:1) and<br />
the sound of the <strong>com</strong>pression be<strong>com</strong>es more noticeable.<br />
The ideal setting for <strong>com</strong>pression is almost inaudible to the<br />
ear, but s<strong>at</strong>isfying to the fingers (a sense of control over the<br />
instrument).<br />
E. CONTOUR - This fe<strong>at</strong>ure is for scooping out the mid-range<br />
signal, a sound typically desired for thumb style playing to<br />
achieve a modern “hi-fi” type bass tone. Turning this knob<br />
clock-wise increases the cut of the mid range, increasing<br />
the scooped sound.<br />
F. BASS - Adjusts low-frequency tone character.<br />
G. 2-BAND SEMI-PARAMETRIC EQ - Having more control<br />
over the mid-range frequencies is very important in<br />
defining your bass tone. This is why your <strong><strong>Bass</strong>man</strong> ® <strong>com</strong>es<br />
equipped with semi-parametric control (1 band on the<br />
<strong><strong>Bass</strong>man</strong> ® 100, 2 bands on the <strong><strong>Bass</strong>man</strong> ® <strong>150</strong> & 250). The<br />
Frequency knob is there to determine WHERE you would<br />
full fe<strong>at</strong>ured XLR output is able to send a crisp, clear signal for<br />
live or studio use. <strong>Fender</strong> ® Special Design Eminence ® USA<br />
speakers ensure th<strong>at</strong> the sound is thick, n<strong>at</strong>ural and balanced<br />
and will sit f<strong>at</strong> in your live or studio mix.<br />
like to adjust the sound. Level is there to determine<br />
whether you would like th<strong>at</strong> particular frequency to be<br />
boosted or cut (+/-15 dB). Adding upper mids (and<br />
favoring the bridge pickup on your instrument) cre<strong>at</strong>es a<br />
biting tone th<strong>at</strong> is gre<strong>at</strong> for Jazz Fusion type melodic lines.<br />
Cutting mids allows for separ<strong>at</strong>ion between the lows and<br />
highs, resulting in a tone well suited for slap-style funk<br />
H. TREBLE - Adjusts high-frequency tone character.<br />
✧ f e n d e r . c o m ✧<br />
I. PRE/POST - Supplies the LINE OUT {L} jack with the<br />
signal either before or after it is processed by the<br />
amplifier’s equaliz<strong>at</strong>ion circuits.<br />
PRE (EQ bypassed) POST (EQ active)<br />
J. LINE LEVEL - Adjusts the output level of the LINE OUT<br />
jack {L}.<br />
K. GROUND LIFT - Disconnects the LINE OUT {L} ground<br />
connection (pin-1) which may reduce hum noise in some<br />
situ<strong>at</strong>ions.<br />
GROUNDED (normal) GROUND LIFTED<br />
L. LINE OUT - This jack allows you to send signal from the<br />
preamp section out to an external source (such as a house<br />
mixing console or a recording device). The on board “level”<br />
control allows for adjustment of signal strength. Use the<br />
“Pre/Post” control to select if you would prefer the bass<br />
signal to be affected by the EQ changes you make (post)<br />
or before the EQ, to give an unaffected signal (pre). The<br />
“Ground Lift” is there to elimin<strong>at</strong>e buzz resulting from<br />
connection to improperly grounded equipment.<br />
M. MUTE - Disables all amplifier outputs except for TUNER<br />
OUT {U}. �•�The LED flashes when MUTE is active.<br />
N. MASTER - Adjusts the power amp signal level. Use<br />
together with VOLUME {C} to set the overall loudness of<br />
the amplifier.<br />
�•�PWR AMP CLIP - Indic<strong>at</strong>es power amp clipping.<br />
Reduce MASTER if you hear distortion when this LED<br />
is on.<br />
O. POWER - Switches the amplifier on-off. Illumin<strong>at</strong>es when<br />
the unit is powered on.
P. IEC POWER SOCKET -<br />
Connect the included power cord to a<br />
grounded AC receptacle in <strong>com</strong>pliance<br />
with the voltage and frequency r<strong>at</strong>ings<br />
specified on the rear panel of your amplifier.<br />
Q. SPEAKER OUTPUT - Use the 1/4" phone jack to connect<br />
a speaker load of 4–ohms minimum. The internal speaker<br />
load is 4–ohms for maximum power output.<br />
R. HEADPHONES - Connect your headphones here.<br />
Disconnect speaker connection for priv<strong>at</strong>e listening.<br />
TYPE: PR 596<br />
Rear Panel<br />
S. AUX IN - RCA input jacks for connecting your drum<br />
machine or CD/tape player. Control the level of this input<br />
<strong>at</strong> its source.<br />
T. EFFECTS - (1) Effects Loop - Connect SEND to the input<br />
of your effects device and the output of the effects device<br />
to RETURN. (2) Multiple Amplifiers - Connect SEND on<br />
the primary unit to RETURN on the auxiliary unit. The<br />
primary unit controls all auxiliary units except MASTER<br />
levels.<br />
U. TUNER OUT - Connection for your bass tuner. Use<br />
MUTE {O} for silent tune-ups.<br />
V. HORN LEVEL -<br />
Sets the volume level of the horn <strong>at</strong> high<br />
(full), low (–6dB) or off.<br />
Specific<strong>at</strong>ions<br />
PART NUMBERS: 2345300010 (120V, 60Hz) USA 2345301010 (110V, 60Hz) TW 2345303010 (240V, 50Hz) AUS<br />
POWER REQUIREMENT: 420W<br />
POWER AMP SENSITIVITY: 0.93V R.M.S., 100Hz<br />
2345304010 (230V, 50Hz) UK 2345306010 (230V, 50Hz) EUR 2345307010 (100V, 50Hz) JPN<br />
POWER OUTPUT: <strong>150</strong>W R.M.S. into 4Ω @ < 0.05 % T.H.D., 100Hz<br />
FREQUENCY RESPONSE: –2dB @ 10Hz, 42kHz<br />
PRE AMP INPUT IMPEDANCE: 1MΩ<br />
COMPRESSOR RATIO: 1:1 (OFF); >5:1 (MAX); –10dBV fixed threshold<br />
TONE CONTROLS CONTOUR: –4dB @ 400Hz (MIN), –20dB @ 700Hz (MAX)<br />
BASS/TREBLE: BASS: ± 15dB @ 80Hz TREBLE: ± 15dB @ 10kHz<br />
SEMI-PARAMETRIC EQ: LOW MID: ±15dB @ <strong>150</strong>Hz–1.5kHz<br />
HIGH MID: ±15dB @ 800Hz–4kHz<br />
EFFECTS LOOP IMPEDANCES: SEND: 1kΩ balanced RETURN: 20kΩ balanced<br />
LINE OUT MAXIMUM OUTPUT: +6dBu, 600Ω<br />
SPEAKERS: 1 Eminence ® 4Ω 12" woofer (064053) 1 piezo horn (068880)<br />
DIMENSIONS: HEIGHT: 21 in (53.3 cm) WIDTH: 19 1/4 in (48.9 cm) DEPTH: 17 1/4 in (43.8 cm)<br />
WEIGHT: 39 lb (17.7 kg)<br />
Product specific<strong>at</strong>ions are subject to change without notice.<br />
✧ f e n d e r . c o m ✧<br />
7
8<br />
<strong><strong>Bass</strong>man</strong> ® <strong>150</strong><br />
<strong>Fender</strong> ® <strong>Bass</strong> Amplific<strong>at</strong>ion le agradece su <strong>com</strong>pra del<br />
amplificador <strong><strong>Bass</strong>man</strong> ® <strong>150</strong>. La línea <strong><strong>Bass</strong>man</strong> ® ha sido<br />
diseñada para músicos que necesiten ampllificadores<br />
portátiles pero de gran potencia y con un sonido personal. La<br />
salida XLR de alta calidad es capaz de emitir una señal limpia<br />
Panel frontal<br />
A. INPUT - Conecte su bajo a esta entrada.<br />
B. –6dB - Reduce la sensibilidad de entrada para que<br />
disponga de una respuesta limpia con bajos de alto nivel<br />
de salida:<br />
NORMAL—Toda la sensibilidad de entrada.<br />
–6dB—Sensibilidad de entrada reducida.<br />
C. VOLUME - Ajusta el nivel de señal del preamplifricador.<br />
Uselo junto con el mando MASTER {N} para ajustar el<br />
volumen global del amplificador.<br />
�•�CLIP - Indica s<strong>at</strong>uración del previo. Cuando toque<br />
fuerte será normal un parpadeo ocasional. Reduzca el<br />
nivel VOLUME si escucha alguna distorsión con este<br />
piloto encendido.<br />
�•�PRE AMP SIGNAL - Indica una fuerza de señal<br />
suficiente. Aumente la salida de su instrumento o el nivel<br />
VOLUME si este piloto está apagado mientras toca.<br />
D. COMPRESSOR RATIO - Usado habitualmente para<br />
equilibrar una interpretación musical, un <strong>com</strong>presor ofrece<br />
un efecto de suavizamiento entre el <strong>at</strong>aque de púa y de<br />
dedo. El control de <strong>com</strong>presor de un amplificador de la<br />
serie <strong><strong>Bass</strong>man</strong> ® determina el RATIO o relación de<br />
<strong>com</strong>presión. Cuando una señal es lo suficientemente<br />
potente <strong>com</strong>o para activar la <strong>com</strong>presión, este RATIO<br />
determinará la cantidad de <strong>com</strong>presión aplicada. Cuando<br />
lo baje al mínimo, el RATIO será 1:1 (off) y conforme suba<br />
el control, el RATIO aumentará (2:1, 3:1, 4:1) y el efecto de<br />
la <strong>com</strong>presión será más observable. El ajuste ideal para la<br />
<strong>com</strong>presión es que sea casi inaudible para el oído, pero<br />
que resulte perfecta para sus dedos (que tenga una<br />
sensación de total control sobre el instrumento).<br />
E. CONTOUR - Esta función aplasta el rango de medios, un<br />
sonido habitualmente deseado para estilos slap para<br />
conseguir un tipo de sonido “hi-fi”. El gira este control a la<br />
derecha aumentará el corte sobre los medios, aumentando<br />
el efecto de valle.<br />
F. BASS - Ajusta el carácter tonal de los graves.<br />
G. EQ SEMIPARAMETRICO DE 2 BANDAS - El tener un<br />
mayor control sobre los medios es muy importante para<br />
definir el sonido de bajo. Por ello los <strong><strong>Bass</strong>man</strong> ® vienen<br />
equipados con un control semi-paramétrico (1 banda en el<br />
<strong><strong>Bass</strong>man</strong> ® 100 y 2 en el <strong><strong>Bass</strong>man</strong> ® <strong>150</strong> y 250). El mando<br />
y con vida tanto para directo <strong>com</strong>o para aplicaciones de<br />
estudio. Los altavoces <strong>Fender</strong> ® diseñados especialmente por<br />
Eminence ® USA le aseguran un sonido <strong>com</strong>pacto, n<strong>at</strong>ural y<br />
balanceado y de gran potencia para su directo o estudio.<br />
Frequency determina DONDE le gustará ajustar el sonido.<br />
Level determinará si quiere realzar o cortar la frecuencia<br />
elegida antes (+/-15 dB). El añadir medio-agudos (dando<br />
prioridad a la pastilla del puente de su bajo) creará un<br />
sonido duro perfecto para líneas melódicas de tipo Jazz<br />
Fusion. El corte de medios mejorará la separación entre<br />
graves y medios, produciendo un sonido perfecto para<br />
música funk de tipo slap.<br />
H. TREBLE - Ajusta el carácter tonal de los agudos.<br />
✧ f e n d e r . c o m ✧<br />
I. PRE/POST - Pasa al conector LINE OUT {N} una señal que<br />
puede proceder de tanto antes <strong>com</strong>o después de ser<br />
procesada por el circuito de ecualización del amplificador.<br />
PRE (EQ anulado) POST (EQ activo)<br />
J. LINE LEVEL - Ajusta el nivel de la salida que es enviada al<br />
conector LINE OUT {L}.<br />
K. GROUND LIFT - Desconecta la toma a tierra de la salida<br />
LINE OUT {L} (punta 1) lo que puede reducir los ruidos en<br />
algunos casos.<br />
CONECTADO A TIERRA (normal) TIERRA ANULADA<br />
L. LINE OUT - Este conector le permite enviar señal de la<br />
sección del preamplificador a una fuente exterior (<strong>com</strong>o<br />
una mesa de mezclas o unidad de grabación). El control<br />
“level” interno le permite el ajuste de la potencia de la<br />
señal. Use el control “Pre/Post” para elegir si quiere que la<br />
señal de bajo se vea afectada por los cambios que haga<br />
en el EQ (post) o que sea enviada antes del EQ, para tener<br />
así una señal sin efectos (pre). La opción “Ground Lift” le<br />
permite eliminar los zumbidos que se pueden producir por<br />
la conexión a unidades que estén mal conectadas a tierra.<br />
M. MUTE - Anula todas las salidas del amplificador excepto<br />
la salida TUNER OUT {U}. El piloto �•�parpadea cuando<br />
MUTE está activo.<br />
N. MASTER - Ajusta el nivel de señal de la etapa de potencia.<br />
Use esto junto con el control VOLUME {C} para ajustar el<br />
nivel de salida global del amplificador.<br />
�•�PWR AMP CLIP - Indica una s<strong>at</strong>uración de la etapa de<br />
potencia. Reduzca el nivel MASTER si escucha alguna<br />
distorsión y este piloto está encendido.<br />
O. POWER - Enciende y apaga el amplificador. El piloto se<br />
ilumina cuando el amplificador está encendido.
P. ENTRADA IEC DE CORRIENTE -<br />
Conecte el cable de alimentación que se<br />
incluye a una salida de corriente alterna<br />
con toma de tierra del voltaje y amperaje<br />
indicados en el panel trasero de este<br />
amplificador.<br />
Q. SALIDA DE ALTAVOZ - Use este conectore de 6.3 mm<br />
para conectar otro altavoz con una carga total mínima de<br />
4 ohmios. El altavoz interno tiene una carga de 4 ohmios<br />
para ofrecer la máxima potencia de salida.<br />
R. HEADPHONES - Conecte aquí sus auriculares.<br />
Desconecte los altavoces si quiere ensayar totalmente en<br />
privado.<br />
TIPO: PR 596<br />
Panel trasero 9<br />
S. AUX IN - Entrada en clavijas RCA para la conexión de su<br />
caja de ritmos o reproductor de CD/cintas. Controle el nivel<br />
de esta entrada en el apar<strong>at</strong>o que tenga conectado a ella.<br />
T. EFFECTS - (1) Bucle de efectos - Conecte la toma SEND<br />
a la entrada de su unidad de efectos y la salida de esta a<br />
la toma RETURN. (2) Varios amplificadores - Conecte la<br />
salida SEND de la unidad principal al RETURN de la<br />
unidad auxiliar. La unidad principal contrará todas las<br />
auxiliares excepto la MASTER.<br />
U. TUNER OUT - Le permite conectar un afinador de bajo.<br />
Use el control MUTE {O} para afinar su bajo sin que el resto<br />
de la gente lo escuche.<br />
V. HORN LEVEL -<br />
Ajusta el nivel de volumen de la<br />
trompeta a alto (full), bajo (–6dB) o<br />
desconectada.<br />
Especificaciones técnicas<br />
NUMERO DE REFERENCIA: 2345300010 (120V, 60Hz) USA 2345301010 (110V, 60Hz) TW 2345303010 (240V, 50Hz) AUS<br />
CONSUMO: 420 W<br />
ETAPA DE POTENCIA SENSIBILIDAD: 0.93 V R.M.S., 100 Hz<br />
2345304010 (230V, 50Hz) UK 2345306010 (230V, 50Hz) EUR 2345307010 (100V, 50Hz) JPN<br />
SALIDA DE POTENCIA: <strong>150</strong> W R.M.S. a 4 Ω @ < 0.05 % T.H.D., 100 Hz<br />
RESPUESTA DE FRECUENCIA: –2dB @ 10 Hz, 42kHz<br />
PREVIO IMPEDANCIA ENTRADA: 1 MΩ<br />
COMPRESSOR RATIO: 1:1 (OFF); >5:1 (MAX); umbral fijo de –10dBV<br />
CONTROLES TONO CONTOUR: –4dB @ 400Hz (MIN), –20dB @ 700Hz (MAX)<br />
GRAVES/AGUDOS: BASS: ± 15 dB @ 80 Hz TREBLE: ± 15 dB @ 10 kHz<br />
EQ SEMI-PARAMETRICO: MEDIO GRAVES: ±15 dB @ <strong>150</strong> Hz–1.5 kHz<br />
MEDIO AGUDOS: ±15 dB @ 800 Hz–4 kHz<br />
BUCLE EFECTOS IMPEDANCIAS: SEND: 1 kΩ balanceado RETURN: 20 kΩ balanceado<br />
SALIDA DE LINEA SALIDA MAXIMA: +6dBu, 600Ω<br />
ALTAVOCES: 1 woofer Eminence ® 4 Ω 12" (064053) 1 trompeta piezo (068880)<br />
DIMENSIONES: ALTURA: 21 pulg. (53.3 cm) ANCHURA: 19 1/4 pulg. (48.9 cm) PROF.: 17 1/4 pulg. (43.8 cm)<br />
PESO: 17.7 kg<br />
Las especificaciones de este apar<strong>at</strong>o están sujetas a cambios sin previo aviso.<br />
✧ f e n d e r . c o m ✧
10<br />
<strong><strong>Bass</strong>man</strong> ® <strong>150</strong><br />
<strong>Fender</strong> ® <strong>Bass</strong> Amplific<strong>at</strong>ion tient à vous remercier d’avoir<br />
choisi l’amplific<strong>at</strong>eur <strong><strong>Bass</strong>man</strong> ® <strong>150</strong>. La gamme <strong><strong>Bass</strong>man</strong> ® a<br />
été conçue pour les bassistes qui ont besoin d’un<br />
amplific<strong>at</strong>eur portable puissant et des réglages intuitifs. La<br />
sortie XLR de haute qualité vous offre un signal de sortie<br />
Face avant<br />
A. ENTRÉE - Connectez votre basse à cette embase.<br />
B. –6 dB - Réduit la sensibilité de l’entrée pour un signal plus<br />
clair avec les basses à niveau de sortie élevé.<br />
NORMAL — Sensibilité d’entrée normale.<br />
–6 dB — Sensibilité d’entrée inférieure.<br />
C. VOLUME - Détermine le niveau du signal du<br />
préamplific<strong>at</strong>eur. Utilisez ce réglage avec le MASTER {P}<br />
pour régler le volume général de l’amplific<strong>at</strong>eur.<br />
�•�SATURATION — Indique un écrêtage du préampli. Il est<br />
normal que la Led s’allume de temps en temps sur les<br />
passages les plus forts. Réduisez le VOLUME si vous<br />
entendez de la distorsion lorsque cette Led s’allume.<br />
�•�SIGNAL PRÉAMPLI — Indique un signal de niveau<br />
suffisant. Augmentez le niveau de sortie de l’instrument<br />
ou le VOLUME si cette Led ne s’allume pas lorsque<br />
vous jouez.<br />
D. COMPRESSOR RATIO - Les <strong>com</strong>presseurs sont utilisés<br />
pour obtenir un niveau sonore homogène et pour diminuer<br />
les différences de niveaux entre le jeu en Slap et le jeu aux<br />
doigts. Le bouton Compressor du <strong><strong>Bass</strong>man</strong> ® détermine le<br />
taux de <strong>com</strong>pression. Lorsque le niveau du signal est<br />
suffisamment élevé pour activer le <strong>com</strong>presseur, le bouton<br />
RATIO détermine l’intensité de la <strong>com</strong>pression. En position<br />
minimum le taux est de 1:1 (<strong>com</strong>pression désactivée) —<br />
tournez le bouton vers la droite pour augmenter le taux de<br />
<strong>com</strong>pression (2:1, 3:1, 4:1). Le son de <strong>com</strong>pression devient<br />
alors plus décelable. Pour obtenir un réglage de<br />
<strong>com</strong>pression idéal, vous devez régler pour obtenir une<br />
<strong>com</strong>pression quasiment indécelable à l’oreille, mais<br />
permettant d’améliorer le jeu (ce qui vous donne un<br />
meilleur contrôle de l’instrument).<br />
E. CONTOUR - Permet de creuser les médiums, ce qui est<br />
très intéressant en jeu en Slap, pour obtenir un son de<br />
basse moderne de type “hi-fi”. Tournez le bouton vers la<br />
droite pour creuser encore plus les médiums.<br />
F. BASS - Réglage de basses fréquences.<br />
G. ÉGALISEUR SEMI-PARAMÉTRIQUE 2 BANDES - Le fait<br />
de pouvoir contrôler la réponse dans les médiums de votre<br />
basse est très important et vous permet de définir votre<br />
son avec précision. Le <strong><strong>Bass</strong>man</strong> ® est équipé d’un égaliseur<br />
semi-paramétrique (1 bande sur le <strong><strong>Bass</strong>man</strong> ® 100,<br />
2 bandes sur les <strong><strong>Bass</strong>man</strong> ® <strong>150</strong> et 250). Le bouton<br />
parfaitement clair, pour la scène ou le studio. Les hautparleurs<br />
spéciaux fabriqués par Eminence ® USA pour <strong>Fender</strong> ®<br />
vous garantissent un son puissant, n<strong>at</strong>urel et équilibré vous<br />
permettant de mettre en valeur les qualités sonores de votre<br />
basse sur scène ou en studio.<br />
Frequency détermine LA FRÉQUENCE à modifier. Le<br />
réglage Level détermine l’<strong>at</strong>ténu<strong>at</strong>ion/accentu<strong>at</strong>ion de<br />
cette fréquence sur une plage de +/-15 dB. L’ajout de<br />
hauts-médiums (ce qui favorise le micro aigu de<br />
l’instrument) donne du mordant au son, parfait pour les<br />
lignes mélodiques Jazz Fusion. L’<strong>at</strong>ténu<strong>at</strong>ion des médiums<br />
permet de séparer les basses des hautes fréquences, ce<br />
qui convient parfaitement en Slap et en Funk.<br />
H. TREBLE - Réglage de hautes fréquences.<br />
I. PRE/POST - Le signal de la sortie LINE OUT {L} est<br />
prélevé avant ou après l’étage d’égalis<strong>at</strong>ion de<br />
l’amplific<strong>at</strong>eur.<br />
PRE — Bypass de l’égaliseur.<br />
POST — Le signal est prélévé en sortie de l’égaliseur.<br />
J. LINE LEVEL - Niveau de la sortie LINE OUT {L}.<br />
K. GROUND LIFT - Déconnecte la masse (broche 1) de la<br />
sortie LINE OUT {L}, ce qui peut réduire les ronflements<br />
dans certaines situ<strong>at</strong>ions.<br />
MISE À LA MASSE (normal).<br />
MASSE DÉCOUPLÉE.<br />
✧ f e n d e r . c o m ✧<br />
L. LINE OUT - Cette embase XLR vous permet de<br />
transmettre le signal de sortie du préamplific<strong>at</strong>eur vers une<br />
source externe (console de sonoris<strong>at</strong>ion ou<br />
d’enregistrement, par exemple). Le bouton “Level”<br />
détermine le niveau du signal de cette sortie. Utilisez la<br />
touche “Pre/Post” si vous souhaitez utiliser le signal avec<br />
(Post) ou sans (Pre) égalis<strong>at</strong>ion. La touche de découplage<br />
de masse “Ground Lift” vous permet de supprimer les<br />
ronflements dus à des connexions de masses défaillantes.<br />
M. MUTE - Coupe toutes les sorties de l’amplific<strong>at</strong>eur sauf la<br />
sortie TUNER OUT {U}. �•�La Led clignote lors de la<br />
coupure du signal.<br />
N. MASTER - Détermine le niveau en entrée de l’étage de<br />
sortie. Utilisez ce réglage avec le bouton VOLUME {C}<br />
pour régler le niveau sonore global de l’amplific<strong>at</strong>eur.<br />
�•�PWR AMP CLIP — Indique une s<strong>at</strong>ur<strong>at</strong>ion de<br />
l’amplific<strong>at</strong>eur de puissance. Réduisez le réglage<br />
MASTER si vous entendez de la distorsion lorsque la<br />
Led est allumée.<br />
O. POWER - Place l’amplific<strong>at</strong>eur sous/hors tension.<br />
S’allume lorsque l’amplific<strong>at</strong>eur est sous tension.
P. EMBASE SECTEUR IEC -<br />
Connectez le cordon secteur fourni à une<br />
prise secteur avec terre et vérifiez que<br />
l’amplific<strong>at</strong>eur correspond à la tension et à<br />
la fréquence du secteur de votre pays..<br />
Q. SORTIE ENCEINTE- Utilisez cette sortie Jack pour<br />
connecter une enceinte d’impédance de 4 Ohms<br />
minimum. L’impédance de l’enceinte interne est de<br />
4 Ohms pour garantir une puissance de sortie maximum.<br />
R. HEADPHONES - Connectez votre casque à ce Jack.<br />
Déconnectez les enceintes pour une écoute privée.<br />
TYPE : PR 596<br />
Face arrière 11<br />
S. AUX IN - Entrées RCA permettant la connexion d’une<br />
boîte à rythmes ou d’un lecteur de CD/cassette. Contrôlez<br />
le niveau sur la source.<br />
T. EFFECTS - (1) Boucle d’effets - Connectez le départ<br />
SEND à l’entrée de votre processeur d’effets et la sortie du<br />
processeur à l’entrée RETURN. (2) Plusieurs<br />
amplific<strong>at</strong>eurs - Connectez le départ SEND de l’ampli<br />
maître à l’entrée RETURN de l’ampli secondaire. L’ampli<br />
maître contrôle les amplis secondaires, sauf leurs réglages<br />
MASTER.<br />
U. TUNER OUT - Permet la connexion de votre accordeur<br />
pour basse. Utilisez la touche MUTE {M} pour couper le<br />
signal lors de l’accordage.<br />
V. HORN LEVEL -<br />
Règle le volume du Tweeter au<br />
maximum (Full), avec une <strong>at</strong>ténu<strong>at</strong>ion<br />
(–6 dB) ou le coupe (Off).<br />
Caractéristiques techniques<br />
RÉFÉRENCE : 2345300010 (120 V, 60 Hz) USA 2345301010 (110 V, 60 Hz) TW 2345303010 (240 V, 50 Hz) AUS<br />
CONSOMMATION ÉLECTRIQUE : 420 W<br />
ÉTAGE DE PUISSANCE : SENSIBILITÉ : 0.93 Veff., 100 Hz<br />
2345304010 (230 V, 50 Hz) UK 2345306010 (230 V, 50 Hz) EUR 2345307010 (100 V, 50 Hz) JPN<br />
PUISSANCE DE SORTIE : <strong>150</strong>W eff. dans 4 Ω avec DHT < 0.05 %, 100 Hz<br />
RÉPONSE EN FRÉQUENCE : –2dB à 10 Hz, 42kHz<br />
PRÉAMPLIFICATEUR IMPÉDANCE : 1 MΩ<br />
COMPRESSOR RATIO: 1:1 (OFF); >5:1 (MAX); seuil fixe de –10dBV<br />
TONALITÉS CONTOUR: –4dB à 400Hz (MIN), –20dB à 700Hz (MAX)<br />
GRAVE/AIGU : BASS : ± 15 dB à 80 Hz TREBLE : ± 15 dB à 10 kHz<br />
ÉGALISEUR SEMI-PARAMÉTRIQUE : LOW MID : ±15 dB à <strong>150</strong> Hz–1,5 kHz<br />
HIGH MID : ±15 dB à 800 Hz–4 kHz<br />
BOUCLE D’EFFETS IMPÉDANCES : SEND : 1 kΩ symétrique RETURN : 20 kΩ symétrique<br />
SORTIE LIGNE<br />
NIVEAU DE SORTIE MAXIMUM : +6 dBu, 600Ω<br />
HAUT-PARLEURS WOOFER : 1 Woofer Eminence ® , 31 cm, 4 Ω (064053) 1 piezo horn (068880)<br />
DIMENSIONS HAUTEUR : 53,3 cm LARGEUR : 48,9 cm PROFONDEUR : 43,8 cm<br />
POIDS 17.7 kg<br />
Caractéristiques sujettes à modific<strong>at</strong>ions sans préavis.<br />
✧ f e n d e r . c o m ✧
12<br />
<strong><strong>Bass</strong>man</strong> ® <strong>150</strong><br />
Un grazie da <strong>Fender</strong> ® <strong>Bass</strong> Amplific<strong>at</strong>ion per aver scelto il<br />
nuovo <strong><strong>Bass</strong>man</strong> ® <strong>150</strong>. La linea di amplific<strong>at</strong>ori <strong><strong>Bass</strong>man</strong> ® è<br />
st<strong>at</strong>a ide<strong>at</strong>a per tutti quei musicisti che necessitano di<br />
amplific<strong>at</strong>ori port<strong>at</strong>ili car<strong>at</strong>terizz<strong>at</strong>i da elev<strong>at</strong>a potenza e da<br />
controlli di tono pr<strong>at</strong>ici e intuitivi. L’elev<strong>at</strong>a qualità dell’uscita<br />
XLR permette di inviare un segnale pulito e trasparente,<br />
Pannello Frontale<br />
A. INPUT - Collega il tuo basso a questa connessione.<br />
B. –6dB - Utilizzando chitarre basso dot<strong>at</strong>e di un livello d’uscita<br />
elev<strong>at</strong>o, questo selettore permette la riduzione della<br />
sensibilità dello stadio d’ingresso, fornendo una risposta più<br />
pulita:<br />
NORMAL—Sensibilità d’ingresso normale (Full).<br />
–6dB—Sensibilità d’ingresso ridotta.<br />
C. VOLUME - Regola il livello del segnale nel preamplific<strong>at</strong>ore.<br />
Utilizzalo congiuntamente al controllo MASTER {N} per<br />
impostare il volume generale dell’amplific<strong>at</strong>ore.<br />
�•�CLIP - Indic<strong>at</strong>ore LED che segnala eventuali clip nel<br />
preamplific<strong>at</strong>ore. Suonando in modo energico, l’<strong>at</strong>tività<br />
occasionale di questo indic<strong>at</strong>ore è da considerarsi<br />
normale. Nel caso in cui il suono risultasse distorto, e<br />
questo indic<strong>at</strong>ore apparisse costantemente illumin<strong>at</strong>o,<br />
occorre ridurre il livello del VOLUME.<br />
�•�PRE AMP SIGNAL - Indica che il livello del segnale in<br />
ingresso è sufficientemente elev<strong>at</strong>o. Se questo<br />
indic<strong>at</strong>ore non si <strong>at</strong>tiva mentre suoni, aumenta il volume<br />
del tuo strumento, oppure il livello del VOLUME.<br />
D. COMPRESSOR RATIO - Normalmente impieg<strong>at</strong>o per livellare<br />
la dinamica del segnale in uscita durante l’esecuzione, il<br />
<strong>com</strong>pressore fornisce una sonorità più omogenea tra le due<br />
tipologie d’<strong>at</strong>tacco nelle tecniche esecutive Thumb e<br />
Fingerstyle. Questo controllo, presente nel pannello degli<br />
amplific<strong>at</strong>ori della serie <strong><strong>Bass</strong>man</strong> ® , determina il parametro<br />
RATIO del <strong>com</strong>pressore. Quando un segnale possiede un<br />
livello abbastanza elev<strong>at</strong>o da far <strong>at</strong>tivare il <strong>com</strong>pressore, il<br />
controllo RATIO determina l’INTENSITÀ del processo di<br />
<strong>com</strong>pressione. Ruotando la manopola <strong>com</strong>pletamente in<br />
senso anti-orario, il valore del parametro RATIO sarà 1:1 (Off),<br />
mentre ruotando in senso orario esso aumenterà (2:1, 3:1, 4:1)<br />
e la <strong>com</strong>pressione risulterà più evidente. La regolazione ideale<br />
si ottiene quando la <strong>com</strong>pressione risulta non udibile,<br />
fornendo allo stesso tempo un senso di maggior controllo<br />
dinamico sullo strumento durante l’esecuzione.<br />
E. CONTOUR - Questo controllo permette di “scavare” le medie<br />
frequenze del segnale, in modo da generare la sonorità<br />
perfetta per la tecnica esecutiva Thumb, ottenendo il tipico<br />
tono di basso “Hi-Fi” moderno. Ruotando questa manopola in<br />
senso orario si incrementa il taglio sulle frequenze medie,<br />
esaltando il suono scav<strong>at</strong>o.<br />
F. BASS - Determina il contenuto delle basse frequenze.<br />
G. 2-BAND SEMI-PARAMETRIC EQ - Poter disporre di maggior<br />
controllo sulle frequenze medie è un f<strong>at</strong>tore determinante per<br />
✧ f e n d e r . c o m ✧<br />
car<strong>at</strong>teristica indispensabile sia in studio che dal vivo. Gli<br />
altoparlanti <strong>Fender</strong> ® Special Design Eminence ® , realizz<strong>at</strong>i negli<br />
USA, garantiscono un suono consistente, n<strong>at</strong>urale e ben<br />
bilanci<strong>at</strong>o, capace di ad<strong>at</strong>tarsi a qualsiasi applicazione e<br />
genere musicale.<br />
la definizione del suono di basso. Per questo motivo, il tuo<br />
nuovo <strong><strong>Bass</strong>man</strong> ® è equipaggi<strong>at</strong>o con un controllo semiparametrico<br />
(1 banda su <strong><strong>Bass</strong>man</strong> ® 100, 2 bande su<br />
<strong><strong>Bass</strong>man</strong> ® <strong>150</strong> e 250). La manopola Frequency imposta la<br />
frequenza sulla quale desideri agire con l’equalizzazione. Il<br />
controllo Level permette di esaltare o tagliare la frequenza<br />
impost<strong>at</strong>a (+/-15 dB). Incrementando le frequenze medio-alte<br />
(e favorendo così il pickup al ponte) si ottiene un suono più<br />
tagliente, ideale per le linee melodiche nei generi Jazz Fusion.<br />
Il taglio delle medie genera una separazione tra le frequenze<br />
basse e alte, creando una sonorità perfetta per le parti Funk<br />
con tecnica Slap.<br />
H. TREBLE - Determina il contenuto delle alte frequenze.<br />
I. PRE/POST - Determina se il segnale invi<strong>at</strong>o all’uscita LINE<br />
OUT {L} debba essere prelev<strong>at</strong>o prima o dopo lo stadio di<br />
equalizzazione e i controlli di tono dell’amplific<strong>at</strong>ore.<br />
PRE (EQ bypass<strong>at</strong>o) POST (EQ <strong>at</strong>tivo)<br />
J. LINE LEVEL - Regola il livello dell’uscita LINE OUT {L}.<br />
K. GROUND LIFT - Permette di scollegare la massa di circuito<br />
dalla massa di terra nell’uscita LINE OUT {L} (pin-1). In alcune<br />
situazioni consente la riduzione dei ronzii caus<strong>at</strong>i<br />
dall’alimentazione.<br />
A TERRA (normale) NON A TERRA<br />
L. LINE OUT - Questa connessione permette di inviare ad unità<br />
esterne il segnale proveniente dalla sezione preamp (ad<br />
esempio, nei collegamenti a mixing console o a sistemi di<br />
registrazione). Il rel<strong>at</strong>ivo controllo Line Level regola il volume<br />
di questa uscita. Usa il selettore “Pre/Post” per scegliere se<br />
inviare il segnale equalizz<strong>at</strong>o dalla sezione EQ (Post), oppure<br />
prelev<strong>at</strong>o prima dell’EQ, in modo da fornire un segnale non<br />
process<strong>at</strong>o (Pre). Il tasto “Ground Lift” permette l’eliminazione<br />
dei ronzii gener<strong>at</strong>i da apparecchi<strong>at</strong>ure non correttamente<br />
colleg<strong>at</strong>e a terra.<br />
M. MUTE - Disabilita tutte le uscite dell’amplific<strong>at</strong>ore, ad<br />
eccezione dell’uscita TUNER OUT {U}. �•�Il LED lampeggia<br />
quando il MUTE è <strong>at</strong>tivo.<br />
N. MASTER - Regolazione del livello del segnale amplific<strong>at</strong>o.<br />
Utilizz<strong>at</strong>o in congiunzione col controllo VOLUME {C} permette<br />
di impostare il volume generale dell’amplific<strong>at</strong>ore.<br />
�•�PWR AMP CLIP - Segnala i clip nell’amplific<strong>at</strong>ore.<br />
Riduci il livello MASTER nel caso in cui questo LED<br />
appare <strong>at</strong>tivo e il segnale risulti distorto.<br />
O. POWER - Attiva/dis<strong>at</strong>tiva l’amplific<strong>at</strong>ore. Si illumina se<br />
<strong>at</strong>tiv<strong>at</strong>o.
P. CONNESSIONE IEC POWER -<br />
Collega il cavo d'alimentazione in dotazione<br />
ad una presa CA colleg<strong>at</strong>a a terra e<br />
conforme alle specifiche di voltaggio e<br />
frequenza, riport<strong>at</strong>e sul pannello posteriore<br />
del tuo amplific<strong>at</strong>ore.<br />
Q. SPEAKER OUTPUT - Utilizza un cavo jack da 1/4" per<br />
collegare un diffusore esterno con un carico minimo di<br />
4–ohms. L'altoparlante interno ha un carico d’impedenza<br />
di 4-ohm, per la massima potenza in uscita.<br />
R. HEADPHONES - Collegando una cuffia, l’altoparlante<br />
interno verrà silenzi<strong>at</strong>o in modo da poter suonare senza<br />
disturbare nessuno.<br />
TIPO: PR 596<br />
Pannello Posteriore 13<br />
S. AUX IN - Ingresso RCA utile per la connessione di b<strong>at</strong>terie<br />
elettroniche o lettori CD/Nastro. Controlla il livello di questo<br />
ingresso agendo sull’unità sorgente.<br />
T. EFFECTS - (1) Effects Loop - Collega l’uscita SEND<br />
all’ingresso di un’unità effetti esterna, quindi collega l’uscita<br />
dell’unità effetti all’ingresso RETURN. (2) Unità Amp<br />
Multiple - Collega l’uscita SEND della prima unità<br />
all’ingresso RETURN dell’unità ausiliaria. La prima unità<br />
controllerà tutte le unità ausiliarie, ad eccezione dei controlli<br />
MASTER.<br />
U. TUNER OUT - Connessione per l'accord<strong>at</strong>ore. Usa il tasto<br />
MUTE {O} per silenziare il segnale audio durante la fase di<br />
accord<strong>at</strong>ura.<br />
V. HORN LEVEL -<br />
Imposta il livello di volume delle trombe<br />
su High (totale), Low (–6dB) o Off.<br />
Specifiche<br />
NUMERO PARTI: 2345300010 (120V, 60Hz) USA 2345301010 (110V, 60Hz) TW 2345303010 (240V, 50Hz) AUS<br />
CONSUMO ENERGETICO: 420 W<br />
POWER AMP SENSIBILITÀ: 0.93V R.M.S., 100Hz<br />
2345304010 (230V, 50Hz) UK 2345306010 (230V, 50Hz) EUR 2345307010 (100V, 50Hz) JPN<br />
POTENZA IN USCITA: <strong>150</strong>W R.M.S. su 4Ω @ < 0.05 % T.H.D., 100Hz<br />
RISPOSTA IN FREQUENZA: –2dB @ 10Hz, 42kHz<br />
PRE AMP IMPEDENZA IN INGRESSO: 1MΩ<br />
COMPRESSOR RATIO: 1:1 (OFF); >5:1 (MAX); soglia fissa di –10dBV<br />
CONTROLLI DI TONO CONTOUR: –4dB @ 400Hz (MIN), –20dB @ 700Hz (MAX)<br />
BASS/TREBLE: BASS: ± 15dB @ 80Hz TREBLE: ± 15dB @ 10kHz<br />
SEMI-PARAMETRIC EQ: LOW MID: ±15dB @ <strong>150</strong>Hz–1.5kHz<br />
HIGH MID: ±15dB @ 800Hz–4kHz<br />
EFFECTS LOOP IMPEDENZA: SEND: 1kΩ bilanci<strong>at</strong>o RETURN: 20kΩ bilanci<strong>at</strong>o<br />
USCITA LINE<br />
LIVELLO MASSIMO ÍN USCITA : +6dBu,600Ω<br />
ALTOPARLANTI: 1 woofer Eminence ® da 12", 4Ω (064053) 1 piezo horn (068880)<br />
DIMENSIONI: ALTEZZA: 53.3 cm (21 in) LARGHEZZA: 48.9 cm (19 1/4 in) PROFONDITÀ: 43.8 cm (17 1/4 in)<br />
PESO: 17.7 kg<br />
Le specifiche possono essere soggette a variazioni senza alcun preavviso.<br />
✧ f e n d e r . c o m ✧
14<br />
<strong><strong>Bass</strong>man</strong> ® <strong>150</strong><br />
<strong>Fender</strong> ® <strong>Bass</strong> Amplific<strong>at</strong>ion dankt Ihnen für den Kauf des<br />
<strong><strong>Bass</strong>man</strong> ® <strong>150</strong> Verstärkers. Die <strong><strong>Bass</strong>man</strong> ® Produktlinie wurde<br />
für Musiker konzipiert, die einen tragbaren Amp mit hoher<br />
Leistung und intuitiven Klangreglern benötigen. Der<br />
hochwertige, komplett ausgest<strong>at</strong>tete XLR-Ausgang überträgt<br />
Vo rderseite<br />
A. INPUT - Schließen Sie hier Ihren <strong>Bass</strong> an.<br />
B. –6dB - Verringert die Eingangsempfindlichkeit, um bei E-<br />
Bässen mit hoher Ausgangsleistung eine klare Ansprache<br />
zu ermöglichen:<br />
NORMAL—volle Eingangsempfindlichkeit.<br />
–6dB—niedrigere Eingangsempfindlichkeit.<br />
C. VOLUME - Regelt den Signalpegel des Vorverstärkers. Mit<br />
diesem Regler und mit MASTER {N} stellen Sie die<br />
Gesamtlautstärke des <strong>Amps</strong> ein.<br />
�•�CLIP - Zeigt die Übersteuerung des Preamps an.<br />
Gelegentliches Blinken ist bei hartem Saitenanschlag<br />
normal. Drehen Sie den VOLUME-Regler zurück, wenn<br />
Sie bei leuchtender LED Verzerrungen hören.<br />
�•�PRE AMP SIGNAL - Zeigt eine ausreichende Signalstärke<br />
an. Drehen Sie Ihr Instrument oder den<br />
VOLUME-Regler auf, wenn diese LED beim Spielen<br />
nicht leuchtet.<br />
D. COMPRESSOR RATIO - Der Compressor dient normalerweise<br />
zum Glätten einer musikalischen Darbietung und<br />
gleicht die Daumen- und Fingeranschlagtechniken<br />
aneinander an. Bei einem Amp der <strong><strong>Bass</strong>man</strong> ® Serie<br />
bestimmt der Compressor-Regler das Kompressionsverhältnis<br />
(RATIO). Wenn ein Signal laut genug ist, um den<br />
Compressor zu aktivieren, bestimmt RATIO, wie FETT die<br />
Kompression ist. Ganz zurückgedreht, beträgt RATIO 1:1<br />
(Aus). Je weiter Sie den Regler aufdrehen, desto höher der<br />
RATIO-Wert (2:1, 3:1, 4:1) und desto deutlicher<br />
wahrnehmbar ist die Wirkung der Kompression. Die ideale<br />
Compression-Einstellung ist fast nicht hörbar, aber mit den<br />
Fingern spürbar (ein Gefühl der Kontrolle über das<br />
Instrument).<br />
E. CONTOUR - Mit dieser Funktion werden die Mitten des<br />
Signals „abgeschöpft“, um bei Daumenanschlagtechniken<br />
einen modernen HiFi-<strong>Bass</strong>klang zu erzielen. Eine<br />
Rechtsdrehung erhöht die Absenkung der Mitten und<br />
betont den „abgeschöpften“ Sound.<br />
F. BASS - Steuert den tieffrequenten Klangcharakter.<br />
G. 2-BAND SEMI-PARAMETRIC EQ - Eine detaillierte<br />
Steuerung der Mitten ist beim Bestimmen des <strong>Bass</strong>klangs<br />
von großer Bedeutung. Deshalb ist Ihr <strong><strong>Bass</strong>man</strong> ® mit semiparametrischen<br />
Reglern ausgest<strong>at</strong>tet (1 Band beim<br />
<strong><strong>Bass</strong>man</strong> ® 100, 2 Bänder beim <strong><strong>Bass</strong>man</strong> ® <strong>150</strong> & 250). Mit<br />
✧ f e n d e r . c o m ✧<br />
ein knackiges, klares Signal für den Live- und Studio-Eins<strong>at</strong>z.<br />
Die <strong>Fender</strong> ® Special Design Eminence ® USA Lautsprecher<br />
stellen sicher, dass Sie einen fetten, n<strong>at</strong>ürlichen und<br />
ausgewogenen Sound erhalten, der massiv in Ihrer Live- oder<br />
Studiomischung zur Geltung kommt.<br />
dem Frequency-Regler bestimmen Sie, WO Sie den Klang<br />
einstellen möchten. Mit Level bestimmen Sie, ob diese<br />
bestimmte Frequenz angehoben oder abgesenkt werden<br />
soll (+/-15 dB). Eine Betonung der oberen Mitten (plus<br />
Steg-Pickup des Instruments) erzeugt einen beißenden<br />
Klang, der sich sehr gut für Jazz Fusion Melodielinien<br />
eignet. Durch Absenken der Mitten lassen sich die Bässe<br />
und Höhen gut voneinander abgrenzen. Der resultierende<br />
Klang ist speziell für Slapping-Techniken und Funk-Musik<br />
geeignet<br />
H. TREBLE - Steuert den hochfrequenten Klangcharakter.<br />
I. PRE/POST - Bestimmt, ob das Signal vor oder nach der<br />
Bearbeitung mit den EQ-Reglern des <strong>Amps</strong> zur LINE OUT<br />
{L} Buchse geleitet wird.<br />
PRE (EQ wird umgangen) POST (EQ aktiv)<br />
J. LINE LEVEL - Regelt den Ausgangspegel der LINE OUT-<br />
Buchse {L}.<br />
K. GROUND LIFT - Unterbricht die LINE OUT {L}<br />
Masseverbindung (Pol 1), wodurch sich in manchen Fällen<br />
störende Brummgeräusche entfernen lassen.<br />
GROUNDED (normal) GROUND LIFTED<br />
L. LINE OUT - Über diese Buchse können Sie ein Signal aus<br />
der Preamp-Sektion zu einer externen Quelle leiten (z. B.<br />
Saal-Mischpult oder Aufnahmegerät). Mit dem integrierten<br />
“Level” Regler lässt sich die Signalstärke einstellen.<br />
Wählen Sie mit dem “Pre/Post” Regler, ob das <strong>Bass</strong>-Signal<br />
von den vorgenommenen EQ-Änderungen beeinflusst<br />
werden soll (post EQ) oder nicht (pre EQ). Mit “Ground Lift”<br />
entfernen Sie Brummgeräusche, die durch Verbindungen<br />
mit falsch geerdeten Geräten entstehen.<br />
M. MUTE - Deaktiviert alle Verstärker-Ausgänge außer<br />
TUNER OUT {U}. �•�Bei aktiviertem MUTE blinkt die LED.<br />
N. MASTER - Steuert den Signalpegel der Endstufe. Mit<br />
diesem Regler und VOLUME {C} bestimmen Sie die<br />
Gesamtlautstärke des <strong>Amps</strong>.<br />
�•�PWR AMP CLIP - Zeigt das Übersteuern der Endstufe<br />
an. Verringern Sie den MASTER-Pegel, wenn Sie bei<br />
leuchtender LED Verzerrungen hören.<br />
O. POWER - Schaltet den Amp ein/aus. Leuchtet bei<br />
eingeschaltetem Gerät.
P. IEC-NETZANSCHLUSS -<br />
Verbinden Sie das mitgelieferte Netzkabel<br />
mit einer geerdeten AC-Steckdose, die den<br />
auf der Rückseite des <strong>Amps</strong> angegebenen<br />
Spannungs- und Frequenz-Nennwerten<br />
entspricht.<br />
Q. SPEAKER-AUSGANG - Schließen Sie an die 1/4"<br />
Klinkenbuchse eine Lautsprecherlast von mindestens 4<br />
Ohm an. Die interne Lautsprecher-Last beträgt 4 Ohm für<br />
eine maximale Ausgangsleistung.<br />
R. HEADPHONES - Schließen Sie hier Ihre Kopfhörer an.<br />
Entfernen Sie die Lautsprecher-Anschlüsse, um Ihre<br />
Umgebung nicht zu stören.<br />
TYP: PR 596<br />
Rückseite 15<br />
S. AUX IN - Cinch-Eingänge zum Anschluss einer<br />
Drummachine oder eines CD Players/Cassettenrecorders.<br />
Steuern Sie den Pegel des Eingangs mit der Signalquelle.<br />
T. EFFECTS - (1) Effects Loop - Verbinden Sie SEND mit<br />
dem Eingang Ihres Effektgeräts und dessen Ausgang mit<br />
RETURN. (2) Multiple Amplifiers - Verbinden Sie SEND<br />
des Hauptgeräts mit RETURN des Zus<strong>at</strong>zgeräts. Das<br />
Hauptgerät steuert alle Zus<strong>at</strong>zgeräte außer den MASTER-<br />
Pegeln.<br />
U. TUNER OUT - Anschluss für Ihren <strong>Bass</strong>-Tuner. Mittels<br />
MUTE {O} können Sie lautlos stimmen.<br />
V. HORN LEVEL -<br />
Stellt den Lautstärkepegel des Horns<br />
auf High (Vollpegel), Low (–6dB) oder<br />
AUS ein.<br />
Technische D<strong>at</strong>en<br />
TEILENUMMERN: 2345300010 (120V, 60Hz) USA 2345301010 (110V, 60Hz) TW 2345303010 (240V, 50Hz) AUS<br />
LEISTUNGSAUFNAHME: 420 W<br />
ENDSTUFE EMPFINDLICHKEIT: 0.93V R.M.S., 100 Hz<br />
2345304010 (230V, 50Hz) UK 2345306010 (230V, 50Hz) EUR 2345307010 (100V, 50Hz) JPN<br />
AUSGANGSLEISTUNG: <strong>150</strong> W R.M.S. an 4 Ohm @ < 0.05 % T.H.D., 100 Hz<br />
FREQUENZGANG: –2dB @ 10 Hz, 42kHz<br />
VORVERSTÄRKER EINGANGSIMPEDANZ: 1M Ohm<br />
COMPRESSOR RATIO: 1:1 (OFF); >5:1 (MAX); festgelegter Threshold –10dBV<br />
KLANGREGLER CONTOUR: –4dB @ 400Hz (MIN), –20dB @ 700Hz (MAX)<br />
BASS/TREBLE: BASS: ± 15 dB @ 80 Hz TREBLE: ± 15 dB @ 10 kHz<br />
SEMI-PARAMETRISCHER EQ: LOW MID: ±15 dB @ <strong>150</strong> Hz–1.5 kHz<br />
HIGH MID: ±15 dB @ 800 Hz–4 kHz<br />
EFFECTS LOOP IMPEDANZEN: SEND: 1k Ohm symmetrisch RETURN: 20k Ohm symmetrisch<br />
LINE-AUSGANG<br />
MAX AUSGANGSLEISTUNG: +6dBu,600Ω<br />
LAUTSPRECHER: 1 Eminence ® 4 Ohm 12" Woofer (064053) 1 piezo horn (068880)<br />
ABMESSUNGEN: HÖHE: 53.3 cm (21 in) BREITE: 48.9 cm (19 1/4 in) TIEFE: 43.8 cm (17 1/4 in)<br />
GEWICHT: 17.7 kg<br />
Technische D<strong>at</strong>en können ohne Ankündigung geändert werden.<br />
✧ f e n d e r . c o m ✧
16 <strong><strong>Bass</strong>man</strong> ® <strong>150</strong><br />
A <strong>Fender</strong> Amplificação de Baixo agradeçe pela sua <strong>com</strong>pra do<br />
amplificador <strong><strong>Bass</strong>man</strong>n <strong>150</strong>. A linha <strong><strong>Bass</strong>man</strong>® foi designada<br />
para músicos que reconhece a necessidade de um<br />
amplificador <strong>com</strong> muita potência e controles tonais lógicos. A<br />
saída XLR de alta fidelidade é capaz de enviar sinais puros de<br />
Painel Frontal<br />
A. INPUT - Conecte seu baixo aqui.<br />
B. –6dB - Reduze a sensitividade da entrada para permitir<br />
uma resposta mais pura <strong>com</strong> baixos de alta saída de nível:<br />
NORMAL—Sensitividade de entrada <strong>com</strong>pleta.<br />
–6dB—Sensitividade de entrada mais baixa.<br />
C. VOLUME - Ajuste o nível de sinal preamp. Use em<br />
conjunto <strong>com</strong> MASTER {N} para configurar o nível de saída<br />
geral do amplificador.<br />
�•�CLIP - Indica preamp clipping. Piscadas ocasionais é<br />
normal quando você tocar alto. Reduza o nível do<br />
VOLUME se você ouvir distorção quando este LED<br />
estiver ligado.<br />
�•�PRE AMP SIGNAL - Indica suficiente potência do sinal.<br />
Aumente o seu instrumento ou nível de VOLUME caso<br />
o LED esteja desligado enquanto tocando.<br />
D. COMPRESSOR RATIO - Tipicamente usado para<br />
equilibrar uma performance musical, o <strong>com</strong>pressor<br />
fornece um efeito de “alisar” estilos de <strong>at</strong>aque de dedo ou<br />
slap. O controle <strong>com</strong>pressor nos amplificadores<br />
<strong><strong>Bass</strong>man</strong>® determinam a taxa (RATIO) do <strong>com</strong>pressão.<br />
Quando o sinal estiver suficientemente alto para permitir<br />
que o <strong>com</strong>pressor fique ligado, a taxa determina a<br />
quantidade de <strong>com</strong>pressão. Na posição mínima, a taxa é<br />
1:1 (desligado). Conforme você aumenta o nível, a taxa<br />
aumenta também (2:1, 3:1, 4:1) e o som da <strong>com</strong>pressão se<br />
torna mais notável. A configuração ideal é quase inaudível<br />
mas agradável para os dedos (A sensação de controle sob<br />
o instrumento).<br />
E. CONTOUR - Esta característica é para encolher o sinal na<br />
banda media, um som tipicamente desejável para um<br />
estilo slap para obter um som de baixo moderno tipo "hifi".<br />
Girando este botão sentido horário aumentará o limite<br />
da banda media, causando um aumento no som<br />
encolhido.<br />
F. BASS - Ajusta a característica tonal de freqüências baixas.<br />
G. 2-BAND SEMI-PARAMETRIC EQ - Tendo mais controle<br />
sobre freqüências da banda media é muito importante<br />
para definir o som do seu baixo. É por isso que o<br />
<strong><strong>Bass</strong>man</strong>® vem equipado <strong>com</strong> controle semi-paramétrico<br />
(1 banda no <strong><strong>Bass</strong>man</strong>® 100, 2 bandas no <strong><strong>Bass</strong>man</strong>® <strong>150</strong><br />
& 250). O botão da freqüência se encontra lá para<br />
✧ f e n d e r . c o m ✧<br />
alta qualidade para uso ao vivo ou em estúdio. Os altofalantes<br />
<strong>Fender</strong>® Special Design Eminence® garantem um<br />
som presente, n<strong>at</strong>ural, e equilibrado que vai se destacar na<br />
sua mixagem de estúdio ou ao vivo.<br />
determinar ONDE você gostaria de ajustar o som. O nível<br />
para determinar se você quiser uma freqüência especifica<br />
aumentada ou não. (+/-15 DB). Acrescentando o som na<br />
banda media para cima (enfocando o bridge no seu<br />
instrumento) cria um som ótimo para estilos de Jazz e<br />
fusão. Diminuindo freqüências medias abre espaço para<br />
uma separação entre freqüências baixas e altas,<br />
resultando em um som muito apropriado para estilos de<br />
funk.<br />
H. TREBLE - Ajusta a característica de freqüências altas.<br />
I. PRE/POST - Fornece o conector LINE OUT {L} <strong>com</strong> o sinal<br />
antes ou depois de ser processado pelo circuito de<br />
equalização do amplificador.<br />
PRE (EQ não <strong>at</strong>ivo) POST (EQ <strong>at</strong>ivo)<br />
J. LINE LEVEL - Ajusta o nível de saída da LINE OUT {L}.<br />
K. GROUND LIFT - Desconecta a conexão <strong>at</strong>errada (pin-1)<br />
LINE OUT {L} que possa reduzir ruídos em algumas<br />
situações.<br />
ATERRADO (normal) NÃO ATERRADO<br />
L. LINE OUT - Este conector permite que você envie um<br />
sinal de saída da seção do preamp para uma fonte externa<br />
(tais <strong>com</strong>o um console de mixagem ou um dispositivo de<br />
gravação). O controle de nível embutido permite<br />
ajustagem da potência do sinal. Use o controle "Pre/Post"<br />
se você quiser que o sinal do baixo esteja afetado pelas<br />
mudanças de EQ que você faça (post) ou antes o EQ, para<br />
obter um sinal não afetado (pré). O "Ground Lift" serve<br />
para eliminar ruídos vindo de uma conexão para<br />
equipamento inadequadamente <strong>at</strong>errado.<br />
M. MUTE - Des<strong>at</strong>iva todas as saídas do amplificador exceto<br />
do TUNER OUT {U}. �•�O LED piscará quando MUTE esta<br />
<strong>at</strong>ivado.<br />
N. MASTER - Ajusta o nível do sinal do power amp Use<br />
juntos <strong>com</strong> VOLUME {C} para configurar o nível geral do<br />
amplificador.<br />
�•�PWR AMP CLIP - Indica power amp clipping. Reduze<br />
o MASTER se você ouvir distorção quando este LED<br />
estiver ligado.<br />
O. POWER - Liga e desliga o amplificador lluminado quando<br />
o aparelho esta ligado.
P. IEC POWER SOCKET -<br />
Conecte o cabo de força incluída para uma<br />
fonte <strong>at</strong>errada receptáculo conforme as<br />
especificações de voltagem e freqüência<br />
encontradas no painel traseiro do seu<br />
amplificador.<br />
Q. SPEAKER OUTPUT - Use o conector apropriado de 1/4"<br />
para conectar um carregamento de alto-falante de<br />
4–ohms mínimo. O carregamento interno do alto-falante<br />
é de 4–ohms para saída máximo de potência .<br />
R. HEADPHONES - Conecte seus fones de ouvido aqui.<br />
Desconecte a conexão para alto-falante para ouvir música<br />
em particular.<br />
TIPO: PR 596<br />
✧ f e n d e r . c o m ✧<br />
Painel Traseiro<br />
S. AUX IN - RCA conectores de entrada para connectar sua<br />
maquina de b<strong>at</strong>eria ou CD/tape player. Controle o nível<br />
desta entrada na fonte do sinal.<br />
T. EFFECTS - (1) Effects Loop - Conecte SEND para a<br />
entrada do seu dispositivo de efeitos e a saída do<br />
dispositivo de efeitos para RETURN. (2) Amplificadores<br />
múltiplos- Conecte SEND na unidade principal para<br />
RETURN na unidade auxiliar. A unidade principal controla<br />
todas as unidades auxiliares exceto níveis MASTER.<br />
U. TUNER OUT - Conexão para seu tuner de baixo. Use<br />
MUTE {O} para tune-ups. silenciosas<br />
V. HORN LEVEL -<br />
Configura o nível do volume da<br />
trombeta em alta (<strong>com</strong>pleto),<br />
baixo (–6dB) ou desligado.<br />
Especificações<br />
PEÇAS NUMEROS: 2345300010 (120V, 60Hz) USA 2345301010 (110V, 60Hz) TW 2345303010 (240V, 50Hz) AUS<br />
POTÊNCIA REQUERIDA: 420W<br />
POWER AMP SENSIBILIDADE: 0.93V R.M.S., 100Hz<br />
2345304010 (230V, 50Hz) UK 2345306010 (230V, 50Hz) EUR 2345307010 (100V, 50Hz) JPN<br />
POTÊNCIA DE SAÍDA: <strong>150</strong>W R.M.S. em 4Ω @ < 0.05 % T.H.D., 100Hz<br />
RESPOSTA DE FREQÜÊNCIA: –2dB @ 10Hz, 42kHz<br />
PRE AMP IMPEDÂNCIA DE ENTRADA: 1MΩ<br />
TAXA DE COMPRESSÃO: 1:1 (OFF); >5:1 (MAX); –10dBV ponto inicial fixado<br />
CONTROLES TONAIS CONTOUR: –4dB @ 400Hz (MIN), –20dB @ 700Hz (MAX)<br />
GRAVE/AGUDO: GRAVE: ± 15dB @ 80Hz AGUDO: ± 15dB @ 10kHz<br />
EQ SEMI-PARAMÉTRICO: BAIXA MEDIA: ±15dB @ <strong>150</strong>Hz–1.5kHz<br />
ALTA MEDIA: ±15dB @ 800Hz–4kHz<br />
EFFECTS LOOP IMPEDÂNCIAS: SEND: 1kΩ balanced RETURN: 20kΩ balanced<br />
LINHA DE SAÍDA SAÍDA MAXIMO: +6dBu, 600Ω<br />
ALTO-FALANTES: 1 Eminence ® 4Ω 12" woofer (064053) 1 piezo horn (068880)<br />
DIMENSÕES: ALTURA: 21 in (53.3 cm) LARGURA: 19 1/4 in (48.9 cm) PROFUNDIDADE: 17 1/4 in (43.8 cm)<br />
PESO 39 lb (17.7 kg)<br />
Especificações do produto estão submetidas a mudanças sem aviso prévio.<br />
17
18<br />
<strong><strong>Bass</strong>man</strong> ® <strong>150</strong><br />
✧ f e n d e r . c o m ✧
✧ f e n d e r . c o m ✧<br />
19
A PRODUCT OF:<br />
FENDER MUSICAL INSTRUMENTS CORPORATION<br />
CORONA, CA USA<br />
<strong><strong>Bass</strong>man</strong> ® and <strong>Fender</strong> ® are registered trademarks of FMIC.<br />
Other trademarks are property of their respective owners.<br />
Copyright © 2004 FMIC. All rights reserved. P/N 063731 REV A