Acoustimass® 16 Series II Acoustimass® 15 Series III - Bose
Acoustimass® 16 Series II Acoustimass® 15 Series III - Bose
Acoustimass® 16 Series II Acoustimass® 15 Series III - Bose

You also want an ePaper? Increase the reach of your titles
YUMPU automatically turns print PDFs into web optimized ePapers that Google loves.
Figure 3<br />
English Español Français<br />
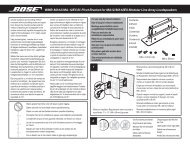
Position options for your<br />
Acoustimass module<br />
Making the connections<br />
Figure 4<br />
Speaker cable connection<br />
to an output jack on the<br />
module and to the speaker<br />
Placing your Acoustimass ® module<br />
SETTING UP<br />
<strong>Bose</strong> ® Acoustimass ® speaker technology makes it difficult to locate the source of !<br />
low-frequency sound from this module. So feel free to hide it from view, and:<br />
• Locate the module at the same end of the room as the television screen.<br />
• Keep the module at least 2 feet (.6 m) from your TV set to prevent interference.<br />
• To increase bass effects, turn the front opening toward a wall; turn it away from the wall to<br />
decrease bass effects.<br />
• Keep both the front opening and the ventilation grille on the bottom of the module at least !<br />
2 inches (5 cm) from any other surface.<br />
• Do not block the ventilation grille located on the bottom of the module. !<br />
Impeding ventilation can cause a reduction in the bass-frequency output from the module.<br />
Preferred Alternate<br />
Front opening Ventilation grille<br />
Only the Acoustimass module connects to your receiver. The small center front speaker and<br />
cube speaker arrays connect directly to the Acoustimass module.<br />
WARNING: Connecting the small speakers to a receiver can result in damage to your system<br />
and possible electric shock.<br />
Connecting speakers to the Acoustimass module<br />
Insert the connector on each speaker cable into the jack on the module. Refer to the label on<br />
each connector to match it to the proper jack.<br />
Supplied<br />
speaker cable<br />
Matched labels<br />
Cube speaker array<br />
Red collar<br />
to red speaker terminal<br />
1. Use the supplied 20-foot (6.1 m) speaker cables for the three front speakers.<br />
Insert the connectors, as labeled, into jacks on the module as follows!<br />
(Figure 5 on page 8).<br />
• R goes into the jack labeled Right Front.<br />
• C goes into the jack labeled Center Front.<br />
• L goes into the gray jack labeled Left Front.<br />
7