DK DANSK - RENO-FF A/S
DK DANSK - RENO-FF A/S
DK DANSK - RENO-FF A/S

Create successful ePaper yourself
Turn your PDF publications into a flip-book with our unique Google optimized e-Paper software.
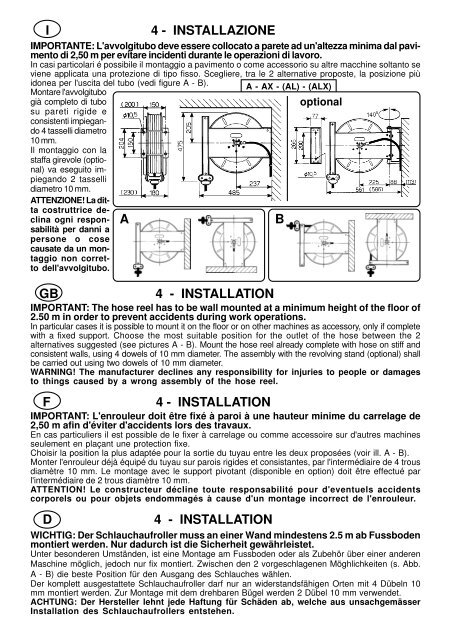
I 4 - INSTALLAZIONE<br />
IMPORTANTE: L'avvolgitubo deve essere collocato a parete ad un'altezza minima dal pavimento<br />
di 2,50 m per evitare incidenti durante le operazioni di lavoro.<br />
In casi particolari é possibile il montaggio a pavimento o come accessorio su altre macchine soltanto se<br />
viene applicata una protezione di tipo fisso. Scegliere, tra le 2 alternative proposte, la posizione più<br />
idonea per l'uscita del tubo (vedi figure A - B).<br />
Montare l'avvolgitubo<br />
già completo di tubo<br />
su pareti rigide e<br />
consistenti impiegando<br />
4 tasselli diametro<br />
10 mm.<br />
Il montaggio con la<br />
staffa girevole (optional)<br />
va eseguito impiegando<br />
2 tasselli<br />
diametro 10 mm.<br />
ATTENZIONE! La dit-<br />
A - AX - (AL) - (ALX)<br />
optional<br />
ta costruttrice declina<br />
ogni responsabilità<br />
per danni a<br />
persone . o cose<br />
causate da un montaggio<br />
non corretto<br />
dell'avvolgitubo.<br />
A B<br />
GB 4 - INSTALLATION<br />
IMPORTANT: The hose reel has to be wall mounted at a minimum height of the floor of<br />
2.50 m in order to prevent accidents during work operations.<br />
In particular cases it is possible to mount it on the floor or on other machines as accessory, only if complete<br />
with a fixed support. Choose the most suitable position for the outlet of the hose between the 2<br />
alternatives suggested (see pictures A - B). Mount the hose reel already complete with hose on stiff and<br />
consistent walls, using 4 dowels of 10 mm diameter. The assembly with the revolving stand (optional) shall<br />
be carried out using two dowels of 10 mm diameter.<br />
WARNING! The manufacturer declines any responsibility for injuries to people or damages<br />
to things caused by a wrong assembly of the hose reel.<br />
F 4 - INSTALLATION<br />
IMPORTANT: L'enrouleur doit être fixé à paroi à une hauteur minime du carrelage de<br />
2,50 m afin d'éviter d'accidents lors des travaux.<br />
En cas particuliers il est possible de le fixer à carrelage ou comme accessoire sur d'autres machines<br />
seulement en plaçant une protection fixe.<br />
Choisir la position la plus adaptée pour la sortie du tuyau entre les deux proposées (voir ill. A - B).<br />
Monter l'enrouleur déjà équipé du tuyau sur parois rigides et consistantes, par l'intermédiaire de 4 trous<br />
diamètre 10 mm. Le montage avec le support pivotant (disponible en option) doit être effectué par<br />
l'intermédiaire de 2 trous diamètre 10 mm.<br />
ATTENTION! Le constructeur décline toute responsabilité pour d'eventuels accidents<br />
corporels ou pour objets endommagés à cause d'un montage incorrect de l'enrouleur.<br />
D 4 - INSTALLATION<br />
WICHTIG: Der Schlauchaufroller muss an einer Wand mindestens 2.5 m ab Fussboden<br />
montiert werden. Nur dadurch ist die Sicherheit gewährleistet.<br />
Unter besonderen Umständen, ist eine Montage am Fussboden oder als Zubehör über einer anderen<br />
Maschine möglich, jedoch nur fix montiert. Zwischen den 2 vorgeschlagenen Möghlichkeiten (s. Abb.<br />
A - B) die beste Position für den Ausgang des Schlauches wählen.<br />
Der komplett ausgestattete Schlauchaufroller darf nur an widerstandsfähigen Orten mit 4 Dübeln 10<br />
mm montiert werden. Zur Montage mit dem drehbaren Bügel werden 2 Dübel 10 mm verwendet.<br />
ACHTUNG: Der Hersteller lehnt jede Haftung für Schäden ab, welche aus unsachgemässer<br />
Installation des Schlauchaufrollers entstehen.