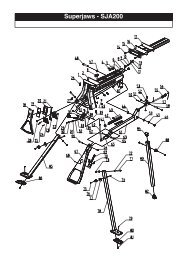
Manual de instrucciones - Triton Tools
Manual de instrucciones - Triton Tools
Manual de instrucciones - Triton Tools

You also want an ePaper? Increase the reach of your titles
YUMPU automatically turns print PDFs into web optimized ePapers that Google loves.
GB<br />
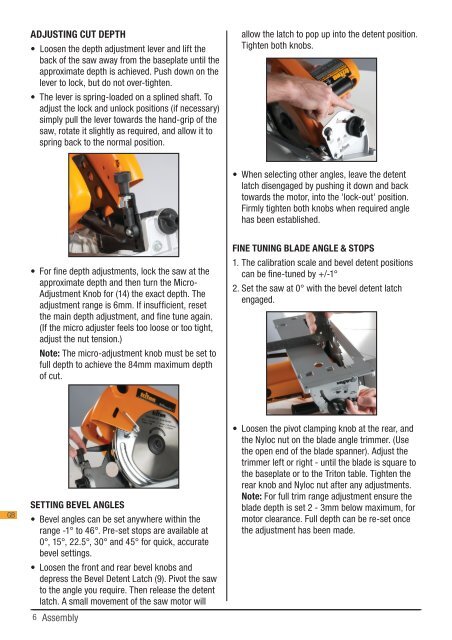
ADJUSTING CUT DEPTH<br />
• Loosen the <strong>de</strong>pth adjustment lever and lift the<br />
back of the saw away from the baseplate until the<br />
approximate <strong>de</strong>pth is achieved. Push down on the<br />
lever to lock, but do not over-tighten.<br />
• The lever is spring-loa<strong>de</strong>d on a splined shaft. To<br />
adjust the lock and unlock positions (if necessary)<br />
simply pull the lever towards the hand-grip of the<br />
saw, rotate it slightly as required, and allow it to<br />
spring back to the normal position.<br />
• For fine <strong>de</strong>pth adjustments, lock the saw at the<br />
approximate <strong>de</strong>pth and then turn the Micro-<br />
Adjustment Knob for (14) the exact <strong>de</strong>pth. The<br />
adjustment range is 6mm. If insufficient, reset<br />
the main <strong>de</strong>pth adjustment, and fine tune again.<br />
(If the micro adjuster feels too loose or too tight,<br />
adjust the nut tension.)<br />
Note: The micro-adjustment knob must be set to<br />
full <strong>de</strong>pth to achieve the 84mm maximum <strong>de</strong>pth<br />
of cut.<br />
SETTING BEVEL ANGLES<br />
• Bevel angles can be set anywhere within the<br />
range -1° to 46°. Pre-set stops are available at<br />
0°, 15°, 22.5°, 30° and 45° for quick, accurate<br />
bevel settings.<br />
• Loosen the front and rear bevel knobs and<br />
<strong>de</strong>press the Bevel Detent Latch (9). Pivot the saw<br />
to the angle you require. Then release the <strong>de</strong>tent<br />
latch. A small movement of the saw motor will<br />
6 Assembly<br />
allow the latch to pop up into the <strong>de</strong>tent position.<br />
Tighten both knobs.<br />
• When selecting other angles, leave the <strong>de</strong>tent<br />
latch disengaged by pushing it down and back<br />
towards the motor, into the 'lock-out' position.<br />
Firmly tighten both knobs when required angle<br />
has been established.<br />
FINE TUNING BLADE ANGLE & STOPS<br />
1. The calibration scale and bevel <strong>de</strong>tent positions<br />
can be fine-tuned by +/-1°<br />
2. Set the saw at 0° with the bevel <strong>de</strong>tent latch<br />
engaged.<br />
• Loosen the pivot clamping knob at the rear, and<br />
the Nyloc nut on the bla<strong>de</strong> angle trimmer. (Use<br />
the open end of the bla<strong>de</strong> spanner). Adjust the<br />
trimmer left or right - until the bla<strong>de</strong> is square to<br />
the baseplate or to the <strong>Triton</strong> table. Tighten the<br />
rear knob and Nyloc nut after any adjustments.<br />
Note: For full trim range adjustment ensure the<br />
bla<strong>de</strong> <strong>de</strong>pth is set 2 - 3mm below maximum, for<br />
motor clearance. Full <strong>de</strong>pth can be re-set once<br />
the adjustment has been ma<strong>de</strong>.