
You also want an ePaper? Increase the reach of your titles
YUMPU automatically turns print PDFs into web optimized ePapers that Google loves.
Precautions<br />
Location<br />
Using the unit in the following locations can<br />
result in a malfunction.<br />
• In direct sunlight<br />
• Locations of extreme temperature or humidity<br />
• Excessively dusty or dirty locations<br />
• Locations of excessive vibration<br />
• Close to magnetic fields<br />
Power supply<br />
Please connect the designated AC adapter to<br />
an AC outlet of the correct voltage. Do not connect<br />
it to an AC outlet of voltage other than that<br />
for which your unit is intended.<br />
Interference with other electrical devices<br />
Radios and televisions placed nearby may<br />
experience reception interference. Operate<br />
this unit at a suitable distance from radios and<br />
televisions.<br />
Handling<br />
To avoid breakage, do not apply excessive<br />
force to the switches or controls.<br />
Care<br />
If the exterior becomes dirty, wipe it with a<br />
clean, dry cloth. Do not use liquid cleaners<br />
such as benzene or thinner, or cleaning compounds<br />
or flammable polishes.<br />
Keep this manual<br />
After reading this manual, please keep it for<br />
later reference.<br />
Keeping foreign matter out of your equipment<br />
Never set any container with liquid in it near<br />
this equipment. If liquid gets into the equipment,<br />
it could cause a breakdown, fire, or electrical<br />
shock.<br />
Be careful not to let metal objects get into the<br />
equipment. If something does slip into the<br />
equipment, unplug the AC adapter from the<br />
wall outlet. Then contact your nearest <strong>Korg</strong><br />
dealer or the store where the equipment was<br />
purchased.<br />
THE FCC REGULATION WARNING (for USA)<br />
This equipment has been tested and found to<br />
comply with the limits for a Class B digital device,<br />
pursuant to Part 15 of the FCC Rules. These limits<br />
are designed to provide reasonable protection<br />
against harmful interference in a residential installation.<br />
This equipment generates, uses, and can<br />
radiate radio frequency energy and, if not installed<br />
and used in accordance with the instructions, may<br />
cause harmful interference to radio communications.<br />
However, there is no guarantee that interference<br />
will not occur in a particular installation. If<br />
this equipment does cause harmful interference<br />
to radio or television reception, which can be determined<br />
by turning the equipment off and on, the<br />
user is encouraged to try to correct the interference<br />
by one or more of the following measures:<br />
Reorient or relocate the receiving antenna.<br />
Increase the separation between the equipment<br />
and receiver.<br />
Connect the equipment into an outlet on a circuit<br />
different from that to which the receiver is connected.<br />
Consult the dealer or an experienced radio/TV<br />
technician for help.<br />
Unauthorized changes or modification to this system<br />
can void the user’s authority to operate this<br />
equipment.<br />
Notice regarding disposal (EU only)<br />
When this “crossed-out wheeled bin” symbol<br />
is displayed on the product, owner’s<br />
manual, battery, or battery package, it signifies<br />
that when you wish to dispose of this<br />
product, manual, package or battery you<br />
must do so in an approved manner. Do not<br />
discard this product, manual, package or<br />
battery along with ordinary household waste. Disposing<br />
in the correct manner will prevent harm to<br />
human health and potential damage to the environment.<br />
Since the correct method of disposal will<br />
depend on the applicable laws and regulations in<br />
your locality, please contact your local administrative<br />
body for details. If the battery contains heavy<br />
metals in excess of the regulated amount, a<br />
chemical symbol is displayed below the “crossedout<br />
wheeled bin” symbol on the battery or battery<br />
package.<br />
* All product names and company names are the<br />
trademarks or registered trademarks of their respective<br />
owners.<br />
3
4<br />
Introduction<br />
Thank you for purchasing the <strong>Korg</strong> <strong>KAOSS</strong><br />
<strong>PAD</strong> <strong>QUAD</strong> dynamic effect processor. To enjoy<br />
the <strong>KAOSS</strong> <strong>PAD</strong> <strong>QUAD</strong> to the fullest potential,<br />
please read this manual carefully and<br />
use the <strong>KAOSS</strong> <strong>PAD</strong> <strong>QUAD</strong> only as directed.<br />
Main features<br />
Create custom <strong>KAOSS</strong> effects combinations<br />
You can combine up to four different effects<br />
to create your custom <strong>KAOSS</strong> effect combinations,<br />
with literally hundreds of possibilities.<br />
Since switching is as easy as hitting a button<br />
and touching the touch pad, you can also swap<br />
effects as often as desired as the song progresses.<br />
Total control and smooth playability<br />
Simply touch, tap or rub your finger across the<br />
surface of the touch pad, and you will be in<br />
total control of the effects.<br />
Flexible Looping<br />
In addition to the normal Looper function,<br />
the <strong>KAOSS</strong> <strong>PAD</strong> <strong>QUAD</strong> features a Reverse<br />
Looper, and a Loop Slicer that slices recorded<br />
samples and then loops them automatically<br />
between manually adjusted points. You can<br />
switch the type of the Looper during playback.<br />
These newly-designed Looper effects increase<br />
the variety of performance possibilities.<br />
New Vinyl Break effect<br />
The Vinyl Break effect simulates how a turntable<br />
platter slows down gradually before stopping.<br />
The effect also simulates Scratch play<br />
on a turntable. These turntable effects can be<br />
useful for DJ performances.<br />
Tap Tempo and Auto BPM<br />
The <strong>KAOSS</strong> <strong>PAD</strong> <strong>QUAD</strong>’s Auto BPM circuit<br />
derives tempo information from any audio<br />
source and can sync effects to play in time.<br />
You can also tap the Tap button along with the<br />
beat to sync with the music’s BPM.<br />
Freeze function<br />
Pressing the FREEZE button while touching<br />
the pad will memorize your position on the<br />
pad, allowing you to remove your finger and<br />
keep the effect(s) playing. Since each effect<br />
module features its own FREEZE button, the<br />
looper can play a phrase repeatedly using the<br />
same “frozen” effect, while you control other<br />
effects via the touch pad. Creative freedom is<br />
all yours. Turning an effect on or off, or changing<br />
the effect within one of the four banks, will<br />
call up the effect with the “frozen” position on<br />
the pad.
Getting ready<br />
Connections<br />
CD PLAYER<br />
MIXER, DJ MIXER<br />
Connecting your monitor amp or mixer to the output<br />
jacks<br />
Connect the <strong>KAOSS</strong> <strong>PAD</strong> <strong>QUAD</strong>’s LINE OUT<br />
jacks to your mixer or powered monitors (amplified<br />
speakers).<br />
If you’re using headphones, connect them to<br />
the PHONES jack.<br />
TIP The <strong>KAOSS</strong> <strong>PAD</strong> <strong>QUAD</strong>’s sound will still be output<br />
from the LINE OUT jacks even if headphones are<br />
connected.<br />
Connecting your mic or audio source to the input<br />
jacks<br />
If you’re using a mic, connect it to the MIC<br />
jack.<br />
If you want to connect a sampler or other audio<br />
source device, connect its output jacks to the<br />
<strong>KAOSS</strong> <strong>PAD</strong> <strong>QUAD</strong>’s LINE IN jacks.<br />
Always connect devices to your <strong>KAOSS</strong> <strong>PAD</strong> <strong>QUAD</strong><br />
with the power turned off. Careless operation can damage<br />
your speaker system or cause other issues.<br />
If you are not using a mic, turn the MIC VOLUME knob<br />
all the way down.<br />
AC ADAPTER<br />
AC<br />
Connecting the <strong>KAOSS</strong> <strong>PAD</strong> <strong>QUAD</strong> to send/return jacks<br />
You can use the <strong>KAOSS</strong> <strong>PAD</strong> <strong>QUAD</strong> as an external<br />
effect unit by connecting it to the send<br />
and return jacks of a mixer. For this connection,<br />
set the CONNECTION switch to SEND.<br />
DIRECT: Both input and effect sounds will be<br />
output from the <strong>KAOSS</strong> <strong>PAD</strong> <strong>QUAD</strong>. When<br />
you are not touching the touch pad, the input<br />
sound will be output as is. “Controlling the effect<br />
depth (p.7)”<br />
SEND: Only the effect sound (not the input<br />
sound) will be output from the <strong>KAOSS</strong> <strong>PAD</strong><br />
<strong>QUAD</strong>.<br />
TIP For more information on the send and return<br />
jacks, refer to the owner’s manual for the device that<br />
you are connecting.<br />
TIP When you are using the <strong>KAOSS</strong> <strong>PAD</strong> <strong>QUAD</strong> as<br />
an external effects unit, the return level may be lower<br />
than expected. In such cases, adjust the input level<br />
on the <strong>KAOSS</strong> <strong>PAD</strong> <strong>QUAD</strong>. “Adjusting the volume<br />
(p.6)”<br />
5
6<br />
Operation<br />
Using the power switch<br />
1. Connect the <strong>KAOSS</strong> <strong>PAD</strong> <strong>QUAD</strong> to your<br />
other equipment as shown in the diagrams<br />
on the preceding pages, and connect the AC<br />
adapter to an electrical outlet.<br />
Never use any AC adapter other than the one that’s included.<br />
2. Press the Power button to turn the <strong>KAOSS</strong><br />
<strong>PAD</strong> <strong>QUAD</strong> on. The display will light up.<br />
To turn the <strong>KAOSS</strong> <strong>PAD</strong> <strong>QUAD</strong> off, press and<br />
hold down the Power button until the display<br />
indicators turn off.<br />
The settings will not be retained after the power is<br />
turned off.<br />
Auto Power Off<br />
The <strong>KAOSS</strong> <strong>PAD</strong> <strong>QUAD</strong> features an Auto<br />
Power Off function, which turns the unit off<br />
automatically if the unit is left unused for approximately<br />
four hours.<br />
TIP If any sound is being input, this function will not<br />
kick in.<br />
Disabling the Auto Power Off function<br />
Follow the steps below to disable the Auto<br />
Power Off function.<br />
1. Turn the <strong>KAOSS</strong> <strong>PAD</strong> <strong>QUAD</strong> on while<br />
pressing and holding down the 1DELAY button.<br />
The unit will indicate the current settings on<br />
the display.<br />
2. Rotate the BPM knob to select “dis” on the<br />
display.<br />
3. Press the TAP button to store this setting.<br />
The unit will automatically restart.<br />
4. To enable the Auto Power Off function, turn<br />
the <strong>KAOSS</strong> <strong>PAD</strong> <strong>QUAD</strong> on while pressing and<br />
holding down the 1DELAY button. Rotate the<br />
BPM knob to select “Ena” on the display, then<br />
press the TAP button.<br />
TIP If you turn the unit off without pressing the TAP<br />
button in the steps above, the changes to the setting<br />
will not be applied.<br />
TIP The initial factory setting is “Ena” for the Auto<br />
Power Off function.<br />
Adjusting the volume<br />
1. Use the INPUT VOLUME knob to adjust<br />
the input level.<br />
Adjust the level as high as possible without<br />
making the peak indicator light up red when<br />
audio is input from the connected equipment.<br />
If you are using the mic jack, adjust the MIC<br />
VOLUME knob as appropriate for the sensitivity<br />
of the mic, so that the sound is not distorted.<br />
2. If you are listening through headphones,<br />
use the PHONES VOLUME knob to adjust the<br />
headphone level.<br />
TIP The PHONES VOLUME knob does not affect the<br />
level at the LINE OUT jack.<br />
Selecting an effect<br />
The <strong>KAOSS</strong> <strong>PAD</strong> <strong>QUAD</strong> features four effect<br />
modules (1–4). You can assign a different effect<br />
to each of these four models.<br />
Touching the touch pad will cause all selected<br />
effects to be applied to the sound. You can<br />
also continue applying the effects by pressing<br />
the FREEZE button. “Freeze (p.7)”<br />
TIP Effects are applied in ascending order of the effect<br />
modules (1 to 4).<br />
1. Select an effect by pressing the corresponding<br />
Effect Type button. The selected Effect<br />
Type button indicator will light up.<br />
2. To turn the effect off, press the illuminated<br />
Effect Type button. The Effect Type button indicator<br />
will go dark and the corresponding effect<br />
turns off.<br />
3. To switch to a different effect for an effect<br />
module, press the corresponding Effect Type<br />
button. A different effect will be selected for<br />
that effect module.<br />
TIP Some combinations of certain effects may distort<br />
the sound.
Controlling the effect depth<br />
Use the FX DEPTH knob to adjust the depth of<br />
the effect. Rotating the knob all the way to the<br />
left will turn the effect off. Rotating the knob<br />
all the way to the right will maximize the effect<br />
depth.<br />
INPUT OUTPUT<br />
During performance, if you rotate the FX<br />
DEPTH knob all the way to the left or release<br />
your fingers from the touch pad, the effect<br />
sound will continue until its delay or reverb<br />
sound decays and dissipates.<br />
Using the touch pad<br />
You can control the sound by using your finger<br />
to rub or tap the touch pad.<br />
TIP Affix the included protective sheet to the touch<br />
pad before using it.<br />
Touch pad care<br />
Never press the touch pad with excessive<br />
force, or place heavy objects on it. It may<br />
crack or break if handled roughly. Press the<br />
touch pad only with your finger, since rubbing<br />
or pressing the touch pad with a sharp<br />
object will scratch it. To clean the touch pad,<br />
wipe it lightly with a soft dry cloth. Do not<br />
use solvents such as thinner, since this may<br />
cause deformation.<br />
Freeze<br />
If you press the FREEZE button, the <strong>KAOSS</strong><br />
<strong>PAD</strong> <strong>QUAD</strong> will remember the current touch<br />
pad position at the time you press the button,<br />
and will continue to apply the same effects.<br />
You can use the Freeze function for each effect<br />
module. Even if you switch the effects inside<br />
the effect modules, the unit remembers<br />
the touch pad position.<br />
1. While your finger is on the touch pad, press<br />
the FREEZE button. The effect sound being<br />
used at that point will be retained.<br />
TIP Touching the touch pad will not change<br />
the sound of the “frozen” effect modules. How-<br />
ever, the sound of “non-frozen” effect modules<br />
will change.<br />
2. Press the FREEZE button again to cancel<br />
the Freeze function.<br />
TIP If you press the FREEZE button again immediately<br />
after you cancel the Freeze function, the same<br />
touch pad position information will be recalled.<br />
Touch pad LED<br />
The touch pad LED lights up in different patterns<br />
depending on the selected effects, the<br />
Freeze or BPM setting, and operation of the<br />
touch pad.<br />
Adjusting the brightness of the touch pad LED<br />
1. While pressing and holding down the LPF<br />
button, turn on the power to the <strong>KAOSS</strong> <strong>PAD</strong><br />
<strong>QUAD</strong>.<br />
The touch pad LED will light up, and the brightness<br />
value will appear on the display. The<br />
higher the value, the brighter the LED.<br />
2. Rotate the BPM knob to adjust the brightness.<br />
3. Press the TAP button to store the setting.<br />
The unit automatically restarts.<br />
TIP If you turn the unit off without pressing the TAP<br />
button as described in the step above, changes to<br />
the setting will not be applied.<br />
TIP The initial factory setting is maximum brightness.<br />
Specifying the BPM<br />
What is BPM?<br />
BPM (Beats Per Minute) is the tempo of the<br />
song expressed as the number of beats (quarter<br />
notes) that occur in one minute. A higher<br />
BPM value means a faster tempo.<br />
TIP When you turn on the <strong>KAOSS</strong> <strong>PAD</strong> <strong>QUAD</strong>, the<br />
BPM will be set to 120.0.<br />
<strong>Manual</strong>ly setting the BPM<br />
Use the BPM knob to adjust the BPM value.<br />
TIP The Auto BPM is automatically turned off.<br />
7
8<br />
Using Tap Tempo to set the BPM<br />
If you’re not certain of the BPM value of a song,<br />
you can set the BPM by pressing the TAP button<br />
in rhythm with the beat of the song.<br />
Press the TAP button three or more times in<br />
rhythm with the beat of the song. The <strong>KAOSS</strong><br />
<strong>PAD</strong> <strong>QUAD</strong> will detect the interval at which<br />
you press the button, the corresponding BPM<br />
value will appear in the display, and that BPM<br />
value will be set.<br />
Auto BPM detection<br />
The <strong>KAOSS</strong> <strong>PAD</strong> <strong>QUAD</strong> can set the BPM value<br />
automatically by detecting the beat of the<br />
song. If the song’s BPM changes, the <strong>KAOSS</strong><br />
<strong>PAD</strong> <strong>QUAD</strong>’s BPM value will change in sync.<br />
1. Press and hold down the TAP button to<br />
turn on Auto BPM detection. The AUTO indicator<br />
will light up. The BPM of the incoming<br />
audio source will be detected automatically.<br />
If the <strong>KAOSS</strong> <strong>PAD</strong> <strong>QUAD</strong> is unable to detect the BPM<br />
Press the TAP button several times in time<br />
with the beat of the song; the <strong>KAOSS</strong> <strong>PAD</strong><br />
<strong>QUAD</strong> will automatically detect the BPM using<br />
the beat you manually tapped as a guideline.<br />
Because of the way that the Auto BPM function<br />
operates, it may erroneously detect a value<br />
that is 1/2 or 2/3 of the correct BPM value,<br />
or small deviations may arise. In such cases,<br />
you can use the TAP button to make compensations.<br />
If you press the TAP button while Auto<br />
BPM detection is active, the value you specify<br />
by tapping will become the center value of the<br />
BPM range.<br />
TIP It’s not possible to detect the BPM value from<br />
music that does not have a clear sense of beat. The<br />
detectable BPM range is from 80 to 160.<br />
Turning off Auto BPM<br />
Press and hold down the TAP button until the<br />
AUTO indicator goes dark. The Auto BPM<br />
function will turn off, and the unit will use the<br />
BPM value obtained at the point you turned off<br />
the function.<br />
Effects guide<br />
1. Looper category<br />
LOOPER<br />
The Looper samples (records) a phrase and<br />
plays it back repeatedly. You can add some<br />
variety to a song by looping a phrase while<br />
changing the length of the phrase by rubbing<br />
the touch pad up and down with your finger.<br />
TIP When your finger touches the touch pad, recording<br />
will start. As soon as a phrase is recorded,<br />
the phrase will play repeatedly.<br />
REV LOOPER (REVERSE LOOPER)<br />
As you touch the touch pad with your finger,<br />
a phrase will play in reverse. You can play a<br />
phrase repeatedly while changing the length<br />
of the phrase by rubbing the touch pad up and<br />
down with your finger.<br />
TIP The Looper always records the input audio, and<br />
starts looping as soon as you touch the touch pad.<br />
LOOP SLICER<br />
A sampled phrase of one measure can be<br />
sliced into parts of various length. You can assign<br />
these parts onto the x axis of the touch<br />
pad, then play the desired parts repeatedly.<br />
TIP The Looper always records the input audio, and<br />
starts looping as soon as you touch the touch pad.<br />
GRAIN SHIFTER<br />
The looper samples a sound for a short period<br />
of time on a certain cycle, and plays it repeatedly.<br />
This effect is useful for sounds that<br />
change their tone frequently.<br />
VINYL BREAK<br />
This effect simulates the sound heard when a<br />
turntable is stopped. Rubbing the touch pad<br />
will simulate the scratch technique.
2. Mod category<br />
DIST (DISTORTION)<br />
This effect distorts the input sound. Distortion<br />
will add an edginess to the sound.<br />
DECIMATOR<br />
This effect reduces the sampling frequency<br />
or data bit length, creating a gritty and rough<br />
cheap sampler sound.<br />
DUCKING COMP<br />
This compressor effect responds to the bass<br />
range of the input sound. It emphasizes offbeats,<br />
creating a well-framed sound.<br />
TIP The effect may be subtle under certain circumstances.<br />
FLANGER<br />
This effect adds a substantial swell and rolling<br />
pitch. It is very effective with sounds that contain<br />
a lot of harmonics.<br />
PHASER<br />
This effect offsets the phase of the sound, creating<br />
a swell.<br />
3. Filter category<br />
LPF<br />
This filter cuts the treble and boosts the bass.<br />
HPF<br />
This filter cuts the bass and boosts the treble.<br />
BPF+<br />
This filter emphasizes a certain band based on<br />
the current touch pad position.<br />
JET<br />
This filter creates an effect of the high swishing<br />
whine of a jet plane.<br />
PITCH SHIFTER<br />
This filter changes the pitch of the input<br />
sound.<br />
4. Delay/Rev category<br />
1DELAY<br />
This effect delays the input sound and plays<br />
just one delay sound.<br />
DELAY<br />
This is a standard stereo delay effect.<br />
TAPE ECHO<br />
This effect simulates a tape echo, which reproduces<br />
distortion or tonal changes on magnetic<br />
tapes.<br />
REVERB<br />
This effect simulates the ambient reverberation<br />
of a hall.<br />
DELAY REVERB<br />
This effect combines the DELAY and REVERB<br />
effects. First the DELAY effect is applied, followed<br />
by the REVERB effect.<br />
9
10<br />
Specifications<br />
Main controllers Touch pad, EFFECT TYPE button, FX DEPTH<br />
knob<br />
Connectors LINE OUT L/R (RCA jacks), LINE IN L/R (RCA<br />
Power supply DC9V<br />
jacks), MIC IN (unbalanced 6.3 mm phone jack),<br />
HEADPHONES (6.3 mm stereo phone jack)<br />
Dimensions and weight 185 (W) x 213 (D) x 44 (H) mm, 754g<br />
7.28” x 8.39” x 1.73”, 1.66 lbs.<br />
Operating temperature 0–+40 ˚C (non-condensing)<br />
Included items AC adapter, protective sheet for touch pad<br />
* Specifications and appearance are subject to change without notice for improvement.<br />
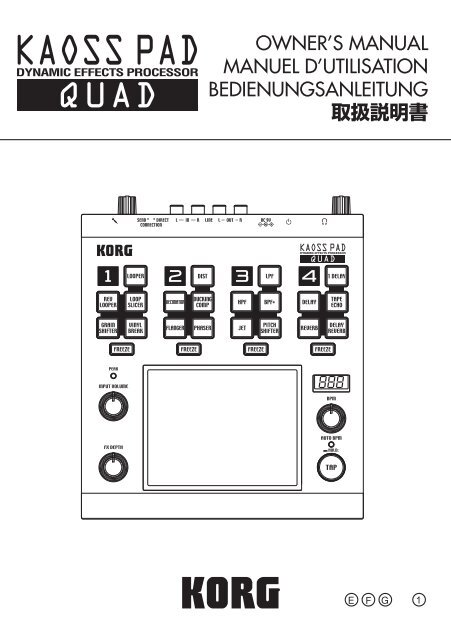
Parts of the <strong>KAOSS</strong> <strong>PAD</strong> <strong>QUAD</strong><br />
11 12 13 1. Effect type button<br />
2. FREEZE button<br />
3. Peak indicator<br />
4. INPUT VOLUME knob<br />
5. FX DEPTH knob<br />
1<br />
6. Display<br />
2<br />
3<br />
6<br />
7. BPM knob<br />
8. AUTO indicator<br />
9. TAP button<br />
4<br />
7<br />
8<br />
10. Touch pad<br />
11. MIC VOLUME knob<br />
5 9 12. Power button<br />
13. PHONES VOLUME knob<br />
10
Précautions<br />
Emplacement<br />
L’utilisation de cet instrument dans les endroits suivants<br />
peut en entraîner le mauvais fonctionnement.<br />
• En plein soleil<br />
• Endroits très chauds ou très humides<br />
• Endroits sales ou fort poussiéreux<br />
• Endroits soumis à de fortes vibrations<br />
• A proximité de champs magnétiques<br />
Alimentation<br />
Branchez l’adaptateur secteur mentionné à une prise<br />
secteur de tension appropriée. Evitez de brancher<br />
l’adaptateur à une prise de courant dont la tension<br />
ne correspond pas à celle pour laquelle l’appareil est<br />
conçu.<br />
Interférences avec d’autres appareils électriques<br />
Les postes de radio et de télévision situés à proximité<br />
peuvent par conséquent souffrir d’interférences<br />
à la réception. Veuillez dès lors faire fonctionner cet<br />
appareil à une distance raisonnable de postes de radio<br />
et de télévision.<br />
Maniement<br />
Pour éviter de les endommager, manipulez les commandes<br />
et les boutons de cet instrument avec soin.<br />
Entretien<br />
Lorsque l’instrument se salit, nettoyez-le avec un<br />
chiffon propre et sec. Ne vous servez pas d’agents<br />
de nettoyage liquides tels que du benzène ou du diluant,<br />
voire des produits inflammables.<br />
Conservez ce manuel<br />
Après avoir lu ce manuel, veuillez le conserver soigneusement<br />
pour toute référence ultérieure.<br />
Evitez toute intrusion d’objets ou de liquide<br />
Ne placez jamais de récipient contenant du liquide<br />
près de l’instrument. Si le liquide se renverse ou coule,<br />
il risque de provoquer des dommages, un courtcircuit<br />
ou une électrocution.<br />
Veillez à ne pas laisser tomber des objets métalliques<br />
dans le boîtier (trombones, par ex.). Si cela se<br />
produit, débranchez l’alimentation de la prise de courant<br />
et contactez votre revendeur korg le plus proche<br />
ou la surface où vous avez acheté l’instrument.<br />
Note concernant les dispositions (Seulement EU)<br />
Quand un symbole avec une poubelle barrée<br />
d’une croix apparait sur le produit, le<br />
mode d’emploi, les piles ou le pack de piles,<br />
cela signifie que ce produit, manuel ou piles<br />
doit être déposé chez un représentant<br />
compétent, et non pas dans une poubelle<br />
ou toute autre déchetterie conventionnelle.<br />
Disposer de cette manière, de prévenir<br />
les dommages pour la santé humaine et les<br />
dommages potentiels pour l'environnement. La<br />
bonne méthode d'élimination dépendra des lois<br />
et règlements applicables dans votre localité, s’il<br />
vous plaît, contactez votre organisme administratif<br />
pour plus de détails. Si la pile contient des métaux<br />
lourds au-delà du seuil réglementé, un symbole<br />
chimique est affiché en dessous du symbole de la<br />
poubelle barrée d’une croix sur la pile ou le pack<br />
de piles.<br />
* Tous les noms de produits et de sociétés sont des<br />
marques commerciales ou déposées de leur détenteur<br />
respectif.<br />
11
12<br />
Introduction<br />
Nous vous remercions d’avoir choisi le processeur<br />
d’effets dynamique <strong>Korg</strong> <strong>KAOSS</strong> <strong>PAD</strong><br />
<strong>QUAD</strong>. Afin de pouvoir exploiter au mieux<br />
toutes les fonctions du <strong>KAOSS</strong> <strong>PAD</strong> <strong>QUAD</strong>,<br />
veuillez lire attentivement ce manuel et utiliser<br />
l’instrument de la manière préconisée.<br />
Caractéristiques principales<br />
Création de combinaisons personnelles d’effets KA-<br />
OSS<br />
Vous pouvez assembler jusqu’à quatre effets<br />
différents pour créer des ensembles d’effets<br />
<strong>KAOSS</strong> très personnels. Les possibilités de<br />
combinaisons se comptent par centaines. Le<br />
changement d’effet se faisant d’une simple<br />
pression sur un bouton et du pad tactile, vous<br />
pouvez changer d’effet autant de fois que vous<br />
le voulez au cours d’un morceau.<br />
Contrôle total et plaisir de jeu inégalé<br />
Touchez, tapez ou frottez du doigt la surface<br />
du pad tactile pour contrôler parfaitement les<br />
effets.<br />
Boucles flexibles à souhait<br />
En plus de la fonction “Looper” traditionnelle,<br />
le <strong>KAOSS</strong> <strong>PAD</strong> <strong>QUAD</strong> propose les fonctions<br />
“Reverse Looper” et “Loop Slicer”. Cette dernière<br />
“tranche” les échantillons puis les met<br />
automatiquement en boucle entre deux points<br />
choisis manuellement. De plus, vous pouvez<br />
changer de type de fonction “Loop” en cours<br />
de reproduction. Ces nouvelles fonctions de<br />
boucle étendent encore les possibilités de<br />
jeu.<br />
Nouvel effet ‘Vinyl Break’<br />
L’effet “Vinyl Break” simule la façon dont une<br />
platine vinyle ralentit progressivement avant de<br />
s’arrêter. Cet effet simule aussi l’effet Scratch<br />
sur un vinyle. Ces effets de platine vinyle sont<br />
principalement destinés aux DJ.<br />
‘Tap Tempo’ et ‘Auto BPM’<br />
Le circuit “Auto BPM” du <strong>KAOSS</strong> <strong>PAD</strong> <strong>QUAD</strong><br />
détecte les informations de tempo de n’importe<br />
quelle source audio et peut synchroniser<br />
les effets avec ce tempo. Vous pouvez aussi<br />
régler la valeur BPM en tapant sur le bouton<br />
Tap selon le rythme de la musique.<br />
Fonction ‘Freeze’<br />
En appuyant sur le bouton FREEZE tout en<br />
touchant le pad, vous mémorisez la position<br />
sur le pad, ce qui vous permet de relâcher le<br />
pad tout en conservant l’effet. Comme chaque<br />
module dispose de son propre bouton<br />
FREEZE, vous pouvez “geler” un module à la<br />
fois pour produire son effet en boucle tandis<br />
que vous continuez à piloter les autres modules<br />
avec le pad tactile. Votre liberté artistique<br />
a toute latitude. Quand vous changez d’effet<br />
sur un module que vous avez “gelé”, le son du<br />
nouvel effet adopte automatiquement le réglage<br />
correspondant à la position “gelée” sur<br />
le pad.
Préparations<br />
Connexions<br />
LECTEUR CD<br />
MÉLANGEUR, MÉLANGEUR DJ<br />
Connexion d’enceintes actives ou d’une console de<br />
mixage aux sorties<br />
Branchez les prises LINE OUT du <strong>KAOSS</strong><br />
<strong>PAD</strong> <strong>QUAD</strong> aux entrées de votre console de<br />
mixage ou de vos enceintes actives.<br />
Si vous utilisez un casque, branchez-le à la<br />
prise PHONES.<br />
ASTUCE: Le son du <strong>KAOSS</strong> <strong>PAD</strong> <strong>QUAD</strong> est toujours<br />
envoyé aux prises LINE OUT même quand vous<br />
branchez un casque.<br />
Connexion d’un micro ou d’un dispositif audio aux<br />
entrées<br />
Si vous utilisez un micro, branchez-le à la<br />
prise MIC.<br />
Vous pouvez brancher les sorties d’un échantillonneur<br />
ou d’une autre source audio aux prises<br />
LINE IN du <strong>KAOSS</strong> <strong>PAD</strong> <strong>QUAD</strong>.<br />
Coupez toujours l’alimentation avant de brancher des<br />
périphériques au <strong>KAOSS</strong> <strong>PAD</strong> <strong>QUAD</strong>. Un mauvais maniement<br />
risque d’endommager vos enceintes ou d’entraîner<br />
d’autres problèmes.<br />
Si vous n’utilisez pas de micro, réglez la commande MIC<br />
VOLUME au minimum.<br />
SECTEUR<br />
ADAPTATEUR SECTEUR<br />
Connexion du <strong>KAOSS</strong> <strong>PAD</strong> <strong>QUAD</strong> à des départ/retour<br />
Vous pouvez utiliser le <strong>KAOSS</strong> <strong>PAD</strong> <strong>QUAD</strong><br />
comme processeur d’effet externe et le brancher<br />
aux prises de départ et de retour d’une<br />
console de mixage. Pour cette connexion,<br />
réglez le commutateur CONNECTION sur<br />
“SEND”.<br />
DIRECT: Le signal d’entrée et le signal d’effet<br />
sont transmis par le <strong>KAOSS</strong> <strong>PAD</strong> <strong>QUAD</strong>. Si<br />
vous ne touchez pas le pad tactile, le signal<br />
d’entrée est retransmis tel quel. “Réglage de<br />
l’intensité de l’effet (p.15)”<br />
SEND: Seul le signal d’effet (et non le signal<br />
d’entrée) est transmis par le <strong>KAOSS</strong> <strong>PAD</strong><br />
<strong>QUAD</strong>.<br />
ASTUCE Pour en savoir plus sur les prises de départ<br />
et de retour, voyez le mode d’emploi du dispositif<br />
branché.<br />
ASTUCE Quand vous utilisez le <strong>KAOSS</strong> <strong>PAD</strong> <strong>QUAD</strong><br />
comme processeur d’effet externe, le niveau de retour<br />
peut être trop faible. Dans ce cas, réglez le niveau<br />
d’entrée sur le <strong>KAOSS</strong> <strong>PAD</strong> <strong>QUAD</strong>. “Réglage<br />
du volume(p.14)”<br />
13
14<br />
Fonctionnement<br />
Interrupteur d’alimentation<br />
1. Branchez le <strong>KAOSS</strong> <strong>PAD</strong> <strong>QUAD</strong> à votre<br />
matériel en vous référant aux illustrations des<br />
pages précédentes puis branchez l’adaptateur<br />
secteur à une prise de courant.<br />
N’utilisez jamais d’autre adaptateur secteur que l’adaptateur<br />
fourni.<br />
2. Appuyez sur l’interrupteur d’alimentation<br />
pour mettre le <strong>KAOSS</strong> <strong>PAD</strong> <strong>QUAD</strong> sous tension.<br />
L’écran s’allume.<br />
Pour mettre le <strong>KAOSS</strong> <strong>PAD</strong> <strong>QUAD</strong> hors tension,<br />
maintenez l’interrupteur d’alimentation<br />
enfoncé jusqu’à ce que l’écran s’éteigne.<br />
Les réglages ne sont pas conservés après la mise hors<br />
tension.<br />
Mise hors tension automatique<br />
Le <strong>KAOSS</strong> <strong>PAD</strong> <strong>QUAD</strong> dispose d’une fonction<br />
“Auto Power Off” qui met automatiquement<br />
l’appareil hors tension s’il reste inutilisé durant<br />
environ quatre heures.<br />
ASTUCE Si un signal d’entrée arrive, l’instrument<br />
n’est pas mis hors tension.<br />
Désactivation de la fonction ‘Auto Power Off’<br />
Effectuez les opérations suivantes pour désactiver<br />
la fonction “Auto Power Off”.<br />
1. Mettez le <strong>KAOSS</strong> <strong>PAD</strong> <strong>QUAD</strong> sous tension<br />
tout en maintenant le bouton 1DELAY enfoncé.<br />
L’écran affiche le réglage en vigueur à l’écran.<br />
2. Tournez la commande BPM pour sélectionner<br />
“dis” à l’écran.<br />
3. Appuyez sur le bouton TAP pour sauvegarder<br />
ce réglage. L’instrument redémarre automatiquement.<br />
4. Pour activer la fonction “Auto Power Off”,<br />
mettez le <strong>KAOSS</strong> <strong>PAD</strong> <strong>QUAD</strong> hors tension<br />
tout en maintenant le bouton 1DELAY enfoncé.<br />
Tournez la commande BPM pour sélectionner<br />
“Ena” à l’écran puis appuyez sur le bouton<br />
TAP.<br />
ASTUCE Si vous coupez l’alimentation sans appuyer<br />
sur le bouton TAP ci-dessus, le changement de réglage<br />
n’est pas appliqué.<br />
ASTUCE A la sortie d’usine, la fonction “Auto Power<br />
Off” est réglée sur “Ena”.<br />
Réglage du volume<br />
1. Utilisez la commande INPUT VOLUME<br />
pour régler le niveau d’entrée.<br />
Choisissez un niveau aussi élevé que possible<br />
tout en évitant que le témoin PEAK ne s’allume<br />
en rouge quand il reçoit des signaux audio.<br />
Si vous utilisez un micro, réglez la commande<br />
MIC VOLUME en fonction de la sensibilité du micro<br />
afin d’éviter une distorsion du signal audio.<br />
2. Si vous écoutez au casque, réglez le volume<br />
du casque avec la commande PHONES<br />
VOLUME.<br />
ASTUCE La commande PHONES VOLUME n’influence<br />
pas le niveau de sortie de la prise LINE OUT.<br />
Sélection d’un effet<br />
Le <strong>KAOSS</strong> <strong>PAD</strong> <strong>QUAD</strong> dispose de quatre modules<br />
d’effet (1~4). Vous pouvez assigner un<br />
effet différent à chacun de ces modules.<br />
En touchant le pad tactile, vous appliquez tous<br />
les effets sélectionnés au son. Vous pouvez<br />
aussi maintenir (“geler”) les effets en appuyant<br />
sur le bouton FREEZE. “Freeze (p.15)”<br />
ASTUCE Les effets sont appliqués dans l’ordre des<br />
modules (1~4).<br />
1. Choisissez un type d’effet en appuyant sur<br />
le bouton de type d’effet correspondant. Le<br />
témoin du bouton de type d’effet sélectionné<br />
s’allume.<br />
2. Pour couper l’effet, appuyez sur le bouton<br />
de type d’effet allumé. Le témoin du bouton de<br />
type d’effet s’éteint et l’effet correspondant est<br />
coupé.<br />
3. Pour changer l’effet d’un module, appuyez<br />
sur le bouton de type d’effet voulu. Le module<br />
en question utilise alors le nouvel effet.<br />
ASTUCE Certaines combinaisons de certains effets<br />
peuvent entraîner de la distorsion.
Réglage de l’intensité de l’effet<br />
Utilisez la commande FX DEPTH pour régler<br />
l’intensité de l’effet. Tournez la commande à<br />
bout de course vers la gauche pour couper le<br />
signal d’effet. Inversement, tournez la commande<br />
à fond vers la droite pour obtenir l’intensité<br />
d’effet maximale.<br />
INPUT OUTPUT<br />
Si vous tournez la commande FX DEPTH à<br />
fond vers la gauche durant le jeu ou si vous<br />
relâchez le pad tactile, le signal d’effet reste<br />
audible jusqu’à la disparition naturelle du delay<br />
ou de la réverbération.<br />
Pad tactile<br />
Vous pouvez contrôler le son en glissant ou en<br />
tapant du doigt sur le pad tactile.<br />
ASTUCE: Avant d’utiliser le pad tactile, apposez le<br />
film protecteur sur le pad.<br />
Précautions liées au pad tactile<br />
N’exercez jamais de force excessive sur le<br />
pad tactile et évitez d’y déposer des objets<br />
lourds. Il risque de se fêler ou de se casser<br />
en cas de maniement brutal. Jouez uniquement<br />
avec le doigt sur le pad tactile: si vous<br />
le frottez ou appuyez dessus avec un objet<br />
acéré, vous risquez de le griffer. Nettoyez le<br />
pad tactile en le frottant délicatement avec<br />
un chiffon sec et doux. N’utilisez pas de solvants<br />
comme de la térébenthine car cela<br />
peut entraîner des déformations.<br />
Freeze<br />
Si vous appuyez sur le bouton FREEZE, le<br />
<strong>KAOSS</strong> <strong>PAD</strong> <strong>QUAD</strong> mémorise la position sur<br />
le pad tactile au moment où vous appuyez sur<br />
le bouton et continue à appliquer les effets<br />
même si vous relâchez le pad.<br />
Vous pouvez utiliser la fonction “Freeze” pour<br />
chaque module d’effet. La position mémorisée<br />
sur le pad s’applique même quand vous changez<br />
d’effet au sein d’un module.<br />
1. Appuyez sur le bouton FREEZE quand votre<br />
doigt est sur le pad. Les réglages d’effet<br />
correspondant à cette position sont mémorisés.<br />
ASTUCE Les modules pour lesquels le bouton FREE-<br />
ZE est activé ne changent pas leurs réglages d’effet<br />
quand vous touchez le pad. Cependant, l’effet des<br />
modules non “gelés” change.<br />
2. Appuyez de nouveau sur le bouton FREE-<br />
ZE pour couper la fonction “Freeze”.<br />
ASTUCE Si vous appuyez de nouveau sur le bouton<br />
FREEZE immédiatement après avoir coupé la fonction<br />
“Freeze”, les réglages d’effet correspondant à<br />
la position mémorisée au préalable sont à nouveau<br />
chargés.<br />
Diode du pad tactile<br />
La diode du pad tactile s’allume selon différents<br />
motifs en fonction des effets sélectionnés,<br />
des réglages “Freeze” ou “BPM” et de<br />
l’utilisation faite du pad.<br />
Réglage de la luminosité de la diode du pad tactile<br />
1. Maintenez le bouton LPF enfoncé et mettez<br />
le <strong>KAOSS</strong> <strong>PAD</strong> <strong>QUAD</strong> sous tension.<br />
La diode du pad tactile s’allume et la valeur de<br />
luminosité s’affiche à l’écran. Plus la valeur est<br />
élevée, plus la diode est lumineuse.<br />
2. Réglez la luminosité avec la commande<br />
BPM.<br />
3. Appuyez sur le bouton TAP pour mémoriser<br />
le réglage. L’instrument redémarre automatiquement.<br />
ASTUCE Si vous coupez l’alimentation sans appuyer<br />
sur le bouton TAP ci-dessus, le changement de réglage<br />
n’est pas mémorisé.<br />
ASTUCE A la sortie d’usine, la luminosité a son réglage<br />
maximum.<br />
Réglage du BPM<br />
Qu’est-ce que le BPM ?<br />
BPM (Beats Per Minute) est le tempo du morceau<br />
exprimé sous la forme du nombre de<br />
temps (noires) par minute. Plus la valeur du<br />
BPM est élevée, plus le tempo est rapide.<br />
ASTUCE Quand vous mettez le <strong>KAOSS</strong> <strong>PAD</strong> <strong>QUAD</strong><br />
soustension, le BPM est réglé sur 120,0.<br />
15
16<br />
Réglage manuel du BPM<br />
Utilisez la commande BPM pour régler la valeur<br />
BPM.<br />
ASTUCE La fonction “Auto BPM” est alors automatiquement<br />
désactivée.<br />
Régler la valeur BPM avec ‘Tap Tempo’<br />
Si vous ne connaissez pas la valeur BPM d’un<br />
morceau, vous pouvez la déterminer en appuyant<br />
sur le bouton TAP selon la pulsation du<br />
morceau.<br />
Appuyez au moins trois fois sur le bouton TAP<br />
en suivant la pulsation du morceau. Le <strong>KAOSS</strong><br />
<strong>PAD</strong> <strong>QUAD</strong> détecte la vitesse à laquelle vous<br />
appuyez sur le bouton. Il affiche la valeur BPM<br />
correspondante à l’écran et l’adopte.<br />
Fonction AUTO BPM<br />
Le <strong>KAOSS</strong> <strong>PAD</strong> <strong>QUAD</strong> peut régler automatiquement<br />
la valeur du BPM en identifiant le<br />
temps du morceau. Si le BPM du morceau<br />
change, le BPM du <strong>KAOSS</strong> <strong>PAD</strong> <strong>QUAD</strong> changera<br />
de manière synchronisée.<br />
1. Maintenez le bouton TAP enfoncé pour activer<br />
la fonction “Auto BPM”. Le témoin AUTO<br />
s’allume. La valeur BPM du signal d’entrée<br />
audio est automatiquement détectée.<br />
Si le <strong>KAOSS</strong> <strong>PAD</strong> <strong>QUAD</strong> n’arrive pas à détecter le BPM<br />
Appuyez plusieurs fois sur la touche TAP en<br />
suivant le temps du morceau. Le <strong>KAOSS</strong> <strong>PAD</strong><br />
<strong>QUAD</strong> détectera automatiquement le BPM<br />
en utilisant les battements de votre doigt. Les<br />
modalités de fonctionnement d’AUTO BPM<br />
rendent possible la détection par erreur d’une<br />
valeur représentant 1/2 ou 1/3 de celle du BPM<br />
correct, ou bien de légères déviations peuvent<br />
survenir. Dans ce cas, vous pouvez utiliser la<br />
touche TAP pour effectuer des corrections.<br />
Si vous appuyez sur la touche TAP alors que<br />
AUTO BPM est activé, la valeur spécifiée en<br />
tapant manuellement deviendra la valeur centrale<br />
d’une gamme de valeurs de BPM.<br />
ASTUCE Il n’est pas possible de détecter la valeur<br />
de BPM d’un morceau dont les temps ne sont pas<br />
prononcés. La gamme de BPM identifiables est comprise<br />
entre 80 et 160.<br />
Désactivation de la fonction ‘Auto BPM’<br />
Maintenez le bouton TAP enfoncé jusqu’à ce<br />
que le témoin AUTO s’éteigne. La fonction<br />
“Auto BPM” est désactivée et l’instrument utilise<br />
la valeur BPM en vigueur lorsque vous avez<br />
désactivé la fonction.
Guide des effets<br />
1. Catégorie ‘Looper’<br />
LOOPER<br />
Le “Looper” échantillonne (enregistre) des<br />
phrases et les reproduit en boucle. Vous pouvez<br />
modifier la longueur des phrases durant<br />
la reproduction en glissant le doigt sur le pad<br />
vers le haut ou vers le bas.<br />
ASTUCE L’enregistrement démarre quand votre doigt<br />
touche le pad. Dès qu’une phrase est enregistrée,<br />
elle est reproduite en boucle.<br />
REV LOOPER (REVERSE LOOPER)<br />
Quand vous touchez le pad du doigt, une phrase<br />
est reproduite à l’envers. Vous pouvez reproduire<br />
une phrase en boucle et en modifier<br />
la longueur en glissant le doigt sur le pad vers<br />
le haut ou vers le bas.<br />
ASTUCE Le Looper enregistre les signaux audio entrant<br />
en continu et les met en boucle dès que vous<br />
touchez le pad tactile.<br />
LOOP SLICER<br />
Une phrase échantillonnée d’une mesure peut<br />
être “tranchée” en sections de longueurs différentes.<br />
Vous pouvez assigner ces sections à<br />
l’axe X du pad et les reproduire en boucle.<br />
ASTUCE Le Looper enregistre les signaux audio entrant<br />
en continu et les met en boucle dès que vous<br />
touchez le pad tactile.<br />
GRAIN SHIFTER<br />
Le Looper enregistre un bref signal audio selon<br />
un certain cycle et le reproduit en boucle.<br />
Cet effet est particulièrement destiné aux sons<br />
dont le timbre change fréquemment.<br />
VINYL BREAK<br />
Cet effet simule le son obtenu lors de l’arrêt<br />
d’une platine vinyle. Frottez le pad tactile pour<br />
simuler l’effet scratch sur vinyle.<br />
2. Catégorie ‘Mod’<br />
DIST (DISTORTION)<br />
Cet effet ajoute de la distorsion au signal d’entrée<br />
et rend le son plus rugueux.<br />
DECIMATOR<br />
Cet effet réduit la fréquence d’échantillonnage<br />
ou le débit en bits et recrée l’effet “lo-fi” d’un<br />
vieil échantillonneur.<br />
DUCKING COMP<br />
Ce compresseur est déclenché par les basses<br />
fréquences du signal d’entrée. Il souligne les<br />
temps pairs et produit un son bien cadré.<br />
ASTUCE L’effet obtenu peut être à peine perceptible<br />
selon les circonstances.<br />
FLANGER<br />
Cet effet gonfle considérablement le son et<br />
plus particulièrement son timbre. Il donne très<br />
bien avec des sons contenant beaucoup d’harmoniques.<br />
PHASER<br />
Cet effet déphase du son, rendant ce dernier<br />
plus vaste.<br />
3. Catégorie ‘Filter’<br />
LPF<br />
Ce filtre coupe l’aigu et accentue le grave.<br />
HPF<br />
Ce filtre coupe le grave et accentue l’aigu.<br />
BPF+<br />
Ce filtre accentue une certaine bande dépendant<br />
de la position du doigt sur le pad tactile.<br />
JET<br />
Ce filtre simule le son produit par un avion à<br />
réaction.<br />
PITCH SHIFTER<br />
Cet effet change la hauteur du signal d’entrée.<br />
17
18<br />
4. Catégorie ‘Delay/Rev’<br />
1DELAY<br />
Cet effet retarde le signal d’entrée et ne produit<br />
pas de répétitions.<br />
DELAY<br />
Cet effet est un delay stéréo standard.<br />
TAPE ECHO<br />
Cet effet simule un écho à bande qui reproduit<br />
la distorsion ou les changements de timbre<br />
des bandes magnétiques.<br />
REVERB<br />
Cet effet simule la réverbération d’une salle.<br />
DELAY REVERB<br />
Cet effet combine les effets DELAY et RE-<br />
VERB. Il applique d’abord l’effet DELAY puis<br />
l’effet REVERB.
Fiche technique<br />
Description du <strong>KAOSS</strong> <strong>PAD</strong> <strong>QUAD</strong><br />
1<br />
2<br />
11<br />
Contrôleurs principaux Pad tactile, Bouton de type d’effet, Commande<br />
3<br />
6<br />
4<br />
7<br />
8<br />
5 9<br />
10<br />
12 13<br />
FX DEPTH<br />
Prises LINE OUT (prises stéréo RCA/cinch), LINE IN<br />
Alimentation DC9V<br />
(prises stéréo RCA/cinch), MIC IN (mini-jack<br />
asymétrique de 6,3mm), HEADPHONES (mini-<br />
jack stéréo de 6,3mm)<br />
Dimensions et poids 185 (W) x 213 (D) x 44 (H) mm, 754g<br />
Température de fonctionnement 0~+40˚C (sans condensation)<br />
Accessoires fournis Adaptateur secteur, Film protecteur du pad tactile<br />
* Les caractéristiques et l’aspect du produit sont susceptibles d’être modifiés sans avis préalable<br />
en vue d’une amélioration.<br />
1. Bouton de type d’effet<br />
2. Bouton FREEZE<br />
3. Témoins PEAK<br />
4. Commande INPUT VOLUME<br />
5. Commande FX DEPTH<br />
6. Ecran<br />
7. Commande BPM<br />
8. Témoin AUTO<br />
9. Bouton TAP<br />
10. Pad tactile<br />
11. commande MIC VOLUME<br />
12. Interrupteur d’alimentation<br />
13. commande PHONES VOLUME<br />
19
20<br />
Vorsichtsmaßnahmen<br />
Aufstellungsort<br />
Vermeiden Sie das Aufstellen des Geräts an Orten, an<br />
denen<br />
• es direkter Sonneneinstrahlung ausgesetzt ist;<br />
• hohe Feuchtigkeit oder Extremtemperaturen auftreten<br />
können;<br />
• Staub oder Schmutz in großen Mengen vorhanden<br />
sind;<br />
• das Gerät Erschütterungen ausgesetzt sein kann.<br />
•<br />
in der Nähe eines Magnetfeldes.<br />
Stromversorgung<br />
Schließen Sie das optionale Netzteil nur an eine geeignete<br />
Steckdose an. Verbinden Sie es niemals mit einer<br />
Steckdose einer anderen Spannung.<br />
Störeinflüsse auf andere Elektrogeräte<br />
Dieser kann bei in der Nähe aufgestellten Rund-funkempfängern<br />
oder Fernsehgeräten Empfangsstörungen<br />
hervorrufen. Betreiben Sie solche Geräte nur in einem<br />
geeigneten Abstand von diesem Erzeugnis.<br />
Bedienung<br />
Vermeiden Sie bei der Bedienung von Schaltern und<br />
Reglern unangemessenen Kraftaufwand.<br />
Reinigung<br />
Bei auftretender Verschmutzung können Sie das Gehäuse<br />
mit einem trockenen, sauberen Tuch abwischen.<br />
Verwenden Sie keinerlei Flüssigreiniger wie beispielsweise<br />
Reinigungsbenzin, Verdünnungs- oder Spülmittel.<br />
Verwenden Sie niemals brennbare Reiniger.<br />
Bedienungsanleitung<br />
Bewahren Sie diese Bedienungsanleitung gut auf, falls<br />
Sie sie später noch einmal benötigen.<br />
Flüssigkeiten und Fremdkörper<br />
Stellen Sie niemals Behältnisse mit Flüssigkeiten in<br />
der Nähe des Geräts auf. Wenn Flüssigkeit in das Gerät<br />
gelangt, können Beschädigung des Geräts, Feuer<br />
oder ein elek-trischer Schlag die Folge sein.<br />
Beachten Sie, daß keinerlei Fremdkörper in das Gerät<br />
gelangen. Sollte ein Fremdkörper in das Gerät gelangt<br />
sein, so trennen Sie es sofort vom Netz. Wenden Sie<br />
sich dann an Ihren KORG-Fachhändler.<br />
Hinweis zur Entsorgung (Nur EU)<br />
Wenn Sie das Symbol mit der „durchgekreuzten<br />
Mülltonne“ auf Ihrem Produkt, der<br />
dazugehörigen Bedienungsanleitung, der<br />
Batterie oder dem Batteriefach sehen, müssen<br />
Sie das Produkt in der vorgeschriebenen<br />
Art und Weise entsorgen. Dies bedeutet,<br />
dass dieses Produkt mit elektrischen und<br />
elektronischen Komponenten nicht mit dem<br />
normalen Hausmüll entsorgt werden darf. Für Produkte<br />
dieser Art existiert ein separates, gesetzlich<br />
festgelegtes Entsorgungssystem. Gebrauchte elektrische<br />
und elektronische Geräte müssen separat<br />
entsorgt werden, um ein umweltgerechtes Recycling<br />
sicherzustellen. Diese Produkte müssen bei benannten<br />
Sammelstellen abgegeben werden. Die Entsorgung<br />
ist für den Endverbraucher kostenfrei! Bitte erkundigen<br />
sie sich bei ihrer zuständigen Behörde, wo<br />
sie diese Produkte zur fachgerechten Entsorgung<br />
abgeben können.<br />
Falls ihr Produkt mit Batterien oder Akkumulatoren<br />
ausgerüstet ist, müssen sie diese vor Abgabe des<br />
Produktes entfernen und separat entsorgen (siehe<br />
oben). Die Abgabe dieses Produktes bei einer zuständigen<br />
Stelle hilft ihnen, dass das Produkt umweltgerecht<br />
entsorgt wird. Damit leisten sie persönlich<br />
einen nicht unerheblichen Beitrag zum Schutz<br />
der Umwelt und der menschlichen Gesundheit vor<br />
möglichen negativen Effekten durch unsachgemäße<br />
Entsorgung von Müll. Batterien oder Akkus, die<br />
Schadstoffe enthalten, sind auch mit dem Symbol<br />
einer durchgekreuzten Mülltonne gekennzeichnet.<br />
In der Nähe zum Mülltonnensymbol befindet sich die<br />
chemische Bezeichnung des Schadstoffes.<br />
Cd oder NiCd steht für Cadmium, Pb für Blei und Hg<br />
für Quecksilber.<br />
* Alle Produkt- und Firmennamen sind Warenzeichen<br />
oder eingetragene Warenzeichen der betreffenden Eigentümer.
Vorweg<br />
Vielen Dank für Ihre Entscheidung zu einem dynamischen<br />
Effektprozessors <strong>Korg</strong> <strong>KAOSS</strong> <strong>PAD</strong><br />
<strong>QUAD</strong>. Um alle Funktionen des <strong>KAOSS</strong> <strong>PAD</strong><br />
<strong>QUAD</strong> kennen zu lernen und über Jahre hinaus<br />
Freude daran zu haben, müssen Sie sich diese<br />
Bedienungsanleitung vollständig durchlesen.<br />
Hauptfunktionen<br />
Erstellung eigener <strong>KAOSS</strong>-Effektkombinationen<br />
Es lassen sich bis zu vier verschiedene Effekte<br />
zu <strong>KAOSS</strong>-Effektkombinationen konfigurieren,<br />
woraus sich Hunderte von Möglichkeiten ergeben.<br />
Da die Umschaltung auf Tastendruck und<br />
Berühren des Pads erfolgen kann, lassen sich<br />
innerhalb eines Songs auch unterschiedliche Effektkombinationen<br />
verwenden.<br />
Umfassende Kontrolle—ein wahrer Kreativitätsschub<br />
Berühren Sie das Pad, tappen Sie darauf oder<br />
reiben Sie darüber, um die Effekte auf eine überaus<br />
flexible Art zu beeinflussen.<br />
Flexible Loops<br />
Außer einer herkömmlichen „Looper“-Funktion<br />
bietet das <strong>KAOSS</strong> <strong>PAD</strong> <strong>QUAD</strong> einen „Reverse<br />
Looper“ und einen „Loop Slicer“. Letzterer<br />
kann das gewählte Sample in Stücke schneiden<br />
und zwischen den von Hand gewählten Positionen<br />
Schleifen abspielen. Selbst während der<br />
Looper-Wiedergabe kann eine andere dieser<br />
Schleifenfunktionen gewählt werden. Dank der<br />
neu hinzugekommenen Funktionen lässt es sich<br />
viel kreativer mit Loops arbeiten.<br />
Neuer ‘Vinyl Break’-Effekt<br />
Der „Vinyl Break“-Effekt simuliert den Effekt, der<br />
beim Anhalten eines Plattentellers auftritt und<br />
sogar das „Scratchen“ mit einem Plattenteller.<br />
Diese Effekte eignen sich natürlich in erster Linie<br />
für DJs.<br />
‘Tap Tempo’ und ‘Auto BPM’<br />
Die „Auto BPM“-Schaltung des <strong>KAOSS</strong> <strong>PAD</strong><br />
<strong>QUAD</strong> kann Tempo-Impulse von Audiomaterial<br />
ermitteln und die Effekte zu dem berechneten<br />
Tempowert synchronisieren. Andererseits können<br />
Sie den BPM-Wert sehr bequem einstellen,<br />
indem Sie den TAP-Taster im Rhythmus der Musik<br />
drücken.<br />
‘Freeze’-Funktion<br />
Durch Drücken des FREEZE-Tasters, während<br />
Sie das Pad berühren, können Sie die aktuell<br />
verwendeten Einstellungen „einfrieren“, d.h. halten,<br />
selbst wenn Sie das Pad freigeben. Da für<br />
jedes Effektmodul ein separater FREEZE-Taster<br />
zur Verfügung steht, brauchen nicht unbedingt<br />
alle Effekteinstellungen gleichzeitig gehalten zu<br />
werden. So können Sie also ausgesprochen kreativ<br />
arbeiten. Und wenn Sie ein Effektmodul zuerst<br />
„einfrieren“ und danach einen anderen Effekttyp<br />
wählen, wird auch dafür sofort der Sound<br />
der „eingefrorenen“ Pad-Position verwendet.<br />
21
22<br />
Vorbereitungen<br />
Anschlüsse<br />
CD-Player<br />
Mischpult, DJ-Mixer<br />
Anschließen eines Verstärkers, Mischpults usw. an<br />
die Ausgänge<br />
Verbinden Sie die LINE OUT-Buchsen des<br />
<strong>KAOSS</strong> <strong>PAD</strong> <strong>QUAD</strong> mit den Eingängen eines<br />
Mischpults oder mit Ihren Aktivboxen (d.h. Boxen<br />
mit internem Verstärker).<br />
An die Kopfhörerbuchse des PHONES kann ein<br />
optionaler Kopfhörer angeschlossen werden.<br />
TIPP Beim Anschließen eines Kopfhörers an das<br />
<strong>KAOSS</strong> <strong>PAD</strong> <strong>QUAD</strong> werden die LINE OUT-Buchsen<br />
nicht stummgeschaltet.<br />
Anschließen eines Mikrofons oder einer Audioquelle<br />
an die Eingänge<br />
Wenn Sie ein Mikrofon verwenden möchten,<br />
müssen Sie es an die MIC-Buchse anschließen.<br />
Ein Sampler bzw. ein anderes Audiogerät muss<br />
mit den LINE IN-Buchsen des <strong>KAOSS</strong> <strong>PAD</strong><br />
<strong>QUAD</strong> verbunden werden.<br />
Sie alle Geräte aus, bevor Sie sie mit dem <strong>KAOSS</strong> <strong>PAD</strong><br />
<strong>QUAD</strong> verbinden. Andernfalls könnten Sie die Lautsprecher<br />
beschädigen oder Betriebsstörungen verursachen.<br />
Solange Sie kein Mikrofon verwenden, sollten Sie den<br />
MIC VOLUME-Regler auf den Mindestwert stellen.<br />
Netzteil<br />
Steckdose<br />
Verbinden des <strong>KAOSS</strong> <strong>PAD</strong> <strong>QUAD</strong> mit den SEND/RE-<br />
TURN-Buchsen<br />
Wenn Sie das <strong>KAOSS</strong> <strong>PAD</strong> <strong>QUAD</strong> an die SEND/<br />
RETURN-Buchsen eines Mischpults anschließen,<br />
können Sie es als „allgemeinen“ Effekt verwenden.<br />
In dem Fall müssen Sie den CONNEC-<br />
TION-Schalter auf „SEND“ stellen.<br />
DIRECT: Das <strong>KAOSS</strong> <strong>PAD</strong> <strong>QUAD</strong> gibt sowohl<br />
das Direkt- als auch das Effektsignal aus. Solange<br />
Sie das Pad nicht berühren, wird das Eingangssignal<br />
unverändert ausgegeben. „Beeinflussung<br />
des Effektanteils (p.24)”<br />
SEND: Das <strong>KAOSS</strong> <strong>PAD</strong> <strong>QUAD</strong> gibt nur das Effektsignal<br />
aus—also nicht das Direktsignal.<br />
TIPP Weitere Hinweise zur Send/Return-Verbindung<br />
mit dem Mischpult entnehmen Sie bitte dessen Bedienungsanleitung.<br />
TIPP Wenn Sie das <strong>KAOSS</strong> <strong>PAD</strong> <strong>QUAD</strong> als Send/Return-Effektprozessor<br />
nutzen, ist sein Ausgangspegel<br />
eventuell niedriger als erwartet. Das können Sie aber<br />
lösen, indem Sie den Eingangspegel des <strong>KAOSS</strong> <strong>PAD</strong><br />
<strong>QUAD</strong> erhöhen. „Einstellen der Lautstärke (p.23)”
Bedienung<br />
Verwendung des Netzschalters<br />
1. Schließen Sie das <strong>KAOSS</strong> <strong>PAD</strong> <strong>QUAD</strong> wie<br />
auf den vorangehenden Seiten gezeigt an und<br />
verbinden Sie sein Netzteil mit einer Steckdose.<br />
Es darf ausschließlich das beiliegende Netzteil gebraucht<br />
werden.<br />
2. Drücken Sie den Netzschalter, um das<br />
<strong>KAOSS</strong> <strong>PAD</strong> <strong>QUAD</strong> einzuschalten. Das Display<br />
leuchtet.<br />
Um das <strong>KAOSS</strong> <strong>PAD</strong> <strong>QUAD</strong> einzuschalten,<br />
müssen Sie den Netztaster so lange gedrückt<br />
halten, bis die Display-Anzeigen erlöschen.<br />
Beim Ausschalten werden alle vorgenommenen Einstellungen<br />
wieder gelöscht.<br />
Ausschaltautomatik<br />
Das <strong>KAOSS</strong> <strong>PAD</strong> <strong>QUAD</strong> enthält eine „Auto Power<br />
Off“-Funktion, die dafür sorgt, dass es sich<br />
automatisch ausschaltet, wenn Sie es mehr als<br />
vier Stunden nicht verwenden.<br />
TIPP Diese Automatik funktioniert jedoch nicht, wenn<br />
das Gerät weiterhin Audiosignale empfängt.<br />
Deaktivieren der ‘Auto Power Off’-Funktion<br />
Zum Deaktivieren der „Auto Power Off“-Funktion<br />
gehen Sie bitte folgendermaßen vor.<br />
1. Halten Sie den 1DELAY-Taster gedrückt,<br />
während Sie das <strong>KAOSS</strong> <strong>PAD</strong> <strong>QUAD</strong> einschalten.<br />
Das Display zeigt jetzt die aktuell verwendeten<br />
Einstellungen an.<br />
2. Wählen Sie mit dem BPM-Regler „dis“ im<br />
Display.<br />
3. Drücken Sie den TAP-Taster, um diese Einstellung<br />
zu speichern. Das Gerät wird automatisch<br />
neugestartet.<br />
4. Um die „Auto Power Off“-Funktion zu aktivieren,<br />
müssen Sie den 1DELAY-Taster gedrückt<br />
halten, während Sie das <strong>KAOSS</strong> <strong>PAD</strong> <strong>QUAD</strong><br />
einschalten. Wählen Sie mit dem BPM-Regler<br />
„Ena“ im Display und drücken Sie anschließend<br />
den TAP-Taster.<br />
TIPP Wenn Sie das Gerät ausschalten, ohne vorher<br />
den TAP-Taster zu drücken, wird die neue Einstellung<br />
nicht gespeichert.<br />
TIPP Die Werksvorgabe für „Auto Power Off“ lautet<br />
„Ena“.<br />
Einstellen der Lautstärke<br />
1. Stellen Sie mit dem INPUT VOLUME-Regler<br />
den Eingangspegel ein.<br />
Stellen Sie den Pegel so hoch wie möglich ein.<br />
Allerdings darf die PEAK-Diode selbst bei Signalspitzen<br />
niemals leuchten.<br />
Wenn Sie mit einem Mikrofonsignal arbeiten,<br />
müssen Sie den MIC VOLUME-Regler so einstellen,<br />
dass der Pegel hoch genug ist, jedoch<br />
ohne Übersteuerung zu bewirken.<br />
2. Wenn Sie einen Kopfhörer anschließen, können<br />
Sie den Hörpegel mit dem PHONES VOLU-<br />
ME-Regler einstellen.<br />
TIPP Die Lautstärke der an LINE OUT anliegenden Signale<br />
wird vom PHONES VOLUME-Regler nicht beeinflusst.<br />
Anwahl eines Effekts<br />
Das <strong>KAOSS</strong> <strong>PAD</strong> <strong>QUAD</strong> enthält vier Effektmodule<br />
(1–4). Diesen Modulen können unterschiedliche<br />
Effekte zugeordnet werden.<br />
Wenn Sie das Pad berühren, wird das Eingangssignal<br />
von allen gewählten Effekten bearbeitet.<br />
Wenn Sie den FREEZE-Taster aktivieren, wird<br />
das Eingangssignal selbst nach Freigabe des<br />
Pads noch mit den Effekten bearbeitet. „Freeze<br />
(p.24)”<br />
TIPP Die Effektreihenfolge entspricht der Reihenfolge<br />
der Effektmodule (1–4).<br />
1. Um einen Effekt zu wählen, brauchen Sie<br />
nur den Taster des gewünschten Typs im Tastenfeld<br />
eines Moduls zu drücken. Der Taster des<br />
gewählten Effekttyps leuchtet.<br />
2. Um einen Effekt wieder auszuschalten, müssen<br />
Sie den leuchtenden Effekttyptaster erneut<br />
drücken. Die Tasterdiode erlischt und der Effekt<br />
wird deaktiviert.<br />
23
24<br />
3. Um einem Modul einen anderen Effekttyp<br />
zuzuordnen, drücken Sie einfach den Taster des<br />
gewünschten Typs. Das betreffende Modul verwendet<br />
dann den neu gewählten Effekttyp.<br />
TIPP Bestimmte Effektkombinationen können zu Übersteuerung<br />
führen.<br />
Beeinflussung des Effektanteils<br />
Mit dem FX DEPTH-Regler kann der Effektanteil<br />
eingestellt werden. Wenn Sie den Regler ganz<br />
nach links drehen, werden die Effekte nicht angesprochen.<br />
Drehen Sie den Regler ganz nach<br />
rechts, um mit dem maximalen Effektanteil zu<br />
arbeiten.<br />
INPUT OUTPUT<br />
Wenn Sie den FX DEPTH-Regler während der<br />
Bearbeitung ganz nach links drehen oder das<br />
Pad freigeben, klingen Hall- und Delay-Effekte<br />
trotzdem natürlich aus.<br />
Verwendung des berührungsempfindlichen<br />
Pads<br />
Alle Fingerbewegungen auf dem berührungsempfindlichen<br />
Pad beeinflussen die Tonausgabe.<br />
TIPP Vor der ersten Verwendung sollten Sie den beiliegenden<br />
Schutzfilm auf dem Pad anbringen.<br />
Pflege des berührungsempfindlichen Pads<br />
Drücken Sie niemals mit Gewalt auf das Pad<br />
und stellen Sie keine schweren Gegenstände<br />
darauf. Bei einer all zu forschen Handhabung<br />
wird es beschädigt. Bedienen Sie das<br />
Pad nur mit den Fingern, weil andere Gegenstände<br />
es verkratzen könnten. Verwenden<br />
Sie zum Reinigen des Pads ein weiches<br />
trockenes Tuch. Benutzen Sie niemals Lösungsmittel<br />
wie Verdünner, weil das zu Verformungen<br />
führt.<br />
Freeze<br />
Wenn Sie den FREEZE-Taster drücken, werden<br />
die Effekteinstellungen der aktuellen Fingerposition<br />
auf dem Pad gepuffert. Das <strong>KAOSS</strong> <strong>PAD</strong><br />
<strong>QUAD</strong> verwendet die entsprechenden Einstellungen<br />
dann selbst, wenn Sie das Pad wieder<br />
freigeben.<br />
Jedes Effektmodul ist mit einem separaten<br />
FREEZE-Taster ausgestattet. Die gepufferte<br />
Pad-Position wird selbst beibehalten, wenn Sie<br />
für jenes Modul einen anderen Effekttyp wählen.<br />
1. Berühren Sie das Pad und drücken Sie den<br />
FREEZE-Taster. Die über die Pad-Position gewählten<br />
Effekteinstellungen werden beibehalten.<br />
TIPP Module, deren FREEZE-Taster aktiv ist, ändern<br />
ihre Effekteinstellungen nicht mehr, wenn Sie auf dem<br />
Pad „rühren“. Nur die nicht „eingefrorenen“ Module<br />
werden von der Pad-Bedienung beeinflusst.<br />
2. Drücken Sie den FREEZE-Taster erneut, um<br />
die „Freeze“-Funktion zu deaktivieren.<br />
TIPP Sie können den FREEZE-Taster nach Deaktivieren<br />
dieser Funktion erneut drücken, um wieder die zuvor<br />
gepufferten Effekteinstellungen zu verwenden.<br />
Diode des berührungsempfindlichen Pads<br />
Das Leuchtmuster der Pad-Diode richtet sich<br />
nach den gewählten Effekten, der „Freeze“- und<br />
„BPM“-Einstellung sowie der aktuellen Verwendung<br />
des Pads.<br />
Ändern der Helligkeit der Pad-Diode<br />
1. Halten Sie den LPF-Taster gedrückt, während<br />
Sie das <strong>KAOSS</strong> <strong>PAD</strong> <strong>QUAD</strong> wieder einschalten.<br />
Die Pad-Diode leuchtet und der aktuelle Helligkeitswert<br />
erscheint im Display. Je größer der<br />
Wert, desto heller leuchtet die Diode.<br />
2. Wählen Sie mit dem BPM-Regler die gewünschte<br />
Helligkeit.<br />
3. Drücken Sie den TAP-Taster, um die Einstellung<br />
zu speichern. Das Gerät wird automatisch<br />
neugestartet.<br />
TIPP Wenn Sie das Gerät ausschalten, ohne vorher<br />
den TAP-Taster zu drücken, wird die neue Einstellung<br />
nicht gespeichert.<br />
TIPP Ab Werk wird der maximale Helligkeitswert verwendet.
Festlegen der Taktzahl (BPM)<br />
Was bedeutet BPM?<br />
Die Taktzahl (BPM, Beats per Minute) drückt<br />
das Tempo eines Stücks als Anzahl der Taktschläge<br />
(Viertelnoten) pro Minute aus. Je höher<br />
der BPM-Wert, desto schneller das Tempo.<br />
TIPP Beim Einschalten des <strong>KAOSS</strong> <strong>PAD</strong> <strong>QUAD</strong> ist die<br />
Taktzahl auf 120,0 eingestellt.<br />
Manuelle Einstellung des BPM-Werts<br />
Mit dem BPM-Regler kann der gewünschte<br />
BPM-Wert eingestellt werden.<br />
TIPP Die „Auto BPM“-Funktion wird dann automatisch<br />
deaktiviert.<br />
Einstellen des BPM-Werts mit ‘Tap Tempo’<br />
Wenn Sie den BPM-Wert eines Titels nicht genau<br />
kennen, können Sie ihn einstellen, indem<br />
Sie den TAP TEMPO-Taster im Takt des Titels<br />
drücken.<br />
Drücken Sie den TAP TEMPO-Taster mindestens<br />
drei Mal im Takt des Songs. Das <strong>KAOSS</strong><br />
<strong>PAD</strong> <strong>QUAD</strong> ermittelt den entsprechenden BPM-<br />
Wert, zeigt ihn im Display an und stellt ihn ein.<br />
Automatische Taktzahl-Erkennung<br />
Der <strong>KAOSS</strong> <strong>PAD</strong> <strong>QUAD</strong> kann den Taktzahlwert<br />
automatischdurch Erkennung des Takts des<br />
Stücks einstellen. Wenn die Taktzahl sich ändert,<br />
ändert sich der Taktzahlwert des <strong>KAOSS</strong><br />
<strong>PAD</strong> <strong>QUAD</strong> synchron damit.<br />
1. Halten Sie den TAP-Taster gedrückt, um die<br />
„Auto BPM“-Funktion zu aktivieren. Die AUTO-<br />
Diode leuchtet. Jetzt wird der BPM-Wert der eingehenden<br />
Audiosignale automatisch ermittelt.<br />
Wenn der <strong>KAOSS</strong> <strong>PAD</strong> <strong>QUAD</strong> nicht die Taktzahl ermitteln<br />
kann<br />
Drücken Sie die TAP-Taste mehrmals entsprechend<br />
dem Takt des Stücks; der <strong>KAOSS</strong> <strong>PAD</strong><br />
<strong>QUAD</strong> ermittelt automatisch die Taktzahl mit<br />
dem manuell eingetrommelten Takt als Richtlinie.<br />
Aufgrund der Weise, wie die automatische Taktzahl-Funktion<br />
arbeitet, kann fälschlich ein Wert<br />
ermittelt werden, der 1/2 oder 2/3 des korrekten<br />
Taktzahlwerts ist, oder es können kleine Abweichungen<br />
auftreten. In solchen Fällen können<br />
Sie die Taste TAP verwenden, um Korrekturen<br />
vorzunehmen Wenn Sie die Taste TAP drükken,<br />
während die automatisch Taktzahl-Erkennung<br />
aktiv ist, wird der durch Antrommeln festgelegte<br />
Wert der Mittenwert des Taktzahlbereichs.<br />
TIPP Es ist nicht möglich, den Taktzahl- Wert von Musik<br />
zu ermitteln, die keinen deutlichen Takt aufweist.<br />
Der Taktzahl-Erkennungsbereich beträgt<br />
80 bis 160.<br />
Deaktivieren von ‘Auto BPM’<br />
Halten Sie den TAP-Taster so lange gedrückt,<br />
bis die AUTO-Diode erlischt. Die „Auto BPM“-<br />
Funktion wird deaktiviert und als Tempo wird<br />
weiterhin der zuletzt ermittelte BPM-Wert verwendet.<br />
25
26<br />
Die Effekte<br />
1. ‘Looper’-Kategorie<br />
LOOPER<br />
Der „Looper“ zeichnet Phrasen auf (d.h. er<br />
„sampelt“ sie) und spielt sie wiederholt ab. Die<br />
Länge der Phrasen kann man bei laufender Wiedergabe<br />
ändern, indem man mit einem Finger<br />
auf- oder abwärts über das Pad reibt.<br />
TIPP Die Aufnahme beginnt, sobald Sie das Pad mit<br />
einem Finger berühren. Wenn Sie das Pad wieder freigeben,<br />
hält die Aufnahme an – und die Phrase wird<br />
wiederholt abgespielt.<br />
REV LOOPER (REVERSE LOOPER)<br />
Wenn Sie das Pad mit einem Finger berühren,<br />
wird eine Phrase rückwärts abgespielt. Die Länge<br />
der rückwärts abgespielten Phrase kann man<br />
bei laufender Wiedergabe ändern, indem man<br />
mit einem Finger auf- oder abwärts über das<br />
Pad reibt.<br />
TIPP Der Looper nimmt die eingehenden Audiosignale<br />
fortwährend auf und spielt eine Schleife ab, sobald Sie<br />
das Pad berühren.<br />
LOOP SLICER<br />
Eine gesampelte Phrase kann in unterschiedlich<br />
große Stücke zerteilt werden. Diese Bruchteile<br />
können der X-Achse des Pads zugeordnet und<br />
danach in einer Schleife abgespielt werden.<br />
TIPP Der Looper nimmt die eingehenden Audiosignale<br />
fortwährend auf und spielt eine Schleife ab, sobald Sie<br />
das Pad berühren.<br />
GRAIN SHIFTER<br />
Der Looper sampelt ein kurzes Audiosignal<br />
(z.B. einen Zyklus) und spielt es danach in einer<br />
Schleife ab. Dieser Effekt eignet sich besonders<br />
für Klänge mit häufigen Klangfarbenänderungen.<br />
VINYL BREAK<br />
Dieser Effekt simuliert den Klangeindruck eines<br />
anhaltenden Plattentellers. Reiben Sie über das<br />
Pad, wenn Sie „scratchen“ möchten.<br />
2. ‘Mod’-Kategorie<br />
DIST (DISTORTION)<br />
Dieser Effekt verzerrt das Eingangssignal. Das<br />
führt zu einer rauen, kratzbürstigen Wiedergabe.<br />
DECIMATOR<br />
Dieser Effekt reduziert die Sampling-Frequenz<br />
oder Wortbreite (Anzahl der Bits) und simuliert<br />
so den „LoFi“-Klang eines alten oder billigen<br />
Samplers.<br />
DUCKING COMP<br />
Dieser Kompressor wird von den Bassfrequenzen<br />
des eingehenden Audiosignals ausgelöst.<br />
Hierdurch werden die geradzahligen Taktschläge<br />
und Schlagunterteilungen hervorgehoben.<br />
TIPP Bei bestimmtem Audiomaterial ist dieser<br />
Effekt kaum hörbar.<br />
FLANGER<br />
Versieht das Eingangssignal mit einem Schwelleffekt,<br />
der vor allem die Klangfarbe beeinflusst.<br />
Daher eignet er sich besonders für obertonreiche<br />
Signale.<br />
PHASER<br />
Dieser Effekt erzeugt einen periodischen Phasenversatz,<br />
der ebenfalls an- und abschwillt.<br />
3. ‘Filter’-Kategorie<br />
LPF<br />
Dieses Filter unterdrückt die Höhen und hebt<br />
den Bass hervor.<br />
HPF<br />
Dieses Filter unterdrückt den Bass und hebt die<br />
Höhen hervor.<br />
BPF+<br />
Dieses Filter hebt ein relativ schmales Frequenzband<br />
hervor, das man über die Fingerposition<br />
auf dem Pad wählen kann.<br />
JET<br />
Dieses Filter simuliert den hochfrequenten „Wuusch“<br />
eines Düsenjägers.<br />
PITCH SHIFTER<br />
Dieser Effekt ändert die Tonhöhe des eingehenden<br />
Signals.
4. ‘Delay/Rev’-Kategorie<br />
1DELAY<br />
Dieser Effekt verzögert das Eingangssignal, erzeugt<br />
aber keine Wiederholungen.<br />
DELAY<br />
Hierbei handelt es sich um ein herkömmliches<br />
Stereo-Delay.<br />
TAPE ECHO<br />
Dieser Effekt simuliert ein bandbasiertes Echogerät,<br />
das nicht nur Wiederholungen, sondern<br />
auch leichte Unsauberkeiten erzeugt.<br />
REVERB<br />
Dieser Effekt simuliert die Akustik eines Konzertsaals.<br />
DELAY REVERB<br />
Dies ist eine Kombination des DELAY-Effekts<br />
mit REVERB. Der DELAY-Effekt bearbeitet das<br />
Signal zuerst. Sein Ausgangssignal geht dann<br />
zum REVERB-Effekt.<br />
27
28<br />
Technische Daten<br />
Wichtigste Bedienelemente Berührungsempfindliches Pad, Effekttypwahltas-<br />
ter, FX DEPTH-Regler<br />
Anschlüsse LINE OUT (RCA/Cinch, stereo), LINE IN (RCA/<br />
Stromversorgung DC9V<br />
Cinch, stereo), MIC IN (unsymmetrische 6,3mm-<br />
Klinkenbuchse), HEADPHONES (6,3mm-<br />
Stereoklinkenbuchse)<br />
Abmessungen und Gewicht 185 (B) x 213 (T) x 44 (H) mm, 754g<br />
Betriebstemperatur 0–+40˚C (ohne Kondensbildung)<br />
Lieferumfang Netzteil, Schutzfilm für das berührungsempfindliche<br />
* Änderungen der technischen Daten und des Designs ohne vorherige Ankündigung vorbehalten.<br />
Pad<br />
Bedienelemente des <strong>KAOSS</strong> <strong>PAD</strong> <strong>QUAD</strong><br />
1<br />
2<br />
11<br />
3<br />
6<br />
4<br />
7<br />
8<br />
5 9<br />
10<br />
12 13<br />
1. Effekttypwahltaster<br />
2. FREEZE-Taster<br />
3. PEAK-Diode<br />
4. INPUT VOLUME-Regler<br />
5. FX DEPTH-Regler<br />
6. Display<br />
7. BPM-Regler<br />
8. AUTO-Diode<br />
9. TAP-Taster<br />
10.Berührungsempfindliches Pad<br />
11. MIC VOLUME-Regler<br />
12. Netzschalters<br />
13. PHONES VOLUME-Regler
38<br />
Effect Type List<br />
FX Category<br />
LOOPER<br />
MOD<br />
FILTER<br />
SIGNAL PATH<br />
DELAY/REVERB<br />
FX Name Assign X Assign Y BPM Sync<br />
LOOPER - Looper beat o<br />
REV LOOPER - Looper beat o<br />
LOOP SLICER Slice Position Looper beat o<br />
GRAIN SHIFTER LFO Sync Note Duration o<br />
VINYL BREAK Stop Speed Scratch x<br />
DIST Tone Gain x<br />
DECIMATOR Sample Rate Bit Depth x<br />
DUCKING COMP Ratio Threshold x<br />
FLANGER LFO Speed Feedback x<br />
PHASER LFO Speed Resonance x<br />
LPF Cutoff frequency Resonance x<br />
HPF Cutoff frequency Resonance x<br />
BPF+ Cutoff frequency Resonance x<br />
JET Delay time Feedback x<br />
PITCH SHIFTER Pitch Mix Balance x<br />
1 DELAY Delay time Pan o<br />
DELAY Delay time Delay Depth o<br />
TAPE ECHO Delay time Delay Depth o<br />
REVERB Reverb time Reverb Depth x<br />
DELAY REVERB Delay/Reverb time<br />
Delay/Reverb Depth o<br />
INPUT LOOPER MOD FILTER<br />
DELAY/REV<br />
OUTPUT
© 2010 KORG INC.<br />
IMPORTANT NOTICE TO CONSUMERS<br />
This product has been manufactured according to strict specifications and<br />
voltage requirements that are applicable in the country in which it is intended<br />
that this product should be used. If you have purchased this product via the<br />
internet, through mail order, and/or via a telephone sale, you must verify that<br />
this product is intended to be used in the country in which you reside.<br />
WARNING: Use of this product in any country other than that for which it is<br />
intended could be dangerous and could invalidate the manufacturer’s or<br />
distributor’s warranty.<br />
Please also retain your receipt as proof of purchase otherwise your product<br />
may be disqualified from the manufacturer’s or distributor’s warranty.<br />
REMARQUE IMPORTANTE POUR LES CLIENTS<br />
Ce produit a été fabriqué suivant des spécifications sévères et des besoins en<br />
tension applicables dans le pays où ce produit doit être utilisé. Si vous avez<br />
acheté ce produit via l’internet, par vente par correspondance ou/et vente par<br />
téléphone, vous devez vérifier que ce produit est bien utilisable dans le pays où<br />
vous résidez.<br />
ATTENTION: L’utilisation de ce produit dans un pays autre que celui pour<br />
lequel il a été conçu peut être dangereuse et annulera la garantie du fabricant<br />
ou du distributeur. Conservez bien votre récépissé qui est la preuve de votre<br />
achat, faute de quoi votre produit ne risque de ne plus être couvert par la<br />
garantie du fabricant ou du distributeur.<br />
WICHTIGER HINWEIS FÜR KUNDEN<br />
Dieses Produkt wurde unter strenger Beachtung von Spezifikationen und<br />
Spannungsanforderungen hergestellt, die im Bestimmungsland gelten. Wenn<br />
Sie dieses Produkt über das Internet, per Postversand und/oder mit<br />
telefonischer Bestellung gekauft haben, müssen Sie bestätigen, dass dieses<br />
Produkt für Ihr Wohngebiet ausgelegt ist.<br />
WARNUNG: Verwendung dieses Produkts in einem anderen Land als dem, für<br />
das es bestimmt ist, verwendet wird, kann gefährlich sein und die Garantie des<br />
Herstellers oder Importeurs hinfällig lassen werden. Bitte bewahren Sie diese<br />
Quittung als Kaufbeleg auf, da andernfalls das Produkt von der Garantie des<br />
Herstellers oder Importeurs ausgeschlossen werden kann.<br />
4015-2 Yanokuchi, Inagi-city, Tokyo 206-0812 Japan<br />
1