- Page 1 and 2: Примечание: В соотв
- Page 3 and 4: • • Contents ..................
- Page 5 and 6: Introduction Remote control unit 1
- Page 7 and 8: Introduction DVR 200 PIONEER 1 201
- Page 9 and 10: Introduction Using with other equip
- Page 11 and 12: Introduction * 1 2 3 4 5 6 TV (Fron
- Page 13 and 14: Preparation Inserting the batteries
- Page 15 and 16: Quick guide Initial installation ov
- Page 17 and 18: Quick guide Initial auto installati
- Page 19 and 20: Watching TV Common Operation 1 Pres
- Page 21 and 22: Watching TV Timer recording using E
- Page 23 and 24: Connecting external devices E •
- Page 25 and 26: Connecting external devices NOTE
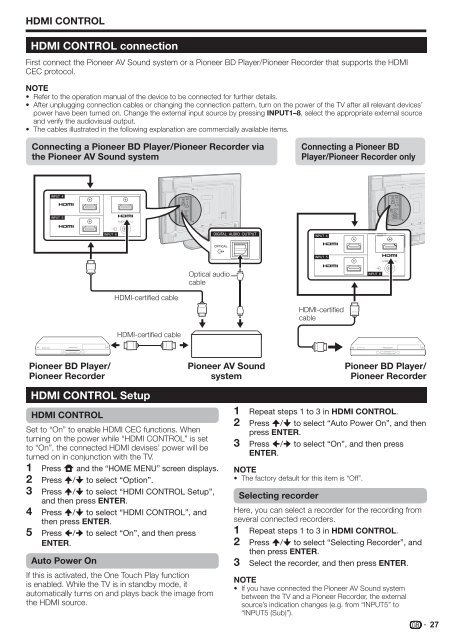
- Page 27: Connecting external devices Inserti
- Page 31 and 32: Menu operation • • • 1 3 NOTE
- Page 33 and 34: Basic adjustment Monochrome For vie
- Page 35 and 36: Basic adjustment Setup Programme Se
- Page 37 and 38: Useful Viewing functions Selecting
- Page 39 and 40: Useful Viewing functions * Display
- Page 41 and 42: Connecting a PC NOTE • • •
- Page 43 and 44: Connecting a PC RS-232C port specif
- Page 45 and 46: Appendix Troubleshooting Problem Po
- Page 47 and 48: Appendix Specifications Item 32o Fl
- Page 49 and 50: Memo 47
- Page 51 and 52: • • Table des matières .......
- Page 53 and 54: Introduction Télécommande 1 a (TV
- Page 55 and 56: Introduction DVR 200 PIONEER 1 201
- Page 57 and 58: Introduction Utilisation de la tél
- Page 59 and 60: Introduction * 1 2 3 4 5 6 Télévi
- Page 61 and 62: Préparation Insertion des piles Av
- Page 63 and 64: Guide rapide Présentation de la pr
- Page 65 and 66: Guide rapide Auto installation init
- Page 67 and 68: Regarder la télévision 1 2 3 4 5
- Page 69 and 70: Regarder la télévision Enregistre
- Page 71 and 72: Raccordement d’appareils externes
- Page 73 and 74: Raccordement d’appareils externes
- Page 75 and 76: Raccordement d’appareils externes
- Page 77 and 78: HDMI CONTROL Connexion HDMI CONTROL
- Page 79 and 80:
Utilisation des menus • • • R
- Page 81 and 82:
Réglage de base Noir et blanc Pour
- Page 83 and 84:
Réglage de base Installation Insta
- Page 85 and 86:
Fonctions de visualisation pratique
- Page 87 and 88:
Fonctions de visualisation pratique
- Page 89 and 90:
Branchement d’un ordinateur REMAR
- Page 91 and 92:
Branchement d’un ordinateur Spéc
- Page 93 and 94:
Annexe Guide de dépannage Problèm
- Page 95 and 96:
Annexe Fiche technique Rubrique Té
- Page 97 and 98:
Note 47
- Page 99 and 100:
• BEDIENUNGSANLEITUNG Die Illustr
- Page 101 and 102:
Einleitung Fernbedienung 1 a (TV) (
- Page 103 and 104:
Einleitung DVR 200 PIONEER 1 201 PI
- Page 105 and 106:
Einleitung Benutzung mit anderen Ge
- Page 107 and 108:
Einleitung * 1 2 3 4 5 6 TV (Vorder
- Page 109 and 110:
Vorbereitung Einlegen der Batterien
- Page 111 and 112:
Kurzanleitung Übersicht über die
- Page 113 and 114:
Kurzanleitung Anfängliche Autoinst
- Page 115 and 116:
Fernsehen 1 2 3 4 5 EPG (Electronic
- Page 117 and 118:
Fernsehen Timeraufnahme über EPG S
- Page 119 and 120:
Anschließen von externen Geräten
- Page 121 and 122:
Anschließen von externen Geräten
- Page 123 and 124:
Anschließen von externen Geräten
- Page 125 and 126:
HDMI CONTROL HDMI CONTROL-Anschluss
- Page 127 and 128:
Menü-Bedienung • • • ZUR BEA
- Page 129 and 130:
Grundeinstellung Schwarz/Weiß Zum
- Page 131 and 132:
Grundeinstellung Einstellungen Prog
- Page 133 and 134:
Praktische Betrachtungsfunktionen W
- Page 135 and 136:
Praktische Betrachtungsfunktionen *
- Page 137 and 138:
Anschließen eines PC ZUR BEACHTUNG
- Page 139 and 140:
Anschließen eines PC Kenndaten der
- Page 141 and 142:
Anhang Fehlersuche Problem Lösungs
- Page 143 and 144:
Anhang Technische Daten Punkt 32o F
- Page 145 and 146:
Notizen 47
- Page 147 and 148:
• • MANUALE DI ISTRUZIONI Le il
- Page 149 and 150:
Introduzione Telecomando 1 a (TV) (
- Page 151 and 152:
Introduzione DVR 200 PIONEER 1 201
- Page 153 and 154:
Introduzione Utilizzo con altro app
- Page 155 and 156:
Introduzione * 1 2 3 4 5 6 Televiso
- Page 157 and 158:
Preparativi Inserimento delle batte
- Page 159 and 160:
Guida rapida Panoramica prima insta
- Page 161 and 162:
Guida rapida Autoinstallazione iniz
- Page 163 and 164:
Guardare la TV Normale funzionament
- Page 165 and 166:
Guardare la TV Registrazione progra
- Page 167 and 168:
Collegamento di dispositivi esterni
- Page 169 and 170:
Collegamento di dispositivi esterni
- Page 171 and 172:
Collegamento di dispositivi esterni
- Page 173 and 174:
HDMI CONTROL Collegamento HDMI CONT
- Page 175 and 176:
Funzioni del menu • • • NOTA
- Page 177 and 178:
Regolazione base Bianco e nero Per
- Page 179 and 180:
Regolazione base Regolazione Impost
- Page 181 and 182:
Utili funzioni per la visione Selez
- Page 183 and 184:
Utili funzioni per la visione * Imp
- Page 185 and 186:
Collegamento di un PC NOTA • •
- Page 187 and 188:
Collegamento di un PC Caratteristic
- Page 189 and 190:
Appendice Risoluzione degli errori
- Page 191 and 192:
Appendice Dati tecnici Elemento Tel
- Page 193 and 194:
Promemoria 47
- Page 195 and 196:
• • Inhoudsopgave .............
- Page 197 and 198:
Inleiding Afstandsbediening 1 B (TV
- Page 199 and 200:
Inleiding DVR 200 PIONEER 1 201 PIO
- Page 201 and 202:
Inleiding Gebruik met andere appara
- Page 203 and 204:
Inleiding * 1 2 3 4 5 6 TV (Voorkan
- Page 205 and 206:
Voorbereidingen Plaatsen van de bat
- Page 207 and 208:
Snelstartgids Overzicht van eerste
- Page 209 and 210:
Snelstartgids Automatische installa
- Page 211 and 212:
TV kijken 1 2 3 4 5 EPG (Electronic
- Page 213 and 214:
TV kijken Timeropname met EPG U kun
- Page 215 and 216:
Aansluiten van externe apparaten E
- Page 217 and 218:
Aansluiten van externe apparaten OP
- Page 219 and 220:
Aansluiten van externe apparaten Pl
- Page 221 and 222:
HDMI CONTROL HDMI CONTROL verbindin
- Page 223 and 224:
Menubediening • • • OPMERKING
- Page 225 and 226:
Basisinstelling Zwart-wit Voor weer
- Page 227 and 228:
Basisinstelling Instellingen Progra
- Page 229 and 230:
Handige weergavefuncties Kiezen van
- Page 231 and 232:
Handige weergavefuncties * Display-
- Page 233 and 234:
Aansluiten van een PC OPMERKING •
- Page 235 and 236:
Aansluiten van een PC Technische ge
- Page 237 and 238:
Aanhangsel Problemen oplossen Probl
- Page 239 and 240:
Aanhangsel Technische gegevens Inst
- Page 241 and 242:
Memo 47
- Page 243 and 244:
• Contenido .....................
- Page 245 and 246:
Introducción Mando a distancia 1 a
- Page 247 and 248:
Introducción DVR 200 PIONEER 1 201
- Page 249 and 250:
Introducción Utilización con otro
- Page 251 and 252:
Introducción * 1 2 3 4 5 6 Televis
- Page 253 and 254:
Preparación Colocación de las pil
- Page 255 and 256:
Guía rápida Resumen de la primera
- Page 257 and 258:
Guía rápida Instalación automát
- Page 259 and 260:
Viendo televisión Operación comú
- Page 261 and 262:
Viendo televisión Grabación con t
- Page 263 and 264:
Conexión de dispositivos externos
- Page 265 and 266:
Conexión de dispositivos externos
- Page 267 and 268:
Conexión de dispositivos externos
- Page 269 and 270:
HDMI CONTROL Conexión HDMI CONTROL
- Page 271 and 272:
Operación del menú • • • NO
- Page 273 and 274:
Ajuste básico Blanco y negro Para
- Page 275 and 276:
Ajuste básico Instalación Configu
- Page 277 and 278:
Funciones de visualización útiles
- Page 279 and 280:
Funciones de visualización útiles
- Page 281 and 282:
Conexión de un PC Conexión de un
- Page 283 and 284:
Conexión de un PC Especificaciones
- Page 285 and 286:
Apéndice Búsqueda de errores Prob
- Page 287 and 288:
Apéndice Especificaciones Elemento
- Page 289 and 290:
Memorando 47
- Page 291 and 292:
ИНСТРУКЦИЯ ПО ЭКСП
- Page 293 and 294:
Введение Пульт дис
- Page 295 and 296:
Введение DVR 200 PIONEER 1
- Page 297 and 298:
Введение Использов
- Page 299 and 300:
Введение * 1 2 3 4 5 6 Те
- Page 301 and 302:
Подготовка Вставка
- Page 303 and 304:
Руководство по быс
- Page 305 and 306:
Руководство по быс
- Page 307 and 308:
Просмотр телевизор
- Page 309 and 310:
Просмотр телевизор
- Page 311 and 312:
Подключение внешни
- Page 313 and 314:
Подключение внешни
- Page 315 and 316:
Подключение внешни
- Page 317 and 318:
HDMI CONTROL Подключение
- Page 319 and 320:
Операции меню • •
- Page 321 and 322:
Основная регулиров
- Page 323 and 324:
Основная регулиров
- Page 325 and 326:
Полезные функции п
- Page 327 and 328:
Полезные функции п
- Page 329 and 330:
Подключение ПК ПРИ
- Page 331 and 332:
Подключение ПК Тех
- Page 333 and 334:
Приложение Поиск и
- Page 335 and 336:
Приложение Техниче
- Page 337 and 338:
Заметки 47