
You also want an ePaper? Increase the reach of your titles
YUMPU automatically turns print PDFs into web optimized ePapers that Google loves.
RCD-N8<br />
NETWORK CD RECEIVER<br />
Owner’s <strong>Manual</strong>
n SAFETY PRECAUTIONS<br />
CAUTION<br />
RISK OF ELECTRIC SHOCK<br />
DO NOT OPEN<br />
CAUTION:<br />
TO REDUCE THE RISK OF ELECTRIC SHOCK, DO NOT REMOVE<br />
COVER (OR BACK). NO USER-SERVICEABLE PARTS INSIDE.<br />
REFER SERVICING TO QUALIFIED SERVICE PERSONNEL.<br />
The lightning flash with arrowhead symbol, within an equilateral<br />
triangle, is intended to alert the user to the presence of<br />
uninsulated “dangerous voltage” within the product’s enclosure<br />
that may be of sufficient magnitude to constitute a risk of<br />
electric shock to persons.<br />
The exclamation point within an equilateral triangle is intended<br />
to alert the user to the presence of important operating<br />
and maintenance (servicing) instructions in the literature<br />
accompanying the appliance.<br />
WARNING:<br />
TO REDUCE THE RISK OF FIRE OR ELECTRIC SHOCK, DO NOT<br />
EXPOSE THIS APPLIANCE TO RAIN OR MOISTURE.<br />
Hot<br />
surface<br />
mark<br />
CAUTION:<br />
HOT SURFACE. DO NOT TOUCH.<br />
The top surface over the internal heat sink may become hot<br />
when operating this product continuously.<br />
Do not touch hot areas, especially around the “Hot surface<br />
mark” and the top panel.<br />
CAUTION:<br />
To completely disconnect this product from the mains, disconnect the plug<br />
from the wall socket outlet.<br />
The mains plug is used to completely interrupt the power supply to the unit<br />
and must be within easy access by the user.<br />
IMPORTANT SAFETY<br />
INSTRUCTIONS<br />
1. Read these instructions.<br />
2. Keep these instructions.<br />
3. Heed all warnings.<br />
4. Follow all instructions.<br />
5. Do not use this apparatus near water.<br />
6. Clean only with dry cloth.<br />
7. Do not block any ventilation openings.<br />
Install in accordance with the manufacturer’s instructions.<br />
8. Do not install near any heat sources such as radiators, heat registers,<br />
stoves, or other apparatus (including amplifiers) that produce heat.<br />
9. Protect the power cord from being walked on or pinched particularly at<br />
plugs, convenience receptacles, and the point where they exit from the<br />
apparatus.<br />
10. Only use attachments/accessories specified by the manufacturer.<br />
11. Use only with the cart, stand, tripod, bracket, or table<br />
specified by the manufacturer, or sold with the apparatus.<br />
When a cart is used, use caution when moving the cart/<br />
apparatus combination to avoid injury from tip-over.<br />
12. Unplug this apparatus during lightning storms or when<br />
unused for long periods of time.<br />
13. Refer all servicing to qualified service personnel.<br />
Servicing is required when the apparatus has been damaged in any way,<br />
such as power-supply cord or plug is damaged, liquid has been spilled or<br />
objects have fallen into the apparatus, the apparatus has been exposed to<br />
rain or moisture, does not operate normally, or has been dropped.<br />
14. Batteries shall not be exposed to excessive heat such as sunshine, fire or<br />
the like.<br />
• DECLARATION OF CONFORMITY<br />
We declare under our sole responsibility that this product, to which this<br />
declaration relates, is in conformity with the following standards:<br />
EN60065, EN55013, EN55020, EN61000-3-2, EN61000-3-3, EN300328,<br />
EN301489-01, EN301489-17 and EN50371.<br />
Following the provisions of Low Voltage Directive 2006/95/EC and EMC<br />
Directive 2004/108/EC, the EC regulation 1275/2008 and its frame work<br />
Directive 2009/125/EC for Energy-related Products (ErP).<br />
DENON EUROPE<br />
Division of D&M Germany GmbH<br />
An der Kleinbahn 18, Nettetal,<br />
D-41334 Germany<br />
CLASS 1 LASER PRODUCT<br />
LUOKAN 1 LASERLAITE<br />
KLASS 1 LASERAPPARAT<br />
ADVARSEL:<br />
VAROITUS!<br />
VARNING:<br />
CLASS 1<br />
LASER PRODUCT ,<br />
,,<br />
USYNLIG LASERSTRÅLING VED ÅBNING, NÅR<br />
SIKKERHEDSAFBRYDERE ER UDE AF FUNKTION.<br />
UNDGÅ UDSAETTELSE FOR STRÅLING.<br />
LAITTEEN KÄYTTÄMINEN MUULLA KUIN TÄSSÄ<br />
KÄYTTÖOHJEESSA MAINITULLA TAVALLA SAATTAA<br />
ALTISTAA KÄYTTÄJÄN TURVALLISUUSLUOKAN 1<br />
YLITTÄVÄLLE NÄKYMÄMTTÖMÄLLE LASERSÄTEILYLLE.<br />
OM APPARATEN ANVÄNDS PÅ ANNAT SÄTT ÄN I DENNA<br />
BRUKSANVISNING SPECIFICERATS, KAN ANVÄNDAREN<br />
UTSÄTTAS FÖR OSYNLIG LASERSTRÅLNING SOM<br />
ÖVERSKRIDER GRÄNSEN FÖR LASERKLASS 1.<br />
ATTENZIONE: QUESTO APPARECCHIO E’ DOTATO DI<br />
DISPOSITIVO OTTICO CON RAGGIO LASER.<br />
L’USO IMPROPRIO DELL’APPARECCHIO PUO’ CAUSARE<br />
PERICOLOSE ESPOSIZIONI A RADIAZIONI!<br />
A NOTE ABOUT RECYCLING:<br />
This product’s packaging materials are recyclable and can<br />
be reused. Please dispose of any materials in accordance<br />
with the local recycling regulations.<br />
When discarding the unit, comply with local rules or<br />
regulations.<br />
Batteries should never be thrown away or incinerated<br />
but disposed of in accordance with the local regulations<br />
concerning battery disposal.<br />
This product and the supplied accessories, excluding the<br />
batteries, constitute the applicable product according to the<br />
WEEE directive.<br />
R&TTE Directive 1999/5/EC<br />
This product may be operated in the following countries;<br />
AT BE CZ DK FI<br />
FR DE GR HU IE<br />
IT NL PL PT SK<br />
ES SE GB NO CH<br />
Indoor use only.<br />
CAUTION:<br />
USE OF CONTROLS OR ADJUSTMENTS OR PERFORMANCE OF<br />
PROCEDURES OTHER THAN THOSE SPECIFIED HEREIN MAY RESULT IN<br />
HAZARDOUS RADIATION EXPOSURE.<br />
THIS PRODUCT SHOULD NOT BE ADJUSTED OR REPAIRED BY ANYONE<br />
EXCEPT PROPERLY QUALIFIED SERVICE PERSONNEL.<br />
I
n NOTES ON USE<br />
WARNINGS<br />
• Avoid high temperatures.<br />
Allow for sufficient heat dispersion when installed in a rack.<br />
• Handle the power cord carefully.<br />
Hold the plug when unplugging the cord.<br />
• Keep the unit free from moisture, water, and dust.<br />
• Unplug the power cord when not using the unit for long periods of time.<br />
• Do not obstruct the ventilation holes.<br />
• Do not let foreign objects into the unit.<br />
• Do not let insecticides, benzene, and thinner come in contact with the unit.<br />
• Never disassemble or modify the unit in any way.<br />
• Ventilation should not be impeded by covering the ventilation openings<br />
with items, such as newspapers, tablecloths or curtains.<br />
• Naked flame sources such as lighted candles should not be placed on<br />
the unit.<br />
• Observe and follow local regulations regarding battery disposal.<br />
• Do not expose the unit to dripping or splashing fluids.<br />
• Do not place objects filled with liquids, such as vases, on the unit.<br />
• Do not handle the mains cord with wet hands.<br />
• When the switch is in the OFF (STANDBY) position, the equipment is not<br />
completely switched off from MAINS.<br />
• The equipment shall be installed near the power supply so that the power<br />
supply is easily accessible.<br />
• Do not keep the battery in a place exposed to direct sunlight or in places<br />
with extremely high temperatures, such as near a heater.<br />
n CAUTIONS ON INSTALLATION<br />
z<br />
z<br />
z<br />
Wall<br />
z z For proper heat dispersal, do not install this unit in a confined<br />
space, such as a bookcase or similar enclosure.<br />
• More than 0.3 m is recommended.<br />
• Do not place any other equipment on this unit.<br />
z<br />
1. IMPORTANT NOTICE: DO NOT MODIFY THIS PRODUCT<br />
This product, when installed as indicated in the instructions contained in<br />
this manual, meets R&TTE directive requirements. Modification of the<br />
product could result in hazardous Radio and EMC radiation.<br />
2. CAUTION<br />
• Separation distance of at least 20 cm must be maintained between the<br />
antenna of this product and all persons.<br />
• This product and its antenna must not be co-located or operating in<br />
conjunction with any other antenna or transmitter.<br />
II
Getting started<br />
Thank you for purchasing this DENON product. To ensure proper operation, please read these owner’s manual carefully before using the product.<br />
After reading them, be sure to keep them for future reference.<br />
Contents<br />
Getting started···············································································1<br />
Accessories···················································································2<br />
Main features················································································2<br />
Cautions on handling·····································································2<br />
Discs······························································································3<br />
Remote operation ·········································································4<br />
Preparations··············································································5<br />
Connections····················································································6<br />
Connecting the speakers·······························································6<br />
Connecting an analog device·························································7<br />
Connecting a digital device····························································7<br />
Connecting a portable player·························································7<br />
Connecting an antenna··································································8<br />
Connecting to a home network (LAN)···········································9<br />
Connecting the power cord·························································10<br />
Setup·····························································································11<br />
Menu map···················································································11<br />
Setting the first setup [Quick Setup]···········································12<br />
Setting the general [General]·······················································12<br />
Setting the network [Network]····················································17<br />
Operations···············································································22<br />
Operations····················································································23<br />
Preparations·················································································23<br />
Operations possible during playback···········································23<br />
CD playback·················································································25<br />
MP3 and WMA files playback······················································28<br />
Network audio playback······························································29<br />
Tuning in radio stations································································33<br />
Favorite function ·········································································36<br />
iPod playback···············································································37<br />
USB memory device playback·····················································40<br />
Portable audio player playback·····················································41<br />
Listening to ANALOG IN·····························································41<br />
Listening to DIGITAL IN·······························································42<br />
AirPlay function············································································43<br />
Remote play function··································································45<br />
Web control function···································································46<br />
Other functions············································································48<br />
Information··············································································50<br />
Information···················································································51<br />
Part names and functions····························································51<br />
iPod······························································································56<br />
MP3 and WMA············································································56<br />
USB memory device····································································57<br />
Network audio·············································································58<br />
Explanation terms········································································59<br />
Troubleshooting···········································································61<br />
Specifications···············································································65<br />
1
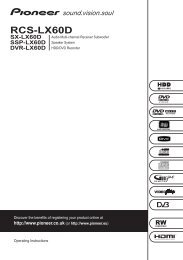
Accessories<br />
Check that the following parts are supplied with the product.<br />
q Quick setup guide.................................................................... 1<br />
w CD-ROM (Owner’s manual)..................................................... 1<br />
e Safety Instructions................................................................... 1<br />
r Service network list.................................................................. 1<br />
t Power cord............................................................................... 1<br />
y Remote control (RC-1174)........................................................ 1<br />
u R03/AAA batteries.................................................................... 2<br />
i FM indoor antenna................................................................... 1<br />
t<br />
y<br />
i<br />
Main features<br />
Big sound in Small body<br />
• Full digital sound<br />
• High power output (65 W x 2 channels, 4 Ω)<br />
• High quality sound (LPCM/FLAC 192 kHz/24 bit)<br />
Compatible with “Denon Remote App” for<br />
performing basic operations of the unit.<br />
“Denon Remote App” is application software that allows you to<br />
perform basic operations with an iPod touch, iPhone or Android<br />
smartphone such as turning the unit ON/OFF, controlling the<br />
volume, and switching the sources.<br />
Supports AirPlay®<br />
This unit also supports AirPlay that lets you stream your music<br />
library from an iPhone ® , iPad ® , iPod touch ® or iTunes.<br />
Wi-Fi compatibility<br />
This unit is equipped with a built-in diversity antenna, and is certified<br />
under WMM (Wi-Fi Multimedia) for efficient wireless connectivity.<br />
In addition, easy wireless connection is possible by pressing the<br />
WPS button.<br />
iPod®/iPhone® charge function<br />
You can charge your iPhone/iPod by connecting it to the dock<br />
connector or USB port. Even if the unit enters the power standby<br />
mode, the iPod/iPhone will continue to be charged, and when the<br />
iPhone/iPod is fully charged the unit automatically stops supplying<br />
power for charging. In addition, if you connect your iPhone/iPod to<br />
the dock connector while the unit is in power standby mode, the<br />
iPhone/iPod will automatically begin charging.<br />
Cautions on handling<br />
• Before turning the power switch on<br />
Check once again that all connections are correct and that there are<br />
no problems with the connection cables.<br />
• Power is supplied to some of the circuitry even when the unit is<br />
set to the standby mode. When going on vacation or leaving home<br />
for long periods of time, be sure to unplug the power cord from the<br />
power outlet.<br />
• Proper ventilation<br />
If the unit is left in a room full of smoke from cigarettes, etc., for<br />
long periods of time, the surface of the optical pickup may get dirty,<br />
preventing it from receiving signals properly.<br />
• About condensation<br />
If there is a major difference in temperature between the inside of<br />
the unit and its surroundings, condensation may form on parts inside<br />
the unit, causing it to fail to operate properly.<br />
If this happens, let the unit sit for an hour or two with the power<br />
turned off and wait until there is little difference in temperature<br />
before using the unit.<br />
• Cautions on using mobile phones<br />
Using a mobile phone near this unit may result in noise. If that<br />
occurs, move the mobile phone away from the unit when it is in use.<br />
• Moving the unit<br />
Turn off the power and unplug the power cord from the power<br />
outlet. Next, disconnect the cables connected to other system units<br />
before moving the unit.<br />
• About care<br />
• Wipe the cabinet and control panel clean with a soft cloth.<br />
• Follow the instructions when using a chemical cleaner.<br />
• Benzene, paint thinner or other organic solvents as well as<br />
insecticide may cause material changes and discoloration if brought<br />
into contact with the unit, and should therefore not be used.<br />
3 Line OELD<br />
Incorporated 3-line display to show file information or menu items<br />
legibly. The display can enlarge letters of selected items and show<br />
icons clearly. The menu selection supports seven languages.<br />
2
Discs<br />
Discs playable on this unit<br />
q Music CDs<br />
Discs marked with the logo below can be played in this unit.<br />
w CD-R/CD-RW<br />
NOTE<br />
• Discs in special shapes (heart-shaped discs, octagonal discs, etc.)<br />
cannot be played. Do not attempt to play them, as doing so can<br />
damage the unit.<br />
• Some discs and some recording<br />
formats cannot be played.<br />
• Non-finalized discs cannot be<br />
played.<br />
• What is finalization?<br />
Finalization is the process that makes recorded CD-R/CD-RW discs<br />
playable on compatible players.<br />
Holding discs<br />
Do not touch the signal surface.<br />
Loading discs<br />
• Place the disc in the tray, label side up.<br />
• Make sure the disc tray is fully open when inserting the disc.<br />
• Place the discs flat, 12 cm discs in the outer tray guide (Figure 1), 8<br />
cm discs in the inner tray guide (Figure 2).<br />
Figure 1<br />
Outer tray guide<br />
12 cm disc<br />
Figure 2<br />
Inner tray guide<br />
8 cm disc<br />
• Place 8 cm discs in the inner tray guide without using an adapter.<br />
• “Unsupported” is displayed if a disc that cannot be played is loaded.<br />
• “No Disc” is displayed if the disc is loaded upside-down or if no disc<br />
is loaded.<br />
NOTE<br />
Do not push the disc tray in by hand when the power is turned off.<br />
Doing so could damage the set.<br />
Cautions on loading discs<br />
• Only load one disc at a time. Loading two or more discs can damage<br />
the unit or scratch the discs.<br />
• Do not use cracked or warped discs or discs that have been repaired<br />
with adhesive, etc.<br />
• Do not use discs on which the sticky part of cellophane tape or labels<br />
is exposed or on which there are traces of where labels have been<br />
removed. Such discs can get caught inside the player and damage it.<br />
Cautions on handling<br />
• Do not get fingerprints, oil or dirt on discs.<br />
• Take special care not to scratch discs when removing them from<br />
their cases.<br />
• Do not bend or heat discs.<br />
• Do not enlarge the hole in the center.<br />
• Do not write on the labeled (printed) surface with ball-point pens,<br />
pencils, etc., or stick new labels on discs.<br />
• Water droplets may form on discs if they are moved suddenly from<br />
a cold place (outdoors for example) to a warm place, but do not try to<br />
dry them off using a hairdryer, etc.<br />
Cautions on storing discs<br />
• Be sure to remove discs after using them.<br />
• Be sure to store discs in their cases to protect them from dust,<br />
scratches, warping, etc.<br />
• Do not store discs in the following places:<br />
1. Places exposed to direct sunlight for long periods of time<br />
2. Dusty or humid places<br />
3. Places exposed to heat from heaters, etc.<br />
Cleaning discs<br />
• If there are fingerprints or dirt on a disc, wipe them off before using<br />
the disc. Fingerprints and dirt can impair sound quality and cause<br />
interruptions in playback.<br />
• Use a commercially available disc cleaning set or a soft cloth to clean<br />
discs.<br />
Gently wipe the disc from the<br />
inside towards the outside.<br />
Do not wipe in a circular motion.<br />
NOTE<br />
Do not use record spray, antistatic agents, benzene, thinner or other<br />
solvents.<br />
3
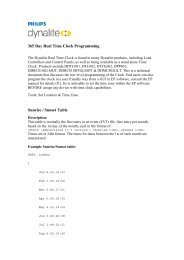
Remote operation<br />
About the remote control<br />
nnInserting the batteries<br />
q Remove the remote<br />
control’s rear cover.<br />
w Set two R03/AAA batteries in<br />
the battery compartment in the<br />
indicated direction.<br />
nnOperating range of the remote control<br />
Point the remote control at the remote sensor when operating it.<br />
Denon Remote App<br />
Denon Remote App is a unique application developed for the iPhone,<br />
iPod touch and Android smartphone. This application enables you to<br />
control DENON network devices that are connected to your home<br />
network. Install the App onto your iPhone, iPod touch or Android<br />
smartphone to control this device.<br />
iPod<br />
18:46<br />
CEOL<br />
Player<br />
View<br />
Approx. 7 m<br />
30° 30°<br />
Internet Radio<br />
e Put the rear cover back on.<br />
NOTE<br />
• Insert the specified batteries in the remote control.<br />
• Replace the batteries with new ones if the set does not operate<br />
even when the remote control is operated close to the unit. (The<br />
supplied batteries are only for verifying operation. Replace them<br />
with new batteries at an early date.)<br />
• When inserting the batteries, be sure to do so in the proper direction,<br />
following the q and w marks in the battery compartment.<br />
• To prevent damage or leakage of battery fluid:<br />
• Do not use a new battery together with an old one.<br />
• Do not use two different types of batteries.<br />
• Do not attempt to charge dry batteries.<br />
• Do not short-circuit, disassemble, heat or dispose of batteries in<br />
flames.<br />
• Do not keep the battery in a place exposed to direct sunlight or in<br />
places with extremely high temperatures, such as near a heater.<br />
• If the battery fluid should leak, carefully wipe the fluid off the inside<br />
of the battery compartment and insert new batteries.<br />
• Remove the batteries from the remote control if it will not be in use<br />
for long periods.<br />
• Used batteries should be disposed of in accordance with the local<br />
regulations regarding battery disposal.<br />
• The remote control may function improperly if rechargeable batteries<br />
are used.<br />
NOTE<br />
• The set may function improperly or the remote control may not<br />
operate if the remote control sensor is exposed to direct sunlight,<br />
strong artificial light from an inverter type fluorescent lamp or<br />
infrared light.<br />
• When using 3D video devices that transmit radio communication<br />
signals (such as infrared signals etc) between the various units<br />
(such as the monitor, 3D glasses, 3D transmitter unit etc), the<br />
remote control may not operate due to interference from those<br />
radio communication signals. If this occurs, adjust the direction and<br />
distance of the 3D communication for each unit, and check that the<br />
remote control operation is not affected by these signals.<br />
Favorites Internet Radio Music Server USB<br />
Tuner Digital In CD iPod Player<br />
15<br />
• Bidirectional communication is performed.<br />
• The Denon Remote App can be downloaded for free from the Apple<br />
App Store or Google Play store.<br />
4
Preparations<br />
Preparations<br />
Here, we explain the connections and basic operation methods for this unit.<br />
F Connections vpage 6<br />
F Setup vpage 11<br />
5
Connections<br />
NOTE<br />
• Do not plug in the power cord until all connections have been<br />
completed.<br />
• When making connections, also refer to the operating instructions of<br />
the other components.<br />
• Be sure to connect the left and right channels properly (left with left,<br />
right with right).<br />
• Do not bundle power cords together with connection cables. Doing<br />
so can result in humming or noise.<br />
Cables used for connections<br />
Subwoofer cable<br />
Speaker cable<br />
Audio cable (sold separately)<br />
Connecting the speakers<br />
Speakers<br />
(L)<br />
(R)<br />
w q w q<br />
IN<br />
Subwoofer<br />
with built-in<br />
amplifier<br />
Connecting the speaker cables<br />
Carefully check the left (L) and right (R) channels and + (red) and –<br />
(black) polarities on the speakers being connected to this unit, and be<br />
sure to interconnect the channels and polarities correctly.<br />
1<br />
Peel off about 10 mm of sheathing from<br />
the tip of the speaker cable, then either<br />
twist the core wire tightly or terminate it.<br />
2<br />
Turn<br />
3<br />
Insert<br />
the speaker terminal<br />
counterclockwise to loosen it.<br />
the speaker cable’s core wire to<br />
the hilt into the speaker terminal.<br />
Optical cable<br />
Audio cable<br />
Stereo mini-plug cable<br />
L<br />
R<br />
L<br />
R<br />
4<br />
Turn<br />
the speaker terminal clockwise to<br />
tighten it.<br />
NOTE<br />
• Disconnect this unit’s power plug from the power outlet before<br />
connecting the speakers. Also, turn off the subwoofer.<br />
• Use speakers with an impedance of 4 to 16 Ω. The protection<br />
circuit may be activated if speakers with an impedance other<br />
than specified are used.<br />
• Connect the speaker cables so they do not stick out of the<br />
speaker terminals. The protection circuit may be activated if the<br />
wires touch the rear panel or if the + and – sides touch each<br />
other (vpage 59 “Protection circuit”).<br />
• Never touch the speaker terminals while the power supply is<br />
connected. Doing so could result in electric shock.<br />
6
Connecting an analog device<br />
Analog<br />
device<br />
AUDIO<br />
AUDIO<br />
L<br />
OUT<br />
R<br />
Connecting a digital device<br />
Digital<br />
device<br />
AUDIO<br />
OPTICAL<br />
OUT<br />
Connecting a portable player<br />
L<br />
R<br />
L<br />
R<br />
Portable<br />
Audio<br />
HEADPHONE<br />
Connect this unit and portable audio player using a separately sold<br />
mini-stereo audio cable.<br />
NOTE<br />
After you connect a portable audio player, the input source<br />
automatically switches to “Portable In”.<br />
7
Connecting an antenna<br />
• Connect the FM antenna supplied with the unit to enjoy listening to<br />
radio broadcasts.<br />
• After connecting the antenna and receiving a broadcast signal<br />
(vpage 33 “Listening to FM broadcasts”), fix the antenna with<br />
tape in a position where the noise level becomes minimal.<br />
Direction of broadcasting station<br />
FM outdoor<br />
antenna<br />
75 Ω coaxial<br />
cable<br />
FM indoor antenna<br />
(Supplied)<br />
NOTE<br />
• Do not connect two FM antennas simultaneously.<br />
• If you are unable to receive a good broadcast signal, we recommend<br />
installing an outdoor antenna. For details, inquire at the retail store<br />
where you purchased the unit.<br />
8
Connecting to a home network (LAN)<br />
• This unit lets you play via your home network (LAN) music files<br />
stored on a computer and music content such as that from Internet<br />
radio.<br />
• You can update by downloading the latest firmware from the<br />
DENON website.<br />
For more information, see “Update” (vpage 14).<br />
• See “Setting the network [Network]” (vpage 17) for more<br />
information on network setting.<br />
Wired LAN<br />
Cables used for connections<br />
Ethernet<br />
cable<br />
Router<br />
Internet<br />
Cable (sold separately)<br />
Modem<br />
To WAN side<br />
To LAN port<br />
To LAN port<br />
Computer<br />
LAN port/<br />
Ethernet<br />
connector<br />
For connections to the Internet, contact an ISP (Internet<br />
Service Provider) or a computer shop.<br />
Wireless LAN<br />
Internet<br />
Modem<br />
To WAN side<br />
Required system<br />
Router with<br />
access point<br />
z z This unit comes with a built-in<br />
Wi-Fi antenna.<br />
Computer<br />
nnBroadband internet connection<br />
nnModem<br />
Device that connects to the broadband circuit and conducts<br />
communications on the Internet.<br />
A type that is integrated with a router is also available.<br />
nnRouter<br />
When using this unit, we recommend you use a router equipped<br />
with the following functions:<br />
• Built-in DHCP server<br />
This function automatically assigns IP addresses on the LAN.<br />
• Built-in 100BASE-TX switch<br />
When connecting multiple devices, we recommend a switching<br />
hub with a speed of 100 Mbps or greater.<br />
• When using with a wireless LAN, prepare a broadband router<br />
with built-in access point.<br />
• When using a WPS (Wi-Fi Protected Setup) compatible router,<br />
easy wireless connection is possible by pressing this unit’s WPS<br />
button (vpage 19).<br />
nnEthernet cable (CAT-5 or greater recommended)<br />
• Use only a shielded STP or ScTP LAN cable which is available at<br />
retailer.<br />
• Some flat type Ethernet cables are easily affected by noise.<br />
We recommend using a normal type cable.<br />
• If you have an Internet provider contract for a line on which network<br />
settings are made manually, make the settings at “Network connecting<br />
(when “DHCP” settings is “Off”)” (vpage 17).<br />
• With this unit, it is possible to use the DHCP and Auto IP functions<br />
to make the network settings automatically.<br />
• When using this unit with the broadband router’s DHCP function<br />
enabled, this unit automatically performs the IP address setting and<br />
other settings.<br />
When using this unit connected to a network with no DHCP function,<br />
make the settings for the IP address, etc., at “Network connecting<br />
(when “DHCP” settings is “Off”)” (vpage 17).<br />
• When setting manually, check the setting contents with the network<br />
administrator.<br />
NOTE<br />
• A contract with an ISP is required to connect to the Internet.<br />
• No additional contract is needed if you already have a broadband<br />
connection to the Internet.<br />
• The types of routers that can be used depend on the ISP. Contact an<br />
ISP or a computer shop for details.<br />
• DENON assumes no responsibility whatsoever for any<br />
communication errors or troubles resulting from customer’s network<br />
environment or connected devices.<br />
• This unit is not compatible with PPPoE. A PPPoE-compatible router<br />
is required if you have a contract for a type of line set by PPPoE.<br />
• Do not connect an Ethernet connector directly to the LAN port/<br />
Ethernet connector on your computer.<br />
• To listen to audio streaming, use a router that supports audio<br />
streaming.<br />
9
Connecting the power cord<br />
When all of the connections are completed, insert the power plug into<br />
the power outlet.<br />
Power cord<br />
(supplied)<br />
To household power outlet<br />
(AC 230 V, 50/60 Hz)<br />
10
Setup<br />
Menu map<br />
Setting items Detailed items Description Page<br />
Quick Setup<br />
[Setup]<br />
Quick Setup<br />
:enter :back<br />
General<br />
[Setup]<br />
General<br />
:enter :back<br />
Network<br />
[Setup]<br />
Network<br />
:enter :back<br />
Quick Setup<br />
Performs the network settings using a Wizard style window.<br />
For details on the operations, see the separate “Quick setup guide”.<br />
Alarm Sets the timer playback. 12<br />
Clock Sets the current time 13<br />
Speaker Optimization Sets the optimum playback properties of the speakers SC-N8, sold separately. 14<br />
Language Sets the language. 14<br />
Auto-Standby Sets the unit power to standby when the unit is not in use. 14<br />
Update Updates the firmware. 14<br />
Firmware<br />
Notification Set the Update and Upgrade notification on/off. 15<br />
Add New Feature Displays new functions that can be downloaded, and upgrades functions. 16<br />
Network Information Displays various information about the network. –<br />
Network Control Performs the ON/OFF settings for the network function when in standby mode. 20<br />
Friendly Name Edits a name displayed on the Internet. 21<br />
Last.fm Display Disables the display of Last.fm on the menu. 21<br />
Settings<br />
When making<br />
wired<br />
connection<br />
Wired Setup<br />
When<br />
making<br />
ONLINE<br />
Wi-Fi<br />
MUSIC<br />
MUSIC SERVER<br />
connection<br />
nnTo back to the top of the menu, during<br />
TUNE -<br />
menu<br />
MUTE<br />
operation<br />
Press TOP MENU.<br />
SLEEP<br />
INTERNET<br />
RADIO<br />
TUNER<br />
z Displayed when the “DHCP” setting is “Off” (vpage 17).<br />
iPod<br />
ADD<br />
FAVORITE<br />
CALL<br />
CLOCK<br />
ANALOG IN<br />
USB<br />
CH- CH +<br />
SDB<br />
TONE<br />
DIMMER<br />
POWER<br />
DIGITAL IN<br />
CD<br />
TUNE +<br />
VOLUME<br />
Performs the settings for a wired or wireless LAN. 17<br />
Performs the settings for a wired LAN. 17<br />
DHCP (On) or DHCP (Off) Performs the DHCP setting. 17<br />
IP Addressz Performs the IP address setting. 17<br />
Subnet Maskz Performs the subnet mask setting. 17<br />
Gatewayz Performs the gateway setting. 17<br />
Primary DNSz Performs the primary DNS setting. 17<br />
Secondary DNSz Performs the secondary DNS setting. 17<br />
Proxy Performs the proxy setting. 18<br />
Test Connection Performs the wired LAN connection. 17<br />
Performs the wireless LAN connection setting. 18<br />
Auto-Scan Selects and sets the wireless connections from the access point list. 18<br />
WPS (Wi-Fi Protected Setup) Sets the wireless connection using WPS (Wi-Fi Protected Setup). 19<br />
<strong>Manual</strong> Sets the wireless connection manually. 20<br />
–<br />
TOP MENU<br />
INFO<br />
ENTER<br />
SEARCH<br />
SETUP<br />
1 2 3<br />
. / ABC<br />
DEF<br />
4 5 6<br />
GHI JKL MNO<br />
7 8 9<br />
PQRS TUV WXYZ<br />
11<br />
+10 a/A 0<br />
*<br />
CLEAR
TUNER<br />
ANALOG IN<br />
DIGITAL IN<br />
Alarm<br />
Setting the first setup<br />
[Quick Setup]<br />
• For details on “Quick Setup” operations, see the separate<br />
“Quick setup guide”.<br />
• If you cancelled “Quick Setup” menu or changed the network<br />
environment, perform “Setup” – “Quick Setup”.<br />
Setting the general [General]<br />
This device can playback using the alarm playback (everyday alarm,<br />
once alarm).<br />
• This unit’s alarm does not support exit time settings for alarm<br />
playback.<br />
nnAlarm operation when the time settings for<br />
alarms overlap<br />
When the once alarm and everyday alarm are both<br />
set (sleep timer is not set)<br />
• Automatically starts playback at the earlier alarm start time set for<br />
either of the alarms.<br />
If the current time is not set, enter alarm setting mode to get time<br />
setting mode.<br />
nnSetting the everyday alarm and once alarm<br />
• Everyday alarm (“Everyday”)<br />
Playback starts at the set times each day.<br />
• Once alarm (“Once”)<br />
Playback starts once only at the set times.<br />
1<br />
Press<br />
2<br />
Use<br />
3<br />
Use<br />
SETUP.<br />
Turns on the Menu settings mode<br />
and the Menu appears on the display<br />
(vpage 11 “Menu map”).<br />
ui and ENTER to select<br />
“General” – “Alarm”, then press<br />
ENTER or p.<br />
ui to select the alarm<br />
mode, and use o p to select “On”<br />
or “Off” then press ENTER.<br />
iPod<br />
ADD<br />
FAVORITE<br />
CALL<br />
SEARCH<br />
CH- CH +<br />
TUNE -<br />
TOP MENU<br />
USB<br />
MUTE<br />
SDB<br />
TONE<br />
ENTER<br />
1 2 3<br />
. / ABC<br />
DEF<br />
4 5 6<br />
GHI JKL MNO<br />
7 8 9<br />
PQRS TUV WXYZ<br />
4<br />
+10 a/A<br />
Use ui to select “Set Time”,<br />
0<br />
RANDOM REPEAT<br />
then press ENTER or p.<br />
*<br />
PROGRAM<br />
CLEAR<br />
MODE<br />
5<br />
Use ui to select “hours” – “minutes” for the alarm<br />
RC-1174<br />
start time, then press ENTER or p.<br />
6<br />
Use ui to select “Source”, then press ENTER or p.<br />
7<br />
Use ui to select the input source, then press ENTER<br />
or p.<br />
8<br />
Use<br />
9<br />
Use<br />
10<br />
CD<br />
iPod<br />
Favorite<br />
USB<br />
ui to select “Volume”, then press ENTER or<br />
p.<br />
ui to select the volume “0 – 60”, then press<br />
ENTER or p.<br />
Press POWER X to set the power to standby.<br />
Alarm standby mode is set, and the power indicator lights<br />
orange.<br />
CD<br />
TUNE +<br />
VOLUME<br />
INFO<br />
SETUP<br />
Setting the general [General]<br />
NOTE<br />
• If the unit or remote control is not operated for 90 minutes or more<br />
when the alarm is set to on, the standby mode is activated.<br />
• When using alarm playback on an iPod touch or iPhone, set the iPod<br />
touch or iPhone to “Sleep” mode. If the power is switched off using<br />
the power off operation, alarm playback cannot be used.<br />
For details on the “Sleep” mode of the iPod touch or iPhone, see the<br />
instruction manuals of the products or related web pages.<br />
nnSetting the alarm to on or off<br />
Perform the operations at “Alarm” (vpage 12).<br />
• When set to “OFF”, time operation is disabled, but the alarm<br />
settings remain unchanged.<br />
nnTo check the alarm settings<br />
Perform the operations at “Alarm” (vpage 12).<br />
nnTo change the alarm settings<br />
Perform the operations at “Alarm” (vpage 12).<br />
nnTo change the setting while setting the alarm<br />
Press o.<br />
The setting returns to the previous step. Display the setting you<br />
want to change, then make the desired setting.<br />
12
INTERNET<br />
RADIO<br />
ONLINE<br />
MUSIC<br />
MUSIC<br />
SERVER<br />
Clock<br />
You can automatically adjust the clock of this unit using the Internet.<br />
To use this function, the unit must be connected to the Internet.<br />
nnSetting the Time Zone<br />
TUNE -<br />
TUNE +<br />
When changing the time zone, use the following procedure to<br />
select your local standard time (time zone).<br />
MUTE<br />
ADD<br />
1<br />
FAVORITE<br />
VOLUME<br />
Press SETUP.<br />
CALL<br />
SDB<br />
TONE<br />
Turns on the Menu settings mode<br />
TOP MENU<br />
INFO<br />
and the Menu appears on the display.<br />
(vpage 11 “Menu map”)<br />
2<br />
Use<br />
ui and ENTER to select<br />
“General” – “Clock” – “Auto-<br />
Adjust” – “Time Zone”, then<br />
press ENTER or p.<br />
“Time Zone” menu appears.<br />
SLEEP<br />
INTERNET<br />
RADIO<br />
TUNER<br />
iPod<br />
SEARCH<br />
CLOCK<br />
ONLINE<br />
MUSIC<br />
ANALOG IN<br />
USB<br />
DIMMER<br />
CH- CH +<br />
ENTER<br />
1 2 3<br />
. / ABC<br />
DEF<br />
4 5 6<br />
POWER<br />
MUSIC<br />
SERVER<br />
DIGITAL IN<br />
CD<br />
SETUP<br />
GHI JKL MNO<br />
3<br />
7 PQRS 8 TUV 9 WXYZ<br />
Use ui to select your time zone, then +10 a/A press 0 * ENTER<br />
CLEAR<br />
RANDOM REPEAT PROGRAM MODE<br />
or p.<br />
4<br />
Use ui and ENTER to select “Auto-Adjust” –<br />
RC-1174<br />
“Adjust Now”, then press ENTER or p.<br />
The setting is entered.<br />
nnSetting the Summer Time<br />
Use the following procedure to set Summer time if the Summer<br />
MUTE<br />
time system is used in your country.<br />
ADD<br />
1<br />
FAVORITE<br />
VOLUME<br />
Press SETUP.<br />
CALL<br />
SDB<br />
TONE<br />
Turns on the Menu settings mode and<br />
TOP MENU<br />
INFO<br />
the Menu appears on the display.<br />
2<br />
Use<br />
ui and ENTER to select<br />
“General” – “Clock” – “Auto-<br />
Adjust” – “Summer Time”, then<br />
press ENTER or p.<br />
“Select Summer Time” menu appears.<br />
TUNER<br />
iPod<br />
SEARCH<br />
CH- CH +<br />
TUNE -<br />
ANALOG IN<br />
USB<br />
ENTER<br />
DIGITAL IN<br />
CD<br />
TUNE +<br />
1 2 3<br />
. / ABC<br />
DEF<br />
4 GHI 5 JKL 6<br />
3<br />
MNO<br />
Use ui to select “Off (0H)” or “On 7 PQRS (+1H)”, 8 TUV 9 WXYZ then<br />
SLEEP CLOCK DIMMER POWER<br />
press ENTER or p.<br />
+10 a/A 0 * CLEAR<br />
4<br />
RANDOM REPEAT PROGRAM MODE<br />
INTERNET<br />
Use ui and ENTER to select “Auto-Adjust” RADIO<br />
ONLINE<br />
MUSIC SERVER<br />
MUSIC<br />
–<br />
TUNER ANALOG IN DIGITAL IN<br />
“Adjust Now”, then press ENTER or p.<br />
The setting is entered.<br />
nnAuto Adjust<br />
iPod USB CD<br />
RC-1174<br />
CH- CH +<br />
MUTE<br />
Use the following procedure to automatically adjust the clock.<br />
ADD<br />
1<br />
FAVORITE<br />
VOLUME<br />
Press SETUP.<br />
CALL<br />
SDB<br />
TONE<br />
Turns on the Menu settings mode<br />
TOP MENU<br />
INFO<br />
and the Menu appears on the display<br />
(vpage 11 “Menu map”).<br />
2<br />
Use<br />
ui and ENTER to select<br />
“General” – “Clock” – “Auto-<br />
Adjust” – “Adjust Now”, then<br />
press ENTER or p.<br />
The operation to receive the current<br />
time starts.<br />
SEARCH<br />
SETUP<br />
1 2 3<br />
. / ABC<br />
DEF<br />
4 5 6<br />
GHI JKL MNO<br />
7 8 9<br />
PQRS TUV WXYZ<br />
+10 a/A 0 * CLEAR<br />
• The current time is displayed for several seconds when it is<br />
RANDOM REPEAT PROGRAM MODE<br />
received successfully.<br />
• If the current time is not received successfully, “Connection<br />
Failed” appears.<br />
TUNE -<br />
ENTER<br />
RC-1174<br />
TUNE +<br />
SETUP<br />
Setting the general [General]<br />
nnSetting the current time (<strong>Manual</strong> Adjust)<br />
(24-Hour Display)<br />
1<br />
Press<br />
SLEEP CLOCK<br />
SETUP.<br />
Turns on the Menu settings mode<br />
and the Menu appears on the display<br />
(vpage 11 “Menu map”).<br />
2<br />
Use ui and ENTER to select<br />
“General” – “Clock” – “<strong>Manual</strong><br />
Adjust”, then press ENTER or p.<br />
3<br />
Use ui to set the “hours”.<br />
4<br />
Press ENTER or p.<br />
5<br />
Use ui to set the “minutes”.<br />
6<br />
Press ENTER or p.<br />
The current time is set.<br />
ADD<br />
FAVORITE<br />
CALL<br />
SEARCH<br />
CH- CH +<br />
1 2 3<br />
. / ABC<br />
DEF<br />
4 5 6<br />
GHI JKL MNO<br />
Checking the current time when the power 7 PQRS 8 TUV is on 9 WXYZ<br />
Press CLOCK.<br />
INTERNET<br />
RADIO<br />
TUNER<br />
iPod<br />
TUNE -<br />
TOP MENU<br />
ONLINE<br />
MUSIC<br />
ANALOG IN<br />
+10 a/A 0 * CLEAR<br />
RANDOM REPEAT PROGRAM MODE<br />
Press once more and the display returns to its original condition.<br />
Checking the current time when the power is set to<br />
RC-1174<br />
standby<br />
Press CLOCK.<br />
The current time is displayed for 30 seconds.<br />
NOTE<br />
• The time cannot be set when in the standby mode. Turn on the<br />
power first.<br />
• The time setting is canceled if the power cord is disconnected. Set<br />
the time again.<br />
USB<br />
MUTE<br />
SDB<br />
TONE<br />
ENTER<br />
DIMMER<br />
POWER<br />
MUSIC<br />
SERVER<br />
DIGITAL IN<br />
CD<br />
TUNE +<br />
VOLUME<br />
INFO<br />
SETUP<br />
13
SLEEP<br />
CLOCK<br />
DIMMER<br />
POWER<br />
Speaker Optimization<br />
An optimizing filter suited for the properties of the CH- speakers (SC-N8)<br />
CH +<br />
can be used.<br />
TUNE -<br />
TUNE +<br />
1<br />
Press SETUP.<br />
MUTE<br />
ADD<br />
Turns on the Menu settings mode<br />
FAVORITE<br />
VOLUME<br />
and the Menu appears on the display<br />
CALL<br />
SDB<br />
TONE<br />
(vpage 11 “Menu map”).<br />
2<br />
Use<br />
3<br />
Use<br />
ON<br />
OFF<br />
ui and ENTER to<br />
select “General” – “Speaker<br />
Optimization”, then press<br />
ENTER or p.<br />
“Speaker Optimization” menu appears.<br />
ui to select “On”, then<br />
press ENTER or p.<br />
INTERNET<br />
RADIO<br />
TUNER<br />
TOP MENU<br />
SEARCH<br />
ONLINE<br />
MUSIC<br />
ANALOG IN<br />
1 2 3<br />
. / ABC<br />
DEF<br />
4 5 6<br />
GHI JKL MNO<br />
7 8 9<br />
PQRS TUV WXYZ<br />
CLOCK DIMMER<br />
RC-1174<br />
MUSIC<br />
SERVER<br />
DIGITAL IN<br />
+10 a/A 0 * CLEAR<br />
RANDOM REPEAT PROGRAM MODE<br />
The response is optimized for the speakers (SC-N8, sold<br />
separately).<br />
Language<br />
The response is flat.<br />
Sets the language for display the menu.<br />
• The factory language setting is “English”.<br />
1<br />
Press SETUP.<br />
Turns on the Menu settings mode<br />
and the Menu appears on the display<br />
(vpage 11 “Menu map”).<br />
2<br />
Use<br />
ui and ENTER to select<br />
“General” – “Language”, then<br />
press ENTER or p.<br />
iPod<br />
SLEEP<br />
INTERNET<br />
RADIO<br />
TUNER<br />
iPod<br />
ADD<br />
FAVORITE<br />
CALL<br />
SEARCH<br />
USB<br />
ENTER<br />
CD<br />
INFO<br />
CH- CH +<br />
TUNE -<br />
TOP MENU<br />
ONLINE<br />
MUSIC<br />
ANALOG IN<br />
USB<br />
MUTE<br />
SDB<br />
TONE<br />
ENTER<br />
SETUP<br />
POWER<br />
MUSIC<br />
SERVER<br />
DIGITAL IN<br />
CD<br />
TUNE +<br />
VOLUME<br />
INFO<br />
SETUP<br />
Auto-Standby<br />
When this unit is in the stop state and there is no input signal and<br />
INTERNET<br />
operation for 30 minutes, it automatically enters the RADIO<br />
ONLINE<br />
standby MUSIC<br />
mode.<br />
SERVER<br />
MUSIC<br />
TUNER ANALOG IN DIGITAL IN<br />
For the input source “Analog In 1”, “Analog In 2” and “Portable<br />
In” only, when no operation is performed for eight iPod hours, USB this CD unit<br />
CH- CH +<br />
automatically enters the standby mode.<br />
• The default setting is “On”.<br />
TUNE -<br />
TUNE +<br />
1<br />
MUTE<br />
Press<br />
ADD<br />
FAVORITE<br />
VOLUME<br />
2<br />
Use<br />
3<br />
Use<br />
SETUP.<br />
Turns on the Menu settings mode<br />
and the Menu appears on the display<br />
(vpage 11 “Menu map”).<br />
ui and ENTER to select<br />
“General” – “Auto-Standby”,<br />
then press ENTER or p.<br />
“Select Auto-Standby” menu appears.<br />
ui to select “On”, then<br />
press ENTER or p.<br />
The setting is entered.<br />
SLEEP<br />
CALL<br />
TOP MENU<br />
SEARCH<br />
CLOCK<br />
SDB<br />
TONE<br />
ENTER<br />
1 2 3<br />
. / ABC<br />
DEF<br />
4 5 6<br />
GHI JKL MNO<br />
7 8 9<br />
PQRS TUV WXYZ<br />
+10 a/A 0<br />
RANDOM REPEAT PROGRAM MODE<br />
NOTE<br />
In the following situations, the Auto-standby function does not operate.<br />
• When the source is “Tuner”, “iPod” (Remote mode) or “AirPlay”.<br />
RC-1174<br />
• During CD playback or pause.<br />
DIMMER<br />
*<br />
POWER<br />
INFO<br />
SETUP<br />
CLEAR<br />
Firmware<br />
nnUpdate<br />
Setting the general [General]<br />
• In order to update the firmware, the environment and settings<br />
iPod USB CD<br />
required for connecting to broadband internet are needed<br />
CH- CH +<br />
(vpage 9).<br />
TUNE -<br />
TUNE +<br />
• Perform the firmware update operation after at least 2 minutes has<br />
elapsed since turning this unit’s power ON.<br />
MUTE<br />
1<br />
ADD<br />
FAVORITE<br />
VOLUME<br />
Press SETUP.<br />
CALL<br />
SDB<br />
TONE<br />
Turns on the Menu settings mode<br />
TOP MENU<br />
INFO<br />
and the Menu appears on the display<br />
(vpage 11 “Menu map”).<br />
2<br />
Use<br />
ui and ENTER to select<br />
“General” – “Firmware” –<br />
“Update”, then press ENTER or<br />
p.<br />
Check For Update<br />
Update Start<br />
SEARCH<br />
ANALOG IN<br />
1 2 3<br />
. / ABC<br />
DEF<br />
4 5 6<br />
GHI JKL MNO<br />
7 8 9<br />
PQRS TUV WXYZ<br />
approximately how long it will take to complete<br />
+10 a/A 0 * CLEAR<br />
RC-1174<br />
• If updating fails, the set automatically retries, but if updating is still<br />
SLEEP<br />
INTERNET<br />
RADIO<br />
TUNER<br />
RANDOM<br />
CLOCK<br />
ONLINE<br />
MUSIC<br />
ENTER<br />
DIMMER<br />
REPEAT PROGRAM<br />
POWER<br />
MUSIC<br />
SERVER<br />
DIGITAL IN<br />
Check for firmware updates. You can also check<br />
an update.<br />
Execute the update process.<br />
not possible, one of the messages shown below is displayed. If<br />
the display reads as shown below, check the settings and network<br />
environment, then update again.<br />
Display<br />
Updating fail<br />
Login failed<br />
Server is busy<br />
Connection fail<br />
Download fail<br />
SETUP<br />
Description<br />
Updating failed.<br />
Failure to login to server.<br />
Server is busy. Wait a while then try again.<br />
Failure in connecting to server.<br />
Downloading of the firmware has failed.<br />
MODE<br />
English / Deutsch / Français /<br />
Italiano / Nederlands / Español /<br />
Svenska<br />
1 2 3<br />
. / ABC<br />
DEF<br />
4 5 6<br />
GHI JKL MNO<br />
7 8 9<br />
PQRS TUV WXYZ<br />
+10 a/A 0 * CLEAR<br />
RANDOM<br />
REPEAT PROGRAM<br />
MODE<br />
RC-1174<br />
14
nnUpdate on web screen<br />
Firmware can be updated using the “Web control function”<br />
(vpage 46).<br />
“Web control function” (vpage 46) settings must be<br />
completed in advance on a PC belonging to the same network.<br />
For information on obtaining update files, please contact our<br />
customer service center.<br />
1<br />
Click r from step 5 for the “Web control function”<br />
(vpage 46).<br />
The PC will display the following screen.<br />
Wait for approximately 1 minute.<br />
You can also gain access by entering the IP address shown by<br />
the unit into a web browser.<br />
GThe web displayH<br />
FIRMWARE<br />
Please wait...<br />
Now,go to the new IP displayed in the body.<br />
If do not move the page within 1 minute,please refer to IP.<br />
GThe unit’s screen displayH<br />
3<br />
When<br />
the following screen is displayed, click the<br />
“OK” (e) button.<br />
Updating will begin.<br />
Firmware<br />
Warning<br />
Once started,the upload process cannot be interrupted or adorted,<br />
in order to ensure the integrity of the Digital Media Player.<br />
Are you sure you want to proceed?<br />
OK<br />
e<br />
NOTE<br />
Do not operate the unit while updating is in progress.<br />
4<br />
When the following screen is displayed, updating is<br />
complete.<br />
Firmware<br />
New Firmware:<br />
xxx.fw<br />
Firmware upload status: 100% completed.<br />
The upload process finished successfully.<br />
Please close this.<br />
nnNotification<br />
Update<br />
Setting the general [General]<br />
TUNER ANALOG IN DIGITAL IN<br />
Displays a notification message on this unit’s menu screen when the<br />
iPod USB CD<br />
latest firmware is released with “Update”.<br />
CH-<br />
Connect to broadband Internet (vpage 9) when using CH +<br />
this<br />
function.<br />
TUNE -<br />
TUNE +<br />
1<br />
MUTE<br />
Press SETUP.<br />
ADD<br />
Turns on the Menu settings mode<br />
FAVORITE<br />
VOLUME<br />
CALL<br />
SDB<br />
and the Menu appears on the display<br />
TONE<br />
(vpage 11 “Menu map”).<br />
TOP MENU<br />
INFO<br />
2<br />
Use<br />
3<br />
Use<br />
On<br />
Off<br />
ui and ENTER to select<br />
“General” – “Firmware” –<br />
“Notification” – “Update”, then<br />
press ENTER or p.<br />
“Update Notification” menu appears.<br />
SEARCH<br />
1 2 3<br />
. / ABC<br />
DEF<br />
4 5 6<br />
GHI JKL MNO<br />
7 PQRS 8 TUV 9 WXYZ<br />
ui to select “On”, then press ENTER or p.<br />
Display update message.<br />
Do not display update message.<br />
SLEEP<br />
INTERNET<br />
RADIO<br />
CLOCK<br />
ONLINE<br />
MUSIC<br />
+10 a/A 0<br />
RANDOM<br />
ENTER<br />
*<br />
RC-1174<br />
DIMMER<br />
REPEAT PROGRAM<br />
POWER<br />
MUSIC<br />
SERVER<br />
SETUP<br />
CLEAR<br />
MODE<br />
2<br />
When<br />
the following screen is displayed by the PC,<br />
click the “Choose File” (q) button, select the update<br />
file, and click the “Upload” (w) button.<br />
Button names may vary depending on the OS language used on your<br />
computer.<br />
• When you press ENTER during display of the notification message,<br />
the “Check for Update” is displayed. (Refer to page 14 for more<br />
information on “Update”.)<br />
• Press o to erase the notification message.<br />
Firmware<br />
Upload new firmware<br />
Choose File<br />
Upload<br />
w<br />
q<br />
15
SLEEP<br />
CLOCK<br />
DIMMER<br />
POWER<br />
Upgrade<br />
TUNER ANALOG IN DIGITAL IN<br />
Display a notification message on this unit’s menu screen when<br />
downloadable firmware is released with “Add New Feature”.<br />
iPod USB CD<br />
CH-<br />
Connect to broadband Internet (vpage 9) when using CH +<br />
this<br />
function.<br />
TUNE -<br />
TUNE +<br />
1<br />
MUTE<br />
Press SETUP.<br />
ADD<br />
Turns on the Menu settings mode<br />
FAVORITE<br />
VOLUME<br />
and the Menu appears on the display<br />
CALL<br />
SDB<br />
TONE<br />
(vpage 11 “Menu map”).<br />
TOP MENU<br />
INFO<br />
2<br />
Use<br />
3<br />
Use<br />
On<br />
Off<br />
ui and ENTER to select<br />
“General” – “Firmware” –<br />
“Notification” – “Upgrade”,<br />
then press ENTER or p.<br />
“Upgrade Notification” menu appears.<br />
ui to select “On”, then<br />
press ENTER or p.<br />
Display upgrade message.<br />
Do not display upgrade message.<br />
SLEEP<br />
INTERNET<br />
RADIO<br />
SEARCH<br />
CLOCK<br />
ONLINE<br />
MUSIC<br />
1 2 3<br />
. / ABC<br />
DEF<br />
4 5 6<br />
GHI JKL MNO<br />
7 8 9<br />
PQRS TUV WXYZ<br />
+10 a/A 0<br />
RANDOM<br />
ENTER<br />
*<br />
RC-1174<br />
DIMMER<br />
REPEAT PROGRAM<br />
• When you press ENTER during display of the notification message,<br />
the “Add New Feature” is displayed. (Refer to page 16 for more<br />
information on “Add New Feature”.)<br />
• Press o to erase the notification message.<br />
POWER<br />
MUSIC<br />
SERVER<br />
SETUP<br />
CLEAR<br />
MODE<br />
nnAdd New Feature<br />
• In order to add new functions, the environment and settings<br />
iPod USB CD<br />
required for connecting to broadband internet are needed<br />
CH- CH +<br />
(vpage 9).<br />
TUNE -<br />
TUNE +<br />
• Perform the add new feature operation after at least 2 minutes has<br />
elapsed since turning this unit’s power on.<br />
MUTE<br />
1<br />
ADD<br />
FAVORITE<br />
VOLUME<br />
Press SETUP.<br />
CALL<br />
SDB<br />
TONE<br />
Turns on the Menu settings mode<br />
TOP MENU<br />
INFO<br />
and the Menu appears on the display<br />
(vpage 11 “Menu map”).<br />
2<br />
Use<br />
ui to select “General”<br />
– “Firmware” – “Add New<br />
Feature”, then press ENTER or<br />
p.<br />
Upgrade Status<br />
Upgrade Start<br />
SEARCH<br />
ANALOG IN<br />
1 2 3<br />
. / ABC<br />
DEF<br />
4 5 6<br />
GHI JKL MNO<br />
+10 a/A 0<br />
RC-1174<br />
those in “Update”(vpage 14) will appear on the display. Check<br />
INTERNET<br />
RADIO<br />
TUNER<br />
RANDOM<br />
ONLINE<br />
MUSIC<br />
ENTER<br />
REPEAT PROGRAM<br />
*<br />
MUSIC<br />
SERVER<br />
DIGITAL IN<br />
Display a list of the additional functions provided<br />
by the upgrade.<br />
7 8 9<br />
PQRS TUV WXYZ<br />
Execute the upgrade process.<br />
• If the upgrade is not successful, an error message identical to<br />
the settings and network environment, then update again.<br />
Upgrade ID<br />
The ID number shown on this screen is needed<br />
when carrying out the procedure.<br />
See the DENON website for details about updates.<br />
When the procedure is complete, “Registered” is displayed and<br />
updates can be carried out. If the procedure has not been carried out,<br />
“Not Registered” is displayed.<br />
SETUP<br />
CLEAR<br />
MODE<br />
Setting the general [General]<br />
[Notes concerning use of “Update” and<br />
“Add New Feature”]<br />
• Do not turn off the power until updating or upgrading is completed.<br />
• Even with a broadband connection to the Internet, approximately<br />
20 minutes is required for the updating/upgrading procedure to be<br />
completed.<br />
• Once updating/upgrade starts, normal operations on this unit cannot<br />
be performed until updating/upgrading is completed.<br />
• Furthermore, updating/upgrading the firmware may reset the backup<br />
data for the parameters, etc. set for this unit.<br />
• If the update or upgrade fails, remove and re-insert the power cord.<br />
“Update Retry” appears on the display and update restarts from<br />
the point at which update failed. If the error continues despite this,<br />
check the network environment.<br />
• Information regarding the “Update” function and “Add New<br />
Feature” will be announced on the DENON web site each time<br />
related plans are defined.<br />
• When usable new firmware is released with “Update” or “Add New<br />
Feature”, a notification message is displayed on the menu screen.<br />
When you do not want to be notified, set “Update” (vpage 15)<br />
and “Upgrade” (vpage 16) to “Off”.<br />
16
Setting the network [Network]<br />
• For details on “Quick Setup” operations, see the separate<br />
“Quick setup guide”.<br />
• If you cancelled “Quick Setup” menu or changed the network<br />
environment, perform “Setup” – “Network” – “Quick Setup”.<br />
Connecting wired LAN<br />
Use this procedure to configure the wired LAN settings.<br />
nnNetwork connecting<br />
(when “DHCP”settings are “On”)<br />
When using this unit with the broadband router’s DHCP function<br />
enabled, this unit automatically performs the IP address setting<br />
and other settings.<br />
1<br />
Connect<br />
SLEEP CLOCK DIMMER POWER<br />
2<br />
Press<br />
3<br />
Press<br />
4<br />
Use<br />
5<br />
Use<br />
the ETHERNET cable<br />
(vpage 9 “Connecting to a<br />
home network (LAN)” – “Wired<br />
LAN”).<br />
POWER X to turn on<br />
power to the main unit.<br />
SETUP.<br />
Turns on the Menu settings mode<br />
and the Menu appears on the display<br />
(vpage 11 “Menu map”).<br />
ui and ENTER to select<br />
“Network” – “Settings” –<br />
“DHCP (On)”, then press<br />
ENTER or p.<br />
“Select DHCP” menu appears.<br />
ADD<br />
FAVORITE<br />
CALL<br />
SEARCH<br />
CH- CH +<br />
1 2 3<br />
. / ABC<br />
DEF<br />
ui to select “On”, then press ENTER 4 GHI 5or JKL p. 6 MNO<br />
“DHCP (On)” menu appears.<br />
INTERNET<br />
RADIO<br />
TUNER<br />
iPod<br />
TUNE -<br />
TOP MENU<br />
ONLINE<br />
MUSIC<br />
ANALOG IN<br />
USB<br />
MUTE<br />
SDB<br />
TONE<br />
ENTER<br />
7 8 9<br />
MUSIC<br />
SERVER<br />
DIGITAL IN<br />
CD<br />
TUNE +<br />
VOLUME<br />
INFO<br />
SETUP<br />
PQRS TUV WXYZ<br />
6<br />
Use<br />
ui to select “Test Connection”, then press<br />
ENTER or p.<br />
“Wait for the network to connect...” is displayed, and the unit<br />
starts connecting to the LAN.<br />
• When the connection is made successfully, “Connected!” appears.<br />
• If the connection cannot be established, “Connection Failed” is<br />
displayed. Perform steps 1 – 6 again.<br />
You may need to set the network connection manually, depending<br />
on the provider you use. To set the connection manually, use the<br />
setting procedure of “Network connecting (when “DHCP” settings<br />
are “Off”)”.<br />
nnNetwork connecting<br />
(when “DHCP” settings is “Off”)<br />
TUNER<br />
ANALOG IN<br />
DIGITAL IN<br />
This section explains the settings when connecting this unit to a<br />
network that does not have a DHCP function.<br />
iPod<br />
USB<br />
CD<br />
CH- CH<br />
+<br />
To configure the settings manually, check the setting details with<br />
MUTE<br />
your network administrator.<br />
ADD<br />
1 FAVORITE<br />
VOLUME<br />
CALL<br />
SDB<br />
Perform steps 1 – 4 of the<br />
TONE<br />
TOP MENU<br />
INFO<br />
“Network connecting (when<br />
“DHCP” settings are “On”)”<br />
procedure and select “Off” in<br />
ENTER<br />
step 5.<br />
SEARCH<br />
SETUP<br />
“DHCP (Off)” menu appears.<br />
2<br />
Use<br />
ui to select “IP Address”,<br />
then press ENTER or p.<br />
“Enter IP Address” menu appears.<br />
SLEEP<br />
INTERNET<br />
RADIO<br />
TUNER -<br />
CLOCK<br />
ONLINE<br />
MUSIC<br />
DIMMER<br />
POWER<br />
MUSIC<br />
SERVER<br />
TUNER +<br />
1 2 3<br />
. / ABC DEF<br />
4 5 6<br />
GHI JKL MNO<br />
7 8 9<br />
PQRS TUV WXYZ<br />
3 +10a/A<br />
0<br />
*<br />
CLEAR<br />
Use uip or 0 – 9 to input the<br />
RANDOM<br />
REPEAT PROGRAM<br />
MODE<br />
IP address and press ENTER.<br />
4<br />
Use uip or 0 – 9 to input the address for<br />
RC-1174<br />
“Subnet Mask”, “Gateway”, “Primary DNS”, and<br />
“Secondary DNS”.<br />
5<br />
Use<br />
ui to select “Test Connection”, then press<br />
ENTER or p.<br />
“Wait for the network to connect...” is displayed, and the unit<br />
starts connecting to the LAN.<br />
• When the connection is made successfully, “Connected!” appears.<br />
• If the connection cannot be established, “Connection Failed” is<br />
displayed. Perform steps 1 – 4 again.<br />
+10 a/A 0<br />
*<br />
CLEAR<br />
RANDOM<br />
REPEAT PROGRAM<br />
MODE<br />
RC-1174<br />
17
INTERNET<br />
RADIO<br />
ONLINE<br />
MUSIC<br />
MUSIC<br />
SERVER<br />
nnProxy settings<br />
TUNE -<br />
TUNE +<br />
Configure these settings to connect to the internet via a proxy<br />
server.<br />
MUTE<br />
ADD<br />
1<br />
FAVORITE<br />
VOLUME<br />
Press SETUP.<br />
CALL<br />
SDB<br />
TONE<br />
Turns on the Menu settings mode<br />
TOP MENU<br />
INFO<br />
and the Menu appears on the display<br />
(vpage 11 “Menu map”).<br />
2<br />
Use<br />
3<br />
If<br />
4<br />
Use<br />
5<br />
Use<br />
ui and ENTER to select<br />
“Network” – “Settings” –<br />
“Proxy”, then press ENTER or<br />
p.<br />
“Setup Proxy” menu appears.<br />
“Proxy(On)” appears, go to<br />
step 5.<br />
If “Proxy(Off)” appears, press<br />
ENTER or p.<br />
“Select Proxy” menu appears.<br />
TUNER<br />
iPod<br />
SEARCH<br />
ANALOG IN<br />
USB<br />
CH- CH +<br />
RANDOM<br />
ENTER<br />
REPEAT PROGRAM<br />
RC-1174<br />
DIGITAL IN<br />
CD<br />
SETUP<br />
1 2 3<br />
. / ABC<br />
DEF<br />
4 5 6<br />
GHI JKL MNO<br />
7 8 9<br />
PQRS TUV WXYZ<br />
+10 a/A 0<br />
ui to select “On”, then press ENTER or p.<br />
“Setup Proxy” menu appears.<br />
ui to select “Proxy (Address)” or “Proxy<br />
(Name)”, then press ENTER or p.<br />
“Select Type” menu appears.<br />
*<br />
CLEAR<br />
MODE<br />
6<br />
Use<br />
7<br />
Use<br />
8<br />
Use<br />
9<br />
Use<br />
10<br />
ui to select “Address” or “Name”, then press<br />
ENTER or p.<br />
“Setup Proxy” menu appears.<br />
ui to select “Address” or “Name”, then press<br />
ENTER or p.<br />
“Enter Proxy Address” or “Enter Proxy Name” menu appears.<br />
uip or 0 – 9, +10 to input the address or name,<br />
then press ENTER.<br />
“Setup Proxy” menu appears.<br />
ui to select “Port”, then press ENTER or p.<br />
“Enter Proxy Port” menu appears.<br />
Use uip or 0 – 9 to input the port, then press<br />
ENTER.<br />
The Proxy settings are completed.<br />
Connecting wireless LAN<br />
Setting the network [Network]<br />
Use this procedure to configure the wireless LAN settings.<br />
nnAuto-Scan (Wireless LAN)<br />
If a LAN cable is connected, remove it.<br />
1<br />
Press POWER X to turn on<br />
power to the main unit.<br />
2<br />
Press<br />
3<br />
Use<br />
4<br />
Use<br />
SETUP.<br />
Turns on the menu settings mode<br />
and the menu appears on the display<br />
(vpage 11 “Menu map”).<br />
ui and ENTER to select<br />
“Network” – “Settings” – “Auto-<br />
Scan”, then press ENTER or p.<br />
The access point you have set is<br />
displayed.<br />
ui to select the access<br />
point, and then press ENTER or<br />
p.<br />
• If the access point is not detected<br />
automatically, configure it manually<br />
(vpage 20 “<strong>Manual</strong> Settings”).<br />
SLEEP<br />
INTERNET<br />
RADIO<br />
TUNER<br />
iPod<br />
ADD<br />
FAVORITE<br />
CALL<br />
SEARCH<br />
CH- CH +<br />
TUNE -<br />
TOP MENU<br />
CLOCK<br />
ONLINE<br />
MUSIC<br />
ANALOG IN<br />
USB<br />
MUTE<br />
SDB<br />
TONE<br />
ENTER<br />
DIMMER<br />
1 2 3<br />
. / ABC<br />
DEF<br />
4 5 6<br />
GHI JKL MNO<br />
7 8 9<br />
POWER<br />
MUSIC<br />
SERVER<br />
DIGITAL IN<br />
CD<br />
TUNE +<br />
VOLUME<br />
INFO<br />
SETUP<br />
PQRS TUV WXYZ<br />
+10 a/A 0<br />
*<br />
CLEAR<br />
RANDOM<br />
REPEAT PROGRAM<br />
MODE<br />
RC-1174<br />
18
INTERNET<br />
RADIO<br />
ONLINE<br />
MUSIC<br />
MUSIC<br />
SERVER<br />
TUNER<br />
ANALOG IN<br />
DIGITAL IN<br />
5<br />
If<br />
there is an encryption setting for the access point<br />
you selected in step 4, enter same encryption key as<br />
used for the access point. (If there is no encryption<br />
setting, proceed to step 6.)<br />
Use uio p or 0 – 9, +10 to input the “Password” (encryption<br />
key) and press ENTER or p. Enter the same encryption key as<br />
used for the access point.<br />
• The types of characters that can be input are as shown below.<br />
GLower case charactersH<br />
abcdefghijklmnopqrstuvwxyz<br />
GUpper case charactersH<br />
ABCDEFGHIJKLMNOPQRSTUVWXYZ<br />
GSymbolsH ! “ # $ % & ‘ ( ) z + , - . / : ; < = > ? @ [ \ ] ^ _ ` { | } ˜<br />
GNumbersH 0123456789 (Space)<br />
• When no security settings have been used in the Internet<br />
connection settings, this step is not necessary.<br />
6<br />
Use<br />
i to select “Test Connection”, then press ENTER<br />
or p.<br />
“Wait for the network to connect...” is displayed, and the unit<br />
starts connecting to the network.<br />
• This unit performs automatic network setup due to the DHCP<br />
function.<br />
nnWPS Settings (Push-button method)<br />
By just pressing the WPS button on your router and this unit, the<br />
wireless LAN connection settings are made.<br />
• Before turning this unit on, make sure that an Ethernet cable is<br />
not connected to this unit. If a cable is connected, have this unit<br />
enter the power standby mode and disconnect the cable.<br />
• After the unit is turned on, it takes approximately 30 seconds for<br />
the WPS button on this unit to be available.<br />
1<br />
Press the WPS button of the router.<br />
2<br />
Press WPS on the rear panel.<br />
“Wait for the network to connect...” is displayed, and the unit<br />
starts connecting to the LAN.<br />
• When the connection is made successfully, “Connected!” appears.<br />
• If the connection cannot be established, “Connection Failed” is<br />
displayed. Perform steps 1 – 2 again.<br />
NOTE<br />
If the router uses WEP, WPA-TKIP or WPA2-TKIP encryption,<br />
connection is not possible using the WPS button. In this case, connect<br />
using “Auto-scan” or “<strong>Manual</strong>”.<br />
nnWPS Settings (PIN code method)<br />
1<br />
Press<br />
2<br />
Use<br />
3<br />
Use<br />
SETUP.<br />
Turns on the Menu settings mode<br />
and the Menu appears on the display<br />
(vpage 11 “Menu map”).<br />
ui and ENTER to select<br />
“Network” – “Settings” – “WPS<br />
(Wi-Fi Protected Setup)” – “PIN<br />
code”, then press ENTER or p.<br />
The access point that you have set is<br />
displayed.<br />
ui to select the access point<br />
whose PIN code you want to<br />
display, and press ENTER or p.<br />
PIN code number is displayed.<br />
iPod USB CD<br />
Setting the network [Network]<br />
ADD<br />
FAVORITE<br />
CALL<br />
SEARCH<br />
CH- CH +<br />
TUNE -<br />
TOP MENU<br />
MUTE<br />
SDB<br />
TONE<br />
1 2 3<br />
. / ABC<br />
DEF<br />
4 5 6<br />
GHI JKL MNO<br />
7 8 9<br />
PQRS TUV WXYZ<br />
+10 a/A 0<br />
RANDOM<br />
REPEAT PROGRAM<br />
4<br />
RC-1174<br />
Set this PIN code to the register.<br />
When connection is established with access point,<br />
“Connected!” is displayed.<br />
ENTER<br />
*<br />
TUNE +<br />
VOLUME<br />
INFO<br />
SETUP<br />
CLEAR<br />
MODE<br />
19
INTERNET<br />
RADIO<br />
ONLINE<br />
MUSIC<br />
MUSIC<br />
SERVER<br />
TUNER<br />
ANALOG IN<br />
DIGITAL IN<br />
SLEEP<br />
CLOCK<br />
DIMMER<br />
POWER<br />
nn<strong>Manual</strong> Settings<br />
1<br />
Press<br />
2<br />
Use<br />
3<br />
Use<br />
4<br />
Use<br />
iPod<br />
USB<br />
CD<br />
CH- CH +<br />
TUNE -<br />
TUNE +<br />
Use ui to select following items, then press ENTER<br />
6 MUTE<br />
SETUP.<br />
or p.<br />
ADD<br />
Turns on the Menu settings mode<br />
FAVORITE<br />
VOLUME • None Select if not encrypted. Can also be used even without<br />
and the Menu appears on the display<br />
CALL<br />
SDB<br />
TONE<br />
encryption, through we recommend encryption for improved<br />
(vpage 11 “Menu map”).<br />
TOP MENU<br />
INFO<br />
security.<br />
ui and ENTER to select<br />
• WEP / WPA(TKIP) / WPA(AES) / WPA2(TKIP) / WPA2(AES)<br />
ENTER<br />
“Network” – “Settings” –<br />
Select the encryption method according to the encryption setting<br />
of the access point you are using.<br />
SEARCH<br />
SETUP<br />
“<strong>Manual</strong>”, then press ENTER or<br />
p.<br />
7<br />
Use ui to select “Password”, then press ENTER.<br />
1 . / 2 ABC 3 DEF<br />
ui to select “SSID”, then 4 GHI 5 JKL 6 MNO<br />
press ENTER<br />
8<br />
or p.<br />
Use uio p to enter the encryption key, and press<br />
7 PQRS 8 TUV 9 WXYZ<br />
ENTER.<br />
+10 a/A 0 * CLEAR<br />
uio p or 0 – 9, +10 to input<br />
Enter the same encryption key as used for the access point.<br />
RANDOM REPEAT PROGRAM MODE<br />
the name of the wireless network<br />
• When no security settings have been used in the Internet<br />
(SSID), then press ENTER.<br />
connection settings, this step is not necessary.<br />
RC-1174<br />
• When connecting to a “WEP” encrypted network, set the access<br />
point “Default Key” to “Key 1”.<br />
9<br />
Use i to select “Test Connection” and press ENTER<br />
or p.<br />
“Wait for the network to connect...” is displayed, and the unit<br />
! “ # $ % & ‘ ( ) z + , - . / : ; < = > ? @ [ \ ] ^ _ ` { | } ˜<br />
starts connecting to the network.<br />
0123456789 (Space)<br />
• This unit performs automatic network setup due to the DHCP<br />
function.<br />
ui to select “Security”, then press ENTER or p.<br />
• The types of characters that can be input are as shown below.<br />
GLower case charactersH<br />
abcdefghijklmnopqrstuvwxyz<br />
GUpper case charactersH<br />
ABCDEFGHIJKLMNOPQRSTUVWXYZ<br />
GSymbolsH<br />
GNumbersH<br />
5<br />
Use<br />
NOTE<br />
This unit is not compatible with WEP (TSN) encryption system.<br />
Other network settings<br />
nnNetwork Control<br />
Setting the network [Network]<br />
Set the network function On/Off during standby.<br />
1<br />
Press SETUP.<br />
Turns on the Menu settings mode<br />
and the Menu appears on the display<br />
(vpage 11 “Menu map”).<br />
2<br />
Use<br />
3<br />
Use<br />
4<br />
Press<br />
ui to select “Network” –<br />
“Network Control”, then press<br />
ENTER or p.<br />
“Network Control” menu appears.<br />
ui to select “On”, then<br />
press ENTER or p.<br />
INTERNET<br />
RADIO<br />
TUNER<br />
ADD<br />
FAVORITE<br />
CALL<br />
SEARCH<br />
CH- CH +<br />
TUNE -<br />
TOP MENU<br />
ONLINE<br />
MUSIC<br />
ANALOG IN<br />
MUTE<br />
SDB<br />
TONE<br />
1 2 3<br />
. / ABC<br />
DEF<br />
4 5 6<br />
GHI JKL MNO<br />
7 8 9<br />
MUSIC<br />
SERVER<br />
DIGITAL IN<br />
PQRS TUV WXYZ<br />
On Network is on during standby. Main unit +10 a/A<br />
operable 0 * CLEARwith<br />
a network compatible controller. Shortens RANDOM REPEAT PROGRAM the MODEtime<br />
iPod<br />
USB<br />
ENTER<br />
CD<br />
TUNE +<br />
VOLUME<br />
before the network connection is completed.<br />
• When “Network Control” is set to “On”, the power<br />
display lights red.<br />
RC-1174<br />
• More power is consumed when in standby (Power<br />
consumption: 3 W).<br />
Off Suspend network function during standby. It will take<br />
slightly longer till the network connection is completed.<br />
• The minimum amount of power is consumed when<br />
in standby (Power consumption: 0.3 W).<br />
• This is the default setting.<br />
SETUP.<br />
The display returns to normal.<br />
INFO<br />
SETUP<br />
20
SLEEP<br />
CLOCK<br />
DIMMER<br />
POWER<br />
INTERNET<br />
RADIO<br />
ONLINE<br />
MUSIC<br />
MUSIC<br />
SERVER<br />
nnFriendly Name<br />
The Friendly Name is the name of this unit displayed iPod USB CD on the<br />
CH- CH +<br />
network (Maximum 63 characters).<br />
1<br />
TUNE -<br />
TUNE +<br />
Press SETUP.<br />
MUTE<br />
Turns on the Menu settings mode<br />
ADD<br />
and the Menu appears on the display<br />
FAVORITE<br />
VOLUME<br />
(vpage 11 “Menu map”).<br />
CALL<br />
SDB<br />
TONE<br />
2<br />
Use<br />
3-1<br />
ui to select “Network”<br />
– “Friendly Name”, then press<br />
ENTER or p.<br />
“Friendly Name” menu appears.<br />
GWhen p is pressedH<br />
Choose from preset names.<br />
Use ui to select a name, then<br />
press ENTER.<br />
SEARCH<br />
ANALOG IN<br />
1 2 3<br />
. / ABC<br />
DEF<br />
4 5 6<br />
GHI JKL MNO<br />
7 8 9<br />
PQRS TUV WXYZ<br />
+10 a/A 0<br />
Room / Kitchen / Living Room / Office / CEOL (default)<br />
RC-1174<br />
/ Other<br />
3-2<br />
INTERNET<br />
RADIO<br />
TUNER<br />
TOP MENU<br />
ONLINE<br />
MUSIC<br />
ENTER<br />
*<br />
MUSIC<br />
SERVER<br />
DIGITAL IN<br />
Preset names<br />
RANDOM REPEAT PROGRAM MODE<br />
Current friendly name / DENON RCD-N8 / AV Room /<br />
Bedroom / Dining Room / Family Room / Guest Room / Kids<br />
GWhen ENTER is pressedH<br />
Edit a friendly name.<br />
• For character input, see page 48.<br />
INFO<br />
SETUP<br />
CLEAR<br />
nnLast.fm Display<br />
TUNER ANALOG IN DIGITAL IN<br />
Setting the network [Network]<br />
Set whether or not to display Last.fm item on the menu.<br />
TUNE -<br />
1<br />
Press SETUP.<br />
ADD<br />
Turns on the Menu settings mode<br />
FAVORITE<br />
and the Menu appears on the display<br />
CALL<br />
(vpage 11 “Menu map”).<br />
TOP MENU<br />
2<br />
Use<br />
3<br />
Use<br />
ui to select “Network” –<br />
“Last.fm Display”, then press<br />
ENTER or p.<br />
“Last.fm Display” appears.<br />
ui to select “Show” or<br />
“Hidden”, then press ENTER or<br />
p.<br />
Show<br />
Hide<br />
Last.fm items will be displayed.<br />
Last.fm items will not be displayed.<br />
iPod<br />
SEARCH<br />
CH- CH +<br />
MUTE<br />
SDB<br />
TONE<br />
1 2 3<br />
. / ABC<br />
DEF<br />
4 5 6<br />
GHI JKL MNO<br />
7 8 9<br />
PQRS TUV WXYZ<br />
+10 a/A 0<br />
RANDOM<br />
USB<br />
ENTER<br />
REPEAT PROGRAM<br />
*<br />
RC-1174<br />
CD<br />
TUNE +<br />
VOLUME<br />
INFO<br />
SETUP<br />
CLEAR<br />
MODE<br />
nnResetting the friendly name to the default<br />
setting<br />
In step 3-1, select “CEOL (Default)” and press ENTER.<br />
21
Operations<br />
Operations<br />
Here, we explain functions and operations that let you make better use of this unit.<br />
F Preparations vpage 23<br />
F Operations possible during playback vpage 23<br />
F CD playback vpage 25<br />
F MP3 and WMA files playback vpage 28<br />
F Network audio playback vpage 29<br />
F Tuning in radio stations vpage 33<br />
F Favorite function vpage 36<br />
F iPod playback vpage 37<br />
F USB memory device playback vpage 40<br />
F Portable audio player playback vpage 41<br />
F Listening to ANALOG IN vpage 41<br />
F Listening to DIGITAL IN vpage 42<br />
F AirPlay function vpage 43<br />
F Remote play function vpage 45<br />
F Web control function vpage 46<br />
F Other functions vpage 48<br />
22
Operations<br />
This section provides information on operations of playback<br />
procedures.<br />
Preparations<br />
Turning the power on<br />
Press POWER X.<br />
The power indicator lights white and the<br />
power turns on.<br />
MUTE<br />
• When you turn on the power of this unit for the ADD first time after<br />
FAVORITE<br />
VOLUME<br />
purchasing it, the “Quick Setup” menu starts up. For details on<br />
CALL<br />
TONE<br />
SDB<br />
“Quick Setup” operations, see the separate “Quick setup guide”.<br />
TOP MENU<br />
INFO<br />
SLEEP<br />
INTERNET<br />
RADIO<br />
TUNER<br />
iPod<br />
SEARCH<br />
CH- CH +<br />
• If you cancelled “Quick Setup” menu or changed the network<br />
environment, perform “Setup” – “Quick Setup”.<br />
Turning the power to standby mode<br />
Press POWER X.<br />
The unit enters standby mode.<br />
• Power indicator<br />
Standby : Off<br />
Network Control – “On” : Red<br />
iPod charge standby : Red<br />
Alarm standby : Orange<br />
TUNE -<br />
CLOCK<br />
ONLINE<br />
MUSIC<br />
ANALOG IN<br />
USB<br />
ENTER<br />
DIMMER<br />
SLEEP CLOCK DIMMER POWER<br />
1 2 3 DEF<br />
. / ABC<br />
4 5 6<br />
7 8 9<br />
POWER<br />
MUSIC<br />
SERVER<br />
DIGITAL IN<br />
CD<br />
TUNE +<br />
SETUP<br />
GHI JKL MNO<br />
INTERNET ONLINE MUSIC<br />
RADIO MUSIC SERVER<br />
PQRS TUV WXYZ<br />
TUNER ANALOG IN DIGITAL IN<br />
+10 a/A 0 * CLEAR<br />
iPod USB CD<br />
RANDOM REPEAT PROGRAM MODE<br />
CH +<br />
CH-<br />
Operations possible during playback<br />
Selecting the input source<br />
nnSelecting the input source using the main unit<br />
1<br />
Press SOURCE.<br />
The display changes to the input source selection screen.<br />
2<br />
Press<br />
ui to select the input source.<br />
The input source is switched each time the button is pressed.<br />
Favorite<br />
Internet Radio<br />
Music Server<br />
Last.fm<br />
iPod<br />
USB<br />
CD<br />
FM<br />
Digital In<br />
Analog In 1<br />
Analog In 2<br />
Portable Inz<br />
Setup<br />
z z “Portable In” appears only when the portable audio player is<br />
connected to portable in jack.<br />
With the unit, you can play back music files stored on your iPhone/<br />
iPod touch and music from iTunes (vpage 43 “AirPlay function”).<br />
nnSelecting the input source using the remote<br />
control<br />
Press the input source select button<br />
(INTERNET RADIO, ONLINE MUSIC,<br />
MUSIC SERVER, TUNER, ANALOG<br />
IN, DIGITAL IN, iPod, USB, CD).<br />
• The desired input source can be selected<br />
directly.<br />
• The input source is switched as follows<br />
each time ANALOG IN is pressed.<br />
SLEEP<br />
CH- CH +<br />
TUNE -<br />
SLEEP<br />
ADD<br />
TUNE -<br />
SEARCH<br />
CLOCK<br />
ADD<br />
1 . /<br />
FAVORITE<br />
2 3<br />
VOLUME<br />
ABC<br />
DEF<br />
SDB<br />
CALL<br />
GHI TONE JKL MNO<br />
4 5 6<br />
TOP MENU<br />
INFO<br />
PQRS TUV WXYZ<br />
7 8 9<br />
+10 a/A 0<br />
DIMMER<br />
MUTE<br />
CLOCK DIMMER<br />
TOP MENU<br />
INFO<br />
TUNER ANALOG IN DIGITAL IN<br />
in jack, “Portable In” is not displayed when you press IN.<br />
iPod USB CD<br />
INTERNET<br />
RADIO<br />
Analog In 1 Analog In 2<br />
TUNER<br />
iPod<br />
*<br />
TUNE +<br />
CH- CH +<br />
ENTER<br />
RANDOM<br />
ONLINE<br />
MUSIC<br />
ANALOG IN<br />
FAVORITE<br />
VOLUME<br />
(Portable In)<br />
INTERNET CALL ONLINE SDB MUSIC<br />
RADIO MUSIC TONE SERVER<br />
• When there is no portable audio player connected to the portable<br />
Adjusting the master volume<br />
Use VOLUME df to adjust the<br />
volume.<br />
The volume level is displayed.<br />
GVariable rangeH<br />
0 – 60<br />
SEARCH<br />
USB<br />
MUTE<br />
REPEAT PROGRAM<br />
ENTER<br />
POWER<br />
MUSIC<br />
SERVER<br />
DIGITAL IN<br />
CD<br />
POWER<br />
TUNE +<br />
SETUP<br />
CLEAR<br />
MODE<br />
SETUP<br />
NOTE<br />
RC-1174 MUTE<br />
Power continues to be supplied to some of the circuitry<br />
ADD<br />
even when the<br />
FAVORITE<br />
VOLUME<br />
power is in the standby mode. When leaving home for long periods of<br />
CALL<br />
SDB<br />
TONE<br />
time, unplug the power cord from the power outlet.<br />
nnCompletely turning off the power<br />
Unplug the power cord from the wall outlet.<br />
TUNE -<br />
TOP MENU<br />
ENTER<br />
TUNE +<br />
INFO<br />
You can also do this by turning VOLUME on the main unit.<br />
RC-1174<br />
1 2 3<br />
. / ABC<br />
DEF<br />
4 5 6<br />
GHI JKL MNO<br />
7 8 9<br />
PQRS TUV WXYZ<br />
+10 a/A 0 * CLEAR<br />
RANDOM REPEAT PROGRAM MODE<br />
SEARCH<br />
SETUP<br />
RC-1174<br />
1 2 3<br />
. / ABC<br />
DEF<br />
4 5 6<br />
GHI JKL MNO<br />
7 8 9<br />
PQRS TUV WXYZ<br />
+10 a/A 0 * CLEAR<br />
RANDOM REPEAT PROGRAM MODE<br />
23<br />
RC-1174
INTERNET<br />
RADIO<br />
ONLINE<br />
MUSIC<br />
MUSIC<br />
SERVER<br />
TUNER<br />
ANALOG IN<br />
DIGITAL IN<br />
INTERNET<br />
RADIO<br />
ONLINE<br />
MUSIC<br />
MUSIC<br />
SERVER<br />
Adjusting the tone<br />
1<br />
Press<br />
2<br />
Use<br />
SDB TONE to select the<br />
tone parameter to be adjusted.<br />
SDB<br />
S. Direct<br />
Bass<br />
Treble<br />
Balance<br />
o p to adjust the “SDB”,<br />
“Bass”, “Treble” or “Balance”.<br />
ADD<br />
FAVORITE<br />
CALL<br />
SEARCH<br />
CH- CH +<br />
1 2 3<br />
. / ABC<br />
DEF<br />
4 GHI 5 JKL 6 MNO<br />
• If no operation is performed for 5 seconds, the adjustment is<br />
iPod<br />
TUNE -<br />
TOP MENU<br />
• To make other tone adjustments at this time, press SDB TONE.<br />
retained and the normal display reappears.<br />
SDB<br />
Bass<br />
Treble<br />
Balance<br />
S.Direct<br />
Emphasize the +10 dB bass sound.<br />
GSelectable modesH On – Off<br />
Adjusts the bass sound.<br />
GVariable rangeH –10dB – +10dB<br />
Adjusts the treble sound.<br />
GVariable rangeH –10dB – +10dB<br />
USB<br />
MUTE<br />
ENTER<br />
7 8 9<br />
PQRS TUV WXYZ<br />
+10 a/A 0<br />
RANDOM<br />
SDB<br />
TONE<br />
REPEAT PROGRAM<br />
*<br />
RC-1174<br />
CD<br />
TUNE +<br />
VOLUME<br />
Adjusts the left/right volume balance.<br />
GVariable rangeH L6 – Center – R6<br />
Press o when you want to adjust the left channel, p<br />
when you want to adjust the right channel.<br />
The tone is not adjusted.<br />
INFO<br />
SETUP<br />
CLEAR<br />
MODE<br />
Turning off the sound temporarily<br />
Press MUTE :.<br />
The “MUTING” is displayed.<br />
TUNER<br />
iPod<br />
ADD<br />
FAVORITE<br />
CALL<br />
SEARCH<br />
CH- CH +<br />
TUNE -<br />
TOP MENU<br />
ANALOG IN<br />
To cancel, press MUTE : again.<br />
The mute mode is also canceled when VOLUME df is pressed.<br />
Setting the sleep timer<br />
USB<br />
MUTE<br />
SDB<br />
TONE<br />
ENTER<br />
1 2 3<br />
. / ABC<br />
DEF<br />
4 5 6<br />
GHI JKL MNO<br />
7 8 9<br />
PQRS TUV WXYZ<br />
Use this function to automatically switch the power to the standby<br />
+10 a/A 0 * CLEAR<br />
mode after a specific amount of time (minutes).<br />
RANDOM REPEAT PROGRAM MODE<br />
The sleep timer can be set to up to 90 minutes, in steps of 10 minutes.<br />
Press SLEEP during playback and<br />
select the setting time.<br />
• Press the button to select the setting time.<br />
• After about 3 seconds, the setting is<br />
entered and the display returns to as it was<br />
before.<br />
nnCanceling the sleep timer<br />
INTERNET<br />
RADIO<br />
TUNER<br />
CLOCK RC-1174 DIMMER<br />
DIGITAL IN<br />
CD<br />
TUNE +<br />
VOLUME<br />
INFO<br />
SETUP<br />
CH- CH +<br />
TUNE -<br />
ONLINE<br />
MUSIC<br />
ANALOG IN<br />
MUTE<br />
Either press SLEEP to select “Sleep1OFF” or press POWER X.<br />
ADD<br />
FAVORITE<br />
VOLUME<br />
nnTo check the time remaining until the sleep<br />
CALL<br />
SDB<br />
TONE<br />
timer is activated<br />
Press SLEEP.<br />
SLEEP<br />
iPod<br />
TOP MENU<br />
USB<br />
POWER<br />
MUSIC<br />
SERVER<br />
DIGITAL IN<br />
CD<br />
TUNE +<br />
INFO<br />
Operations possible during playback<br />
Switching the display’s brightness<br />
Press DIMMER.<br />
SEARCH<br />
SETUP<br />
If you operate the buttons when the display’s brightness is set to<br />
ADD<br />
FAVORITE<br />
CALL<br />
1 2 3<br />
. / ABC<br />
DEF<br />
4 5 6<br />
GHI JKL MNO<br />
7 8 9<br />
PQRS TUV WXYZ<br />
RC-1174<br />
To prevent hearing loss, do not raise the volume level excessively<br />
ANALOG IN<br />
CH- CH +<br />
• The display brightness is adjusted each time DIMMER is pressed<br />
TUNE -<br />
TUNE +<br />
as shown below.<br />
SLEEP<br />
100% 75% 50%<br />
Off<br />
INTERNET<br />
RADIO<br />
TUNER<br />
iPod<br />
25%<br />
TOP MENU<br />
“Off”, the display temporarily lights at “25%” brightness level.<br />
Listening with headphones<br />
Plug the headphones (sold separately) into .<br />
+10 a/A<br />
• The sound from the speakers is automatically cut off. 0<br />
NOTE<br />
when using headphones.<br />
RANDOM<br />
CLOCK<br />
ONLINE<br />
MUSIC<br />
USB<br />
MUTE<br />
SDB<br />
TONE<br />
ENTER<br />
DIMMER<br />
REPEAT PROGRAM<br />
*<br />
POWER<br />
MUSIC<br />
SERVER<br />
DIGITAL IN<br />
CD<br />
VOLUME<br />
INFO<br />
CLEAR<br />
MODE<br />
GDefault settingsH<br />
• SDB : Off<br />
• Bass : 0dB<br />
• Treble : 0dB<br />
• Balance : Center<br />
ENTER<br />
SEARCH<br />
SETUP<br />
1 2 3<br />
. / ABC<br />
DEF<br />
4 5 6<br />
GHI JKL MNO<br />
7 8 9<br />
PQRS TUV WXYZ<br />
+10 a/A 0<br />
*<br />
CLEAR<br />
RANDOM<br />
REPEAT PROGRAM<br />
MODE<br />
RC-1174<br />
24
CD playback<br />
SLEEP<br />
CLOCK<br />
DIMMER<br />
POWER<br />
This section explains how to playback CDs.<br />
Before playing a disc<br />
SEARCH<br />
CH- CH +<br />
1 2 3<br />
. / ABC<br />
DEF<br />
+10 a/A 0 * CLEAR<br />
• Do not push the disc tray in by hand when the power is turned off.<br />
RANDOM REPEAT PROGRAM MODE<br />
SLEEP<br />
INTERNET<br />
RADIO<br />
TUNER<br />
1<br />
iPod<br />
Press POWER X.<br />
2<br />
TUNE -<br />
Press SOURCE and ui to select<br />
to “ ”, then press ENTER, 1/3<br />
ADD<br />
FAVORITE<br />
ENTER or p, or press CD.<br />
CALL<br />
If no disc is loaded “No Disc” is<br />
TOP MENU<br />
displayed.<br />
3<br />
Insert<br />
a disc (vpage 3).<br />
• Press 5 to open/close the disc tray.<br />
• The disc tray also closes when 1/3<br />
ENTER or 1/3 is pressed.<br />
NOTE<br />
4 GHI 5 JKL 6 MNO<br />
• Do not place any foreign objects in the disc tray. Doing so could<br />
7 PQRS 8 TUV 9 WXYZ<br />
damage it.<br />
Doing so could damage the set.<br />
CLOCK<br />
ONLINE<br />
MUSIC<br />
ANALOG IN<br />
USB<br />
MUTE<br />
SDB<br />
TONE<br />
ENTER<br />
DIMMER<br />
POWER<br />
MUSIC<br />
SERVER<br />
DIGITAL IN<br />
CD<br />
TUNE +<br />
VOLUME<br />
INFO<br />
SETUP<br />
Playing CDs<br />
Press 1/3 ENTER or 1/3.<br />
The “1” indicator lights and playback begins.<br />
INTERNET<br />
RADIO<br />
TUNER<br />
iPod<br />
ADD<br />
FAVORITE<br />
CALL<br />
TOP MENU<br />
SEARCH<br />
RANDOM<br />
ONLINE<br />
MUSIC<br />
ANALOG IN<br />
USB<br />
MUTE<br />
SDB<br />
TONE<br />
REPEAT PROGRAM<br />
MUSIC<br />
SERVER<br />
DIGITAL IN<br />
CH- CH +<br />
TUNE -<br />
ENTER<br />
TUNE +<br />
VOLUME<br />
INFO<br />
SETUP<br />
1 2 3<br />
. / ABC<br />
DEF<br />
4 5 6<br />
GHI JKL MNO<br />
7 8 9<br />
PQRS TUV WXYZ<br />
+10 a/A 0<br />
*<br />
CD<br />
CLEAR<br />
MODE<br />
nnStopping playback<br />
Press 2.<br />
nnStopping playback temporarily<br />
Press 1/3 ENTER or 1/3.<br />
3 is displayed.<br />
• To resume playback, press 1/3 ENTER or 1/3.<br />
nnFast-forwarding and fast-reversing (searching)<br />
During playback, press and hold in 6, 7.<br />
nnMoving to the beginning of tracks (skipping)<br />
During playback, press 8, 9 or o p.<br />
• The disc skips as many tracks as times the button is pressed.<br />
• When you press reverse once, playback returns to the beginning<br />
of the current track.<br />
nnTo play the desired track (remote control only)<br />
Press 0 – 9, +10 to select the track.<br />
GExampleH Track 4 : 4<br />
GExampleH Track 12 : +10, 2<br />
GExampleH Track 20 : +10, +10, 0<br />
RC-1174<br />
• If the input source is set to something other than “ ”, press CD to<br />
switch the input source to “ ”.<br />
• The input source can also be switched to “ ” using SOURCE<br />
(vpage 23).<br />
RC-1174<br />
25
iPod<br />
USB<br />
CD<br />
CH- CH +<br />
ENTER<br />
SLEEP<br />
CLOCK<br />
DIMMER<br />
POWER<br />
Switching the display<br />
Press INFO.<br />
Elapsed time of<br />
current track<br />
Remaining time for<br />
all remaining tracks<br />
TUNE -<br />
ADD<br />
FAVORITE<br />
CALL<br />
TOP MENU<br />
SEARCH<br />
MUTE<br />
SDB<br />
TONE<br />
ENTER<br />
Remaining time<br />
of current track<br />
1 2 3<br />
. / ABC<br />
DEF<br />
4 5 6<br />
GHI JKL MNO<br />
7 8 9<br />
PQRS TUV WXYZ<br />
+10 a/A 0<br />
RANDOM REPEAT PROGRAM<br />
• The display switches each time the button is pressed.<br />
*<br />
RC-1174<br />
TUNE +<br />
VOLUME<br />
INFO<br />
SETUP<br />
CLEAR<br />
MODE<br />
. / ABC<br />
Playing repeatedly (Repeat playback)<br />
Press REPEAT.<br />
Playback in the respective repeat mode starts.<br />
SEARCH<br />
1 2 3<br />
4 5 6<br />
+10 a/A 0<br />
DEF<br />
GHI JKL MNO<br />
7 8 9<br />
RANDOM<br />
PQRS TUV WXYZ<br />
REPEAT<br />
*<br />
RC-1174<br />
PROGRAM<br />
Single-track repeat<br />
All-track repeat<br />
Repeat off<br />
(indicator turns off)<br />
[Selectable items]<br />
1 (Single-track repeat) Only 1 track plays repeatedly.<br />
ALL (All-track repeat) All tracks play repeatedly.<br />
Repeat off (indicator turns off) Normal playback resumes.<br />
SETUP<br />
CLEAR<br />
MODE<br />
ONLINE MUSIC<br />
CD playback<br />
MUSIC SERVER<br />
TUNER ANALOG IN DIGITAL IN<br />
Playing random order (Random playback)<br />
iPod USB CD<br />
1<br />
In<br />
2<br />
Press<br />
the stop mode, press RANDOM.<br />
The “ ” is displayed.<br />
1/3 ENTER or 1/3.<br />
The tracks start playing in random order.<br />
INTERNET<br />
RADIO<br />
ADD<br />
FAVORITE<br />
CALL<br />
SEARCH<br />
CH- CH +<br />
TUNE -<br />
TOP MENU<br />
MUTE<br />
SDB<br />
TONE<br />
1 2 3<br />
. / ABC<br />
DEF<br />
4 5 6<br />
GHI JKL MNO<br />
7 8 9<br />
PQRS TUV WXYZ<br />
+10 a/A 0<br />
RANDOM<br />
REPEAT<br />
ENTER<br />
*<br />
PROGRAM<br />
TUNE +<br />
VOLUME<br />
INFO<br />
SETUP<br />
CLEAR<br />
MODE<br />
If REPEAT is pressed during random playback, after the current<br />
session of random playback is finished, another session in a different<br />
order of tracks starts.<br />
NOTE<br />
Random play cannot be set or canceled during playback.<br />
nnCanceling random playback<br />
While stopped, press RANDOM.<br />
The “ ” turns off.<br />
RC-1174<br />
26
SLEEP<br />
Playing tracks in the desired order<br />
INTERNET<br />
RADIO<br />
(Program playback)<br />
Up to 25 tracks can be programmed.<br />
1<br />
In<br />
2<br />
Use<br />
the stop mode, press<br />
PROGRAM.<br />
“Program” is displayed.<br />
0 – 9, +10 to select the tracks.<br />
GExampleH To program tracks 3, 12, 7 to<br />
play in that order:<br />
Press PROGRAM, 3, +10, 2, 7.<br />
3<br />
Press 1/3 ENTER or 1/3.<br />
Playback starts in the programmed<br />
order.<br />
TUNER<br />
iPod<br />
ADD<br />
FAVORITE<br />
CALL<br />
SEARCH<br />
CH- CH +<br />
TUNE -<br />
TOP MENU<br />
CLOCK<br />
ONLINE<br />
MUSIC<br />
ANALOG IN<br />
USB<br />
MUTE<br />
SDB<br />
TONE<br />
ENTER<br />
1 2 3<br />
. / ABC<br />
DEF<br />
4 5 6<br />
GHI JKL MNO<br />
7 8 9<br />
PQRS TUV WXYZ<br />
+10 a/A 0<br />
DIMMER<br />
*<br />
POWER<br />
MUSIC<br />
SERVER<br />
DIGITAL IN<br />
CD<br />
TUNE +<br />
VOLUME<br />
INFO<br />
SETUP<br />
CLEAR<br />
CD playback<br />
nnChecking the order of the programmed tracks<br />
In the stop mode, press 9.<br />
The track numbers are displayed in the programmed order each<br />
time the button is pressed.<br />
nnTo clear the last track programmed<br />
In the stop mode, press CLEAR.<br />
The last track programmed is cleared each time the button is pressed.<br />
nnTo clear one programmed track at a time<br />
In the stop mode, press 9 to select the track to be cleared, then<br />
press CLEAR.<br />
nnClearing the all programmed track<br />
In the stop mode, press PROGRAM.<br />
• If REPEAT is pressed during program playback, the tracks are played<br />
repeatedly in the programmed order.<br />
• If RANDOM is pressed during program playback, the programmed<br />
tracks are played in random order.<br />
• The program is cleared when the disc tray is opened or the power<br />
is turned off.<br />
RANDOM<br />
REPEAT PROGRAM<br />
MODE<br />
RC-1174<br />
27
MP3 and WMA files playback<br />
This section explains how to playback MP3 and WMA files<br />
that are recorded onto a CD-R or CD-RW. For details on how to<br />
playback files recorded onto media other than CD-R or CD-RW,<br />
see the following sections.<br />
nn<br />
Portable audio player playback (vpage 41)<br />
nn<br />
USB memory device playback (vpage 40)<br />
nn<br />
iPod playback (vpage 37)<br />
nn<br />
MP3 and WMA formats (vpage 56)<br />
There are many music distribution sites on the Internet allowing you<br />
to download music files in MP3 or WMA (Windows Media ® Audio)<br />
format. The music (files) downloaded from such sites can be stored<br />
on CD-R or CD-RW discs and played on this unit.<br />
“Windows Media” and “Windows” are registered trademarks or<br />
SLEEP CLOCK DIMMER POWER<br />
trademarks in the United States and other countries of Microsoft<br />
Corporation of the United States.<br />
Playing files<br />
1<br />
Load<br />
2<br />
Press<br />
a CD-R or CD-RW disc<br />
containing music files in the MP3<br />
or WMA format into the disc<br />
tray (vpage 3).<br />
MODE and select “Folder”<br />
or “Disc”.<br />
Folder Disc<br />
GAbout the displayH<br />
• When “Folder” is selected:<br />
“ ” is displayed.<br />
• When “Disc” is selected:<br />
“ ” turns off.<br />
INTERNET<br />
RADIO<br />
TUNER<br />
iPod<br />
TUNE -<br />
ADD<br />
FAVORITE<br />
CALL<br />
TOP MENU<br />
SEARCH<br />
ONLINE<br />
MUSIC<br />
ANALOG IN<br />
USB<br />
MUTE<br />
SDB<br />
TONE<br />
ENTER<br />
MUSIC<br />
SERVER<br />
DIGITAL IN<br />
CD<br />
CH- CH +<br />
TUNE +<br />
VOLUME<br />
SETUP<br />
1 2 3<br />
. / ABC<br />
DEF<br />
4 5 6<br />
GHI JKL MNO<br />
7 8 9<br />
PQRS TUV WXYZ<br />
+10 a/A 0<br />
CLEAR<br />
RANDOM REPEAT PROGRAM MODE<br />
*<br />
INFO<br />
3<br />
Use ui to select the folder to be played.<br />
4<br />
Use 8, 9 or o p to select the file to be played.<br />
5<br />
Press 1/3, ENTER or 1/3 ENTER.<br />
nnTo switch the folder or file during playback<br />
Folder<br />
Use ui to select the folder, then press ENTER or 1/3 ENTER.<br />
File<br />
Use o p to select the file, then press ENTER or 1/3 ENTER.<br />
Also use 8, 9 to select the file, or use 0 – 9, +10 to select the<br />
file number.<br />
• The folder and file numbers are set automatically when the disc is<br />
loaded.<br />
• Copyright-protected files cannot be played.<br />
• Depending on the application software used for writing, it may not<br />
be possible to write the data properly.<br />
• Depending on the disc’s recording conditions, it may not be possible<br />
to play some discs properly.<br />
nnSwitching the display<br />
During playback, press INFO.<br />
Artist name<br />
Album name<br />
nnTo play repeatedly<br />
Press REPEAT.<br />
Playback starts in the respective repeat mode.<br />
• The selectable repeat modes differ in the “Folder” and the<br />
“Disc”.<br />
When “Folder” is selected:<br />
Single-track repeat<br />
When “Disc” is selected:<br />
Single-track repeat<br />
Repeat off<br />
Repeat off<br />
(turns off)<br />
[Selectable items]<br />
When “Folder” is selected:<br />
Only the selected track is played repeatedly.<br />
Repeat of all the tracks<br />
in the folder<br />
All-track repeat<br />
All the files in the selected folder are played repeatedly.<br />
Folder playback resumes.<br />
When “Disc” is selected:<br />
“Playing repeatedly (Repeat playback)” (vpage 26)<br />
nnSetting random playback<br />
“Playing random order (Random playback)” (vpage 26)<br />
Programmed playback is not possible with MP3/WMA discs.<br />
Folder<br />
Disc<br />
All the files in the selected folder are played.<br />
RC-1174<br />
After the selected folder and files are played, all<br />
the files in all the folders are played.<br />
28
. / ABC<br />
a/A<br />
DEF<br />
GHI JKL MNO<br />
PQRS TUV WXYZ<br />
*<br />
INTERNET<br />
RADIO<br />
ONLINE<br />
MUSIC<br />
MUSIC<br />
SERVER<br />
Network audio playback<br />
Follow this procedure to play Internet radio stations or music files<br />
stored on a computer.<br />
nn<br />
About the internet radio function (vpage 58)<br />
nn<br />
About Music server (vpage 58)<br />
nn<br />
About Last.fm (vpage 58)<br />
Listening to internet radio<br />
1<br />
Prepare<br />
2<br />
Press<br />
for playback.<br />
q Check the network environment,<br />
then turn on this unit’s power<br />
(vpage 23 “Turning the power<br />
on”).<br />
w If settings are required, make the<br />
“Setting the network [Network]”<br />
(vpage 17).<br />
INTERNET RADIO to switch<br />
the input source to “Internet<br />
Radio”.<br />
• For details on selecting the input source<br />
using the unit buttons, see “Selecting<br />
the input source using the main unit”<br />
(vpage 23).<br />
3<br />
Press<br />
press ENTER or p.<br />
SLEEP<br />
INTERNET<br />
RADIO<br />
TUNER<br />
iPod<br />
ADD<br />
FAVORITE<br />
CALL<br />
SEARCH<br />
CH- CH +<br />
TUNE -<br />
TOP MENU<br />
CLOCK<br />
ONLINE<br />
MUSIC<br />
ANALOG IN<br />
USB<br />
MUTE<br />
SDB<br />
TONE<br />
ENTER<br />
DIMMER<br />
1 2 3<br />
. / ABC<br />
DEF<br />
4 5 6<br />
GHI JKL MNO<br />
7 8 9<br />
POWER<br />
MUSIC<br />
SERVER<br />
DIGITAL IN<br />
ui to select the item you want to play, then<br />
PQRS TUV WXYZ<br />
4<br />
Repeat step 3 until the station list is displayed.<br />
+10 a/A 0 * CLEAR<br />
RANDOM REPEAT PROGRAM MODE<br />
The station list is displayed.<br />
• Any characters that cannot be displayed are replaced with “.”<br />
(period) or “ ” (space).<br />
RC-1174<br />
5<br />
Press ui to select the station, then press ENTER or<br />
p.<br />
Playback starts once buffering reaches “100%”.<br />
CD<br />
TUNE +<br />
VOLUME<br />
INFO<br />
SETUP<br />
• There are many Internet radio stations on the Internet, and the<br />
quality of the programs they broadcast as well as the bit rate of the<br />
tracks varies widely.<br />
SLEEP CLOCK DIMMER POWER<br />
Generally, the higher the bit rate, the higher the sound quality, but<br />
depending on the communication lines and server traffic, the music<br />
INTERNET ONLINE MUSIC<br />
or audio signals being streamed may be interrupted. RADIO Inversely, lower<br />
MUSIC SERVER<br />
bit rates mean a lower sound quality but less tendency for the sound<br />
TUNER ANALOG IN DIGITAL IN<br />
to be interrupted.<br />
iPod USB CD<br />
• “Server Full” or “Connection Down” is displayed if the station is<br />
CH- CH +<br />
busy or not broadcasting.<br />
nnSwitching the display<br />
Press INFO during Internet radio<br />
reception.<br />
The broadcast station information and signal<br />
format bit rate are displayed.<br />
ADD<br />
FAVORITE<br />
CALL<br />
SEARCH<br />
iPod<br />
1 2 3<br />
. / ABC<br />
DEF<br />
TUNE -<br />
TUNE +<br />
4 5 6<br />
GHI JKL MNO<br />
MUTE<br />
Recently played internet radio stations can be selected from<br />
ADD<br />
PQRS TUV WXYZ<br />
TUNE -<br />
SLEEP<br />
TOP MENU<br />
nnRecently played internet radio stations<br />
1<br />
On<br />
2<br />
Press<br />
“Recently Played”.<br />
Up to 20 stations stored in “Recently Played”.<br />
a top menu of the internet<br />
radio station, press ui to select<br />
“Recently Played”, then press<br />
ENTER or p.<br />
ui to select the item you<br />
want to play, then press ENTER<br />
or p.<br />
INTERNET<br />
RADIO<br />
TUNER<br />
MUTE<br />
SDB<br />
TONE<br />
ENTER<br />
ANALOG IN<br />
7 8 9<br />
FAVORITE<br />
VOLUME<br />
+10 a/A 0 * CLEAR<br />
CALL<br />
SDB<br />
TONE<br />
RANDOM REPEAT PROGRAM MODE<br />
TOP MENU<br />
INFO<br />
SEARCH<br />
CLOCK<br />
ONLINE<br />
MUSIC<br />
USB<br />
RC-1174<br />
ENTER<br />
TUNE +<br />
VOLUME<br />
DIMMER POWER<br />
INFO<br />
MUSIC<br />
SERVER<br />
DIGITAL IN<br />
SETUP<br />
CD<br />
CH- CH +<br />
RANDOM<br />
REPEAT PROGRAM<br />
SETUP<br />
1 2 3<br />
. / ABC<br />
DEF<br />
4 5 6<br />
GHI JKL MNO<br />
7 8 9<br />
PQRS TUV WXYZ<br />
+10 a/A 0<br />
*<br />
CLEAR<br />
MODE<br />
nnSearching stations by keyword<br />
(Alphabetic strings)<br />
1<br />
Press ui to select “Search by<br />
Keyword”, then press ENTER or<br />
p.<br />
2<br />
Use<br />
uip or 0 – 9, +10 to<br />
input the characters, then press<br />
ENTER.<br />
• For character input, see page 48.<br />
TUNER<br />
iPod<br />
ADD<br />
FAVORITE<br />
CALL<br />
SEARCH<br />
CH- CH +<br />
TUNE -<br />
TOP MENU<br />
RANDOM<br />
ANALOG IN<br />
USB<br />
MUTE<br />
SDB<br />
TONE<br />
ENTER<br />
REPEAT PROGRAM<br />
DIGITAL IN<br />
CD<br />
TUNE +<br />
VOLUME<br />
INFO<br />
SETUP<br />
1 2 3<br />
. / ABC<br />
DEF<br />
4 5 6<br />
GHI JKL MNO<br />
7 8 9<br />
PQRS TUV WXYZ<br />
+10 a/A 0<br />
nnRegistering internet radio stations as your<br />
favorites<br />
RC-1174<br />
You can register your favorite broadcast stations in Favorite List<br />
(vpage 36).<br />
nnInternet radio operation<br />
Operation buttons<br />
Function<br />
FAVORITE ADD Registration to the Favorite list<br />
FAVORITE CALL Call from the Favorite list<br />
1/3 Stop<br />
SETUP<br />
Menu<br />
uio p Cursor operation (Up/Down/Left/Right)<br />
ENTER<br />
Enter<br />
SEARCH<br />
Character search z<br />
z Press SEARCH, then press ENTER to select the<br />
first letter you want to search mode.<br />
If the list is not in alphabetical order, you may not be<br />
able to perform a character search.<br />
*<br />
SLEEP<br />
INTERNET<br />
RADIO<br />
TUNER<br />
CLEAR<br />
MODE<br />
iPod USB CD<br />
CH- CH +<br />
TUNE -<br />
ADD<br />
FAVORITE<br />
CALL<br />
TOP MENU<br />
SEARCH<br />
CLOCK<br />
ONLINE<br />
MUSIC<br />
ANALOG IN<br />
MUTE<br />
SDB<br />
TONE<br />
ENTER<br />
DIMMER POWER<br />
1 2 3<br />
4 5 6<br />
7 8 9<br />
MUSIC<br />
SERVER<br />
DIGITAL IN<br />
TUNE +<br />
VOLUME<br />
INFO<br />
SETUP<br />
+10 0<br />
CLEAR<br />
RANDOM REPEAT PROGRAM MODE<br />
RC-1174<br />
RC-1174<br />
29
Applying media sharing settings<br />
Here, we apply the settings to share music files stored on a PC and<br />
NAS on the network.<br />
nnSharing media stored in PC<br />
If you are using a media server, be sure to apply this setting first.<br />
When using Windows Media Player 12<br />
(Windows 7)<br />
NOTE<br />
Perform this procedure after changing the control panel display to<br />
“Category”.<br />
1<br />
In the PC’s “Control Panel”, select “Network<br />
and Internet” – “Choose homegroup and sharing<br />
options”.<br />
2<br />
Select the “Stream my pictures, music, and videos<br />
to all devices on my home network” check box and<br />
select “Choose media streaming options”.<br />
3<br />
Select “Allowed” in the drop-down list for “CEOL”.<br />
4<br />
Select “Allowed” in the drop-down list for “Media<br />
programs on this PC and remote connections...”.<br />
5<br />
Click<br />
Network audio playback<br />
When using Windows Media Player 11<br />
1<br />
Start up Windows Media Player 11 on the PC.<br />
2<br />
Select “Media Sharing” in the “Library”.<br />
3<br />
Click the “Share my media” check box, select<br />
“CEOL”, and then click “Allow”.<br />
4<br />
As you did in step 3, select the icon of the device<br />
(other PCs and mobile devices) you want to use as a<br />
media controller, and then click “Allow”.<br />
5<br />
Click “OK” to finish.<br />
Sharing media stored in NAS<br />
“OK” to finish.<br />
Change settings on the NAS to allow this unit and other devices (PCs<br />
and mobile devices) used as media controllers to access the NAS. For<br />
details, see the owner’s manual that came with the NAS.<br />
30
. / ABC<br />
a/A<br />
DEF<br />
GHI JKL MNO<br />
PQRS TUV WXYZ<br />
*<br />
INTERNET<br />
RADIO<br />
ONLINE<br />
MUSIC<br />
MUSIC<br />
SERVER<br />
TUNER<br />
ANALOG IN<br />
DIGITAL IN<br />
Playing files stored on a PC and NAS<br />
Use this procedure to play music files or playlists.<br />
1<br />
Prepare for playback.<br />
q Check the network environment,<br />
then turn on this unit’s power<br />
(vpage 23 “Turning the power<br />
on”).<br />
w If settings are required, make the<br />
“Setting the network [Network]”<br />
(vpage 17).<br />
e Prepare the computer<br />
(vpage 30 “Applying media<br />
sharing settings”, vpage 58<br />
“About Music server”).<br />
2<br />
Press<br />
MUSIC SERVER to switch<br />
the input source to “Music<br />
Server”.<br />
ADD<br />
FAVORITE<br />
CALL<br />
SEARCH<br />
1 2 3<br />
. / ABC<br />
DEF<br />
GHI JKL MNO<br />
“Selecting the input source using the main unit” (vpage 23).<br />
SLEEP<br />
INTERNET<br />
RADIO<br />
TUNER<br />
CH- CH +<br />
TUNE -<br />
TOP MENU<br />
ANALOG IN<br />
• For details on selecting the input source using the unit buttons, see<br />
4 5 6<br />
3<br />
7 8 9<br />
Press<br />
RANDOM REPEAT PROGRAM MODE<br />
played, then press ENTER or p.<br />
4<br />
Press ui to select the search item or folder, then<br />
RC-1174<br />
press ENTER or p.<br />
5<br />
Repeat step 4 until the file is displayed.<br />
6<br />
Press ui to select the file, then press ENTER or p.<br />
Playback starts once buffering reaches “100%”.<br />
DIGITAL IN<br />
PQRS TUV WXYZ<br />
ui to select the server including +10 the<br />
a/A 0 file<br />
* CLEAR<br />
to be<br />
iPod<br />
CLOCK<br />
ONLINE<br />
MUSIC<br />
USB<br />
MUTE<br />
SDB<br />
TONE<br />
ENTER<br />
DIMMER<br />
POWER<br />
MUSIC<br />
SERVER<br />
CD<br />
TUNE +<br />
VOLUME<br />
INFO<br />
SETUP<br />
• Connections to the required system and specific settings must be<br />
made in order to play music files (vpage 9).<br />
• Before starting, you must launch the computer’s server software<br />
and set the files as server contents. For details, see the operating<br />
instructions of your server software.<br />
• The order in which the tracks/files are displayed depends on<br />
the server specifications. If the tracks/files are not displayed in<br />
alphabetical order due to the server specifications, searching by the<br />
first letter may not work properly.<br />
• WMA Lossless files can be played when using a server supporting<br />
transcoding, such as Windows Media Player Ver. 11 or later.<br />
NOTE<br />
Particularly when you play back large music files, depending on your<br />
wireless LAN environment, the playback sound may be interrupted. In<br />
this case, make the wired LAN connection.<br />
nnPlaying repeatedly (Repeat playback)<br />
(vpage 40)<br />
n n Playing random order (Random playback)<br />
(vpage 40)<br />
nnSwitching the display<br />
During playback, press INFO.<br />
• The display switches each time INFO is<br />
pressed.<br />
Artist name<br />
File type/Bit rate<br />
nnMusic server operation<br />
Operation buttons<br />
Function<br />
FAVORITE ADD Registration to the Favorite list<br />
FAVORITE CALL Call from the Favorite list<br />
8 9 Auto search (cue)<br />
1/3 Playback / Pause<br />
SETUP<br />
Menu<br />
uio p<br />
Cursor operation (uio p) /<br />
Auto search (cue, ui)<br />
ENTER<br />
Enter<br />
SEARCH<br />
Character search z1<br />
REPEAT Repeat playback (vpage 40)<br />
RANDOM Random playback (vpage 40) z2<br />
iPod USB CD<br />
Network audio playback<br />
CH- CH +<br />
TUNE -<br />
ADD<br />
FAVORITE<br />
CALL<br />
TOP MENU<br />
SEARCH<br />
MUTE<br />
SDB<br />
TONE<br />
ENTER<br />
Album name<br />
z1 Press SEARCH, then press ENTER to select the<br />
first letter you want to search mode.<br />
z2 When playing files stored on a computer using<br />
the random play function, when a track has<br />
finished playing, the next track is selected at<br />
random from all of the tracks on the computer.<br />
For this reason, the same track may be played<br />
back to back.<br />
1 2 3<br />
. / ABC<br />
DEF<br />
4 5 6<br />
GHI JKL MNO<br />
7 8 9<br />
PQRS TUV WXYZ<br />
+10 a/A 0<br />
RANDOM<br />
REPEAT PROGRAM<br />
*<br />
RC-1174<br />
SLEEP<br />
INTERNET<br />
RADIO<br />
TUNER<br />
iPod<br />
TUNE -<br />
TOP MENU<br />
SEARCH<br />
CLOCK<br />
TUNE +<br />
VOLUME<br />
INFO<br />
SETUP<br />
CLEAR<br />
MODE<br />
1 2 3<br />
4 5 6<br />
7 8 9<br />
+10 0<br />
RANDOM<br />
ONLINE<br />
MUSIC<br />
ANALOG IN<br />
REPEAT<br />
USB<br />
MUTE<br />
SDB<br />
TONE<br />
ENTER<br />
RC-1174<br />
DIMMER<br />
PROGRAM<br />
POWER<br />
MUSIC<br />
SERVER<br />
DIGITAL IN<br />
CD<br />
CH- CH +<br />
ADD<br />
FAVORITE<br />
CALL<br />
TUNE +<br />
VOLUME<br />
INFO<br />
SETUP<br />
CLEAR<br />
MODE<br />
• If the list is not in alphabetical order, you may not be able to perform<br />
a character search.<br />
• Depending on the server being used, some functions may be limited.<br />
31
Listening to Last.fm<br />
Last.fm radio is not available in all countries. Please check<br />
www.last.fm/hardware for more information. You’ll also need a<br />
subscription. Get one today at www.last.fm/subscribe.<br />
1<br />
Prepare<br />
SLEEP CLOCK DIMMER POWER<br />
2<br />
Press<br />
for playback.<br />
q Make sure this unit is connected to<br />
the Internet, then turn on this unit’s<br />
power (vpage 23 “Turning the<br />
power on”).<br />
w If settings are required, make the<br />
“Setting the network [Network]”<br />
(vpage 17).<br />
ONLINE MUSIC to switch<br />
the input source to “Last.fm”.<br />
• For details on selecting the input source<br />
using the unit buttons, see “Selecting<br />
the input source using the main unit”<br />
(vpage 23).<br />
• If you do not have a Last.fm account, press<br />
i to select “I am new to Last.fm”. Then<br />
press ENTER or p.<br />
Create an account in accordance with the<br />
instructions on the display.<br />
3<br />
If<br />
ADD<br />
FAVORITE<br />
CALL<br />
SEARCH<br />
CH- CH +<br />
1 2 3<br />
. / ABC<br />
DEF<br />
4 5 6<br />
GHI JKL MNO<br />
you have a Last.fm account, press ui<br />
7<br />
to<br />
8<br />
select<br />
9<br />
“I<br />
PQRS TUV WXYZ<br />
+10 a/A 0 * CLEAR<br />
have a Last.fm account”. Then press ENTER or p.<br />
RANDOM REPEAT PROGRAM MODE<br />
INTERNET<br />
RADIO<br />
TUNER<br />
iPod<br />
TUNE -<br />
TOP MENU<br />
ONLINE<br />
MUSIC<br />
ANALOG IN<br />
4<br />
Use uip to enter your username and password.<br />
RC-1174<br />
• For character input, see page 48.<br />
USB<br />
MUTE<br />
SDB<br />
TONE<br />
ENTER<br />
MUSIC<br />
SERVER<br />
DIGITAL IN<br />
CD<br />
TUNE +<br />
VOLUME<br />
INFO<br />
SETUP<br />
5<br />
After<br />
inputting the username and password, select<br />
“login”, then press ENTER.<br />
If the username and password match, the top menu for Last.fm<br />
is displayed.<br />
• The types of characters that can be input are as shown below.<br />
nnUsername<br />
GLower case charactersH abcdefghijklmnopqrstuvwxyz<br />
GUpper case charactersH<br />
ABCDEFGHIJKLMNOPQRSTUVWXYZ<br />
GSymbolsH _ -<br />
GNumbersH 0123456789<br />
nnPassword<br />
GLower case charactersH abcdefghijklmnopqrstuvwxyz<br />
GUpper case charactersH<br />
ABCDEFGHIJKLMNOPQRSTUVWXYZ<br />
GSymbolsH<br />
! “ # $ % & ‘ ( ) z + , - . / : ; < = > ? @ [ \ ] ^ _ ` { | } ~ (Space)<br />
GNumbersH 0123456789<br />
6<br />
Use ui to select menu and then press ENTER or p.<br />
Popular Tags Play popular tags in your area.<br />
Popular Artists<br />
Your Recent<br />
Stations<br />
Your<br />
Recommended<br />
Radio<br />
Your Library<br />
Play popular artists tags in your area.<br />
Play your recent stations.<br />
Play your recommended radio.<br />
Play your library.<br />
7<br />
Use<br />
8<br />
When<br />
Network audio playback<br />
ui to select a station, and press ENTER, p or<br />
1/3 to start playback.<br />
Playback starts.<br />
you press p during playback, the following<br />
menu appears.<br />
Love this track Loving tracks improves your Last.fm<br />
recommendations, and you can optionally share<br />
them on popular social networks.<br />
Ban this track<br />
Scrobbling<br />
If you ban a track, we won’t play it again. You can<br />
undo this on the Last.fm website.<br />
Scrobbling sends the tracks you played to your<br />
Last.fm account. You can see charts of the music<br />
you’ve been listening to, get recommendations for<br />
new music and events in your area and share your<br />
listening tastes with your friends. You can turn this<br />
service on or off using this option. The more you<br />
scrobble, the better your recommendations will<br />
become.<br />
NOTE<br />
The password should be no longer than 90 characters<br />
Your Friend’s<br />
Radio<br />
Your Top Artists<br />
Search Tag Radio<br />
Search Artist<br />
Radio<br />
Play your friend’s radio.<br />
Play your top Artists.<br />
You can search station by Tag.<br />
You can search station by Artist.<br />
32
. / ABC<br />
a/A<br />
DEF<br />
GHI JKL MNO<br />
PQRS TUV WXYZ<br />
*<br />
INTERNET<br />
RADIO<br />
ONLINE<br />
MUSIC<br />
MUSIC<br />
SERVER<br />
nnSwitching the display<br />
During playback, press INFO.<br />
The file type/bit rate, artist name and album<br />
name are displayed.<br />
nnLast.fm operation<br />
Operation buttons<br />
Function<br />
1/3 Playback<br />
9 Auto search (cue)<br />
1/3 ENTER Stop<br />
SETUP<br />
Menu<br />
uio p Cursor operation / Auto search (cue, i)<br />
ENTER<br />
Enter<br />
TUNER<br />
TUNE -<br />
ADD<br />
FAVORITE<br />
CALL<br />
TOP MENU<br />
SEARCH<br />
ANALOG IN<br />
MUTE<br />
SDB<br />
TONE<br />
ENTER<br />
1 2 3<br />
. / ABC<br />
DEF<br />
SLEEP CLOCK DIMMER POWER<br />
GHI JKL MNO<br />
4 5 6<br />
7 8 9<br />
PQRS TUV WXYZ<br />
TUNER ANALOG IN DIGITAL IN<br />
iPod USB CD<br />
+10 a/A 0 * CLEAR<br />
CH-<br />
CH +<br />
RANDOM REPEAT PROGRAM MODE<br />
TUNE -<br />
TUNE +<br />
CALL<br />
RC-1174<br />
TOP MENU<br />
DIGITAL IN<br />
iPod USB CD<br />
Network audio playback<br />
CH- CH +<br />
INTERNET<br />
RADIO<br />
ADD<br />
FAVORITE<br />
SEARCH<br />
ONLINE<br />
MUSIC<br />
MUTE<br />
SDB<br />
TONE<br />
ENTER<br />
TUNE +<br />
VOLUME<br />
INFO<br />
SETUP<br />
1 2 3<br />
4 5 6<br />
7 8 9<br />
+10 0<br />
CLEAR<br />
RANDOM REPEAT PROGRAM MODE<br />
RC-1174<br />
MUSIC<br />
SERVER<br />
VOLUME<br />
INFO<br />
SETUP<br />
Tuning in radio stations<br />
Connect the antenna beforehand (vpage 8).<br />
Listening to FM broadcasts<br />
1<br />
Press<br />
TUNER to select the<br />
reception band.<br />
FM When listening to an FM broadcast.<br />
• The reception band can also be selected by<br />
pressing SOURCE (vpage 23).<br />
2<br />
Tune in the desired broadcast<br />
station.<br />
When a station is received, the will<br />
light.<br />
Auto tuning To tune in automatically.<br />
SLEEP<br />
INTERNET<br />
RADIO<br />
iPod<br />
ADD<br />
FAVORITE<br />
CALL<br />
SEARCH<br />
CH- CH +<br />
TOP MENU<br />
1 2 3<br />
. / ABC<br />
DEF<br />
4 5 6<br />
GHI JKL MNO<br />
7 8 9<br />
+10 a/A 0<br />
RANDOM<br />
CLOCK<br />
ONLINE<br />
MUSIC<br />
ANALOG IN<br />
USB<br />
MUTE<br />
SDB<br />
TONE<br />
ENTER<br />
PQRS TUV WXYZ<br />
*<br />
RC-1174<br />
DIMMER<br />
REPEAT PROGRAM<br />
q Press MODE, and “AUTO” lights in the display.<br />
w Press TUNE + or TUNE – to select the station you want to hear.<br />
<strong>Manual</strong> tuning To tune in manually.<br />
q Press MODE , and “AUTO” goes out in the display.<br />
w Press TUNE + or TUNE – to select the station you want to hear.<br />
TUNER<br />
TUNE -<br />
POWER<br />
MUSIC<br />
SERVER<br />
DIGITAL IN<br />
CD<br />
TUNE +<br />
VOLUME<br />
INFO<br />
SETUP<br />
CLEAR<br />
MODE<br />
Automatically presetting FM stations<br />
SLEEP CLOCK<br />
(Auto Preset)<br />
• This unit can be preset to favorite list with a total of<br />
TUNER<br />
50,<br />
ANALOG<br />
FM<br />
IN<br />
broadcast<br />
DIGITAL IN<br />
stations.<br />
iPod USB CD<br />
1<br />
CH- CH +<br />
Press SEARCH.<br />
TUNE -<br />
TUNE +<br />
“Search” menu appears.<br />
2<br />
MUTE<br />
ADD<br />
Use<br />
FAVORITE<br />
VOLUME<br />
ui to select “Auto Preset –<br />
Start”, then press ENTER, 1/3<br />
ENTER or p.<br />
“Searching” appears in the display,<br />
and the unit searches for radio<br />
stations. When the search is complete,<br />
“Complete!!” appears.<br />
Canceling auto presetting<br />
Press 2.<br />
NOTE<br />
INTERNET<br />
RADIO<br />
CALL<br />
TOP MENU<br />
SEARCH<br />
ONLINE<br />
MUSIC<br />
SDB<br />
TONE<br />
1 2 3<br />
. / ABC<br />
DEF<br />
4 5 6<br />
GHI JKL MNO<br />
7 8 9<br />
PQRS TUV WXYZ<br />
+10 a/A 0<br />
RANDOM<br />
ENTER<br />
DIMMER<br />
REPEAT PROGRAM<br />
• Broadcast stations whose antenna signal are weak cannot be preset<br />
automatically. If you wish to preset such stations, tune them in<br />
RC-1174<br />
manually.<br />
• When all 50 items in the favorite list are registered, no additional<br />
registrations can be made.<br />
*<br />
POWER<br />
MUSIC<br />
SERVER<br />
INFO<br />
SETUP<br />
CLEAR<br />
MODE<br />
• If the desired station cannot be tuned in with auto tuning, tune it in<br />
manually.<br />
• When tuning in stations manually, press and hold TUNE + or TUNE<br />
– to change frequencies continuously.<br />
n n To stop auto tuning<br />
Press 2.<br />
33
RDS (Radio Data System)<br />
Note that the RDS function only works when receiving RDS compatible<br />
stations.<br />
RDS (works only on the FM band) is a broadcasting service which<br />
allows a station to send additional information along with the regular<br />
radio program signal.<br />
The following four types of RDS information can be received with this<br />
unit:<br />
nnRDS Search<br />
Use this function to automatically tune to FM stations that provide<br />
the RDS service.<br />
INTERNET ONLINE MUSIC<br />
RADIO MUSIC SERVER<br />
1<br />
TUNER ANALOG IN DIGITAL IN<br />
Press TUNER to switch the input<br />
iPod USB CD<br />
source to “TUNER (FM)”.<br />
• For details on selecting the input source<br />
using the unit buttons, see “Selecting<br />
the input source using the main unit”<br />
(vpage 23).<br />
2<br />
Press SEARCH.<br />
3<br />
Use<br />
ui to select “RDS<br />
Search”, then press ENTER,<br />
1/3 ENTER or p.<br />
Automatically begin the RDS search<br />
operation.<br />
SLEEP<br />
CH- CH +<br />
TUNE -<br />
ADD<br />
FAVORITE<br />
CALL<br />
TOP MENU<br />
1 2 3<br />
. / ABC<br />
DEF<br />
4 5 6<br />
• If no RDS station is found, “No Programme” is displayed.<br />
Viewing information during reception<br />
GHI JKL MNO<br />
7 8 9<br />
PQRS TUV WXYZ<br />
+10 a/A 0<br />
RANDOM<br />
CLOCK<br />
MUTE<br />
SDB<br />
TONE<br />
DIMMER<br />
REPEAT PROGRAM<br />
Press INFO while receiving a RDS to display the information currently<br />
being broadcast.<br />
RC-1174<br />
*1 *2<br />
PS<br />
Freq.<br />
RT<br />
PTY<br />
*1 Program service name<br />
• If a station name is entered, it is displayed.<br />
*2 Frequency<br />
SEARCH<br />
ENTER<br />
*<br />
POWER<br />
TUNE +<br />
VOLUME<br />
INFO<br />
SETUP<br />
CLEAR<br />
MODE<br />
PTY (Program Type)<br />
PTY identifies the type of RDS program.<br />
The program types and their displays are as follows:<br />
NEWS<br />
AFFAIRS<br />
INFO<br />
SPORT<br />
EDUCATE<br />
DRAMA<br />
CULTURE<br />
SCIENCE<br />
VARIED<br />
POP M<br />
ROCK M<br />
EASY M<br />
LIGHT M<br />
CLASSICS<br />
OTHER M<br />
News<br />
Current Affairs<br />
Information<br />
Sports<br />
Education<br />
Drama<br />
Culture<br />
Science<br />
Varied<br />
Pop Music<br />
Rock Music<br />
Easy Listening<br />
Music<br />
Light Classical<br />
Serious Classical<br />
Other Music<br />
WEATHER<br />
FINANCE<br />
CHILDREN<br />
SOCIAL<br />
RELIGION<br />
PHONE IN<br />
TRAVEL<br />
LEISURE<br />
JAZZ<br />
COUNTRY<br />
NATION M<br />
OLDIES<br />
FOLK M<br />
DOCUMENT<br />
Weather<br />
Finance<br />
Children’s<br />
programmes<br />
Social Affairs<br />
Religion<br />
Phone In<br />
Travel<br />
Leisure<br />
Jazz Music<br />
Country Music<br />
National Music<br />
Oldies Music<br />
Folk Music<br />
Documentary<br />
nnPTY Search<br />
Use this function to find RDS stations broadcasting a designated<br />
program type (PTY).<br />
SLEEP CLOCK DIMMER POWER<br />
For a description of each program type, refer to “PTY (Program<br />
Type)”.<br />
INTERNET ONLINE MUSIC<br />
RADIO MUSIC SERVER<br />
1<br />
TUNER ANALOG IN DIGITAL IN<br />
Press TUNER to switch the input<br />
iPod USB CD<br />
source to “TUNER (FM)”.<br />
• For details on selecting the input source<br />
using the unit buttons, see “Selecting<br />
the input source using the main unit”<br />
(vpage 23).<br />
2<br />
Press SEARCH.<br />
3<br />
Use<br />
ui to select “PTY Search”,<br />
then press ENTER, 1/3 ENTER<br />
or p.<br />
CH- CH +<br />
TUNE -<br />
ADD<br />
FAVORITE<br />
CALL<br />
TOP MENU<br />
SEARCH<br />
MUTE<br />
SDB<br />
TONE<br />
ENTER<br />
TUNE +<br />
VOLUME<br />
INFO<br />
SETUP<br />
4<br />
Use<br />
ui to call out the desired program type, then<br />
press ENTER, 1/3 ENTER or p.<br />
Automatically begin the PTY search operation.<br />
• If no program of the specified type is found, “No Programme” is<br />
displayed.<br />
TP (Traffic Program)<br />
TP identifies programs that carry traffic announcements.<br />
This allows you to easily find out the latest traffic conditions in your<br />
area before leaving home.<br />
nnTP Search<br />
Use this function to find RDS stations broadcasting traffic programs<br />
(TP stations).<br />
INTERNET ONLINE MUSIC<br />
1<br />
RADIO MUSIC SERVER<br />
TUNER ANALOG IN DIGITAL IN<br />
Press TUNER to switch the input<br />
iPod USB CD<br />
source to “TUNER (FM)”.<br />
• For details on selecting the input source<br />
using the unit buttons, see “Selecting<br />
the input source using the main unit”<br />
(vpage 23).<br />
2<br />
Press SEARCH.<br />
3<br />
Use<br />
ui to select “TP Search”,<br />
then press ENTER, 1/3 ENTER<br />
or p.<br />
Automatically begin the TP search<br />
operation.<br />
ADD<br />
FAVORITE<br />
CALL<br />
1 2 3<br />
. / ABC<br />
DEF<br />
4 5 6<br />
GHI JKL MNO<br />
• “No Programme” is displayed when there is no traffic information<br />
broadcast station.<br />
Tuning in radio stations<br />
SLEEP<br />
CH- CH +<br />
TUNE -<br />
TOP MENU<br />
SEARCH<br />
CLOCK<br />
7 8 9<br />
PQRS TUV WXYZ<br />
+10 a/A 0<br />
RANDOM<br />
MUTE<br />
SDB<br />
TONE<br />
ENTER<br />
*<br />
RC-1174<br />
DIMMER<br />
REPEAT PROGRAM<br />
POWER<br />
TUNE +<br />
VOLUME<br />
INFO<br />
SETUP<br />
CLEAR<br />
MODE<br />
1 2 3<br />
. / ABC<br />
DEF<br />
4 5 6<br />
GHI JKL MNO<br />
7 8 9<br />
PQRS TUV WXYZ<br />
+10 a/A 0<br />
*<br />
CLEAR<br />
RANDOM<br />
REPEAT PROGRAM<br />
MODE<br />
34<br />
RC-1174
. / ABC<br />
a/A<br />
DEF<br />
GHI JKL MNO<br />
PQRS TUV WXYZ<br />
*<br />
RT (Radio Text)<br />
Tuning in radio stations<br />
RT allows RDS stations to send text messages that appear on the<br />
display.<br />
• When the RT mode is turned on while an RDS broadcast station not<br />
offering an RT service is tuned in, “NO TEXT” is displayed on the<br />
display.<br />
• The RT mode cannot be set in the FM stations not offering RDS<br />
broadcasts.<br />
NOTE<br />
The operations described below selecting “RDS Search” will not<br />
function in areas in which there are no RDS broadcasts.<br />
nnTuner (FM) operation<br />
Operation buttons<br />
Function<br />
FAVORITE ADD Registration to the Favorite list<br />
FAVORITE CALL Call from the Favorite list<br />
2 Stop<br />
TUNER +, –<br />
Tuning (up/down)<br />
SETUP<br />
Menu<br />
MODE<br />
Switch search modes<br />
uio p Cursor operation (Up/Down/Left/Right)<br />
ENTER<br />
Enter<br />
SEARCH<br />
RDS search / PTY search / TP search /<br />
Auto preset<br />
TOP MENU<br />
Return to top page<br />
SLEEP<br />
INTERNET<br />
RADIO<br />
TUNER<br />
CLOCK<br />
ANALOG IN<br />
DIMMER POWER<br />
iPod USB CD<br />
CH- CH +<br />
TUNE -<br />
ADD<br />
FAVORITE<br />
CALL<br />
TOP MENU<br />
SEARCH<br />
ONLINE<br />
MUSIC<br />
MUTE<br />
SDB<br />
TONE<br />
ENTER<br />
1 2 3<br />
4 5 6<br />
7 8 9<br />
MUSIC<br />
SERVER<br />
DIGITAL IN<br />
TUNE +<br />
VOLUME<br />
INFO<br />
SETUP<br />
+10 0<br />
CLEAR<br />
RANDOM REPEAT PROGRAM MODE<br />
RC-1174<br />
35
SLEEP<br />
CLOCK<br />
DIMMER<br />
POWER<br />
Favorite function<br />
This section provides information on the Favorite function.<br />
• The Favorite function allows you to register your favorite broadcast<br />
stations and files in Favorite List in advance so that you can call and<br />
listen to the stations or files right away, whenever you want.<br />
SLEEP CLOCK DIMMER POWER<br />
• The contents that you can register and call are Internet radio station,<br />
music server and tuner.<br />
• You can register up to 50 items in Favorite List.<br />
TUNER ANALOG IN DIGITAL IN<br />
Registering stations or files to the iPod favorites<br />
USB CD<br />
CH- CH +<br />
list<br />
TUNE -<br />
TUNE +<br />
1<br />
Press MUTE<br />
ADD<br />
2<br />
Press<br />
FAVORITE ADD while the<br />
Internet radio station or file to<br />
register is played back.<br />
“Favorite” menu appears.<br />
ui to select a number to<br />
register the station or file, and<br />
press ENTER.<br />
“Add to Favorite” is displayed and the<br />
registration is competed.<br />
INTERNET<br />
RADIO<br />
FAVORITE<br />
CALL<br />
TOP MENU<br />
SEARCH<br />
ONLINE<br />
MUSIC<br />
SDB<br />
TONE<br />
ENTER<br />
MUSIC<br />
SERVER<br />
VOLUME<br />
INFO<br />
SETUP<br />
1 2 3<br />
. / ABC<br />
DEF<br />
Calling stations or files from the favorites<br />
INTERNET ONLINE MUSIC<br />
RADIO MUSIC SERVER<br />
list<br />
TUNER ANALOG IN DIGITAL IN<br />
1<br />
Press<br />
2<br />
Press<br />
FAVORITE CALL.<br />
The Favorite list appears.<br />
8 9 or ui to select<br />
the station or file that you want<br />
to call, and press ENTER.<br />
The respective function starts up and<br />
playback starts.<br />
• Press 0 – 9, +10 to call files registered to the<br />
Favorite list by number.<br />
SLEEP<br />
iPod<br />
TUNE -<br />
ADD<br />
TOP MENU<br />
SEARCH<br />
CLOCK<br />
USB<br />
MUTE<br />
SDB<br />
TONE<br />
1 2 3<br />
. / ABC<br />
DEF<br />
+10 a/A 0<br />
RANDOM<br />
DIMMER<br />
REPEAT PROGRAM<br />
*<br />
POWER<br />
CD<br />
CH- CH +<br />
nnTo switch between registered stations<br />
4 GHI 5and JKL 6files<br />
MNO<br />
during playback<br />
7 PQRS 8 TUV 9 WXYZ<br />
Press 8 9 or ui.<br />
FAVORITE<br />
CALL<br />
ENTER<br />
TUNE +<br />
VOLUME<br />
INFO<br />
SETUP<br />
CLEAR<br />
MODE<br />
iPod USB CD<br />
Deleting stations or files from the favorite<br />
CH-<br />
CH +<br />
list<br />
TUNE -<br />
TUNE +<br />
1<br />
Press<br />
2<br />
Press<br />
3<br />
When<br />
FAVORITE CALL.<br />
The Favorite list appears.<br />
ui to select the station or<br />
file that you want to delete, and<br />
press CLEAR.<br />
the prompt “Delete?”<br />
appears, press ENTER.<br />
“Deleted” is displayed and the deletion<br />
is competed.<br />
n n To cancel the operation<br />
Press o.<br />
INTERNET<br />
RADIO<br />
TUNER<br />
ADD<br />
FAVORITE<br />
CALL<br />
TOP MENU<br />
SEARCH<br />
ANALOG IN<br />
1 2 3<br />
. / ABC<br />
DEF<br />
4 5 6<br />
GHI JKL MNO<br />
7 8 9<br />
PQRS TUV WXYZ<br />
+10 a/A 0<br />
RANDOM<br />
ONLINE<br />
MUSIC<br />
MUTE<br />
SDB<br />
TONE<br />
ENTER<br />
REPEAT PROGRAM<br />
*<br />
RC-1174<br />
MUSIC<br />
SERVER<br />
DIGITAL IN<br />
VOLUME<br />
INFO<br />
SETUP<br />
CLEAR<br />
MODE<br />
4 5 6<br />
GHI JKL MNO<br />
7 8 9<br />
PQRS TUV WXYZ<br />
RC-1174<br />
+10 a/A 0<br />
*<br />
CLEAR<br />
RANDOM<br />
REPEAT PROGRAM<br />
MODE<br />
RC-1174<br />
36
iPod playback<br />
The unit can play back music stored on iPod, iPod touch, iPod classic,<br />
iPod nano and iPhone.<br />
nn<br />
iPod (vpage 56)<br />
Loading<br />
iPod<br />
Dismantling<br />
Connecting an iPod<br />
nniPod Dock<br />
Open the lid and mount the adapter suited for your iPod onto the<br />
dock adapter included with your iPod.<br />
Connector<br />
Adapter<br />
iPod<br />
Adapter<br />
nnUSB port<br />
iPod<br />
Dock connector<br />
To connect an iPod to this unit, use the iPod cable supplied with the<br />
iPod.<br />
NOTE<br />
• Please make sure to fit adaptor to connector part for use with your<br />
iPod.<br />
• When plugging in or unplugging the iPod, please proceed carefully,<br />
adjusting the inclination of the connector so as not to place a burden<br />
upon the connector.<br />
37
TUNER<br />
ANALOG IN<br />
DIGITAL IN<br />
iPod<br />
USB<br />
CD<br />
Playing an iPod<br />
1<br />
Press<br />
2<br />
Press<br />
POWER X to turn on<br />
power to the main unit.<br />
iPod to switch the input<br />
source to “iPod”.<br />
• For details on selecting the input source<br />
using the unit buttons, see “Selecting<br />
the input source using the main unit”<br />
(vpage 23).<br />
3<br />
Press MODE to select the display<br />
mode.<br />
The display mode switches each time<br />
MODE is pressed.<br />
• There are two modes for displaying the<br />
contents recorded on the iPod.<br />
Browse mode<br />
Remote mode<br />
Display iPod information on<br />
the display of this unit.<br />
Display iPod information on<br />
the iPod screen.<br />
• “Remote iPod” is displayed<br />
on the display of this unit.<br />
SLEEP<br />
INTERNET<br />
RADIO<br />
TUNER<br />
iPod<br />
ADD<br />
FAVORITE<br />
CALL<br />
SEARCH<br />
CH- CH +<br />
TUNE -<br />
TOP MENU<br />
CLOCK<br />
ONLINE<br />
MUSIC<br />
ANALOG IN<br />
USB<br />
MUTE<br />
SDB<br />
TONE<br />
1 2 3<br />
. / ABC<br />
DEF<br />
4 5 6<br />
GHI JKL MNO<br />
7 8 9<br />
PQRS TUV WXYZ<br />
+10 a/A 0<br />
RANDOM<br />
ENTER<br />
DIMMER<br />
REPEAT PROGRAM<br />
Display mode Browse mode Remote mode<br />
RC-1174<br />
Display location Main unit display iPod display<br />
Playable<br />
files<br />
Active<br />
buttons<br />
Audio file P P<br />
Video file<br />
Pz<br />
Remote control<br />
and main unit<br />
P<br />
P<br />
iPod<br />
P<br />
zzOnly audio is played back.<br />
• The default display mode setting is “Remote mode”.<br />
*<br />
POWER<br />
MUSIC<br />
SERVER<br />
DIGITAL IN<br />
CD<br />
TUNE +<br />
VOLUME<br />
INFO<br />
SETUP<br />
CLEAR<br />
MODE<br />
4<br />
Use<br />
5<br />
Press<br />
ui to select the item, then press ENTER to<br />
select the music file to be played.<br />
1/3.<br />
Playback starts.<br />
NOTE<br />
• 1st generation iPod nano and iPod video do not have remote mode<br />
support.<br />
• DENON will accept no responsibility whatsoever for any loss of iPod<br />
data.<br />
• Depending on the type of iPod and the software version, some<br />
functions may not operate.<br />
nnRemote control and iPod button relations<br />
Remote control<br />
buttons<br />
iPod buttons<br />
Operation on this unit<br />
8, 9 8, 9<br />
Play the track from the beginning/Play the<br />
next track<br />
1/3 13 Play the track / Pause the track<br />
8, 9<br />
(Press and hold)<br />
8, 9<br />
(Press and hold)<br />
MODE –<br />
Fast-reverse the track/Fast-forward the<br />
track<br />
Switch between the browse mode and<br />
the remote mode<br />
ui Click Wheel Cursor operation (up /down)<br />
o<br />
MENU<br />
Display the menu or return to the previous<br />
menu<br />
ENTER or p Select Enter the selection or plays the track<br />
REPEAT – Switch the repeat function<br />
RANDOM – Switch the shuffle function<br />
nnSwitching the display<br />
During playback, press INFO.<br />
• The display switches each time INFO is<br />
pressed (Browse mode only).<br />
ADD<br />
FAVORITE<br />
Artist name Album SEARCH name<br />
CH- CH +<br />
TUNE -<br />
CALL<br />
TOP MENU<br />
nnPlaying repeatedly (Repeat playback)<br />
(vpage 40)<br />
(Browse mode only)<br />
iPod playback<br />
MUTE<br />
SDB<br />
TONE<br />
ENTER<br />
1 2 3<br />
. / ABC<br />
DEF<br />
4 5 6<br />
GHI JKL MNO<br />
7 8 9<br />
PQRS TUV WXYZ<br />
+10 a/A 0<br />
RANDOM<br />
REPEAT PROGRAM<br />
nnPlaying random order (Random playback)<br />
RC-1174<br />
(vpage 40)<br />
Disconnecting the iPod<br />
1<br />
Press<br />
2<br />
Disconnect<br />
POWER X to set the<br />
standby mode.<br />
the iPod from the<br />
Dock connector.<br />
Charging the iPod<br />
SEARCH<br />
SETUP<br />
When the iPhone/iPod is fully charged, the unit automatically stops<br />
SLEEP<br />
INTERNET<br />
RADIO<br />
TUNER<br />
FAVORITE<br />
CALL<br />
4 5 6<br />
*<br />
TUNE +<br />
VOLUME<br />
INFO<br />
SETUP<br />
CLEAR<br />
MODE<br />
CH- CH +<br />
MUTE<br />
You can charge your iPhone/iPod by connecting it to the dock<br />
ADD<br />
connector or USB port.<br />
nnStandby charging<br />
TUNE -<br />
CLOCK<br />
ONLINE<br />
MUSIC<br />
ANALOG IN<br />
TOP MENU<br />
INFO<br />
If the unit enters power standby mode while the iPod/iPhone is<br />
charging, the unit will switch to standby charging mode, and the<br />
iPod/iPhone will continue to be charged. When in standby charging<br />
ENTER<br />
mode, the power display light turns red.<br />
supplying power for charging and enters normal power standby<br />
mode, and the power display light turns off. 1 2 3<br />
. / ABC<br />
DEF<br />
iPod<br />
USB<br />
SDB<br />
TONE<br />
DIMMER<br />
POWER<br />
MUSIC<br />
SERVER<br />
DIGITAL IN<br />
CD<br />
TUNE +<br />
VOLUME<br />
GHI JKL MNO<br />
7 8 9<br />
PQRS TUV WXYZ<br />
If an iPhone/iPod is connected to the dock connector while the unit is<br />
+10 a/A 0 * CLEAR<br />
in power standby mode, the unit will enter standby charging mode and<br />
RANDOM REPEAT PROGRAM MODE<br />
begin charging the iPhone/iPod.<br />
RC-1174<br />
38
Supported iPod models<br />
iPod playback<br />
• iPod classic<br />
• iPod nano<br />
• iPod touch<br />
• iPhone<br />
(as of July 2012)<br />
39
ENTER<br />
USB memory device playback<br />
You can playback music stored on a USB memory device using this<br />
unit.<br />
nn<br />
USB memory device (vpage 57)<br />
Playing files stored on USB memory<br />
devices<br />
1<br />
Connect the USB memory device to the USB port.<br />
2<br />
Press<br />
3<br />
Press<br />
USB<br />
memory<br />
device<br />
POWER X to turn on<br />
power to the main unit.<br />
USB to switch the input<br />
source to “USB”.<br />
• For details on selecting the input source<br />
using the unit buttons, see “Selecting<br />
the input source using the main unit”<br />
(vpage 23).<br />
4<br />
Press<br />
5<br />
Press<br />
ui to select the file or<br />
folder, then press ENTER or p.<br />
ui to select the file, then<br />
press ENTER, p or 1/3.<br />
Playback starts.<br />
SLEEP<br />
INTERNET<br />
RADIO<br />
TUNER<br />
iPod<br />
ADD<br />
FAVORITE<br />
CALL<br />
SEARCH<br />
CH- CH +<br />
TUNE -<br />
TOP MENU<br />
CLOCK<br />
ONLINE<br />
MUSIC<br />
ANALOG IN<br />
USB<br />
MUTE<br />
SDB<br />
TONE<br />
ENTER<br />
DIMMER<br />
POWER<br />
MUSIC<br />
SERVER<br />
DIGITAL IN<br />
CD<br />
TUNE +<br />
VOLUME<br />
INFO<br />
SETUP<br />
• If the USB memory device is divided into multiple partitions, only the<br />
top partition can be selected.<br />
• This unit is compatible with MP3 files conforming to “MPEG-1 Audio<br />
Layer-3” standards.<br />
• DENON does not guarantee that all USB memory devices will<br />
operate or receive power. When using a portable USB connection<br />
type HDD of the kind to which an AC adapter can be connected to<br />
supply power, use the AC adapter.<br />
NOTE<br />
• USB memory devices will not work via a USB hub.<br />
• It is not possible to connect and use a computer via the USB port of<br />
this unit using a USB cable.<br />
• Do not use an extension cable when connecting a USB memory<br />
device. This may cause radio interference with other devices.<br />
• Note that DENON will accept no responsibility whatsoever for any<br />
problems arising with the data on a USB memory device when using<br />
this unit in conjunction with the USB memory device.<br />
Removing the USB memory device<br />
1<br />
Press<br />
2<br />
Check<br />
POWER X to set the<br />
standby mode.<br />
that the communication<br />
indicator on the USB memory<br />
device is not flashing, then pull<br />
out the USB memory device.<br />
SLEEP<br />
INTERNET<br />
RADIO<br />
TUNER<br />
SEARCH<br />
CH- CH +<br />
MUTE<br />
NOTE<br />
ADD<br />
Do not remove the USB memory device from the unit when the USB<br />
FAVORITE<br />
VOLUME<br />
memory communication indicator is flashing. Doing CALL so may<br />
SDB<br />
TONE<br />
damage<br />
the USB memory device, or may corrupt the files recorded TOP MENU on the INFO USB<br />
memory device.<br />
iPod<br />
TUNE -<br />
CLOCK<br />
ONLINE<br />
MUSIC<br />
ANALOG IN<br />
USB<br />
ENTER<br />
DIMMER<br />
POWER<br />
MUSIC<br />
SERVER<br />
DIGITAL IN<br />
CD<br />
TUNE +<br />
SETUP<br />
Playing repeatedly (Repeat playback)<br />
Press REPEAT.<br />
Repeat playback starts.<br />
• Each time you press REPEAT, the repeat<br />
mode is toggled as shown below.<br />
Single-track repeat<br />
Repeat off<br />
(indicator turns off)<br />
SEARCH<br />
1 2 3<br />
. / ABC<br />
DEF<br />
4 5 6<br />
GHI JKL MNO<br />
7 8 9<br />
PQRS TUV WXYZ<br />
+10 a/A 0<br />
RANDOM<br />
SLEEP<br />
REPEAT PROGRAM<br />
CLOCK DIMMER<br />
*<br />
ONLINE<br />
MUSIC<br />
RC-1174<br />
All-track repeat<br />
(Single-track repeat) Only 1 track plays TOP repeatedly.<br />
MENU<br />
INFO<br />
(All-track repeat)<br />
All tracks within the current<br />
playback folder are repeated.<br />
Repeat off (indicator turns off) Normal playback SEARCH resumes.<br />
GHI JKL MNO<br />
Playing random order (Random playback)<br />
4 5 6<br />
Press RANDOM.<br />
The indicator lights in the display, and<br />
random playback starts.<br />
nnCanceling random playback<br />
Press RANDOM.<br />
The indicator on the display turns off.<br />
INTERNET<br />
RADIO<br />
TUNER<br />
iPod<br />
ADD<br />
FAVORITE<br />
CALL<br />
SETUP<br />
CLEAR<br />
MODE<br />
POWER<br />
CH- CH +<br />
TUNE -<br />
1 2 3<br />
. / ABC<br />
DEF<br />
7 8 9<br />
PQRS TUV WXYZ<br />
+10 a/A 0<br />
RANDOM<br />
ANALOG IN<br />
USB<br />
MUTE<br />
SDB<br />
TONE<br />
ENTER<br />
REPEAT PROGRAM<br />
*<br />
RC-1174<br />
MUSIC<br />
SERVER<br />
DIGITAL IN<br />
CD<br />
TUNE +<br />
VOLUME<br />
SETUP<br />
CLEAR<br />
MODE<br />
1 2 3<br />
. / ABC<br />
DEF<br />
4 5 6<br />
GHI JKL MNO<br />
7 8 9<br />
PQRS TUV WXYZ<br />
+10 a/A 0 * CLEAR<br />
RANDOM REPEAT PROGRAM MODE<br />
1 2 3<br />
. / ABC<br />
DEF<br />
4 5 6<br />
GHI JKL MNO<br />
7 8 9<br />
PQRS TUV WXYZ<br />
+10 a/A 0 * CLEAR<br />
RANDOM REPEAT PROGRAM MODE<br />
RC-1174<br />
40<br />
RC-1174
. / ABC<br />
a/A<br />
DEF<br />
GHI JKL MNO<br />
PQRS TUV WXYZ<br />
*<br />
INTERNET<br />
RADIO<br />
ONLINE<br />
MUSIC<br />
MUSIC<br />
SERVER<br />
TUNER<br />
ANALOG IN<br />
DIGITAL IN<br />
nnUSB operation<br />
Operation buttons<br />
Function<br />
8, 9 Auto search (cue)<br />
1/3 Playback / Pause<br />
ui<br />
Cursor operation /<br />
Auto search (cue, ui)<br />
ENTER or p<br />
Enter / Playback<br />
o<br />
Display the menu or return to the<br />
previous menu<br />
SEARCH<br />
Character search z1<br />
REPEAT<br />
Repeat playback<br />
RANDOM<br />
Random playback z2<br />
z1 Press SEARCH, then press ENTER to select the<br />
first letter you want to search mode.<br />
z2 When playing files stored on a USB memory<br />
device using the random play function, when<br />
a track has finished playing, the next track is<br />
selected at random from all of the tracks on the<br />
device. For this reason, the same track may be<br />
played back to back.<br />
SLEEP<br />
INTERNET<br />
RADIO<br />
TUNER<br />
iPod<br />
TUNE -<br />
ADD<br />
FAVORITE<br />
CALL<br />
TOP MENU<br />
SEARCH<br />
CLOCK<br />
1 2 3<br />
4 5 6<br />
7 8 9<br />
+10 0<br />
ONLINE<br />
MUSIC<br />
ANALOG IN<br />
USB<br />
MUTE<br />
SDB<br />
TONE<br />
RC-1174<br />
DIMMER<br />
PROGRAM<br />
POWER<br />
MUSIC<br />
SERVER<br />
DIGITAL IN<br />
CD<br />
CH- CH +<br />
RANDOM<br />
REPEAT<br />
ENTER<br />
TUNE +<br />
VOLUME<br />
INFO<br />
SETUP<br />
CLEAR<br />
MODE<br />
nnSwitching the display<br />
During playback, press INFO.<br />
• The display switches each time INFO is<br />
pressed.<br />
Artist name<br />
File type/Bit rate<br />
iPod USB CD<br />
USB memory device playback<br />
ADD<br />
FAVORITE<br />
CALL<br />
SEARCH<br />
CH- CH +<br />
TUNE -<br />
TOP MENU<br />
MUTE<br />
SDB<br />
TONE<br />
ENTER<br />
1 2 3<br />
. / ABC<br />
DEF<br />
4 5 6<br />
GHI JKL MNO<br />
Album name<br />
7 8 9<br />
PQRS TUV WXYZ<br />
+10 a/A 0<br />
RANDOM<br />
REPEAT PROGRAM<br />
*<br />
RC-1174<br />
TUNE +<br />
VOLUME<br />
INFO<br />
SETUP<br />
CLEAR<br />
MODE<br />
Portable audio player playback<br />
Your portable audio player can be connected to this unit’s portable jack<br />
to play tracks on the portable audio player.<br />
Playing portable audio player<br />
1<br />
Connect<br />
2<br />
Play<br />
the portable audio player to (vpage 7<br />
“Connecting a portable player”).<br />
The input source automatically switches to “Portable In”.<br />
the portable audio player.<br />
The player’s audio is output.<br />
• Also read the portable audio player’s operating instructions.<br />
NOTE<br />
When using the portable player’s headphone jack, set the volume on<br />
the portable player to an appropriate level.<br />
1<br />
Prepare<br />
Listening to ANALOG IN<br />
for playback.<br />
Check the connection, then turn on this<br />
units.<br />
SLEEP<br />
CLOCK<br />
DIMMER<br />
POWER<br />
If the list is not in alphabetical order, you may not be able to perform<br />
a character search.<br />
2<br />
Press<br />
iPod USB CD<br />
CH- CH +<br />
ANALOG IN to select “Analog In 1”, “Analog<br />
In 2” or “Portable In”.<br />
INTERNET<br />
RADIO<br />
TUNER<br />
TUNE -<br />
ONLINE<br />
MUSIC<br />
ANALOG IN<br />
MUTE<br />
Analog In 1 Analog In ADD 2<br />
MUSIC<br />
SERVER<br />
DIGITAL IN<br />
TUNE +<br />
(Portable In)<br />
FAVORITE<br />
CALL<br />
SDB<br />
TONE<br />
• When there is no portable audio player TOP connected MENU to INFO the<br />
portable in jack, “Portable In” is not displayed when you press<br />
ANALOG IN.<br />
3<br />
ENTER<br />
Play the component connected to this unit.<br />
SEARCH<br />
SETUP<br />
1 2 3<br />
. / ABC<br />
DEF<br />
4 5 6<br />
VOLUME<br />
GHI JKL MNO<br />
7 8 9<br />
PQRS TUV WXYZ<br />
+10 a/A 0<br />
*<br />
CLEAR<br />
RANDOM<br />
REPEAT PROGRAM<br />
MODE<br />
RC-1174<br />
41
1<br />
Prepare<br />
Listening to DIGITAL IN<br />
for playback.<br />
Check the connection, then turn on this<br />
units.<br />
2<br />
INTERNET<br />
RADIO<br />
Press DIGITAL IN to select<br />
TUNER<br />
“Digital In”.<br />
iPod<br />
3<br />
Play the component connected to this unit.<br />
TUNE -<br />
NOTE<br />
CH- CH +<br />
FAVORITE<br />
VOLUME<br />
Other digital audio signals than 2 channel linear PCM CALLcannot SDB be input<br />
TONE<br />
through DIGITAL IN connector of this unit.<br />
SLEEP<br />
ADD<br />
TOP MENU<br />
CLOCK<br />
ONLINE<br />
MUSIC<br />
ANALOG IN<br />
USB<br />
MUTE<br />
DIMMER<br />
POWER<br />
MUSIC<br />
SERVER<br />
DIGITAL IN<br />
CD<br />
TUNE +<br />
INFO<br />
ENTER<br />
SEARCH<br />
SETUP<br />
1 2 3<br />
. / ABC<br />
DEF<br />
4 5 6<br />
GHI JKL MNO<br />
7 8 9<br />
PQRS TUV WXYZ<br />
+10 a/A 0<br />
*<br />
CLEAR<br />
RANDOM<br />
REPEAT PROGRAM<br />
MODE<br />
RC-1174<br />
42
AirPlay function<br />
Enjoy music from your iTunes library with DENON quality sound<br />
anywhere in your home.<br />
Streaming music stored in iPhone or iPod<br />
touch directly to the unit<br />
If you update your “iPhone/iPod touch” to iOS 4.2.1 or later, you can<br />
stream music stored in your “iPhone/iPod touch” directly to this unit.<br />
1<br />
Start the music mode on the iPhone or iPod touch.<br />
is displayed on the iPhone or iPod touch screen.<br />
2<br />
Tap<br />
NOTE<br />
the AirPlay icon .<br />
Set “Network Control” (vpage 20) to “On” for this unit.<br />
When “Network Control” is set to “On”, the unit consumes more<br />
standby power.<br />
3<br />
Select the speaker you want to use.<br />
CEOL<br />
Cancel<br />
Playing iTunes music on this unit<br />
1<br />
Install<br />
2<br />
Turn<br />
NOTE<br />
iTunes 10, or later, on a Mac or PC that is<br />
connected to the same network as this unit.<br />
this unit ON.<br />
Set “Network Control” (vpage 20) to “On” for this unit.<br />
When “Network Control” is set to “On”, the unit consumes more<br />
standby power.<br />
3<br />
Launch iTunes and click the AirPlay icon<br />
displayed in the lower right of the window and select<br />
this unit from the list.<br />
4<br />
Choose<br />
a song and click play in iTunes.<br />
The music will stream to this unit.<br />
nnMultiple speakers<br />
You can easily stream music from iTunes to multiple speakers in<br />
your home.<br />
1<br />
Click the AirPlay icon and select “Multiple<br />
Speakers” from the list.<br />
2<br />
Check the speakers you want to use.<br />
Master Volume<br />
My Computer<br />
This Computer<br />
CEOL<br />
AirPlay Device<br />
Multiple Speakers<br />
43
Remote operations<br />
You can use your DENON remote control to play and pause iTunes, as<br />
well as skip to next and previous tracks.<br />
1<br />
Open “Edit” – “Preferences” in iTunes, and click<br />
“Devices”.<br />
2<br />
Check “Allow iTunes audio control from remote<br />
speakers”.<br />
Devices<br />
AirPlay function<br />
• Source input will be switched to “AirPlay” when AirPlay playback<br />
is started.<br />
• You can stop AirPlay playback by pressing the o or choosing other<br />
input source.<br />
• To see artist name or album name together, press INFO.<br />
• For information about how to use iTunes, also see the Help for<br />
iTunes.<br />
• The screen may differ depending on the OS and software versions.<br />
• When you connect iPod to the USB connector during AirPlay<br />
playback, AirPlay playback stops.<br />
General Playback Sharing Store Parental Devices Advanced<br />
Device backups:<br />
Delete Backup ...<br />
Prevent iPods, iPhones, and iPads from syncing automatically<br />
Warn when<br />
more than 5%<br />
of the data on this computer will be changed<br />
Allow iTunes audio control from remote speakers<br />
iTunes is not paired with any Remotes<br />
Forget All Remotes<br />
Reset Sync History<br />
?<br />
OK<br />
Cancel<br />
44
Remote play function<br />
You can use your home network to play back with this unit music<br />
files stored on PC, NAS, mobile phones and portable audio players. In<br />
this case, you use PC, mobile phones and portable audio players for<br />
operations.<br />
• The relevant devices should comply with the DLNA (Digital Living<br />
Network Alliance) Ver. 1.5 standard.<br />
• A wireless LAN environment is required for playing back music files<br />
on mobile phones or portable audio players.<br />
• For some mobile phones, you must install an application for DLNA<br />
music playback.<br />
nn<br />
Roles each device plays<br />
The following devices are used for Remote Play. As specified in<br />
the DLNA standard, these devices are called DMC, DMS or DMR<br />
according to their role.<br />
Name Device example Role<br />
DMC • PC<br />
Performs Remote Play<br />
operations.<br />
(Digital Media • Mobile phone DMC can also play back<br />
Controller) • Portable audio player music files stored on these<br />
devices.<br />
• PC<br />
DMS<br />
• NAS<br />
(Digital Media<br />
(Network<br />
Server)<br />
Storage)<br />
DMR<br />
(Digital Media • This unit<br />
Renderer)<br />
Attached<br />
Stores music files.<br />
Music files stored on these<br />
devices are played back with<br />
DMC.<br />
Outputs audio of music files<br />
played back through Remote<br />
Play from speakers. DMR<br />
cannot perform playback<br />
operations.<br />
Settings required for each device<br />
You must make settings on DMC and DMS for Remote Play. Make<br />
the following settings. Also see the owner’s manual of each device<br />
for settings.<br />
nnSettings on PC and NAS<br />
Make settings on PC and NAS to exchange data with DMR devices.<br />
For settings, see ”Applying media sharing settings”(vpage 30).<br />
nnSettings on mobile phones<br />
You must install an application for DLNA music playback on<br />
your mobile phone to perform operations on DMS and this unit<br />
(DMR) with your mobile phone. The applicable application differs<br />
according to your mobile phone.<br />
Some mobile phones support DLNA music playback with the factory<br />
settings. See the owner’s manual of your mobile phone.<br />
nnSettings on portable audio players<br />
Make settings so that this unit (DMR) can play back music files<br />
stored on your portable audio player. For settings, see the owner’s<br />
manual of your portable player.<br />
nnSettings on this unit<br />
Connect this unit to the DLNA network. You do not need to make<br />
other settings.<br />
For the network connection, see the provided Quick setup Guide,<br />
“Connecting to a home network (LAN)” (vpage 9) and<br />
“Setting the network [Network]” (vpage 17).<br />
nn<br />
Remote Play operations<br />
Operations are different for each device, but the procedures<br />
for preparing for Remote Play are the same. The preparation<br />
procedures are shown below.<br />
1<br />
Turn on this unit.<br />
• Make sure that this unit is connected to the network.<br />
2<br />
Display the music file playback screen on DMC.<br />
• For PC, open Windows Media Player 12, etc.<br />
• For mobile phones, switch to the music file playback mode.<br />
3<br />
Select<br />
4<br />
Start<br />
the friendly name of this unit for the item that<br />
sets the playback device on the playback screen.<br />
• The default friendly name of this unit is “CEOL”.<br />
playing back a music file on DMC.<br />
• The function on this unit automatically switches to Music<br />
Server and the Remote Play mark ( ) appears on the display.<br />
Remote Play starts.<br />
NOTE<br />
During Remote Play, you cannot perform playback operations with<br />
this unit. Use the DMC device for these operations.<br />
n n To exit Remote Play<br />
Press o.<br />
• The Remote Play mode ends.<br />
nn<br />
Files that can be played back<br />
See “About Music server” (vpage 58).<br />
45
Web control function<br />
You can control this unit from a web control screen on a web browser.<br />
Enter the IP address of this unit in browser’s address<br />
4<br />
• This unit and the PC need to be connected to the network properly box.<br />
(vpage 9 “Connecting to a home network (LAN)”) in order to<br />
For example, if the IP address of this unit is “192.168.100.19”,<br />
use the web control function.<br />
enter “http://192.168.100.19/”.<br />
• Depending on the settings of your security-related software, you<br />
http://ceol.local./index.asp<br />
q<br />
Bonjour apple Yahoo! Japan YouTube Wikipedia news(45)<br />
may not be able to access this unit from your PC. If this is the case, w<br />
Please select the menu.<br />
then change the settings of the security-related software.<br />
NETWORK<br />
1<br />
FIRMWARE<br />
Switch the “Network Control” setting to “On”<br />
(vpage 20).<br />
2<br />
Check the IP address of this unit with “Network<br />
Information”.<br />
[Network information ]<br />
IP Address<br />
q Entering the IP address.<br />
192.168.100.19<br />
• By adding this unit’s IP address to the browser’s bookmark, you<br />
can display the web control screen using the bookmark function<br />
Checking the IP address.<br />
the next time you use the browser. If you are using a DHCP<br />
server and “Network Control” (vpage 20)) is set to “Off”,<br />
3<br />
Start up the web browser. turning the power on/off changes the IP address.<br />
w If you are using the Safari web browser, you can select “Bonjour”<br />
and directly access the unit’s web control screen from the<br />
overview section.<br />
5<br />
When<br />
the top menu is displayed, click on the menu<br />
item you want to operate.<br />
NETWORK<br />
FIRMWARE<br />
e<br />
r<br />
Please select the menu.<br />
e Click when you setup network settings. vGExample 1H<br />
r Click when you update firmware (vpage 15)<br />
46
Web control function<br />
6 Operate. GExample 1H Network Setting 1<br />
NETWORK<br />
FIRMWARE<br />
NETWORK<br />
Friendly Name<br />
CEOL Set Set Default<br />
Network Connection<br />
Select Connection<br />
[+]DHCO or Proxy<br />
t<br />
Select Connection<br />
i<br />
Test Connection<br />
y<br />
u<br />
Friendly Name setting<br />
t To change the Friendly Name, enter the new name in the text box<br />
and click “Set”.<br />
y To reset the Friendly Name, click “Set Default”.<br />
Network connection settings<br />
u Click to change the network connection method. If you select<br />
“Wi-Fi”, a new item will appear on-screen.<br />
(vGExample 2H)<br />
i Click to change DHCP/proxy settings.<br />
(vGExample 2H)<br />
o Click to connect using the newly applied settings.<br />
NOTE<br />
To apply network connection settings, click “Test Connection” after<br />
making changes.<br />
o<br />
7 Operate. GExample 2H Network Setting 2<br />
NETWORK<br />
FIRMWARE<br />
NETWORK<br />
Friendly Name<br />
CEOL Set Set Default<br />
Network Connection<br />
Select Connection<br />
Wi-Fi Setup<br />
<strong>Manual</strong><br />
S SID<br />
Security<br />
Security Key<br />
Defaullt Key<br />
[-]DHCP or Proxy<br />
DHCP<br />
IP Address<br />
Subnet Mask<br />
Gateway<br />
Primary DNS<br />
Secondary DNS<br />
Proxy<br />
Address Or Name<br />
Address<br />
Port<br />
Wi-Fi<br />
<strong>Manual</strong><br />
DENON<br />
None<br />
Key1<br />
ON OFF<br />
192.168.000.001<br />
255.255.255.000<br />
000.000.000.000<br />
000.000.000.000<br />
000.000.000.000<br />
ON OFF<br />
Address Name<br />
000.000.000.000<br />
00000<br />
Test Connection<br />
Network connection settings<br />
Q0 Various items will be displayed if you selected “Wi-Fi” in<br />
Example 1. Select or input items as necessary, and then click<br />
“Test Connection” to apply the changes.<br />
NOTE<br />
• Items displayed may vary depending on selected items and<br />
connection status.<br />
• After selecting each item, wait a moment for the display to be<br />
updated.<br />
Q1 Displayed if “DHCP” or “Proxy” is selected in Example 1. When<br />
changing DHCP/proxy settings, input or select for each item.<br />
NOTE<br />
To apply network connection settings, click “Test Connection” after<br />
making changes.<br />
Q1<br />
Q0<br />
47
SLEEP<br />
CLOCK<br />
DIMMER<br />
POWER<br />
Other functions<br />
Inputting characters<br />
On this unit, the names displayed for “Friendly Name” and search,<br />
screens can be changed as desired.<br />
For inputting characters, there are two methods, as shown below.<br />
Method<br />
Using the number<br />
buttons<br />
Using the cursor<br />
buttons<br />
nnDisplay of an input screen<br />
GFriendly name inputH<br />
[Friendly name]<br />
select<br />
Operations<br />
• Operating with the remote control.<br />
• Multiple characters are assigned to<br />
a button, and each time the button is<br />
pressed, a character is switched.<br />
• Operating with the remote control or<br />
the main unit.<br />
• Use uio p and ENTER to input<br />
characters.<br />
: move<br />
Cursor<br />
Using the number buttons<br />
1<br />
Display the screen for inputting<br />
characters.<br />
2<br />
Place the cursor at the character<br />
to be changed with o p and<br />
press 0 – 9, +10 until the desired<br />
character is displayed.<br />
INTERNET<br />
RADIO<br />
TUNER<br />
iPod<br />
ADD<br />
FAVORITE<br />
CALL<br />
SEARCH<br />
CH- CH +<br />
TUNE -<br />
TOP MENU<br />
RANDOM<br />
ONLINE<br />
MUSIC<br />
ANALOG IN<br />
USB<br />
MUTE<br />
SDB<br />
TONE<br />
ENTER<br />
REPEAT PROGRAM<br />
RC-1174<br />
MUSIC<br />
SERVER<br />
DIGITAL IN<br />
CD<br />
TUNE +<br />
VOLUME<br />
INFO<br />
SETUP<br />
1 2 3<br />
. / ABC<br />
DEF<br />
4 5 6<br />
GHI JKL MNO<br />
7 8 9<br />
PQRS TUV WXYZ<br />
+10 a/A 0 * CLEAR<br />
• The types of characters that can be input are as shown below.<br />
1 . @ - _ / : ˜ m n o M N O 6<br />
a b c A B C 2 p q r s P Q R S 7<br />
d e f D E F 3 t u v T U V 8<br />
g h i G H I 4 w x y z W X Y Z 9<br />
j k l J K L 5<br />
0 (Space) ! “ # $ % & ‘ ( ) z + ,<br />
; < = > ? [ \ ] ^ ` { | }<br />
• The input character type can be switched by pressing +10 while the<br />
display name is being changed.<br />
• Press CLEAR to delete the character.<br />
• For entering the characters assigned to one number button<br />
continuously, press p to move the cursor to the right after entering<br />
a character then enter the next character.<br />
• For entering characters assigned to separate buttons, press the<br />
number button continuously. The cursor automatically moves to<br />
the next position, and the entered character is registered.<br />
3<br />
Repeat step 2 to change the name then press ENTER<br />
to register it.<br />
MODE<br />
Example: For changing characters from “POPS” to “ROCK”<br />
q Place the cursor at “P”.<br />
w Press seven times.<br />
“P” changes to “R”.<br />
e Press p twice.<br />
“R” is automatically registered, and the cursor<br />
placed “P”.<br />
POPS<br />
ROPS<br />
ROPS<br />
r Press six times. ROCS<br />
“P” changes to “C”.<br />
t Press p.<br />
ROCS<br />
“C” is registered and the cursor placed “S”.<br />
y Press five times. ROCK<br />
“S” changes to “K”.<br />
u Press ENTER to register the input name.<br />
48
SLEEP<br />
CLOCK<br />
DIMMER<br />
POWER<br />
Using the cursor buttons<br />
1<br />
Display the screen for inputting<br />
characters.<br />
2<br />
Use o p to set the cursor to the<br />
character you want to change.<br />
3<br />
Use ui to change the character.<br />
INTERNET<br />
RADIO<br />
TUNER<br />
iPod<br />
CH-<br />
TUNE -<br />
ADD<br />
FAVORITE<br />
CALL<br />
TOP MENU<br />
ONLINE<br />
MUSIC<br />
ANALOG IN<br />
USB<br />
MUTE<br />
SDB<br />
TONE<br />
ENTER<br />
MUSIC<br />
SERVER<br />
DIGITAL IN<br />
CD<br />
CH +<br />
TUNE +<br />
VOLUME<br />
INFO<br />
Auto power on function<br />
When you press INTERNET RADIO,<br />
ONLINE MUSIC, MUSIC SERVER,<br />
TUNER, iPod, USB, CD, 1/3, 5 or<br />
FAVORITE CALL, the corresponding<br />
device is turned on and the source<br />
automatically switches.<br />
• When you press 1/3, the previously<br />
selected source is played back.<br />
• When you press 5, the disc tray opens.<br />
SLEEP<br />
INTERNET<br />
RADIO<br />
TUNER<br />
iPod<br />
CH- CH +<br />
TUNE -<br />
ADD<br />
CLOCK<br />
ONLINE<br />
MUSIC<br />
ANALOG IN<br />
USB<br />
MUTE<br />
DIMMER<br />
POWER<br />
MUSIC<br />
SERVER<br />
DIGITAL IN<br />
CD<br />
TUNE +<br />
Resetting the microprocessor<br />
Other functions<br />
Perform this procedure if the display is abnormal or if operations<br />
cannot be performed.<br />
When the microprocessor is reset, all the settings are reset to their<br />
default values.<br />
1<br />
Pull the power cord out of the power outlet.<br />
2<br />
Plug<br />
the power cord into a power outlet while<br />
pressing VOLUME df on the main unit.<br />
SEARCH<br />
SETUP<br />
FAVORITE<br />
VOLUME<br />
CALL<br />
SDB<br />
TONE<br />
1 2 3<br />
. / ABC<br />
DEF<br />
TOP MENU<br />
INFO<br />
4 5 6<br />
GHI JKL MNO<br />
7 8 9<br />
PQRS TUV WXYZ<br />
+10 a/A 0<br />
RANDOM<br />
REPEAT PROGRAM<br />
• The types of characters that can be input are as shown below.<br />
GLower case charactersH<br />
abcdefghijklmnopqrstuvwxyz<br />
GUpper case charactersH<br />
ABCDEFGHIJKLMNOPQRSTUVWXYZ<br />
GSymbolsH ! “ # $ % & ‘ ( ) z + , - . / : ; < = > ? @ [ \ ] ^ _ ` { | } ˜<br />
GNumbersH 0123456789 (Space)<br />
• The input character type can be switched by pressing +10 while the<br />
display name is being changed.<br />
• Press CLEAR to delete the character.<br />
• Press 9 to insert a space.<br />
4<br />
Repeat steps 2 and 3 to change the name then press<br />
ENTER to register it.<br />
*<br />
RC-1174<br />
CLEAR<br />
MODE<br />
Last function memory<br />
SEARCH<br />
ENTER<br />
1 2 3<br />
. / ABC<br />
DEF<br />
4 5 6<br />
GHI JKL MNO<br />
7 8 9<br />
PQRS TUV WXYZ<br />
+10 a/A 0<br />
RANDOM<br />
REPEAT PROGRAM<br />
This stores the settings as they were immediately before going into<br />
the standby mode.<br />
When the power is turned back on, the settings are restored to as<br />
they were immediately before going into the standby mode.<br />
*<br />
RC-1174<br />
SETUP<br />
CLEAR<br />
MODE<br />
3<br />
When<br />
the power indicator lights white, release the<br />
buttons.<br />
“Initialized” appears in the display.<br />
If “Initialized” does not display in step 3, start over from step 1.<br />
49
Information<br />
Information<br />
Here, we list various information related to this unit.<br />
Please refer to this information as needed.<br />
F Information vpage 51<br />
F Explanation terms vpage 59<br />
F Troubleshooting vpage 61<br />
F Specifications vpage 65<br />
F Index vpage 66<br />
50
Information<br />
Part names and functions<br />
For buttons not explained here, see the page indicated in parentheses ( ).<br />
Front panel<br />
Q3 Q2 Q1<br />
Q0 o i u<br />
y<br />
y<br />
t<br />
q<br />
w<br />
e<br />
r<br />
q SOURCE button········································································ (23)<br />
Selects the input source.<br />
w USB port·············································································· (37, 40)<br />
Used to connect iPod or USB memory devices.<br />
e Portable in jack ( )··································································· (41)<br />
Used to connect portable audio devices.<br />
r Headphones jack ( )······························································ (24)<br />
Used to connect headphones.<br />
NOTE<br />
To prevent hearing loss, do not raise the volume level excessively<br />
when using headphones.<br />
t Volume up/down button (VOLUME df)······························· (23)<br />
Adjusts the audio volume.<br />
y Cursor button (uio p)····················································· (12, 23)<br />
u Play/Pause/ENTER button (1/3/ENTER)······························ (25)<br />
i Disc tray················································································ (3, 25)<br />
Tray used to insert a compact disc.<br />
o Display<br />
Displays play status, settings, etc.<br />
Q0 Remote control sensor······························································ (4)<br />
Q1 Disc tray open/close button (5)·············································· (25)<br />
Used to open/close the disc tray.<br />
Q2 Power indicator········································································ (23)<br />
Q3 Power operation button and indicator<br />
(X)······························································································ (23)<br />
Turns power to this unit on and off (standby).<br />
The power indicator changes as shown below according to the<br />
status of the unit.<br />
• Power on : White<br />
• Standby : Off<br />
• Network Control – “On” : Red<br />
• iPod charge standby : Red<br />
• Alarm standby : Orange<br />
51
Top panel<br />
Rear panel<br />
Part names and functions<br />
PUSH OPEN<br />
GWhen the door is openedH<br />
q w e<br />
r t y u i<br />
q Door······························································ (37)<br />
w Dock connector············································ (37)<br />
q<br />
w<br />
q AC inlet (AC IN)············································ (10)<br />
w Speaker terminals (SPEAKERS)··················· (6)<br />
e SUBWOOFER connector······························· (6)<br />
r ANALOG IN connectors································ (7)<br />
t DIGITAL IN connector··································· (7)<br />
y FM antenna terminal (ANTENNA)··············· (8)<br />
u ETHERNET connector (NETWORK)·············· (9)<br />
i WPS button·················································· (19)<br />
52
Remote control<br />
This section explains the buttons used to playback each input source.<br />
nnButtons that work with all input sources<br />
nnButtons that work with CDs<br />
“Buttons that work with all input sources” can also be used.<br />
Part names and functions<br />
q<br />
w<br />
e<br />
r<br />
t<br />
y<br />
u<br />
SLEEP<br />
INTERNET<br />
RADIO<br />
TUNER<br />
iPod<br />
CH- CH +<br />
TUNE -<br />
ADD<br />
FAVORITE<br />
CALL<br />
TOP MENU<br />
CLOCK<br />
ONLINE<br />
MUSIC<br />
ANALOG IN<br />
USB<br />
MUTE<br />
SDB<br />
TONE<br />
DIMMER<br />
POWER<br />
MUSIC<br />
SERVER<br />
DIGITAL IN<br />
CD<br />
TUNE +<br />
VOLUME<br />
INFO<br />
i<br />
o<br />
Q0<br />
Q1<br />
q SLEEP button··············································· (24)<br />
w CLOCK button·············································· (13)<br />
e Input source select buttons························ (23)<br />
r MUTE button··············································· (24)<br />
t FAVORITE CALL button······························ (36)<br />
y SDB TONE button······································· (24)<br />
u TOP MENU button······································ (11)<br />
i POWER button (X)······································ (23)<br />
o DIMMER button··········································· (24)<br />
Q0 VOLUME buttons (df) ······························ (23)<br />
Q1 Information button (INFO)·························· (29)<br />
Q2 SETUP button·············································· (17)<br />
Q3 Number buttons<br />
(0 – 9, +10)·············································· (36, 48)<br />
Q4 CLEAR button·································· (36, 48, 49)<br />
q<br />
w<br />
e<br />
SLEEP<br />
INTERNET<br />
RADIO<br />
TUNER<br />
iPod<br />
ADD<br />
FAVORITE<br />
CALL<br />
TOP MENU<br />
CLOCK<br />
ONLINE<br />
MUSIC<br />
ANALOG IN<br />
USB<br />
MUTE<br />
SDB<br />
TONE<br />
DIMMER<br />
POWER<br />
MUSIC<br />
SERVER<br />
DIGITAL IN<br />
CD<br />
CH- CH +<br />
TUNE -<br />
TUNE +<br />
VOLUME<br />
INFO<br />
w<br />
e<br />
r<br />
Q2<br />
y<br />
q Play/Pause button (1/3)··························· (25)<br />
w Reverse-skip/Forward-skip buttons<br />
(8, 9)··················································· (25)<br />
e Fast-reverse/Fast-forward buttons<br />
(6, 7) ···················································· (25)<br />
r Stop button (2)··········································· (25)<br />
t MODE button··············································· (28)<br />
y ENTER button·············································· (25)<br />
u Cursor buttons (uio p)···························· (28)<br />
i Number buttons (0 – 9, +10)······················· (25)<br />
o CLEAR button·············································· (27)<br />
Q0 PROGRAM button······································· (27)<br />
Q1 RANDOM button········································· (26)<br />
Q2 Information button (INFO)·························· (26)<br />
Q3 REPEAT button············································ (26)<br />
ENTER<br />
u<br />
ENTER<br />
SEARCH<br />
SETUP<br />
Q2<br />
SEARCH<br />
SETUP<br />
1 . / 2 ABC 3 DEF<br />
1 . / 2 ABC 3 DEF<br />
4 5 6<br />
GHI JKL MNO<br />
7 8 9<br />
PQRS TUV WXYZ<br />
Q3<br />
i<br />
4 5 6<br />
GHI JKL MNO<br />
7 8 9<br />
PQRS TUV WXYZ<br />
+10 a/A 0<br />
*<br />
CLEAR<br />
Q4<br />
+10 a/A 0 * CLEAR<br />
o<br />
RANDOM<br />
REPEAT PROGRAM<br />
MODE<br />
Q1<br />
Q3<br />
RANDOM<br />
REPEAT PROGRAM<br />
MODE<br />
t<br />
Q0<br />
RC-1174<br />
RC-1174<br />
53
nnButtons that work when the input source is “Internet Radio”,<br />
“Music Server” or “Last.fm”<br />
“Buttons that work with all input sources” can also be used.<br />
nnButtons that work when the input source is “TUNER”<br />
“Buttons that work with all input sources” can also be used.<br />
Part names and functions<br />
q<br />
w<br />
e<br />
SLEEP<br />
INTERNET<br />
RADIO<br />
TUNER<br />
iPod<br />
TUNE -<br />
CLOCK<br />
ONLINE<br />
MUSIC<br />
ANALOG IN<br />
USB<br />
MUTE<br />
DIMMER<br />
POWER<br />
MUSIC<br />
SERVER<br />
DIGITAL IN<br />
CD<br />
CH- CH +<br />
ADD<br />
TUNE +<br />
q Play/Pause button (1/3)··························· (29)<br />
w Reverse-skip/Forward-skip buttons<br />
(8, 9)················································· (31)<br />
e FAVORITE ADD button······························· (36)<br />
r FAVORITE CALL button······························ (36)<br />
t ENTER button·············································· (29)<br />
y Cursor buttons (uio p)··························· (29)<br />
u SEARCH button··········································· (29)<br />
i RANDOM button········································· (31)<br />
o REPEAT button············································ (31)<br />
Q0 Information button (INFO)·························· (29)<br />
q<br />
SLEEP<br />
INTERNET<br />
RADIO<br />
TUNER<br />
iPod<br />
CH- CH +<br />
TUNE -<br />
ADD<br />
CLOCK<br />
ONLINE<br />
MUSIC<br />
ANALOG IN<br />
USB<br />
MUTE<br />
DIMMER<br />
POWER<br />
MUSIC<br />
SERVER<br />
DIGITAL IN<br />
CD<br />
TUNE +<br />
t<br />
q Stop button (2)··········································· (33)<br />
w ENTER button·············································· (33)<br />
e Cursor buttons (ui p)······························ (33)<br />
r SEARCH button··········································· (33)<br />
t Tuning up/Tuning down buttons<br />
(TUNE +, –)··················································· (33)<br />
y MODE button··············································· (33)<br />
FAVORITE<br />
VOLUME<br />
FAVORITE<br />
VOLUME<br />
r<br />
CALL<br />
SDB<br />
TONE<br />
CALL<br />
SDB<br />
TONE<br />
t<br />
TOP MENU<br />
INFO<br />
Q0<br />
w<br />
TOP MENU<br />
INFO<br />
y<br />
ENTER<br />
e<br />
u<br />
SEARCH<br />
SETUP<br />
r<br />
SEARCH<br />
SETUP<br />
1 . / 2 ABC 3 DEF<br />
4 5 6<br />
GHI JKL MNO<br />
7 8 9<br />
PQRS TUV WXYZ<br />
1 . / 2 ABC 3 DEF<br />
4 5 6<br />
GHI JKL MNO<br />
7 8 9<br />
PQRS TUV WXYZ<br />
+10 a/A 0<br />
*<br />
CLEAR<br />
+10 a/A 0 * CLEAR<br />
i<br />
o<br />
RANDOM<br />
REPEAT PROGRAM<br />
MODE<br />
RANDOM<br />
REPEAT PROGRAM<br />
MODE<br />
y<br />
RC-1174<br />
RC-1174<br />
54
nnButtons that work when the input source is “iPod” or “USB”<br />
“Buttons that work with all input sources” can also be used.<br />
Part names and functions<br />
q<br />
w<br />
SLEEP<br />
INTERNET<br />
RADIO<br />
TUNER<br />
iPod<br />
TUNE -<br />
CLOCK<br />
ONLINE<br />
MUSIC<br />
ANALOG IN<br />
USB<br />
DIMMER<br />
POWER<br />
MUSIC<br />
SERVER<br />
DIGITAL IN<br />
CD<br />
CH- CH +<br />
TUNE +<br />
q Play/Pause button (1/3)····················· (37, 40)<br />
w Reverse-skip/Forward-skip buttons<br />
(8, 9)··········································· (37, 41)<br />
e ENTER button·············································· (37)<br />
r Cursor buttons (uio p)··························· (37)<br />
t SEARCH button··········································· (41)<br />
y RANDOM button··································· (37, 40)<br />
u REPEAT button······································ (37, 40)<br />
i Information button (INFO)···················· (37, 41)<br />
o MODE button··············································· (37)<br />
ADD<br />
MUTE<br />
FAVORITE<br />
VOLUME<br />
CALL<br />
SDB<br />
TONE<br />
TOP MENU<br />
INFO<br />
e<br />
i<br />
r<br />
ENTER<br />
t<br />
SEARCH<br />
SETUP<br />
1 . / 2 ABC 3 DEF<br />
4 5 6<br />
GHI JKL MNO<br />
7 8 9<br />
PQRS TUV WXYZ<br />
+10 a/A 0<br />
*<br />
CLEAR<br />
y<br />
RANDOM<br />
REPEAT PROGRAM<br />
MODE<br />
o<br />
u<br />
RC-1174<br />
55
iPod<br />
MP3 and WMA<br />
MP3 and WMA formats<br />
“Made for iPod” and “Made for iPhone” mean that an electronic<br />
accessory has been designed to connect specifically to iPod, or<br />
iPhone, respectively, and has been certified by the developer to meet<br />
Apple performance standards.<br />
Apple is not responsible for the operation of this device or its<br />
compliance with safety and regulatory standards. Please note that<br />
the use of this accessory with iPod, or iPhone, may affect wireless<br />
performance.<br />
AirPlay, the AirPlay logo, iPhone, iPod, iPod classic, iPod nano, iPod<br />
shuffle, and iPod touch are trademarks of Apple Inc., registered in the<br />
U.S. and other countries.<br />
• Individual users are permitted to use iPhone, iPod, iPod classic, iPod<br />
nano, iPod shuffle, and iPod touch for private copy and playback of<br />
non-copyrighted contents and contents whose copy and playback is<br />
permitted by law. Copyright infringement is prohibited by law.<br />
CD-R and CD-RW discs created in the format described below can<br />
be played.<br />
nnWriting software format<br />
ISO9660 level 1<br />
When written in other formats, it may not be possible to play the<br />
disc properly.<br />
nnMaximum number of playable files and folders<br />
Total number of folders and files : 512<br />
Number of folders : 256<br />
nnFile format<br />
MPEG-1 Audio Layer-3<br />
WMA (Windows Media Audio)<br />
nnTag data<br />
ID3-Tag (Ver. 1.x and 2.x )<br />
META-Tag<br />
(Compatible with title, artist and album names)<br />
Playable MP3/WMA file<br />
File format<br />
Sampling<br />
frequency<br />
Bit rate Extension<br />
MP3 32, 44.1, 48 kHz 32 ~ 320 kbps .mp3<br />
WMA 32, 44.1, 48 kHz 64 ~ 192 kbps .wma<br />
• Be sure to give files the extension “.MP3” or “.WMA”. Files with<br />
any other extensions or with no extensions cannot be played.<br />
• Mac OS X files assigned with filenames that begin with “._” are not<br />
music data and cannot be played back.<br />
• In accordance with copyright laws, recordings you have made should<br />
only be used for your personal enjoyment and may not be used in<br />
other ways without permission of the copyright holder.<br />
56
USB memory device<br />
Playing back music files recorded on a USB memory device.<br />
Important information<br />
• Only USB memory devices conforming to mass storage class and<br />
MTP (Media Transfer Protocol) standards can be played on this unit.<br />
• This unit is compatible with USB memory devices in “FAT16” or<br />
“FAT32” format.<br />
• This unit is compatible with MP3 files conforming to “MPEG-1 Audio<br />
Layer-3” standards.<br />
• File types that this unit can play back and specifications are shown<br />
below.<br />
GSupported file typesH<br />
Supported file types<br />
USB memory devices z1<br />
WMA (Windows Media Audio)<br />
P z2<br />
MP3 (MPEG-1 Audio Layer-3)<br />
P<br />
WAV<br />
P<br />
MPEG-4 AAC<br />
P z3<br />
FLAC (Free Lossless Audio Codec)<br />
P<br />
z1 USB memory device<br />
• This unit is compatible with MP3 ID3-Tag (Ver. 2) standard.<br />
• This unit is compatible with WMA META tags.<br />
• WAV format Quantization bit length: 16 bits.<br />
• FLAC format Quantization bit length: 16 or 24 bits.<br />
z2 Copyright-protected files can be played on certain portable<br />
players compatible with MTP.<br />
z3 Only files that are not protected by copyright can be played on<br />
this unit.<br />
Content downloaded from pay sites on the Internet are copyright<br />
protected. Also, files encoded in WMA format when ripped from<br />
a CD, etc. on a computer may be copyright protected, depending<br />
on the computer’s settings.<br />
NOTE<br />
File types that this unit does not support are not displayed.<br />
WMA<br />
(Windows Media<br />
Audio)<br />
MP3<br />
(MPEG-1 Audio<br />
Layer-3)<br />
WAV<br />
MPEG-4 AAC<br />
FLAC<br />
(Free Lossless<br />
Audio Codec)<br />
GCompatible formatsH<br />
Sampling<br />
Bit rate<br />
frequency<br />
32/44.1/<br />
48 kHz<br />
32/44.1/<br />
48 kHz<br />
32/44.1/<br />
48/88.2/<br />
96/176.4/<br />
192 kHz<br />
32/44.1/<br />
48 kHz<br />
32/44.1/<br />
48/88.2/<br />
96/176.4/<br />
192 kHz<br />
Bit<br />
length<br />
Extension<br />
48 – 192 kbps – .wma<br />
32 – 320 kbps – .mp3<br />
–<br />
16 /<br />
24 bit<br />
16 – 320 kbps –<br />
–<br />
16 /<br />
24 bit<br />
.wav<br />
.aac/<br />
.m4a/<br />
.mp4<br />
.flac<br />
nnMaximum Number of Playable Files and Folder<br />
The limits on the number of folders and files that can be displayed<br />
by this unit are as follows.<br />
Media<br />
Item<br />
Memory capacity<br />
Number of folder directory levels<br />
z1<br />
USB memory devices<br />
FAT16 : 2 GB, FAT32 : 2 TB<br />
8 levels<br />
Number of folders 500<br />
Number of files z2 5000<br />
z1 The limited number includes the root folder.<br />
z2 The allowable number of files may differ according to the USB<br />
memory device capacity and the file size.<br />
57
Network audio<br />
Important information<br />
nnAbout the internet radio function<br />
• Internet radio refers to radio broadcasts distributed over the<br />
Internet.<br />
Internet radio stations from around the world can be received.<br />
• This unit is equipped with the following Internet radio functions:<br />
• Stations can be selected by genre and region.<br />
• Internet radio stations in MP3 and WMA (Windows Media<br />
Audio) format can be listened to.<br />
• Your favorite radio stations can be registered by accessing an<br />
exclusive DENON Internet radio URL from a Web browser on<br />
a computer.<br />
• The function is managed for individual users, so you must provide<br />
your MAC or e-mail address.<br />
Exclusive URL: http://www.radiodenon.com<br />
• The radio station database service may be suspended without<br />
notice.<br />
• This unit’s Internet radio station list is created using a radio<br />
station database service (vTuner). This database service provides<br />
a list edited and created for this unit.<br />
nnAbout Music server<br />
This function lets you play music files and playlists (m3u, wpl)<br />
stored on a computer (music server) connected to this unit via a<br />
network.<br />
With this unit’s network audio playback function, connection to the<br />
server is possible using one of the technologies below.<br />
• Windows Media Player Network Sharing Service<br />
• Windows Media DRM10<br />
GTypes of files that can be played back by each functionH<br />
Internet radio Music server z1<br />
WMA (Windows<br />
Media Audio)<br />
P<br />
P<br />
MP3 (MPEG-1 Audio<br />
Layer-3)<br />
P<br />
P<br />
WAV<br />
P<br />
MPEG-4 AAC<br />
P z2<br />
FLAC (Free Lossless<br />
Audio Codec)<br />
P<br />
A server or server software compatible with distribution in the<br />
corresponding formats is required to play music files via a network.<br />
z1 Music server<br />
• This unit is compatible with MP3 ID3-Tag (Ver. 2) standard.<br />
• This unit is compatible with WMA META tags.<br />
• If the image size (pixels) of an album artwork exceeds 500×500<br />
(WMA/MP3/WAV/FLAC) or 349×349 (MPEG-4 AAC), then<br />
music may not be played back properly.<br />
z2 Only files that are not protected by copyright can be played on<br />
this unit.<br />
Content downloaded from pay sites on the Internet are copyright<br />
protected. Also, files encoded in WMA format when ripped from<br />
a CD, etc. on a computer may be copyright protected, depending<br />
on the computer’s settings.<br />
WMA<br />
(Windows<br />
Media Audio)<br />
MP3<br />
(MPEG-1 Audio<br />
Layer-3)<br />
WAV<br />
MPEG-4 AAC<br />
FLAC<br />
(Free Lossless<br />
Audio Codec)<br />
GPlayback file specificationsH<br />
Sampling<br />
frequency<br />
32/44.1/<br />
48 kHz<br />
32/44.1/<br />
48 kHz<br />
32/44.1/<br />
48/88.2/<br />
96/176.4/<br />
192 kHz<br />
32/44.1/<br />
48 kHz<br />
32/44.1/<br />
48/88.2/<br />
96/176.4/<br />
192 kHz<br />
Bit rate<br />
Bit<br />
length<br />
Extension<br />
48 – 192 kbps – .wma<br />
32 – 320 kbps – .mp3<br />
–<br />
16 /<br />
24 bit<br />
16 – 320 kbps –<br />
–<br />
16 /<br />
24 bit<br />
.wav<br />
.aac/<br />
.m4a/<br />
.mp4<br />
.flac<br />
NOTE<br />
Particularly when you play back large music files, depending on your<br />
wireless LAN environment, the playback sound may be interrupted. In<br />
this case, make the wired LAN connection.<br />
n n About Last.fm<br />
Last.fm learns what you love... and it’s a great way to discover<br />
new music.<br />
Your new DENON Network CD receiver is very clever. You can<br />
create a free Last.fm profile when you start using your DENON<br />
Network CD receiver and magically keep track of all the songs you<br />
hear.<br />
When you sign in at www.last.fm, you can see your top music<br />
charts, view thousands of reviews, biographies and artwork, and<br />
get recommendations for local performances you won’t want to<br />
miss.<br />
With an affordable subscription you can enjoy an endless choice<br />
of personalised ad-free radio stations. Check out www.last.fm/<br />
subscribe today for more details.<br />
Your subscription also gives you access to Last.fm radio on a great<br />
range of music products, including your DENON Network CD<br />
receiver. This feature is not available in all countries. Visit www.<br />
last.fm/hardware to find out more.<br />
58
Explanation terms<br />
A<br />
AES (Advanced Encryption Standard)<br />
This is a next generation standard encryption<br />
method replacing the current DES and 3DES, and<br />
because of its high security it is expected to be<br />
applied widely to wireless LANs in the future. It<br />
uses the “Rijndael” algorithm developed by two<br />
Belgian cryptographers to divide the data into<br />
blocks of fixed lengths and encrypt each block.<br />
It supports data lengths of 128, 192 and 256 bits<br />
and key lengths of 128, 192 and 256 bits as well,<br />
offering extremely high encryption security.<br />
AirPlay<br />
AirPlay sends (plays) contents recorded in iTunes<br />
or on an iPhone/iPod touch to a compatible device<br />
via the network.<br />
B<br />
Bit rate<br />
This expresses the read amount per 1 second of<br />
video/audio data recorded in a disc. A larger number<br />
means higher sound quality, but also means a larger<br />
file size.<br />
D<br />
DLNA<br />
DLNA and DLNA CERTIFIED are trademarks and/<br />
or service marks of Digital Living Network Alliance.<br />
Some contents may not be compatible with other<br />
DLNA CERTIFIED ® products.<br />
F<br />
Finalize<br />
This is processing that enables playing back of disc<br />
of CD, which was recorded using a recorder, by<br />
other players.<br />
FLAC<br />
FLAC stands for Free lossless Audio Codec, and is a<br />
lossless free audio file format. Lossless means that<br />
the audio is compressed without any loss in quality.<br />
The FLAC license is as shown below.<br />
Copyright (C) 2000,2001,2002,2003,2004,2005,200<br />
6,2007,2008,2009 Josh Coalson<br />
Redistribution and use in source and binary forms,<br />
with or without modification, are permitted provided<br />
that the following conditions are met:<br />
• Redistributions of source code must retain the<br />
above copyright notice, this list of conditions and<br />
the following disclaimer.<br />
• Redistributions in binary form must reproduce the<br />
above copyright notice, this list of conditions and<br />
the following disclaimer in the documentation and/<br />
or other materials provided with the distribution.<br />
• Neither the name of the Xiph.org Foundation nor<br />
the names of its contributors may be used to<br />
endorse or promote products derived from this<br />
software without specific prior written permission.<br />
THIS SOFTWARE IS PROVIDED BY THE<br />
COPYRIGHT HOLDERS AND CONTRIBUTORS “AS<br />
IS” AND ANY EXPRESS OR IMPLIED WARRANTIES,<br />
INCLUDING, BUT NOT LIMITED TO, THE<br />
IMPLIED WARRANTIES OF MERCHANTABILITY<br />
AND FITNESS FOR A PARTICULAR PURPOSE<br />
ARE DISCLAIMED. IN NO EVENT SHALL THE<br />
FOUNDATION OR CONTRIBUTORS BE LIABLE<br />
FOR ANY DIRECT, INDIRECT, INCIDENTAL,<br />
SPECIAL, EXEMPLARY, OR CONSEQUENTIAL<br />
DAMAGES (INCLUDING, BUT NOT LIMITED TO,<br />
PROCUREMENT OF SUBSTITUTE GOODS OR<br />
SERVICES; LOSS OF USE, DATA, OR PROFITS; OR<br />
BUSINESS INTERRUPTION) HOWEVER CAUSED<br />
AND ON ANY THEORY OF LIABILITY, WHETHER<br />
IN CONTRACT, STRICT LIABILITY, OR TORT<br />
(INCLUDING NEGLIGENCE OR OTHERWISE)<br />
ARISING IN ANY WAY OUT OF THE USE OF<br />
THIS SOFTWARE, EVEN IF ADVISED OF THE<br />
POSSIBILITY OF SUCH DAMAGE.<br />
I<br />
IEEE 802.11b<br />
This is one wireless LAN standard set by the 802<br />
working group that establishes LAN technology<br />
standards at the IEEE (Institute of Electrical and<br />
Electronics Engineers) of the United States. It<br />
uses the 2.4 GHz band usable freely without<br />
a radio frequency license (ISM band), enabling<br />
communications at a maximum speed of 11 Mbps.<br />
• The value indicated above is the maximum<br />
theoretical value for the wireless LAN standard,<br />
and does not indicate the actual data transfer rate.<br />
IEEE 802.11g<br />
This is another wireless LAN standard set by the<br />
802 working group that establishes LAN technology<br />
standards at the IEEE (Institute of Electrical and<br />
Electronics Engineers) of the United States, and<br />
is compatible with IEEE 802.11b. It also uses the<br />
2.4 GHz band, but enables communications at a<br />
maximum speed of 54 Mbps.<br />
• The value indicated above is the maximum<br />
theoretical value for the wireless LAN standard,<br />
and does not indicate the actual data transfer rate.<br />
iTunes<br />
iTunes is the name of the multimedia player<br />
provided by Apple Inc. It enables management<br />
and playback of multimedia contents including<br />
music and movies. iTunes supports many main file<br />
formats including AAC, WAV, and MP3.<br />
M<br />
MP3 (MPEG Audio Layer-3)<br />
This is an internationally standardized audio data<br />
compression scheme, using the “MPEG-1” video<br />
compression standard. It compresses the data<br />
volume to about one eleventh its original size while<br />
maintaining sound quality equivalent to a music CD.<br />
MPEG (Moving Picture Experts Group), MPEG-2,<br />
MPEG-4<br />
These are the names for digital compression format<br />
standards used for the encoding of video and audio.<br />
Video standards include “MPEG-1 Video”, “MPEG-<br />
2 Video”, “MPEG-4 Visual”, “MPEG-4 AVC”. Audio<br />
standards include “MPEG-1 Audio”, “MPEG-2<br />
Audio”, “MPEG-4 AAC”.<br />
N<br />
Network Names<br />
(SSID: Security Set Identifier)<br />
When forming wireless LAN networks, groups are<br />
formed to prevent interference, data theft, etc.<br />
This grouping is done by “SSID” or “Security Set<br />
Identifiers”. For further security, a WEP key is set<br />
and signal transfer is not possible unless the SSID<br />
and WEP key match.<br />
P<br />
Protection circuit<br />
This is a function to prevent damage to components<br />
within the power supply when an abnormality<br />
such as an overload, excess voltage occurs or<br />
temperature for any reason.<br />
In this unit, the power indicator blinks and the unit<br />
enters standby mode when an abnormality occurs.<br />
S<br />
Sampling frequency<br />
Sampling involves taking a reading of a sound wave<br />
(analog signal) at regular intervals and expressing<br />
the height of the wave at each reading in digitized<br />
format (producing a digital signal).<br />
The number of readings taken in one second is<br />
called the “sampling frequency”. The larger the<br />
value, the closer the reproduced sound is to the<br />
original.<br />
Speaker impedance<br />
This is an AC resistance value, indicated in Ω<br />
(ohms). Greater power can be obtained with this<br />
value smaller.<br />
T<br />
TKIP (Temporal Key Integrity Protocol)<br />
This is a network key used for WPA. The encryption<br />
algorithm is RC4, the same as for WEP, but the<br />
security level is increased by changing the network<br />
key used for encryption for each packet.<br />
59
V<br />
vTuner<br />
This is a free online content server for Internet<br />
radio. Note that usage fees are included in upgrade<br />
costs.<br />
For inquiries about this service, visit the vTuner site<br />
below.<br />
vTuner website: http://www.radiodenon.com<br />
This product is protected by certain intellectual<br />
property rights of Nothing Else Matters Software<br />
and BridgeCo. Use or distribution of such technology<br />
outside of this product is prohibited without a<br />
license from Nothing Else Matters Software and<br />
BridgeCo or an authorized subsidiary.<br />
W<br />
WEP Key (Network Key)<br />
This is key information used for encrypting data<br />
when conducting data transfer. On this unit, the<br />
same WEP key is used for data encryption and<br />
decryption, so the same WEP key must be set on<br />
both devices in order for communications to be<br />
established between them.<br />
Wi-Fi ®<br />
Wi-Fi Certification assures tested and proven<br />
interoperability by the Wi-Fi Alliance, a group<br />
certifying interoperability among wireless LAN<br />
devices.<br />
Windows Media DRM<br />
This is a copyright protection technology developed<br />
by Microsoft.<br />
Content providers are using the digital rights<br />
management technology for Windows Media<br />
contained in this device (WM-DRM) to protect<br />
the integrity of their content (Secure Content) so<br />
that their intellectual property, including copyright,<br />
in such content is not misappropriated. This<br />
device uses WM-DRM software to play Secure<br />
Content (WM-DRM Software). If the security of<br />
the WM-DRM Software in this device has been<br />
compromised, owners of Secure Content (Secure<br />
Content Owners) may request that Microsoft<br />
revoke the WM-DRM Software’s right to acquire<br />
new licenses to copy, display and/or play Secure<br />
Content. Revocation does not alter the WM-DRM<br />
Software’s ability to play unprotected content.<br />
A list of revoked WM-DRM Software is sent to<br />
your device whenever you download a license for<br />
Secure Content from the Internet or from a PC.<br />
Microsoft may, in conjunction with such license,<br />
also download revocation list onto your device on<br />
behalf of Secure Content Owners.<br />
Windows Media Player Ver. 11 or later<br />
This is a media player distributed free of charge by<br />
Microsoft Corporation.<br />
It can be used to play playlists created with<br />
Windows Media Player Ver. 11 or later as well as<br />
files in such formats as WMA, DRM WMA, MP3<br />
and WAV.<br />
WMA (Windows Media Audio)<br />
This is audio compression technology developed by<br />
Microsoft Corporation.<br />
WMA data can be encoded using Windows Media ®<br />
Player Ver.7, 7.1, Windows Media ® Player<br />
for Windows ® XP and Windows Media ® Player 9<br />
Series.<br />
To encode WMA files, only use applications<br />
authorized by Microsoft Corporation. If you use<br />
an unauthorized application, the file may not work<br />
properly.<br />
WPA (Wi-Fi Protected Access)<br />
This is a security standard established by the Wi-Fi<br />
Alliance. In addition to the conventional SSID<br />
(network name) and WEP key (network key), it also<br />
uses a user identification function and encrypting<br />
protocol for stronger security.<br />
WPA2 (Wi-Fi Protected Access 2)<br />
This is a new version of the WPA established by the<br />
Wi-Fi Alliance, compatible with more secure AES<br />
encryption.<br />
WPA-PSK/WPA2-PSK (Pre-shared Key)<br />
This is a simple authentication system for mutual<br />
authentication when a preset character string<br />
matches on the wireless LAN access point and<br />
client.<br />
WPS (Wi-Fi Protected Setup)<br />
This is a standard drawn up by the Wi-Fi Alliance<br />
to ease the task of setting up wireless LAN<br />
connections and configuring security.<br />
There are two methods: push-button and PIN<br />
(Personal Identification Number) code.<br />
60
Troubleshooting<br />
If a problem occurs first check the following:<br />
1. Are the connections correct?<br />
2. Is the set being operated as described in the owner’s manual?<br />
3. Are the other devices operating properly?<br />
If this unit does not operate properly, check the items listed in the table below. If the problem persists,<br />
there may be a malfunction.<br />
In this case, disconnect the power immediately and contact your retail outlet.<br />
GGeneralH<br />
Symptom Cause Countermeasure Page<br />
Set does not • External noise or interference is • Reset the microprocessor. 49<br />
operate properly. causing the set to malfunction.<br />
Display not lit<br />
and sound not<br />
produced when<br />
power switched<br />
to on.<br />
Display lit but<br />
sound not<br />
produced.<br />
Display is off.<br />
For stereo<br />
sources, the<br />
positions of the<br />
instruments are<br />
inverted.<br />
Power turns off<br />
suddenly and<br />
POWER indicator<br />
flashes red.<br />
(Flashes at 0.25<br />
second intervals)<br />
“No Network<br />
Connection” is<br />
displayed.<br />
• Power cord not plugged in<br />
securely.<br />
• The speaker cables are not<br />
properly connected.<br />
• The function is not switched to<br />
the input source you want to<br />
play.<br />
• The volume is set too low.<br />
• The Dimmer setting is set to<br />
“Off”.<br />
• The connections of the speaker<br />
cables or input cables are<br />
inverted.<br />
• Set is damaged.<br />
• The network is not properly set<br />
up.<br />
• Check the connections on<br />
the set’s rear panel and the<br />
connection of the power plug to<br />
the power outlet.<br />
• Connect securely.<br />
• Switch to the correct function.<br />
• Adjust the volume to an<br />
appropriate level.<br />
• Set to something other than<br />
“Off”.<br />
• Check and remedy the<br />
connections.<br />
• Turn off the power and contact a<br />
DENON service center.<br />
• Select a source other than the<br />
network function.<br />
• Perform “Quick Setup”.<br />
10<br />
6<br />
23<br />
23<br />
24<br />
6 – 10<br />
–<br />
23<br />
Quick setup<br />
guide<br />
GCDH<br />
Symptom Cause Countermeasure Page<br />
“Unsupported” • The disc is not properly loaded. • Reload the disc. 3<br />
is shown on the<br />
display even<br />
though a CD is<br />
loaded.<br />
Disc does not<br />
play when 1/3<br />
button is pressed.<br />
• The disc is dirty or scratched. • Wipe the disc clean or replace<br />
the disc.<br />
3<br />
A specific part<br />
of a disc is not<br />
played.<br />
A CD-R or CD-RW<br />
disc cannot be<br />
played.<br />
MP3 and WMA<br />
files cannot be<br />
played.<br />
• The disc is dirty or scratched.<br />
• The disc has not been finalized.<br />
• The recording conditions are bad<br />
or the quality of the disc itself<br />
it poor.<br />
• The file formats, extensions or<br />
settings made when the disc<br />
was created are not compatible<br />
with this unit.<br />
• Wipe the disc clean or replace<br />
the disc.<br />
• Finalize the disc then play it.<br />
• Use a properly recorded disc.<br />
• Create discs with file formats,<br />
extensions or settings<br />
compatible with this unit.<br />
GTunerH<br />
Symptom Cause Countermeasure Page<br />
Continuous noise<br />
is heard when<br />
receiving FM<br />
programs.<br />
• Antenna cable is not properly<br />
connected.<br />
• Connect the antenna cable<br />
properly.<br />
• Connect an outdoor antenna.<br />
8<br />
–<br />
3<br />
3<br />
–<br />
56<br />
61
GInternet radio/Music server/iPod/USB memory deviceH<br />
Symptom Cause Countermeasure Page<br />
When a USB<br />
memory device<br />
is connected,<br />
“USB” is not<br />
displayed.<br />
• Check the connection.<br />
• Connect a USB memory device<br />
conforming to mass storage<br />
class or MTP standards.<br />
40<br />
–<br />
iPod cannot be<br />
played.<br />
Files on a USB<br />
memory device<br />
cannot be played.<br />
Internet radio<br />
cannot be played.<br />
• The set cannot recognize a USB<br />
memory device.<br />
• A USB memory device not<br />
conforming to mass storage<br />
class or MTP standards is<br />
connected.<br />
• A USB memory device that<br />
the set cannot recognize is<br />
connected.<br />
• USB memory device is<br />
connected via USB hub.<br />
• The input source is set to<br />
something other than “iPod”.<br />
• Cable is not properly connected.<br />
• USB memory device is in a<br />
format other than FAT16 or<br />
FAT32.<br />
• USB memory device is divided<br />
into multiple partitions.<br />
• Files are stored in a noncompatible<br />
format.<br />
• You are attempting to play a file<br />
that is copyright protected.<br />
• Ethernet cable is not properly<br />
connected or network is<br />
disconnected.<br />
• Program is being broadcast in<br />
non-compatible format.<br />
• The computer’s or router’s<br />
firewall is activated.<br />
• Radio station is not currently<br />
broadcasting.<br />
• IP address is wrong.<br />
• This is not a malfunction. DENON<br />
does not guarantee that all USB<br />
memory devices will operate or<br />
receive power.<br />
• Connect the USB memory<br />
device directly to the USB port.<br />
• Switch the input source to<br />
“iPod”.<br />
• Reconnect.<br />
• Set the format to FAT16 or<br />
FAT32. For details, refer to the<br />
USB memory device’s operating<br />
instructions.<br />
• When divided into multiple<br />
partitions, only files stored in the<br />
top partition can be played.<br />
• Record the files in a compatible<br />
format.<br />
• Files that are copyright protected<br />
cannot be played on this set.<br />
• Check the connection status.<br />
• Only Internet radio programs in<br />
MP3 and WMA can be played on<br />
this set.<br />
• Check the computer’s or router’s<br />
firewall settings.<br />
• Choose a radio station that is<br />
currently broadcasting.<br />
• Check the set’s IP address.<br />
–<br />
–<br />
23<br />
37<br />
–<br />
–<br />
57<br />
57<br />
9<br />
58<br />
–<br />
29<br />
17<br />
Symptom Cause Countermeasure Page<br />
Files stored on a<br />
computer cannot<br />
be played.<br />
• Record in a compatible format. 58<br />
58<br />
Server is not<br />
found, or it is<br />
not possible to<br />
connect to the<br />
server.<br />
Cannot connect<br />
to favorite radio<br />
stations.<br />
For some<br />
radio stations,<br />
“Server Full”<br />
or “Connection<br />
Down” is<br />
displayed and<br />
station cannot be<br />
connected to.<br />
Sound is broken<br />
during playback.<br />
Sound quality is<br />
poor or played<br />
sound is noisy.<br />
• Files are stored in a noncompatible<br />
format.<br />
• You are attempting to play a file<br />
that is copyright protected.<br />
• Set and computer are connected<br />
by USB cable.<br />
• The computer’s or router’s<br />
firewall is activated.<br />
• Computer’s power is not turned<br />
on.<br />
• Server is not running.<br />
• Set’s IP address is wrong.<br />
• Radio station is not currently<br />
broadcasting.<br />
• Radio station is not currently in<br />
service.<br />
• Station is congested or not<br />
currently broadcasting.<br />
• Network’s signal transfer speed<br />
is slow or communications lines<br />
or radio station is congested.<br />
• File being played has a low bit<br />
rate.<br />
• Files that are copyright protected<br />
cannot be played on this set.<br />
• The set’s USB port cannot<br />
be used for connection to a<br />
computer.<br />
• Check the computer’s or router’s<br />
firewall settings.<br />
• Turn on the power.<br />
• Launch the server.<br />
• Check the set’s IP address.<br />
• Wait a while before trying again.<br />
–<br />
–<br />
–<br />
–<br />
17<br />
–<br />
• It is not possible to connect to –<br />
radio stations that are no longer<br />
in service.<br />
• Wait a while before trying again. –<br />
• This is not a malfunction. When –<br />
playing broadcast data with a<br />
high bit rate, the sound may<br />
be broken, depending on the<br />
communications conditions.<br />
• This is not a malfunction. –<br />
62
GLast.fmH<br />
Symptom Cause Countermeasure Page<br />
Cannot login • Login authentication error. • Enter the correct username and –<br />
to Last.fm.<br />
password and retry login.<br />
(“Subscription • If a nonsubscriber user accesses • You need to be a paid Last.fm –<br />
required” is it. Or when the listening subscriber to listen to this.<br />
displayed.) limitation exceeds it.<br />
Visit www.last.fm/subscribe to<br />
upgrade.<br />
Cannot play back<br />
music. (“Library<br />
empty” is<br />
displayed.)<br />
Cannot play back<br />
music. (“No<br />
more tacks” is<br />
displayed.)<br />
Cannot access<br />
the Last.fm.<br />
(“No network<br />
Connection” is<br />
displayed.)<br />
Cannot access<br />
the Last.fm.<br />
(“Not available in<br />
your country” is<br />
displayed.)<br />
Cannot login<br />
to Last.fm.<br />
(“Incorrect user<br />
or password” is<br />
displayed.)<br />
Cannot create<br />
and register<br />
an account.<br />
(“Try another<br />
username” is<br />
displayed.)<br />
• No music data to be played back. • Visit www.last.fm/download –<br />
and install the Scrobbler to add<br />
the music you’ve played to your<br />
profile and make this feature<br />
work.<br />
• When you played all tunes of the • Select another playlist. –<br />
playlist.<br />
• Cannot connect to the network. • Check the network environment. 9<br />
• You are accessing the network<br />
from a country where Last.fm<br />
radio is not available.<br />
• Incorrect username or password<br />
entered for login authentication.<br />
• The username has already been<br />
taken.<br />
• Last.fm radio is not available<br />
in all countries. Please check<br />
www.last.fm/hardware for more<br />
information.<br />
• Enter the correct username and<br />
password and retry login.<br />
• Enter another username to<br />
create and register the account.<br />
–<br />
–<br />
–<br />
GWireless LANH<br />
Symptom Cause Countermeasure Page<br />
• The settings of the SSID and<br />
20<br />
network key (WEP) are incorrect.<br />
• The reception is poor and the<br />
–<br />
signals cannot be received.<br />
Cannot connect<br />
to network.<br />
Cannot achieve<br />
network<br />
connection using<br />
the WPS button.<br />
Played sound is<br />
interrupted or<br />
sound cannot be<br />
played.<br />
• There are multiple networks and<br />
the usable channels overlap.<br />
• The router power is off.<br />
• The encryption type on the router<br />
is set to “WEP” or “TKIP”.<br />
• There are multiple networks and<br />
the usable channels overlap.<br />
• Match the network settings with<br />
this unit settings.<br />
• Shorten the distance from the<br />
wireless LAN’s access point,<br />
remove any obstacles and<br />
otherwise improve visibility, then<br />
try reconnecting. Also install<br />
away from microwave ovens<br />
and the access points of other<br />
networks.<br />
• Set the access point’s channel<br />
settings away from the channels<br />
used for other networks.<br />
Alternatively, connect using a<br />
network cable.<br />
• Turn on the router power.<br />
• Set the encryption type to<br />
“None”, “WPA-PSK(AES)”<br />
or “WPA2-PSK(AES)” before<br />
establishing connection.<br />
• Set the access point’s channel<br />
settings away from the channels<br />
used for other networks.<br />
Alternatively, connect using a<br />
network cable.<br />
–<br />
–<br />
18, 19<br />
–<br />
63
GAirPlayH<br />
Symptom Cause Countermeasure Page<br />
The AirPlay • This unit and the computer • Connect the computer or iPhone/ 9<br />
icon is not or iPhone/iPod touch are not iPod touch to the same network<br />
displayed in connected to the same network as this unit.<br />
iTunes or on (LAN).<br />
the iPhone/iPod • iTunes or the iPhone/iPod touch • Update to the latest firmware. 14<br />
touch.<br />
do not have firmware that<br />
supports AirPlay installed.<br />
No sound. • This unit is not selected in the • Start iTunes or switch on the 43<br />
screen that is displayed when iPhone/iPod touch, click the<br />
iTunes or the iPhone/iPod touch AirPlay icon in the displayed<br />
is started.<br />
screen, and select this unit.<br />
GRemote controlH<br />
Symptom Cause Countermeasure Page<br />
Set does not<br />
work properly<br />
when remote<br />
control operated.<br />
• Batteries are worn.<br />
• You are operating outside of the<br />
specified range.<br />
• Obstacle between main unit and<br />
remote control.<br />
• The batteries are not inserted in<br />
the proper direction, as indicated<br />
by the polarity marks in the<br />
battery compartment.<br />
• The set’s remote control sensor<br />
is exposed to strong light (direct<br />
sunlight, fluorescent light, etc.).<br />
• Replace with new batteries.<br />
• Operate within the specified<br />
range.<br />
• Remove the obstacle.<br />
• Insert the batteries in the<br />
proper direction, following the<br />
polarity marks in the battery<br />
compartment.<br />
• Move the set to a place in which<br />
the remote control sensor will<br />
not be exposed to strong light.<br />
4<br />
4<br />
–<br />
4<br />
4<br />
64
Specifications<br />
nn<br />
CD player<br />
Playback frequency response:<br />
10 Hz – 20 kHz<br />
Wow & flutter: Below measurable limits (± 0.001%)<br />
Sampling frequency:<br />
44.1 kHz<br />
nn<br />
Audio AMP<br />
Rated output:<br />
2-channel driving<br />
65 W + 65 W (4 Ω, 1 kHz, T.H.D. 0.7 %)<br />
Dynamic power: 80 W + 80 W (4 Ω)<br />
Output terminals:<br />
Speaker 4 – 16 Ω<br />
Suited for headphones/stereo headphones<br />
Input sensitivity/impedance:<br />
AUX: 200 mV/22 kΩ<br />
Total harmonic distortion (1 kHz, 5 W, 8 Ω): AUX: 0.05 %<br />
S/N ratio (10 W, 8 Ω, IHF-A):<br />
AUX: 86 dB<br />
Tone control:<br />
Frequency response:<br />
SDB : 100 Hz +8 dB<br />
BASS : 100 Hz ± 10 dB<br />
TREBLE : 10 kHz ± 10 dB<br />
10 Hz – 40 kHz (+0.5 dB, –3 dB) (SOURCE DIRECT: ON)<br />
nnClock/Alarm<br />
Clock type:<br />
Alarm:<br />
nnPower supply<br />
Power supply voltage/frequency:<br />
Power consumption:<br />
Power consumption in standby mode:<br />
Power consumption in<br />
“Network Control” – “On” mode:<br />
Power line frequency synchronized method<br />
(Within ±60 seconds per month)<br />
Everyday alarm / Once alarm : One system each<br />
Sleep timer : Max. 90 minutes<br />
AC 230 V, 50/60 Hz<br />
55 W<br />
0.3 W<br />
z z Wi-Fi ® conformity indicates tested and proven interoperability by the “Wi-Fi Alliance”, a group certifying<br />
interoperability among wireless LAN devices.<br />
• For purposes of improvement, specifications and design are subject to change without notice.<br />
3 W<br />
nn<br />
Tuner<br />
Reception frequency range:<br />
FM : 87.50 MHz – 108.00 MHz<br />
Reception sensitivity:<br />
FM : 1.2 μV / 75 Ω<br />
FM channel separation:<br />
30 dB (1 kHz)<br />
FM S/N ratio: Monaural : 74 dB Stereo : 70 dB<br />
FM harmonic distortion: Monaural : 0.3 % Stereo : 0.4 %<br />
nn<br />
Wireless LAN<br />
Network type (wireless LAN standards): Conforming to IEEE 802.11b<br />
Conforming to IEEE 802.11g<br />
Transfer rate:<br />
Security:<br />
Used frequency range:<br />
No. of channels:<br />
(Conforming to Wi-Fi ® )z<br />
DS-SS: 11 / 5.5 / 1 Mbps (Automatic switching)<br />
OFDM: 54 / 48 / 36 / 24 / 18 / 12 / 9 / 6 Mbps<br />
(Automatic switching)<br />
SSID (Network name)<br />
WEP key (network key) (64/128 bits)<br />
WPA-PSK (TKIP/AES)<br />
WPA2-PSK (TKIP/AES)<br />
2.412 MHz – 2.472 MHz<br />
Conforming to IEEE 802.11b : 13ch (DS-SS)<br />
(Of which 1 channel used)<br />
Conforming to IEEE 802.11g : 13ch (OFDM)<br />
(Of which 1 channel used)<br />
65
Index<br />
vvA<br />
Accessories··························································· 2<br />
Add New Feature················································ 16<br />
AES······························································· 20, 59<br />
AirPlay····················································· 43, 45, 59<br />
Auto preset························································· 33<br />
Auto-Standby······················································· 14<br />
vvB<br />
Bit rate····················································· 56, 58, 59<br />
Browse mode······················································ 38<br />
vvC<br />
Cable<br />
Audio cable························································· 6<br />
Ethernet cable···················································· 9<br />
Optical cable······················································· 6<br />
Speaker cable····················································· 6<br />
Stereo mini-plug cable········································ 6<br />
Subwoofer cable················································· 6<br />
Characters··································· 19, 20, 45, 48, 49<br />
Connection<br />
Antenna······························································ 8<br />
Network······························································ 9<br />
Portable audio player·········································· 7<br />
Power cord······················································· 10<br />
Speaker······························································· 6<br />
Current time························································ 13<br />
vvD<br />
Display’s brightness············································ 24<br />
DLNA··································································· 59<br />
vvF<br />
Favorite list·························································· 36<br />
Finalize···························································· 3, 59<br />
Firmware Update················································ 14<br />
FLAC··································································· 59<br />
FM indoor antenna················································ 8<br />
Friendly Name····················································· 21<br />
Front panel·························································· 51<br />
vvH<br />
Headphones························································ 24<br />
vvI<br />
IEEE 802.11b······················································· 59<br />
IEEE 802.11g······················································· 59<br />
Input source························································ 23<br />
Inputting characters······································ 45, 48<br />
Internet radio······················································· 29<br />
iTunes······················································ 43, 45, 59<br />
vvL<br />
Last.fm································································ 32<br />
Last.fm Display··················································· 20<br />
vvM<br />
Menu map··························································· 11<br />
MP3··················································· 28, 57, 58, 59<br />
MPEG·································································· 59<br />
MPEG-4 AAC······················································· 57<br />
Music server······················································· 31<br />
vvN<br />
Network Control·················································· 20<br />
Network Names (SSID)······································· 59<br />
vvP<br />
Playback<br />
ANALOG IN······················································ 41<br />
CD····································································· 25<br />
DIGITAL IN······················································· 42<br />
Files·································································· 28<br />
FM···································································· 33<br />
Internet radio···················································· 29<br />
iPod··································································· 37<br />
Last.fm····························································· 32<br />
Music server····················································· 31<br />
Network audio············································ 29, 58<br />
Portable audio player········································ 41<br />
Program···························································· 27<br />
Random······················································ 26, 40<br />
Repeat························································ 26, 40<br />
USB memory device········································· 40<br />
Protection circuit················································· 59<br />
PTY······································································ 34<br />
vvR<br />
RDS····································································· 34<br />
Rear panel··························································· 52<br />
Remote control··································· 4, 53, 54, 55<br />
Battery································································ 4<br />
Remote mode····················································· 38<br />
Resetting the microprocessor····························· 49<br />
RT········································································ 35<br />
vvS<br />
Sampling frequency································ 56, 58, 59<br />
Setting<br />
General····························································· 12<br />
Network·········································· 12, 17, 18, 20<br />
Sleep timer·························································· 24<br />
Speaker impedance············································· 59<br />
Subwoofer····························································· 6<br />
vvT<br />
TKIP····································································· 59<br />
TP········································································ 34<br />
vvU<br />
Update Notification············································· 15<br />
Upgrade Notification··········································· 16<br />
vvV<br />
vTuner··························································· 58, 60<br />
vvW<br />
Web control························································· 46<br />
WEP Key······················································· 20, 60<br />
Wi-Fi···································································· 60<br />
Windows Media DRM··································· 58, 60<br />
Windows Media Player································· 30, 60<br />
WMA················································· 28, 57, 58, 60<br />
WPA······························································ 20, 60<br />
WPA2···························································· 20, 60<br />
WPA-PSK/WPA2-PSK·········································· 60<br />
WPS························································ 19, 20, 60<br />
66
Dimensions<br />
Unit : mm<br />
108.0<br />
112.0<br />
2.0<br />
36.0<br />
299.0<br />
301.0<br />
218.0 45.0<br />
280.0<br />
30.0<br />
35.0 210.0<br />
35.0<br />
4.0<br />
Weight : 4.0 kg<br />
67
V00<br />
www.denon.com<br />
D&M Holdings Inc.<br />
3520 10171 00AD