Installation instructions and User guide Instructions ... - Fisher & Paykel
Installation instructions and User guide Instructions ... - Fisher & Paykel
Installation instructions and User guide Instructions ... - Fisher & Paykel

You also want an ePaper? Increase the reach of your titles
YUMPU automatically turns print PDFs into web optimized ePapers that Google loves.
US<br />
CA<br />
10<br />
<strong>Installation</strong> <strong>instructions</strong><br />
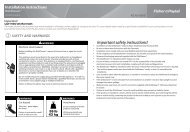
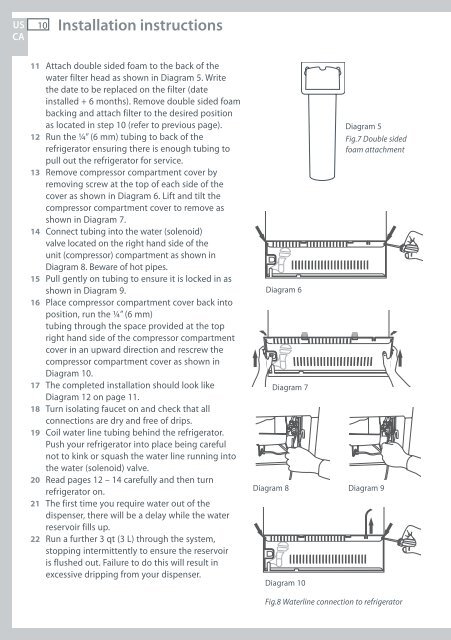
11 Attach double sided foam to the back of the<br />
water filter head as shown in Diagram 5. Write<br />
the date to be replaced on the filter (date<br />
installed + 6 months). Remove double sided foam<br />
backing <strong>and</strong> attach filter to the desired position<br />
as located in step 10 (refer to previous page).<br />
12 Run the ¼” (6 mm) tubing to back of the<br />
refrigerator ensuring there is enough tubing to<br />
pull out the refrigerator for service.<br />
13 Remove compressor compartment cover by<br />
removing screw at the top of each side of the<br />
cover as shown in Diagram 6. Lift <strong>and</strong> tilt the<br />
compressor compartment cover to remove as<br />
shown in Diagram 7.<br />
14 Connect tubing into the water (solenoid)<br />
valve located on the right h<strong>and</strong> side of the<br />
unit (compressor) compartment as shown in<br />
Diagram 8. Beware of hot pipes.<br />
15 Pull gently on tubing to ensure it is locked in as<br />
shown in Diagram 9.<br />
16 Place compressor compartment cover back into<br />
position, run the ¼” (6 mm)<br />
tubing through the space provided at the top<br />
right h<strong>and</strong> side of the compressor compartment<br />
cover in an upward direction <strong>and</strong> rescrew the<br />
compressor compartment cover as shown in<br />
Diagram 10.<br />
17 The completed installation should look like<br />
Diagram 12 on page 11.<br />
18 Turn isolating faucet on <strong>and</strong> check that all<br />
connections are dry <strong>and</strong> free of drips.<br />
19 Coil water line tubing behind the refrigerator.<br />
Push your refrigerator into place being careful<br />
not to kink or squash the water line running into<br />
the water (solenoid) valve.<br />
20 Read pages 12 – 14 carefully <strong>and</strong> then turn<br />
refrigerator on.<br />
21 The first time you require water out of the<br />
dispenser, there will be a delay while the water<br />
reservoir fills up.<br />
22 Run a further 3 qt (3 L) through the system,<br />
stopping intermittently to ensure the reservoir<br />
is flushed out. Failure to do this will result in<br />
excessive dripping from your dispenser.<br />
Diagram 6<br />
Diagram 8<br />
Diagram 7<br />
Diagram 10<br />
Diagram 5<br />
Fig.7 Double sided<br />
foam attachment<br />
Diagram 9<br />
Fig.8 Waterline connection to refrigerator