User guide - Fisher & Paykel
User guide - Fisher & Paykel
User guide - Fisher & Paykel

You also want an ePaper? Increase the reach of your titles
YUMPU automatically turns print PDFs into web optimized ePapers that Google loves.
<strong>User</strong> <strong>guide</strong><br />
DishDrawer<br />
DS603 and DD603 models<br />
NZ AU
Installation checklist<br />
Your installer MUST have completed and checked the following:<br />
The DishDrawer ® is square and level.<br />
The DishDrawer ® is fastened securely to the cabinetry.<br />
Ensure moisture protection tape has been applied and the cabinet is sealed according to the<br />
DishDrawer ® Installation Instructions.<br />
The DishDrawer ® opens and closes freely. The DishDrawer ® must be free to close completely with<br />
no resistance from cabinetry.<br />
For the integrated models, check the 8mm air gap has been achieved in the correct place.<br />
The power supply is connected and switched on.<br />
The inlet water hose is connected and turned on. There should be no leaks.<br />
The drain hose(s) are connected and there are no leaks. There must be no kinks, or obstructions<br />
in the drain hose(s).<br />
The spray arm is in the centre and can freely rotate.<br />
The rinse programme has been run.<br />
The water level will be below the stainless steel filter plate at the end of the wash programme. It<br />
is normal to find some water in the drain filter area.<br />
Important!<br />
The installer is responsible for the DishDrawer® installation. Incorrect installation is not<br />
covered by warranty.
Important safety information<br />
Save these instructions<br />
WARNING!<br />
For your safety, follow basic precautions when using your DishDrawer ® , including the<br />
following:<br />
Please read all instructions before operating the DishDrawer ® .<br />
The information in this manual must be followed to minimise the risk of fire or explosion or to<br />
prevent property damage, personal injury or loss of life.<br />
Use the DishDrawer ® only for its intended function as described in this <strong>User</strong> Guide.<br />
Use only detergents or rinse aid recommended for use in a domestic Dishwasher and keep them<br />
out of reach of children. Check that the detergent dispenser is empty after the completion of<br />
each wash programme.<br />
When loading items to be washed locate sharp items so that they are not likely to damage the<br />
lid seal and load sharp knives with the handles up to reduce the risk of cut type injuries.<br />
Do not touch the heater plate during or immediately after use.<br />
Do not operate your DishDrawer ® unless all the enclosure panels are properly in place.<br />
Do not tamper with the controls.<br />
Do not abuse, sit on, stand in or on the drawer or dish rack of the DishDrawer ® .<br />
The cup racks are designed to support cups, glasses and kitchen utensils. When the cup racks<br />
are in the DishDrawer ® do not lean on or use the cup racks to support your body weight.<br />
To reduce the risk of injury, do not allow children to play in or on the DishDrawer ® .<br />
Under certain conditions hydrogen gas may be produced in a hot water heater system that has<br />
not been used for two weeks or more. HYDROGEN GAS IS EXPLOSIVE. If the hot water system has<br />
not been used for such a period, before using the dishwasher, turn on all hot water taps and let<br />
the water flow from each for several minutes. This will release any accumulated hydrogen gas. As<br />
gas is flammable, do not smoke or use an open flame during this time.<br />
Remove the door to the washing compartment when removing an old dishwasher from service<br />
or discarding it.<br />
Dishwasher detergents are alkaline. They can be dangerous if swallowed. Avoid contact with<br />
skin and eyes, keep children and infirm person(s) away from the dishwasher when the drawer is<br />
opened.
Installation<br />
This DishDrawer ® must be installed and located in accordance with the Installation Instructions<br />
before it is used. If you did not receive Installation Instruction sheets with your DishDrawer ® , you<br />
can order them by calling your Authorised Service Agent.<br />
Installation and service must be performed by a qualified technician.<br />
If the power supply cord is damaged, it must be replaced by a dealer or Authorised Service<br />
Centre or a similar qualified trades person in order to avoid a hazard.<br />
Ensure the DishDrawer ® is secured to adjacent cabinetry using the brackets provided. Failure to<br />
do so may result in an unstable product, which may cause damage or injury.<br />
Do not operate this appliance if it is damaged, malfunctioning, partially disassembled or has<br />
missing or broken parts, including a damaged power supply cord or plug.<br />
Do not store or use petrol, or other flammable vapours and liquids in the vicinity of the<br />
DishDrawer ® .<br />
Connect to a properly rated, protected and sized power supply circuit to avoid electrical<br />
overload.<br />
Make sure that the power supply cord is located so that it will not be stepped on, tripped over or<br />
otherwise subject to damage or stress.<br />
Do not install or store the DishDrawer ® where it will be exposed to temperatures below freezing<br />
or exposed to weather.<br />
Do not use an extension cord or a portable electrical outlet device (e.g. multi socket outlet box)<br />
to connect the DishDrawer ® to the power supply.<br />
Maintenance<br />
Do not repair or replace any part of the appliance or attempt any servicing unless specifically<br />
recommended in this <strong>User</strong> Guide. We recommend that you call an Authorised Service Agent.<br />
Keep the floor around your appliance clean and dry to reduce the possibility of slipping.<br />
Keep the area around/underneath your appliance free from the accumulation of combustible<br />
materials, such as lint, paper, rags and chemicals.<br />
When cleaning the underside of the filter plate, care must be taken on the sharp outer edge to<br />
avoid the risk of cut type injuries.
Operational<br />
Important!<br />
Under no circumstances should you open the drawer whilst the DishDrawer ® is in operation.<br />
Always press the button to pause and wait until you hear the three additional beeps before<br />
opening the drawer.<br />
The DishDrawer ® must be used with the motor assembly, filter plate, drain filter and spray arm in<br />
place.<br />
When disconnecting the appliance pull the plug rather than the power supply cord or junction<br />
of cord to avoid damage.<br />
Take care when loading the DishDrawer ® not to load dishware items so it prevents the lid from<br />
properly sealing with the drawer. Items should be placed so they do not protrude above and/or<br />
forced into the drawer, otherwise a service call may result.<br />
Household appliances are not intended to be played with by children. Children or persons with a<br />
disability which limits their ability to use the appliance, should have a responsible person instruct<br />
them in its use. The instructor should be satisfied that they can then use the appliance without<br />
danger to themselves or their surroundings.<br />
Close supervision is necessary if this appliance is used by or near children. Do not allow children<br />
to play inside, on or with this appliance or any discarded appliance.<br />
If a Dishwasher cleaner is used, we would strongly recommend a wash programme with<br />
detergent should be run immediately afterward, to prevent any damage to the DishDrawer ® .<br />
The DishDrawer ® is designed for washing normal household utensils. Items that are contaminated<br />
by petrol, paint, steel or iron debris, corrosive, acidic or alkaline chemicals are not to be washed<br />
in the DishDrawer ® .<br />
If the DishDrawer ® is not being used for long periods of time, turn the electricity and water<br />
supply to the DishDrawer ® off.<br />
Do not pour detergent or rinse aid into the salt reservoir. The detergent or rinse aid will destroy<br />
the water softener.<br />
Important!<br />
This <strong>User</strong> Guide should be retained with the appliance for future reference. Should the<br />
appliance be sold or transferred to another owner, always ensure that the <strong>User</strong> Guide is left<br />
with the appliance in order that the new owner can become familiar with the appliance and<br />
the relevant warnings.
DishDrawer® user <strong>guide</strong><br />
DishDrawer ® Prefinished with LCD controls<br />
DishDrawer ® Prefinished with no LCD controls<br />
DishDrawer ® Integrated with badge controls<br />
Contents<br />
Installation checklist<br />
Important safety information<br />
Controls (Integrated Badge & Prefinished<br />
models with no LCD) 2<br />
LCD Controls 4<br />
Operation 6<br />
Wash programme chart 7<br />
Caring for your dinnerware 8<br />
Dishwasher standards test 9<br />
Accessories 10<br />
Loading 12<br />
Detergent dispenser 14<br />
Rinse aid dispenser 16<br />
Option adjustment 17<br />
<strong>User</strong> maintenance instructions 20<br />
Trouble shooting 23<br />
Fault codes 25<br />
Warranty 27<br />
Customer care 28<br />
This <strong>User</strong> Guide explains how to operate and<br />
maintain your new appliance properly and<br />
safely. Please read the whole <strong>guide</strong> carefully<br />
before starting to use your appliance.
2<br />
Controls (Integrated models and Prefinished models with no LCD)<br />
If you have a double DishDrawer®, each drawer has<br />
its own controls and can run independently of the<br />
other.<br />
Power button<br />
The button turns the DishDrawer® on or off.<br />
Opening the drawer will automatically turn the<br />
DishDrawer® on for 30 seconds. To end a wash<br />
programme in mid cycle, press the button.<br />
Any water in the DishDrawer® will be pumped out.<br />
Start/Pause button<br />
The button starts a wash programme. Press the button to pause or restart the<br />
DishDrawer® during a wash programme. When paused, wait for three beeps before opening the<br />
drawer. Forcing the drawer open while in mid cycle may cause damage or injury.<br />
Delay Start<br />
The button also sets the Delay Start feature which can delay the start of a wash programme<br />
from 1 to 12 hours.<br />
To activate Delay Start<br />
1 Press and hold the button until the light above the button turns orange (or purple,<br />
depending on your model).<br />
2 Continue holding the button down until the desired delay time has been reached. The<br />
DishDrawer® will emit audible ‘beeps’ as you hold the<br />
another hour delay.<br />
button down, each beep indicates<br />
3 The DishDrawer® will start once the delay time has elapsed and the drawer is closed.<br />
To cancel Delay Start<br />
Press the button.<br />
Lock button / (optional)<br />
The / button activates/deactivates the Keylock or the Childlock functions.<br />
Integrated badge<br />
Prefinished models with no LCD<br />
Keylock<br />
The Keylock feature disables all the buttons on the DishDrawer®.<br />
To activate, press and hold the / button until you hear one beep (3 seconds). The light<br />
above the / button is lit when Keylock is activated.<br />
To cancel the Keylock feature, press and hold the / button until the light above the /<br />
button disappears.
Childlock<br />
The Childlock feature locks the drawer and disables all the buttons on the integrated badge.<br />
To activate, press and hold the / button until you hear two beeps (5 seconds). The light<br />
above the / button is lit when Childlock is activated.<br />
To cancel the Childlock feature, press and hold the / button until the light above the<br />
/ button disappears.<br />
Wash programme selector<br />
Press the button to select a wash programme. The DishDrawer® will remember the last<br />
programme used.<br />
Eco button (optional)<br />
Press the button if you would like the wash programme to use less energy and time. The<br />
red ECO light will indicate the feature is on. If your dishes are heavily soiled or you require<br />
enhanced dry performance, we do not recommend ECO programmes.<br />
Power failure<br />
If the DishDrawer® is operating and a power failure occurs, it will stop. The DishDrawer® may be<br />
unable to be opened during this time. When the power supply is resumed, the DishDrawer® will<br />
restart in the same part of the wash programme.<br />
3
4<br />
LCD screen controls (Prefinished models with LCD)<br />
If you have a double DishDrawer®, each drawer has its own control panel and can run<br />
independently of the other.<br />
Time remaining<br />
Wash programme<br />
progress symbol<br />
(Delay Start)<br />
Delay Start symbol<br />
Power button<br />
Power Button<br />
The button turns the DishDrawer® on or off. Opening the drawer will automatically turn the<br />
DishDrawer® on for 30 seconds. To end a wash programme in mid cycle, press the button.<br />
Any water in the DishDrawer® will be pumped out.<br />
Start/Pause Button<br />
The button starts a wash programme. Press the button to pause or restart the<br />
DishDrawer® during a wash programme. When paused, wait for three beeps before opening the<br />
drawer. Forcing the drawer open while in mid cycle may cause damage or injury.<br />
Delay Start<br />
The button also sets the Delay Start feature which can delay the start of a wash programme<br />
from 1 to 12 hours.<br />
To activate Delay Start<br />
1 Press and hold the button until the delay symbol appears on the electronic display.<br />
2 Continue holding the button down until the desired delay time has been reached.<br />
3 The DishDrawer® will start once the delay time has elapsed and the drawer is closed.<br />
To cancel Delay Start<br />
Press the button.<br />
Electronic display<br />
(LCD screen)<br />
Start/Pause button<br />
Lock Button (optional)<br />
The button activates/deactivates the Keylock or the Childlock functions.<br />
Lock button<br />
Keylock<br />
The Keylock feature disables all the buttons on the control panel.<br />
To activate, press and hold the button until you hear one beep (3 seconds). The symbol<br />
appears in the electronic display when the Keylock feature is activated.
Childlock<br />
The Childlock feature locks the drawer and disables all the buttons on the control panel.<br />
To activate, press and hold the button until you hear two beeps (5 seconds). The symbol<br />
appears in the electronic display when the Childlock feature is activated.<br />
To cancel the Childlock feature, press and hold the button until you hear one beep and the<br />
symbol disappears from the electronic display.<br />
Wash programme selector<br />
Press the button to select a wash programme. The DishDrawer® will remember the last<br />
programme used.<br />
Eco button (optional)<br />
Press the button if you would like the wash programme to use less energy and time. The<br />
red ECO light will indicate the feature is on. If your dishes are heavily soiled or you require<br />
enhanced dry performance, we do not recommend ECO programmes.<br />
Wash programme progress symbols<br />
As the wash programme advances through the cycle, the following symbols will appear in<br />
the electronic display to indicate the progression. When a wash programme has started, the<br />
electronic display also will count down the time remaining in one minute increments.<br />
Dirty Pre Wash Main Wash Post Rinse Drying Clean<br />
Power failure<br />
If the DishDrawer® is operating and a power failure occurs, it will stop. The DishDrawer® may be<br />
unable to be opened during this time. When the power supply is resumed, the DishDrawer® will<br />
restart in the same part of the wash programme.<br />
5
6<br />
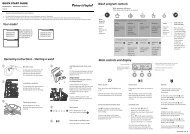
Operation<br />
1 Load Dishes<br />
Remove all food scraps and load the dishes.<br />
2 Add Detergent<br />
3 Check Rinse Aid<br />
4 Press the Button<br />
5 Select a Wash Programme<br />
The length of the wash programme will<br />
appear on the electronic display (LCD) on<br />
Prefinished models with LCD controls (shown<br />
below).<br />
6 Select (optional)<br />
7 Check<br />
Ensure there is nothing obstructing the spray<br />
arm. The drain filter must be level with the<br />
filter plate.<br />
4<br />
8<br />
5<br />
1<br />
2,3<br />
8 Start<br />
Close the drawer and press the button.<br />
9 Finish<br />
The DishDrawer® will beep six times to<br />
indicate the end of the wash programme. At<br />
the end of the wash programme the drying<br />
fan will continue to run for a set time or<br />
until the drawer is opened. The fan assists<br />
with drying and uses negligible amounts<br />
of energy. It is normal for some water to<br />
remain in the drain filter area after the wash<br />
programme is complete.<br />
6<br />
7
Wash programme chart<br />
Standard Wash Programme - when to use<br />
Heavy<br />
Heavily soiled pots,<br />
pans and dishes.<br />
Normal<br />
Dishes with normal<br />
soils for optimum<br />
wash and dry<br />
performance.<br />
Fast<br />
Lightly soiled dishes.<br />
Delicate<br />
Lightly soiled and<br />
heat sensitive<br />
crockery.<br />
Rinse<br />
Prevents odours<br />
and soils drying on<br />
dishes.<br />
pre wash 45 o C<br />
pre wash pre wash pre wash<br />
main wash 70 o C main wash 55 o C main wash 55 o C main wash 50 o C<br />
post rinse post rinse post rinse post rinse<br />
final rinse 65 o C final rinse 60 o C final rinse 50 o C final rinse 60 o C<br />
drying phase drying phase drying phase<br />
Eco Wash Programme - when to use<br />
Heavy<br />
Heavily soiled<br />
everyday dishes.<br />
Normal<br />
Normal soiled<br />
dishes for optimum<br />
energy use.<br />
Fast<br />
Lightly soiled, non<br />
greasy dishes.<br />
Delicate<br />
Lightly soiled, non<br />
greasy and heat<br />
sensitive crockery.<br />
pre wash 35 o C<br />
pre wash pre wash<br />
main wash 60 o C main wash 40 o C main wash 45 o C main wash 45 o C<br />
post rinse post rinse post rinse post rinse<br />
final rinse 55 o C final rinse 40 o C final rinse 45 o C final rinse 50 o C<br />
drying phase drying phase drying phase<br />
note<br />
Wash times can vary depending on the incoming water temperature, ambient conditions, type<br />
of dish load and whether the drawer has been opened during the wash. Wash times are only<br />
APPROXIMATE on the Electronic Display (LCD) and based on 20°C incoming water.<br />
7
8<br />
Caring for your dinnerware<br />
The combination of high temperatures and dishwasher detergent may cause damage to some<br />
items if they are washed in the DishDrawer®. Remember, if in any doubt about any aspect<br />
concerning items washed in the DishDrawer®, follow the instructions from the manufacturer of<br />
the items, or wash the item by hand.<br />
Cutlery & Silverware<br />
All cutlery and silverware should be rinsed<br />
immediately after use to prevent tarnishing<br />
caused by some foods. The Rinse wash<br />
programme is useful for this. Silver items<br />
should not come into contact with stainless<br />
steel, for example other cutlery. Mixing these<br />
items can cause staining. Remove silver<br />
cutlery from the DishDrawer® and hand dry<br />
it immediately after the programme has<br />
finished.<br />
Aluminium<br />
Aluminium can be dulled by dishwasher<br />
detergent. The degree of change depends<br />
on the quality of the product.<br />
Other Metals<br />
Iron and cast iron objects can rust and stain<br />
other items. Copper, pewter and brass tend<br />
to stain.<br />
Woodware<br />
Wooden items are generally sensitive to heat<br />
and water. Regular use in the dishwasher<br />
may cause deterioration over time. If in<br />
doubt, wash by hand.<br />
Glassware<br />
Most everyday glassware is dishwasher safe.<br />
Crystal, very fine and antique glassware may<br />
etch i.e. become opaque. You may prefer to<br />
wash these items by hand.<br />
Plastic<br />
Some plastic may change shape or colour<br />
with hot water. Check manufacturer’s<br />
instructions about washing plastic items.<br />
Washable plastic items should be weighed<br />
down so they do not flip over and fill with<br />
water or fall through the basket during the<br />
wash.<br />
Decorated Items<br />
Most modern china patterns are Dishwasher<br />
safe. Antique items, those with a pattern<br />
painted over the glaze, gold rims or hand<br />
painted china may be more sensitive to<br />
machine washing. If in doubt wash these<br />
items by hand.<br />
Glued Items<br />
Certain adhesives are softened or dissolved<br />
in machine washing. If in doubt, wash glued<br />
items by hand.<br />
Holiday time<br />
If the DishDrawer® is not going to be used for some time, we recommend you ensure the<br />
baskets are empty. Leave the inside of the DishDrawer® clean. Leave the drawers ajar to allow air<br />
to circulate. Turn off both the power and water supply to the DishDrawer®.
Dishwasher standards test<br />
The DishDrawer®s are tested to AS2007 standards for both wash and dry performance.<br />
The following are loading pattern diagrams, detergent quantities and rinse aid quantities used<br />
for the DishDrawer®.<br />
Wash Programme Normal Eco<br />
Detergent Quantities 15g (main wash)<br />
Rinse Aid Setting 4<br />
Maximum Place Setting DD603 series: 12<br />
DS603 series: 6<br />
Recommended Loading Pattern<br />
9
10<br />
Accessories<br />
The inserts and racks can be added or removed to suit your individual needs. If you have the<br />
double DishDrawer® model, some of the accessories are interchangeable between the two<br />
drawers. For example you can combine the two Mega Racks into one drawer and wash all cups<br />
and glasses, leaving the other drawer for plates and larger items.<br />
a. Basket<br />
The basket holds some of the accessories in<br />
place and keeps dishes away from the spray<br />
arm.<br />
b. Drain Filter Access Panel<br />
The drain filter access panel is designed to<br />
snap onto the basket over the drain filter.<br />
This prevents objects from touching the<br />
base of the DishDrawer® and stopping the<br />
rotation of the spray arm, while still giving<br />
access to the drain filter.<br />
c. Mega Rack<br />
The Mega rack is designed to hold glasses,<br />
cups and small plates.<br />
d. Plate Insert<br />
The plate insert supports plates and bowls.<br />
How to install the Mega Rack<br />
To install the Mega rack, place the<br />
outer legs of the rack on top of the<br />
basket, and clip the Mega rack to<br />
the side of the basket. When the<br />
Mega rack is correctly installed it<br />
should not feel loose in the basket.<br />
c<br />
a<br />
b<br />
d
Cup Racks<br />
Cups, glasses and kitchen utensils can be placed on the<br />
left and right hand side of the cup racks.<br />
For best performance ensure there are no large items<br />
below, blocking the wash water from reaching the cup<br />
racks.<br />
Wine glasses can be supported on the cup racks if used in<br />
conjunction with the Mega Rack.<br />
There are stops on the cup rack to prevent cups from<br />
touching the DishDrawer® wall. This will maximise the dry<br />
and wash performance.<br />
Cutlery Basket<br />
Cutlery, small kitchen utensils and some plastic lids are<br />
best placed into the cutlery basket.<br />
For best wash performance, we recommend loading<br />
cutlery with handles pointing down and sharp utensils<br />
with their handles facing up, to reduce the risk of injury.<br />
Mix spoons, knives and forks within each section, to<br />
stop cutlery nesting together and to ensure the water<br />
circulates freely.<br />
Keep stainless steel from touching silver cutlery to avoid<br />
staining.<br />
Use the oval slots (spoon rack) for spoons and teaspoons.<br />
Small items, like plastic lids, can be placed under the<br />
spoon rack, this will prevent them from being displaced<br />
by wash water and falling to the bottom, where they may<br />
stop the spray arm rotation.<br />
11
12<br />
Loading<br />
Wash water for the DishDrawer® comes from the spray arm which is situated inside the base of<br />
the drawer. The spray arm rotates, providing wash water to all areas of the wash compartment<br />
so care needs to be taken when loading dishes to ensure there is enough space and room for<br />
the water to reach all areas, particularly the cup racks. If there are any items blocking the spray<br />
arm path or the wash water, then the performance will be ineffective.<br />
How to load your DishDrawer®<br />
Standard load Heavy load<br />
Note<br />
The basket and its inserts are not designed to be lifted out of the DishDrawer® while loaded<br />
with dishes.
How NOT to load your DishDrawer®<br />
figure 1<br />
Overcrowded and wash water will not<br />
reach some of the dinnerware.<br />
Cups, glasses and bowls must have their<br />
openings facing downwards.<br />
figure 2<br />
figure 3 figures 4 & 5<br />
Ensure dishware items are not forced into<br />
or protrude out of the drawer as it may<br />
prevent the lid from properly sealing which<br />
could result in a service call.<br />
Locate sharp items safely to prevent<br />
injuring the user and damaging the lid<br />
assembly.<br />
Check the bottom of the cutlery basket to<br />
ensure sharp or pointed items have not<br />
come through as they may stop spray arm<br />
rotation.<br />
The plates are nesting together and wash<br />
water may not get through.<br />
Ensure cutlery are not nesting or stuck<br />
together. They need to be evenly spread out.<br />
Ensure cutlery has not fallen through the<br />
basket and stopped the spray arm from<br />
rotating.<br />
The large bowl is blocking wash water<br />
reaching the cup racks.<br />
Large utensils should be on cup racks so they<br />
do not become dislodged and stop the spray<br />
arm from rotating.<br />
Sharp or pointed items must be placed<br />
horizontally or with sharp edges/points<br />
facing downward to avoid risk of injury.<br />
13
14<br />
Detergent dispenser<br />
Important!<br />
Only use powdered detergent recommended<br />
for domestic automatic dishwashers in the<br />
detergent dispenser.<br />
Never sprinkle or pour detergent directly onto<br />
any item in the DishDrawer®.<br />
Tablets and liquid detergents are not suitable to<br />
be used in the DishDrawer®.<br />
Hand washing liquids, soap, laundry detergents<br />
or disinfectants will damage the DishDrawer®.<br />
Filling the detergent dispenser<br />
1 Press the latch down and the door will open.<br />
2 Pour in detergent. No detergent is needed for the<br />
Rinse programme.<br />
3 After filling the compartment(s), close the<br />
dispenser door until it clicks shut. The detergent<br />
will automatically be released into the DishDrawer®<br />
during the wash programme.<br />
a,b<br />
e<br />
closed detergent dispenser<br />
a<br />
open detergent dispenser<br />
a Pre Wash Compartment,<br />
10g capacity<br />
b Main Wash Compartment,<br />
30g capacity<br />
c Detergent Dispenser Latch<br />
d Rinse Aid Indicator Light<br />
e Rinse Aid Plug<br />
c<br />
d<br />
b
Detergent quantities<br />
The detergent quantities recommended below are for individual drawers.<br />
Wash programmes Detergent quantities<br />
prewash (g)* main wash (g)*<br />
Heavy 5 15<br />
Normal 15<br />
Delicate<br />
5<br />
Fast<br />
5<br />
* 5g equates to approxiately 1 teaspoon, 15g equates to approximately 1 tablespoon.<br />
WARNING!<br />
Dishwasher detergents are strongly alkaline and can be dangerous if swallowed.<br />
Avoid contact with skin and eyes.<br />
Keep children and infirm persons away from the DishDrawer® when the drawer is open.<br />
Check that the detergent receptacle is empty after completion of the wash cycle.<br />
Failure to do so could result in poisoning<br />
15
16<br />
Rinse aid dispenser<br />
We highly recommend the regular use of liquid rinse aid to give the best drying results. Rinse<br />
aid gives a streak free, sparkling clean look to glass and chinaware, in addition it prevents metal<br />
from tarnishing. The rinse aid dispenser is on the inside of the drawer, located underneath the<br />
detergent dispenser. The dispenser holds approximately 50ml of rinse aid.<br />
Filling the rinse aid dispenser<br />
1 Turn the plug anti-clockwise and remove.<br />
2 Pour the rinse aid into the circular opening.<br />
3 Take care not to spill rinse aid into the<br />
DishDrawer®. Any spillages must be wiped<br />
up to prevent excess foaming. Failure to wipe<br />
rinse aid spillages may result in a service call<br />
which will not be covered by warranty.<br />
4 Fit the plug back into the original position.<br />
How much rinse aid to use<br />
The regulator may need adjusting to suit your water conditions. The lowest setting is ‘1’ and<br />
the highest is ‘5’. Refer to Option Adjustments section to adjust the rinse aid setting. If there<br />
is excessive foam at the end of the wash, reduce the setting. If dishes are wet or streaky after<br />
drying, increase the setting.<br />
Rinse aid indicator light<br />
If the rinse aid indicator light is red, refill the dispenser. If the rinse aid indicator light is dimly lit<br />
or not lit at all, there is enough rinse aid for the wash.<br />
Note<br />
Lighter coloured rinse aids will not dim the indicator light as effectively as darker coloured rinse<br />
aids.
Option adjustments<br />
The following options can be adjusted to suit your preferences.<br />
Rinse Aid setting<br />
Reduce the Rinse Aid setting if there is excess foam after a wash programme.<br />
Increase the Rinse Aid setting if dishes are wet or streaky after a wash programme.<br />
Auto Power setting<br />
By default, DishDrawer® will automatically turn on whenever the drawer is opened. Washing will<br />
not start until the drawer is closed and the button has been pressed. If you do not want the<br />
DishDrawer® to turn on automatically, this feature can be turned off.<br />
End of Wash Programme Beeps<br />
By default, DishDrawer® will beep six times at the end of a wash programme. This feature can be<br />
turned off.<br />
Closed Drawer option<br />
The Closed Drawer option will lock the DishDrawer® when the drawer is closed. When you wish<br />
to open the drawer, press the button. When the drawer is fully closed again, the lid will<br />
automatically come down after 30 seconds and lock.<br />
If the Lock feature is used in conjunction with the Closed Drawer Option, pressing the button<br />
will not unlock the drawer. The Lock feature must be turned off to enable DishDrawer® to be<br />
opened.<br />
Clean Dish Indicator option (Prefinished models with LCD only)<br />
By default, DishDrawer® is programmed with the Clean Dish Indicator option off. When the<br />
Clean Dish Indicator option is on, the symbol will remain in the electronic display after a<br />
wash programme has finished to indicate the dishes are clean. When you have unloaded all the<br />
dishes, press the button to return to normal operating mode.<br />
This option might be useful when dishes have been left in DishDrawer® and you cannot<br />
remember if they have been washed or in situations where household members regularly<br />
remove a only few clean dishes without emptying the drawer.<br />
We do not recommend the Clean Dish Indicator option be used in conjunction with the Closed<br />
Drawer option.<br />
Dry Enhancement Mode option<br />
When the Dry Enhancement Mode is on, the lid will be held down for four hours at the end<br />
of a wash cycle. The fan will continue to run while the lid is held down to enhance drying<br />
performance. Should you wish to open or stop DishDrawer® during the four hours, press the<br />
or button to return to normal operating mode.<br />
17
How to make option adjustments (Integrated models with badge controls and Prefinished models with no LCD)<br />
18<br />
Dry<br />
Enhancement<br />
Mode option1 Closed<br />
Drawer<br />
option Clean Dish<br />
End of Wash<br />
Programme<br />
Beeps option<br />
Auto Power<br />
option<br />
Follow the<br />
steps below Rinse Aid setting<br />
First Enter Option Adjstment Mode<br />
1 Press the button to turn power on.<br />
2 Press and hold the and / buttons for 5 seconds until one long beep sounds.<br />
Prefinished models with no LCD<br />
red / off purple / on blue / on red / on OPTION ONLY purple / on<br />
Integrated models<br />
AVAILABLE ON<br />
red / off orange / on green / on red / on PREFINISHED orange / on<br />
MODELS WITH<br />
LCD CONTROLS<br />
Press the<br />
button to<br />
scroll through<br />
options<br />
Press the / button to turn the selected option on or off.<br />
The current setting is shown on the<br />
wash programme selector in red<br />
lights. If four red lights are lit, the<br />
option selected setting is set to four.<br />
Press the / button to increase<br />
Make an<br />
adjustment<br />
the setting.<br />
Save Press the button to save the change.<br />
Example<br />
On<br />
On<br />
On<br />
Rinse Aid setting set to four On<br />
Off<br />
OPTION ONLY<br />
AVAILABLE ON<br />
PREFINISHED<br />
MODELS WITH<br />
LCD CONTROLS<br />
Off<br />
Off<br />
Off<br />
1 The option sequence will start again from the Rinse Aid setting.
How to make option adjustments (Prefinished models with LCD controls)<br />
Dry<br />
Enhancement<br />
Mode option 1<br />
Closed<br />
Drawer<br />
option Clean Dish<br />
End of Wash<br />
Programme<br />
Beeps option<br />
Auto Power<br />
option<br />
Follow the steps<br />
below Rinse Aid setting<br />
First Enter Option Adjstment Mode<br />
1 Press the button to turn power on.<br />
2 Press and hold the and buttons for 5 seconds until one long beep sounds.<br />
Press the<br />
button to<br />
scroll through<br />
options<br />
Press the button to turn the selected option on or off.<br />
The current setting is shown on the<br />
wash programme selector in red<br />
lights. If four red lights are lit, the<br />
option selected setting is set to four.<br />
Press the button to increase the<br />
setting.<br />
Make an<br />
adjustment<br />
Save Press the button to save the change.<br />
Example<br />
On<br />
On<br />
On<br />
On<br />
On<br />
Rinse Aid setting set to four<br />
Off<br />
Off<br />
Off<br />
Off<br />
Off<br />
1 The option sequence will start again from the Rinse Aid setting.<br />
19
20<br />
<strong>User</strong> maintenance instructions<br />
Cleaning the outer surfaces<br />
From time to time the wash programme indicator panel and its surrounds need to be cleaned<br />
to remove food particles, hard water scale and any spillages. We recommend wiping these areas<br />
with a clean damp cloth.<br />
Important!<br />
We do not recommend the use of the following cleaning aids on your DishDrawer® as they<br />
may damage the surfaces:<br />
Plastic or stainless steel scouring pads<br />
Abrasive, solvent, household cleaners<br />
Acid or alkaline cleaners<br />
Hand washing liquids or soap<br />
Laundry detergents or disinfectants<br />
For prefinished models<br />
Depending on the type of exterior finish on your DishDrawer®, we recommend the following:<br />
Stainless Steel<br />
This surface requires only a mild dishwashing detergent and warm water. Take care not to wet<br />
the control panel.<br />
Dry with a clean lint-free cloth<br />
DO NOT use proprietary “Stainless Steel” type cleaners or polishes as these may damage the<br />
protective coating.<br />
Important!<br />
Never use abrasive cleaners or harsh solvents as these will damage the stainless steel surface.<br />
White or Black<br />
To clean the doors wipe the doors with a clean damp cloth.<br />
Dry with a clean lint-free cloth.<br />
For integrated models<br />
Clean the integrated control badge with a damp cloth, then dry with a clean, lint-free cloth.
Cleaning the Drain Filter, Spray Arm and Filter Plate<br />
Internal Parts of the DishDrawer®<br />
a Spray Arm<br />
b Filter Plate<br />
c Drain Filter<br />
a<br />
b<br />
c<br />
We recommend that the drain filter is cleaned<br />
whenever there is evidence of food particles. The<br />
spray arm and filter plate may need cleaning about<br />
once a month in normal use or more often should<br />
the need arise.<br />
If a dishwasher cleaner/descaler is used, you must<br />
run a wash programme with detergent immediately<br />
afterward to prevent any damage to your<br />
DishDrawer®.<br />
Important !<br />
The DishDrawer® must be used with the filter<br />
plate, drain filter and spray arm correctly in place.<br />
Cleaning the Drain Filter<br />
1 Lift up the drain filter access panel on the basket (if<br />
fitted).<br />
2 Lift and remove the drain filter.<br />
3 Empty, rinse under clean running water and replace<br />
back into the allocated space.<br />
4 Ensure the drain filter is flush with the filter plate.<br />
21
22<br />
Cleaning the Spray Arm & Filter plate<br />
Ensure the DishDrawer® is cool before you start<br />
cleaning and follow the instructions for removing<br />
the drain filter and spray arm.<br />
1 Remove the basket carefully. Lift from the back<br />
end first to prevent knocking the detergent and<br />
rinse aid dispenser.<br />
2 Lift the spray arm and shake any foreign material<br />
out.<br />
Rinse the spray arm under clean running water and<br />
wipe the with a damp cloth.<br />
3 In the centre of the filter plate there are two rings.<br />
Hold the centre ring still and turn the outer ring<br />
anti-clockwise, about a 1/8 turn. This will release<br />
the filter plate.<br />
4 Lift the filter plate.<br />
When cleaning the underside of the filter plate,<br />
take care handling the sharp outer edge to avoid<br />
the risk of cuts.<br />
Remove any foreign material, wash in hot soapy<br />
water and rinse thoroughly in clean water. The<br />
heater plate can be wiped with a damp cloth.<br />
5 Replace the filter plate so it lies flat in the base of<br />
the drawer ensuring the filter plate is fully locked<br />
into position with the centre ring.<br />
6 To lock the filter plate into position, ensure the<br />
lines align with each other (refer to the diagram for<br />
the correct position). The filter plate must not be<br />
able to move about freely.<br />
7 Replace the spray arm back onto the impeller.<br />
8 Replace the basket, lowering the front edge of the<br />
basket into position first.<br />
Correct Locking Position of<br />
Filter Plate with Motor Assembly<br />
(under Spray Arm)<br />
a Outer Ring<br />
b Impeller<br />
c Correct Alignment marks<br />
d Centre Ring<br />
Note<br />
Where there is broken crockery or glass in the drawer, it must be carefully removed to prevent<br />
damage to the DishDrawer®.<br />
a<br />
b<br />
c<br />
d
Trouble shooting<br />
Problem Possible Cause What to do<br />
Continuous<br />
beeping<br />
Intermittent<br />
beeping<br />
DishDrawer® will<br />
not start<br />
Excess water in<br />
the DishDrawer®<br />
Water marks on<br />
the dishes<br />
Dishes did not<br />
dry<br />
No detergent<br />
dispensed<br />
Excessive motor<br />
noise<br />
A fault has occured. Refer to the Fault codes section.<br />
DishDrawer® is in pause<br />
mode.<br />
Power supply is not<br />
connected.<br />
The drawer is not properly<br />
closed.<br />
Lock feature is on.<br />
Close the DishDrawer® and press the<br />
button.<br />
Connect the power supply.<br />
Ensure the drawer is firmly closed.<br />
Turn the Lock off. Hold down the<br />
/ button until the symbol<br />
disappears from the LCD screen or<br />
the light above the / button<br />
disappears.<br />
button not pressed. Press the button.<br />
Drain hose(s) bent or<br />
kinked.<br />
Straighten the drain hose(s).<br />
Blocked filters and/or drain Clean the filter plate/drain filter. Unblock<br />
hose(s).<br />
the drain hose(s). Refer to the user<br />
maintenance section.<br />
Insufficient rinse aid. Ensure there is enough rinse aid in the<br />
dispenser.<br />
Rinse aid setting too low. Increase the rinse aid setting.<br />
DishDrawer® overloaded/<br />
incorrectly loaded.<br />
Refer to the section on loading.<br />
Incorrect loading. Ensure the dishes are not nesting<br />
together.<br />
Rinse aid depleted. Refill the rinse aid dispenser.<br />
Rinse aid setting too low. Increase the rinse aid setting.<br />
Eco wash programme used. Choose a standard wash programme.<br />
Detergent was wet when Clean the dispenser and ensure the<br />
loaded.<br />
dispenser is dry when adding detergent.<br />
The filter plate and/or spray Refer to the user maintenance section<br />
arm is incorrectly placed. for details on correct placement.<br />
No water in the motor area. This usually occurs on the first use or<br />
when the DishDrawer® has not been<br />
used for long periods of time. Run<br />
the DishDrawer® through a wash<br />
programme.<br />
23
24<br />
Problem Possible Cause What to do<br />
Unclean dishes<br />
Wash programme<br />
unsuitable for the load.<br />
Refer to the wash programmes section<br />
for a suitable wash programme, or the<br />
soils were too heavily baked on and<br />
dishes may need soaking.<br />
Spray arm unable to rotate. Ensure no items are obstructing the<br />
spray arm path.<br />
DishDrawer® overloaded/<br />
incorrectly loaded.<br />
Refer to the section on loading.<br />
Filter plate/drain filter is<br />
incorrectly inserted.<br />
Refer to the user maintenance section.<br />
Detergent put in the wrong Detergent must be placed in the large<br />
compartment.<br />
compartment.<br />
Excessive food not removed Scrape all food scaps off dinnerware<br />
from dinnerware prior to<br />
cleaning.<br />
prior to loading.<br />
Unsuitable detergent. Use recommended brands of dishwasher<br />
detergent.<br />
Not enough detergent. Refer to the detergent section or the<br />
detergent manufacturer’s instructions.<br />
Spray arm holes are blocked. Clean the spray arm.<br />
Filter plate/drain filter is<br />
blocked.<br />
Clean the filter plate and drain filter.<br />
Mega rack incorrectly Refer to the accessories section for<br />
installed.<br />
correct installation.<br />
DishDrawer® Some foods, like tomato Pre-rinse dishes before placing in the<br />
interior is stained based products, may DishDrawer®. Alternatively, using the<br />
stain the inside of the Rinse programme after adding the<br />
DishDrawer®.<br />
dishes may minimise staining.<br />
Foaming Incorrect amount of Refer to the detergent section or<br />
detergent.<br />
consult the detergent manufacturer’s<br />
instructions.<br />
Too much egg in the wash<br />
load.<br />
Increase the amount of detergent.<br />
Rinse aid setting too high. Decrease the rinse aid setting.<br />
Water leaking Drain hose disconnected Reconnect the drain hose to the waste<br />
from waste pipe.<br />
pipe.<br />
Supply inlet hose not Ensure the inlet hose is connected<br />
properly connected. securely.<br />
Other leaks. Turn water and power supplies to the<br />
DishDrawer® off. Call your dealer or<br />
Authorised Service Agent.<br />
DishDrawer® will<br />
not open<br />
Childlock function is on or<br />
the Closed Drawer option is<br />
on, or both.<br />
Turn Lock off. Hold down the /<br />
button until the symbol disappears<br />
from the LCD screen or the light above<br />
the / button disappears and/<br />
or press the<br />
DishDrawer®.<br />
button to open the
Fault codes<br />
How to Recognise a Fault Code<br />
When a fault has occurred, the DishDrawer® will continuously beep every second.<br />
The fault code will be displayed on the electronic display for prefinished models and on the<br />
wash programme selector for integrated models.<br />
Each fault code is shown in the following chart for prefinished and integrated models.<br />
How to Attend to a Fault Code<br />
1 Press the button to remove the fault code.<br />
2 If the fault code and continuous beeps cannot be removed by pressing the button, turn the<br />
power off at the power supply.<br />
3 We recommend you check the following chart and correct the fault where possible.<br />
4 After attending to the fault, turn the DishDrawer® on at the power supply.<br />
5 If the fault code and continuous beeps remain, turn the water and power supply off to the<br />
DishDrawer®.<br />
6 When calling your Authorised Service Centre advise them of the fault code that has appeared<br />
on the DishDrawer®. This information will help the Authorised Service Centre respond to your<br />
request.<br />
25
26<br />
Fault Codes Possible Causes What to Do<br />
F1<br />
Flood switch has been<br />
activated.<br />
Turn the water and power supply to the<br />
DishDrawer ® off and call your Authorised<br />
Service Centre.<br />
F2 Motor problem. Call your Authorised Service Centre.<br />
F3 Temperature sensor failed. Ensure water coming in through the inlet<br />
hose is not hotter than 65 o C. You may<br />
need to install a tempering valve on your<br />
water supply.<br />
F4<br />
Faulty temperature sensor<br />
or element<br />
Call your Authorised Service Centre.<br />
F9 Electronics malfunction. Call your Authorised Service Centre.<br />
U1 Fill Fault 1 Turn the DishDrawer® water supply on.<br />
2 Ensure the spray arm can rotate about<br />
the centre, and if the DishDrawer® is<br />
full of water, it will need to be emptied<br />
manually.<br />
3 Call your Authorised Service Centre.
Warranty<br />
When you purchase any new <strong>Fisher</strong> & <strong>Paykel</strong> whiteware Product you automatically receive a 2<br />
year Manufacturer’s Warranty covering parts and labour for servicing.<br />
<strong>Fisher</strong> & <strong>Paykel</strong> undertakes to<br />
Repair or, at its option, replace without cost to the owner either for material or labour any part of<br />
the Product, the serial number of which appears on the Product, which is found to be defective<br />
within TWO YEARS of the date of purchase.<br />
This warranty DOES NOT cover<br />
A. Service calls to which are not related to any defect in the Product. The cost of a service call will<br />
be charged if the problem is not found to be a Product fault. For example:<br />
1. Correct the installation of the product.<br />
2. Instruct you how to use the product.<br />
3. Replace house fuses or correct house wiring or plumbing.<br />
4. Correcting fault(s) caused by the user.<br />
B. Defects caused by factors other than:<br />
1. Normal domestic use or<br />
2. Use in accordance with the Product’s <strong>User</strong> Guide.<br />
C. Defects to the Product caused by accident, neglect, misuse or Act of God.<br />
D. The cost of repairs carried out by non-authorised repairers or the cost of correcting such<br />
unauthorised repairs.<br />
E. Normal recommended maintenance as set out in the Product’s <strong>User</strong> Guide.<br />
F. Repairs when the appliance has been dismantled, repaired or serviced by other than a<br />
<strong>Fisher</strong> & <strong>Paykel</strong> Authorised Customer Service Centre or the selling dealer.<br />
G. Pick up and delivery.<br />
H. Transportation or travelling costs involved in the repair when the product is installed outside<br />
the <strong>Fisher</strong> & <strong>Paykel</strong> Authorised Customer Service Centre’s normal service area.<br />
Service under this Manufacturer’s Warranty must be provided by an Authorised Service Centre,<br />
please refer to the Customer care section for contact details. Such service shall be provided<br />
during normal business hours. This warranty certificate should be shown when making any<br />
claim.<br />
Note: This Warranty is an extra benefit and does not affect your legal rights.<br />
Please keep this <strong>User</strong> Guide in a safe place.<br />
Do not return to <strong>Fisher</strong> & <strong>Paykel</strong>.<br />
27
28<br />
Customer care<br />
Before you call for service or assistance ...<br />
Check the things you can do yourself. Refer to your <strong>User</strong> Guide and check...<br />
1 Your product is correctly installed<br />
2 You are familiar with its normal operation<br />
If after checking these points you still need assistance, please refer to the following or contact us<br />
through our website:<br />
www.fisherpaykel.com<br />
In New Zealand if you need assistance ...*<br />
Call your <strong>Fisher</strong> & <strong>Paykel</strong> retailer who is trained to provide information on your product, or if we<br />
can be of any further help, please contact our Customer Care Centre,<br />
Toll Free: 0800 FP CARE or 0800 37 2273<br />
Fax: (09) 273 0656<br />
Email: customer.care@fp.co.nz<br />
Postal Address: PO Box 58732, Greenmount, Auckland.<br />
If you need service ...*<br />
<strong>Fisher</strong> & <strong>Paykel</strong> has a network of independent <strong>Fisher</strong> & <strong>Paykel</strong> Authorised Service Centres whose<br />
fully trained technicians can carry out any service necessary on your product. Your dealer or our<br />
Customer Care Centre can recommend an Authorised Service Centre in your area.<br />
In Australia if you need assistance ...*<br />
Call the <strong>Fisher</strong> & <strong>Paykel</strong> Customer Care Centre and talk to one of our consultants.<br />
Toll Free: 1300 650 590 from anywhere within Australia<br />
Fax: (07) 3826 9298<br />
Email: customer.care@fp.com.au<br />
Postal Address: PO Box 798 Cleveland, QLD 4163.<br />
If you need service ...*<br />
<strong>Fisher</strong> & <strong>Paykel</strong> Australia Pty Ltd has a network of independent <strong>Fisher</strong> & <strong>Paykel</strong> Authorised Service<br />
Centres whose fully trained technicians can carry out any service necessary on your<br />
product. Your State Office or our Customer Care Centre can recommend an Authorised Service<br />
Centre in your area.<br />
* If you call or write, please provide: name, address, model number, serial number, date of<br />
purchase and a complete description of the problem. This information is needed in order to<br />
better respond to your request for assistance.
Copyright © <strong>Fisher</strong> & <strong>Paykel</strong> 2006. All rights reserved.<br />
The product specifications in this booklet apply to<br />
the specific products and models described at the<br />
date of issue. Under our policy of continuous product<br />
improvement, these specifications may change at any<br />
time. You should therefore check with your Dealer to<br />
ensure this booklet correctly describes the product<br />
currently available.<br />
www.fisherpaykel.com<br />
NZ AU<br />
DishDrawer user <strong>guide</strong><br />
Published: 03/2006<br />
Part No. 527972 D