Installing the oven - Fisher & Paykel
Installing the oven - Fisher & Paykel
Installing the oven - Fisher & Paykel

You also want an ePaper? Increase the reach of your titles
YUMPU automatically turns print PDFs into web optimized ePapers that Google loves.
Installation instructions<br />
BI453 and BI603 models<br />
Built-in <strong>oven</strong><br />
NZ AU
Safety and warnings<br />
Cut Hazard<br />
Take care - panel edges are sharp.<br />
WARNING!<br />
Failure to use caution could result in injury or cuts.<br />
Important!<br />
To avoid hazard, follow <strong>the</strong>se instructions carefully before installing or using this product.<br />
Please make this information available to <strong>the</strong> person installing <strong>the</strong> product as it could reduce<br />
your installation costs.<br />
This <strong>oven</strong> is to be installed and connected to <strong>the</strong> electricity supply only by an authorised person.<br />
Installation must comply with your local building and electricity regulations.<br />
Failure to install <strong>the</strong> <strong>oven</strong> correctly could invalidate any warranty or liability claims.<br />
Before you install <strong>the</strong> <strong>oven</strong>, please make sure that<br />
A suitable disconnection switch is incorporated in <strong>the</strong> permanent wiring, mounted and positioned<br />
to comply with <strong>the</strong> local wiring rules and regulations. The switch must be of an approved<br />
type installed in <strong>the</strong> fixed wiring and provide a 3 mm air gap contact separation in all poles in<br />
accordance with <strong>the</strong> local wiring rules.<br />
In Australia and New Zealand, a switch of <strong>the</strong> approved type with a 3 mm air gap must be installed<br />
in <strong>the</strong> active (phase) conductor of <strong>the</strong> fixed wiring.<br />
The location of <strong>the</strong> <strong>oven</strong> connection socket (if fitted) is outside <strong>the</strong> cavity if <strong>the</strong> product is flush to<br />
<strong>the</strong> rear wall.<br />
The electrician allows at least 1.5 m free length of connection cable within <strong>the</strong> cavity for ease of<br />
installation and servicing of <strong>the</strong> product. The mains cable should not touch any hot metal parts.<br />
Note: <strong>the</strong> <strong>oven</strong> has a recess at <strong>the</strong> bottom rear to allow for <strong>the</strong> cable entry. The mains cable must<br />
enter <strong>the</strong> cavity in this recessed area.<br />
The cavity is completely sealed with no gaps. This allows <strong>the</strong> cooling air to vent correctly, under<br />
<strong>the</strong> <strong>oven</strong> and through <strong>the</strong> <strong>oven</strong> frame. If you do not seal <strong>the</strong> cavity, <strong>the</strong> surrounding cabinetry may<br />
overheat and become damaged.<br />
The benchtop and <strong>oven</strong> cavity are square and level, and are <strong>the</strong> required dimensions.<br />
The height from <strong>the</strong> floor suits <strong>the</strong> user.<br />
The <strong>oven</strong> door/s can open fully without obstruction.<br />
When you install <strong>the</strong> <strong>oven</strong><br />
For <strong>oven</strong>s with cooktops, make sure that <strong>the</strong> controls connect to <strong>the</strong> correct heating elements.<br />
Do not seal <strong>the</strong> <strong>oven</strong> or cooktop into <strong>the</strong> cabinetry with silicone or glue. This makes future<br />
servicing difficult. <strong>Fisher</strong> & <strong>Paykel</strong> will not cover <strong>the</strong> costs of removing <strong>the</strong> <strong>oven</strong> or cooktop, or of<br />
damage caused by this removal.<br />
Fit <strong>the</strong> washers to <strong>the</strong> screws (supplied) and use <strong>the</strong>m to secure <strong>the</strong> <strong>oven</strong> to <strong>the</strong> cabinetry. Do not<br />
over-tighten <strong>the</strong> screws. You could damage <strong>the</strong> <strong>oven</strong> frame enamel.<br />
Do not stand on <strong>the</strong> door, or place heavy objects on it.
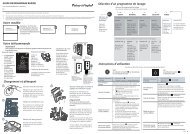
Contents<br />
Product and cabinetry dimensions 2<br />
<strong>Installing</strong> <strong>the</strong> <strong>oven</strong> 6<br />
<strong>Installing</strong> <strong>the</strong> cooktop 7<br />
Important!<br />
SAVE THESE INSTRUCTIONS<br />
1
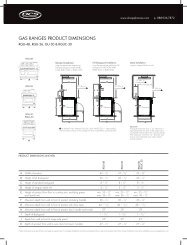
2 Product and cabinetry dimensions<br />
Single <strong>oven</strong> models<br />
H<br />
A<br />
C E<br />
Installation diagrams for illustration purposes only<br />
Product and cabinetry dimensions (mm)<br />
B<br />
G<br />
F<br />
D<br />
L<br />
K<br />
BI453<br />
models<br />
J<br />
BI603<br />
models<br />
A overall height of product 450 595<br />
B overall width of product 595 595<br />
C overall depth of product (without handle) 562 562<br />
D height of chassis 433 578<br />
E width of chassis 550 550<br />
F depth of chassis 542 542<br />
G depth of <strong>oven</strong> frame and control panel (excl. knobs) 20 20<br />
H depth of <strong>oven</strong> door (open) (measured from front of <strong>oven</strong> frame) 320 465<br />
I minimum inside width of cavity 560 560<br />
I I overall width of cavity 600 600<br />
J inside height of cavity 438 583<br />
J I overall height of cavity 455 600<br />
K minimum inside depth of cavity 550 550<br />
L flush fitting cabinetry clearance 20 20<br />
Note: If installing a cooktop above <strong>the</strong> <strong>oven</strong> ensure adequate clearance is provided for <strong>the</strong> cooktop as per <strong>the</strong><br />
cooktop manufacturer’s instructions.<br />
I<br />
I I<br />
L<br />
J I<br />
16-20 mm<br />
2.5 mm<br />
Ensure <strong>the</strong> cavity is completely sealed with no gaps
Double <strong>oven</strong> models<br />
H<br />
C<br />
A<br />
Product and cabinetry dimensions (mm)<br />
Product and cabinetry dimensions<br />
B<br />
G<br />
E<br />
F<br />
BI603 2<br />
models<br />
BI603ED<br />
BI603 1.5<br />
models<br />
A overall height of product 1077 932<br />
B overall width of product 595 595<br />
C overall depth of product (without handle) 562 562<br />
D height of chassis 1060 915<br />
E width of chassis 550 550<br />
F depth of chassis 542 542<br />
G depth of <strong>oven</strong> frame and control panel (excl. knobs) 20 20<br />
H depth of <strong>oven</strong> doors (open) (measured from front of <strong>oven</strong> frame) 465/465 465/320<br />
I minimum inside width of cavity 560 560<br />
I I overall width of cavity 600 600<br />
J inside height of cavity 1065 920<br />
J I overall height of cavity 1082 937<br />
K minimum inside depth of cavity 550 550<br />
L flush fitting cabinetry clearance 20 20<br />
M minimum clearance from floor to bottom of cavity 380 525<br />
D<br />
L<br />
I<br />
K<br />
I I<br />
J<br />
J I<br />
M<br />
Ensure <strong>the</strong> cavity is completely sealed with no gaps<br />
3
4 Product and cabinetry dimensions<br />
Built-in <strong>oven</strong>/cooktop<br />
combination<br />
Dimensions as<br />
per single <strong>oven</strong><br />
model BI603<br />
Product and cabinetry dimensions (mm)<br />
BENCHTOP<br />
BI603 CTE<br />
models<br />
A minimum inside width of cavity 560<br />
AI overall width of cavity 600<br />
B inside height of cavity 583<br />
BI overall height of cavity 600<br />
C minimum inside depth of cavity 550<br />
D flush fitting cabinetry clearance 20<br />
E<br />
minimum clearance from benchtop surface to<br />
top surface of <strong>oven</strong> chassis<br />
55<br />
D<br />
C<br />
A<br />
A I<br />
E<br />
E<br />
OVEN<br />
B<br />
B I<br />
Please refer to cooktop<br />
installation instructions<br />
p/n 599100<br />
Ensure <strong>the</strong> cavity is completely sealed with no gaps<br />
B
Built-in <strong>oven</strong>/microwave<br />
combination model<br />
D<br />
I<br />
H<br />
C<br />
Product and cabinetry dimensions (mm)<br />
Product and cabinetry dimensions<br />
B<br />
G<br />
E<br />
F<br />
A<br />
545<br />
M<br />
J<br />
L<br />
BI603 XC<br />
models<br />
A overall height of product 932<br />
B overall width of product 595<br />
C depth of microwave (excl.frame and control panel) 455<br />
D depth of microwave frame and control panel 30<br />
E width of microwave chassis 558<br />
F depth of <strong>oven</strong> chassis 542<br />
G depth of <strong>oven</strong> frame and control panel (excl. knobs) 20<br />
H depth of <strong>oven</strong> door (open) (measured from front of <strong>oven</strong> frame) 465<br />
I depth of microwave door (open) 440<br />
J minimum inside width of cavity 560<br />
J I overall width of cavity 600<br />
K minimum inside height of cavity 935<br />
L minimum inside depth of cavity 550<br />
M flush fitting cabinetry clearance 20<br />
J I<br />
H<br />
K<br />
Ensure <strong>the</strong> cavity is completely sealed with no gaps<br />
5
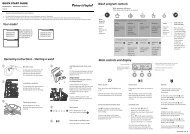
6 <strong>Installing</strong> <strong>the</strong> <strong>oven</strong><br />
<br />
<br />
1 2<br />
3 4<br />
<br />
<br />
<br />
<br />
5 6
<strong>Installing</strong> <strong>the</strong> cooktop<br />
1 2<br />
<br />
<br />
3 4<br />
5 6<br />
<br />
<br />
7<br />
Please refer to cooktop<br />
installation instructions<br />
p/n 599100
Copyright © <strong>Fisher</strong> & <strong>Paykel</strong> 2005. All rights reserved.<br />
The product specifications in this booklet apply to<br />
<strong>the</strong> specific products and models described at <strong>the</strong><br />
date of issue. Under our policy of continuous product<br />
improvement, <strong>the</strong>se specifications may change at any<br />
time. You should <strong>the</strong>refore check with your Dealer to<br />
ensure this booklet correctly describes <strong>the</strong> product<br />
currently available.<br />
www.fisherpaykel.com<br />
NZ AU<br />
Built-in <strong>oven</strong> installation instructions<br />
Published: 08/2005<br />
Part No. 542511 A