User guide - Fisher & Paykel
User guide - Fisher & Paykel
User guide - Fisher & Paykel

Create successful ePaper yourself
Turn your PDF publications into a flip-book with our unique Google optimized e-Paper software.
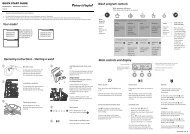
Installation checklist<br />
Your installer MUST have completed and checked the following:<br />
The DishDrawer ® is square and level.<br />
The DishDrawer ® is fastened securely to the cabinetry.<br />
Ensure moisture protection tape has been applied and the cabinet is sealed according to the<br />
DishDrawer ® Installation Instructions.<br />
The DishDrawer ® opens and closes freely. The DishDrawer ® must be free to close completely with<br />
no resistance from cabinetry.<br />
For the integrated models, check the 8mm air gap has been achieved in the correct place.<br />
The power supply is connected and switched on.<br />
The inlet water hose is connected and turned on. There should be no leaks.<br />
The drain hose(s) are connected and there are no leaks. There must be no kinks, or obstructions<br />
in the drain hose(s).<br />
The spray arm is in the centre and can freely rotate.<br />
The rinse programme has been run.<br />
The water level will be below the stainless steel filter plate at the end of the wash programme. It<br />
is normal to find some water in the drain filter area.<br />
Important!<br />
The installer is responsible for the DishDrawer® installation. Incorrect installation is not<br />
covered by warranty.