volkswagen lt 35 2.5 sdi - Giordano Benicchi
volkswagen lt 35 2.5 sdi - Giordano Benicchi
volkswagen lt 35 2.5 sdi - Giordano Benicchi

You also want an ePaper? Increase the reach of your titles
YUMPU automatically turns print PDFs into web optimized ePapers that Google loves.
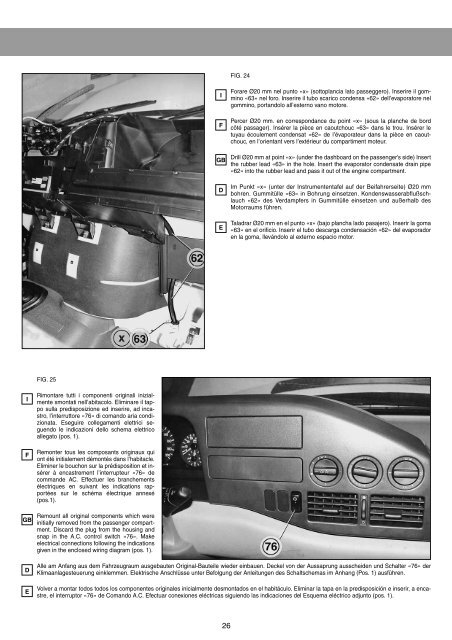
FIG. 24<br />
I<br />
F<br />
GB<br />
D<br />
E<br />
Forare Ø20 mm nel punto «x» (sottoplancia lato passeggero). Inserire il gommino<br />
«63» nel foro. Inserire il tubo scarico condensa «62» dell’evaporatore nel<br />
gommino, portandolo all’esterno vano motore.<br />
Percer Ø20 mm. en correspondance du point «x» (sous la planche de bord<br />
côté passager). Insérer la pièce en caoutchouc «63» dans le trou. Insérer le<br />
tuyau écoulement condensat «62» de l’évaporateur dans la pièce en caoutchouc,<br />
en l’orientant vers l’extérieur du compartiment moteur.<br />
Drill Ø20 mm at point «x» (under the dashboard on the passenger’s side) Insert<br />
the rubber lead «63» in the hole. Insert the evaporator condensate drain pipe<br />
«62» into the rubber lead and pass it out of the engine compartment.<br />
Im Punkt «x» (unter der Instrumententafel auf der Beifahrerseite) Ø20 mm<br />
bohren. Gummitülle «63» in Bohrung einsetzen. Kondenswasserabflußschlauch<br />
«62» des Verdampfers in Gummitülle einsetzen und außerhalb des<br />
Motorraums führen.<br />
Taladrar Ø20 mm en el punto «x» (bajo plancha lado pasajero). Inserir la goma<br />
«63» en el orificio. Inserir el tubo descarga condensación «62» del evaporador<br />
en la goma, llevándolo al externo espacio motor.<br />
FIG. 25<br />
I<br />
F<br />
GB<br />
D<br />
E<br />
Rimontare tutti i componenti originali inizialmente<br />
smontati nell’abitacolo. Eliminare il tappo<br />
sulla predisposizione ed inserire, ad incastro,<br />
l’interruttore «76» di comando aria condizionata.<br />
Eseguire collegamenti elettrici seguendo<br />
le indicazioni dello schema elettrico<br />
allegato (pos. 1).<br />
Remonter tous les composants originaux qui<br />
ont été initialement démontés dans l’habitacle.<br />
Eliminer le bouchon sur la prédisposition et insérer<br />
à encastrement l’interrupteur «76» de<br />
commande AC. Effectuer les branchements<br />
électriques en suivant les indications rapportées<br />
sur le schéma électrique annexé<br />
(pos.1).<br />
Remount all original components which were<br />
initially removed from the passenger compartment.<br />
Discard the plug from the housing and<br />
snap in the A.C. control switch «76». Make<br />
electrical connections following the indications<br />
given in the enclosed wiring diagram (pos. 1).<br />
Alle am Anfang aus dem Fahrzeugraum ausgebauten Original-Bauteile wieder einbauen. Deckel von der Aussaprung ausscheiden und Scha<strong>lt</strong>er «76» der<br />
Klimaanlagesteuerung einklemmen. Elektrische Anschlüsse unter Befolgung der Anleitungen des Scha<strong>lt</strong>schemas im Anhang (Pos. 1) ausführen.<br />
Volver a montar todos todos los componentes originales inicialmente desmontados en el habitáculo. Eliminar la tapa en la predisposición e inserir, a encastre,<br />
el interruptor «76» de Comando A.C. Efectuar conexiones eléctricas siguiendo las indicaciones del Esquema eléctrico adjunto (pos. 1).<br />
26