MPR 211 B - Beyerdynamic
MPR 211 B - Beyerdynamic
MPR 211 B - Beyerdynamic

You also want an ePaper? Increase the reach of your titles
YUMPU automatically turns print PDFs into web optimized ePapers that Google loves.
<strong>MPR</strong> <strong>211</strong> B<br />
KONDENSATORMIKROFON<br />
CONDENSER MICROPHONE<br />
MICROPHONE À CONDENSATEUR<br />
Produktinformation<br />
Product Information<br />
Informations de produit
<strong>MPR</strong> <strong>211</strong> B – Inhalt 3<br />
1. Sicherheitsinformationen . . . . . . . . . . . . . . . . . . . . . . 4<br />
2. Anwendung . . . . . . . . . . . . . . . . . . . . . . . . . . . . . . . 4<br />
3. Grundfunktion . . . . . . . . . . . . . . . . . . . . . . . . . . . . . 4<br />
deutsch<br />
4. Betriebsart (Autonomous/Remote). . . . . . . . . . . . . . . . 5<br />
5. Anschluss. . . . . . . . . . . . . . . . . . . . . . . . . . . . . . . . . 5<br />
6. Mikrofonpositionierung . . . . . . . . . . . . . . . . . . . . . . . 6<br />
7. Befestigung . . . . . . . . . . . . . . . . . . . . . . . . . . . . . . . 7<br />
8. Pflege . . . . . . . . . . . . . . . . . . . . . . . . . . . . . . . . . . . 7<br />
9. Service. . . . . . . . . . . . . . . . . . . . . . . . . . . . . . . . . . . 7<br />
10. Version. . . . . . . . . . . . . . . . . . . . . . . . . . . . . . . . . . . 7<br />
11. Technische Daten . . . . . . . . . . . . . . . . . . . . . . . . . . . 8<br />
Anschlussdiagramm . . . . . . . . . . . . . . . . . . . . . . . . . . . . 26
4<br />
<strong>MPR</strong> <strong>211</strong> B – Kondensatormikrofon<br />
<strong>MPR</strong> <strong>211</strong> B – Kondensatormikrofon 5<br />
Sie haben sich für das Tischmikrofon <strong>MPR</strong> <strong>211</strong> B von beyerdynamic<br />
entschieden. Vielen Dank für Ihr Vertrauen. Nehmen Sie sich bitte<br />
einige Minuten Zeit und lesen Sie diese Produktinfor mation vor Inbetriebnahme<br />
aufmerksam durch.<br />
1. Sicherheitsinformationen<br />
• Schützen Sie das Mikrofon vor Feuchtigkeit, Herunterfallen und<br />
Schlag. Sie könnten sich oder andere verletzen bzw. das Mikrofon<br />
beschädigen.<br />
• Pusten Sie nicht in das Mikrofon. Geben Sie einer Sprechprobe<br />
den Vorzug.<br />
• Achten Sie bei kabelgebundenen Mikrofonen stets darauf, dass<br />
die Mikrofonkabel so verlegt werden, dass niemand darüber<br />
stolpern und sich verletzen kann.<br />
2. Anwendung<br />
Das <strong>MPR</strong> <strong>211</strong> B ist ideal als Tischmikrofon für Diskussionsrunden,<br />
Podiumsbeiträge, Tele /Videokonferenzen sowie für Durchsagen geeignet.<br />
Die Revoluto-Technologie mit 17 integrierten Mikrofonkapseln hat eine<br />
so genannte Korridorcharakteristik, die dem Sprecher einen weiten<br />
Raum mit guter Sprachqualität garantiert. Innerhalb dieser Sprechzone<br />
kann sich der Sprecher frei bewegen, d.h. aufstehen, sich hinsetzen, den<br />
Kopf drehen, neigen oder heben und sich auf die Sprechstelle zu und<br />
von ihr weg bewegen.<br />
Links verfügt das <strong>MPR</strong> <strong>211</strong> B über einen Leuchtstreifen, der bei eingeschaltetem<br />
Mikrofon leuchtet.<br />
3. Grundfunktion<br />
Auf der Unterseite können Sie zwischen drei<br />
Grundfunktionen wählen.<br />
Ein Pfeil zeigt auf die jeweils gewählte<br />
Grundfunktion:<br />
Schalter für Auswahl<br />
Grundfunktion<br />
Autonomous<br />
In dieser Funktion können Sie das Mikrofon über den eingebauten<br />
Taster oder einen externen Taster bedienen.<br />
Remote<br />
In dieser Funktion können Sie das Mikrofon nur über einen externen<br />
Taster bedienen. Der Taster auf der Vorderseite des Gehäuses ist<br />
deaktiviert.<br />
External Logic<br />
Diese Funktion dient zur Verwendung des Mikrofones mit externen,<br />
logischen Steuerungen. Das Mikrofon ist dabei immer aktiv. Die interne<br />
Schaltlogik mit Microcontrollersteuerung ist bei dieser Funktion<br />
deaktiviert. Ein typischer Einsatz ist z.B. die Funktion „Voice<br />
Activation“ in Verbindung mit einer digitalen Audiomatrix.<br />
4. Betriebsart<br />
Auf der Unterseite können Sie zwischen drei<br />
Betriebsarten wählen. Die unterschiedlichen<br />
Betriebsarten werden über einen Microcontroller<br />
gesteuert und überwacht. Ein Pfeil<br />
zeigt auf die jeweils gewählte Betriebsart.<br />
Diese Funktion steht nur in den Grundfunktionen<br />
Autonomous und Remote zur Verfügung.<br />
ON/OFF<br />
Das Mikrofon wird über Taster ein- und ausgeschaltet. Die LED leuchtet<br />
rot, wenn das Mikrofon eingeschaltet ist.<br />
PTM (Push-To-Mute)<br />
Der Taster hat die Funktion einer Räuspertaste. Das Mikrofon ist<br />
immer eingeschaltet. Die LED leuchtet rot. Sobald Sie den Taster gedrückt<br />
halten, ist das Mikrofon aus, die LED erlischt.<br />
PTT (Push-To-Talk)<br />
Das Mikrofon ist eingeschaltet, solange Sie den Taster gedrückt halten.<br />
Die LED leuchtet rot. Lassen Sie den Taster los, ist das Mikrofon aus.<br />
Die LED erlischt.<br />
Output Level<br />
Der Ausgangspegel ist umschaltbar in 3 Stufen:<br />
High, Mid, Low.<br />
Schalter für Auswahl<br />
Betriebsart<br />
Schalter für Ausgangspegel<br />
5. Anschluss<br />
Das <strong>MPR</strong> <strong>211</strong> B verfügt über ein Anschlusskabel mit offenen Enden.<br />
Die Funktionen hängen von der gewählten Grundfunktion Autonomous,<br />
Remote oder External Logic ab.<br />
Zum Betrieb ist eine Phantomspeisung von 24 oder 48 V unabhängig<br />
von der ausgewählten Grundfunktion erforderlich.<br />
Weitere Informationen entnehmen Sie dem Anschlussdiagramm.<br />
Hinweis:<br />
Der LED-Streifen auf der linken Seite kann getrennt und in rot oder<br />
grün angesteuert werden. Da hierfür das Gehäuse geöffnet werden<br />
muss, setzen Sie sich hinsichtlich der weiteren Vorgehensweise bitte<br />
mit Ihrer beyerdynamic-Vertretung oder direkt mit beyerdynamic in<br />
Verbindung.<br />
deutsch
6<br />
<strong>MPR</strong> <strong>211</strong> B – Kondensatormikrofon<br />
<strong>MPR</strong> <strong>211</strong> B – Kondensatormikrofon 7<br />
Das Anschlusskabel kann sowohl nach hinten, als auch nach unten<br />
herausgeführt werden. Dazu müssen Sie die zwei kleinen Schrauben<br />
lösen, die Kabelführung entsprechend drehen und wieder befestigen.<br />
Standardmäßig ist der Kabelauslass hinten.<br />
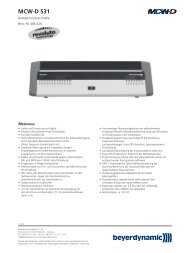
Kabel nach hinten ausgeführt.<br />
Zwei <strong>MPR</strong> <strong>211</strong> B sollten nicht direkt<br />
mit dem Rücken aneinander stehen,<br />
da sonst der akustische Korridoreffekt<br />
nicht funktioniert. Ein Mindestsabstand<br />
von 15 - 20 cm muss<br />
auch hier eingehalten werden.<br />
15 - 20 cm<br />
15 cm<br />
deutsch<br />
Kabelführung<br />
Weitere Informationen zu Anwendungsbeispielen finden Sie im<br />
beyerdynamic „Revoluto Design Guide“.<br />
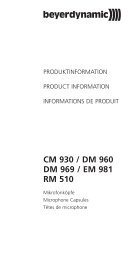
Kabel nach unten ausgeführt.<br />
Kabelführung<br />
7. Befestigung<br />
Über jeweils eine Gewindebuchse rechts und links auf der Unterseite<br />
des <strong>MPR</strong> <strong>211</strong> B können Sie das Tischmikrofon dauerhaft auf einem<br />
Tisch befestigen.<br />
Achtung:<br />
Wir empfehlen eine Einschraubtiefe in das Tischmikrofon von ca.<br />
5 mm. Siehe auch Bohrschablone.<br />
6. Mikrofonpositionierung<br />
Jeder Sprecher benötigt sein eigenes<br />
Mikrofon.<br />
Das <strong>MPR</strong> <strong>211</strong> B darf nicht direkt an<br />
einer Rückwand stehen. Der Abstand<br />
sollte mindestens 15 - 20 cm betragen.<br />
Eine Schallabschattung durch<br />
Verdecken mit Gegenständen wie<br />
z.B. Büchern, Zeitschriften oder Tagungsunterlagen<br />
führt zu erheblichen<br />
Leistungseinbußen.<br />
15 - 20 cm<br />
8. Pflege<br />
Zum Reinigen der Oberfläche nehmen Sie ein feuchtes, weiches<br />
Tuch. Bei Bedarf können Sie ein mildes Reinigungsmittel (z.B. Geschirrspülmittel)<br />
verwenden. Auf keinen Fall lösemittelhaltige Reiniger.<br />
Achten Sie darauf, dass kein Wasser in das Mikrofon eindringt.<br />
9. Service<br />
Im Servicefall wenden Sie sich bitte an autorisiertes Fachpersonal.<br />
Öffnen Sie das Mikrofon auf keinen Fall selbst, Sie könnten sonst alle<br />
Garantiean sprüche verlieren.<br />
Beim Einsatz von Notebooks ist<br />
ebenfalls Rücksicht auf die Mikrofone<br />
zu nehmen. Notebooks sollten<br />
immer seitlich versetzt zu den Mikrofonen<br />
aufgestellt werden, da ansonsten<br />
der aufgeklappte LCD-Monitor<br />
den Schall abschattet. Ebenso könnten<br />
dies z.B. freistehende Monitore<br />
sein. Ein ausreichender Abstand ist<br />
entscheidend für die Richtwirkung<br />
und eine gute Rückkoppelunterdrückung.<br />
Darüberhinaus haben<br />
Notebooks häufig die Lüfter im hinteren<br />
Bereich eingebaut. Die Lüftergeräusche<br />
werden dann voll vom<br />
Mikrofon aufgenommen.<br />
10. Version<br />
<strong>MPR</strong> <strong>211</strong> B<br />
Tischmikrofon mit<br />
Revoluto-Technik,<br />
Korridorcharaktertistik . . . . . . Best.-Nr. 725.099
8<br />
<strong>MPR</strong> <strong>211</strong> B – Kondensatormikrofon<br />
<strong>MPR</strong> <strong>211</strong> B – Kondensatormikrofon 9<br />
11. Technische Daten<br />
Wandlerprinzip . . . . . . . . . . . . . . . . . . . . Kondensator<br />
(Back-Elektret)<br />
Übertragungsbereich. . . . . . . . . . . . . . . . 130 - 17.000 Hz<br />
Mikrofon . . . . . . . . . . . . . . . . . . . . . . . . Microphone-Array,<br />
patentiert<br />
Richtcharakteristik . . . . . . . . . . . . . . . . . Korridor<br />
Optimale Sprecherentfernung . . . . . . . . . 60 - 80 cm<br />
Feldleerlaufübertragungsfaktor<br />
bei 1 kHz. . . . . . . . . . . . . . . . . . . . . . . . ca. 200 mV/Pa<br />
Ausgangspegel je nach<br />
Schalterstellung<br />
Hi . . . . . . . . . . . . . . . . . . . . . . . . . . . . . 200 mV/Pa<br />
Mid . . . . . . . . . . . . . . . . . . . . . . . . . . . . 60 mV/Pa (-10 dB)<br />
Lo . . . . . . . . . . . . . . . . . . . . . . . . . . . . . 20 mV/Pa (-20 dB)<br />
Nennimpedanz . . . . . . . . . . . . . . . . . . . . 200 Ω<br />
Nennabschlussimpedanz . . . . . . . . . . . . . > 1 kΩ<br />
Max. Grenzschalldruckpegel<br />
bei f = 1 kHz, k < 1% . . . . . . . . . . . . . . . 112 dB<br />
Geräuschspannungsabstand<br />
bezogen auf 1 Pa . . . . . . . . . . . . . . . . . . 60 dB<br />
Spannungsversorgung . . . . . . . . . . . . . . . Phantomspeisung<br />
48 V ±4 V an 6,8 kΩ<br />
Speisewiderstand<br />
24 V ±4 V an 1,2 kΩ<br />
Speisewiderstand<br />
Steuerlogik . . . . . . . . . . . . . . . . . . . . . . 12 V - 24 V DC<br />
Stromaufnahme . . . . . . . . . . . . . . . . . . . 10 mA*<br />
Klirrfaktor . . . . . . . . . . . . . . . . . . . . . . . < 0,1%<br />
Anschluss . . . . . . . . . . . . . . . . . . . . . . . 6-adriges Kabel,<br />
3 m lang, offene Enden<br />
(siehe Anschlussdiagramm<br />
Seite 26)<br />
Temperaturbereich . . . . . . . . . . . . . . . . . -10 °C bis +40 °C<br />
Abmessungen (L x H x T) . . . . . . . . . . . . 300 x 40 x 45,5 mm<br />
Gewicht . . . . . . . . . . . . . . . . . . . . . . . . . 230 g<br />
deutsch<br />
*inkl. LED in der Mikrofontaste
<strong>MPR</strong> <strong>211</strong> B – Contents 11<br />
1. Safety Information . . . . . . . . . . . . . . . . . . . . . . . . . 12<br />
2. Application. . . . . . . . . . . . . . . . . . . . . . . . . . . . . . . 12<br />
3. Basic Function . . . . . . . . . . . . . . . . . . . . . . . . . . . . 12<br />
4. Operating Mode (Autonomous/Remote) . . . . . . . . . . . 13<br />
5. Connection . . . . . . . . . . . . . . . . . . . . . . . . . . . . . . . 13<br />
6. Microphone Positioning . . . . . . . . . . . . . . . . . . . . . . 14<br />
english<br />
7. Installation . . . . . . . . . . . . . . . . . . . . . . . . . . . . . . . 15<br />
8. Maintenance. . . . . . . . . . . . . . . . . . . . . . . . . . . . . . 15<br />
9. Service. . . . . . . . . . . . . . . . . . . . . . . . . . . . . . . . . . 15<br />
10. Version. . . . . . . . . . . . . . . . . . . . . . . . . . . . . . . . . . 15<br />
11. Technical Specifications . . . . . . . . . . . . . . . . . . . . . 16<br />
Wiring Diagram . . . . . . . . . . . . . . . . . . . . . . . . . . . . . . . 26
12<br />
<strong>MPR</strong> <strong>211</strong> B – Condenser Microphone<br />
<strong>MPR</strong> <strong>211</strong> B – Condenser Microphone 13<br />
Thank you for selecting the <strong>MPR</strong> <strong>211</strong> B condenser microphone from<br />
beyerdynamic. Please take some time to read carefully through this<br />
product information before using the product.<br />
1. Safety Information<br />
• Protect the microphone from moisture and sudden impacts to<br />
prevent damage. You could either injure yourself or others.<br />
• Do not blow into the microphone, you could damage the transformer.<br />
It is preferable to carry out a speech trial.<br />
• When using wired microphones always ensure that the microphone<br />
cable is laid so that it does not present a trip hazard.<br />
4. Operating Mode<br />
At the bottom you can select between three<br />
operating modes. The different operating<br />
modes are controlled and monitored by a<br />
micro controller. An arrow points to the<br />
selected operating mode. This function is<br />
only available with the basic functions Autonomous<br />
and Remote.<br />
Switch to select the<br />
operating mode<br />
ON/OFF<br />
The microphone is turned on or off via a button. The LED will illuminate<br />
red when the microphone is turned on.<br />
english<br />
2. Application<br />
The <strong>MPR</strong> <strong>211</strong> B is a modern desktop microphone, which is ideal for<br />
discussions, tele/video conferencing and announcements.<br />
The Revoluto technology with 17 integrated microphone capsules<br />
provides a so-called corridor characteristic, which ensures a wide range<br />
of good voice quality. Within this range the speaker can move freely,<br />
i.e. he/she can stand up or sit down, move his/her head and move<br />
towards or away from the microphone.<br />
On the left hand side the <strong>MPR</strong> <strong>211</strong> B provides an LED, which will<br />
illuminate when the microphone is switched on.<br />
3. Basic Function<br />
At the bottom you can select between three<br />
basic functions.<br />
An arrow points to the selected basic<br />
function.<br />
Switch to select the<br />
basic function<br />
Autonomous<br />
With this function you can operate the microphone via the built-in or<br />
external button.<br />
Remote<br />
With this function you can only operate the microphone via an<br />
external button. The button on the front of the housing is deactivated.<br />
External Logic<br />
The function is used when operating the microphone with external,<br />
logic controls. The microphone is always active. With this function the<br />
internal logic with micro controller control is deactivated. A typical<br />
application is for example the “Voice Activation” mode in conjunction<br />
with a digital audio matrix.<br />
PTM (Push-To-Mute)<br />
The button operates as a cough button. The microphone is always<br />
turned on. The LED will illuminate red. When you hold down the<br />
button, the microphone is off and the LED will extinguish.<br />
PTT (Push-To-Talk)<br />
The microphone is on, as long as you hold down the button. The LED<br />
will illuminate red. When you release the button, the microphone is<br />
off. The LED will extinguish.<br />
Output Level<br />
The output level can be set to:<br />
High, Mid, Low.<br />
Switch to select the<br />
output level<br />
5. Connection<br />
The <strong>MPR</strong> <strong>211</strong> B provides a bare ended cable. The functions depend<br />
on the selected operating mode Autonomous, Remote or External<br />
Logic.<br />
For powering a phantom power between 24 or 48 V is required,<br />
irrespective of the selected operating mode.<br />
For more information, please refer to the wiring diagram.<br />
Note:<br />
The LED strip on the left hand side can be controlled separately and<br />
in red or green. As the housing must be opened to set this function,<br />
please contact your beyerdynamic representative or beyerdynamic<br />
directly.
14<br />
<strong>MPR</strong> <strong>211</strong> B – Condenser Microphone<br />
<strong>MPR</strong> <strong>211</strong> B – Condenser Microphone 15<br />
The connecting cable can be guided to the rear or to the bottom.<br />
For this you can remove the two small screws, turn the cable duct<br />
appropriately and tighten the screws. The standard cable exit is on<br />
the rear.<br />
Cable guided to the rear.<br />
Two <strong>MPR</strong> <strong>211</strong> B should not be directly<br />
placed back to back, because the<br />
acoustical corridor effect does not<br />
work in this case. As shown in the<br />
previous example the minimum<br />
distance should be 15 to 20 cm.<br />
15 - 20 cm<br />
15 cm<br />
cable duct<br />
For more information about application examples, please refer to the<br />
beyerdynamic “Revoluto Design Guide”.<br />
english<br />
Cable guided to the bottom.<br />
cable duct<br />
7. Installation<br />
For permanent installation on a table, the <strong>MPR</strong> <strong>211</strong> B provides screw<br />
sockets on the left and right hand side at the bottom of the housing.<br />
Warning:<br />
We recommend that the threaded sleeve is screwed into the microphone<br />
approx. 1/5" (5 mm). Refer also to the drilling template.<br />
6. Microphone Positioning<br />
Each speaker should have his or her<br />
own microphone.<br />
The <strong>MPR</strong> <strong>211</strong> B must not directly be<br />
placed with its back in front of a wall.<br />
The minimum distance to the wall<br />
should be 15 to 20 cm. An acoustic<br />
shadow due to obstructions, such as<br />
books, newspapers or conference<br />
papers, compromises performance<br />
greatly.<br />
When notebooks are being used, it is<br />
also necessary to consider the microphones.<br />
Notebooks should always be<br />
positioned to the side of the microphones.<br />
Otherwise, when opened, the<br />
LCD screen would obstruct the<br />
sound. This also applies to freestanding<br />
monitors. Sufficient<br />
distance is the key to the directional<br />
effect and good feedback suppression.<br />
Moreover, notebooks often have fans<br />
at the back. The noise of the fan<br />
would then be fully picked up by the<br />
microphone.<br />
15 - 20 cm<br />
8. Maintenance<br />
Use a soft, damp cloth for cleaning the <strong>MPR</strong> <strong>211</strong> B microphone. If<br />
necessary, you can use a gentle cleansing agent (such as washingup<br />
liquid). Make sure not to allow any water to enter the transducer<br />
element and never use any solvent cleansers.<br />
9. Service<br />
Servicing must be carried out by qualified service personnel only.<br />
Dismantling the microphone yourself will invalidate the guarantee.<br />
10. Version<br />
<strong>MPR</strong> <strong>211</strong> B<br />
Microphone with<br />
Revoluto technology,<br />
corridor polar pattern . . . . . . . Order # 725.099
16<br />
<strong>MPR</strong> <strong>211</strong> B – Condenser Microphone<br />
<strong>MPR</strong> <strong>211</strong> B – Condenser Microphone 17<br />
11. Technical Specifications<br />
Transducer . . . . . . . . . . . . . . . . . . . . . . . Condenser<br />
(back electret)<br />
Frequency response . . . . . . . . . . . . . . . . 130 - 17,000 Hz<br />
Microphone . . . . . . . . . . . . . . . . . . . . . . Microphone Array,<br />
patented<br />
Polar pattern . . . . . . . . . . . . . . . . . . . . . Corridor<br />
Optimal distance of the speaker . . . . . . . . 60 - 80 cm<br />
Open circuit voltage at 1 kHz. . . . . . . . . . approx. 200 mV/Pa<br />
Output level depending on the<br />
selected position<br />
Hi . . . . . . . . . . . . . . . . . . . . . . . . . . . . . 200 mV/Pa<br />
Mid . . . . . . . . . . . . . . . . . . . . . . . . . . . . 60 mV/Pa (-10 dB)<br />
Lo . . . . . . . . . . . . . . . . . . . . . . . . . . . . . 20 mV/Pa (-20 dB)<br />
Nominal impedance . . . . . . . . . . . . . . . . 200 Ω<br />
Load impedance. . . . . . . . . . . . . . . . . . . > 1 kΩΩ<br />
Max. SPL at f = 1 kHz, k < 1% . . . . . . . . 112 dB<br />
Signal-to-noise ratio rel. to 1 Pa. . . . . . . . 60 dB<br />
Voltage supply . . . . . . . . . . . . . . . . . . . . Phantom powering<br />
48 V ±4 V to 6.8 kΩ<br />
supply impedance<br />
24 V ±4 V to 1.2 kΩ<br />
supply impedance<br />
Control logic. . . . . . . . . . . . . . . . . . . . . . 12 V - 24 V DC<br />
Power consumption . . . . . . . . . . . . . . . . 10 mA*<br />
T.H.D. . . . . . . . . . . . . . . . . . . . . . . . . . . < 0.1%<br />
Connection . . . . . . . . . . . . . . . . . . . . . . bare-ended 6-core cable,<br />
3 m long (refer to wiring<br />
diagram on page 26)<br />
Temperature range . . . . . . . . . . . . . . . . . -10 °C to +40 °C<br />
Dimensions (L x H x D) . . . . . . . . . . . . . . 300 x 40 x 45.5 mm<br />
Weight. . . . . . . . . . . . . . . . . . . . . . . . . . 230 g<br />
english<br />
*incl. LED in the microphone button
<strong>MPR</strong> <strong>211</strong> B – Sommaire 19<br />
1. Consignes de sécurité . . . . . . . . . . . . . . . . . . . . . . . 20<br />
2. Application. . . . . . . . . . . . . . . . . . . . . . . . . . . . . . . 20<br />
3. Fonction de base. . . . . . . . . . . . . . . . . . . . . . . . . . . 20<br />
4. Mode de fonctionnement (Autonomous/Remote). . . . . 21<br />
5. Branchement . . . . . . . . . . . . . . . . . . . . . . . . . . . . . 21<br />
6. Positionnement du microphone . . . . . . . . . . . . . . . . 22<br />
7. Fixation . . . . . . . . . . . . . . . . . . . . . . . . . . . . . . . . . 23<br />
8. Entretien . . . . . . . . . . . . . . . . . . . . . . . . . . . . . . . . 23<br />
9. Service après-vente . . . . . . . . . . . . . . . . . . . . . . . . . 23<br />
français<br />
10. Version. . . . . . . . . . . . . . . . . . . . . . . . . . . . . . . . . . 23<br />
11. Spécifications techniques . . . . . . . . . . . . . . . . . . . . 24<br />
Diagramme de câblage . . . . . . . . . . . . . . . . . . . . . . . . . . 26
20<br />
<strong>MPR</strong> <strong>211</strong> B – Microphone à condensateur<br />
<strong>MPR</strong> <strong>211</strong> B – Microphone à condensateur 21<br />
Nous vous félicitions pour l’achat du microphone <strong>MPR</strong> <strong>211</strong> B de<br />
beyerdynamic et vous remercions de votre confiance. Veuillez lire<br />
attentivement ces informations produit avant la mise en marche du<br />
microphone.<br />
1. Consignes de sécurité<br />
• Veillez à ce que le microphone soit protégé de l’humidité et de<br />
tous dommages résultant de chutes ou de chocs mécaniques.<br />
• Ne soufflez pas dans le microphone. Dans le cas d’un microphone<br />
à condensateur, vous pourriez endommager le transformateur.<br />
Effectuez plutôt un test de parole.<br />
• Pour les microphones à câble, veillez à poser les câbles de sorte<br />
à ce que nul ne puisse trébucher dessus et se blesser.<br />
2. Application<br />
<strong>MPR</strong> <strong>211</strong> B est idéal en tant que microphone de table pour les<br />
cercles de discussion, débats, téléconférences/vidéoconférences ainsi<br />
que pour la transmission de messages.<br />
La technologie Revoluto avec 17 capsules de microphone intégrées<br />
possède une directivité dite « corridor » qui garantit à l’orateur une<br />
large plage de mouvement tout en conservant une bonne qualité<br />
vocale. A l’intérieur de cette zone de captation, il est possible à<br />
l’orateur de bouger, par exemple de se lever, de s’asseoir, de tourner,<br />
baisser ou relever la tête ainsi que de se rapprocher ou de s’éloigner<br />
du poste d’appel.<br />
<strong>MPR</strong> <strong>211</strong> B est doté à gauche d’une DEL allumée lorsque le microphone<br />
est activé.<br />
3. Fonction de base<br />
Sur le dessous de l’appareil, vous pouvez<br />
choisir entre trois fonctions de base.<br />
Une flèche indique la fonction respectivement<br />
sélectionnée:<br />
Interrupteur de sélection<br />
Fonction de base<br />
Autonomous<br />
Cette fonction vous permet d’utiliser le microphone via le bouton<br />
poussoir intégré ou via un bouton poussoir externe.<br />
4. Mode de fonctionnement (Autonomous/Remote)<br />
Sur le dessous de l’appareil, vous pouvez<br />
choisir entre trois modes de fonctionnement.<br />
Les divers modes de fonctionnement sont<br />
pilotés et contrôlés via un microcontrôleur.<br />
Interrupteur de sélection<br />
Une flèche indique le mode de fonctionnement<br />
respectivement sélectionné. Cette<br />
Mode de fonctionnement<br />
fonction n’est disponible que pour les fonctions<br />
de base Autonomous et Remote.<br />
ON/OFF<br />
Le microphone est activé et désactivé via des boutons poussoir. Le<br />
témoin DEL est allumé en rouge lorsque le microphone est activé.<br />
PTM (Push-To-Mute)<br />
Le bouton a la fonction d’une touche de mise en sourdine. Le microphone<br />
est toujours activé. Le témoin DEL est allumé en rouge.<br />
Pour désactiver le microphone, maintenez la touche enfoncée, la DEL<br />
s’éteint.<br />
PTT (Push-To-Talk)<br />
Le microphone est activé tant que vous maintenez la touche enfoncée.<br />
Le témoin DEL est allumé en rouge. Dès que vous relâchez la touche,<br />
le microphone est désactivé. La DEL s’éteint.<br />
Output Level<br />
Le niveau sortie est réglable:<br />
High, Mid, Low.<br />
Interrupteur de sélection<br />
«output level»<br />
5. Branchement<br />
<strong>MPR</strong> <strong>211</strong> B est doté d’un câble de raccordement à extrémités libres.<br />
Les fonctions dépendent de la fonction de base sélectionnée:<br />
Autonomous, Remote ou External Logic.<br />
Le fonctionnement nécessite une tension fantôme de 24 ou 48 V<br />
indépendant de la fonction de base sélectionnée.<br />
Pour davantage d’informations, veuillez vous reporter au diagramme<br />
de câblage.<br />
français<br />
Remote<br />
Cette fonction vous permet d’utiliser le microphone uniquement via un<br />
bouton poussoir externe.<br />
Le bouton poussoir situé sur le devant du boîtier est quant à lui désactivé.<br />
External Logic<br />
Cette fonction vous permet d’utiliser le microphone via des commandes<br />
externes logiques. Le microphone est à cet effet toujours activé.<br />
Le circuit logique interne avec commande par microcontrôleur<br />
est pour cette fonction désactivé. Utilisation typique: par exemple la<br />
fonction « Voice Activation » en association avec une matrice audio<br />
numérique.<br />
Note :<br />
La bande LED sur le côté gauche peut être séparée et pilotée en rouge<br />
ou vert. Comme le boîtier doit à cet effet être ouvert, veuillez pour la<br />
marche à suivre vous adresser à votre dépositaire beyerdynamic ou<br />
directement à beyerdynamic.
22<br />
<strong>MPR</strong> <strong>211</strong> B – Microphone à condensateur<br />
<strong>MPR</strong> <strong>211</strong> B – Microphone à condensateur 23<br />
Le câble de raccordement peut aussi bien être conduit vers l'arrière<br />
que vers le bas. Pour cela, veuillez desserrer les deux petites vis,<br />
tourner le passe-câbles comme il convient et resserrer. En câblage<br />
standard, la sortie de câble se situe à l’arrière.<br />
Câble conduit vers l’arrière.<br />
des ordinateurs portables sont fréquemment situés à l’arrière de l’ordinateur:<br />
les bruits de ventilation sont alors entièrement perçus par le<br />
microphone.<br />
Nous recommandons de ne pas<br />
placer deux <strong>MPR</strong> <strong>211</strong> B directement<br />
dos à dos, l’effet de corridor acoustique<br />
ne pouvant sinon pas fonctionner.<br />
Une distance de 15 - 20 cm doit<br />
ici également être respectée.<br />
15 - 20 cm<br />
15 cm<br />
Passe-câbles<br />
Câble conduit vers le bas.<br />
Pour davantage d’informations et exemples d’applications, veuillez<br />
vous reporter au «Revoluto Design Guide» de beyerdynamic<br />
(uniquement disponible en anglais ou allemand).<br />
français<br />
Passe-câbles<br />
6. Positionnement du microphone<br />
Chaque orateur doit disposer d’un<br />
microphone personnel.<br />
Le <strong>MPR</strong> <strong>211</strong> B ne doit pas être placé<br />
directement contre un panneau arrière,<br />
mais à une distance d’au moins 15 -<br />
20 cm par rapport à ce dernier. Pour<br />
garantir un fonctionnement sans perte<br />
de qualité, veuillez ne pas couvrir<br />
l’appareil avec des objets tels que<br />
livres, magazines ou documents de<br />
conférence pouvant considérablement<br />
étouffer le son.<br />
En cas d’utilisation d’ordinateurs<br />
portables également, veuillez observer<br />
certaines précautions. Nous recommandons<br />
de placer les ordinateurs<br />
portables sur le côté, légèrement<br />
en retrait par rapport aux microphones,<br />
l’écran LCD ouvert pouvant<br />
sinon faire obstacle à la diffusion<br />
sonore. Il en est de même pour<br />
les moniteurs PC placés librement<br />
sur une table. Une distance suffisante<br />
est déterminante pour la directivité<br />
et une bonne réduction de l'effet<br />
Larsen. Par ailleurs, les ventilateurs<br />
15 - 20 cm<br />
7. Fixation<br />
Vous pouvez fixer durablement le microphone sur une table à l’aide<br />
des douilles filetées situées respectivement à droite et à gauche sur<br />
le dessous de <strong>MPR</strong> <strong>211</strong> B.<br />
Attention:<br />
Nous recommandons une profondeur de vissage d’environ 5 mm dans<br />
le microphone de table. Cf. également gabarit de perçage.<br />
8. Entretien<br />
Utilisez un tissu doux humidifié pour nettoyer le microphone<br />
<strong>MPR</strong> <strong>211</strong> B. Si nécessaire, vous pouvez ajouter un produit vaisselle,<br />
mais n’utilisez jamais des dissolvants; veillez à ce que toute pénétration<br />
de l’eau dans le transducteur du microphone soit évitée.<br />
9. Service après-vente<br />
En cas de nécessité veuillez vous adresser à un technicien beyerdynamic<br />
autorisé. N’ouvrez jamais le microphone, vous risquerez sinon de perdre<br />
vos droits de garantie.<br />
10. Version<br />
<strong>MPR</strong> <strong>211</strong> B<br />
Microphone de table avec<br />
technologie Revoluto,<br />
directivité corridor . . . . . . . . . Art. N° 725.099
24<br />
<strong>MPR</strong> <strong>211</strong> B – Microphone à condensateur<br />
<strong>MPR</strong> <strong>211</strong> B – Microphone à condensateur 25<br />
11. Spécifications techniques<br />
Type de transducteur. . . . . . . . . . . . . . . . Condensateur<br />
(back-électret)<br />
Bande de transmission . . . . . . . . . . . . . . 130 – 17.000 Hz<br />
Microphone . . . . . . . . . . . . . . . . . . . . . . Microphone Array,<br />
breveté<br />
Directivité . . . . . . . . . . . . . . . . . . . . . . . Corridor<br />
Distance optimale par rapport<br />
au microphone . . . . . . . . . . . . . . . . . . . . 60 - 80 cm<br />
Efficacité en champ libre, à 1 kHz . . . . . . env. 200 mV/Pa<br />
Niveau de sortie depend de la<br />
position de l’interrupteur<br />
Hi . . . . . . . . . . . . . . . . . . . . . . . . . . . . . 200 mV/Pa<br />
Mid . . . . . . . . . . . . . . . . . . . . . . . . . . . . 60 mV/Pa (-10 dB)<br />
Lo . . . . . . . . . . . . . . . . . . . . . . . . . . . . . 20 mV/Pa (-20 dB)<br />
Impédance nominale . . . . . . . . . . . . . . . 200 Ω<br />
Impédance de charge . . . . . . . . . . . . . . . > 1 kΩ<br />
Niveau max. de pression sonore admissible<br />
pour f = 1 kHz, k < 1% . . . . . . . . . . . . . . 112 dB<br />
Rapport signal/bruit par rapport à 1 Pa . . . 60 dB<br />
Alimentation . . . . . . . . . . . . . . . . . . . . . Tension fantôme<br />
Résistance d’alimentation<br />
48 V ±4 V sur 6,8 kΩ<br />
Résistance d’alimentation<br />
24 V ±4 V sur 1,2 kΩ<br />
Contrôle logique . . . . . . . . . . . . . . . . . . . 12 V - 24 V DC<br />
Consommation . . . . . . . . . . . . . . . . . . . . 10 mA*<br />
Taux de distorsion audio . . . . . . . . . . . . . < 0,1%<br />
Raccordement . . . . . . . . . . . . . . . . . . . . câble 6 fils,<br />
longueur 3 m,<br />
(cf. diagramme de câblage<br />
page 26)<br />
extrémités libres<br />
Plage de températures de -10° C à +40 °C<br />
Dimensions (L x H x P) . . . . . . . . . . . . . . 300 x 40 x 45,5 mm<br />
Poids. . . . . . . . . . . . . . . . . . . . . . . . . . . 230 g<br />
français<br />
*inclus le témoin DEL du bouton de microphone
26<br />
<strong>MPR</strong> <strong>211</strong> B<br />
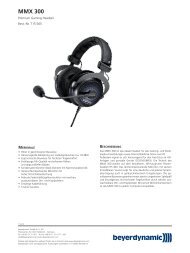
Anschlussdiagramm / Wiring Diagram /<br />
Diagramme de câblage<br />
Die Funktionen „External Logic Mode“ und „Remote Mode“ benötigen<br />
Phantomspeisung.<br />
The functionality in “External Logic Mode” or “Remote Mode” requires<br />
phantom powering.
eyerdynamic GmbH & Co. KG<br />
Theresienstr. 8 | 74072 Heilbronn – Germany<br />
Tel. +49 (0) 7131 / 617 - 0 | Fax +49 (0) 7131 / 617 - 204<br />
info@beyerdynamic.de | www.beyerdynamic.com<br />
Weitere Vertriebspartner weltweit finden Sie unter www.beyerdynamic.com<br />
For further distributors worldwide, please go to www.beyerdynamic.com<br />
DEF1/PI <strong>MPR</strong> <strong>211</strong> B (09.13)/639.818 • Änderungen und Irrtümer vorbehalten • Subject to change without notice • Sous réserve de modifications