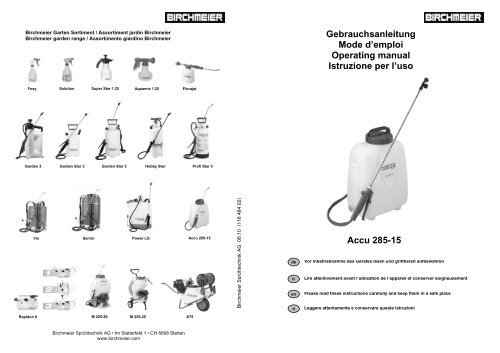
Accu 285-15 - Birchmeier Sprühtechnik AG
Accu 285-15 - Birchmeier Sprühtechnik AG
Accu 285-15 - Birchmeier Sprühtechnik AG

You also want an ePaper? Increase the reach of your titles
YUMPU automatically turns print PDFs into web optimized ePapers that Google loves.
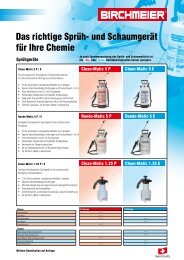
<strong>Birchmeier</strong> Garten Sortiment / Assortiment jardin <strong>Birchmeier</strong><br />
<strong>Birchmeier</strong> garden range / Assortimento giardino <strong>Birchmeier</strong><br />
Foxy Solution Super Star 1.25 Aquamix 1.25<br />
Florajet<br />
Garden 3 Garden Star 3 Garden Star 5 Hobby Star Profi Star 5<br />
Iris Senior Power LG <strong>Accu</strong> <strong>285</strong>-<strong>15</strong><br />
Rapidon 6 M 225-20<br />
M 255-25<br />
<strong>Birchmeier</strong> <strong>Sprühtechnik</strong> <strong>AG</strong> • Im Stetterfeld 1 • CH-5608 Stetten<br />
www.birchmeier.com<br />
A75<br />
<strong>Birchmeier</strong> <strong>Sprühtechnik</strong> <strong>AG</strong> 06.10 (116 484 02)<br />
de<br />
fr<br />
en<br />
it<br />
Gebrauchsanleitung<br />
Mode d’emploi<br />
Operating manual<br />
Istruzione per l’uso<br />
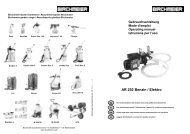
<strong>Accu</strong> <strong>285</strong>-<strong>15</strong><br />
Vor Inbetriebnahme des Gerätes lesen und griffbereit aufbewahren<br />
Lire attentivement avant l’utilisation de l’appareil et conserver soigneusement<br />
Please read these instructions carefully and keep them in a safe place<br />
Leggere attentamente e conservare queste istruzioni
Wichtig!<br />
Lesen sie die Gebrauchsanleitung vor der ersten Inbetriebnahme vollständig durch. Der Anwender haftet<br />
für Schäden, die durch Nichteinhaltung dieser Vorschriften entstehen.<br />
Das Nichtbeachten der Sicherheits- und Warnhinweise kann zu Verletzungen oder zum Tod von<br />
Personen führen!<br />
Warnung!<br />
� Das Gerät darf nur von gut instruierten Personen bedient werden. Bei Weitergabe an Dritte muss die<br />
Gebrauchsanleitung unbedingt mitgegeben werden.<br />
� Der Bediener ist gegenüber Dritten, insbesondere Kindern und Haustieren dafür verantwortlich, dass<br />
diese genügend Abstand von ihm haben. Für direkten oder indirekten Schaden haftet der Bediener.<br />
� Im Umgang mit Chemikalien und Pflanzenschutzmittel ist der Kontakt mit den Augen und der Haut zu<br />
vermeiden. Deshalb ist es notwendig, geeignete Schutzkleider, Schutzmaske, Schutzbrille und<br />
Gummihandschuhe zu tragen.<br />
� Verstopfte Ventile und Düsen nie mit dem Mund durchblasen. (Vergiftungsgefahr!)<br />
� Chemikalien und Pflanzenschutzmittel dürfen nicht in andere Behälter (Flaschen, Dosen, etc.)<br />
abgefüllt werden und sind für Kinder unerreichbar aufzubewahren.<br />
� Nie gegen den Wind oder bei zu starkem Wind sprühen. Nicht mehr Sprühmedium ausbringen, als für<br />
die zu behandelnde Fläche notwendig ist.<br />
Sicherheitshinweise<br />
� Vor jedem Gebrauch ist sicherzustellen, dass das Gerät ordnungsgemäss zusammengebaut, nicht<br />
beschädigt und funktionstüchtig ist. Beschädigte Teile dürfen nicht weiter verwendet werden.<br />
� Es wird ausdrücklich darauf hingewiesen, dass jegliche Manipulation am Gerät unzulässig ist. In<br />
diesem Fall erlöschen jegliche Garantie- und Haftansprüche gegenüber der BIRCHMEIER<br />
<strong>Sprühtechnik</strong> <strong>AG</strong>.<br />
� Wartungs- und Reparaturarbeiten dürfen nur durch gut instruiertes Personal oder durch den<br />
Fachhändler ausgeführt werden. Es sind ausschliesslich BIRCHMEIER-Originalteile zu verwenden.<br />
� Das Gerät nicht an der Sonne stehen lassen. Hitze- und Frosteinwirkung können das Gerät<br />
beschädigen.<br />
� Das Gerät ist nach jedem Gebrauch zu entleeren und gründlich mit Wasser zu reinigen. Dabei ist zu<br />
beachten, dass die Gewässer nicht verschmutzt werden.<br />
� Die Entsorgung der im Flüssigkeitstank verbliebenen Chemikalien oder Pflanzenschutzmittel und<br />
deren Satz müssen den entsprechend gültigen Sicherheitsregeln erfolgen. Wenden Sie hierfür die<br />
gültigen Regeln des Chemikalienherstellers an.<br />
� Dem Hersteller sind zum Zeitpunkt der Fertigung des Gerätes keine schädlichen Einwirkungen der<br />
zugelassenen Pflanzenschutzmittel auf die Werkstoffe bekannt. Nicht zugelassen sind die Geräte für<br />
ätzende Stoffe (z.B. Desinfektions- und Imprägniermittel) sowie für brennbare und explosive Medien.<br />
Ersatzteilliste / Liste des pièces de rechange / Spare parts list / Lista dei pezzi di ricambio<br />
Pos.<br />
Bezeichnung<br />
Désignation<br />
Description<br />
Descrizione<br />
Artikel-Nr.<br />
No d’article<br />
Parts number<br />
No. d’articolo<br />
2 Pumpe mit Motor / Pompe avec moteur / Pump with motor / Pompa con motore MY 123 287<br />
3 Motor / Moteur / Motor / Motore MY 641 932<br />
4 Pumpe kpl. / Pompe compl. / Pump compl. / Pompa compl. MY 641 933<br />
5 Nockensatz / Came / Fastener / Camma MY 641 928<br />
7 Dichtungssatz / Jeu de joints / Gasket set / Set di giunti di tenuta MY 599 682<br />
9 Saugventil kpl. / Vanne d’aspiration compl. / Suction valve compl. / Valvola di aspirazione compl. MY 641 931<br />
<strong>15</strong> Schlauch / Tuyau / Suction hose / Tubo flessibile MY 123 262<br />
16 Schlauchklemme / Collier de serrage / Hose clamp / Collare stringitubo MY 025 896<br />
17<br />
Druckregulierventil kpl. / Vanne régulatrice de pression compl. / Pressure regulator valve compl. /<br />
Valvola regolatrice di pressione compl.<br />
MY 123 290<br />
18 Spritzmittelbehälter / Réservoir du produit à pulvériser / Chemical tank / Serbatoio di poltiglia MY 123 272<br />
19 Einfülldeckel / Couvercle de remplissage / Fill-in cover / Coperchio di riempimento MY 123 213<br />
20 Deckeldichtung / Joint de couvercle / Seal cap / Tenuta coperchio MY 123 216<br />
21 Sieb / Filtre de remplissage / Strainer / Filtro MY 123 217<br />
22 Ablassdeckel kpl. / Orifice de vidange compl. / Drain opening compl. / Coperchio di scarico compl. MY 123 417<br />
23 Dichtung / Joint / Gasket / Anello di tenuta MY 123 418<br />
24 Haltewinkel / Angle / Bracket / Supporto angolare MY 124 433<br />
25 Kabelstrang / Fil / Wires / Cavi MY 124 329<br />
26 Sicherung / Fusible / Fuse / Fusibile MY 114 032<br />
29 Winkel / Angle / Angle / Angolare MY 123 542<br />
30 Schraube / Vis / Screw / Vite MY 083 441<br />
31 Schraube / Vis / Screw / Vite MY 082 708<br />
36 Batterie / Batterie / Battery / Batteria MY 123 294<br />
37 Haltewinkel / Angle / Bracket / Supporto angolare MY 123 225<br />
38 Schraube / Vis / Screw / Vite MY 083 441<br />
39 Handventil mit Schlauch / Poignée avec tuyau / Hand valve with hose / Valvola d’arresto con tubo MY 642 038<br />
41 Wechselschalter / Commutateur de changement / Change over switch / Commutatore MY 117 549<br />
47 Stecker / Fiche / Plug / Spina MY 116 013<br />
50 Saugschlauch / Tuyau d’aspiration / Suction tube / Tubo di aspirazione MY 123 259<br />
51 Abdeckung / Couverture / Cover / Copertura MY 123 260<br />
52 Bride / Collier / Clip / Fascetta MY 103 033<br />
53 Schlauchklemme / Collier de serrage / Hose clamp / Collare stringitubo MY 123 368<br />
54 Überlaufschlauch / Tuyau d’envahisson / Overflow hose / Tubo di troppopieno MY 123 283<br />
55 Schlauchbride / Collier de serrage / Hose clip / Fascetta di serraggio MY 106 348<br />
56 Schlauchklemme / Collier de serrage / Hose clamp / Collare stringitubo MY 123 368<br />
57 Auflage / Support / Support plate / Supporto MY 123 227<br />
58 Unterlagsscheibe / Rondelle / Washer / Rondella MY 106 352<br />
59 Schraube / Vis / Screw / Vite MY 083 441<br />
60 Traggurten-Paar / Courroies de transport / Carrying belt few / Cinture di trasporto MY 123 540<br />
62 Batterie-Kontrolle / Contrôle de batterie / Battery control / Controllo batteria MY 124 328<br />
63 Sprührohr kpl. / Tube de pulvérisation compl. / Spray tube compl. / Tubo spruzzatore compl. MY 122 933<br />
65 Doppeldüse kpl. / Double buse compl. / Double nozzle compl. / Doppio ugello compl. MY 117 958<br />
69 Herbiziddüse kpl. / Buse à herbicide compl. / Herbicide nozzle compl. / Ugello erbicida compl. MY 114 292<br />
74 Ladegerät / Chargeur à batterie / Battery charger / Caricabatteria 118 371 01
Ersatzteilzeichnung / Dessin de pièces de rechange / Spare parts drawing / Disegno dei pezzi di ricambio<br />
Sprührohr<br />
Ablassöffnung<br />
Technische Daten<br />
Doppeldüse<br />
Modell: Batteriespritze <strong>Accu</strong> <strong>285</strong>-<strong>15</strong><br />
Masse: 365 (B) x 220 (T) x 480 (H) mm<br />
Leergewicht: 5,7 kg<br />
Behälterinhalt: <strong>15</strong> Liter<br />
Pumpe: Kolbenpumpe<br />
Druck: 10 bar<br />
Ausbringmenge: 1,6 l/min.<br />
Motor: 30 W, DC<br />
Batterie: NiCd Batterie 12 V, 5 Ah<br />
Betriebsdauer: 1,5 Std. bei Hochdruck, 2 Std. bei Niederdruck<br />
Ladedauer: max. 10 Std.<br />
Ladegerät: 100 – 240 V Eingangsspannung<br />
Leistung: 800 mA<br />
Geräuschausstrahlungen<br />
Lautstärke, gemessen dB(A) 74<br />
Lautstärke, garantiert, LW<strong>AG</strong> dB(A) 74<br />
Spritzmittelbehälter<br />
Handventil<br />
Batterie-Ladeanzeige<br />
Druckregulierventil<br />
Einfülldeckel<br />
Traggurte
Anwendungsbereich<br />
Mit der Motorrückenspritze lassen sich die bekannten Pflanzenschutzmittel, Unkrautvertilgungsmittel<br />
sowie Flüssigdünger, welche in Haus, Garten und Landwirtschaft sowie im Weinanbau verwendet<br />
werden ausbringen.<br />
Warnsymbole<br />
Bedeutung der Warnsymbole:<br />
Gebrauchsanleitung sorgfältig lesen.<br />
Stellen Sie sicher, dass vor Gebrauch die Gebrauchsanleitung aufmerksam gelesen wurde.<br />
Schutzkleidung tragen.<br />
Tragen Sie während der Arbeit Schutzkleidung, wie z.B. einen Helm, eine Schutzbrille und Gehörschutz.<br />
Inbetriebnahme<br />
Vor dem Gebrauch Sprühleitung montieren.<br />
Handventil<br />
<strong>Accu</strong> <strong>285</strong>-<strong>15</strong> auf Dichtheit und Funktion kontrollieren.<br />
Batterieprüfung: Gerät kurz einschalten, um die Spannung zu kontrollieren.<br />
Grün: Spritzbereit<br />
Gelb oder Rot: Aufladen<br />
Sprührohr Doppeldüse<br />
rot gelb grün<br />
Hinweise:<br />
Die Ladeanzeige funktioniert nur während das Gerät in Betrieb ist.<br />
Ist die Ladeanzeige auf gelb, empfehlen wir den Akku aufzuladen. Ist der Behälter leer, darf das Gerät<br />
nicht länger als eine Minute eingeschaltet sein.<br />
(Achtung!! Trockenlauf der Pumpe vermeiden)<br />
Provvedimento da prendere in caso di malfunzionamento<br />
La seguente lista Vi sarà di aiuto per risolvere piccoli malfunzionamenti.<br />
Forma a spruzzo del getto non soddisfacente<br />
Il motore non lavora<br />
Difetto del cavo elettrico: Attacco difettoso -> attaccare correttamente<br />
Interruttore difettoso -> sostituire<br />
Cavo strappato -> sostituire o riparare<br />
Fusibile saltato -> sostituire<br />
Motore: Cavo strappato -> sostituire<br />
Bruciato -> sostituire<br />
Batteria: Perdita di tensione -> ricaricare<br />
Pompa: Guarnizioni sporche o difettose -> pulire o riparare<br />
Il motore lavora, ma ....<br />
Non spruzza: Ugello otturato -> pulire<br />
Valvola di aspirazione otturata -> pulire<br />
Valvola della pompa otturata -> pulire<br />
Valvola d’aspirazione incollata -> schiacciare leggermente la membrana<br />
gialla della pompa<br />
Pressione insufficiente<br />
(Tensione troppo bassa): Valvola della pompa otturata -> pulire<br />
Pompa difettosa -> sostituire<br />
Valvola regolatrice di pressione otturata -> pulire<br />
Valvola regolatrice di pressione difettosa -> sostituire<br />
Ugello difettoso -> sostituire<br />
Tubo di aspirazione intasato o difettoso -> pulire o sostituire<br />
Caduta di tensione -> Caricare la batteria<br />
Problemi con la ricarica<br />
La batteria non si ricarica: Batteria difettosa -> sostituire<br />
Carica-batteria difettoso -> sostituire<br />
Giunzione cavi difettosa -> sostituire<br />
Cavo strappato -> sostituire<br />
Non viene raggiunta pot.: Tempo di ricarica troppo breve -> ricaricare<br />
Batteria difettosa -> sostituire<br />
Carica-batteria difettoso -> sostituire<br />
Fusibile saltato: Il motore gira male -> sostituire<br />
La pompa non lavora -> Guarnizione del pistone intasata o difettosa -> pulire<br />
o sostituire<br />
Attacco interruttore difettoso -> sostituire
Dichiarazione di conformità CE<br />
Noi <strong>Birchmeier</strong> <strong>Sprühtechnik</strong> <strong>AG</strong><br />
Im Stetterfeld 1<br />
CH 5608 Stetten<br />
Con la presente dichiariamo, che i polverizzatori a spalla<br />
Modello: <strong>Accu</strong> <strong>285</strong>-<strong>15</strong> No. d’articolo 1<strong>15</strong> 975 03<br />
<strong>Accu</strong> <strong>285</strong>-<strong>15</strong> BBA 1<strong>15</strong> 975 04<br />
<strong>Accu</strong> <strong>285</strong>-<strong>15</strong> Profi 1<strong>15</strong> 975 05<br />
<strong>Accu</strong> <strong>285</strong>-<strong>15</strong> BBA Profi 1<strong>15</strong> 975 06<br />
per la sua progettazione ed il tipo di costruzione come anche per i modello da noi introdotto sul mercato<br />
è conforme a tutti i requisiti in materia di sicurezza e sanità e delle rispettive direttive CEE.<br />
Disposizioni CE in materia:<br />
DIRETTIVA MACCHINE 2006/42/CEE<br />
Norme armonizzate inerenti:<br />
EN ISO 12100-1:2003<br />
EN ISO-12100-2:2003<br />
Tramite misure interne viene garantito che gli attrezzi di serie corrispondono sempre a tutti i requisiti<br />
delle attuali direttive CEE e alle norme applicate.<br />
Il sottoscritto agisce per incarico e con pieni poteri conferitogli dalla Direzione.<br />
Stetten, Giugno 2010<br />
M. Zuber<br />
Capo reparto Sviluppo & Costruzione<br />
Einstellen der Traggurte<br />
Die Traggurte bei leerem Behälter einstellen.<br />
1. Verkürzen 2. Verlängern<br />
Am Gurt ziehen Gurt hinaufschieben<br />
Einfüllen der Spritzbrühe in den Behälter<br />
Achten sie auf Ihre Sicherheit: Handschuhe, Schutzbrille, Atemschutz und Schutzkleidung. Beachten Sie<br />
die Anweisungen des Spritzmittellieferanten.<br />
� Nur in Wasser lösbare Flüssigkeiten oder bereits mit Flüssigkeit angerührte Pulver einfüllen. Achten<br />
Sie darauf, dass die Spritzbrühe immer durch das Einfüllsieb in den Behälter gefüllt wird. Der Behälter<br />
enthält ganz gefüllt ca. <strong>15</strong> Liter.<br />
� Immer zuerst Wasser in den Behälter füllen und erst danach das Spritzmittel. Bevor Sie die<br />
Pulvermischungen in den Behälter füllen, müssen diese vorher gut mit Wasser verrührt sein.<br />
Zur Dosierung kann der Dosierbecher auf der Siebunterseite benützt werden.<br />
x 1000<br />
x <strong>15</strong>00<br />
x 2000<br />
Die angegebene Verdünnung bezieht sich auf einen vollen Behälter.
Kontrollieren Sie ob der Dichtungsring im Einfülldeckel vorhanden ist und verschliessen Sie den Deckel<br />
Garanzia<br />
fest. Dies garantiert den nötigen Druckaufbau und verhindert ein verschütten der Spritzbrühe.<br />
Vi concediamo una garanzia per la durata di 24 mesi a partire dalla data di vendita. Durante questo<br />
periodo eventuali difetti riscontrati sull’attrezzo derivanti da difetti di fabbricazione o difetti di materiale<br />
verranno da noi eliminati gratuitamente tramite riparazione, sostituzione di parti dell’attrezzo oppure<br />
fest verschliessen sostituzione dell’intero attrezzo.<br />
• Premessa per il diritto a garanzia è la regolare conservazione nonché l’uso appropriato e corretto dei<br />
Einfülldeckel<br />
nostri attrezzi secondo le istruzioni d’uso valide al momento della consegna (incluse tutte le<br />
indicazioni sugli attrezzi stessi), che sono parte integrante del nostro contratto. Qualsiasi difetto<br />
dell’attrezzo che cade sotto la nostra responsabilità deve essere comunicato alla nostra azienda per<br />
Blockierungshebel<br />
Das Niederdrücken des Blockierungshebels gibt die Verriegelung frei und erlaubt es den Griffhebel in die<br />
Ausgangsstellung zu bringen.<br />
Blockierungshebel<br />
Sprühen<br />
� Griffhebel auf ON stellen.<br />
� Die Betätigung des Griffhebels schaltet den Schalter ein, öffnet das Ventil und der Sprühvorgang kann<br />
beginnen.<br />
� Die Entlastung des Griffhebels schaltet den Schalter aus, schliesst das Ventil und beendet den<br />
Sprühvorgang.<br />
Griffhebel betätigen Griffhebel entlasten<br />
Wechselschalter Punktsprühen / kontinuierliches Sprühen<br />
Je nach Arbeitsvorgang schieben Sie den Schalter entweder auf Punktsprühen oder kontinuierliches<br />
Sprühen.<br />
iscritto immediatamente dopo averlo riscontrato.<br />
� Dalla garanzia sono esclusi in modo esplicito i seguenti danni e/o guasti:<br />
- derivanti da mancata osservanza delle istruzioni e degli avvisi nelle istruzioni d’uso come per<br />
esempio uso improprio o conservazione non appropriata dei nostri attrezzi;<br />
- derivanti da reazioni chimiche o normale usura;<br />
- derivanti da cause fuori dal nostro ambito di responsabilità come per esempio danneggiamenti<br />
meccanici, cause di forza maggiore.<br />
� I diritti a garanzia scadono nel caso il proprietario dell’attrezzo o terzi effettuassero delle modifiche o<br />
delle riparazioni non appropriate e quindi non autorizzate dalla nostra azienda.<br />
� Non fanno parte e sono quindi escluse dagli obblighi di garanzia tutte le richieste o pretese non<br />
inerenti agli obblighi a cui sopra. Qualsiasi obbligo di garanzia anche legalmente ammissibile è<br />
escluso in maniera esplicita, soprattutto la richiesta di garanzia per danni al capitale come le perdite<br />
di guadagno, mancato usufrutto, interruzione del servizio o dell’attività, ecc..<br />
� Per ulteriori informazioni sull’utilizzo e la manutenzione dell’attrezzo rivolgersi al venditore.
Precauzioni di sicurezza per l’uso della batteria<br />
� Tenere la batteria lontana da fonti di calore o dalle fiamme.<br />
� Non mettere la batteria in cortocircuito.<br />
� Non aprire mai la batteria.<br />
� In caso di fuoriuscita di liquidi (elettroliti) non mettere in contatto pelle ed occhi.<br />
Importante<br />
� In caso di contatto con la pelle: lavare immediatamente con molta acqua.<br />
� In caso di contatto con gli occhi: lavare immediatamente con molta acqua e andare dal medico.<br />
� Conservare la batteria scarica in temperatura di ca. 5°C – 20°C (livello nella zona gialla).<br />
� Variazioni fino a +40°C, e/o –20°C, riducono la capacità ca. del 40%.<br />
� Nel conservare la batteria scarica si consiglia di caricarla e scaricarla ogni 6 mesi.<br />
Tenere puliti i contatti.<br />
Batterie vecchie richiedono di uno smaltimento speciale per batterie!!<br />
(Raccoglitori per pile usate)<br />
Druckregulierventil<br />
Je nach Anwendung stellen Sie den Schalter entweder auf Hochdruck oder auf Niederdruck ein.<br />
Hochdruck Niederdruck<br />
Aufladen der Batterie<br />
� Stecker (1) in Aufladebuchse des <strong>Accu</strong> <strong>285</strong>-<strong>15</strong> stecken.<br />
� Stecker (2) ans Stromnetz anschliessen.<br />
Aufladebuchse<br />
Stecker (1)<br />
Nach dem Laden entfernen Sie den Stecker 1 und danach den Stecker 2.<br />
Wichtige Hinweise:<br />
� Den Akku erst laden, wenn sich die Ladeanzeige im gelben Bereich befindet.<br />
� Während des Sprühens, Batterie nie vollständig entladen (Vermeiden von Tiefentladung).<br />
� Spritze während des Aufladens nicht benützen.<br />
� Aufladen der Batterie bei 0°C - 40°C.<br />
Nach erfolgtem Aufladen des Akkus, erlischt die rote Diode „Charge“<br />
und die grüne Diode „Ready“ blinkt.<br />
Stecker (2)
Demontage der Batterie<br />
Entfernen Sie zuerst die 4 Schrauben der Rückenauflagefläche (back pad).<br />
Danach entfernen Sie die 2 Schrauben an der Batteriehalterung und nehmen die Batterie heraus.<br />
Ersatzteile und Reparaturen<br />
Wartungs- und Reparaturarbeiten dürfen nur durch gut instruiertes Personal oder den Fachhändler<br />
ausgeführt werden. Es sind ausschliesslich BIRCHMEIER-Originalteile zu verwenden.<br />
Smontare la batteria<br />
Svitare prima le 4 viti sulla superficie di appoggio della schiena (back pad).<br />
Dopo svitare le 2 viti sul portabatteria e togliere la batteria.<br />
Informazione: Il procedimento di ricarica può essere effettuato anche con batteria smontata.<br />
Pezzi di ricambio e riparazioni<br />
Tutte le riparazioni e tutti gli interventi di manutenzione devono essere effettuati esclusivamente da<br />
personale qualificato o dal venditore specializzato. Si dovranno utilizzare sempre esclusivamente<br />
ricambi originali BIRCHMEIER.
Valvola regolatrice di pressione<br />
A seconda dell’utilizzo impostare l’interruttore in posizione di alta pressione o di bassa pressione.<br />
Alta pressione Bassa pressione<br />
Ricaricare la batteria<br />
� Introdurre la spina (1) nella presa femmina di caricamento dell’ <strong>Accu</strong> <strong>285</strong>-<strong>15</strong>.<br />
� Collegare la spina (2) alla rete elettrica.<br />
Presa femmina<br />
Spina (1)<br />
Dopo la carica togliere la spina 1 e successivamente la spina 2.<br />
Note importanti:<br />
� Ricaricare la batteria soltanto quando il livello si trova nel zona gialla.<br />
� Non scaricare la batteria mai completamente durante il lavoro.<br />
� Non utilizzare lo spruzzo durante il caricamento.<br />
� Caricamento della batteria a 0°C - 40°C.<br />
A caricamento completato: si spegna la luce rossa „Charge“<br />
E quella verde „Ready“ lampeggia.<br />
Spina (2)<br />
Vorsichtsmassnahmen bei Handhabung der Batterie<br />
� Niemals mit Feuer in Kontakt bringen.<br />
� Batterie nicht kurzschliessen.<br />
� Batterie nie öffnen.<br />
� Ausgetretenen Elektrolyten (Flüssigkeit) nicht in Kontakt mit der Haut, keinesfalls<br />
mit den Augen bringen.<br />
Wichtig<br />
� Bei Hautkontakt sofort mit viel Wasser abwaschen.<br />
� Bei Augenkontakt sofort mit viel Wasser auswaschen und den Arzt aufsuchen.<br />
� Lagerung des Akku im entladenen Zustand (Ladeanzeige auf gelb), bei ca. 5°C - 20°C.<br />
� Abweichungen bis +40°C, bzw. –20°C, verringern die Kapazität um 40%.<br />
� Bei längerem Nichtgebrauch, Batterie alle 6 Monate laden und entladen.<br />
Alte Batterien einer speziellen Entsorgung<br />
(Batterie-Sammelstelle) zuführen!!
Garantie<br />
Wir gewähren Ihnen eine Garantie von 24 Monaten ab Verkaufsdatum.<br />
Während dieser Dauer beheben wir kostenlos Mängel des Gerätes, die auf Material– und<br />
Fabrikationsfehler beruhen, entweder durch Reparatur oder Austausch von Teilen oder des ganzen<br />
Sprühgerätes.<br />
� Voraussetzung für Garantieleistungen ist die fachgerechte Lagerung und genaue Anwendung unserer<br />
Geräte nach den bei der Lieferung gültigen Bedienungsanleitungen (inkl. Hinweise an den Geräten),<br />
die einen integrierten Bestandteil unseres Vertrages bilden. Allfällige Schäden, die in unserem<br />
Verantwortungsbereich liegen, müssen uns unverzüglich nach deren Entdeckung schriftlich gemeldet<br />
werden.<br />
� Von der Garantie und Haftung ausdrücklich ausgeschlossen sind Schäden und Mängel:<br />
- aus der Nichteinhaltung unserer Instruktionen und Anwendungsempfehlungen in den<br />
Gebrauchsanleitungen wie z.B. unsachgemässer Gebrauch oder mangelnder Unterhalt unserer<br />
Geräte;<br />
- aus chemischen Einwirkungen oder normalem Verschleiss;<br />
- wegen Schadenursachen, die ausserhalb unseres Einfluss- und Verantwortungsbereichs liegen wie<br />
z.B. mechanische Beschädigung, höhere Gewalt.<br />
� Die Garantie und Haftungsansprüche erlöschen, wenn der Besitzer oder Drittpersonen Änderungen<br />
oder unsachgemässe Reparaturen am Gerät vornehmen.<br />
� Von der Garantie und Haftung sind alle Ansprüche ausgeschlossen, welche über die oben genannten<br />
Verpflichtungen hinausgehen. Es wird jede Haftpflicht, soweit gesetzlich zulässig, ausdrücklich weg<br />
bedungen. Insbesondere ist jede Haftungspflicht für reine Vermögensschäden wie entgangener<br />
Gewinn, Nutzungsausfall, Betriebsunterbruch etc. ausdrücklich ausgeschlossen.<br />
� Für weitere Auskünfte über die Handhabung oder den Unterhalt des Gerätes wenden Sie sich an<br />
Ihren Händler.<br />
Controllare che sia presente l’anello di tenuta sul coperchio di riempimento e chiudere bene il coperchio.<br />
Ciò garantisce la formazione della pressione necessaria e evita che venga versata poltiglia per<br />
irrorazione.<br />
Coperchio di riempimento<br />
chiudere bene<br />
Leva di bloccaggio<br />
Spingendo in giù la leva di bloccaggio il bloccaggio viene liberato e permette di portare il manico<br />
spruzzatore nella posizione di partenza.<br />
Leva di bloccaggio<br />
Spruzzare<br />
� Portare il manico spruzzatore in posizione ON.<br />
� Azionando il manico spruzzatore si accende l’interruttore, la valvola viene aperta e il trattamento a spruzzo<br />
può iniziare.<br />
� Scaricando il manico spruzzatore l’interruttore si spegne, la valvola viene chiusa e il processo è<br />
terminato.<br />
Azionare il manico spruzzatore Scaricare il manico spruzzatore<br />
Commutatore spruzzare a punti / spruzzo continuato<br />
A seconda del processo lavorativo spostare l’interruttore in posizione di spruzzo a punti o in quella di<br />
spruzzo continuato.
Regolare la cintura di trasporto<br />
Regolare la cintura quando il serbatoio è vuoto.<br />
Riempimento del serbatoio con la poltiglia per irrorazione<br />
Prendere le adeguate misure precauzionali: Guanti, occhiali di sicurezza, protezione respiratoria<br />
(maschera di protezione) e indumenti di protezione. Attenersi scrupolosamente alle indicazioni del<br />
fornitore dei prodotti chimici impiegati.<br />
� Riempire il serbatoio solo con liquidi solubili in acqua oppure con prodotti in polvere già mescolati con<br />
del liquido. Fare attenzione che la poltiglia per irrorazione venga introdotta sempre attraverso il filtro. Il<br />
serbatoio da pieno contiene ca. <strong>15</strong> litri.<br />
� Introdurre nel serbatoio sempre prima l’acqua e solo dopo il prodotto chimico. Prima di introdurre<br />
delle miscele in polvere, esse dovranno essere precedentemente mescolate bene con acqua. Per il<br />
dosaggio si potrà utilizzare l’apposito bicchiere dosatore posto al lato inferiore del filtro.<br />
La diluizione indicata si riferisce a serbatoio pieno.<br />
EG Konformitätserklärung<br />
Wir <strong>Birchmeier</strong> <strong>Sprühtechnik</strong> <strong>AG</strong><br />
1. Accorciare 2. Allungare Im Stetterfeld 1<br />
CH 5608 Stetten<br />
Tirare la cintura Spingerla in su<br />
x 1000<br />
x <strong>15</strong>00<br />
x 2000<br />
erklären hiermit, dass die Motor-Rücken-Sprühgeräte<br />
Modell: <strong>Accu</strong> <strong>285</strong>-<strong>15</strong> Art. Nr. 1<strong>15</strong> 975 03<br />
<strong>Accu</strong> <strong>285</strong>-<strong>15</strong> BBA 1<strong>15</strong> 975 04<br />
<strong>Accu</strong> <strong>285</strong>-<strong>15</strong> Profi 1<strong>15</strong> 975 05<br />
<strong>Accu</strong> <strong>285</strong>-<strong>15</strong> BBA Profi 1<strong>15</strong> 975 06<br />
aufgrund der Konzipierung und Bauart sowie in der von uns in Verkehr gebrachten Ausführung den<br />
einschlägigen grundlegenden Sicherheits- und Gesundheitsanforderungen der EG- Richtlinien<br />
entspricht.<br />
Einschlägige EG-Richtlinien:<br />
Maschinenrichtlinie 2006/42/EG<br />
Angewandte harmonisierte Normen:<br />
EN 12100-1:2003<br />
EN 12100-2:2003<br />
Es ist durch interne Massnahmen sichergestellt, dass die Seriegeräte immer den Anforderungen der<br />
aktuellen EG-Richtlinien und den angewandten Normen entsprechen.<br />
Der Unterzeichnende handelt im Auftrag und mit Vollmacht der Geschäftsleitung.<br />
Stetten, Juni 2010<br />
M. Zuber<br />
Leiter Entwicklung & Konstruktion
Massnahmen bei Störungen<br />
Die folgende Checkliste soll Ihnen bei der Behebung von kleineren Störungen behilflich sein.<br />
Schlechtes Spritzbild<br />
Motor arbeitet nicht<br />
Defekt am Elektrokabel: Fehlerhafter Anschluss -> richtig anschliessen<br />
Defekter Schalter -> ersetzen<br />
Kabel gerissen -> ersetzen oder reparieren<br />
Sicherung durchgebrannt -> ersetzen<br />
Motor: Kabel gerissen -> ersetzen<br />
Ausgebrannt -> ersetzen<br />
Batterie: Spannungsverlust -> aufladen<br />
Pumpe: Verschmutzte oder defekte Dichtungen -> reinigen oder reparieren<br />
Motor arbeitet, aber ....<br />
Sprüht nicht: Verstopfte Düse -> reinigen<br />
Verstopftes Ansaugventil -> reinigen<br />
Verstopftes Pumpenventil -> reinigen<br />
Verklebtes Saugventil -> gelbe Membrane an der Pumpe leicht drücken<br />
Ungenügender Druck<br />
(Spannung zu niedrig): Verstopftes Pumpenventil -> reinigen<br />
Pumpe defekt -> ersetzen<br />
Verstopftes Druckregulierventil -> reinigen<br />
Druckregulierventil defekt -> ersetzen<br />
Düse defekt -> ersetzen<br />
Ansaugschlauch verstopft oder defekt -> reinigen oder ersetzen<br />
Spannungsabfall -> Batterie laden<br />
Probleme beim Aufladen<br />
Batterie kann nicht<br />
aufgeladen werden: Defekte Batterie -> ersetzen<br />
Defektes Ladegerät -> ersetzen<br />
Defekter Kabelanschluss -> ersetzen<br />
Kabel gerissen -> ersetzen<br />
Leistung wird nicht<br />
erreicht: Zu kurze Ladezeit -> aufladen<br />
Defekte Batterie -> ersetzen<br />
Defektes Ladegerät -> ersetzen<br />
Sicherung durchgebrannt: Motor dreht schlecht -> auswechseln<br />
Pumpe arbeitet nicht -> Kolbendichtung verstopft oder defekt -> reinigen<br />
oder ersetzen<br />
Defekter Schalteranschluss -> ersetzen<br />
Campo di applicazione<br />
Con lo spruzzatore motorizzato da portare a spalla si possono applicare al terreno i prodotti fitosanitari, i<br />
diserbanti e il concime liquido utilizzati in casa, giardino, nell’agricoltura e nella viticoltura.<br />
Simboli per avvertimenti (pittogrammi)<br />
Significato dei pittogrammi:<br />
Leggere attentamente le istruzioni d’uso.<br />
Accertarsi che prima dell’utilizzo il manuale d’istruzioni d’uso sia stato letto attentamente.<br />
Indossare indumenti di protezione.<br />
Durante il lavoro si raccomanda di indossare specifici indumenti di protezione, come per esempio un<br />
elmetto di sicurezza, occhiali di sicurezza e protezione auricolare.<br />
Messa in funzione<br />
Prima dell’uso montare la tubazione di spruzzo.<br />
Valvola d’arresto Tubo spruzzatore Doppio ugello<br />
Controllare il corretto funzionamento e la tenuta dell’attrezzo <strong>Accu</strong> <strong>285</strong>-<strong>15</strong>.<br />
Controllo della batteria: Accendere brevemente per controllare la tensione.<br />
Verde: pronto per spruzzare<br />
Giallo o rosso: Ricaricare<br />
rosso giallo verde<br />
Indicazione importante:<br />
L’indicatore della batteria funziona solo quando l’apparecchio è in funzione.<br />
Se l’indicatore della batteria segna giallo, si raccomanda di caricare l’accumulatore. Qualora il serbatoio<br />
fosse vuoto, l’attrezzo non dovrà essere acceso per più di un minuto.<br />
(Attenzione!! Evitare il funzionamento a secco della pompa).
Tubo spruzzatore<br />
Apertura scarico<br />
Doppio ugello<br />
Serbatoio di poltiglia<br />
Indicatore batteria carica<br />
Valvola di regolazione<br />
di pressione<br />
Coperchio di<br />
riempimento<br />
Important!<br />
Lisez entièrement le mode d’emploi avant la première utilisation. L’utilisateur est responsable pour les<br />
dommages issus de la non observation de ces prescriptions.<br />
La non observation des indications de sécurité et d’avertissement peut entraîner des blessures ou la<br />
mort de personnes!<br />
Avertissement!<br />
� L'appareil doit uniquement être utilisé par des personnes adéquatement formées. En cas de cession<br />
à des tiers, il faudra obligatoirement leur remettre en même temps le mode d'emploi.<br />
� L'opérateur doit faire attention à la présence de tiers, en particulier d'enfants et d'animaux<br />
domestiques, et respecter une distance suffisante par rapport à eux. Il assumera la responsabilité des<br />
dommages directs ou indirects qu'il occasionne.<br />
� Durant toute manipulation de produits chimiques et de produits phytosanitaires, il faudra éviter tout<br />
contact avec les yeux et la peau. C'est pourquoi il est indispensable de porter des vêtements de<br />
protection appropriés, un masque de protection, des lunettes de sécurité et des gants en caoutchouc.<br />
� Ne jamais essayer de déboucher des vannes et des buses colmatées en soufflant dedans. (Risque<br />
d'intoxication!)<br />
� Les produits chimiques et les produits phytosanitaires ne doivent pas être transférés dans d'autres<br />
récipients (bouteilles, boîtes, etc.) et doivent être entreposés hors de portée des enfants.<br />
� Ne jamais pulvériser contre la direction du vent ou quand le vent souffle trop fort. Ne pas verser<br />
davantage de produit de pulvérisation que ce qui est nécessaire pour la surface à traiter.<br />
Valvola d’arresto<br />
Cintura di trasporto<br />
Indication de sécurité<br />
� Avant toute utilisation, il faut s'assurer que l'appareil a été correctement monté, n'est pas endommagé<br />
et est apte au fonctionnement. Les pièces défectueuses ne doivent plus être réutilisées.<br />
� Nous attirons expressément votre attention sur le fait que toute intervention de votre part sur<br />
l'appareil est interdite. Dans ce cas, vous perdez tous vos droits à la garantie et BIRCHMEIER<br />
<strong>Sprühtechnik</strong> <strong>AG</strong> sera dégagée de toute responsabilité.<br />
� Les travaux d'entretien et de réparation ne doivent être effectués que par un personnel adéquatement<br />
Dati tecnici<br />
qualifié ou par le distributeur spécialisé. Il faudra exclusivement utiliser des pièces de rechange<br />
BIRCHMEIER d'origine.<br />
Modello: Spruzzatore a batteria <strong>Accu</strong> <strong>285</strong>-<strong>15</strong><br />
� L'appareil ne doit pas être exposé au rayonnement du soleil. Les effets de la chaleur et du gel<br />
Dimensioni: 365 (B) x 220 (T) x 480 (H) mm<br />
peuvent endommager l'appareil.<br />
Peso a vuoto:<br />
Contenuto serbatoio:<br />
Pompa:<br />
Pressione:<br />
Portata di polverizzazione:<br />
Motore:<br />
Batteria:<br />
Durata servizio:<br />
Durata carica:<br />
Caricabatterie:<br />
Potenza:<br />
5,7 kg<br />
<strong>15</strong> litri<br />
Pompa a pistone<br />
10 bar<br />
1,6 l/min.<br />
30 W, DC<br />
Batteria NiCd 12 V, 5 Ah<br />
1,5 h. con alta pressione, 2 h con bassa pressione<br />
max. 10 ore<br />
100 – 240 V Tensione d’ingresso<br />
800 mA<br />
� L'appareil doit être vidé après chaque usage et nettoyé à fond avec de l'eau. Il faudra veiller à ce<br />
moment-là à ne pas polluer les cours d'eau.<br />
� L'évacuation des produits chimiques ou des produits phytosanitaires qui sont restés dans le réservoir<br />
de liquide et de leur dépôt doit se faire selon les règles de sécurité en vigueur. Appliquer à cette fin<br />
les règles prescrites par le fabricant du produit chimique.<br />
� A la connaissance du constructeur aucune des substances admises au moment de la construction de<br />
l‘appareil comme produit pour le traitement et la protection des plantes n‘est susceptible d‘attaquer ou<br />
de détériorer les matériaux utilisés pour sa fabrication. L‘emploi de l‘appareil n‘est pas admis pour les<br />
produits corrosifs (désinfectants, produit pour imprégnation) ni pour les produits inflammables ou<br />
explosifs.
Tube de<br />
pulvérisation<br />
Orifice de vidange<br />
Données techniques<br />
Double buse<br />
Réservoir du produit<br />
à pulvériser<br />
Poignée<br />
Modèle: Pulvérisateur à batterie <strong>Accu</strong> <strong>285</strong>-<strong>15</strong><br />
Dimensions: 365 (B) x 220 (T) x 480 (H) mm<br />
Poids à vide: 5,7 kg<br />
Capacité: <strong>15</strong> litres<br />
Pompe: Pompe à piston<br />
Pression: 10 bar<br />
Débit: 1,6 l/min.<br />
Moteur: 30 W, DC<br />
Batterie: NiCd Batterie 12 V, 5 Ah<br />
Durée de fonctionnement: 1,5 h avec haute pression, 2 h avec basse pression<br />
Durée de charge: max. 10 heures<br />
Chargeur: 100 – 240 V Tension d’entrée<br />
Puissance: 800 mA<br />
Émissions sonores<br />
Niveau de puissance sonore, mesurée dB(A) 74<br />
Niveau de puissance sonore, garantie, LW<strong>AG</strong> dB(A) 74<br />
Batterie annonce<br />
de tiroir<br />
Vanne régulatrice<br />
de pression<br />
Couvercle de remplissage<br />
Courroies<br />
Importante!<br />
Leggere le istruzioni d’uso interamente ed attentamente prima del primo utilizzo. L’utente risponde per<br />
danni causati da mancata osservanza delle istruzioni indicate nel presente manuale d’uso.<br />
La mancata osservanza delle indicazioni di sicurezza e degli avvertimenti di pericolo potrebbe causare<br />
gravi lesioni alle persone o provocarne addirittura la morte!<br />
Attenzione!<br />
� L’attrezzo deve essere usato solo da personale qualificato. In caso di passaggio a terzi le istruzioni<br />
d’uso dovranno assolutamente essere consegnate a quest’ultimi insieme all’attrezzo stesso.<br />
� L’utente è responsabile nei confronti di terzi, soprattutto bambini ed animali domestici e deve<br />
accertarsi sempre del fatto che essi si tengono a debita distanza dall’attrezzo. Per danni causati<br />
direttamente o indirettamente è responsabile l’utente.<br />
� Durante l’uso di prodotti chimici e fitosanitari evitare il contatto con gli occhi e la pelle. Pertanto è<br />
assolutamente necessario indossare specifici indumenti di protezione, maschera di protezione,<br />
occhiali di sicurezza e guanti di gomma.<br />
� Non cercare mai di stasare valvole e ugelli otturati soffiandoci dentro con la bocca (pericolo di<br />
avvelenamento!).<br />
� Prodotti chimici e fitosanitari non devono essere travasati in altri contenitori (bottiglie, lattine, ecc.) e<br />
devono essere conservati sempre lontani dalla portata dei bambini.<br />
� Non spruzzare mai contro vento o in condizioni di vento forte. Non utilizzare una quantità superiore di<br />
agente da spruzzare di quanto necessario per l’area da trattare.<br />
Indicazioni di sicurezza<br />
� Prima di ogni utilizzo verificare che l’attrezzo sia regolarmente montato, che non presenti danni e che<br />
sia perfettamente funzionale. Eventuali pezzi danneggiati non devono essere riutilizzati.<br />
� Qualsiasi intervento sull’attrezzo non è ammissibile. In tal caso scadrebbero tutti diritti di garanzia nei<br />
confronti della BIRCHMEIER <strong>Sprühtechnik</strong> <strong>AG</strong>.<br />
� Eventuali riparazioni e tutti gli interventi di manutenzione devono essere effettuati esclusivamente da<br />
personale qualificato o dal venditore specializzato. Si dovranno utilizzare sempre esclusivamente<br />
ricambi originali BIRCHMEIER.<br />
� Evitare di lasciare l’attrezzo esposto al sole. L’attrezzo teme il calore e il gelo che potrebbero<br />
danneggiarlo seriamente.<br />
� L’attrezzo dopo ogni utilizzo dovrà essere svuotato e pulito accuratamente con acqua. Accertarsi di<br />
non inquinare le acque.<br />
� Lo smaltimento dei rifiuti chimici o fitosanitari e i loro residui rimasti all’interno del serbatoio deve<br />
essere effettuato secondo le rispettive norme di sicurezza in vigore. Osservare scrupolosamente le<br />
indicazioni del fabbricante dei prodotti chimici impiegati.<br />
� Il produttore al momento della fabbricazione dell’attrezzo non è a conoscenza di effetti nocivi causati<br />
da parte dei prodotti chimici o fitosanitari ammissibili sul materiale impiegato. L’attrezzo non è<br />
ammesso con l’uso di sostanze corrosive (per esempio disinfettanti e sostanze impregnanti) come<br />
anche mezzi combustibili ed esplosivi.
Troubleshooting<br />
The purpose of this checklist is to assist you in rectifying minor malfunctions. If despite these efforts the<br />
problem still cannot be solved, please consult your dealer.<br />
Poor spray pattern<br />
Motor does not run<br />
Faulty cable: Faulty connection -> connect correctly<br />
Faulty switch -> replace<br />
Cable broken -> replace or repair<br />
Fuse blown -> replace<br />
Motor: Cable broken -> replace<br />
Burned out -> replace<br />
Battery: Low voltage -> recharge<br />
Pump: Dirty or worn gaskets -> clean or repair<br />
Motor runs, but ....<br />
Does not spray: Clogged nozzle-> clean<br />
Clogged suction valve -> clean<br />
Clogged pump valve -> clean<br />
If suction valve is clogged -> press smoothly the yellow membrane<br />
of the pump<br />
Not enough pressure<br />
(low voltage): Clogged pump valve -> clean<br />
Pump faulty -> replace<br />
Clogged pressure regulating valve -> clean<br />
Pressure regulating valve faulty -> replace<br />
Nozzle faulty -> replace<br />
Suction hose blocked or faulty -> clean or replace<br />
Voltage low -> recharge battery<br />
Problems during charging<br />
Battery cannot be<br />
recharging: Faulty battery -> replace<br />
Faulty charger -> replace<br />
Faulty cable connection -> replace<br />
Cable broken -> replace<br />
Battery not fully charged: Charging time too short -> recharge<br />
Faulty battery -> replace<br />
Faulty charger -> replace<br />
Fuse blow: Motor not running properly -> replace<br />
Pump does not work -> Piston seal blocked or faulty -> clean or replace<br />
Faulty switch connection -> replace<br />
Domaines d‘application<br />
Pour tous les travaux de pulvérisation pour la protection biologique et chimique de plantes.<br />
Pour épandre l‘engrais liquide, dans le jardin, pour l‘agriculture, l‘horticulture, la culture des fruits et la<br />
vigne.<br />
Symbole de précaution<br />
Signification des symboles:<br />
Lisez scrupuleusement le mode d‘emploi<br />
Veuillez assurer la lecture attentive du mode d‘emploi avant la mise en marche.<br />
Portez les vêtements de protection<br />
Lors de la pulvérisation veuillez porte des vêtements protecteurs, donc aussi un casque, des lunettes de<br />
protection et protections d‘oreille.<br />
Mise en service<br />
Avant l‘emploi monter le tube de pulvérisation.<br />
Poignée Tube de pulvérisation<br />
Double buse<br />
Vérifier l‘étanchéité et le bon fonctionnement de l‘<strong>Accu</strong> <strong>285</strong>-<strong>15</strong>.<br />
Vérification de la batterie: Mettez en marche pour un petit instant l’appareil pour contrôler la tension.<br />
Vert: Prêt pour la pulvérisation<br />
Jaune ou rouge: Recharger<br />
rouge jaune vert<br />
Remarque:<br />
L’indication de chargement fonctionne seulement si l’appareil est en marche.<br />
Si l’indication se trouve à proximité de la zone jaune, nous recommandons de recharger le pulvérisateur.<br />
Si le réservoir est vide, l‘appareil ne peut pas être mise en marche plus qu‘une minute.<br />
(Attention!! Éviter que la pompe ne tourne pas à sec)
Réglage des bretelles<br />
Ce réglage doit être effectué lorsque le réservoir est vide.<br />
1. Raccourcir 2. Allonger<br />
Tirer la courroie Faire glisser la courroie vers le haut<br />
Remplissage du réservoir avec la bouillie<br />
Observez les mesures de protection: gants, lunettes de protection, masque respiratoire et vêtements de<br />
protection. Observez les instructions des fournisseurs des produits à pulvériser.<br />
� Ne verser dans le réservoir que des liquides déjà dilués et bien mélangés.<br />
� Verser toujours d‘abord de l‘eau dans le réservoir puis seulement le produit. Avant de verser des<br />
mélanges préparés avec des poudres il faut que la poudre soit bien mélangés dans l‘eau.<br />
La dilution indiquée correspond à un volume complet de réservoir.<br />
EU Declaration of Conformity<br />
We <strong>Birchmeier</strong> <strong>Sprühtechnik</strong> <strong>AG</strong><br />
Im Stetterfeld 1<br />
CH 5608 Stetten<br />
hereby declare that the motorized knapsack sprayers<br />
Model: <strong>Accu</strong> <strong>285</strong>-<strong>15</strong> Art. No. 1<strong>15</strong> 975 03<br />
<strong>Accu</strong> <strong>285</strong>-<strong>15</strong> BBA 1<strong>15</strong> 975 04<br />
<strong>Accu</strong> <strong>285</strong>-<strong>15</strong> Profi 1<strong>15</strong> 975 05<br />
<strong>Accu</strong> <strong>285</strong>-<strong>15</strong> BBA Profi 1<strong>15</strong> 975 06<br />
described below conforms to the relevant fundamental safety and health requirements of the appropriate<br />
EU Directives both in its basic design and construction as well as in the version marketed by us.<br />
Relevant EU Directives:<br />
EU Machinery Directive 2006/42/CE<br />
Harmonised standards applied:<br />
EN ISO 12100-1:2003<br />
EN ISO 12100-2:2003<br />
x 1000 Stetten, June 2010<br />
x <strong>15</strong>00<br />
x 2000<br />
Appropriate internal measures have been taken to ensure that series-production units conform at all<br />
times to the requirements of current EU Directives and relevant standards.<br />
The signatory is empowered to represent and act on behalf of the company management.<br />
M. Zuber<br />
Head of Development & Design
Warranty<br />
We make a warranty of 24 months from the date of sale. During this warranty period we will repair free of<br />
charge defects of the sprayer which are due to deficiencies in material and manufacturing, either by<br />
repair of replacement of parts, or of the entire sprayer.<br />
� Prerequisite to the honoring of warranties is the appropriate storage and use of our equipment strictly<br />
in accordance with the operating instructions which were valid on delivery (including the instructions<br />
given on the appliances themselves). These instructions constitute an integral part of our contract.<br />
Any and all damages which fall within our scope of responsibility must be reported to us in writing<br />
immediately after they have been discovered.<br />
� Expressly excluded from the warranty and liability are damages and deficiencies:<br />
� Resulting from the non-adherence to our instructions and usage recommendations in the operating<br />
manuals such as the improper use or inadequate maintenance of our equipment;<br />
� Resulting from chemical attack, or due to normal wear;<br />
� Due to damages, the causes of which are beyond the scope of our responsibility and influence, e.g.<br />
mechanical damage, higher force.<br />
� The warranty becomes null and void and any and all liabilities are disclaimed if the user or any third<br />
party alters or makes inexpert repairs to the sprayer.<br />
� Excluded from the warranty and liability are all incidents which extend beyond the obligations set forth<br />
above. Any and all liability is expressly excluded to the extent of the law. Expressly excluded is in<br />
particular any and all liability for damages which are purely asset-related such as lost profit, loss of<br />
use, operating outage etc.<br />
� For further information on handling or the maintenance of the sprayer please consult your dealer.<br />
Vérifiez si le joint de couvercle est à sa place et fermez bien le couvercle. Cela garantit la pression<br />
nécessaire et évite de même le gâchis du produit à pulvériser.<br />
Couvercle de remplissage<br />
fermer solidement<br />
Dispositif d‘arrêt<br />
En pesant le dispositif d‘arrêt, vous enlevez le blocage et permettez d‘actionner la poignée.<br />
Dispositif d’arrêt<br />
Pulvérisation<br />
� Actionnez le levier de la poignée.<br />
� Le mouvement du levier ouvre la soupape et la pulvérisation peut commencer.<br />
� Le levier déchargé ferme la soupape et termine la pulvérisation.<br />
En actionnant la poignée accroissez En soulageant la poignée accroissez<br />
Contacteur d‘échange pour la pulvérisation du point / pulvérisation continuée<br />
Dépendant l‘application mettez le contacteur sur pulvérisation de point ou pulvérisation continuée.
Vanne régulatrice de pression<br />
Dépendant l‘application mettez l‘interrupteur sur pression haute (H) ou basse (L).<br />
Pression haute Pression basse<br />
Recharge de la batterie<br />
� Enfoncer la fiche (1) dans la prise de recharge de l‘<strong>Accu</strong> <strong>285</strong>-<strong>15</strong><br />
� Brancher la fiche (2) sur le secteur.<br />
Prise de recharge<br />
Fiche (1)<br />
Une fois la recharge terminée, retirer la fiche 1 et la fiche 2.<br />
Remarques importantes:<br />
� D’abord charger l’accu si l’indication de chargement se trouve dans le niveau jaune.<br />
� Ne jamais décharger complètement la batterie durant la pulvérisation (décharge forte).<br />
� Ne jamais pulvériser pendant la recharge.<br />
� Recharger la batterie à une température ambiante se situant entre 0°C et 40°C.<br />
Après rechargement de l’accumulateur, la diode électroluminescente<br />
rouge „Charge“ éteint et la verte „Ready“ clignote.<br />
Fiche (2)<br />
Safety precautions when handling batteries<br />
� Keep well away from flames.<br />
� Never short circuit the battery.<br />
� Never open the battery.<br />
� Avoid skin or eye contact with spill out electrolyte of the battery.<br />
Important<br />
� By skin contact with electrolyte, rinse immediately with a lot of water.<br />
� By eye contact with electrolyte, rinse immediately the eye with a lot of water and consult a<br />
physician.<br />
� When not using the battery, store it in a discharged state (arrow needle in the yellow area)<br />
at approximately 5°C – 20°C (41°F – 68°F).<br />
� Deviation to +40°C (+104°F), resp. –20°C (-40°F), reduce the capacity by roughly 40%.<br />
� During storage for a long time, exercise the recharging/discharging operation every 6 month.<br />
Keep the electrical contacts clean.<br />
Return old batteries to a special disposal station!!
Disassembly of the battery<br />
Remove the first the 4 screws of the pack pad.<br />
Then remove the 2 screws of the support of the battery and take off the battery.<br />
Spare parts and repairs<br />
Maintenance and repair work may performed only be well-instructed Personnel, or by your <strong>Birchmeier</strong><br />
dealer. Use exclusively original BIRCHMEIER parts.<br />
Démontage de la batterie<br />
Enlevez les 4 vis du coussin à dos.<br />
Enlever les 2 vis de la fixation de la batterie et enlevez la batterie.<br />
Pièces de rechange et réparations<br />
Les travaux d’entretien et de réparation ne doivent être effectués que par un personnel adéquatement<br />
qualifié ou par le distributeur spécialisé. Il faudra exclusivement utiliser des pièces de rechange<br />
BIRCHMEIER.
Précautions à prendre lors de la manipulation de la batterie<br />
� Ne jamais la laisser a proximité d‘une flamme vive.<br />
� Ne pas court-circuiter la batterie.<br />
� Ne pas ouvrir la batterie.<br />
� Prière de faire attention que les liquides échappés n’ont pas de contacte avec la peau et surtout pas<br />
avec les yeux.<br />
Important<br />
� En cas de contact avec la peau, rincer avec beaucoup d‘eau.<br />
� En cas de contact avec les yeux, rincer avec beaucoup d‘eau et consulter immédiatement un<br />
médecin.<br />
� Stockage de l’accu seulement dans l’état déchargé (indication de chargement sur jaune),<br />
à 5°C – 20°C.<br />
� Des différences de température +40°C, resp. –20°C peuvent provoquer une réduction de la capacité<br />
d‘environ 40%.<br />
� Si l’accu n’a pas été usé durant un long temps, charger et décharger le tous les 6 mois.<br />
Déposer les batteries usées à un endroit spécialement<br />
prévu pour ce genre de déchets!!<br />
(Point de récolte des batteries usée)<br />
Pressure regulator<br />
Depending on the task set the switch either high pressure or low pressure.<br />
High pressure Low pressure<br />
To charge the battery<br />
� Insert plug (1) in the charging socket of <strong>Accu</strong> <strong>285</strong>-<strong>15</strong>.<br />
� Connect plug (2) to the mains.<br />
Charging socket<br />
Plug (1)<br />
After the load disconnect plug 1 and then plug 2.<br />
Important notes:<br />
� Recharge the battery only when the arrow needle is in the yellow area.<br />
� When spraying, do never fully discharge the battery to avoid exhaustive discharge.<br />
� While charging, do not use the sprayer.<br />
� Charge the battery at 0°C - 40°C (32°F - 104°F).<br />
After charging the battery, the red light „Charge“ will switch off<br />
and the green light „Ready“ will start to blink.<br />
Plug (2)
Control if the sealing ring of the filling top is available and close the top immediately. This assures the<br />
Garantie<br />
necessary pressure build-up and prevents the spilling of the spray mixture.<br />
Nous accordons une garantie de 24 mois à partir de la date de vente. Durant cette période de garantie,<br />
nous éliminons sans frais tout défaut de l’appareil consécutif à un défaut de matériel ou de fabrication,<br />
soit par réparation ou échange de composants ou de l’ensemble de l’appareil.<br />
to close firmly � Les conditions pour l’octroi de prestations de garantie sont un entreposage adéquat et une utilisation<br />
conforme de nos appareils selon les modes d’emploi, inclus les indications sur les appareils, valables<br />
Fill-in cover<br />
au moment de la remise de l’appareil et qui font partie intégrante de notre contrat. D’éventuels<br />
dommages, faisant partie de notre domaine de responsabilité, doivent être mentionnés sans délai<br />
Blocking lever<br />
The low pressure of the sealing leverage frees the bolt and allows the handle leverage to get to the initial<br />
position.<br />
Blocking lever<br />
Spraying<br />
� Set the handle leverage ON.<br />
� The activity of the handle leverage activates the switch, opens the valve and the spray procedure may<br />
initiate.<br />
� The release of the handle leverage deactivates the switch, closes the valve and ends the spray<br />
procedure.<br />
Operating the handle leverage Relieving the handle leverage<br />
Toggle switches spray point / continued spraying<br />
Depending on the working procedure shift the switch either to toggle switches spray point or to continued<br />
spraying.<br />
après leur découverte et par écrit.<br />
� Sont expressément exclus de la garantie les dommages et carences:<br />
- résultant de la non observation de nos instructions et recommandations d’utilisation de nos modes<br />
d’emploi comme par ex. une utilisation inadéquate ou un entretien inapproprié de nos appareils;<br />
- par suite d’influences chimiques ou d’usure normale;<br />
- pour des causes de dommages hors de notre domaine d’influence et de responsabilité comme par<br />
ex. dommages mécaniques, actes de violence.<br />
� Les prétentions de garantie et de responsabilité sont échues si le propriétaire ou de tierces personnes<br />
entreprennent des modifications ou des réparations inadéquates à l’appareil.<br />
� Toutes prétentions de garantie ou de responsabilité dépassant les engagements susmentionnés.<br />
Toute prétention en responsabilité civile, sous réserve légale, est exclue. En particulier, sont<br />
expressément exclus toutes prétentions en responsabilité civile les pertes financières telles les pertes<br />
de gain, non-jouissance de l’objet interruptions d’exploitation, etc.,<br />
� Pour d’autres renseignements sur l’emploi ou l’entretien de l’appareil, veuillez consulter votre<br />
revendeur.
Déclaration de conformité européenne<br />
Nous <strong>Birchmeier</strong> <strong>Sprühtechnik</strong> <strong>AG</strong><br />
Im Stetterfeld 1<br />
CH 5608 Stetten<br />
par la présente, nous déclarons que les pulvérisateurs à dos à moteur<br />
Produit: <strong>Accu</strong> <strong>285</strong>-<strong>15</strong> Type: 1<strong>15</strong> 975 03<br />
<strong>Accu</strong> <strong>285</strong>-<strong>15</strong> BBA 1<strong>15</strong> 975 04<br />
<strong>Accu</strong> <strong>285</strong>-<strong>15</strong> Profi 1<strong>15</strong> 975 05<br />
<strong>Accu</strong> <strong>285</strong>-<strong>15</strong> BBA Profi 1<strong>15</strong> 975 06<br />
ci-après répond, suite à sa conception et sa construction ainsi que de par le modèle que nous avons mis<br />
sur le marché, aux exigences de sécurité et d’hygiène en vigueur de la directive européenne.<br />
En cas de modification de la machine effectuée sans notre accord, cette déclaration sera caduque.<br />
Directives européennes en vigueur:<br />
Directive européenne sur les machines (2006/42/CE)<br />
Normes harmonisées appliquées:<br />
EN ISO 12100-1:2003<br />
EN ISO 12100-2:2003<br />
La conformité permanente des appareils de série avec les exigences consignées dans les directives<br />
actuelles de la CE et avec les normes appliquées, est garantie par des mesures internes.<br />
Le soussigné agissent par ordre et avec les pleins pouvoirs de la Direction commerciale.<br />
Stetten, Juin 2010<br />
M. Zuber<br />
Responsable Département Construction<br />
To adjust the carrying straps<br />
Adjust with the tank empty.<br />
1. Shortening<br />
2. Extending<br />
Pull the strap Push the strap<br />
Filling the container with spray mixture<br />
For your own safety, pay attention: gloves, safety glasses, breathing protection and protective clothing.<br />
Follow the instructions of the spray providers.<br />
� Fill only water, soluble liquids or powder already mixed with liquids. Pay attention that the container<br />
must always be filled in with the spray mixture through the filling sieve. The container contains ca. <strong>15</strong><br />
litres well full.<br />
� Always fill in the container first with water and thereafter with the pray. Before you fill in the container<br />
with the spray mixtures, you must mix these well with water. In order to dose, you can use the dose<br />
cup under the sieve.<br />
x 1000<br />
x <strong>15</strong>00<br />
x 2000<br />
The dilution indicated refers to the full capacity of the tank.
Scope of use<br />
The sprayer can be used for spraying plant protections, weed killers and thinners used in the garden in<br />
agriculture and in viniculture.<br />
Warning symbols<br />
Meaning of the warning symbols:<br />
Read carefully the instructions of usage.<br />
Make sure that the instructions of usage were carefully read before the usage.<br />
Wear protective clothing.<br />
During the work, wear always protective clothing, as for instance helm, safety glasses and hearing<br />
protection.<br />
Start up<br />
Before use fit the spray tube.<br />
Hand valve<br />
Check the <strong>Accu</strong> <strong>285</strong>-<strong>15</strong> for leakages correct functioning.<br />
Battery test: Switch on the unit to check the voltage.<br />
Green: Ready for spraying<br />
Yellow or red: Recharge<br />
Spray tube<br />
red yellow green<br />
Double nozzle<br />
Note:<br />
Press the hand valve to check the load indicator.<br />
If the arrow needle is in the yellow area, we recommend to charge the battery. If the container is empty,<br />
the device will not be activated longer than one minute.<br />
(Caution!! Do not allow the pump to run dry)<br />
Mesures à prendre en cas de défauts de fonctionnement<br />
La liste de contrôle ci-après vous sera utile pour remédier aux perturbation mineures. Si malgré tout elle<br />
ne vous permet pas de résoudre le problème, veuillez consulter votre distributeur spécialisé.<br />
Mauvaise pulvérisation<br />
Le moteur ne tourne pas<br />
Câble électrique<br />
défectueux: Branchement erroné -> brancher correctement<br />
Commutateur défectueux -> remplacer<br />
Câble endommagé -> remplacer ou réparer<br />
Fusible fondu -> remplacer<br />
Moteur: Câble endommagé -> remplacer<br />
Brûlé -> remplacer<br />
Batterie: Perte de tension -> recharger<br />
Pompe: Joints encrassée ou défectueux -> nettoyer ou remplacer<br />
Le moteur tourne, mais...<br />
Ne pulvérise pas: Gicleur bouché-> nettoyer<br />
Vanne d’aspiration bouchée -> nettoyer<br />
Vanne de pompe bouchée -> nettoyer<br />
Soupape d’aspiration chassieuse – pousser la membrane jaune légèrement<br />
Pression insuffisante<br />
(tension trop basse): Vanne de pompe bouchée -> nettoyer<br />
Pompe défectueuse -> remplacer<br />
Vanne régulatrice bouchée -> nettoyer<br />
Vanne régulatrice défectueuse -> replacer<br />
Gicleur défectueux -> remplacer<br />
Tuyau d’aspiration bouché ou défectueux -> nettoyer ou remplacer<br />
Chute de tension -> Recharger la batterie<br />
Problèmes lors de la recharge<br />
Impossible de recharger<br />
La batterie: Batterie défectueuse -> remplacer<br />
Chargeur défectueux -> remplacer<br />
Câble de raccordement défectueux -> remplacer<br />
Câble endommage -> remplacer<br />
La puissance n’est pas<br />
atteinte: Durée de recharge trop courte -> recharger<br />
Batterie défectueuse -> remplacer<br />
Chargeur défectueux -> remplacer<br />
Fusible fondus: Le moteur tourne avec difficulté -> remplacer<br />
La pompe ne tourne pas -> Joint de pompe encrassée ou défectueux -><br />
nettoyer ou remplacer<br />
Raccordement de l’interrupteur défectueux -> remplacer
Important!<br />
Make sure to read the user’s manual prior to taking the sprayer into service for the first time. The<br />
manufacturer shall not be held liable for damages resulting from neglect to observe these instructions.<br />
Failure to observe the safety and warning alerts can result in injury to or death of persons!<br />
Warning!<br />
� The sprayer may only be used by well-instructed persons. When the sprayer is passed on to others, it<br />
must definitely be accompanied by the user’s manual.<br />
� The user has the responsibility for maintaining an adequate distance away from third parties, in<br />
particular from children and domestic animals. The user carries the liability for both direct and indirect<br />
damages.<br />
� In the handling of chemicals and plant-care agents it is essential to ensure that contact with the eyes<br />
and skin is avoided. The wearing of suitable protective clothing, a breathing mask, safety glasses and<br />
rubber gloves is therefore imperative.<br />
� Never blow out clogged valves and nozzles with the mouth (toxical hazard!)<br />
� Chemicals and plant-care agents may not be filled into other containers (bottles, cans etc.), and must<br />
be stored out of reach of children.<br />
� Never spray against the wind or under excessively windy conditions. Do not apply more spraying<br />
medium to the surface to be treated than necessary.<br />
Notes of safety<br />
� Before each use of the sprayer, make sure that it is correctly assembled, in an undamaged condition<br />
and operational. The use of parts which have been damaged is prohibited.<br />
� It is expressly noted that any and all alterations to the sprayer are not allowed. In the event of such<br />
alterations, BIRCHMEIER <strong>Sprühtechnik</strong> <strong>AG</strong> disclaims any and all warranties and liabilities.<br />
� Maintenance and repair work may performed only be well-instructed personnel, or by your <strong>Birchmeier</strong><br />
dealer. Use exclusively original BIRCHMEIER parts.<br />
� Do not let the sprayer stand exposed to the sun. It can be damaged by the effects of heat and frost.<br />
� After each use empty the sprayer and clean it thoroughly with water. Make sure that no pollution of<br />
the environment is caused.<br />
� The chemicals or plant-care agents and their residues remaining in the tank must be disposed in<br />
accordance with the appertaining safety regulations. For this purpose, follow the chemical<br />
manufacturer’s instructions.<br />
Spray<br />
tube<br />
Drain opening<br />
Technical Data<br />
Double nozzle<br />
Chemical tank<br />
Revolver valve<br />
Model: Battery-operated sprayer <strong>Accu</strong> <strong>285</strong>-<strong>15</strong><br />
Dimensions: 365 (w) x 220 (d) x 480 (h) mm<br />
Weight empty: 5,7 kg<br />
Capacity of tank: <strong>15</strong> litres<br />
Pump: Piston pump<br />
Pressure: 10 bar<br />
Discharge rate: 1,6 l/min.<br />
Motor: 30 W, DC<br />
Battery: NiCd Battery 12 V, 5 Ah<br />
Capable of running for: 1,5 h with high pressure, 2 h with low pressure<br />
Charging timer: max. 10 h<br />
Battery charger: 100 – 240 V Input voltage<br />
Engine performance: 800 mA<br />
Noise emissions<br />
Sound power level, measured dB(A) 74<br />
Sound power level, guaranteed LW<strong>AG</strong> dB(A) 74<br />
Charging voltage<br />
Pressure regulator<br />
Fill-in cover<br />
Carrying straps